🎃BIENVENIDOS A MI BLOG 🕷🕸
Hola mi gente bonita y creativa feliz aun inicio de semana, esta manualidad la hice hace varios días y ayer era que quería publicar pero la falta de internet no me dejo, asi que me agarro el dia de hallowen, les había comentado lo que quería hacer en el pasillo de mi casa esta noche pero no hice más nada por muchos motivos, también les había comentado que no tenía sombrero de bruja y como lo necesitaba para una de la decoración de esta noche, me puse hacerlo con tiempo y fue bueno haberlo hecho porque lo use para una fiesta el sabado pasado. entonces mi manualidad de hoy para ustedes es un espectacular Sombrero de Bruja, esta es la primera vez que hice un sombrero siempre lo había comprado pero esta vez preferí hacerlo aprovechando que tenia casi todo para hacerlo solo compre 1 metro de marabu naranja.
Les confieso que esta manualidad es la que más trabajo me ha dado por no saber hacerlo fue un primer factor, pero no solo eso, lo hice mientras estaba trabajando en mi local y con mi hijo rodrigo que no habia ido a la escuela, definitivamente para realizar cualquier actividad se necesita concentración y tranquilidad.
A medida que lo fui elaborando me surgieron varias inconvenientes, después que había cortado el cono me quedo ovalado abajo eso lo arregle recordándolo para que quedara el triángulo grande perfecto para el cono, luego que tenia el cono ya formado y pegado fue que se me ocurrió medirmelo y adivinen que? No me servía porque nunca medí mi cabeza solo me llevé del gorro que tome como muestra y pues también resolví y aquí les cuento todo😁. Gracias a Dios que ver el lado positivo siempre se puede solucionar casi todo😅.
🎃WELCOME TO MY BLOG 🕷🕸
Hello my beautiful and creative people, happy
at the beginning of the week, I made this craft several days ago and yesterday I wanted to publish but the lack of internet didn't let me, so I grabbed Halloween day, I had told you what I want to do in the hallway of my house tonight, but I didn't do anything else because I didn't have time, I had also told them that I didn't have a witch hat and since I needed it for one of the decorations I wanted for tonight, I decided to do it ahead of time. and it was good to have done it because I used it for a party last Saturday. So my craft today for you is a spectacular Witch's Hat, this is the first time I made a hat, I had always bought it but this time I preferred to do it taking advantage of the fact that I had almost everything to make it, I only bought 1 meter of orange marabou.
I confess that this craft is the one that has given me the most work because not knowing how to do it was a first factor, but not only that, I did it while I was working in my place and with my son Rodrigo who had not gone to school, definitely to Carrying out any activity requires concentration and tranquility.
As I was making it, several problems arose. After I had cut the cone, it was left oval at the bottom. I fixed it by remembering it so that it would be the perfect large triangle for the cone. After I had the cone already formed and glued, it occurred to me. measure it and guess what? It didn't help me because I never measured my head, I just took the hat I took as a sample and well I also solved it and here I tell you everything😁. Thank God that seeing the positive side can always solve almost everything😅.
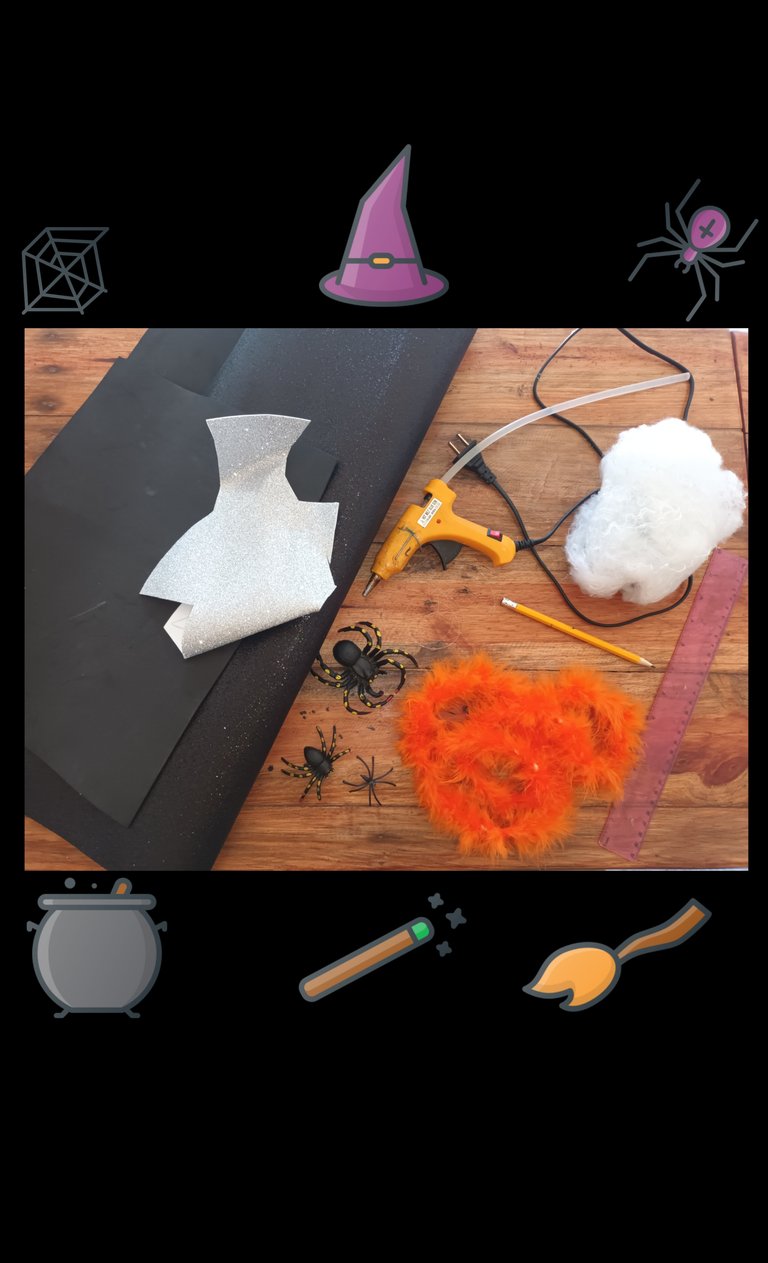
🕷🎃NECESITARAS :
• Foami Negro escarchado y liso
• Foami Plateado
• Marabu naranja
• Arañas falsas
• Tela de araña falsa
• Hilo de Nailon
• Tela negra
• Silicon caliente y frío
• Tijera
• Lapiz
• Regla
🕷🎃YOU WILL NEED:
• Frosted and smooth black foam
• Silver Foami
• Orange Marabu
• False spiders
• Fake spider web
• Nylon Thread
• Black fabric
• Hot and cold silicon
• Scissors
• Pencil
• Ruler
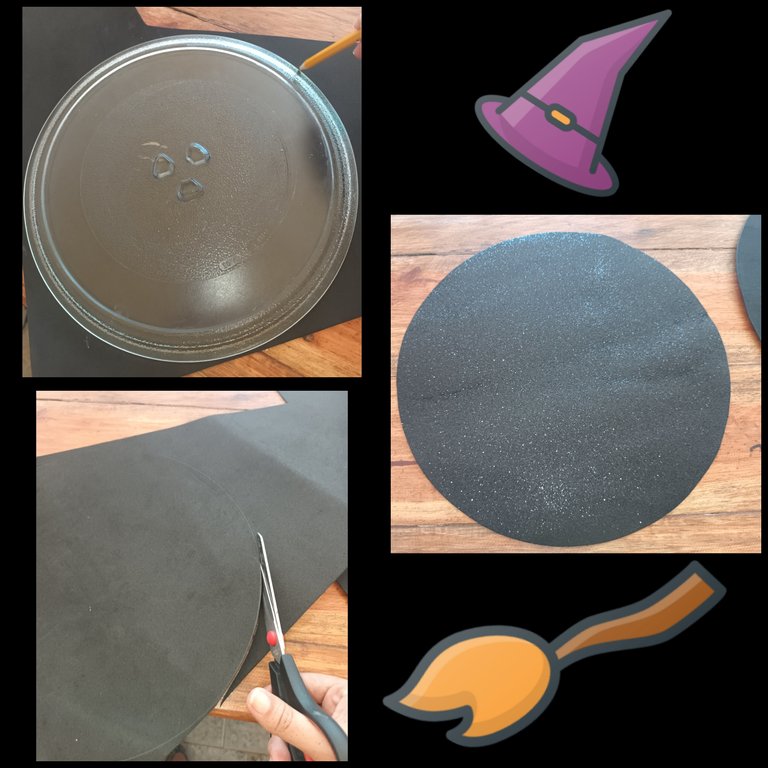
• Lo primero que hice fue doblar el foami de un extremo a el otro formando un triángulo, para ayudarme tome un gorro navideño como guia, marque un poco mas alto que el de navidad porque lo queria asi y corte, cuando lo abrí para ver la forma, me había quedado mal en la parte de abajo, lo volví a doblar y le corte ese pico que me estaba sobrando abajo dándole la forma que era.
• The first thing I did was fold the foam from one end to the other forming a triangle, to help me take a Christmas hat as a guide, mark a little higher than the Christmas hat because I wanted it that way and cut, when I opened it to see the shape, it had looked bad at the bottom, I folded it again and cut off that extra peak at the bottom, giving it the shape it was.
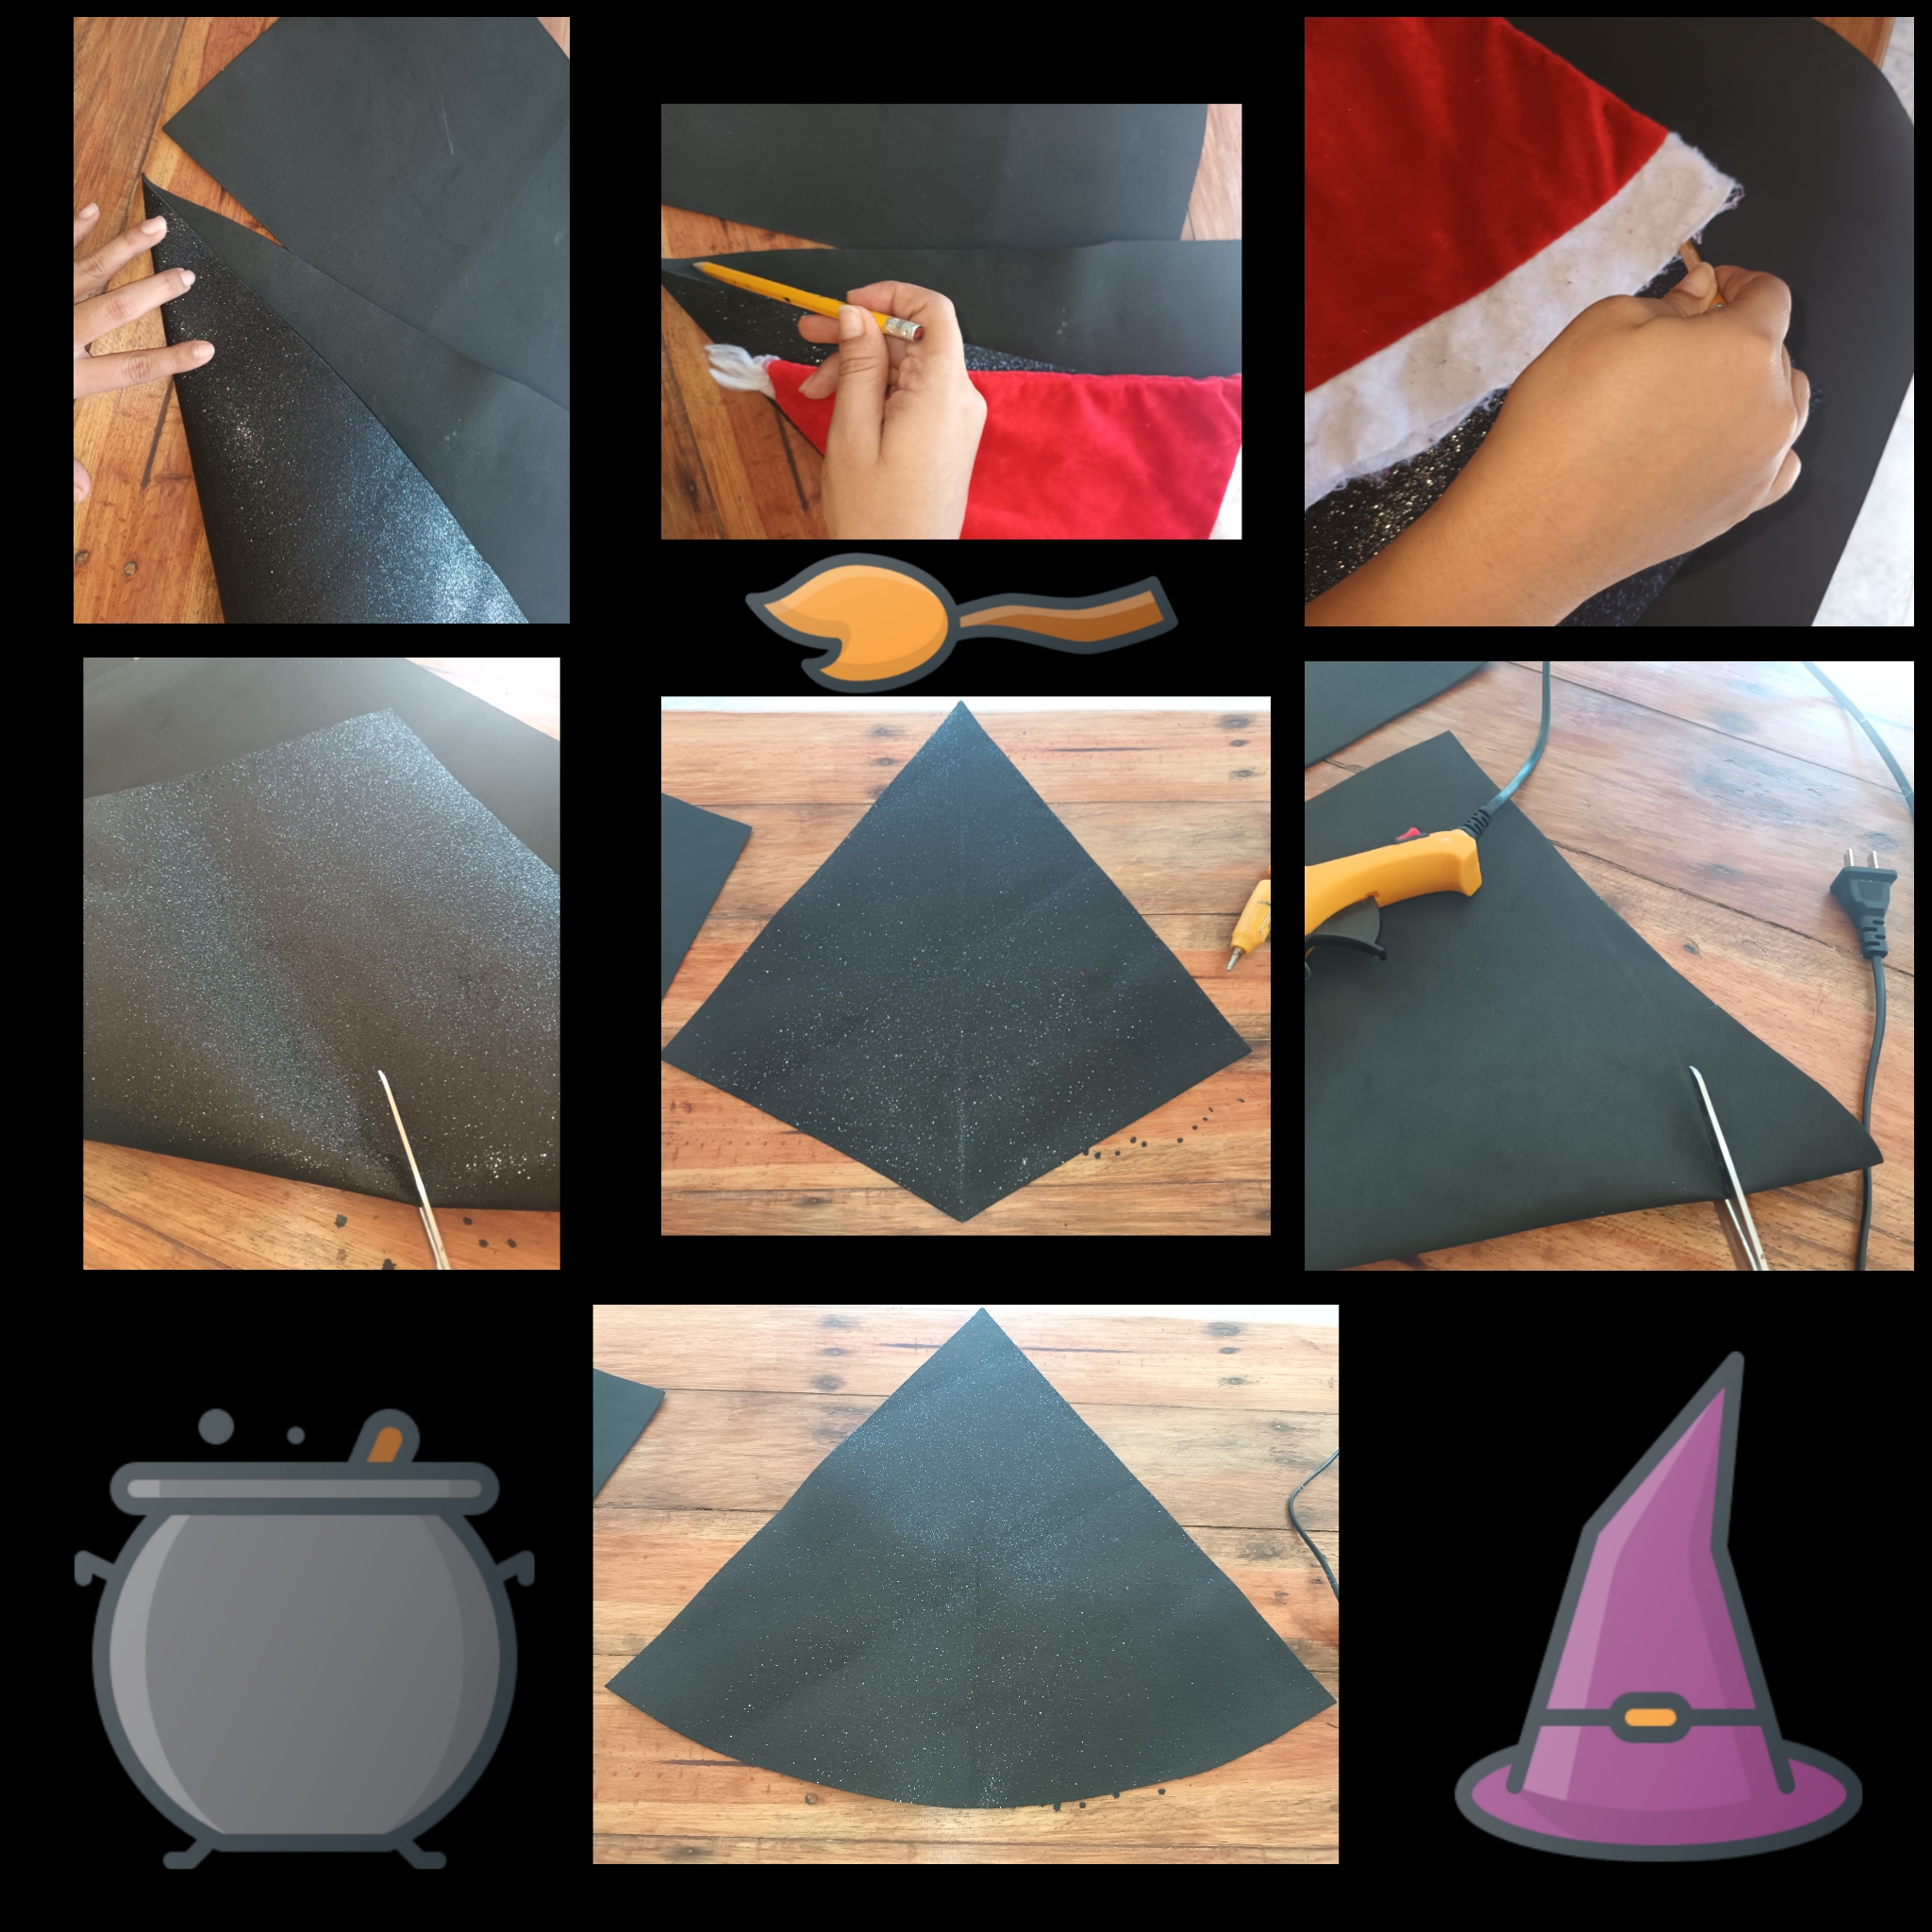
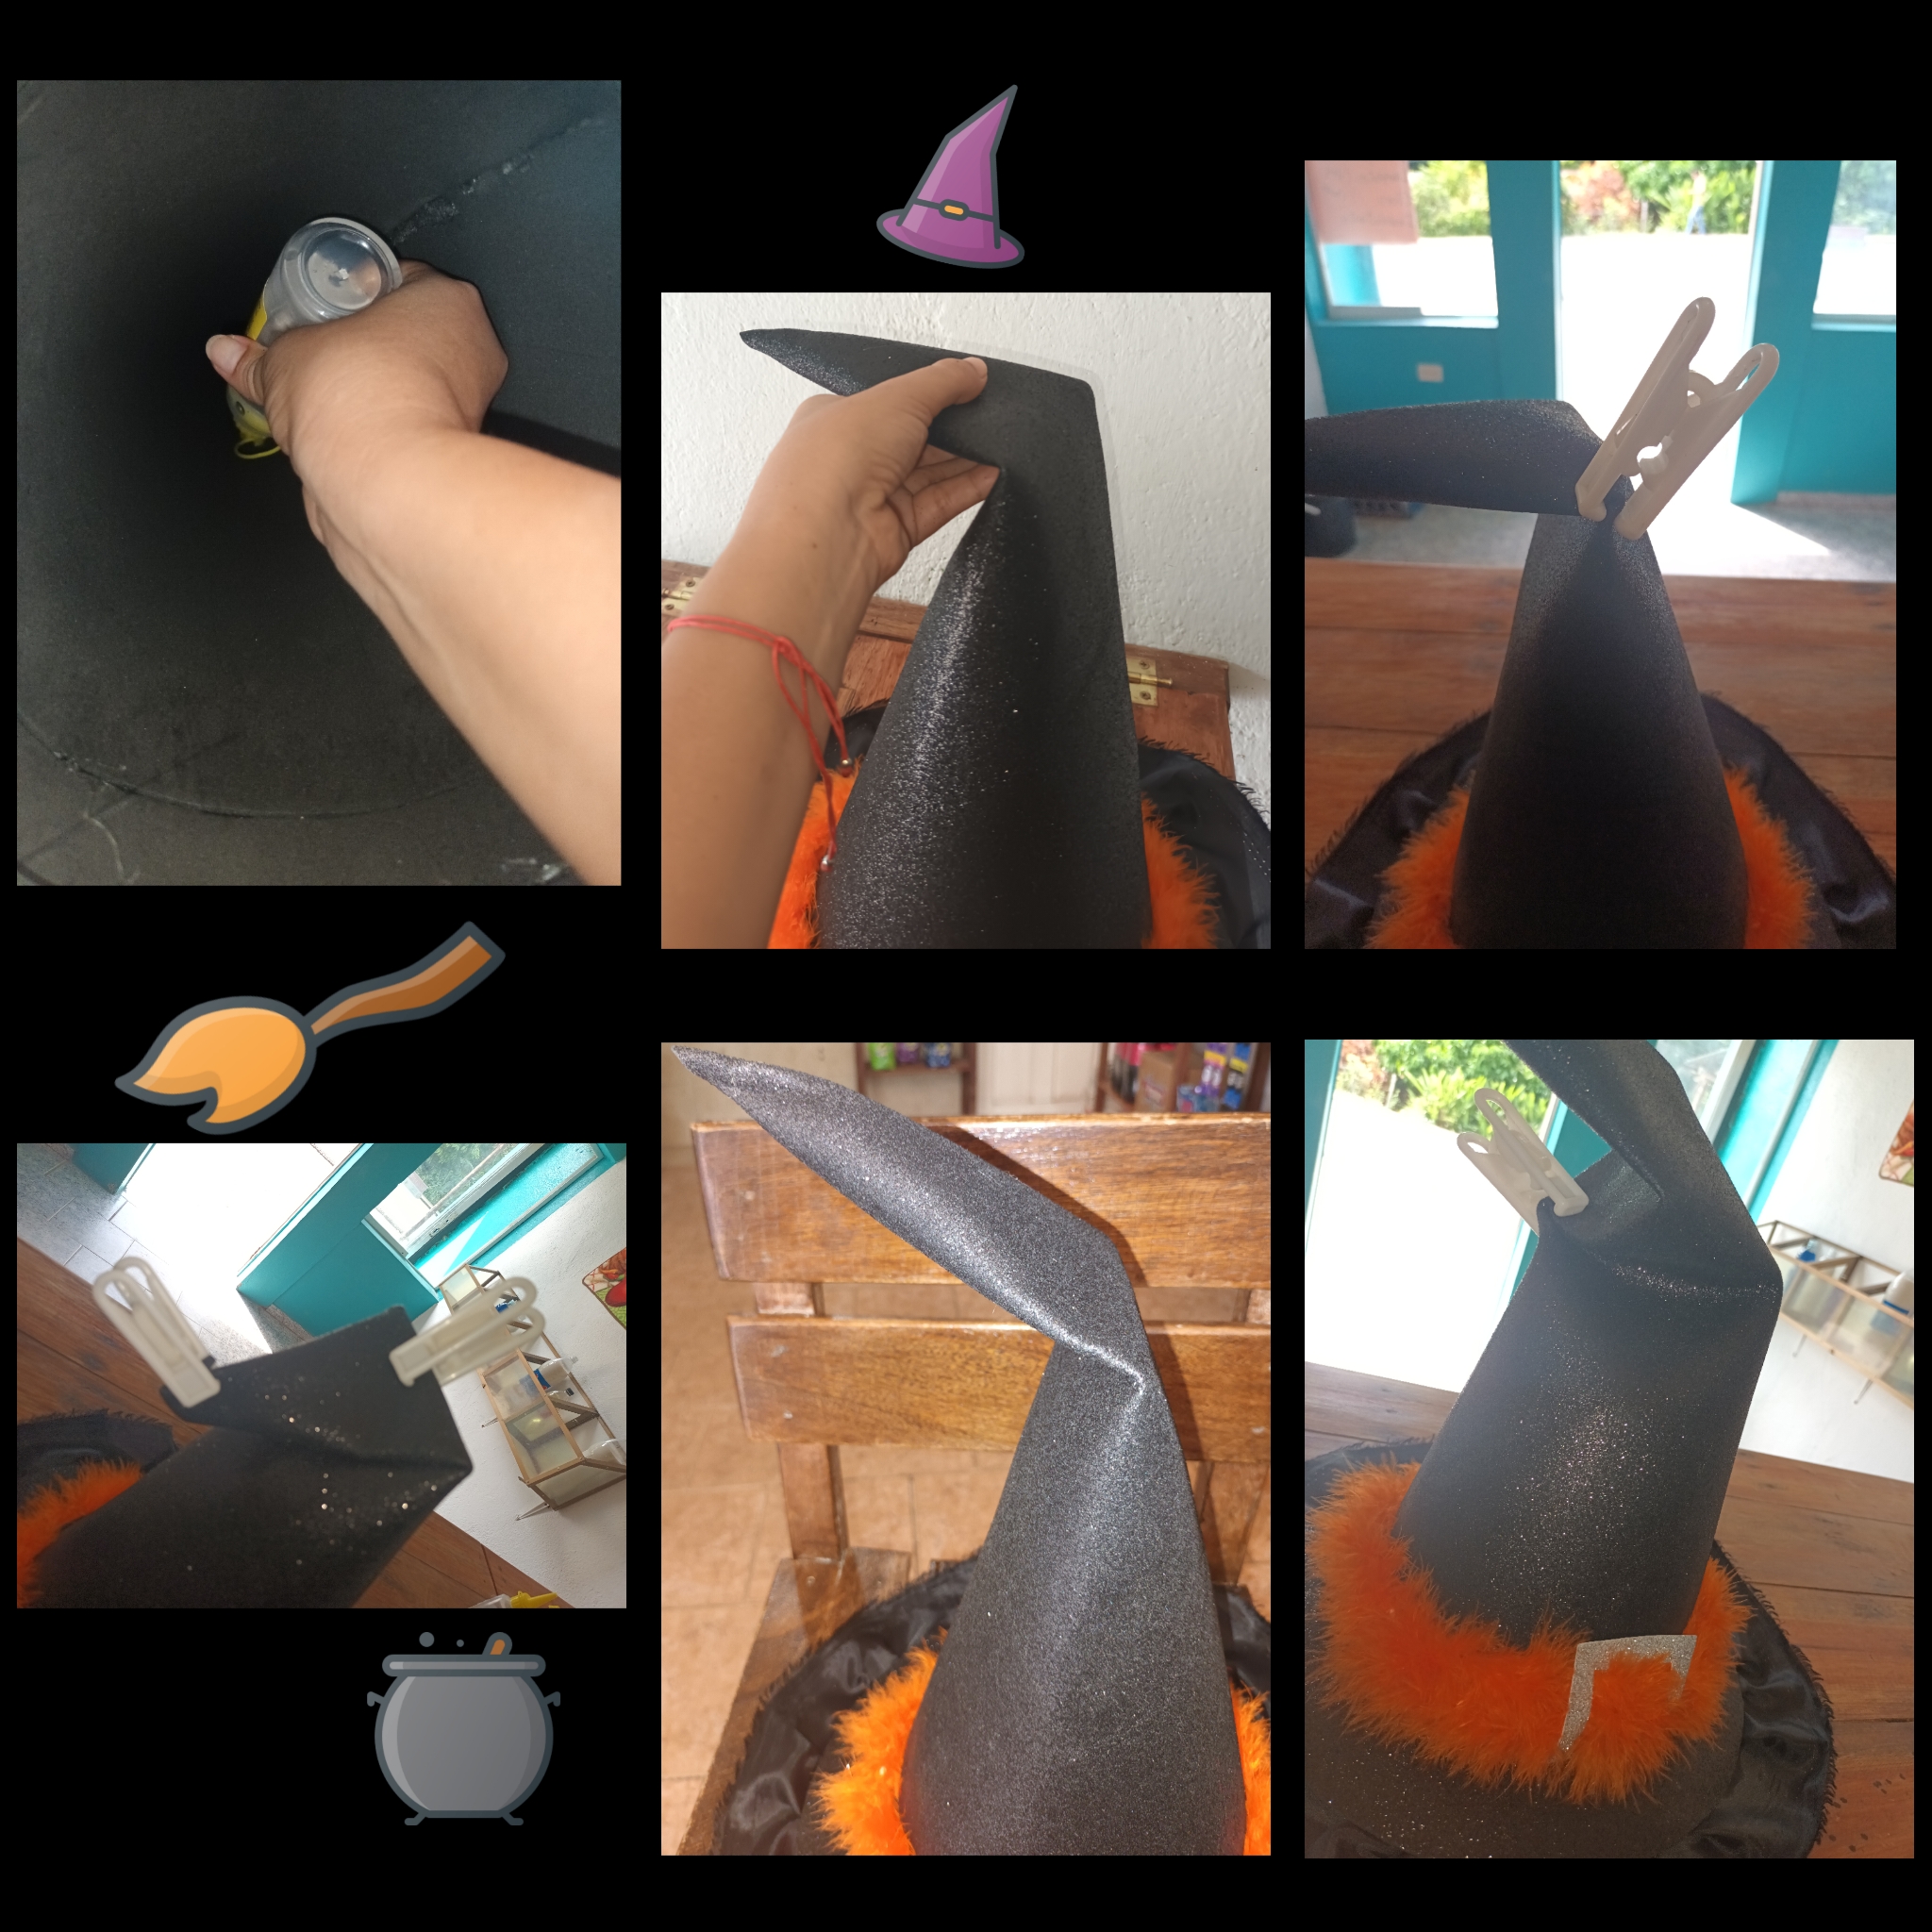
• Seguidamente uni los dos extremos marcando por donde iba a echar el silicon y lo pegue sin medirmelo enmla cabeza eso fue el primer suceso de esto gracias a Dios todo tiene solución, lo tuve despegar y volver a pegar solo orilla con orilla para que me pudiera caber y pues quedo así como les muestro en las imagenes. De ese feo empate me encargue más adelante.
• Then I joined the two ends, marking where I was going to put the silicone and I glued it without measuring it on my head. That was the first event of this. Thank God, everything has a solution. I had to take it off and re-glue it, just edge to edge so that I could fit and well it looks like I show you in the images. I took care of that ugly tie later.

• Luego del foami liso tenia que sacar un circulo de 30cm y a el foami le faltaba un poquito para completar el circulo y como quería trabajar con lo que tenia ya en casa, lo que hice fue colocar otro pedazo de foami liso en el lado donde le faltaba completar y marque para cortar el circulo completo, esa mínima pestañita se la pegue al restante del circulo. Del restante de foami escarchado negro también saque un circulo igual al otro.
• After the smooth foam I had to make a 30cm circle and the foam lacked a little to complete the circle and since I wanted to work with what I already had at home, what I did was place another piece of smooth foam on the side where it would fit. It remained to be completed and I marked to cut the complete circle, I glued that minimal tab to the rest of the circle. From the remaining black frosted foam I also took out a circle equal to the other.
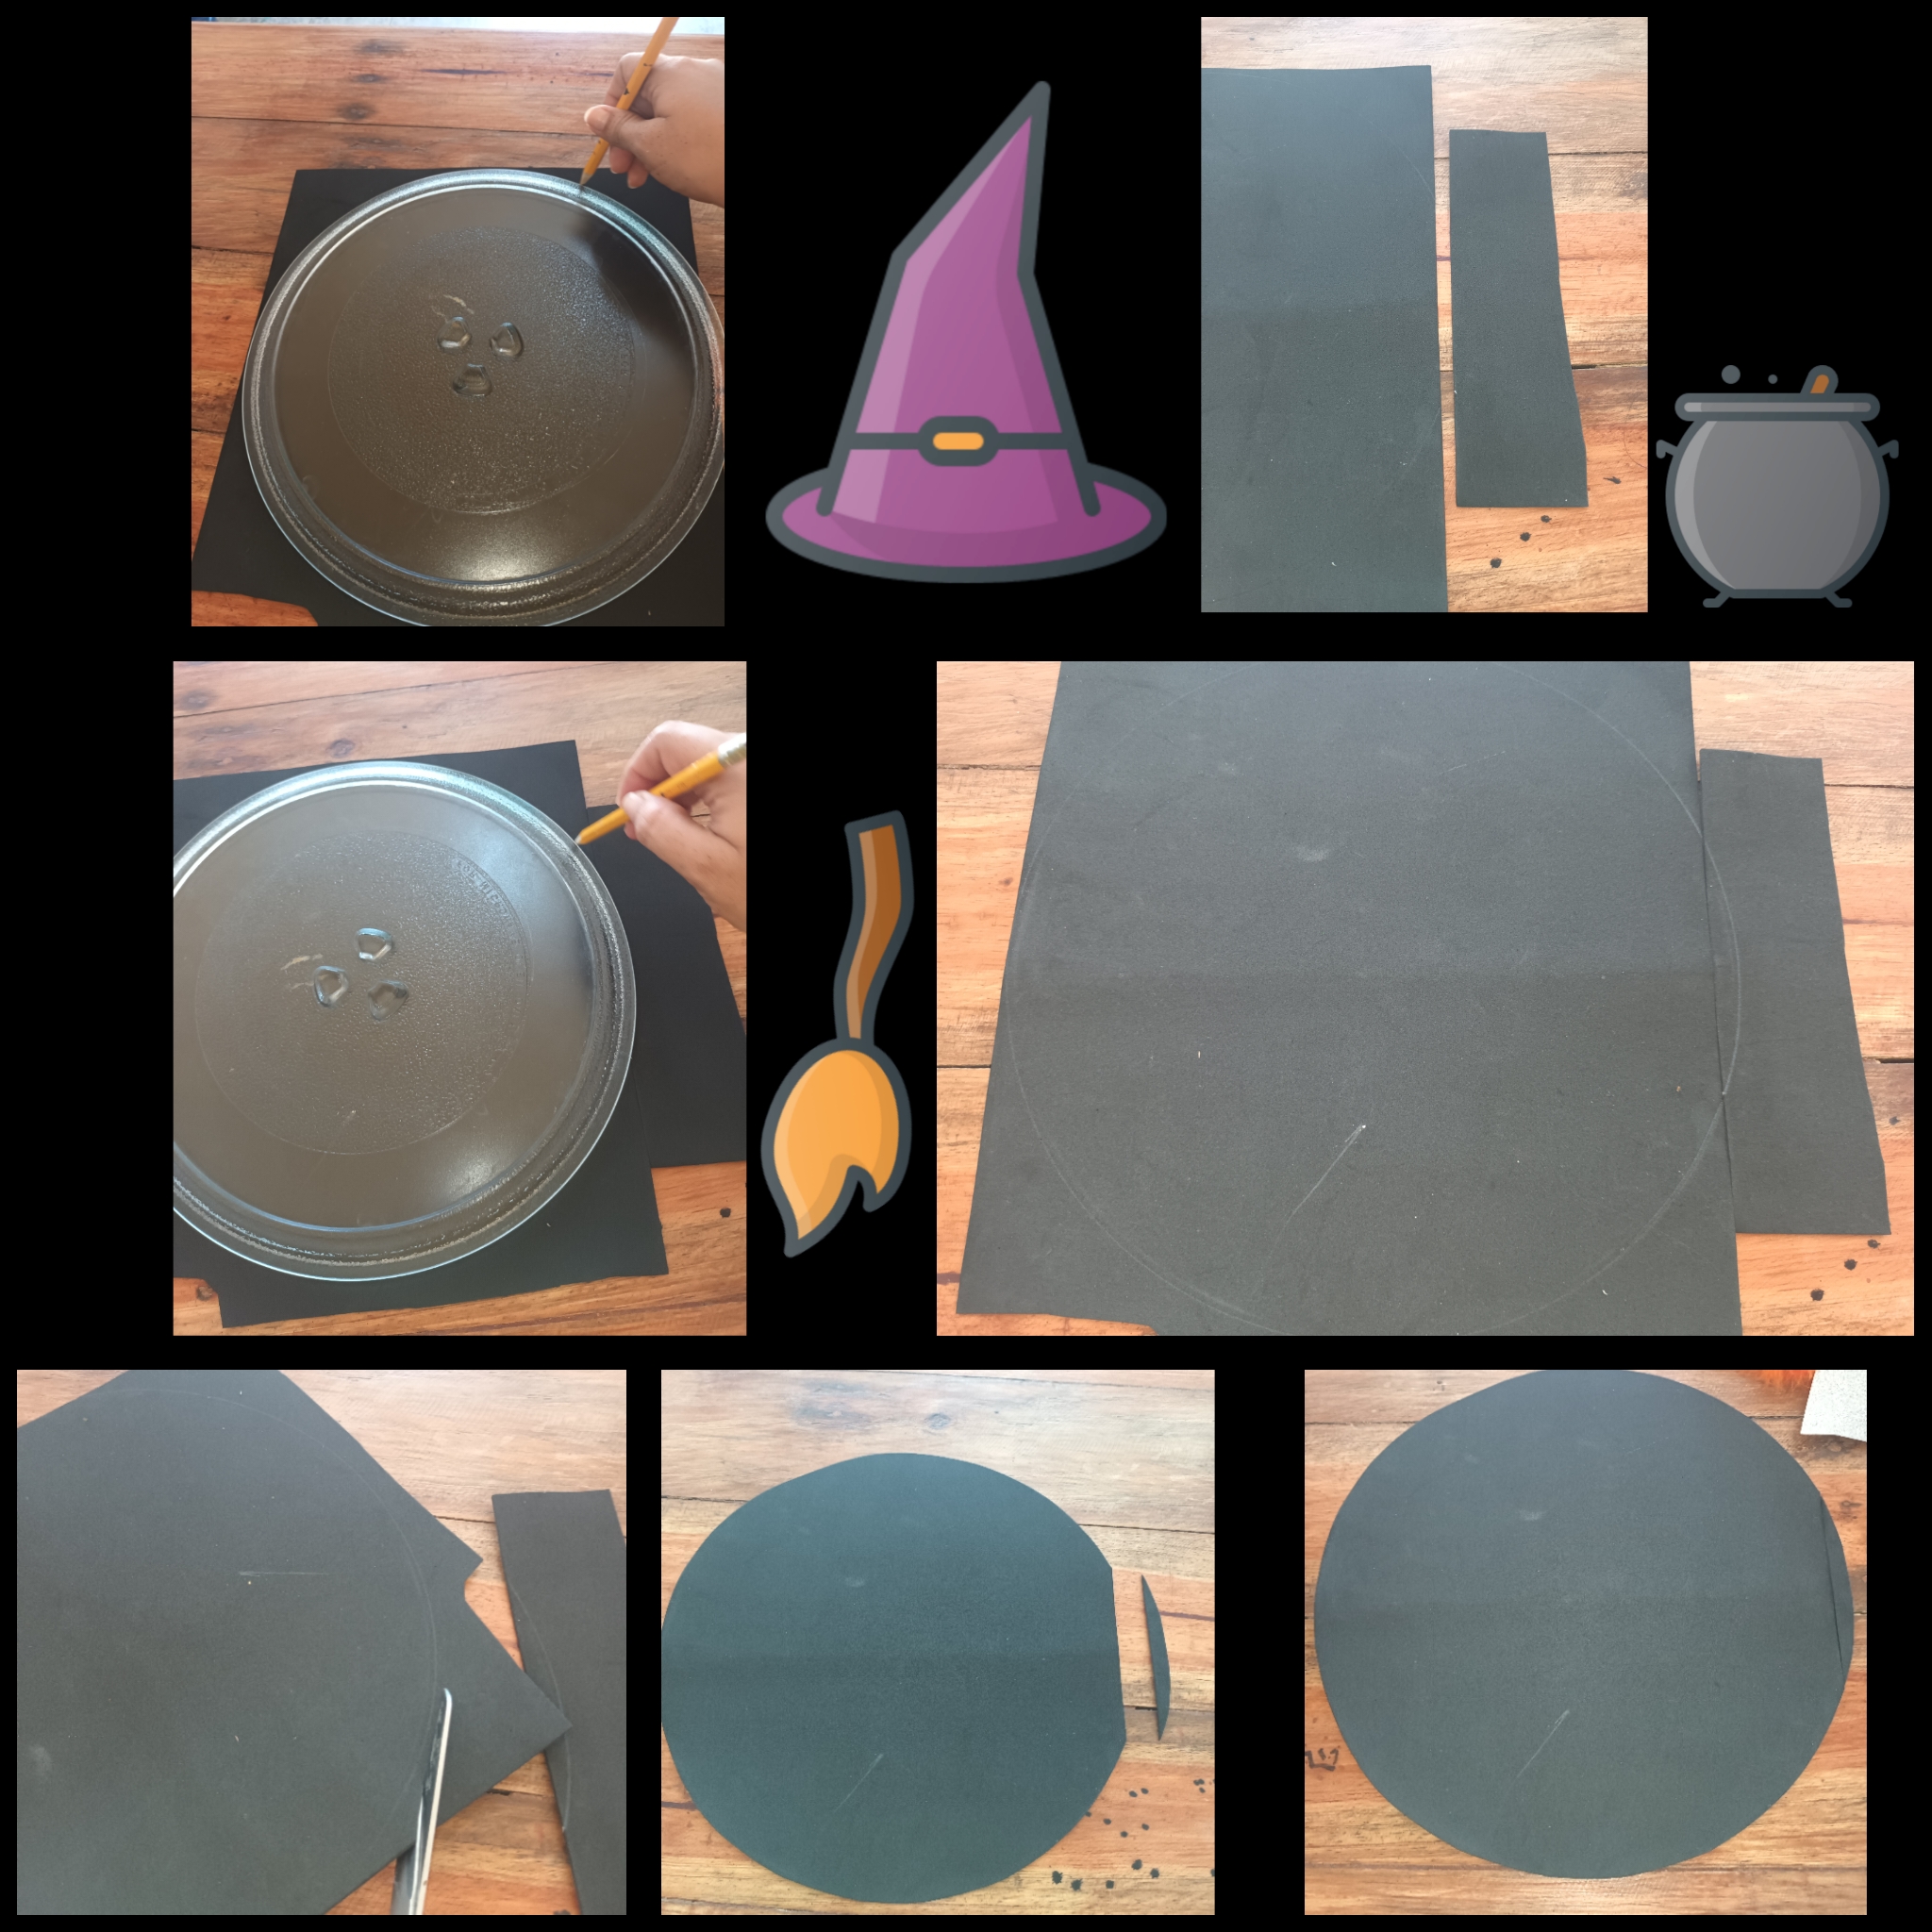
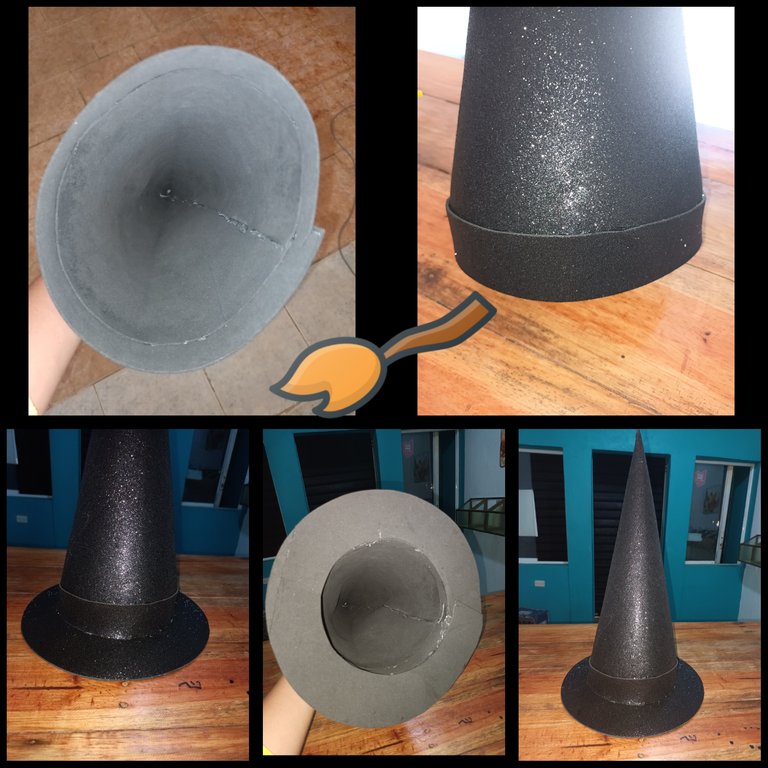
• Con un plato de juguete marque un circulo más pequeño en el centro de los circulos que ya habia sacado, lo recorte y luego uní los dos circulos formando así la base del sombrero, entonces me paso el segundo suceso coloque el cono dentro de lo que será la base le quedo grande 🤦♀️.
• With a toy plate I marked a smaller circle in the center of the circles that I had already taken out, cut it out and then joined the two circles thus forming the base of the hat, then the second event happened to me: I placed the cone inside what It will be the base, it will be too big for you 🤦♀️.
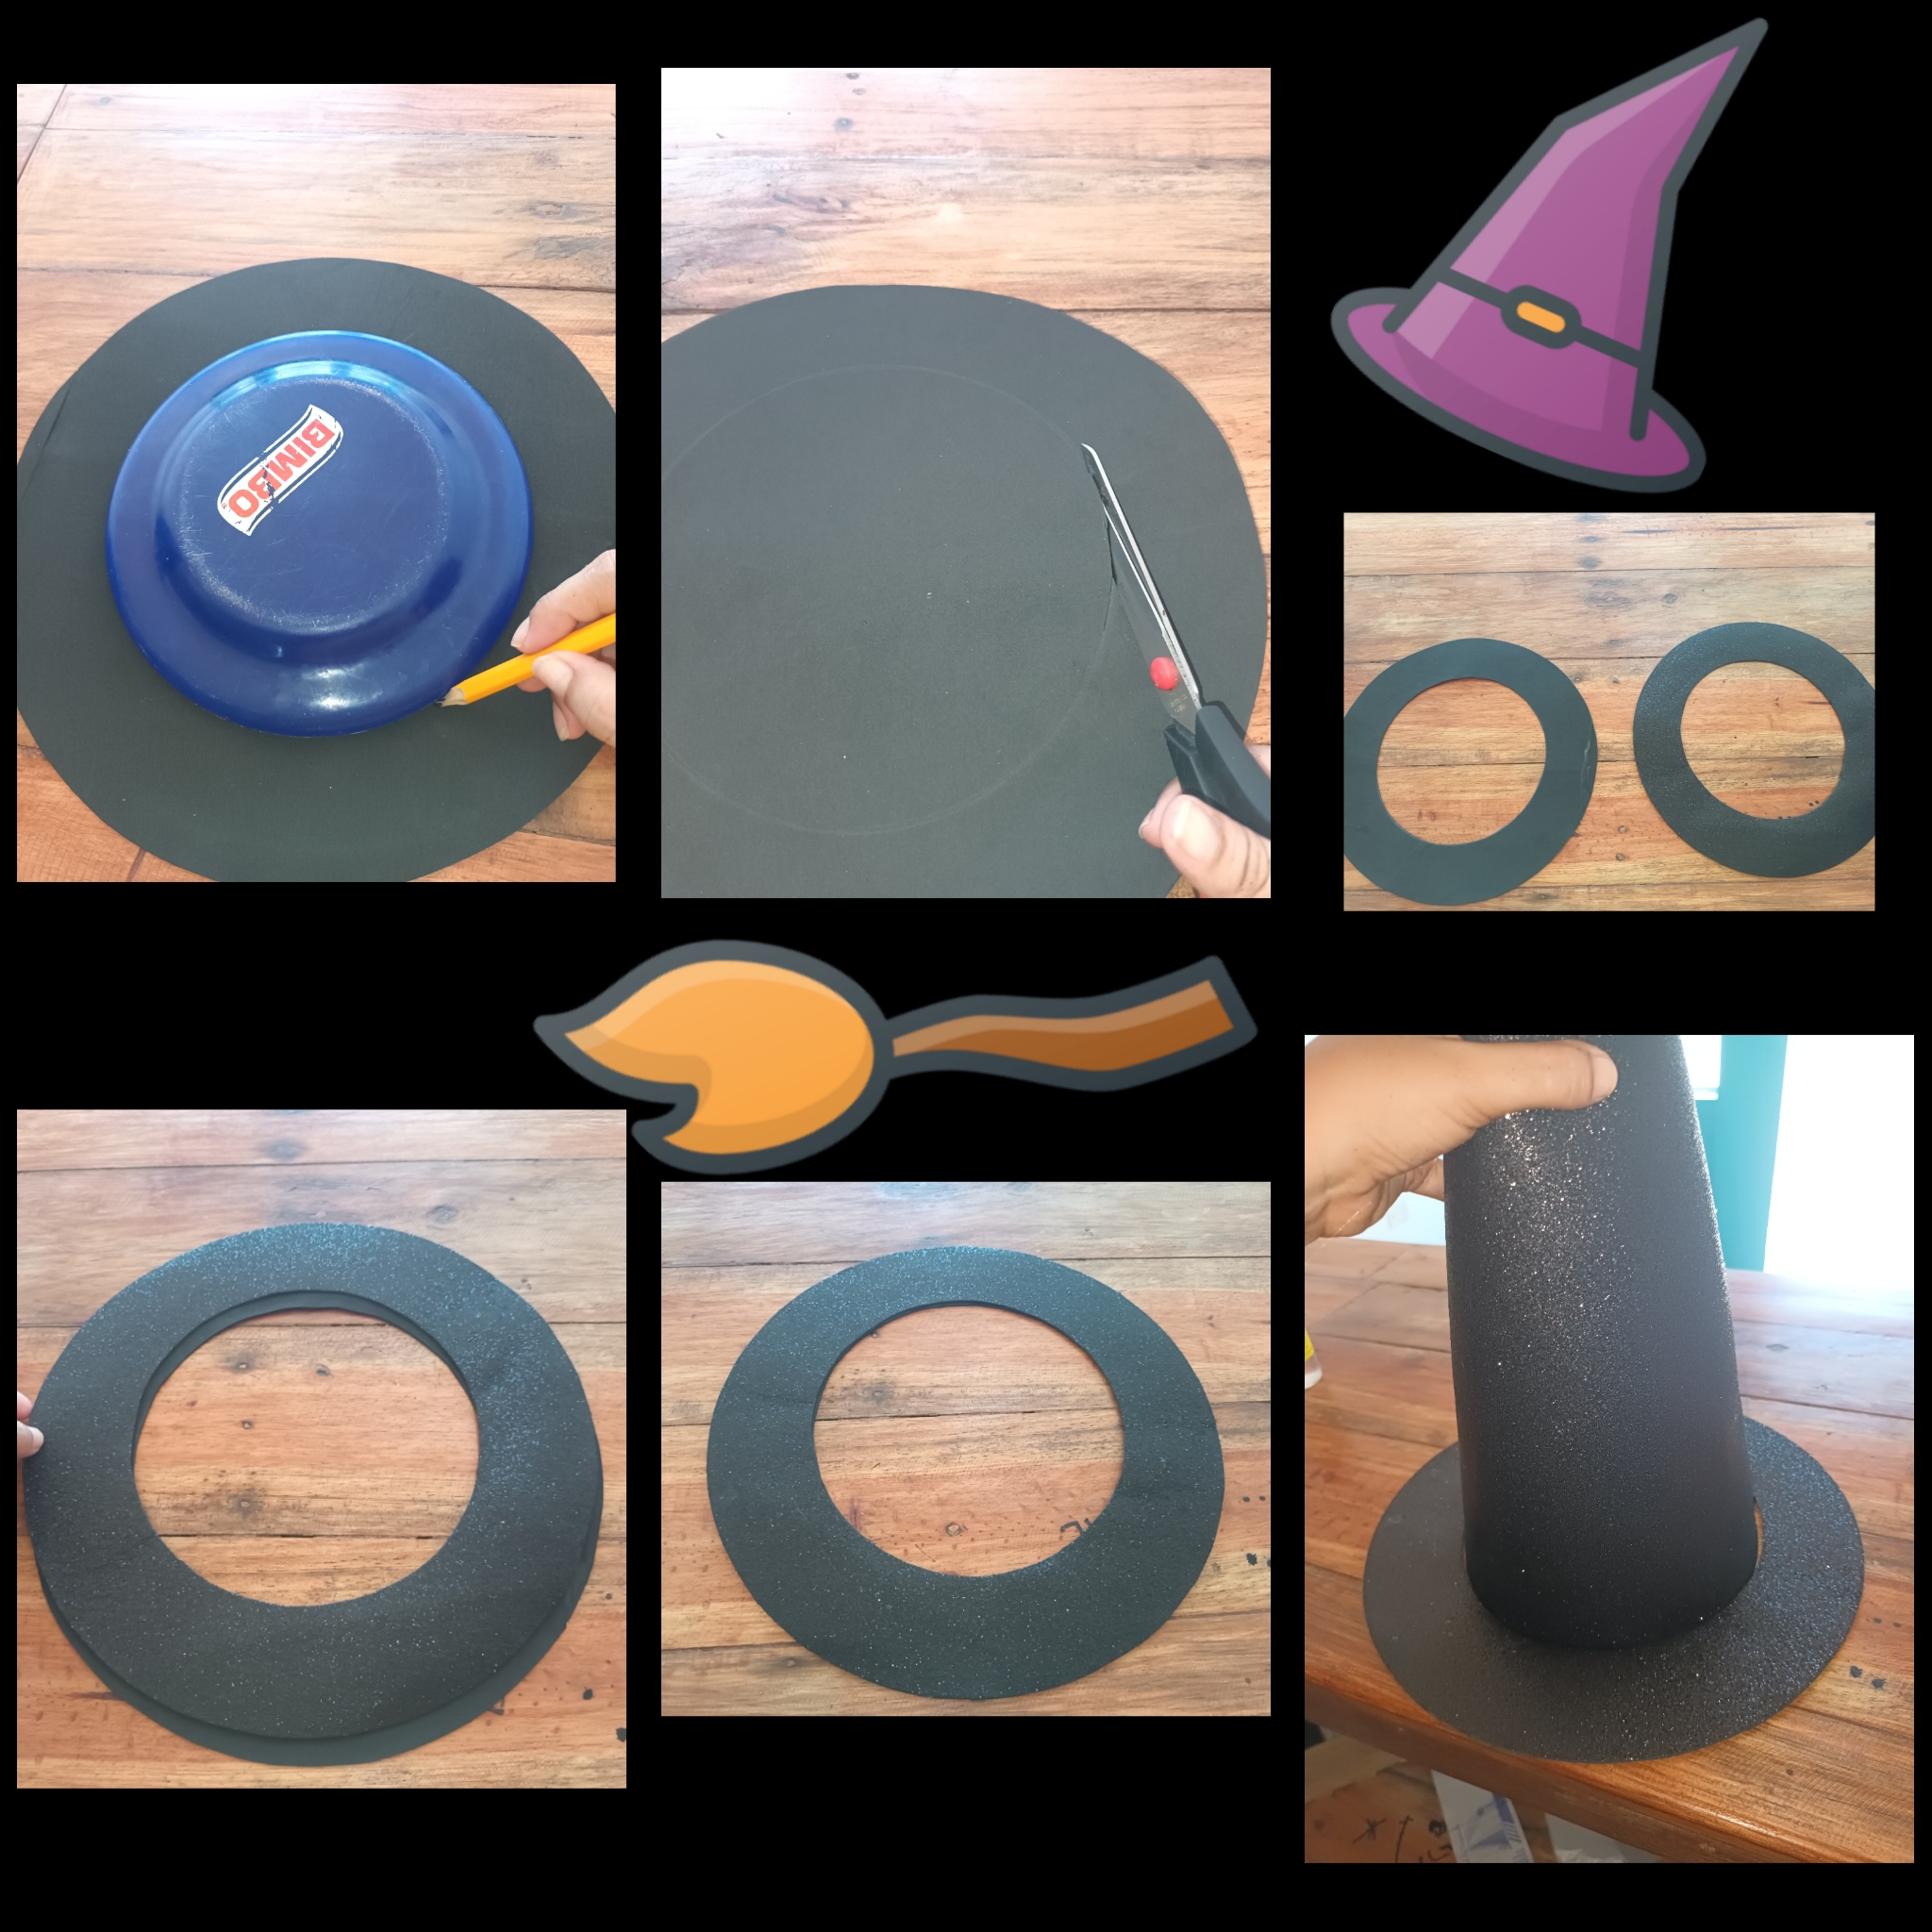
• Rápidamente me puse a pensar un poco como podía solucionar esto y pues lo que hice fue cortar una tira de foami escarchado y se la pegue en toda la orilla de la parte de abajo pero por encima del sombrero para que quedara más ancho, lo pegue a la base también en toda la orilla, salte esas fotos porque era muy engorroso tomarme las fotos yo misma ya que el silicon caliente se seca muy rapido y así quedó. Obviamente pude notar que el sombrero se veía raro porque la base era chica para el resto del sombrero, otro inconveniente más y ya no me quedaba foami lo deje un rato y me ocupe en la casa mientras pensaba que hacer.
• I quickly started to think a little about how I could solve this and what I did was cut a strip of frosted foam and glued it along the entire edge of the bottom but above the hat so that it would be wider, I glued it to the base also along the entire shore, I skipped those photos because it was very cumbersome to take the photos myself since the hot silicone dries very quickly and that's how it turned out. Obviously I could tell that the hat looked strange because the base was too small for the rest of the hat, another inconvenience and I no longer had any foam left. I left it for a while and got busy around the house while I thought about what to do.
• En lo que me desocupe recordé que tengo tela negra una que compre en septiembre para decorar la mesa de un cumpleaños, me dije esa misma es como esa tela no tiene ruedo si no que esta como generalmente viene un poco hilachada en las orillas aproveche eso y corte una tira larga 8 centímetros se ancho por 1 metro de largo.
• While I was free, I remembered that I have black fabric, one that I bought in September to decorate a birthday table. I told myself that's how that fabric doesn't have a hem, but it is, as it usually is, a little frayed at the edges, so take advantage of that. and cut a long strip 8 centimeters wide by 1 meter long.
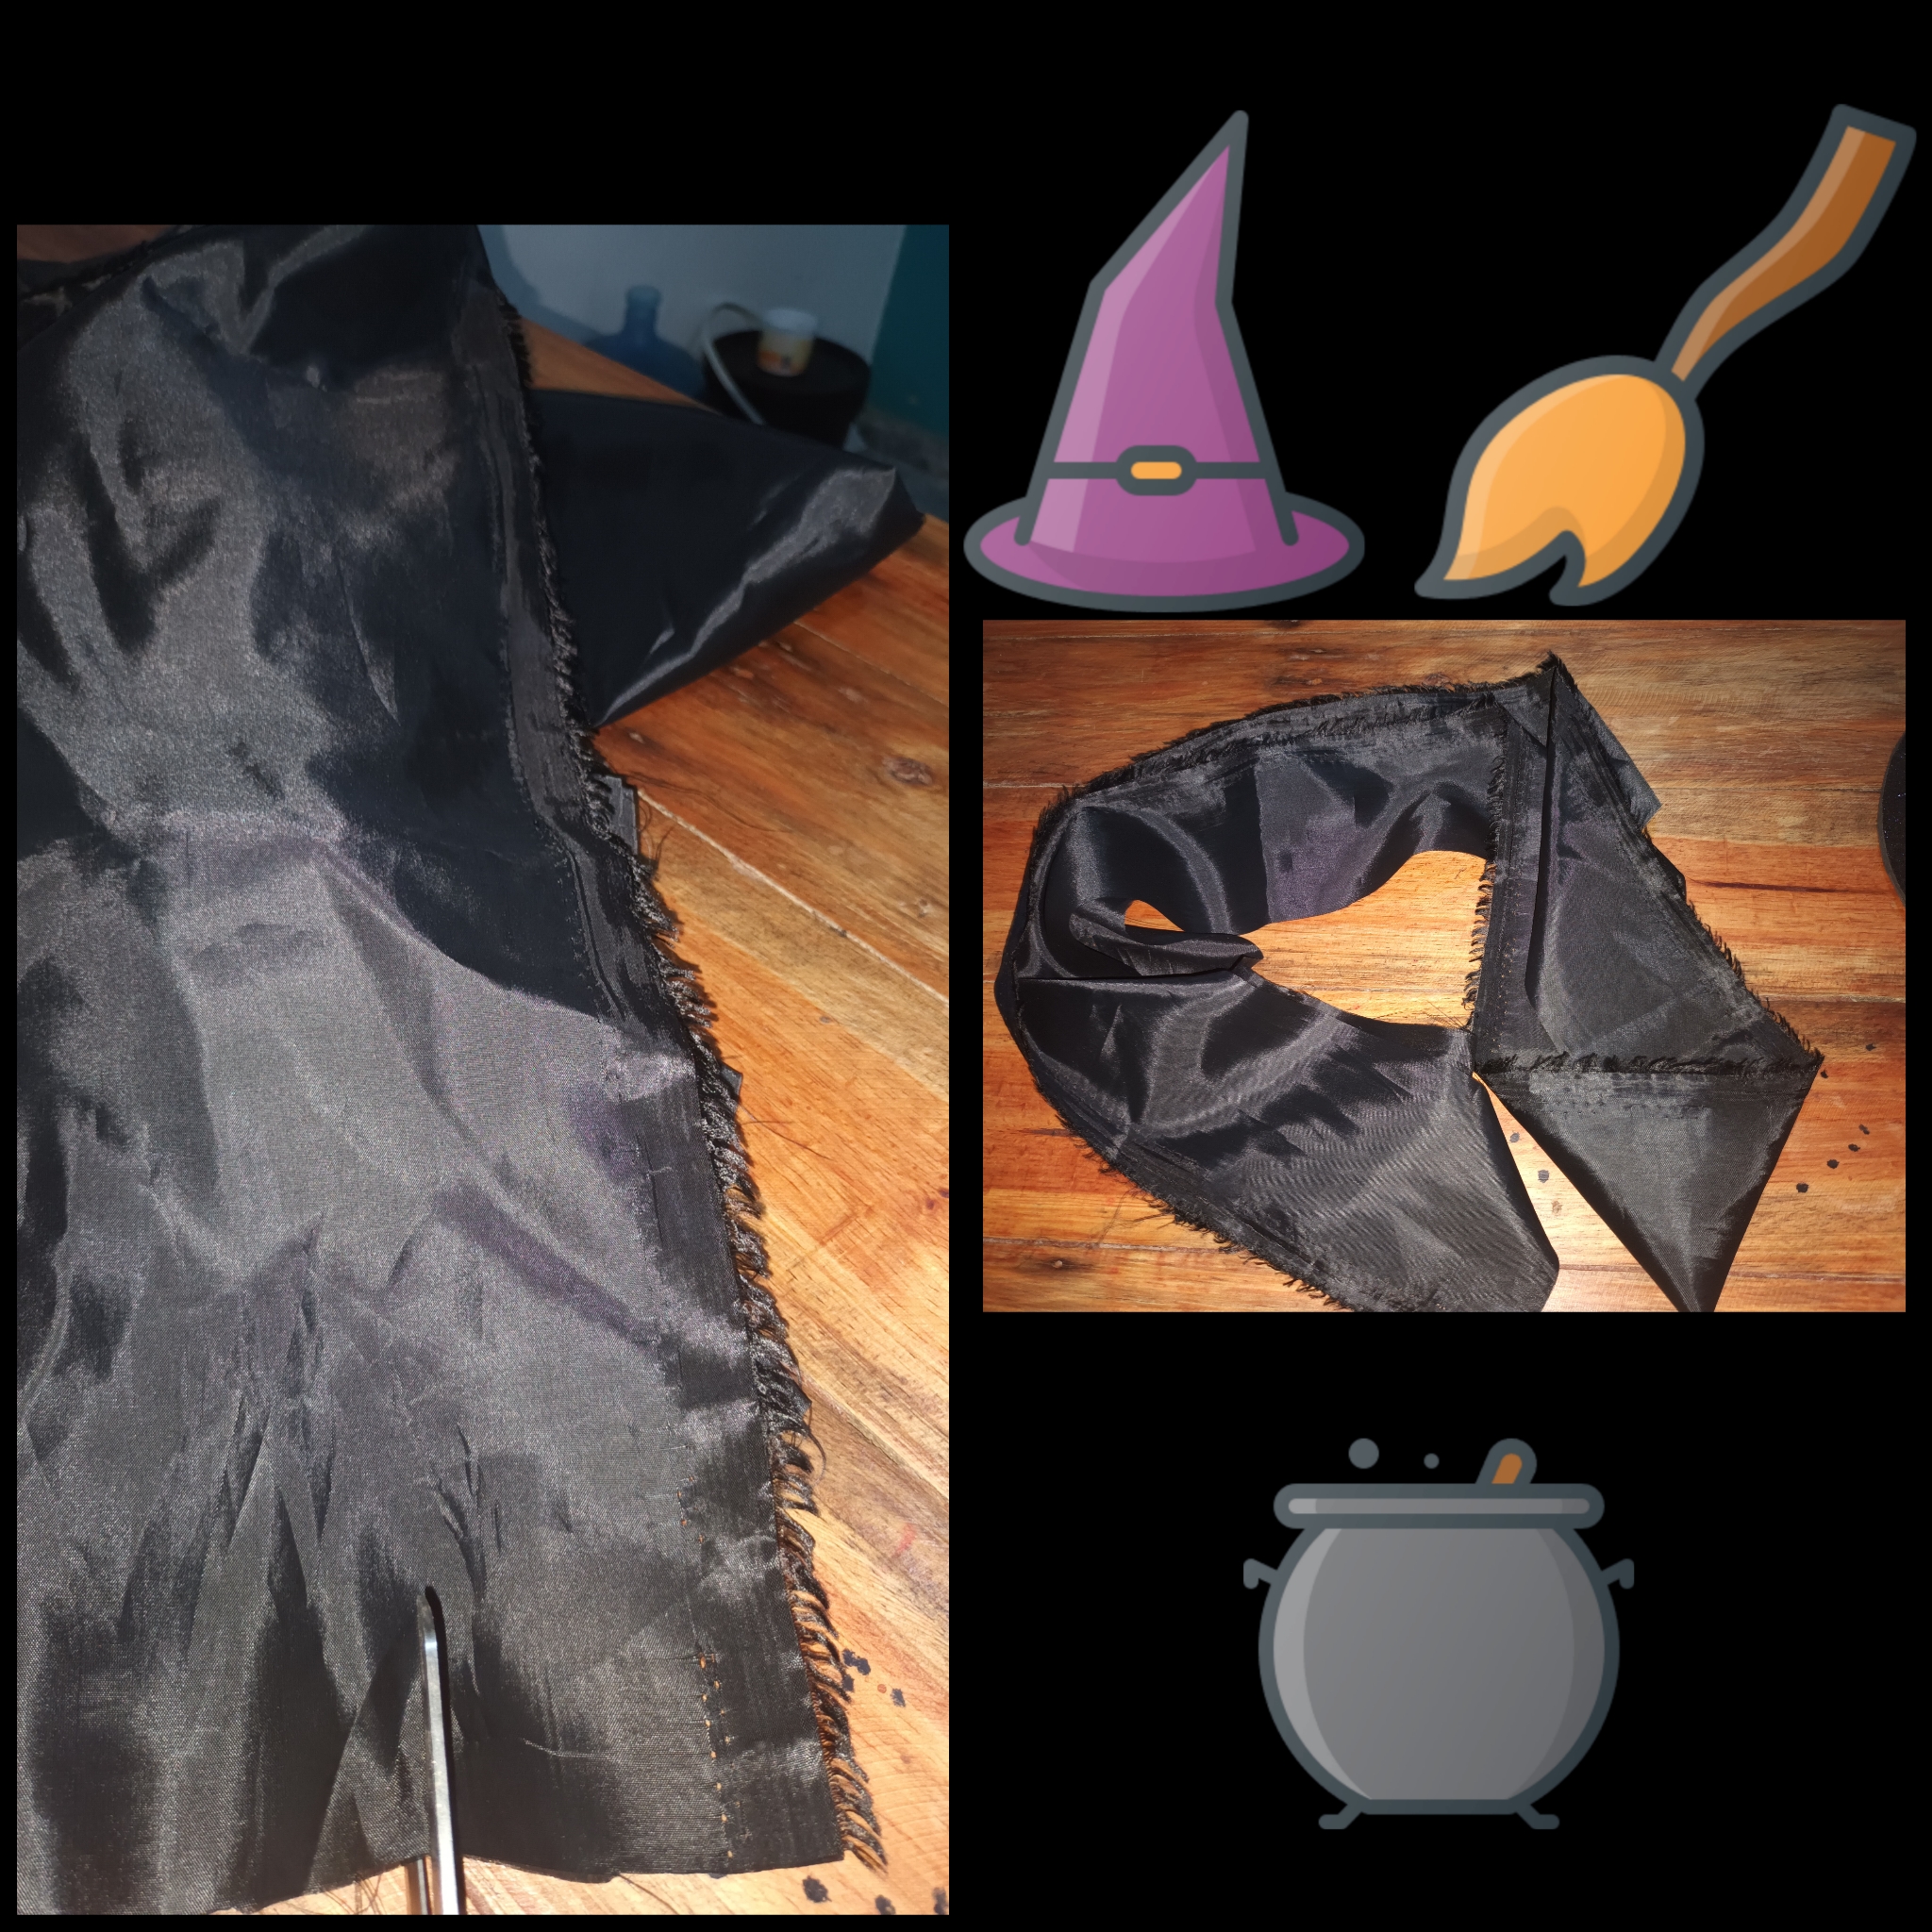
• Tome aguja e hilo y empecé a coser con basteos grandes hasta introducir toda la tela al hilo, al llegar al final uni las dos puntas de la tela amarrado con nudos sin arruchar demasiado la tela, fui midiendola con la base del sombrero.
• I took a needle and thread and began to sew with large threads until the entire fabric was inserted into the thread. When I reached the end, I joined the two ends of the fabric tied with knots without bunching the fabric too much. I measured it with the base of the hat.
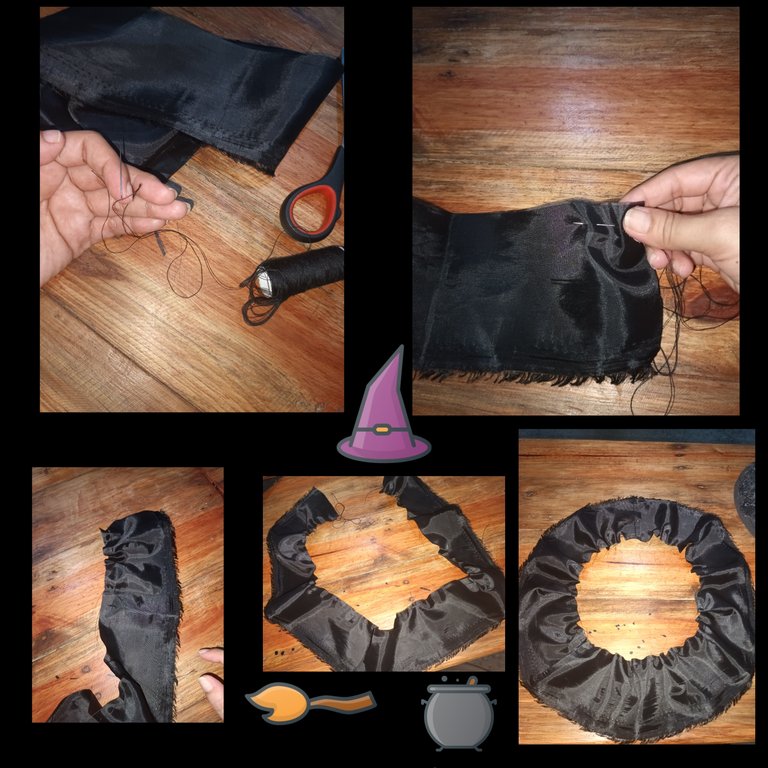
• Luego despegue con mucho cuidado el circulo de abajo de la base, lo había dejado con el foami despegado colgando pero así no iba a poder pegar la tela así que la corte ahi, le eche suficiente silicon líquido en todo el circulo, cuadrando muy bien para que los bordes de la tela quedarán igual en todo el alrededor de la base, con algo de presión y mucha precisión coloque el sombrero encima del circulo de tela, lo mantuve aguantado un buen rato para que quedara bien pegado y así me iba quedando mucho mejor no?.
• Then I very carefully peeled off the bottom circle from the base, I had left it with the detached foam hanging but that way I wouldn't be able to stick the fabric so I cut it there, I poured enough liquid silicone on the entire circle, squaring it very well. So that the edges of the fabric will be the same all around the base, with some pressure and a lot of precision I placed the hat on top of the circle of fabric, I held it for a long time so that it was well glued and thus it fit very well. better not?.
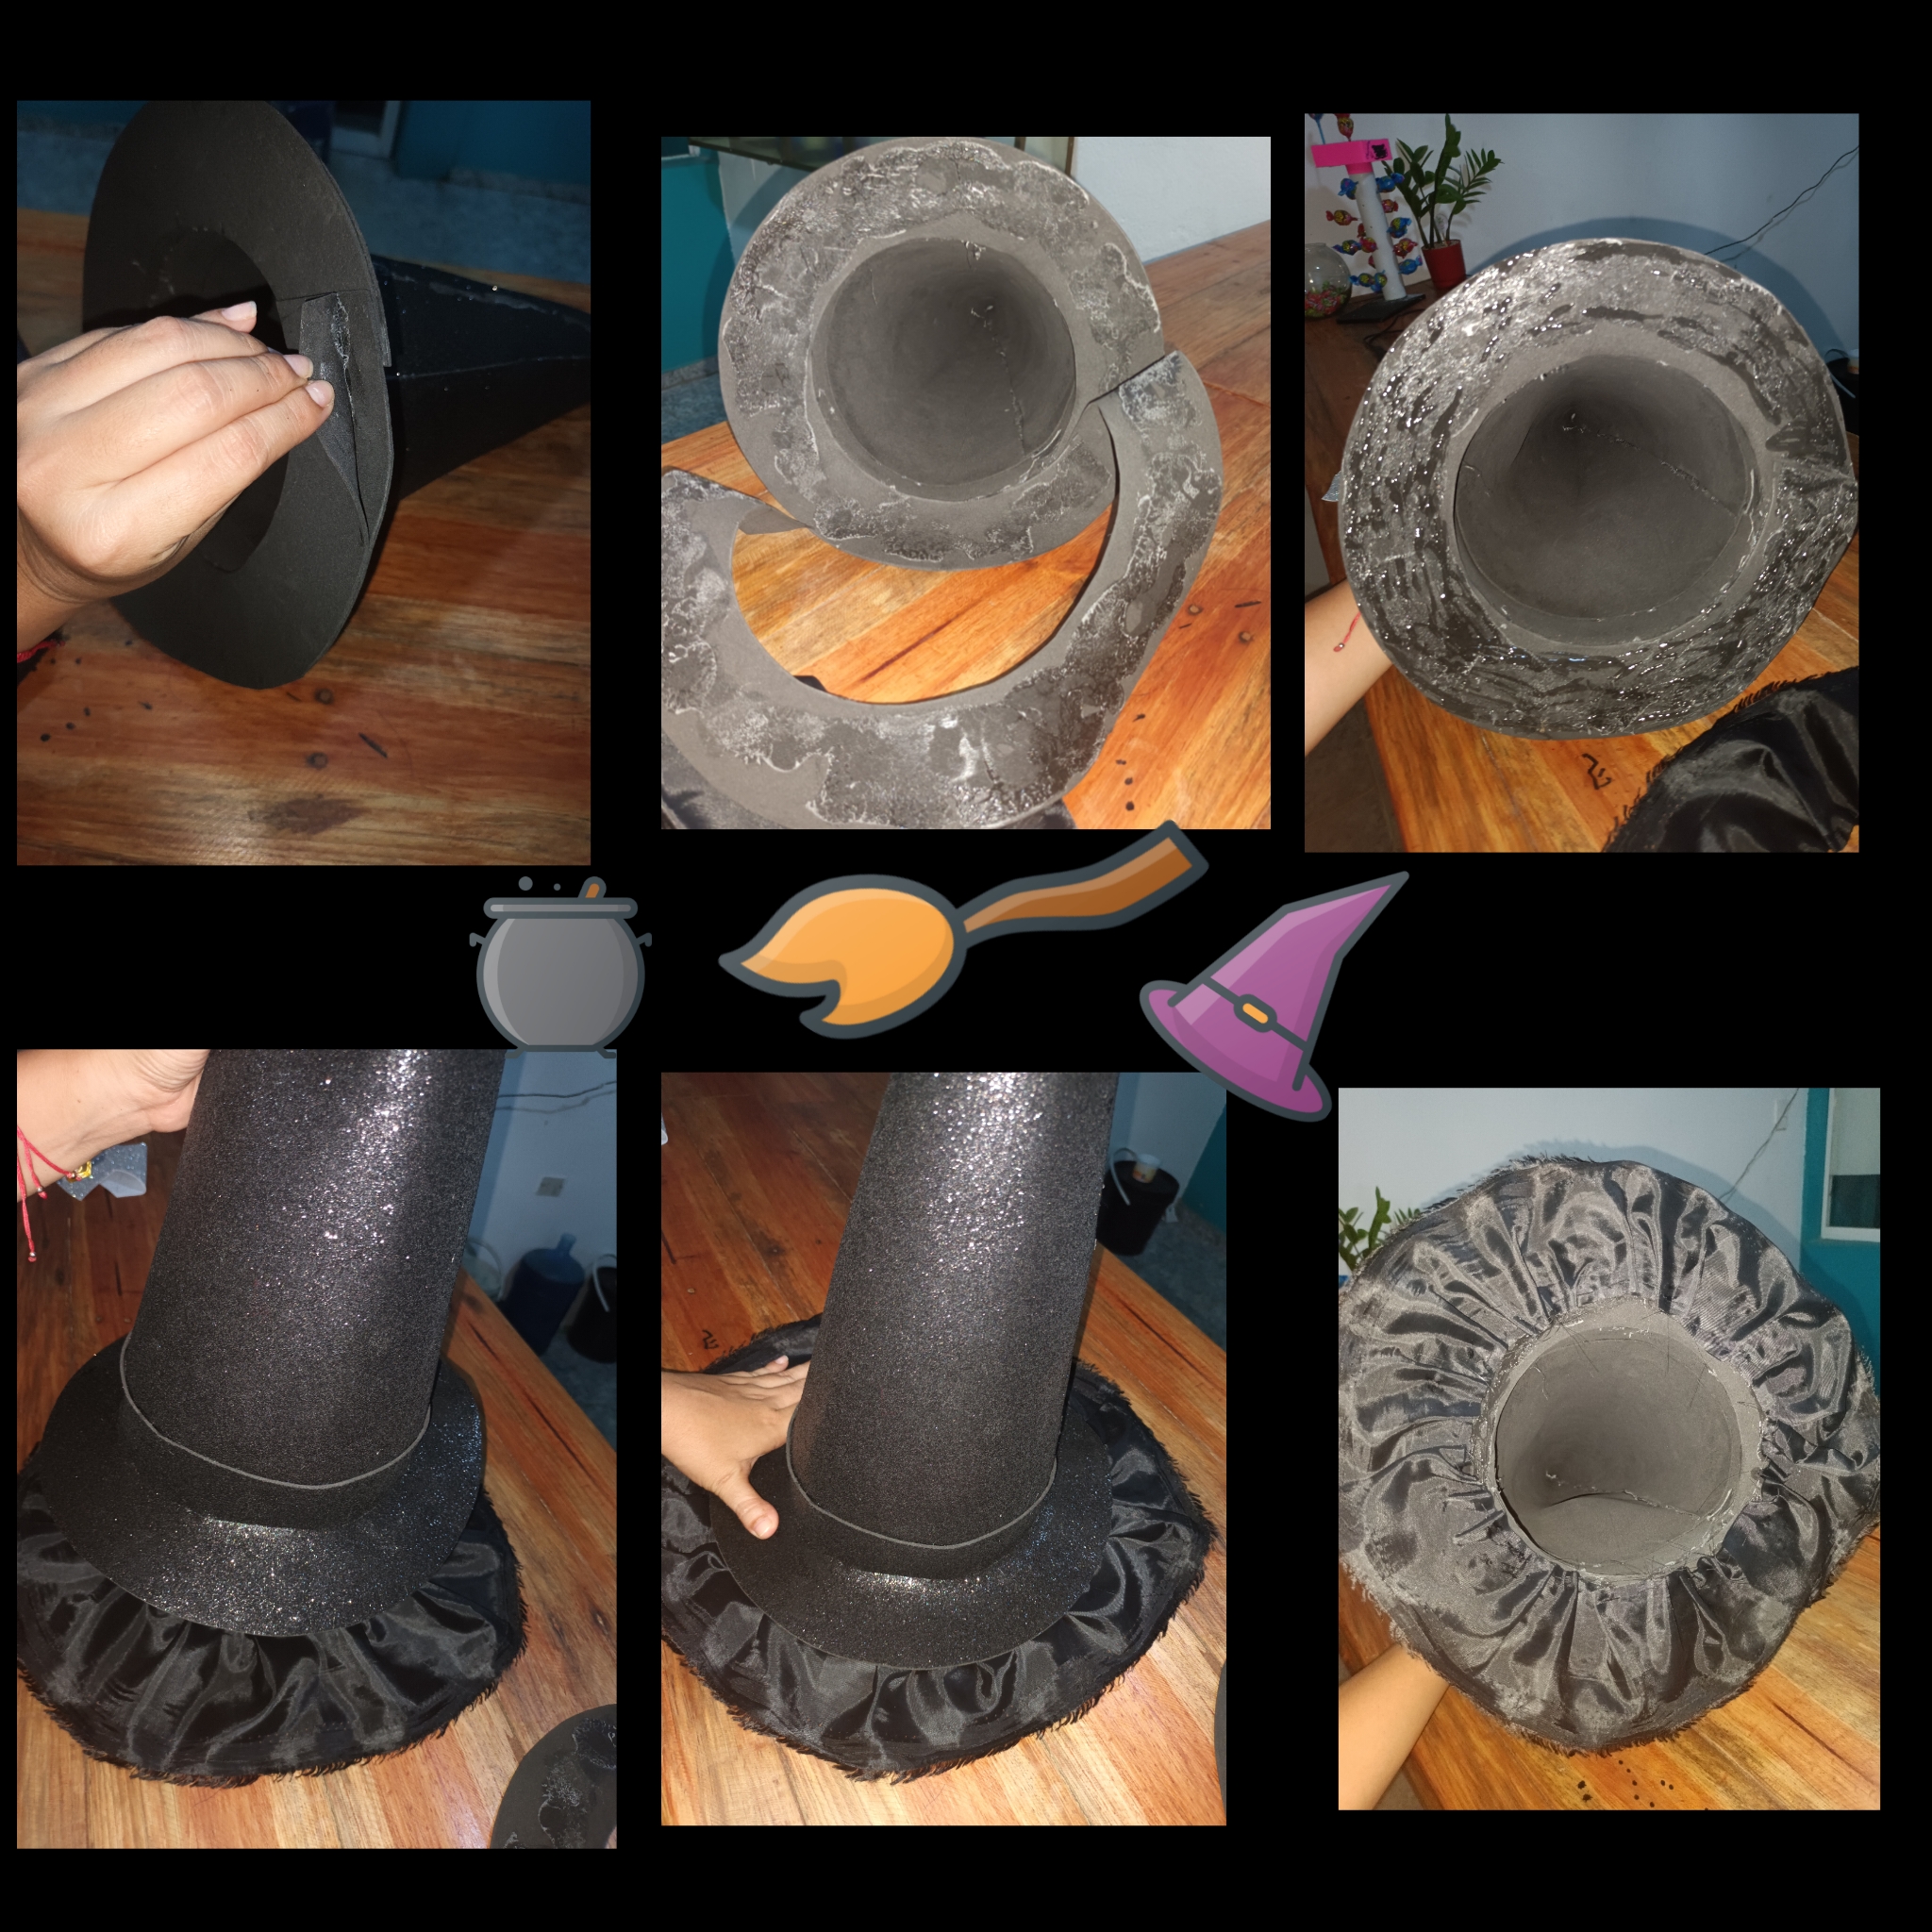
• Por supuesto para obtener un mejor acabado le pegue el circulo que había despegado, cubriendo así la tela por la parte interna. Y lo deje ahí toda la noche para que se secara bien.
• Of course, to obtain a better finish, I glued the circle that had been removed, thus covering the fabric on the inside. And I left it there overnight so it could dry well.

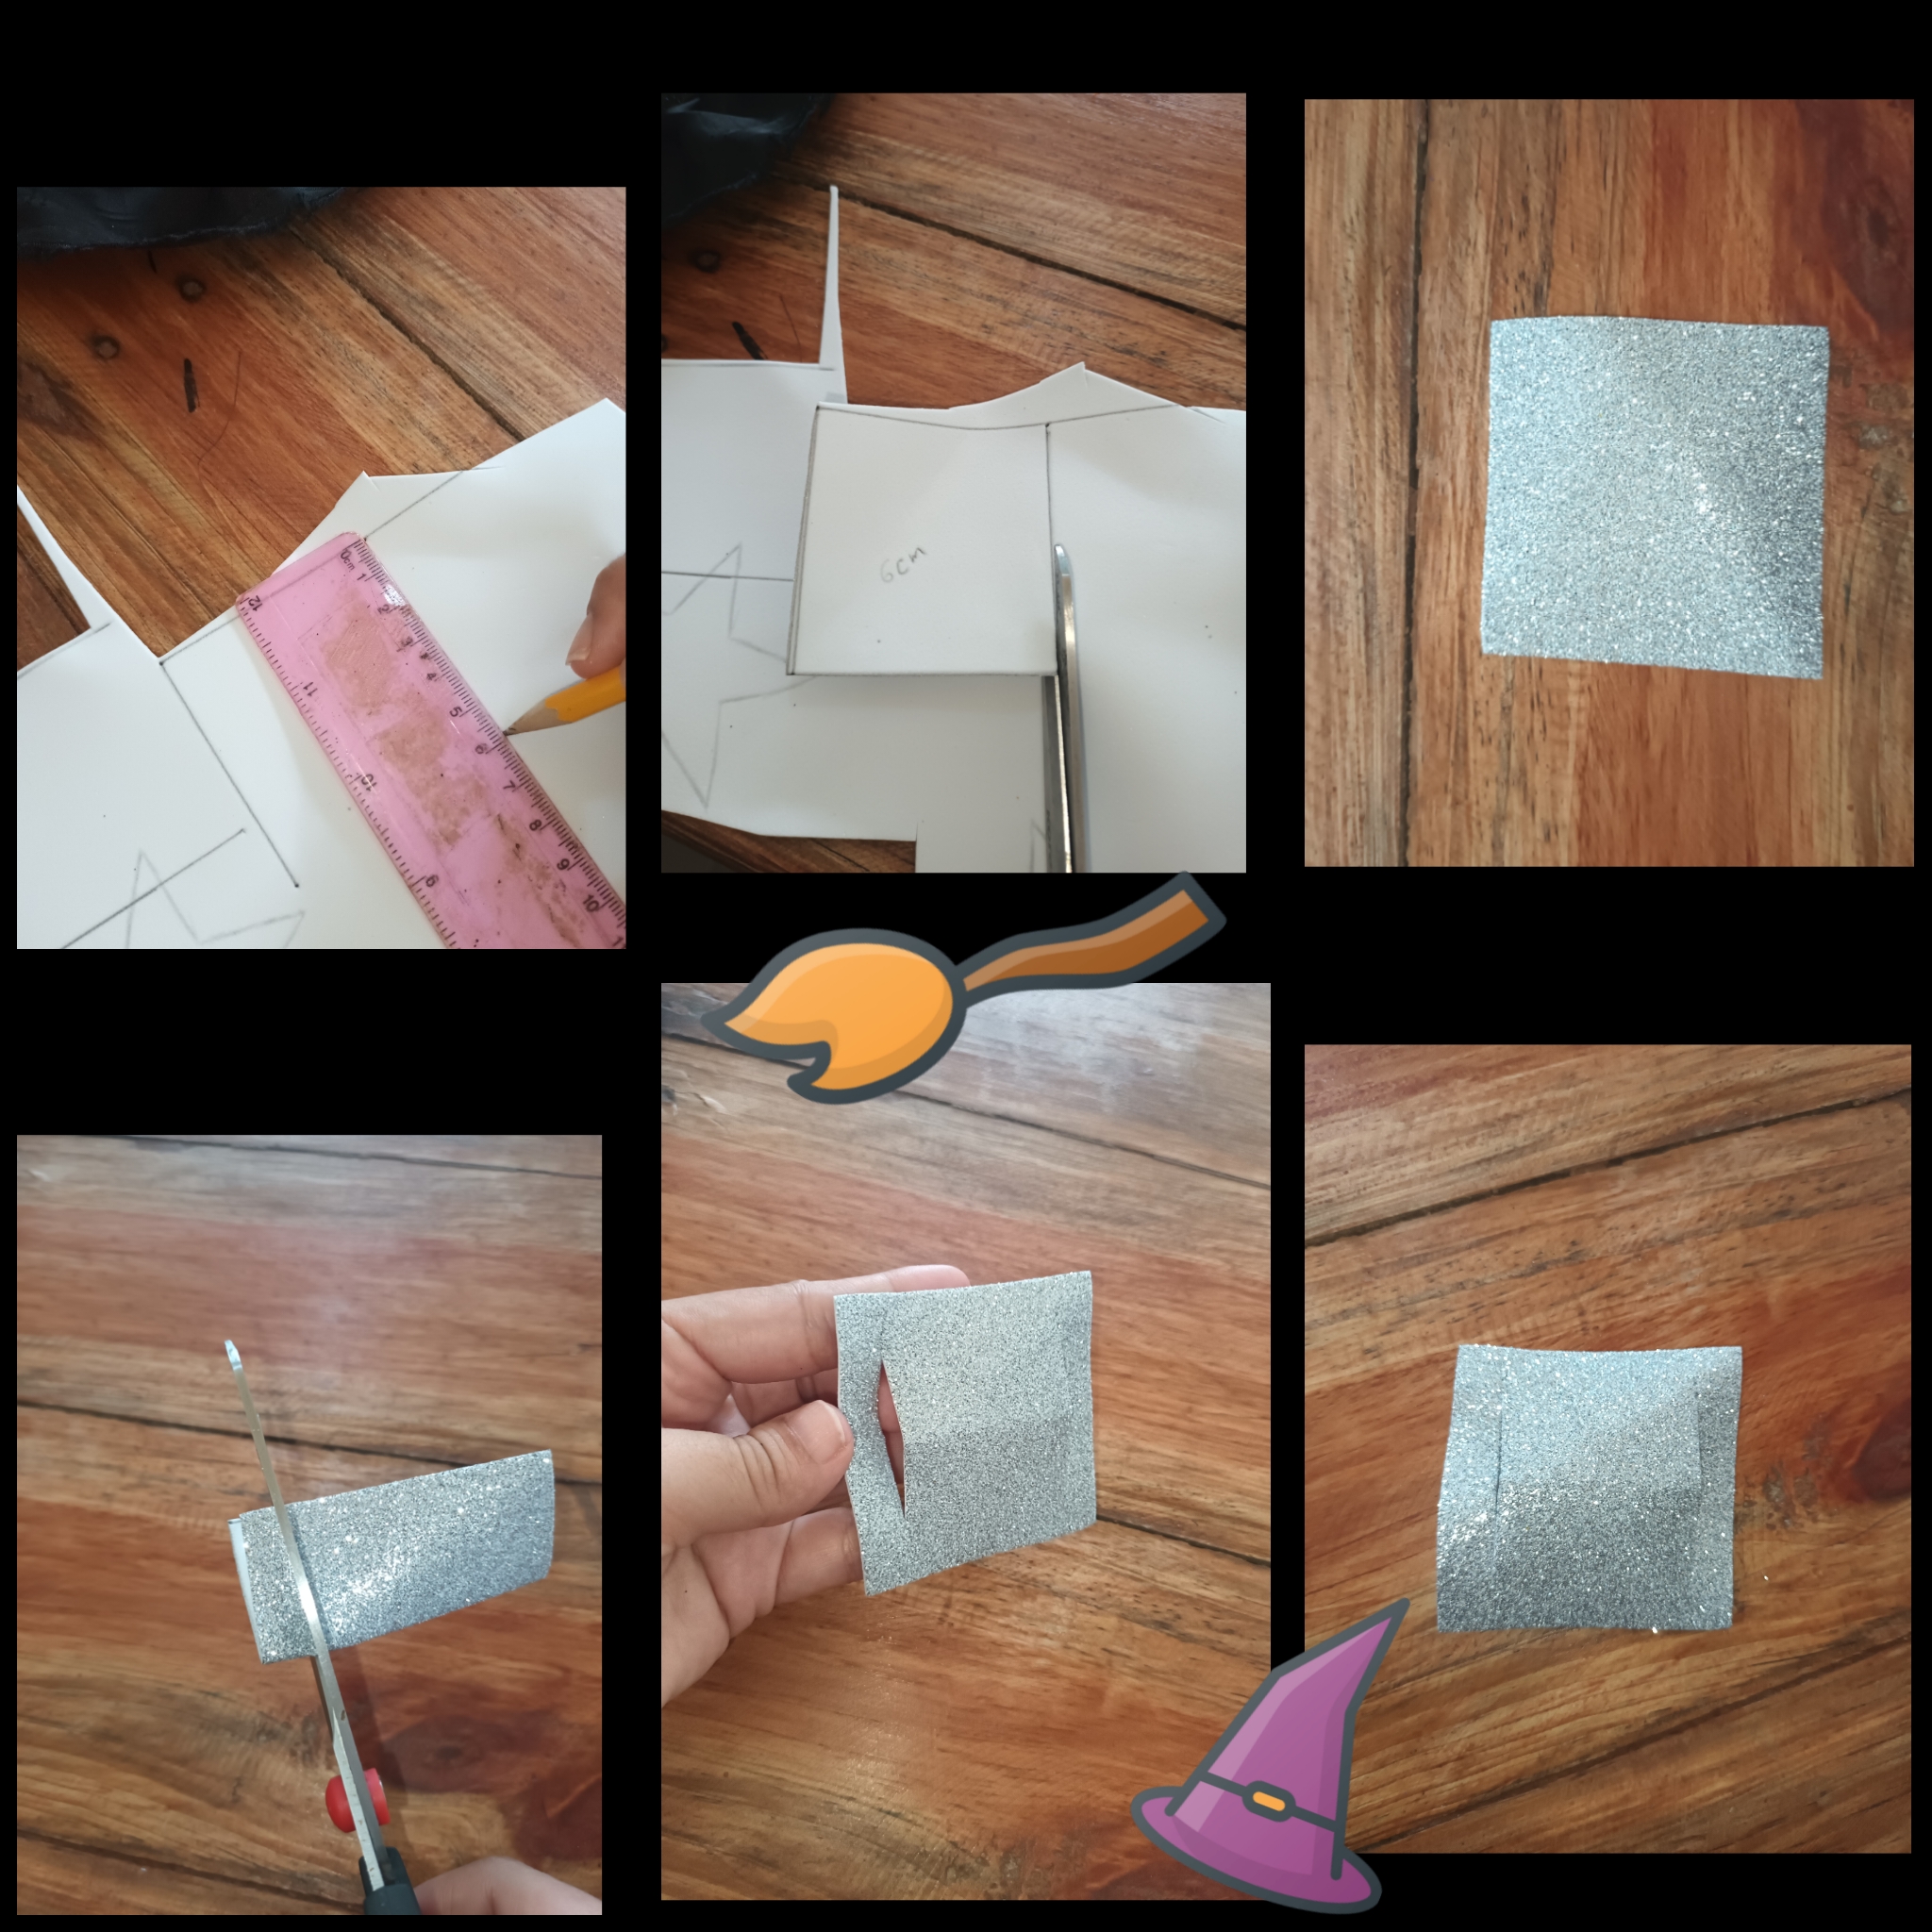
• Al día siguiente le hice los detalles, en el foami plateado marque y recorte un cuadrado de 6 cm, luego lo doble y le hice un corte en cada extremo para obtener una hebilla.
• The next day I made the details, on the silver foam I marked and cut out a 6 cm square, then folded it and made a cut at each end to obtain a buckle.
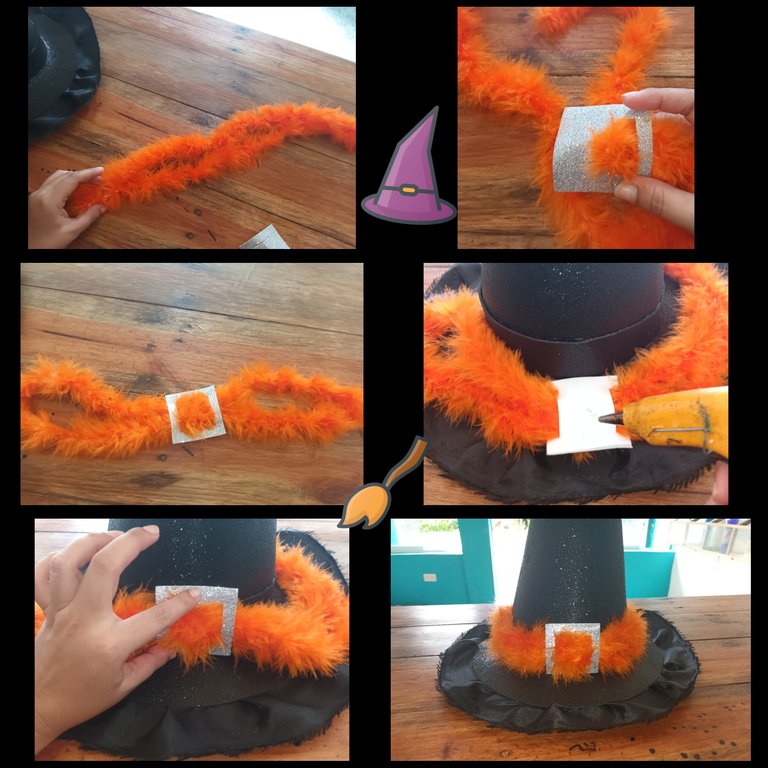
• Despues agarre el marabu lo doble a la mitad y lo introduje por las ranuras que le hice al cuadrado del foami plateado para que este quedara como un cinturón, le eche silicon calien al foami, lo pegue en lo que sería la parte del frente del sombrero justo en la unión del cono y la base, y lo terminé de pagar en la parte trasera.
• Then I grabbed the marabu, folded it in half and inserted it through the slots that I made in the square of the silver foam so that it looked like a belt. I added hot silicone to the foam and glued it on what would be the front part of the foam. hat right at the junction of the cone and the base, and I finished paying it off at the back.
• Para continuar con los detalles le eche silicon frío en la punta del sombrero por la parte interna y después un poco más arriba de la mitad, le hice un dobles, le coloque un pinza y lo mismo hice en la punta para que al secarse quedara con esas formas doblado no te que le faltaba un poco más de deformidad para mi gusto y le coloque otro gancho a un lado del doblez que le había hecho.
• To continue with the details, I poured cold silicone on the tip of the hat on the inside and then a little above the middle, I made a double, placed a clamp on it and did the same on the tip so that when it dried it would remain With those folded shapes, I didn't think it needed a little more deformity for my taste and I placed another hook on one side of the fold that I had made.
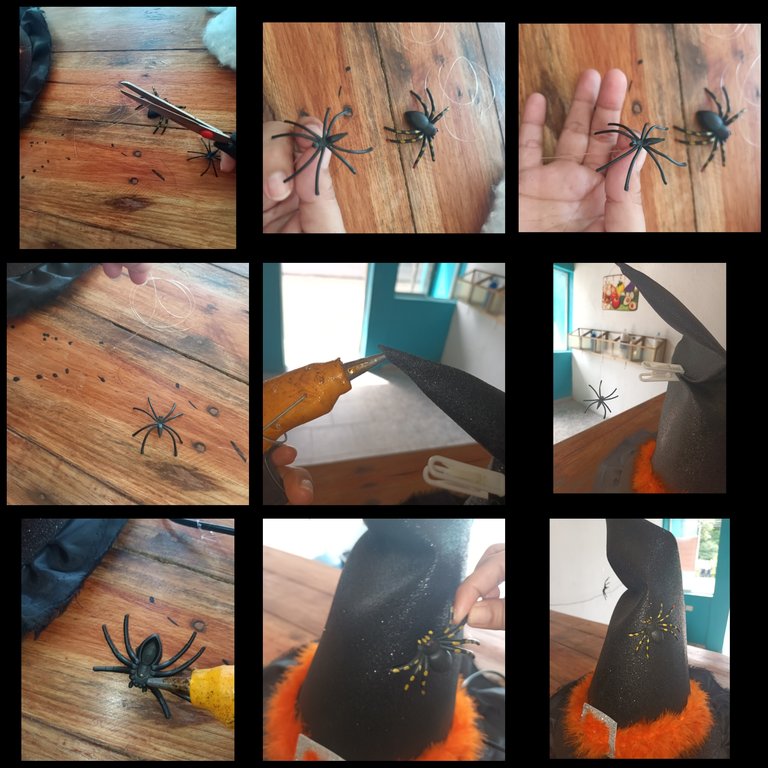
• A este punto si parecia un sombrero de bruja pero aquí van los últimos toques, corte un pedacito de nailon como de 8 cm, tome la araña más pequeña, le amarre el hilo en la cabeza y pegue el otro extremo del hilo en la punta del sombrero para que la araña cuelgue, luego le eche silicon caliente a la araña mediana y se la pegue en la parte del frente como que fuese caminando hacia arriba.
• At this point it looks like a witch's hat but here are the finishing touches, cut a piece of nylon about 8 cm, take the smallest spider, tie the thread on its head and glue the other end of the thread to the tip of the hat so that the spider hangs, then pour hot silicone on the medium-sized spider and stick it on the front as if it were walking up.
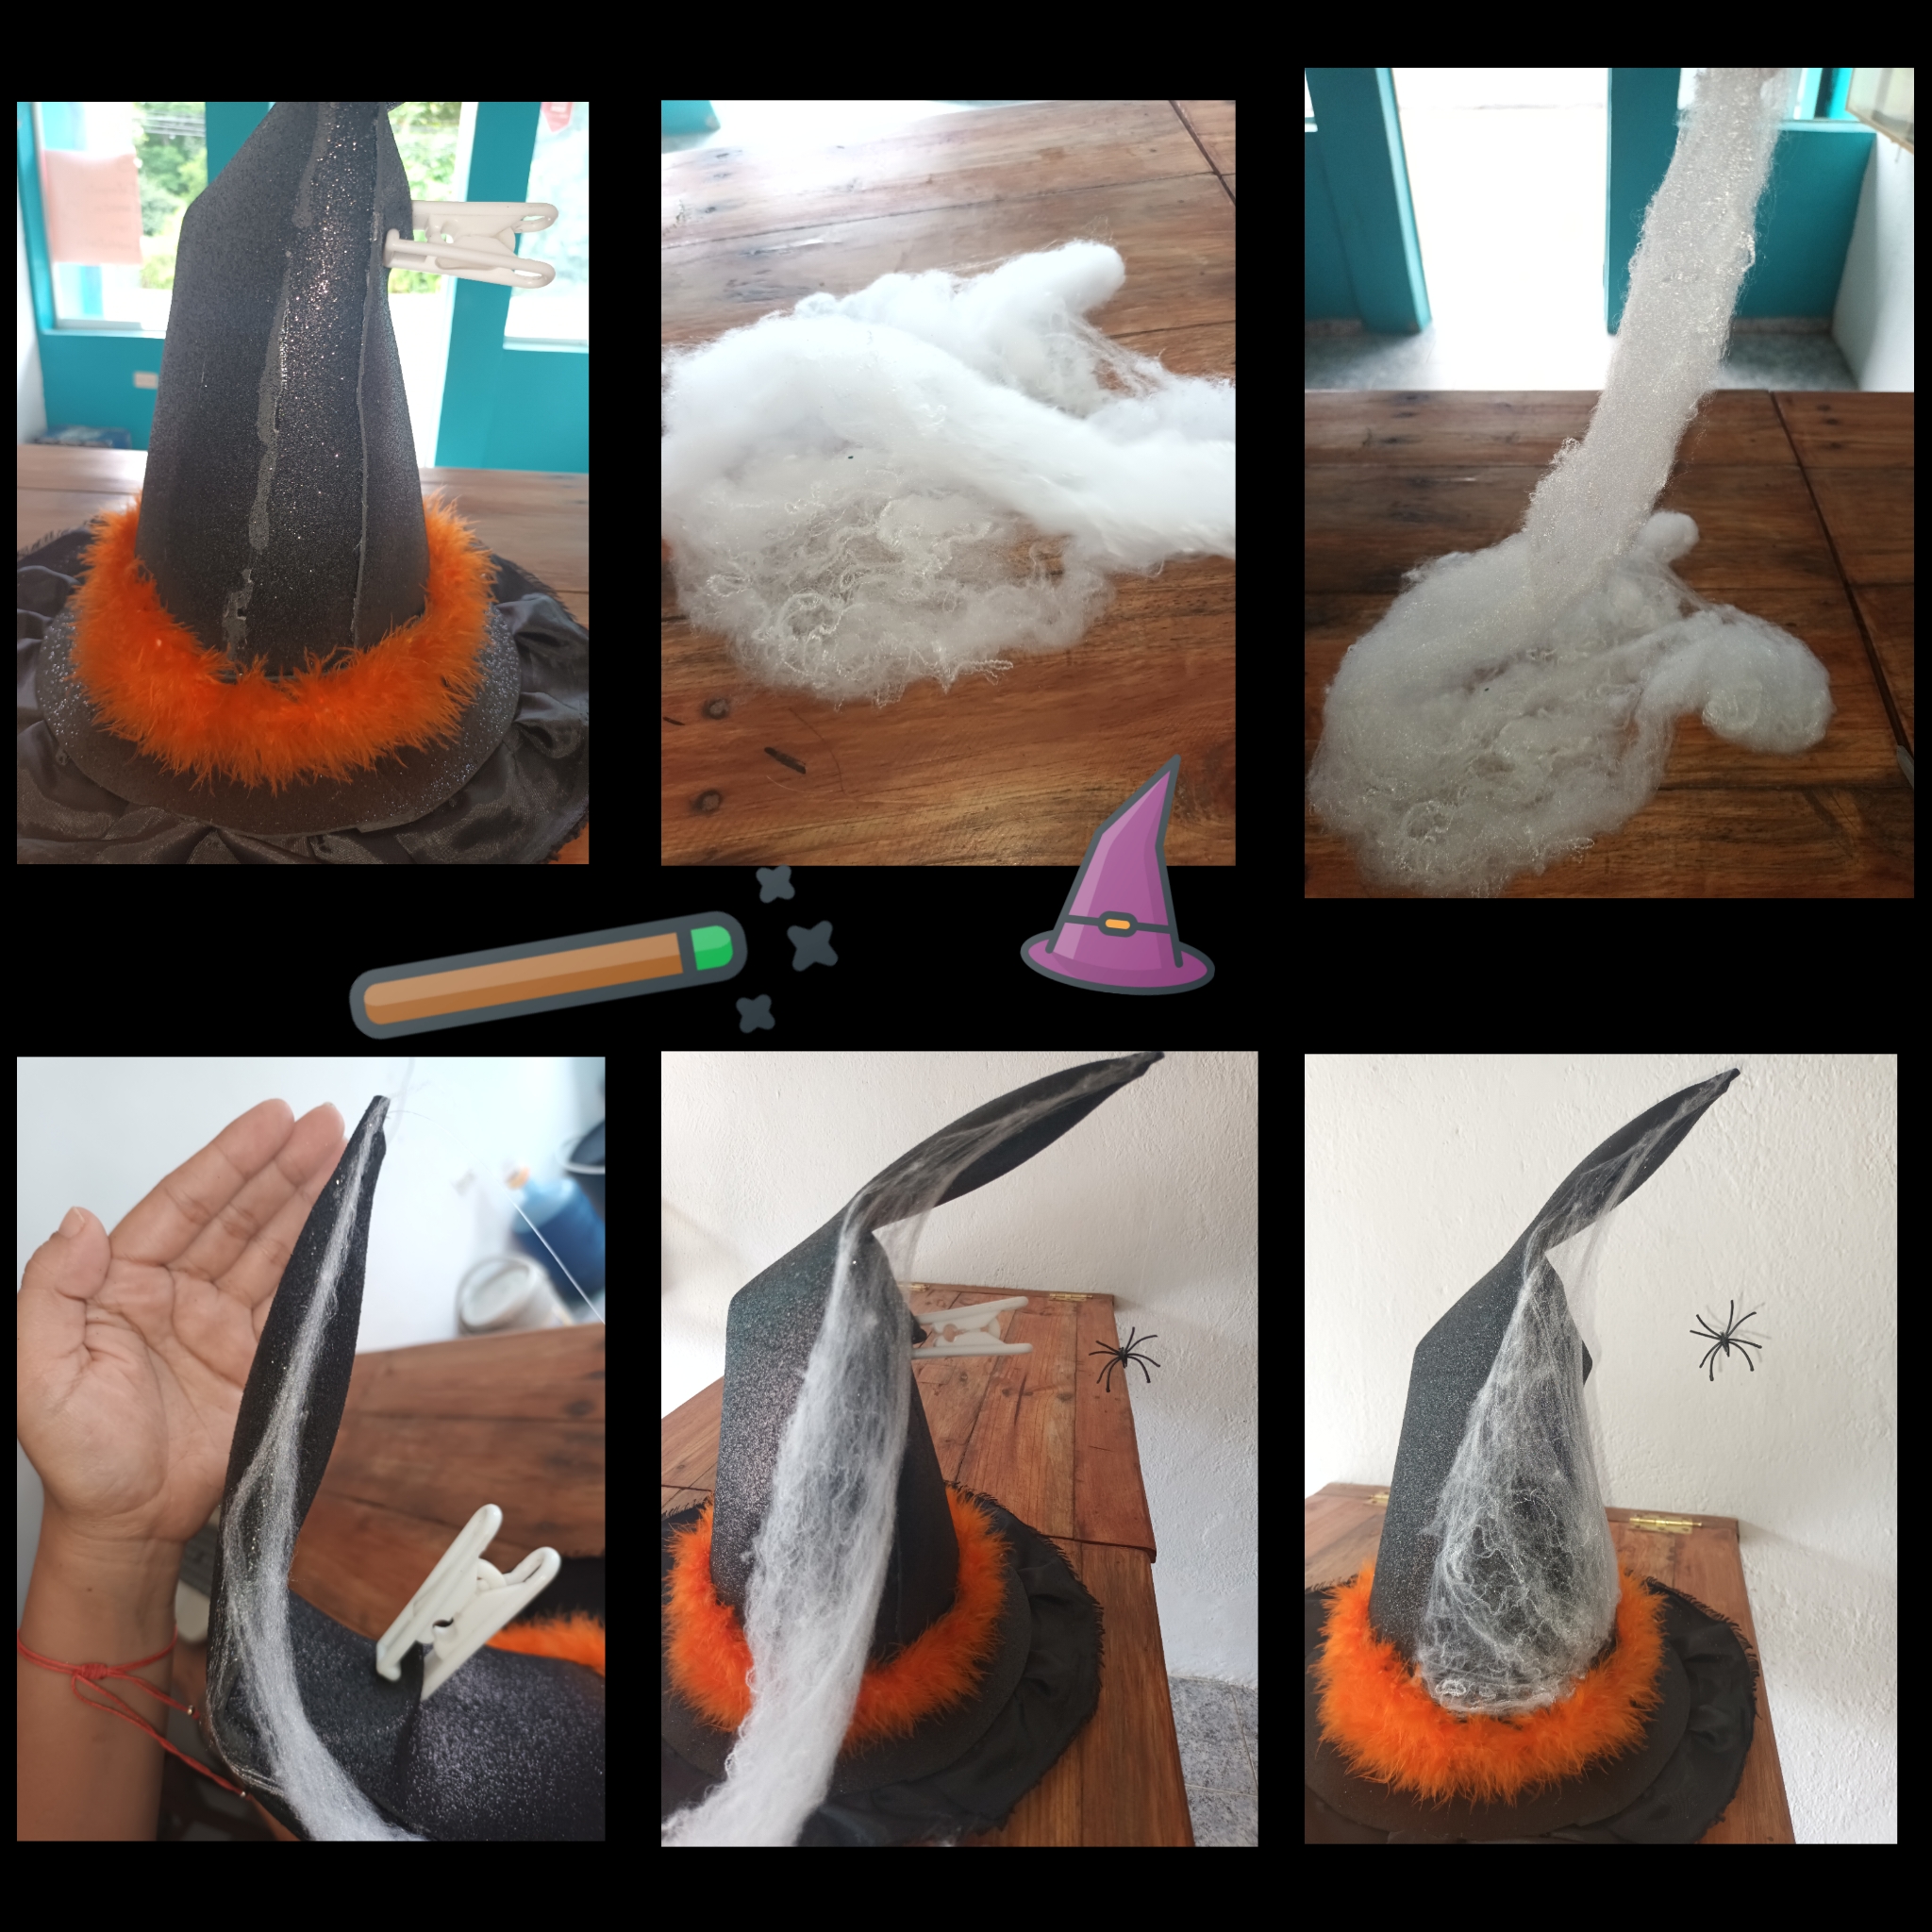
• Por ultimo debía tapar el empate feo que quedó en la parte trasera, para ello tome un poco de la tela de araña falsa y la estire para cortar un pedazo del largo del sombrero y la empecé a colocar desde la punta donde está la araña colgando de manera que se viera lo más real posible, la seguí esparciendo hasta cubrir lo que quería ocultar tratando de dejar un buen acabado para que parezca un nido de arañas real, esta tela de araña no necesito pega porque por tener hilos finos se adheria perfectamente al foami escarchado por este ser rugoso.
• Finally I had to cover the ugly tie that was left on the back, to do this I took some of the fake spider web and stretched it to cut a piece the length of the hat and I started to place it from the tip where the spider is hanging so that it looked as real as possible, I continued spreading it until I covered what I wanted to hide, trying to leave a good finish so that it looks like a real spider's nest. This spider web does not need glue because because it has fine threads it adhered perfectly to the frosted foam for this rugged being.
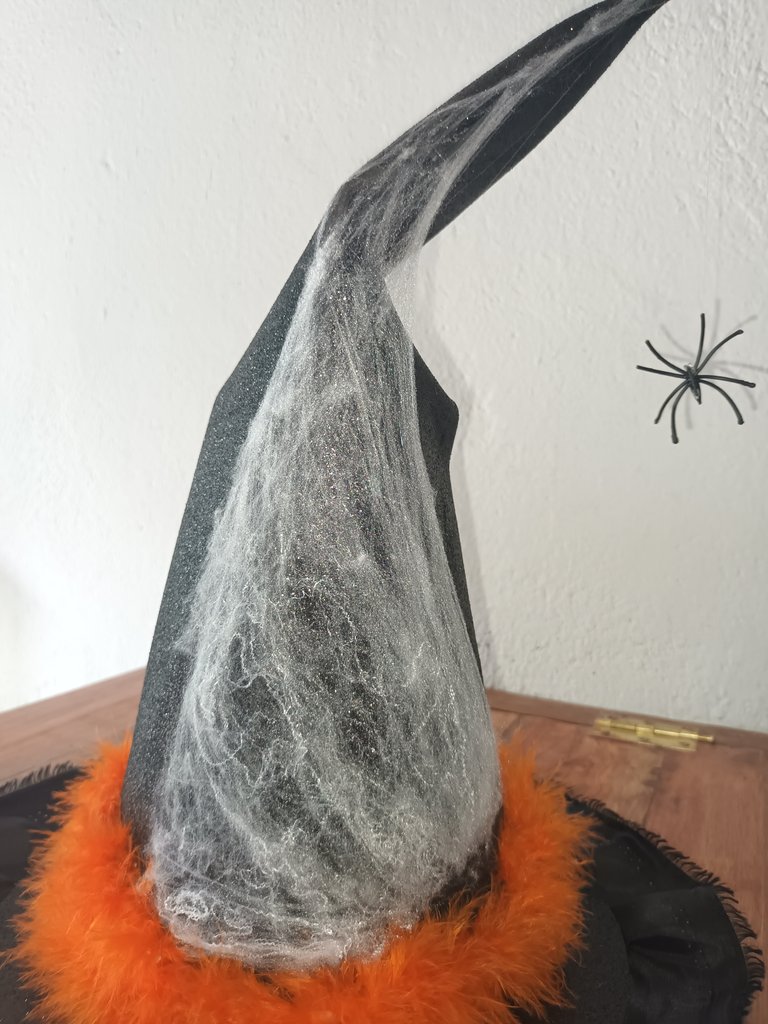
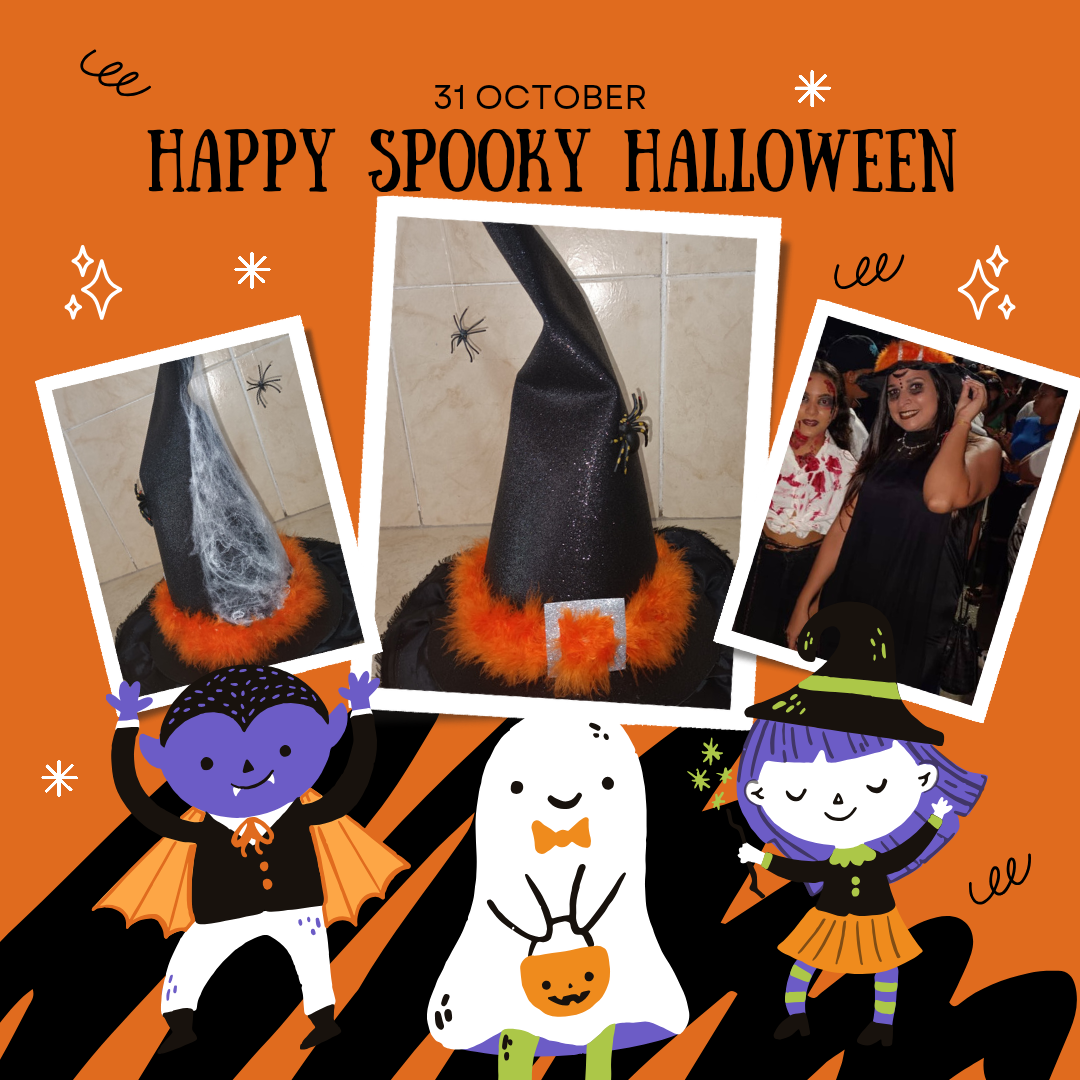
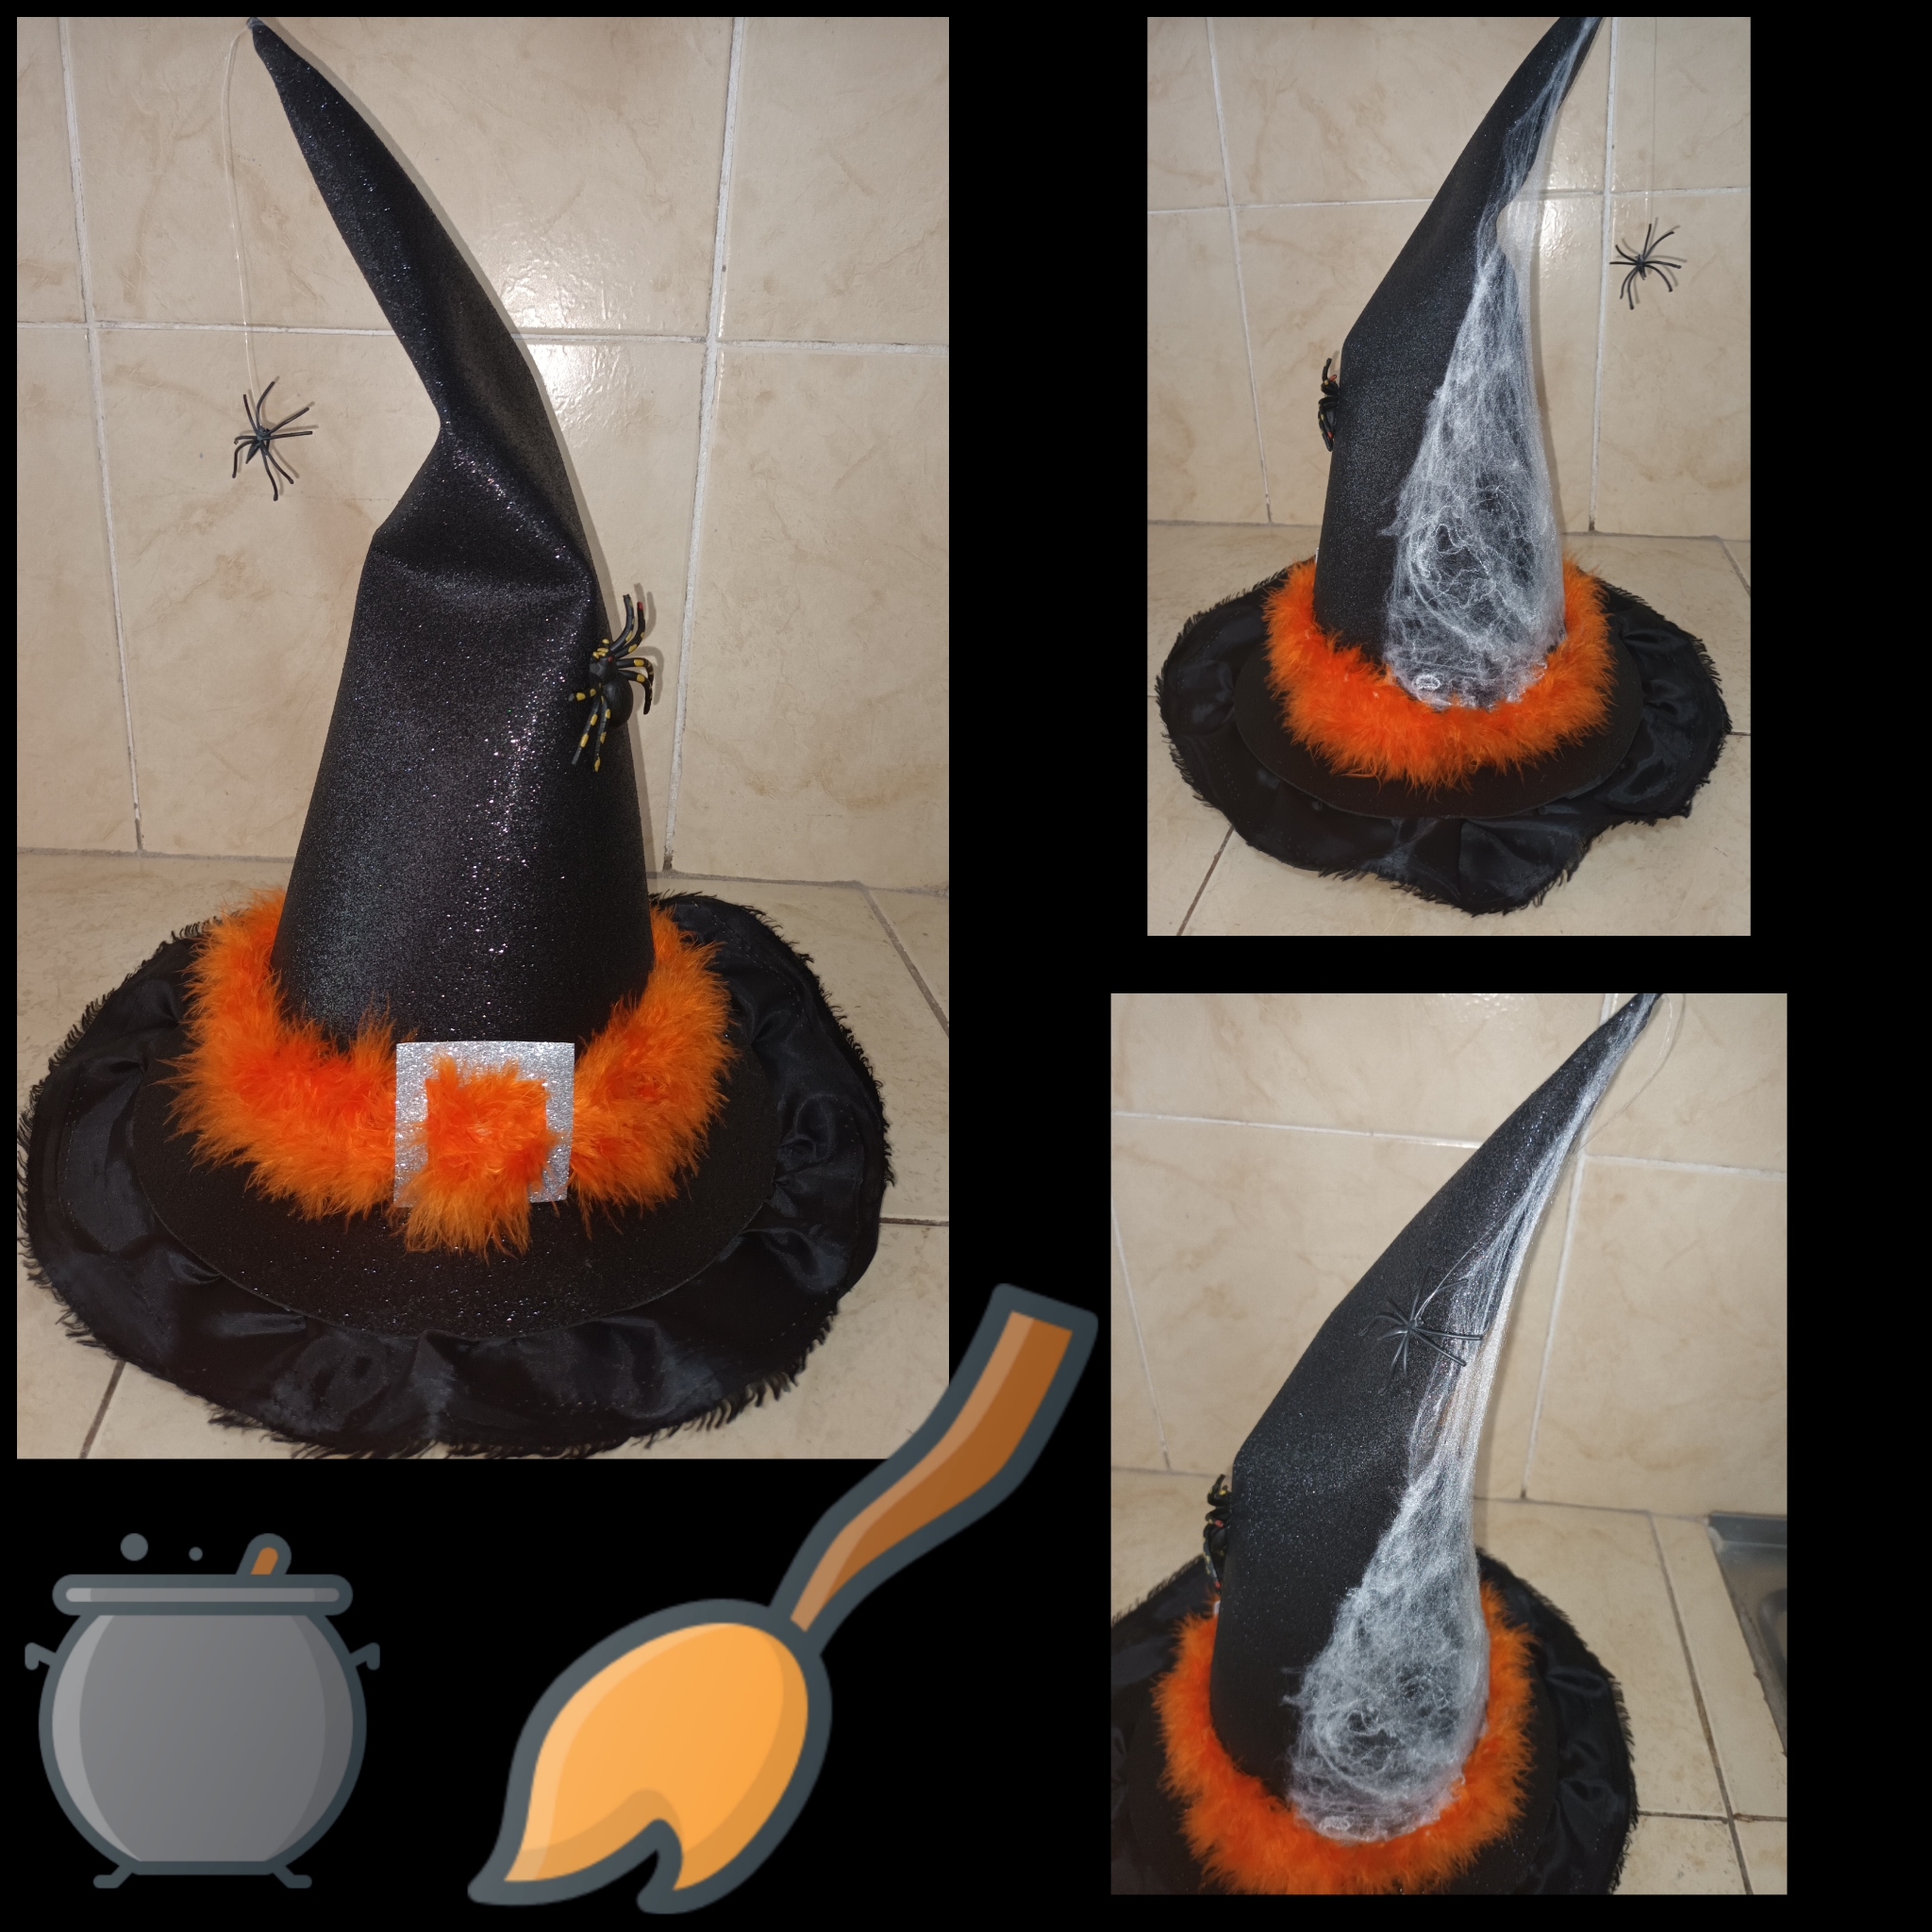
Y listo! Valió la pena hasta el estrés así que Aqui esta el resultado de mi manualidad Un Arácnido Sombrero de Bruja Ideal Para esta Noche de Halloween 🎃 🕸🕷👻.
And ready! It was worth even the stress so Here is the result of my craft An Arachnid Witch's Hat Ideal For This Halloween Night 🎃 🕸🕷👻.
Sacando provecho de las cosas u objetos que tengo en casa, siempre he dicho que el que guarda siempre tiene.
Taking advantage of the things or objects that I have at home, I have always said that he who saves always has.

GRACIAS POR VISITAR MI BLOG ❤️🖤🤍
THANK YOU FOR VISITING MY BLOG ❤️🖤
Es un gusto compartir con ustedes mis ideas💡
It is a pleasure to share my ideas with you💡
Dios les bendiga 😇
God bless you 😇