¡¡Holis!! Hiver's creativos, espero que hayan tenido un bonito domingo 🏡🌤️.
¡¡Holis!! Hiver's creatives, I hope you had a nice Sunday 🏡🌤️.
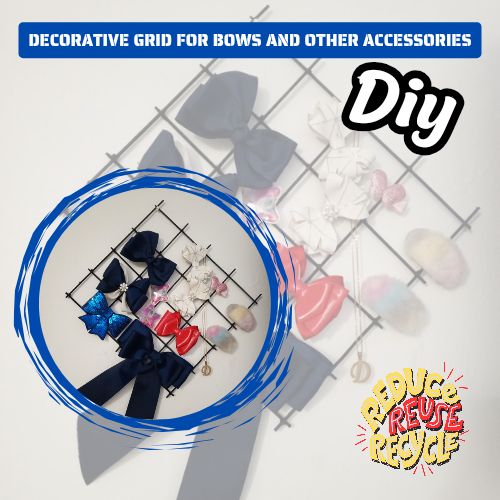
Buscando siempre la manera de ver cada cosa en su lugar, mantener el orden y mejorar la decoración en éste caso del dormitorio, me fui por la opción de realizar un organizador para los lazos de mi niña y otros accesorios pequeños, con materiales que tenía en casa 🏡.
Always looking for a way to see everything in its place, maintain order and improve the decoration in this case of the bedroom, I went for the option of making an organizer for the ties of my daughter and other small accessories, with materials I had at home 🏡.
Ésta rejilla decorativa para colocar accesorios, es un proyecto bastante sencillo, aún así muy útil. Les muestro cuáles materiales se necesitan y como fue el procedimiento. Sigan conmigo...👉
This decorative grid for placing accessories is a fairly simple project, yet very useful. I show them what materials are needed and how the procedure was. Stay with me...👉
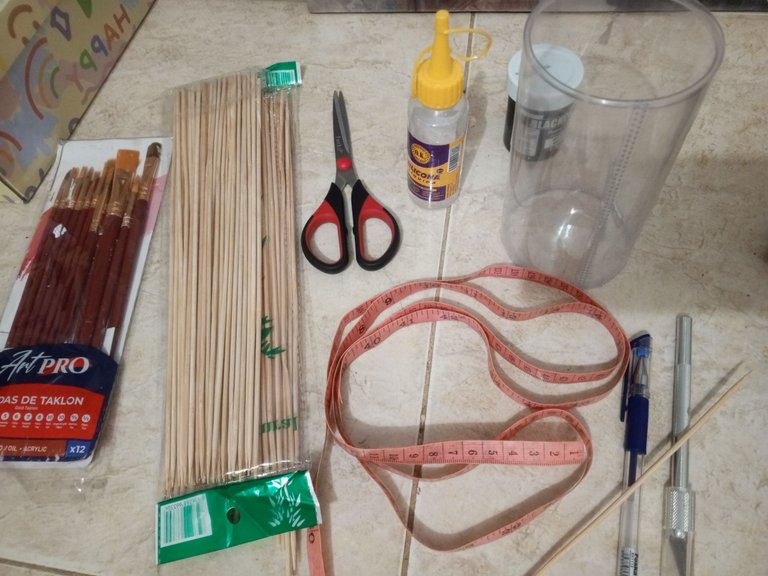
Materiales- Materials
🔅Palillos de madera - Wooden chopsticks.
🔅Silicón en barra o frio líquido - Silicone bar or liquid cold.
🔅Pistola de silicón caliente - Hot silicone gun.
🔅Pintura acrílica negra - Black acrylic paint.
🔅Cinta de medidas - Measurement tape.
🔅Bisturí - Scalpel.
🔅Tijera - Scissors.
🔅Pincel - Brush.
Procedimiento - Procedure
Para comenzar vamos a seleccionar los palillos de madera que estén más rectos, algunos pueden estar curvos, otros por ser reciclados pueden tener restos de materiales.
To begin, we are going to select the wooden sticks that are straightest, some may be curved, others may have remains of materials because they are recycled.

Paso II-Step II📝
Luego vamos a tomar las medidas de los espacios. Cada cuadro que se forma tiene medidas de 7x7cm.
Then we are going to take the measurements of the spaces. Each square that is formed measures 7x7cm.

Paso III-Step III📝
Lo siguiente será pegar los palillos. Utilizamos la pistola de silicón caliente ♨️, para que el secado sea rápido. Pueden utilizar también silicón frio líquido.
The next thing will be to glue the toothpicks. We use the hot silicone gun ♨️, so that drying is quick. You can also use cold liquid silicone.

Paso IV-Step IV📝
Luego de ir pegando los palillos con la intención de formar cada vez mas cuadros, se va notando la forma de una rejilla o malla. Es simplemente colocar 5 palillos con las medidas y luego ir pegando uno por uno el resto de los palillos que formarán los cuadros.
After sticking the toothpicks with the intention of forming more and more squares, the shape of a grid or mesh is noticed. It is simply placing 5 toothpicks with the measurements and then gluing the rest of the toothpicks that will form the paintings one by one.

Paso V-Step V📝
Para darle un toque de color, considerando que la pared donde colocaré la rejilla es blanca, utilicé pintura acrílica de color negro. Preferiblemente se deben colocar dos capas de pintura para que quede bien cubierto. Dejar secar y listo.
To give it a touch of color, considering that the wall where I will place the grille is white, I used black acrylic paint. Preferably two coats of paint should be applied so that it is well covered. Let it dry and that's it.

Resultado final - Final score 🔚
Como verán el resultado final, la rejilla se forma con un procedimiento sencillo y con materiales bastante económicos. Se puede colocar en un clavo en la pared.
As you will see the final result, the grid is formed with a simple procedure and with fairly inexpensive materials. It can be placed on a nail on the wall.

Muchos de estos palillos son reciclados ♻️, estos mismos que se utilizan para colocar en carteles decorativos, banderines escolares, toppers, en fin, los guardo y los reutilizó. Está rejilla no solamente es decorativa, es utilisima. Mi hija tiene muchas cositas, accesorios, lazos y hasta lentes de sol 😎, y aquí los puedo colocar perfectamente. Es una forma de mantener el orden y a la vez queda muy bien en la pared del dormitorio como decoración🎍.
Many of these toothpicks are recycled ♻️, the same ones that are used to place decorative posters, school pennants, toppers, in short, I save them and reuse them. This grille is not only decorative, it is very useful. My daughter has many things, accessories, bows and even sunglasses 😎, and I can place them perfectly here. It is a way to maintain order and at the same time looks great on the bedroom wall as decoration🎍.

Es todo por éste tutorial. Espero les sea de utilidad. Gracias por leerme 📝👆🩷...
That's all for this tutorial. I hope it will be you useful. Thanks for reading me 📝👆 ...
Creditos - Credits
Traductor English translator
Stickers realizado en Bitmoji | Stickers made in Bitmoji.
Fotografias capturadas con mi teléfono Tecno Spark 10 pro | Photos captured with my Tecno Spark 10 pro phone.
