Hello to all the #hive community especially to the #jewelry community, wishing you had a wonderful weekend and that you are well. Some time ago I bought a nice red bracelet that I really liked when I saw it, one of those things that you want to buy when you see it, it's like it says take me, has it ever happened to you? At that time I had no idea that I would dedicate myself to handmade jewelry.

Hola a toda la comunidad de #hive especialmente a la comunidad #jewelry, deseando que hayan tenido un maravilloso fin de semana y que se encuentren bien. Hace algún tiempo compre una linda pulsera roja que me gustó mucho al verla, de esas cosas que quieres comprar cuando la ves, es como si te dijera llévame, ¿les ha pasado alguna vez? Para ese momento yo no tenía ni idea que me dedicaría a la joyería artesanal.
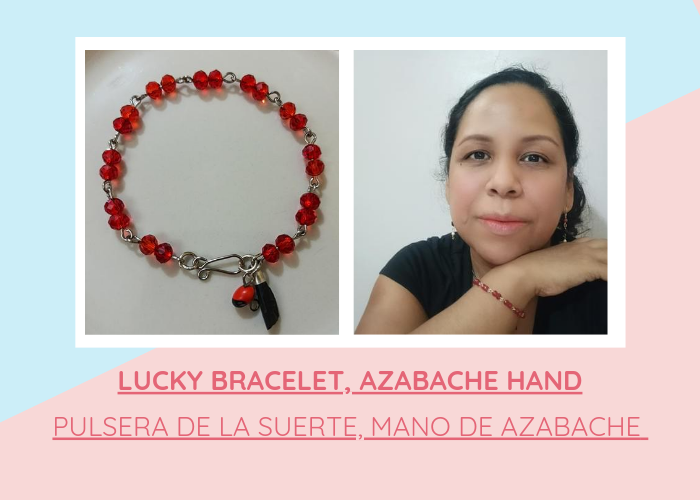
After using the bracelet for more than 4 years it has been damaged, it should be noted that I used it daily, and well, like everything in this world, it also has a shelf life.
I am lucky enough to be able to make a similar one, and you may wonder why a similar one and not the same one? I will tell you: what is handmade will never be the same, no matter how hard we try, there will always be a difference between one piece and the other, that is why I refer to the term similar, after clarifying this, we continue with the step by step.
Después de usar la pulsera por más de 4 años se me ha dañado, cabe destacar que la usaba a diario, y bueno, como todo en este mundo, también tiene una vida útil.
Decide volver a recrear ese diseño, tengo la suerte de poder hacer una parecida y, se preguntarán ¿porque una parecida y no una igual? les cuento: lo hecho a mano nunca nos va a quedar igual un diseño a otro por más que nos esforcemos siempre va a haber una diferencia entre una pieza y la otra por eso hago referencia a el termino parecida, después de aclarar esto continuamos con el paso a paso
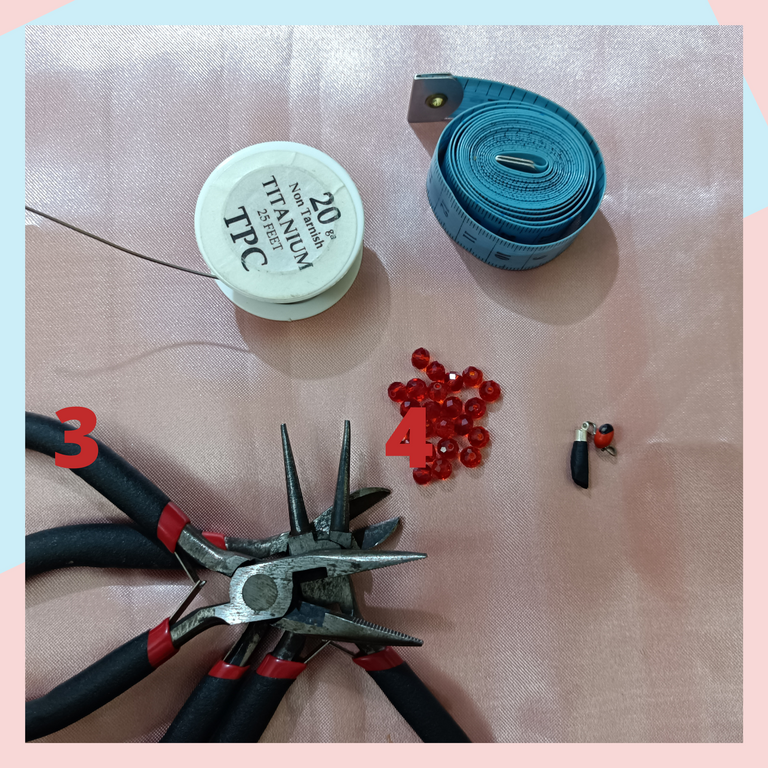
Materials:
- We will need #20 gauge silver-plated wire
- Number 6 red Czech glass beads
- Wire wrap pliers
- Measuring tape
- Jet peony charm or any other charm of your choice
Materiales
- Vamos a necesitar alambre plateado calibre #20
- Cuentas rojas número 6 de cristal checo
- Pinzas para alambrismo
- Cinta métrica
- Manito de azabache con peonía o cualquier otro dije que sea de tu preferencia
Step by step
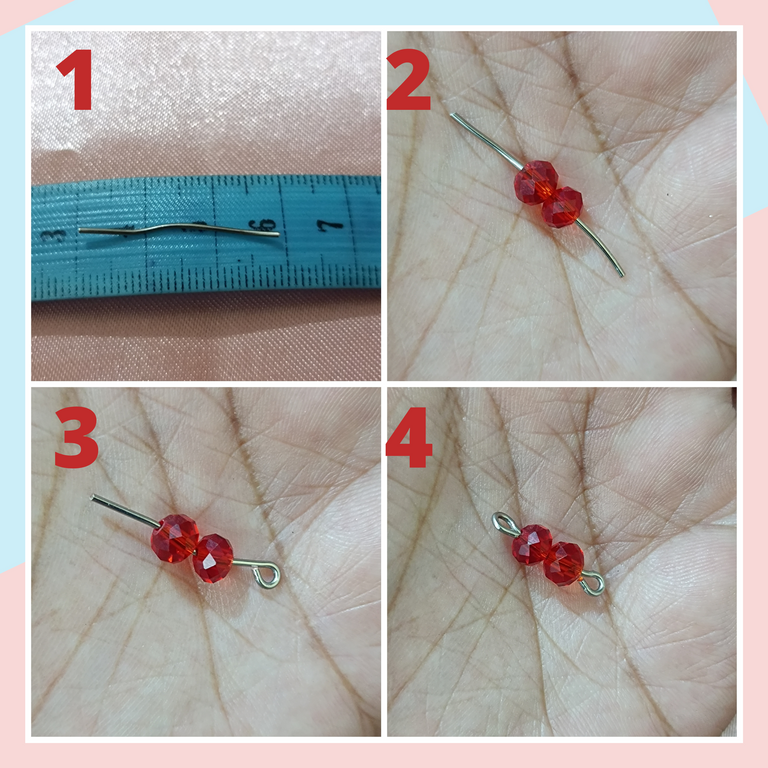
First
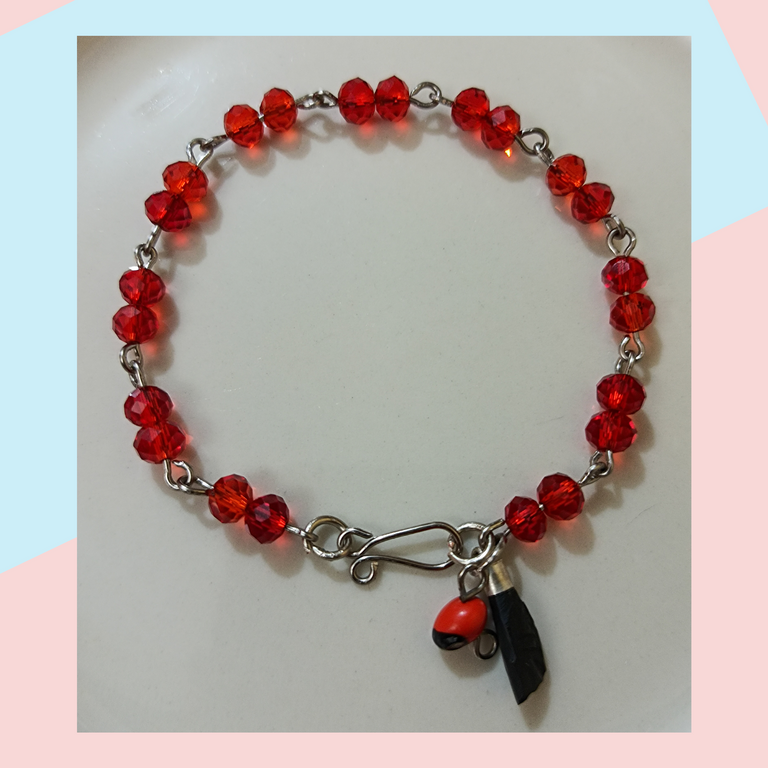
Cut approximately 2.5cm of wire, take two red Czech glass beads and pass the wire through these two beads, at one end of the wire we make a circle with the help of the conical tweezers as shown in the picture N°3, we do the same procedure at the other end of the wire so that the beads are very tight to each other, we do the same with the other Czech glass beads.
Paso a paso
Primero
Cortamos aproximadamente 2. 5cm de alambre, tomamos dos cuentas rojas de cristal Checo y pasamos el alambre a través de estas dos cuentas, en un extremo del alambre hacemos un circulo con la ayuda de la pinza cónica nos queda como se ve en la imagen N°3 realizamos el procedimiento en la otra punta del alambre de modo que las cuentas queden bien justas entre sí, hacemos los mismo con las demás cuentas de cristal checo.
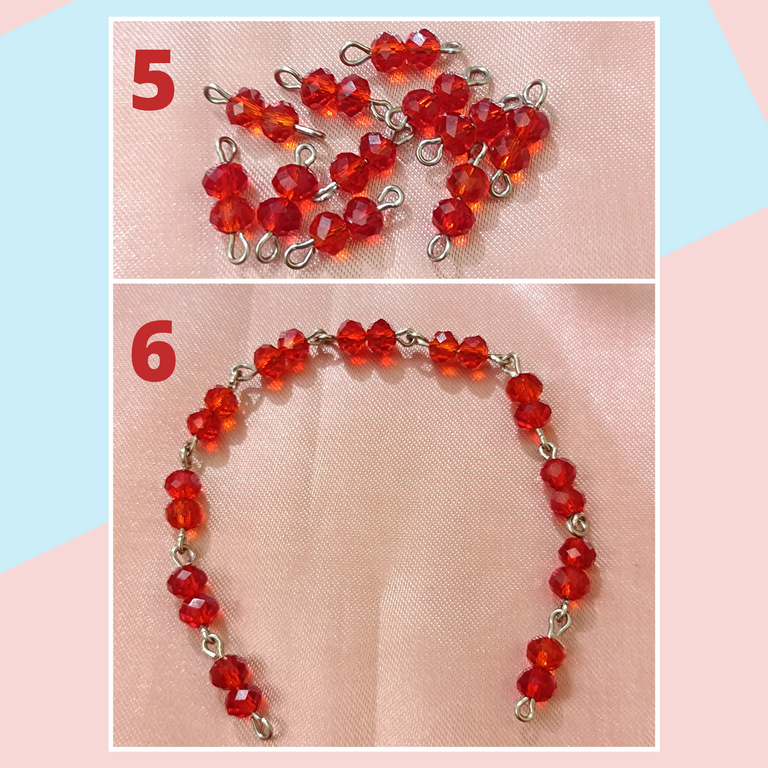
We must always keep in mind that the amount of beads that we will need will depend on the size of our bracelet, in this case I used 22 red beads, once all the beads are finished we proceed to join each pair to form a chain, it will be as shown in picture N°6.
Debemos tener siempre presente que la cantidad de cuentas que vamos a necesitar va a depender de la medida de nuestra pulsera, en este caso yo utilice 22 cuentas rojas, una vez estén terminadas todas las cuentas procedemos a unir cada par para así formar una cadena, nos va a quedar Cómo se muestra en la imagen N°6
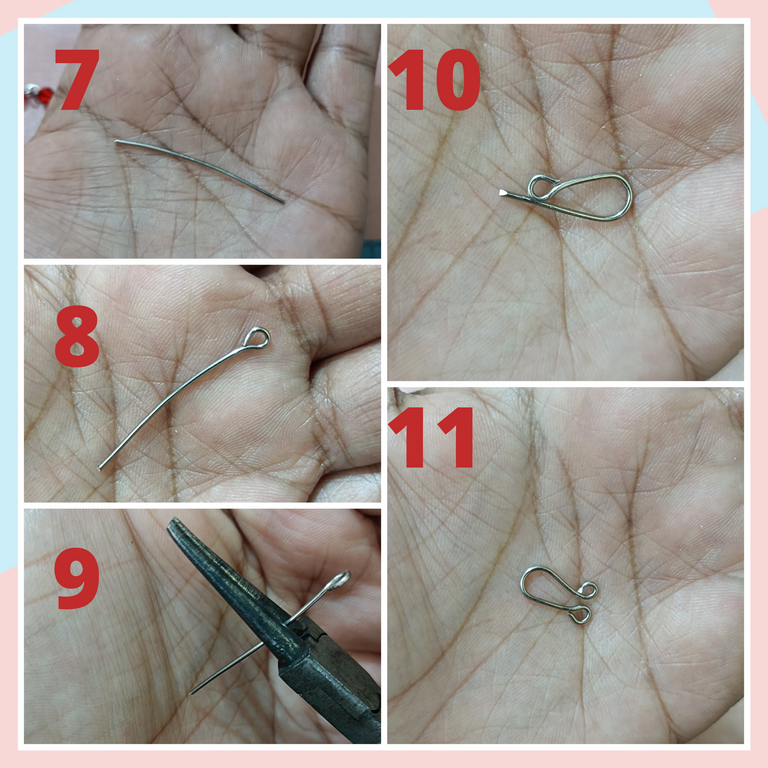
Second
Closure and rings: For this step we need 5 cm of wire in which we will make a small circle at the tip of it, with the help of the conical clamp in its thickest part we place the wire in half and make a kind of U with it, we bend the other end in a circle to finish making our closing hook.
Finally we make two rings that we will place at each end of the bracelet, we attach the hook to the rest of the beads, in this step we place the little hand of Azabache with the peony and ready we have our bracelet.
Segundo
Cierre y argollas: Para este paso necesitamos 5 cm de alambre en el cual vamos hacer un pequeño círculo en la punta del mismo, con la ayuda de la pinza cónica en su parte más gruesa colocamos el alambre en la mitad y realizamos una especie de U con el mismo, doblamos el otro extremo en forma de círculo para terminar de hacer nuestro gancho de cierre.
Por último se realizan dos argollas que colocaremos en cada extremo de la pulsera, unimos al resto de las cuentas el gancho, en este paso colocamos la manita de Azabache con la peonia y listo tenemos nuestra pulsera

I hope you liked it and I encourage you to make this beautiful bracelet. Remember that you can use the materials you feel comfortable with.
Espero les haya gustado y se animen a realizar esta linda pulsera Recuerden que pueden usar los materiales con los que ustedes mejor se sienta cómodo

Jewelry design and making: @monicamm
Photo editing: Canva
Fotografía: mi autoría
Diseños y elaboración de joyería: @monicamm
Edición de fotos: Canva