 🌻🌻🌻🌻🌻🌻🌻🌻🌻
Buenos días tengan todos y cada uno de los seres maravillosos que hacen vida en esta plataforma, les envío muchas buenas vibras para que su día y este inicio de semana sea lleno de muchas bendiciones y de triunfo.
Good morning to each and every one of the wonderful beings that make life on this platform, I send you many good vibes for your day and the beginning of this week to be filled with many blessings and triumph.
Para el día de hoy les traigo un tutorial de la elaboración de un pequeño trabajo que bien puede utilizarse como cuadro decorativo, siendo este de fácil elaboración por lo que los invito a dejar fluir toda esa imaginación que llevan guardada y que está allí esperando salir para demostrar cuánta creatividad tenemos, así que sin más vamos a comenzar, manos a la obra.
For today I bring you a tutorial for the development of a small work that can be used as a decorative painting, being this easy to make so I invite you to let all that imagination that you have stored and that is there waiting to come out to show how much creativity we have, so without further ado let's get started, let's get to work.
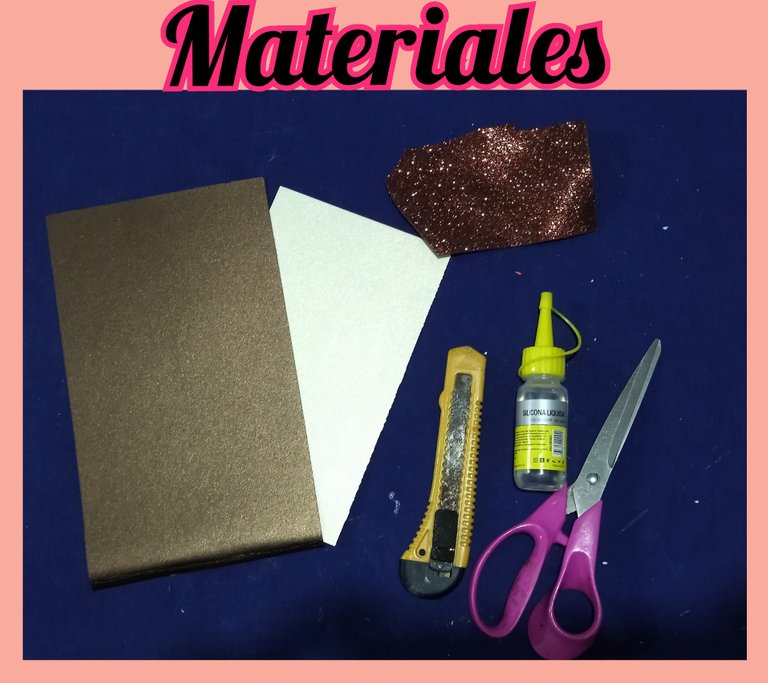
MATERIALES // MATERIALS.
🌻🌻🌻🌻🌻🌻🌻🌻🌻
🌻Cartulina metalizada color crema y marrón./Cream and brown metallized cardboard.
🌻 Silicón./Silicone.
🌻 Tijeras./Scissors.
🌻 Cúter./Cutter.
🌻 Foami escarchado marrón./Brown frosted foami
🌻Marcador negro punta fina./Black fine tip marker.
🌻 Palillo de altura./Height stick
🌻🌻🌻🌻🌻🌻🌻🌻🌻
 🌻🌻🌻🌻🌻🌻🌻🌻🌻
PASO A PASO // STEP BY STEP
🌻🌻🌻🌻🌻🌻🌻🌻🌻
PASO 1 // STEP 1
🌻🌻🌻🌻🌻🌻🌻🌻🌻
🌻🌻🌻🌻🌻🌻🌻🌻🌻
PASO A PASO // STEP BY STEP
🌻🌻🌻🌻🌻🌻🌻🌻🌻
PASO 1 // STEP 1
🌻🌻🌻🌻🌻🌻🌻🌻🌻
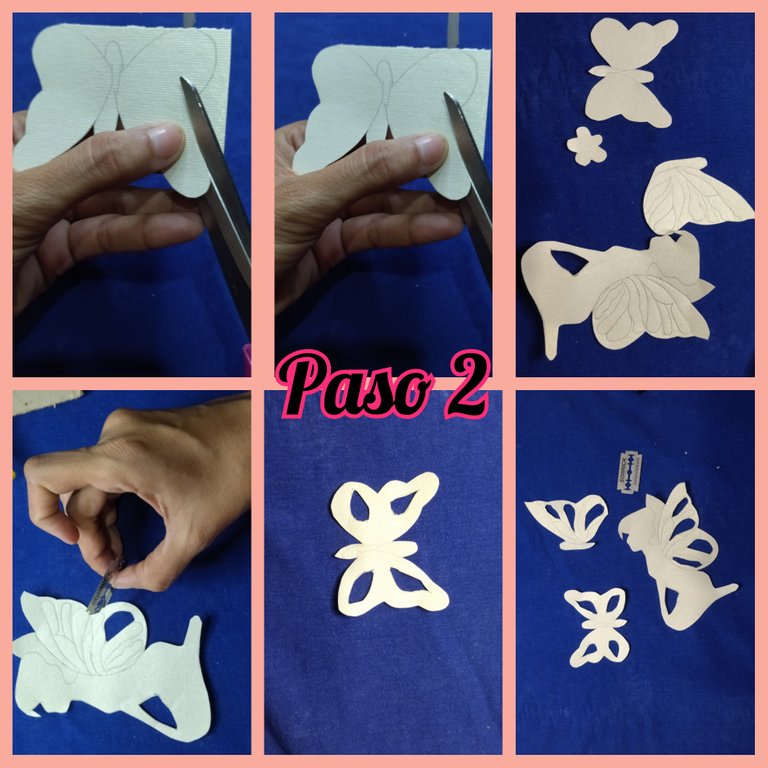
Primero debemos decidir el motivo con el que vamos a trabajar, luego de haberlo elegido sacamos el dibujo y recortamos para utilizarlo como plantilla.
First we must decide on the motif we are going to work with, and once we have chosen it, we take out the drawing and cut it out to use it as a template.
La colocamos encima de la cartulina color crema, y dibujamos la figura, eso sí solo vamos a trabajar con siluetas, y aprovechamos también sacamos algunos elementos de decoración relacionados con el tema de la figura principal, que en este caso será un hada, por lo que vamos a utilizar mariposas y flores como elementos de decoración.
We place it on top of the cream-colored cardboard, and draw the figure, but we are only going to work with silhouettes, and we also take some decorative elements related to the theme of the main figure, which in this case will be a fairy, so we will use butterflies and flowers as decorative elements.
 PASO 2 // STEP 2
🌻🌻🌻🌻🌻🌻🌻🌻🌻
PASO 2 // STEP 2
🌻🌻🌻🌻🌻🌻🌻🌻🌻
Una vez que sacamos la silueta, nos vamos a ayudar con una cuchilla para quitarle los centros de algunas de las partes de nuestros personajes, tanto del principal como el de los decorativos, puede apreciarse en la fotografía.
Once we remove the silhouette, we are going to help us with a blade to remove the centers of some of the parts of our characters, both the main and the decorative ones, as can be seen in the picture.
 PASO 3 // STEP 3
🌻🌻🌻🌻🌻🌻🌻🌻🌻
PASO 3 // STEP 3
🌻🌻🌻🌻🌻🌻🌻🌻🌻
Luego con el marcador punta fina vamos a delinear los principales rasgos de mi personaje, nada muy pronunciado, debe ser sutil porque estamos trabajando con siluetas.
Then with the fine tip marker we are going to outline the main features of my character, nothing too pronounced, it must be subtle because we are working with silhouettes.
 PASO 4 // STEP 4
🌻🌻🌻🌻🌻🌻🌻🌻🌻
PASO 4 // STEP 4
🌻🌻🌻🌻🌻🌻🌻🌻🌻
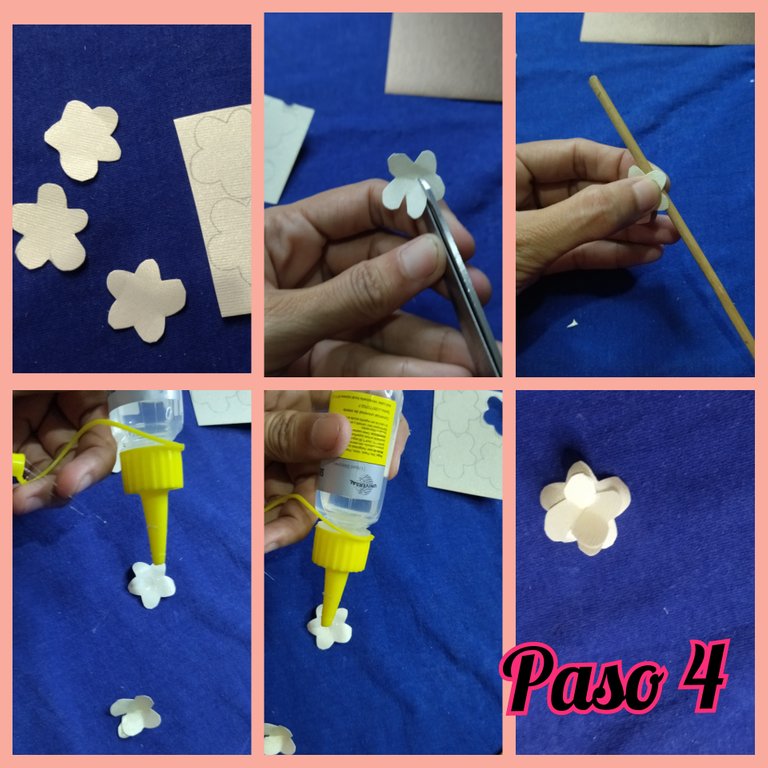
En la cartulina color crema dibujamos unas flores bien pequeñas, luego las recortamos y picamos uno de los pétalos para pegarlo con el silicón esto para darle dimensión a la flor.
On the cream-colored cardboard we draw some small flowers, then we cut them out and cut one of the petals to glue it with the silicone to give dimension to the flower.
Cada flor lleva dos piezas una que se coloca encima de la otra, pero antes de hacerlo con ayuda de un palillo de altura tomamos cada pétalo y lo pasamos por el palillo para doblar los pétalos y darle forma.
Each flower has two pieces, one to be placed on top of the other, but before doing it with the help of a toothpick we take each petal and pass it through the toothpick to bend the petals and give it shape.
 PASO 5 // STEP 5
🌻🌻🌻🌻🌻🌻🌻🌻🌻
PASO 5 // STEP 5
🌻🌻🌻🌻🌻🌻🌻🌻🌻
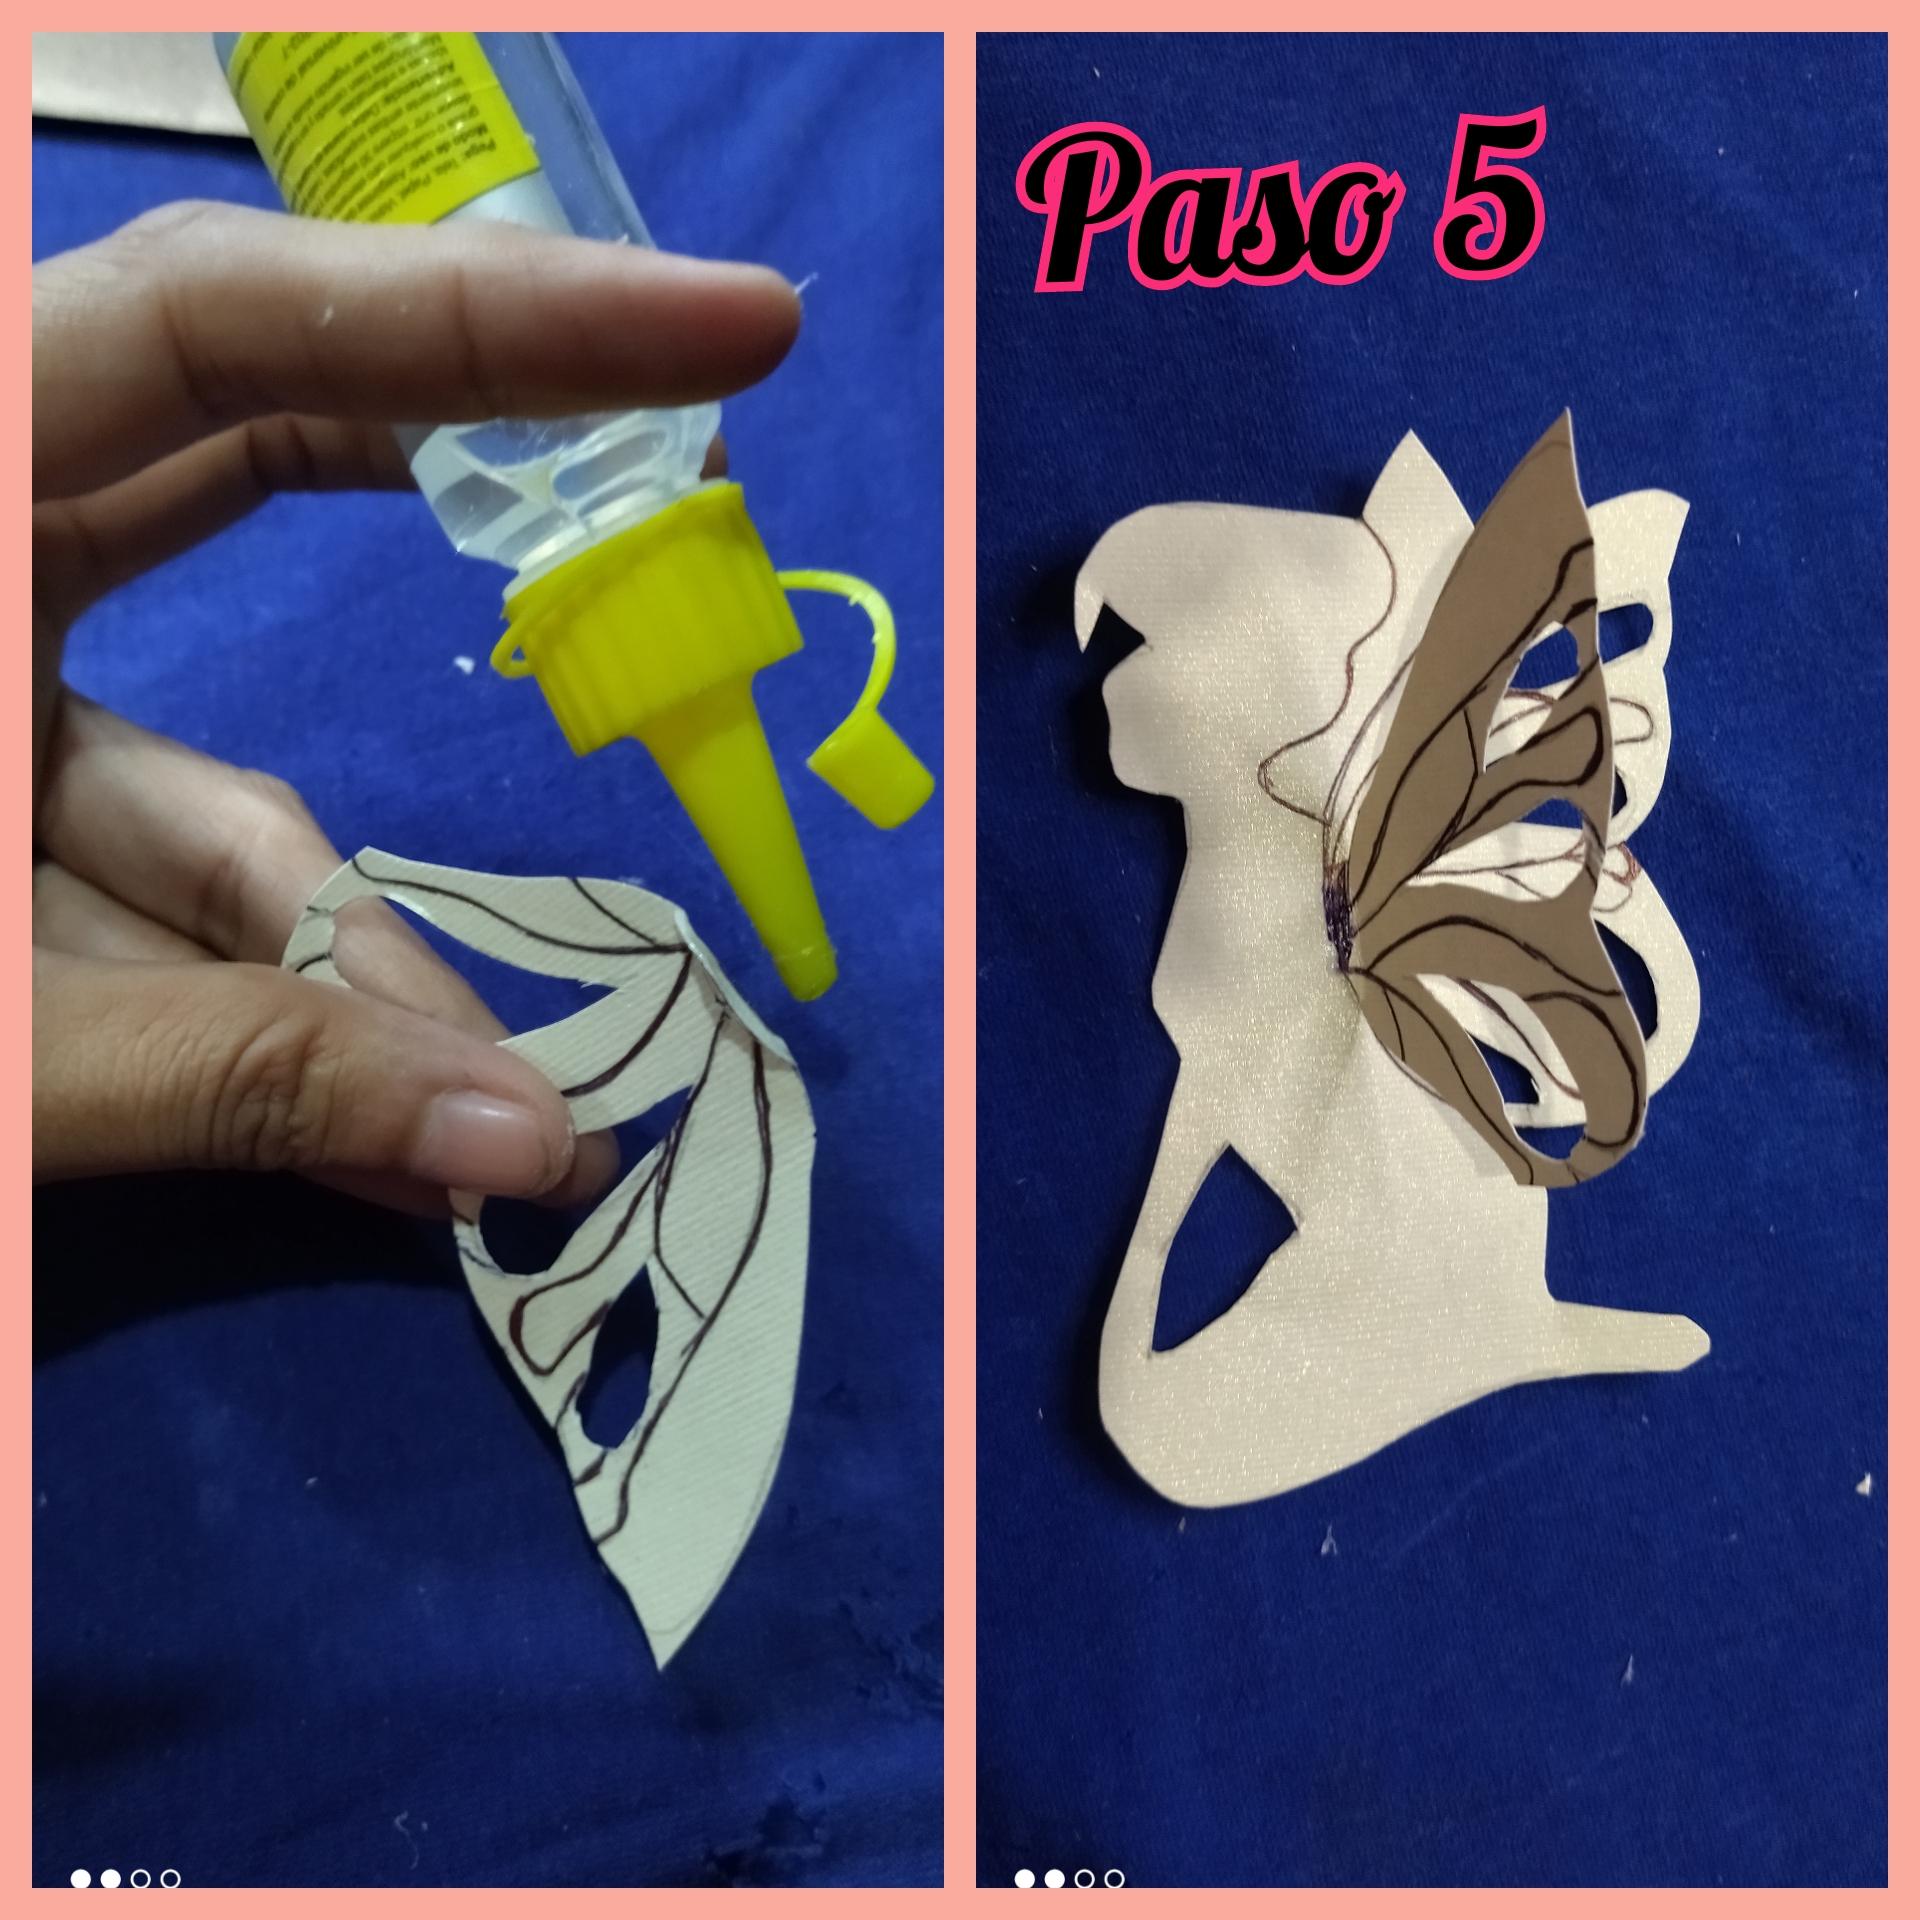
Adicional a la figura del hada yo saque una ala extra a la cual le saque los bordes y delineamos con el marcador, cuando ya está lista le ponemos un poco de silicón y pegamos.
In addition to the fairy figure I took out an extra wing to which I removed the edges and outlined with the marker, when it is ready we put a little silicone and glue.
 PASO 6 // STEP 6
🌻🌻🌻🌻🌻🌻🌻🌻🌻
PASO 6 // STEP 6
🌻🌻🌻🌻🌻🌻🌻🌻🌻
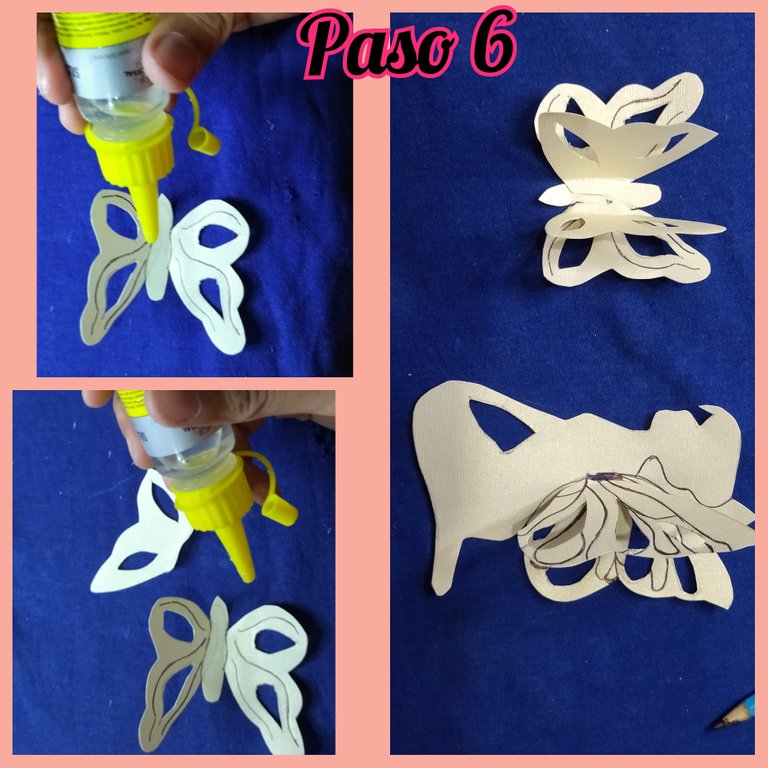
En este paso vamos hacer exactamente lo mismo que con nuestra hada, pero lo haremos en la mariposa que había sacado previamente.
In this step we will do exactly the same as with our fairy, but we will do it on the butterfly that we had previously removed.
 PASO 7 // STEP 7
🌻🌻🌻🌻🌻🌻🌻🌻🌻
PASO 7 // STEP 7
🌻🌻🌻🌻🌻🌻🌻🌻🌻
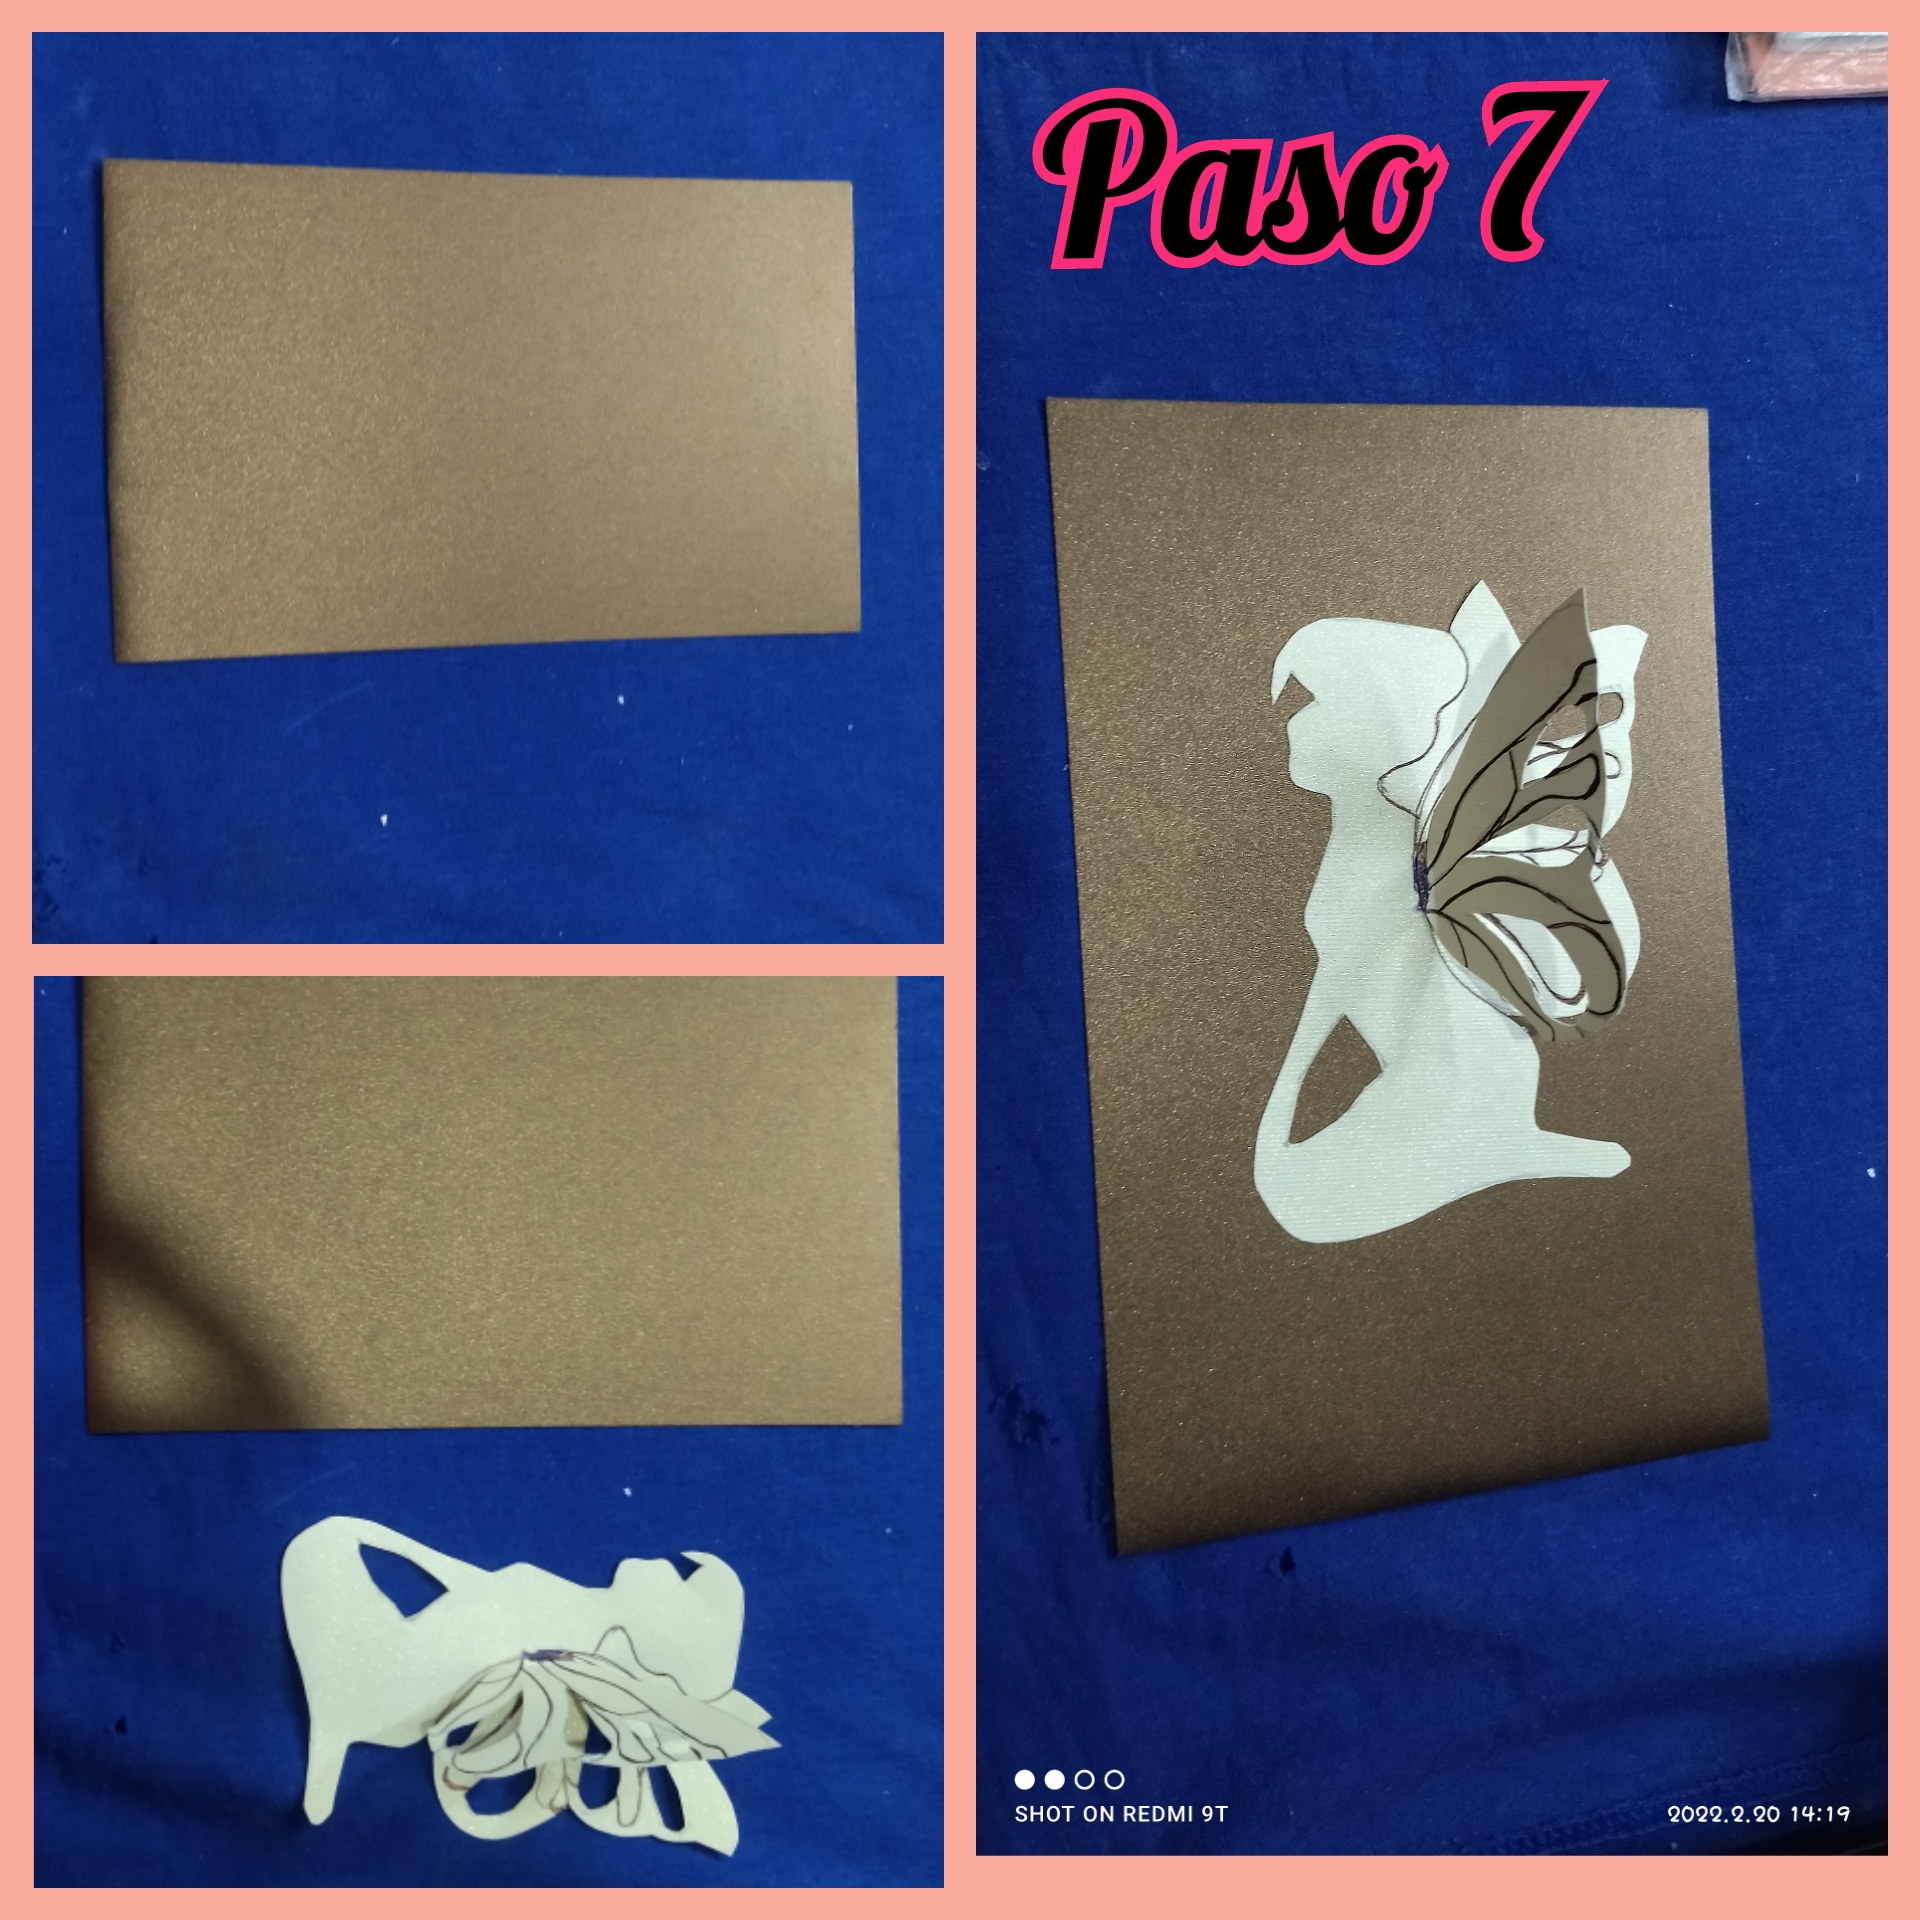
Cuando ya tenemos lista le colocamos un poco de silicón frío por la parte trasera y pegamos en el centro de la cartulina marrón.
When we have it ready, we put some cold silicone on the back and glue it in the center of the brown cardboard.
 PASO 8 // STEP 8
🌻🌻🌻🌻🌻🌻🌻🌻🌻
PASO 8 // STEP 8
🌻🌻🌻🌻🌻🌻🌻🌻🌻
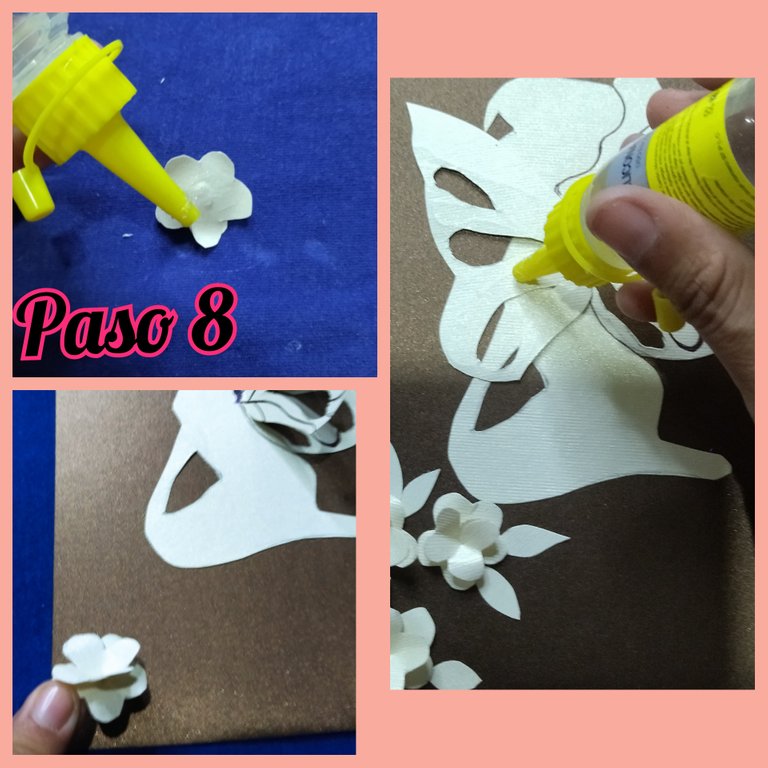
En este paso comenzamos con la decoración por lo que le pusimos las flores en un extremo para que se viera mejor le coloque unas hojitas, quedó realmente lindo.
In this step we started with the decoration so we put the flowers at one end to make it look better I put some leaves, it was really nice.
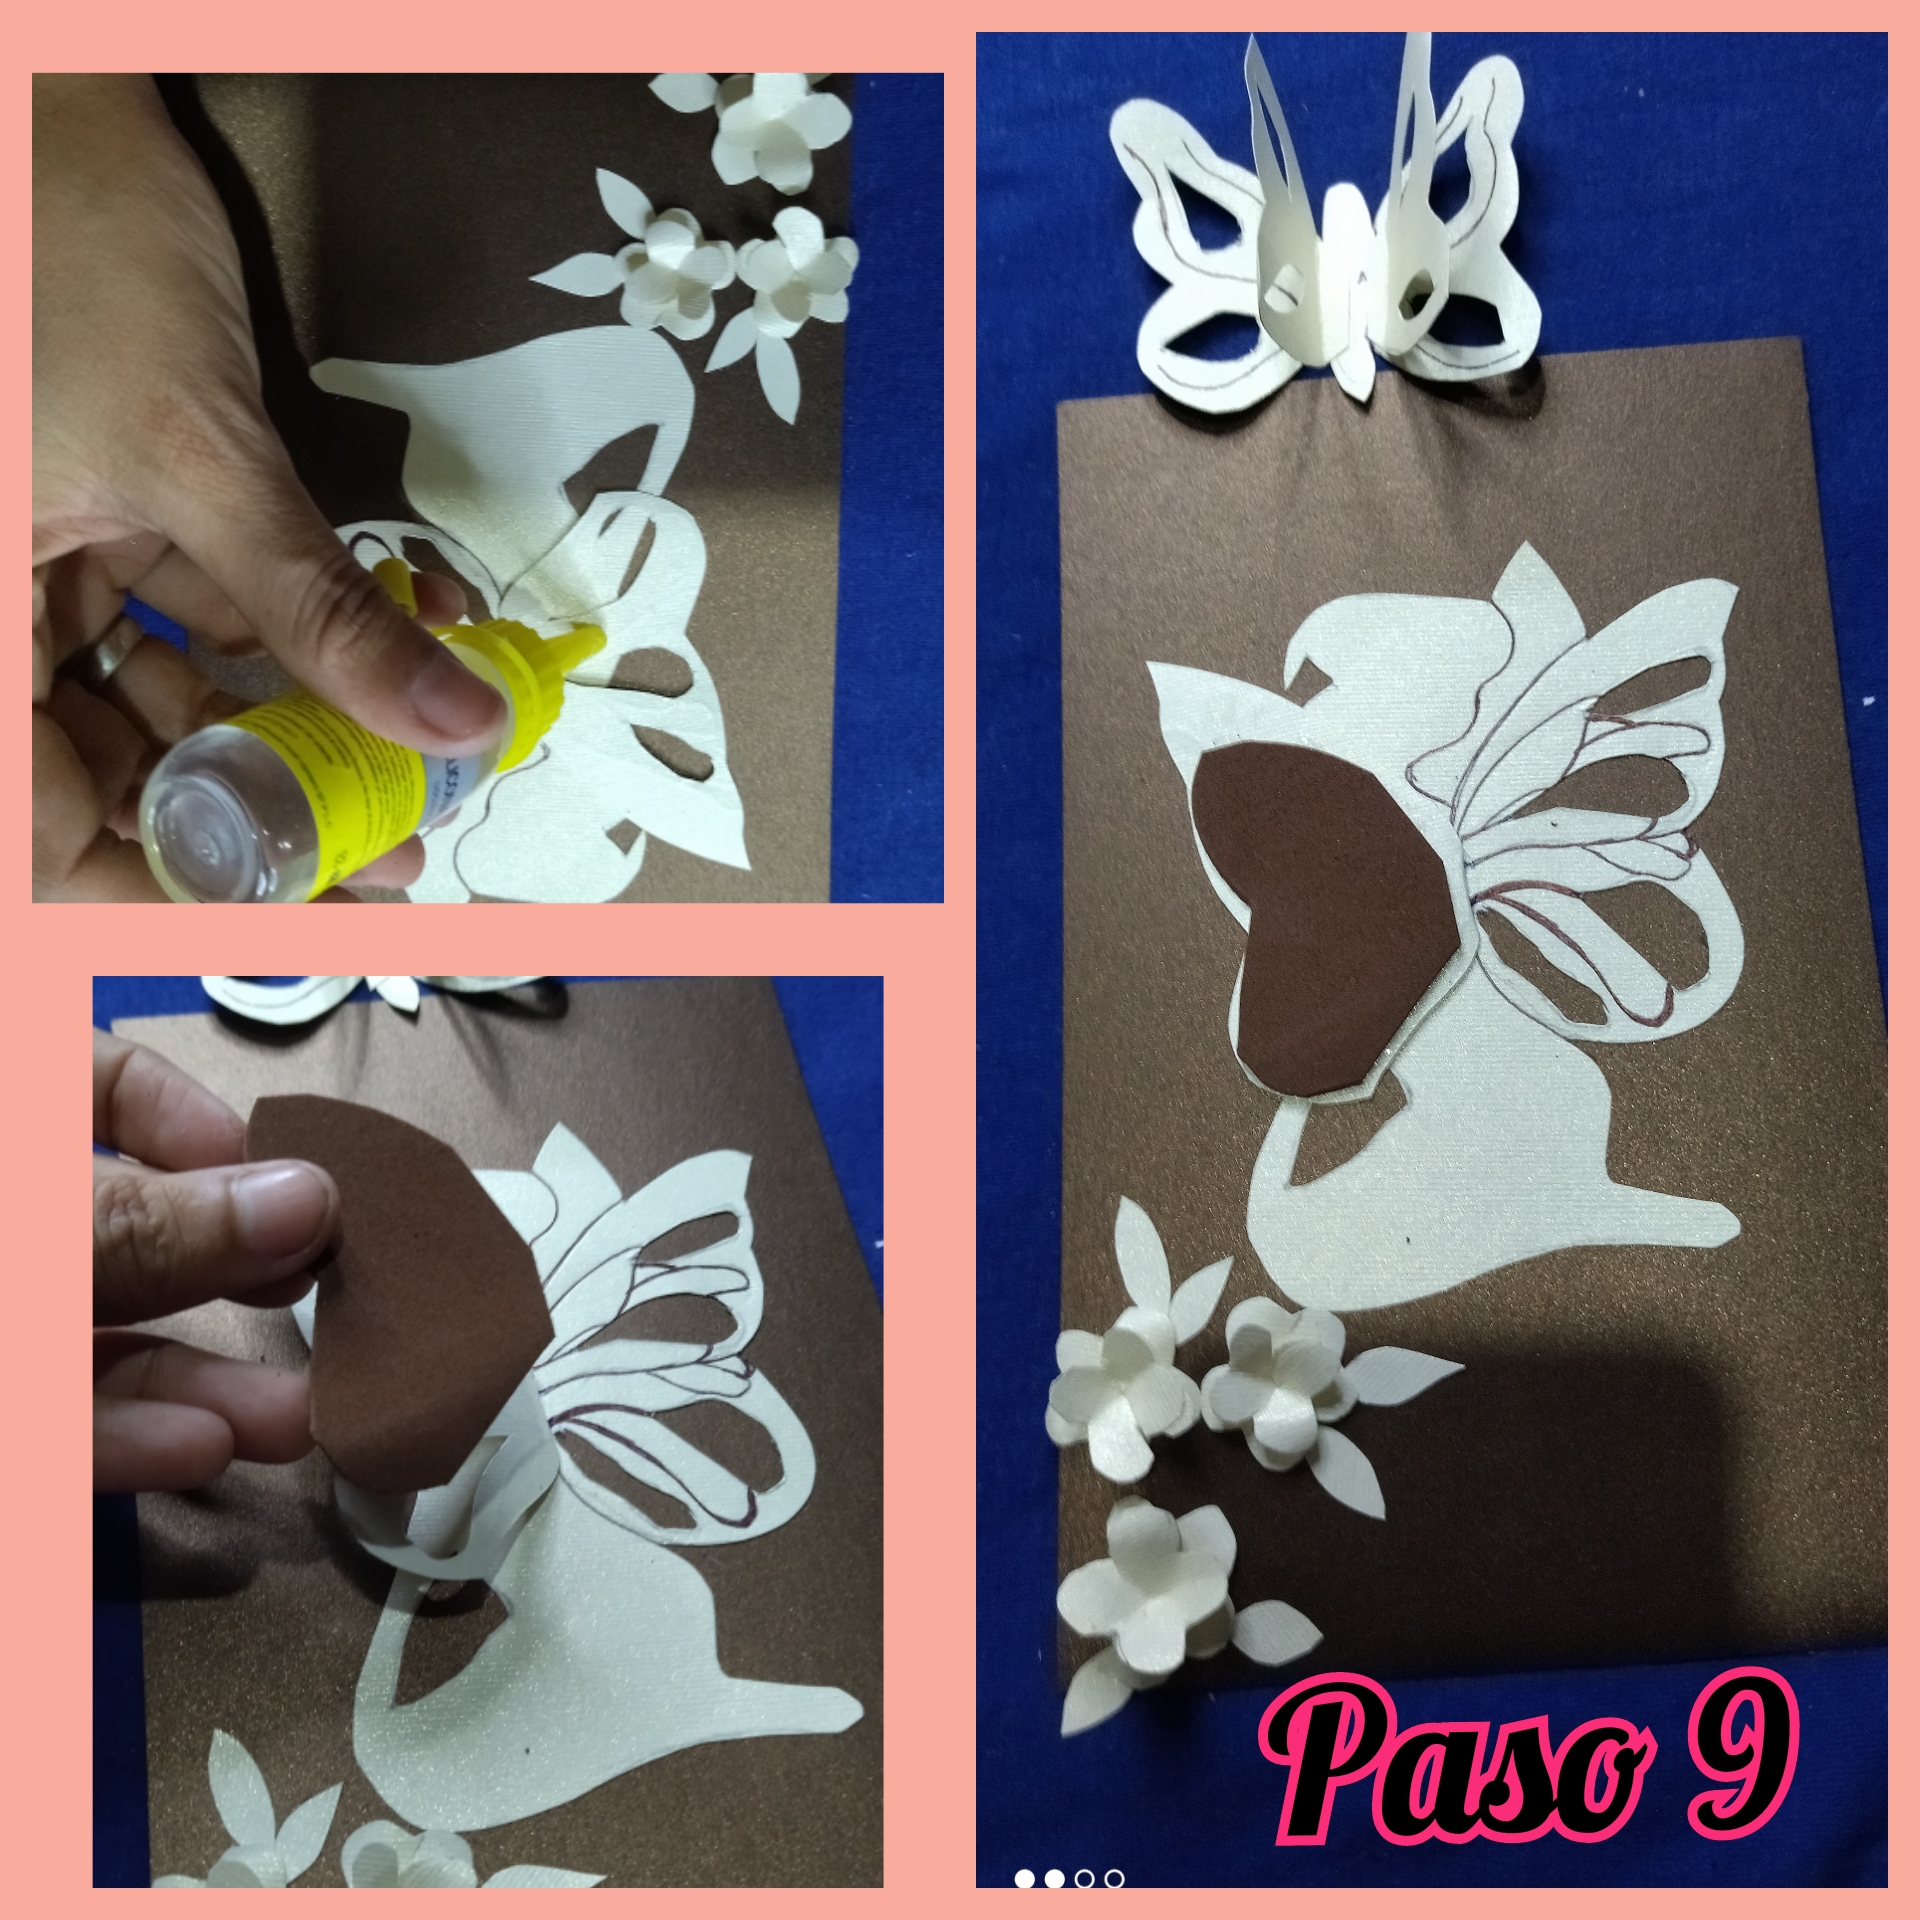
 PASO 9 // STEP 9
🌻🌻🌻🌻🌻🌻🌻🌻🌻
PASO 9 // STEP 9
🌻🌻🌻🌻🌻🌻🌻🌻🌻
Luego picamos trocitos del foami escarchado y lo pegamos en los agujeros que sacamos de la ala extra que hicimos previamente.
Then we cut small pieces of the frosted foami and glue them into the holes we took out of the extra wing we made previously.
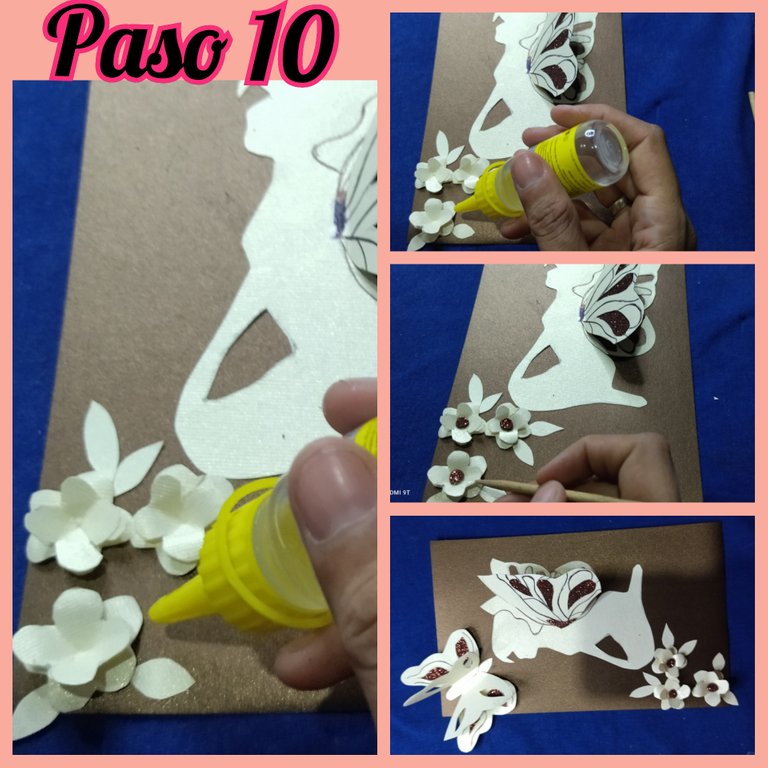
 PASO 10 //STEP 10
🌻🌻🌻🌻🌻🌻🌻🌻🌻
PASO 10 //STEP 10
🌻🌻🌻🌻🌻🌻🌻🌻🌻
Ya le estamos dando los toques finales así que recorte un círculo pequeño y lo coloque de centro de las flores, esto ayudara a darle más realce a las florecitas.
Now we are giving the final touches so I cut out a small circle and placed it in the center of the flowers, this will help to highlight the little flowers.
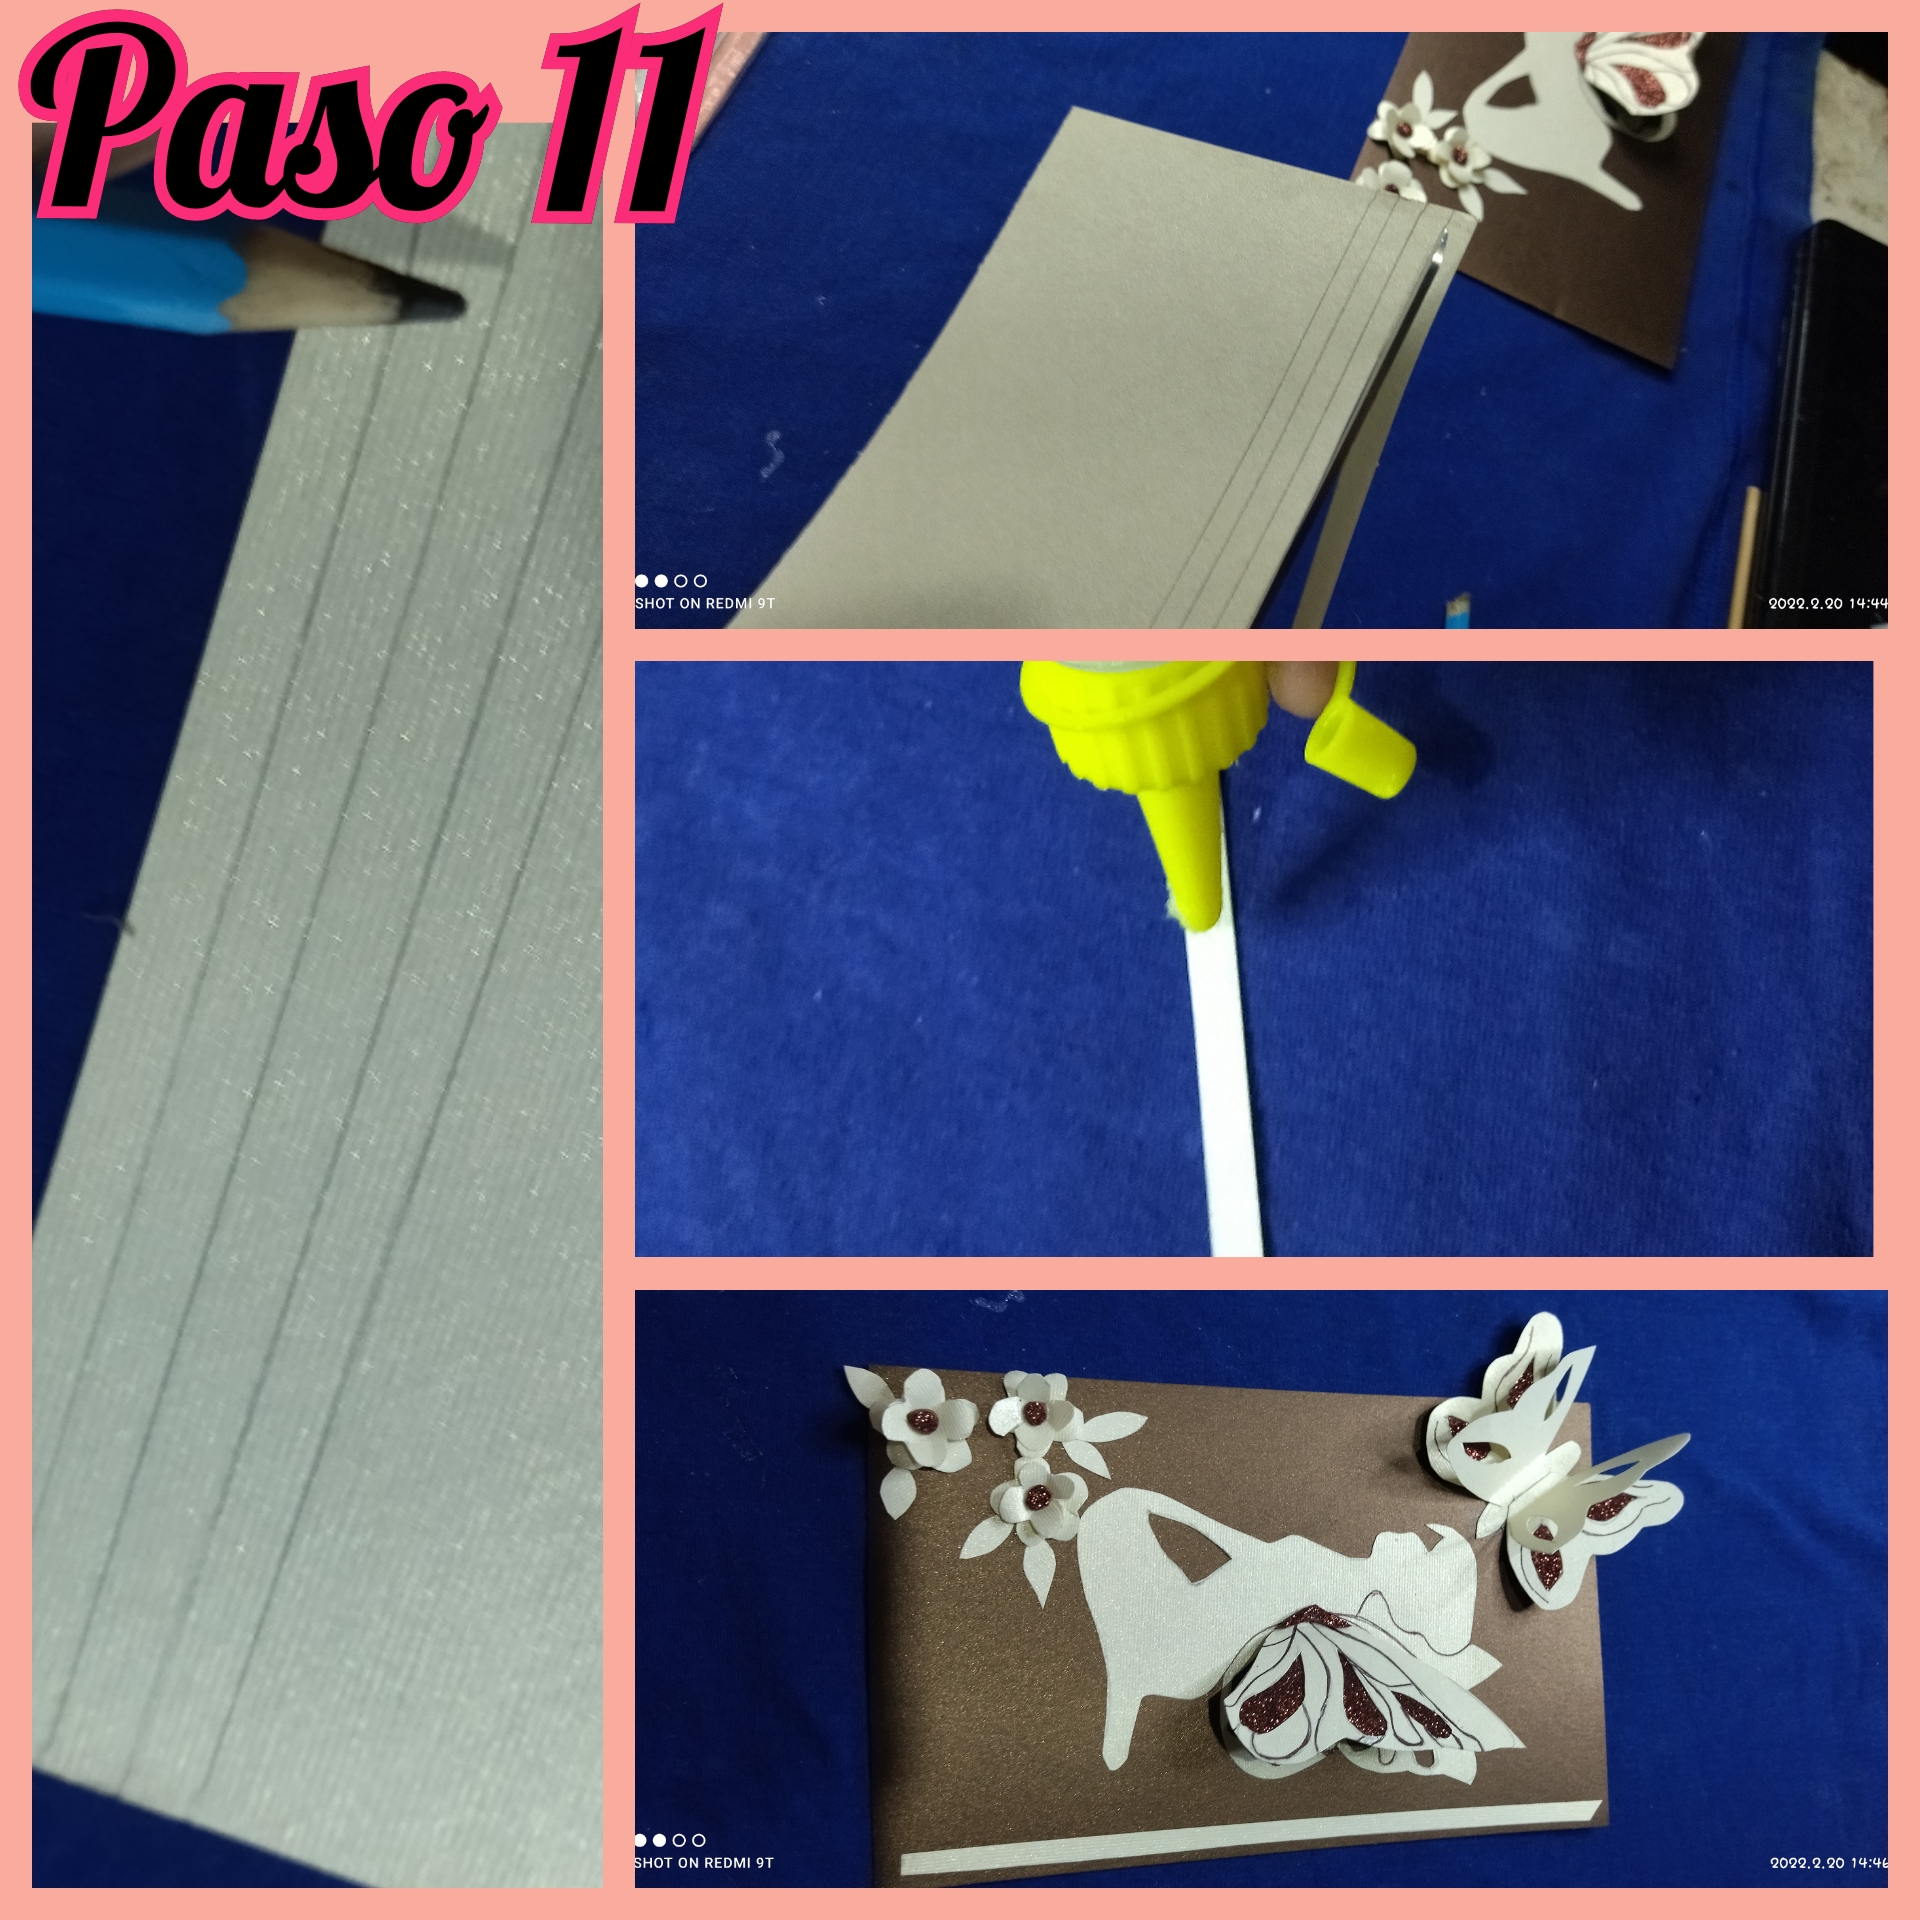
 PASO 11 // STEP 11
🌻🌻🌻🌻🌻🌻🌻🌻🌻
PASO 11 // STEP 11
🌻🌻🌻🌻🌻🌻🌻🌻🌻
Ahora marcamos tiras en la cartulina color crema del largo de nuestro cuadro, recortamos y pegamos por el borde, también otra de las tiras las enrollamos ayudándonos con el palillo de altura y cuando esté lista las pegamos debajo de la mariposa, de esta manera damos por concluido el trabajo, un detalle bien lindo que podemos regalar.
Now we mark strips on the cream colored cardboard the length of our picture, cut and glue along the edge, also another of the strips we roll them helping us with the height stick and when it is ready we glue them under the butterfly, in this way we conclude the work, a nice detail that we can give as a gift.
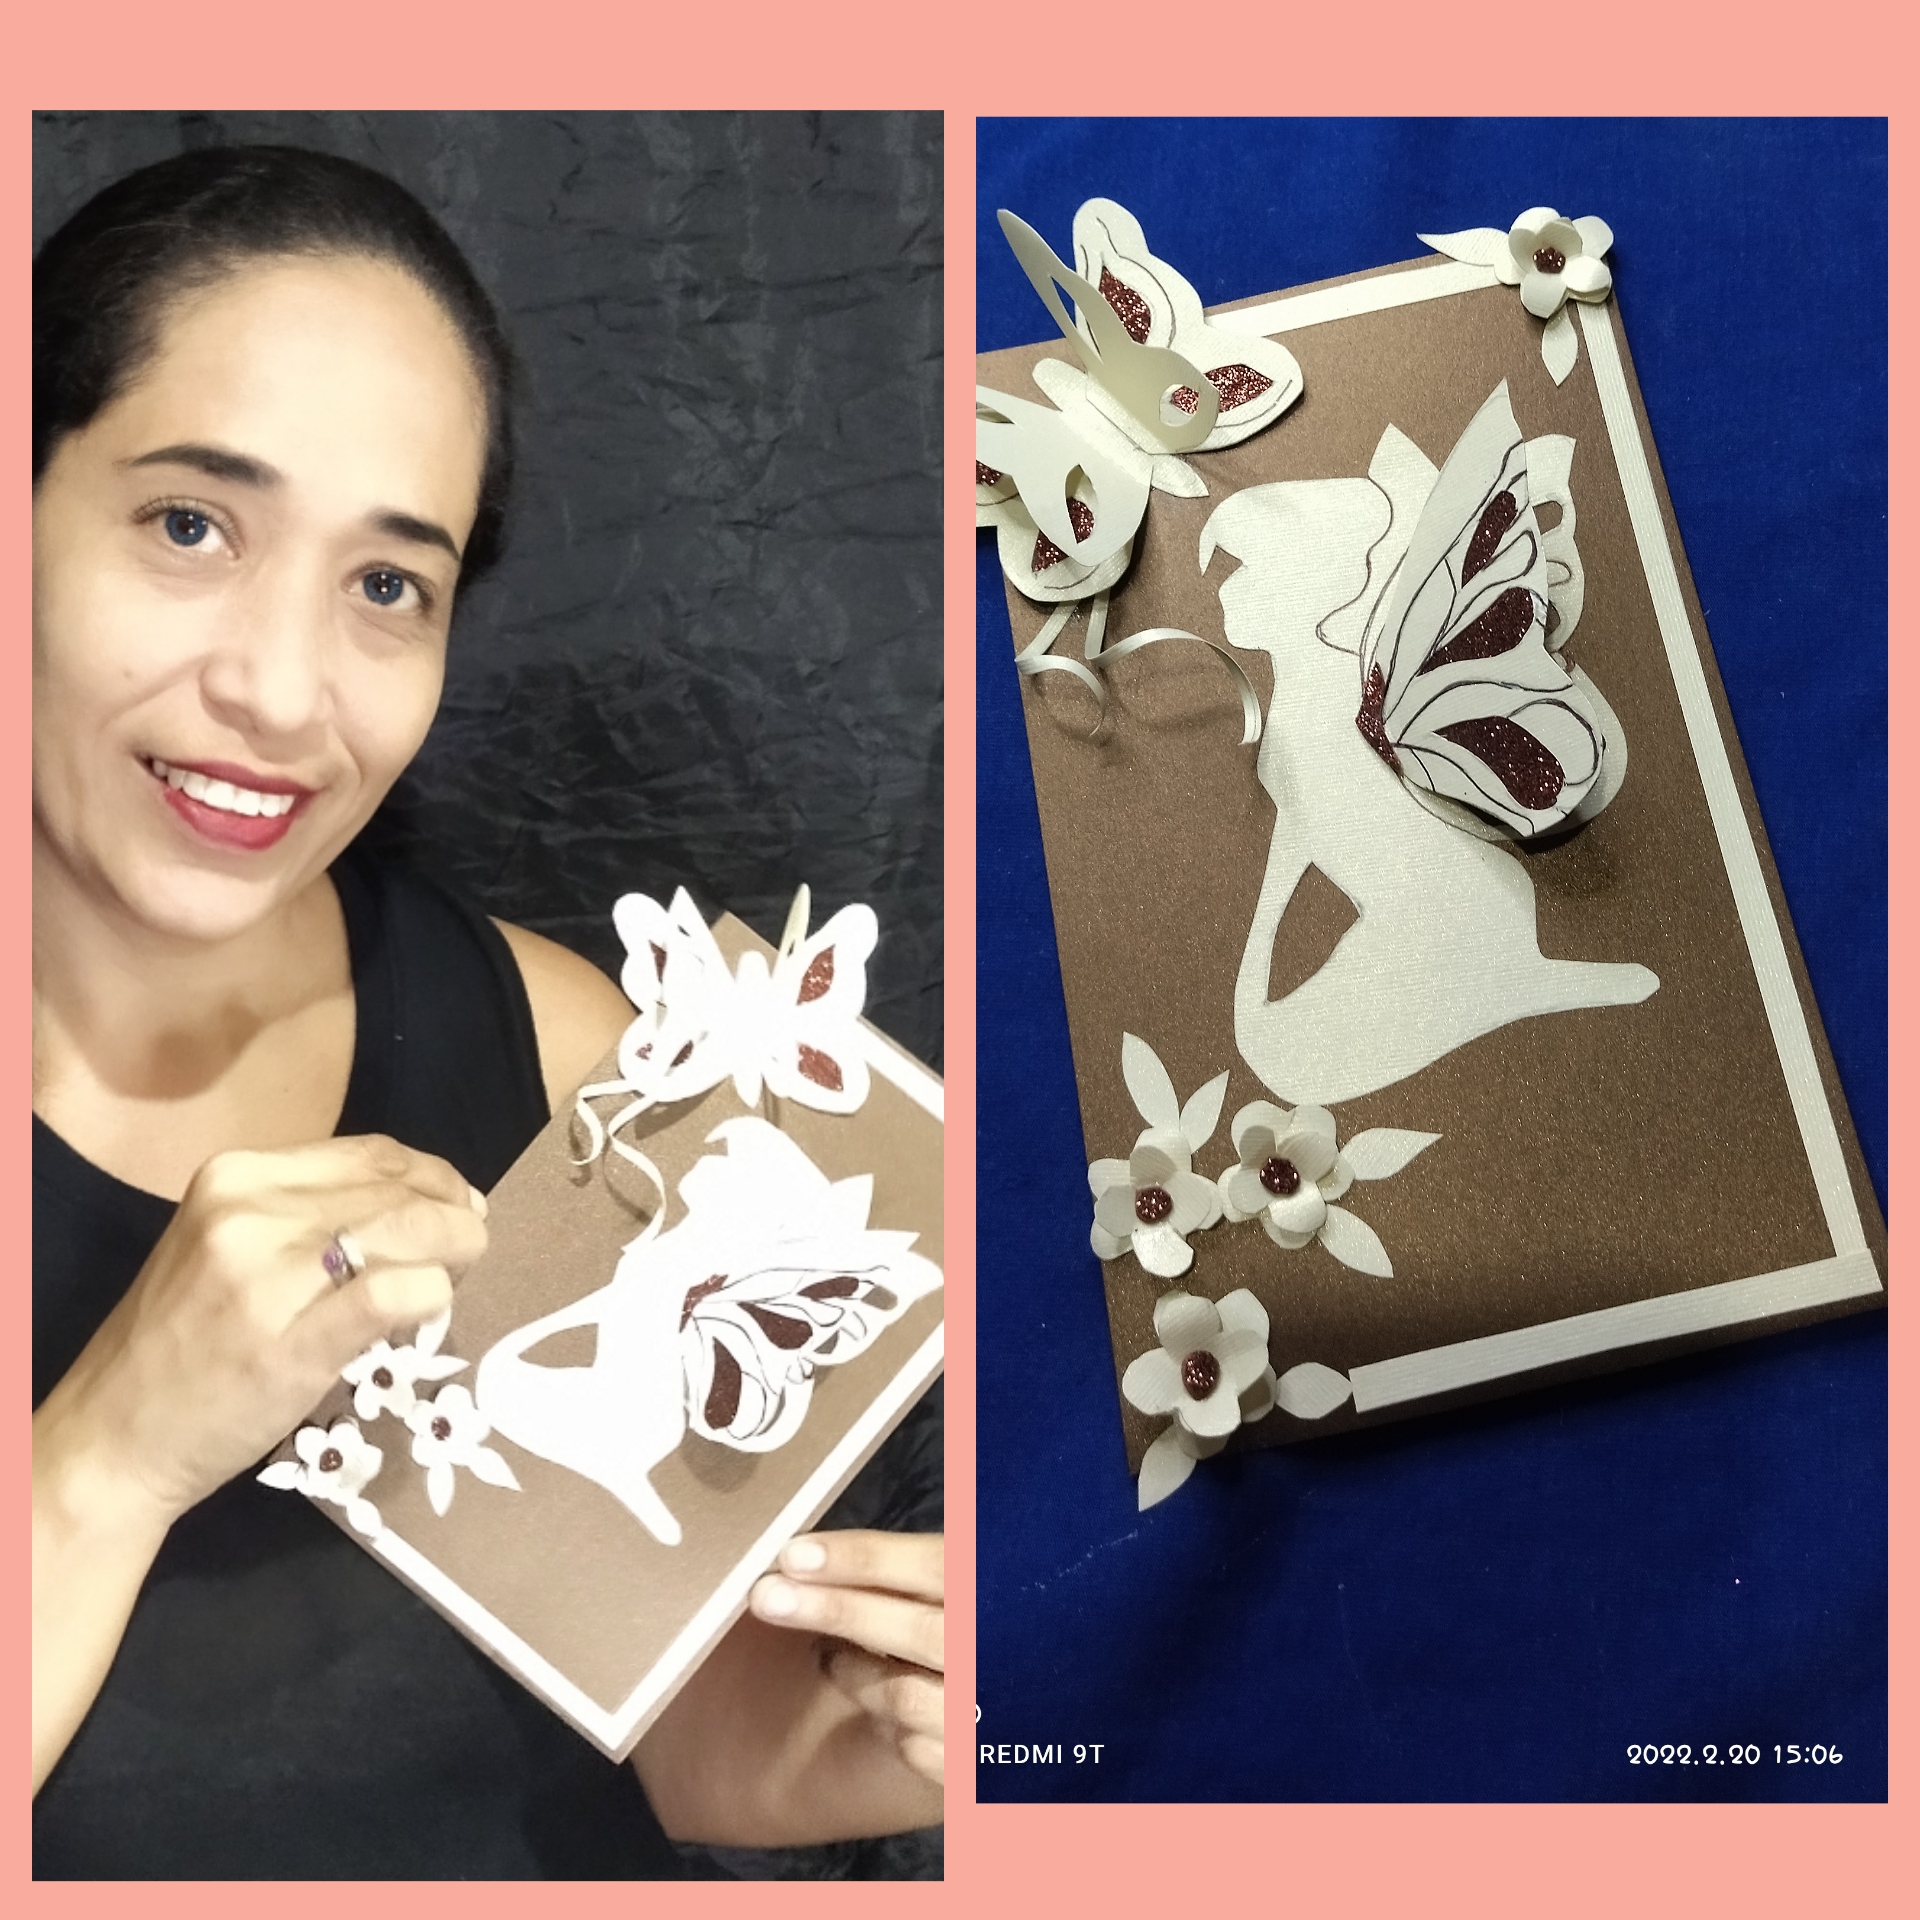
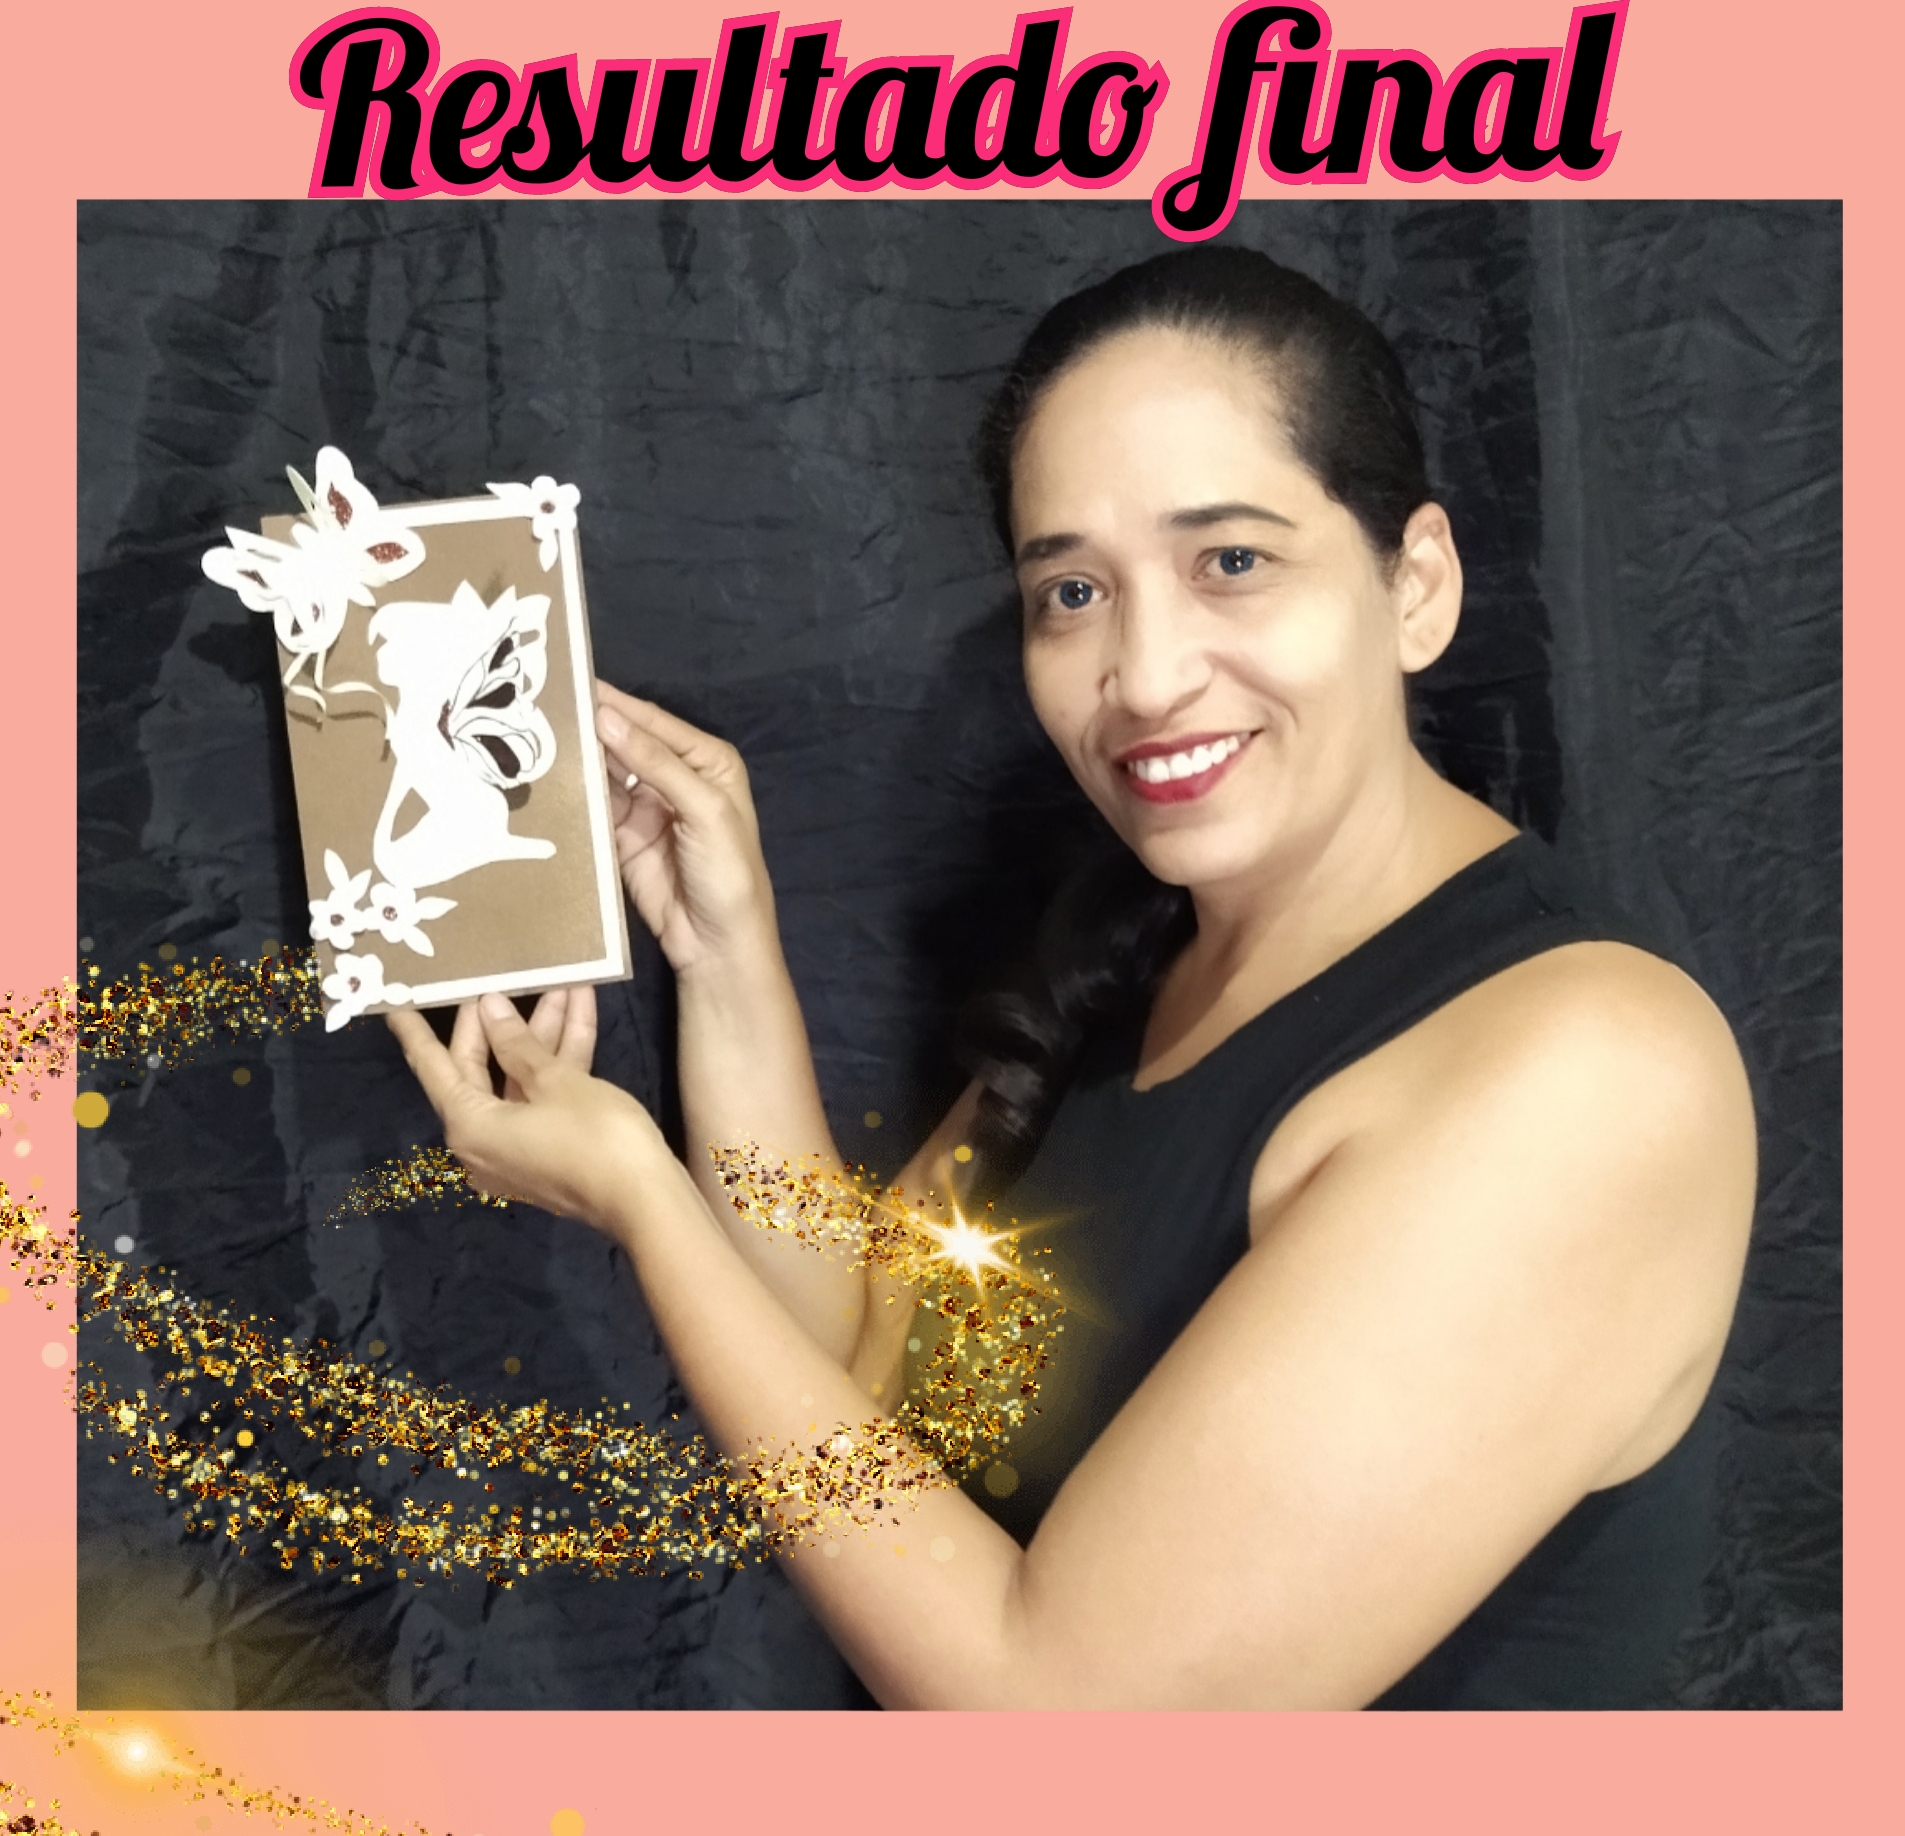
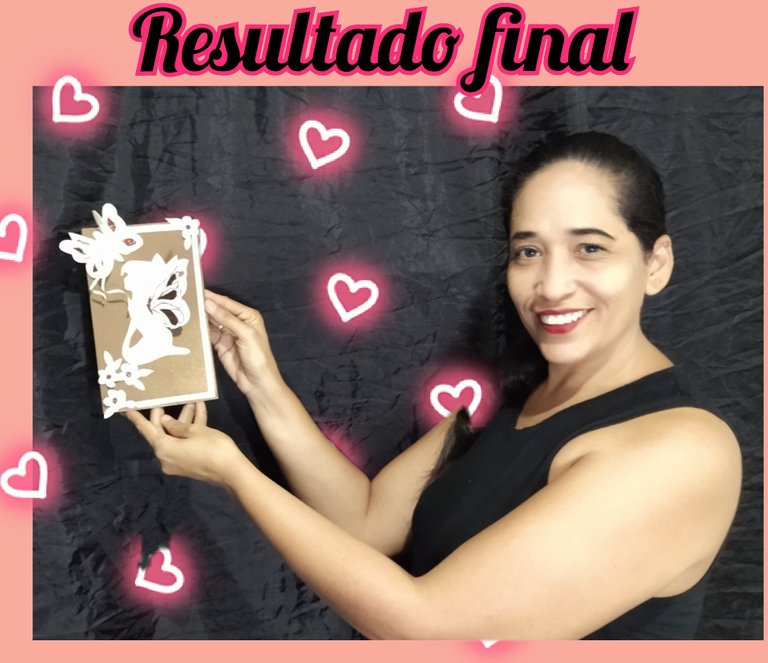
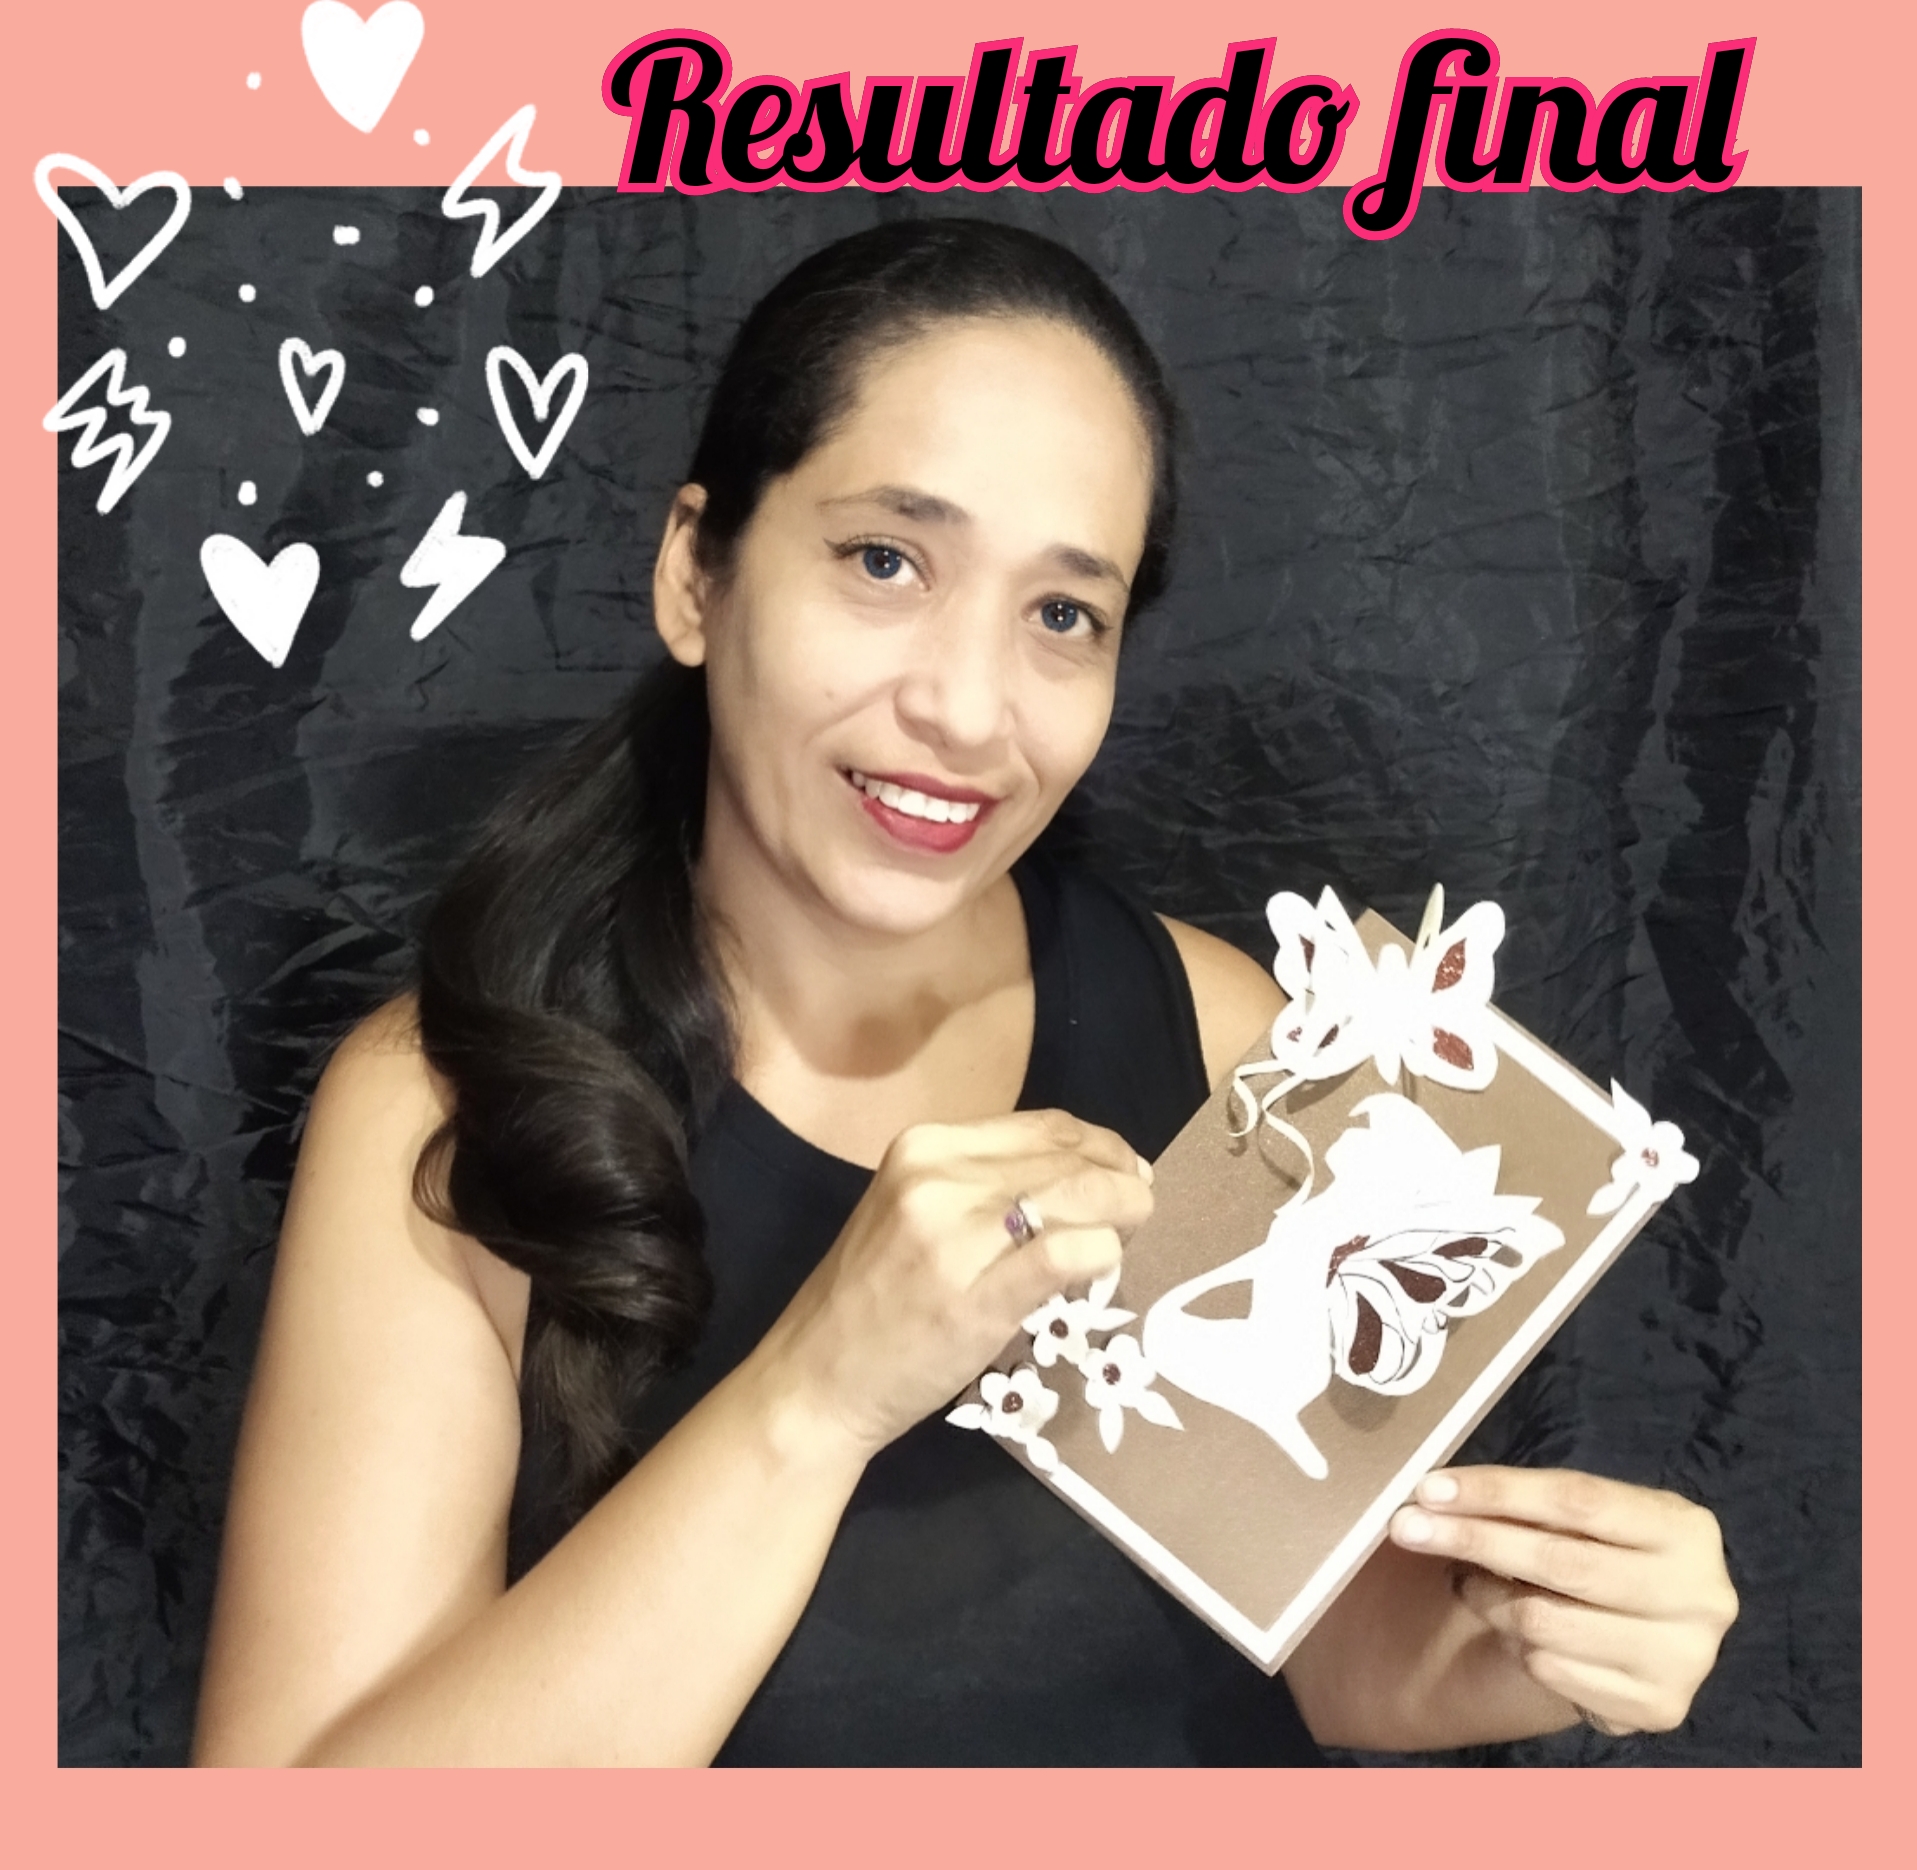
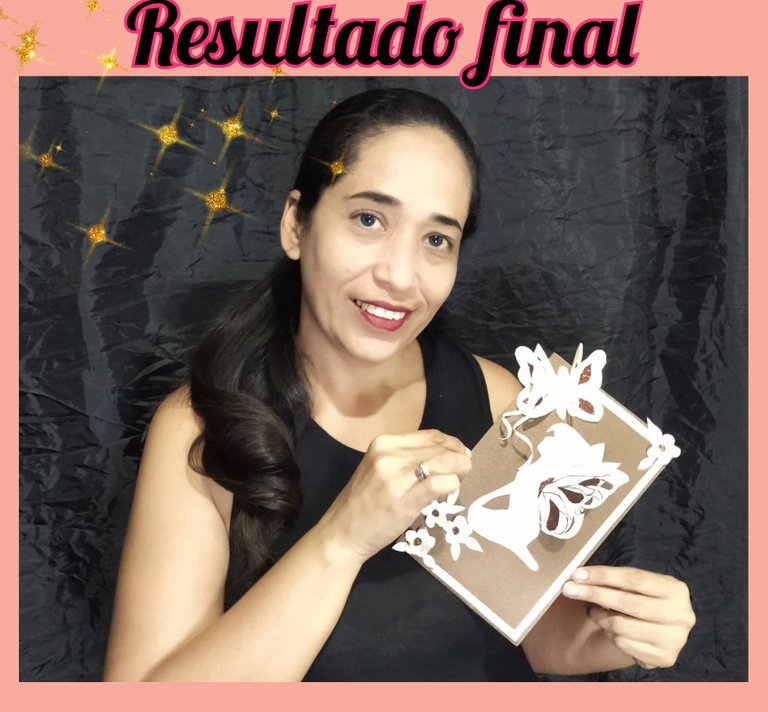
 RESULTADO//RESULT
🌻🌻🌻🌻🌻🌻🌻🌻🌻
RESULTADO//RESULT
🌻🌻🌻🌻🌻🌻🌻🌻🌻
 🌻🌻🌻🌻🌻🌻🌻🌻🌻
 🌻🌻🌻🌻🌻🌻🌻🌻🌻
 🌻🌻🌻🌻🌻🌻🌻🌻🌻
 🌻🌻🌻🌻🌻🌻🌻🌻🌻
Bueno mis amores esto ha Sido todo por el día de hoy espero que les haya gustado mi propuesta y que se haya entendido a la perfección todas las indicaciones, pero por sobre todas las cosas espero que las pongan en práctica, verán que sirve para relajarnos y salir de la rutina diaria.
Well my loves this has been all for today I hope you have liked my proposal and that you have understood perfectly all the indications, but above all I hope you put them into practice, you will see that it serves to relax and get out of the daily routine.
📱 Para este post utilice el traductor Deepl y el programa polish para la edición de las fotos.
📱 For this post I used Deepl translator and polish for editing the photos.
📱 Todas las fotos fueron tomadas con mi teléfono Xiaomi readmi 9T y son de mi propiedad.
📱 All photos were taken with my Xiaomi readmi 9T phone and are my property.