 🌹💖🌹💖🌹💖🌹💖🌹💖🌹
Hola gente de hive, especialmente a mis bellas abejitas creativas de esta hermosa comunidad que nos da la oportunidad de expresarnos atraves de nuestro arte.
Hello hive people, especially to my beautiful creative bees of this beautiful community that gives us the opportunity to express ourselves through our art.
Para el día de hoy les traigo una interesante y creativa idea que podamos desarrollar en casa ayudándonos a dejar fluir toda esa creatividad que estoy segura tenemos por dentro, aunque esté proyecto no solo se trata de realizar un trabajo si no que también estamos dándole uso a ese material de provecho que si lo desechamos solo será basura pero que nosotros vamos a ser capaces de darle vida.
For today I bring you an interesting and creative idea that we can develop at home helping us to let flow all that creativity that I'm sure we have inside, although this project is not only about doing a job but we are also giving use to that useful material that if we discard it will only be garbage but we will be able to give life to it.
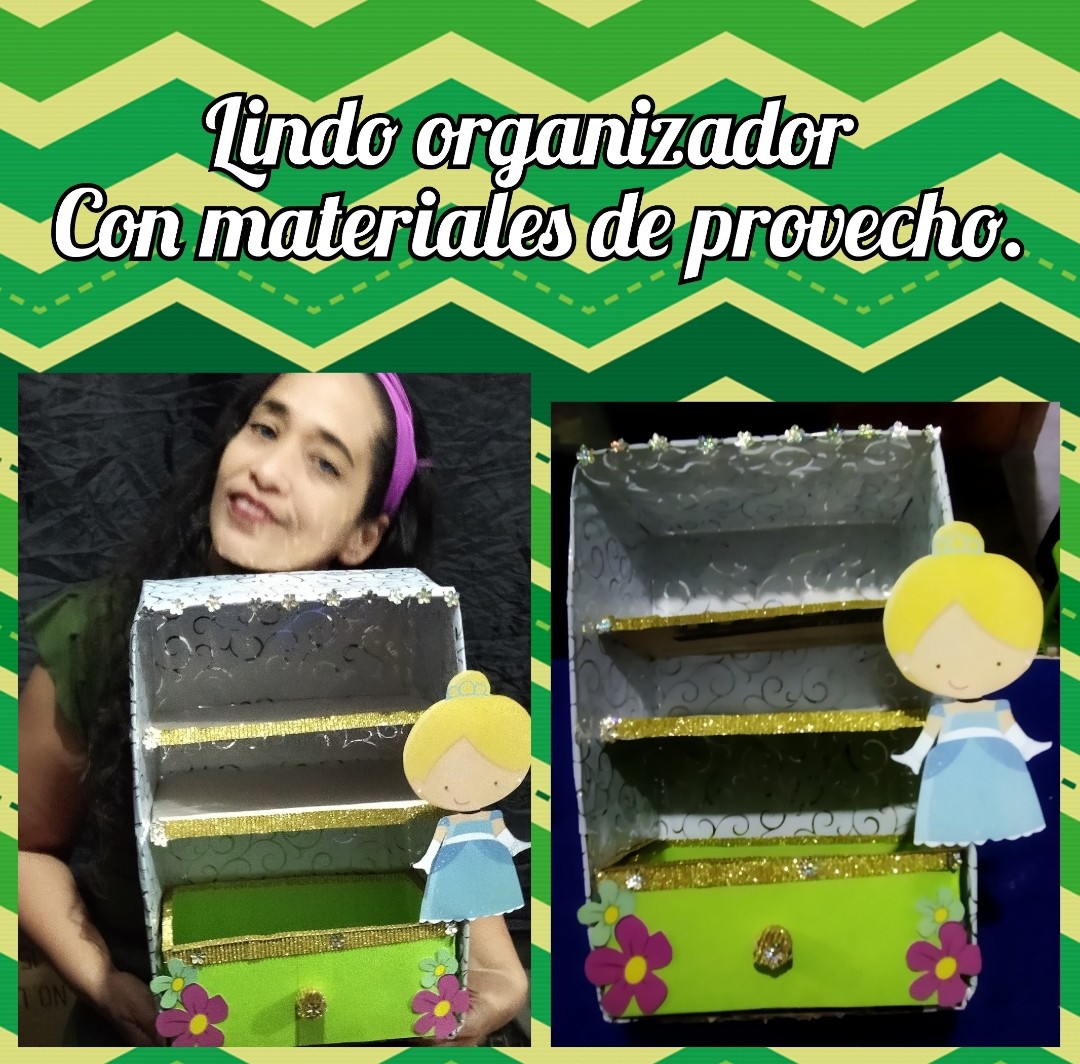
Vamos a realizar en esta oportunidad un lindo organizador con temática de la Cenicienta que puede servir para las princesas de la casa, para que organicen sus colitas, o sus colores, tempera, etc en fin para que mantengan el orden en sus pertenencias, así que mis amores sin más, manos a la obra.
This time we are going to make a cute Cinderella-themed organizer that can be used for the princesses of the house, to organize their pigtails, or their colors, tempera, etc. in short, to keep order in their belongings, so my loves without further ado, let's get to work.
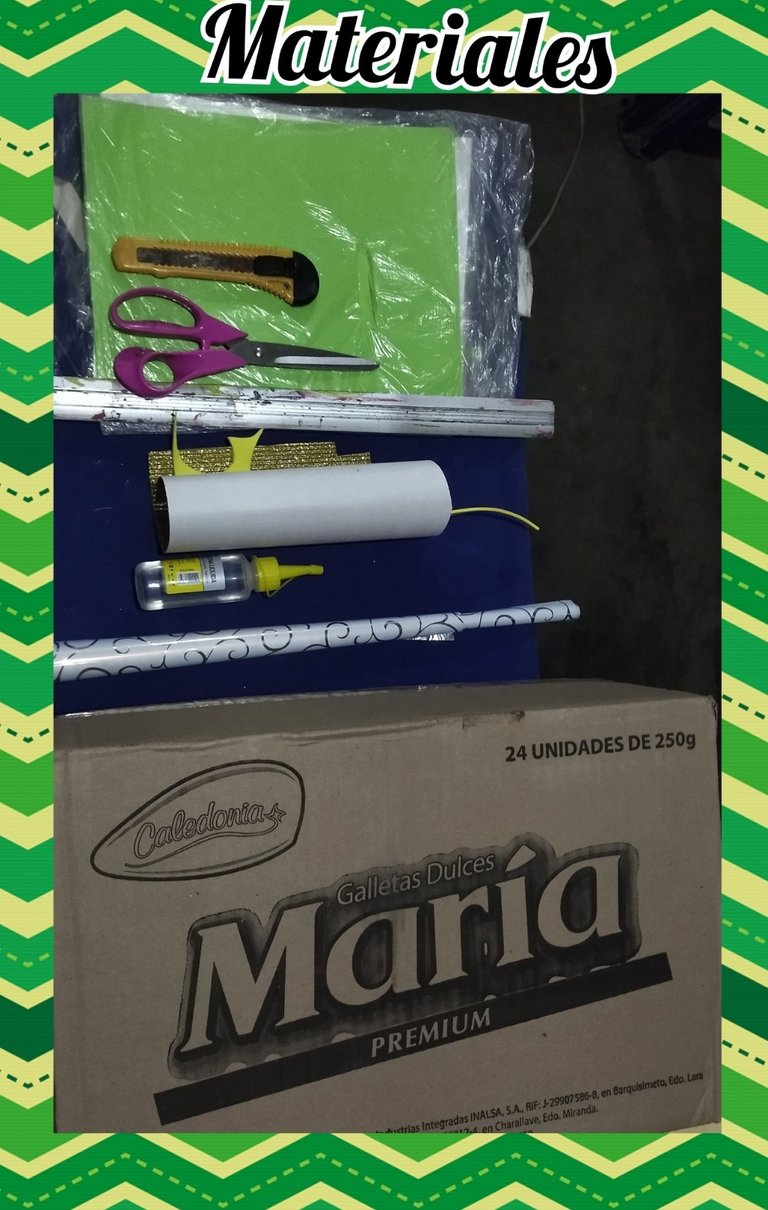
MATERIALES//MATERIALS.
🌹💖🌹💖🌹💖🌹💖🌹💖🌹
🗂️ Una caja de cartón.//A cardboard box.
🗂️ Silicón frío.// Cold silicone.
🗂️ Cartulina de color verde y blanco.//Green and white cardboard.
🗂️ Cartulina escarchada dorada.// Gold frosted cardboard.
🗂️ Papel de regalo metalizado.// Metallized wrapping paper.
🗂️ Tijeras.//Scissors.
🗂️cúter.//cutter.
🗂️ Regla.//Rule.
🗂️ Figura de la Cenicienta mini, y flores impresas en papel glasé.//Mini Cinderella figure, and flowers printed on glazed paper.
🗂️ Aplicaciónes en forma de flores.//Flower-shaped applications.
🌹💖🌹💖🌹💖🌹💖🌹💖🌹
 🌹💖🌹💖🌹💖🌹💖🌹💖🌹
PASO A PASO // STEP BY STEP
🌹💖🌹💖🌹💖🌹💖🌹💖🌹
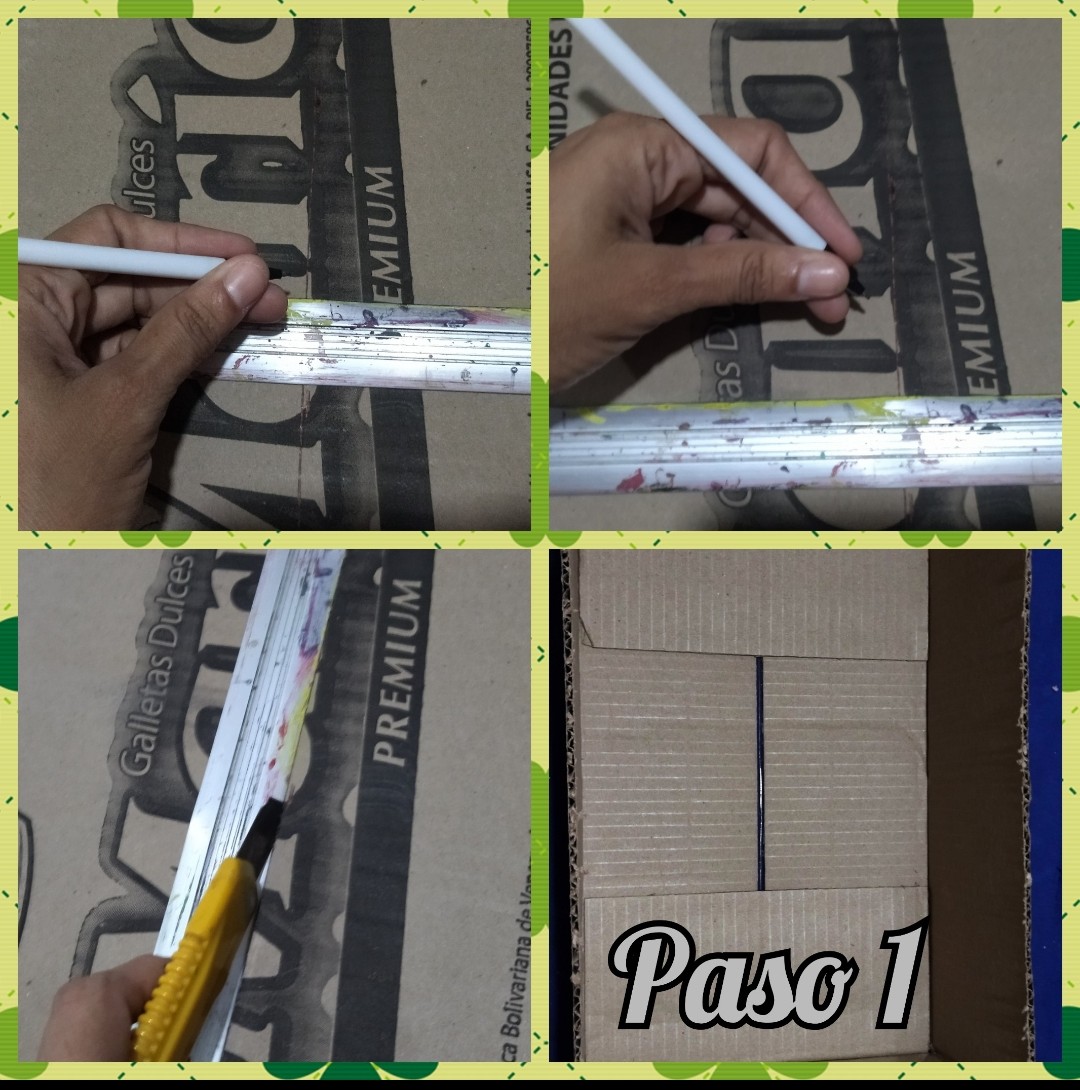
PASO 1 // STEP 1
🌹💖🌹💖🌹💖🌹💖🌹💖🌹
🌹💖🌹💖🌹💖🌹💖🌹💖🌹
PASO A PASO // STEP BY STEP
🌹💖🌹💖🌹💖🌹💖🌹💖🌹
PASO 1 // STEP 1
🌹💖🌹💖🌹💖🌹💖🌹💖🌹
Para comenzar vamos a recortar la caja ya que la que conseguí era muy grande, entonces nos vamos ayudarnos con la regla y el bolígrafo para de esta manera marcar por dónde queremos cortar, yo marque unos 15 cm de ancho para hacer mi organizador, no lo quise hacer tan grande pero ustedes pueden hacerlo del tamaño que deseen.
To start we are going to cut the box because the one I got was too big, then we are going to help us with the ruler and the pen to mark where we want to cut, I marked about 15 cm wide to make my organizer, I did not want to make it so big but you can make it the size you want.
Una vez marcado tomamos la cuchilla y cortamos, luego con la tijera cortamos cualquier exceso que nos haya quedado al picar la caja con la cuchilla.
Once marked we take the blade and cut, then with the scissors we cut any excess that we have left when we chopped the box with the blade.
 🌹💖🌹💖🌹💖🌹💖🌹💖🌹
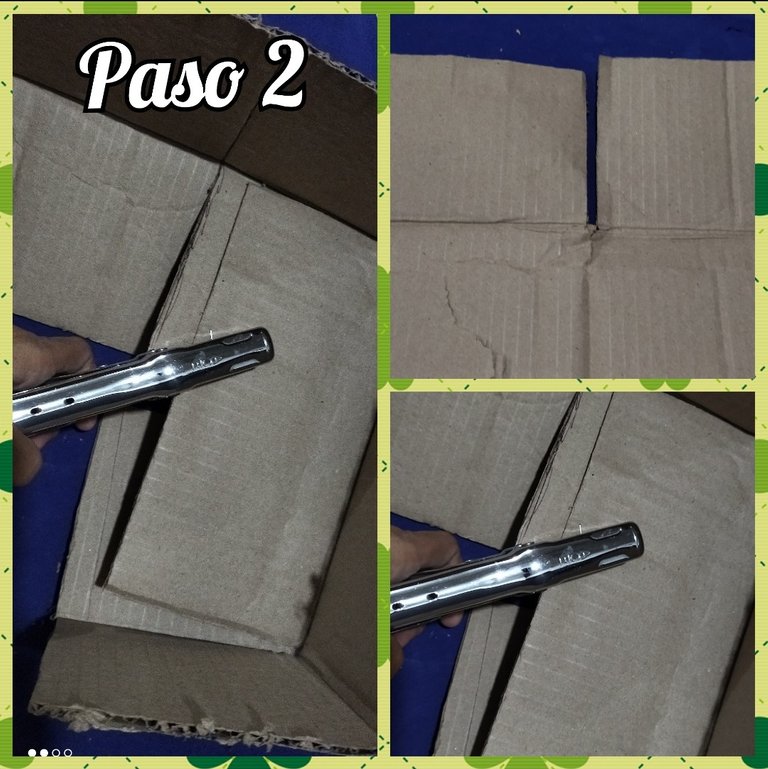
PASO 2 // STEP 2
🌹💖🌹💖🌹💖🌹💖🌹💖🌹
🌹💖🌹💖🌹💖🌹💖🌹💖🌹
PASO 2 // STEP 2
🌹💖🌹💖🌹💖🌹💖🌹💖🌹
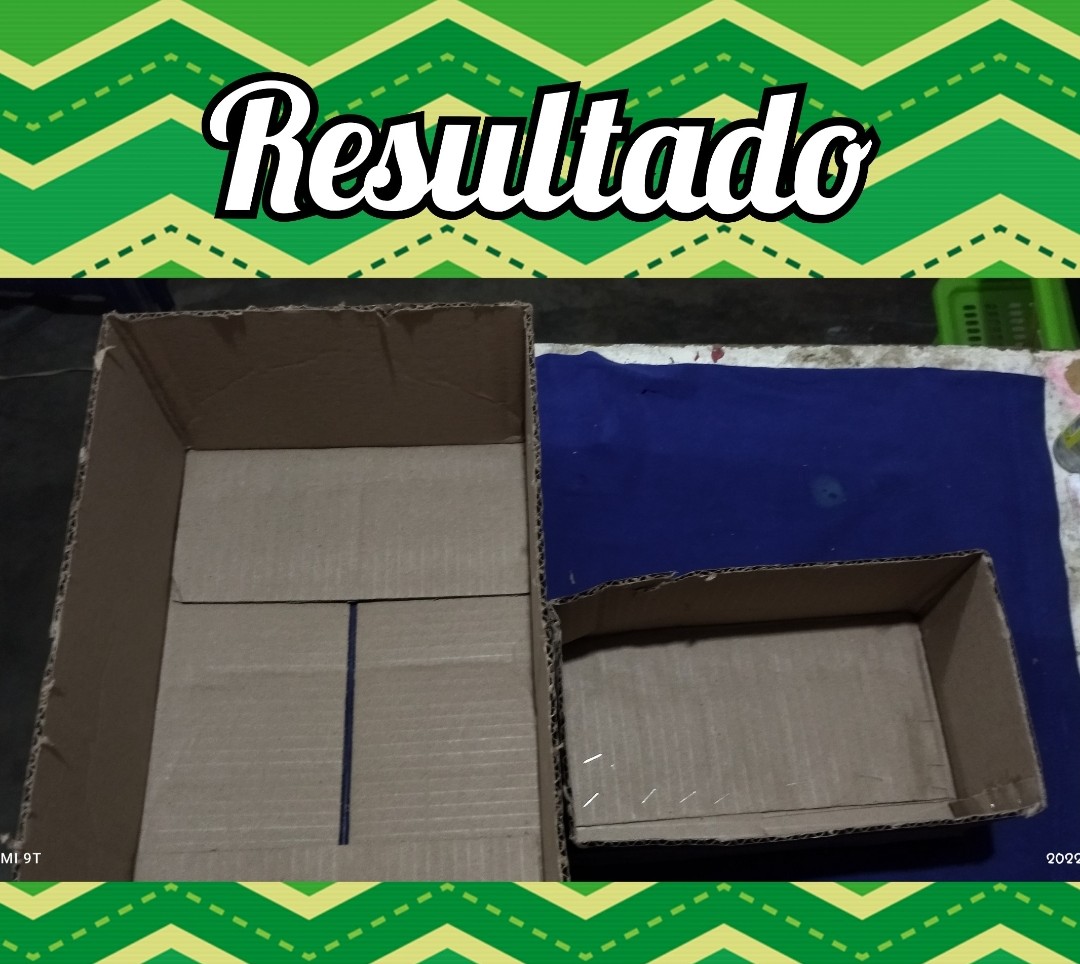
Luego tomamos la engrapadora y vamos a engrapar las pestañas de la caja, hay que asegurarse de que queden bien sellado.
Then we take the stapler and we are going to staple the flaps of the box, making sure that they are well sealed.
Luego con los sobrante de la caja vamos a formar una caja más pequeña, que nos va a servir de gaveta de nuestro organizador.
Then with the leftovers of the box we will form a smaller box, which will serve as the drawer of our organizer.
 🌹💖🌹💖🌹💖🌹💖🌹💖🌹
 🌹💖🌹💖🌹💖🌹💖🌹💖🌹
PASO 3 // STEP 3
🌹💖🌹💖🌹💖🌹💖🌹💖🌹
🌹💖🌹💖🌹💖🌹💖🌹💖🌹
PASO 3 // STEP 3
🌹💖🌹💖🌹💖🌹💖🌹💖🌹
Cómo ya la caja está bien fijada y con las medidas que deseamos vamos a proceder con el siguiente paso, tome el papel de regalo metalizado y con el silicón forre por completo toda la caja, tanto por dentro como por fuera.
Now that the box is well fixed and with the measurements we want, let's proceed with the next step, take the metallic wrapping paper and use the silicone to completely line the entire box, both inside and outside.
Para este trabajo utilice dos pliegos de papel, en cuanto al papel de regalo no es necesario que sea metalizado, puede ser del motivo que ustedes deseen, siempre que sirva para cubrir la caja y le dé un lindo aspecto, también debemos recordar que si la vamos hacer para una niña podemos forrarla con un papel de algún personaje de cómics.
For this work use two sheets of paper, as for the wrapping paper does not need to be metallized, it can be the motif you want, as long as it serves to cover the box and gives it a nice look, we must also remember that if we are going to make it for a girl we can line it with a paper of a comic book character.
 🌹💖🌹💖🌹💖🌹💖🌹💖🌹
PASO 4 // STEP 4
🌹💖🌹💖🌹💖🌹💖🌹💖🌹
🌹💖🌹💖🌹💖🌹💖🌹💖🌹
PASO 4 // STEP 4
🌹💖🌹💖🌹💖🌹💖🌹💖🌹
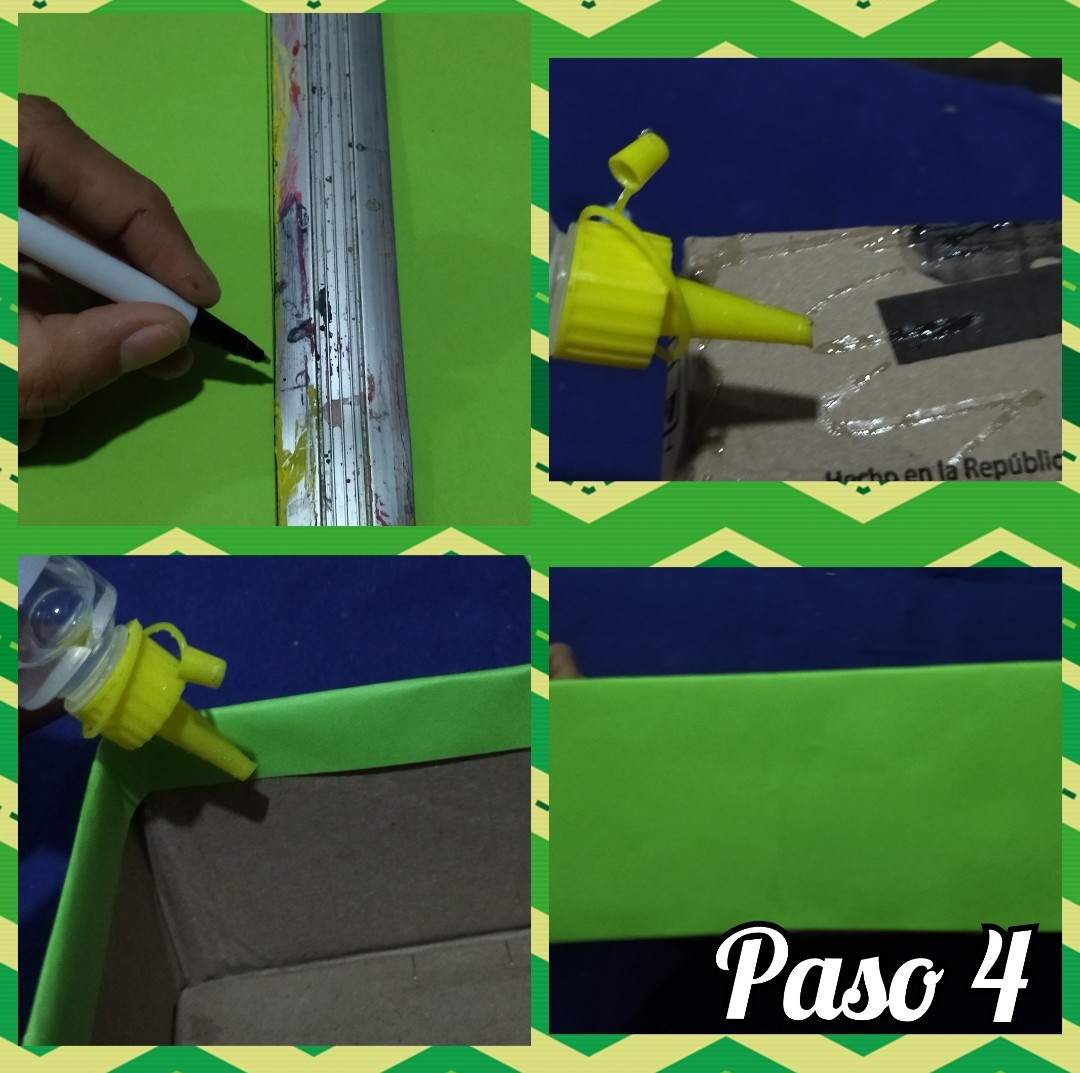
Ahora vamos a tomar la gaveta que hicimos en el paso 3 y procedemos a forrarlo, solo que está vez lo haremos con una cartulina de construcción unicolor que en este caso utilice una verde manzana que sirva para que resalte y se vea más llamativa ya que el papel que utilizamos para forrar la caja es de color muy claro.
Now we are going to take the drawer we made in step 3 and proceed to line it, only this time we will do it with a unicolor construction paper, in this case we will use an apple green to make it stand out and look more striking since the paper we used to line the box is very light colored.
 🌹💖🌹💖🌹💖🌹💖🌹💖🌹
PASO 5 // STEP 5
🌹💖🌹💖🌹💖🌹💖🌹💖🌹
🌹💖🌹💖🌹💖🌹💖🌹💖🌹
PASO 5 // STEP 5
🌹💖🌹💖🌹💖🌹💖🌹💖🌹
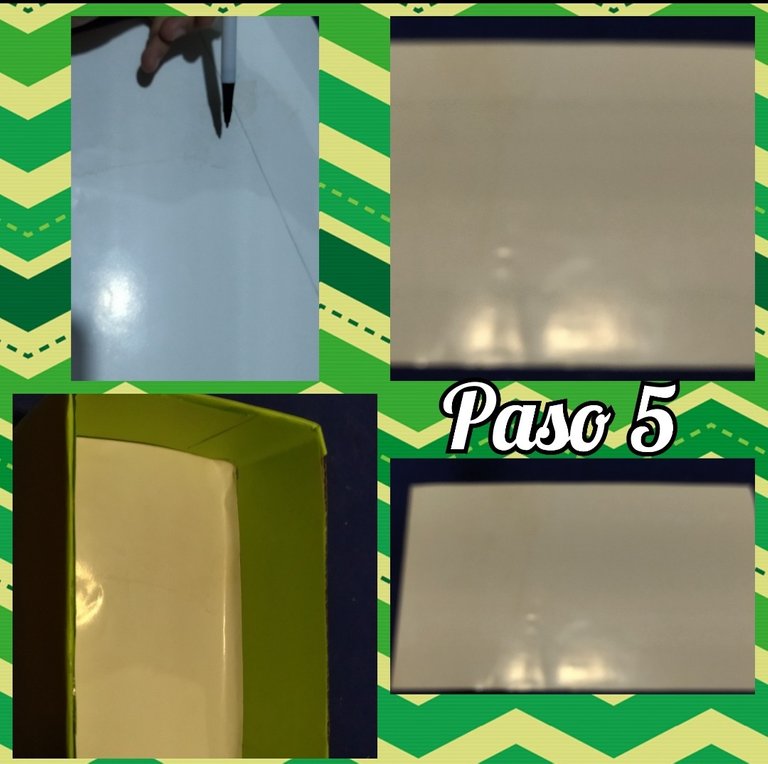
Luego tomamos una cartulina blanca y marcamos un cuadrado del tamaño de la gaveta, la cual recortaremos.
Then we take a white cardboard and mark a square the size of the drawer, which we will cut out.
Una vez recortado, aplicamos el silicón frío en el fondo de la gaveta y le pegamos la cartulina blanca.
Once cut out, apply cold silicone to the bottom of the drawer and glue the white cardboard to it.
 🌹💖🌹💖🌹💖🌹💖🌹💖🌹
PASO 6 // STEP 6
🌹💖🌹💖🌹💖🌹💖🌹💖🌹
🌹💖🌹💖🌹💖🌹💖🌹💖🌹
PASO 6 // STEP 6
🌹💖🌹💖🌹💖🌹💖🌹💖🌹
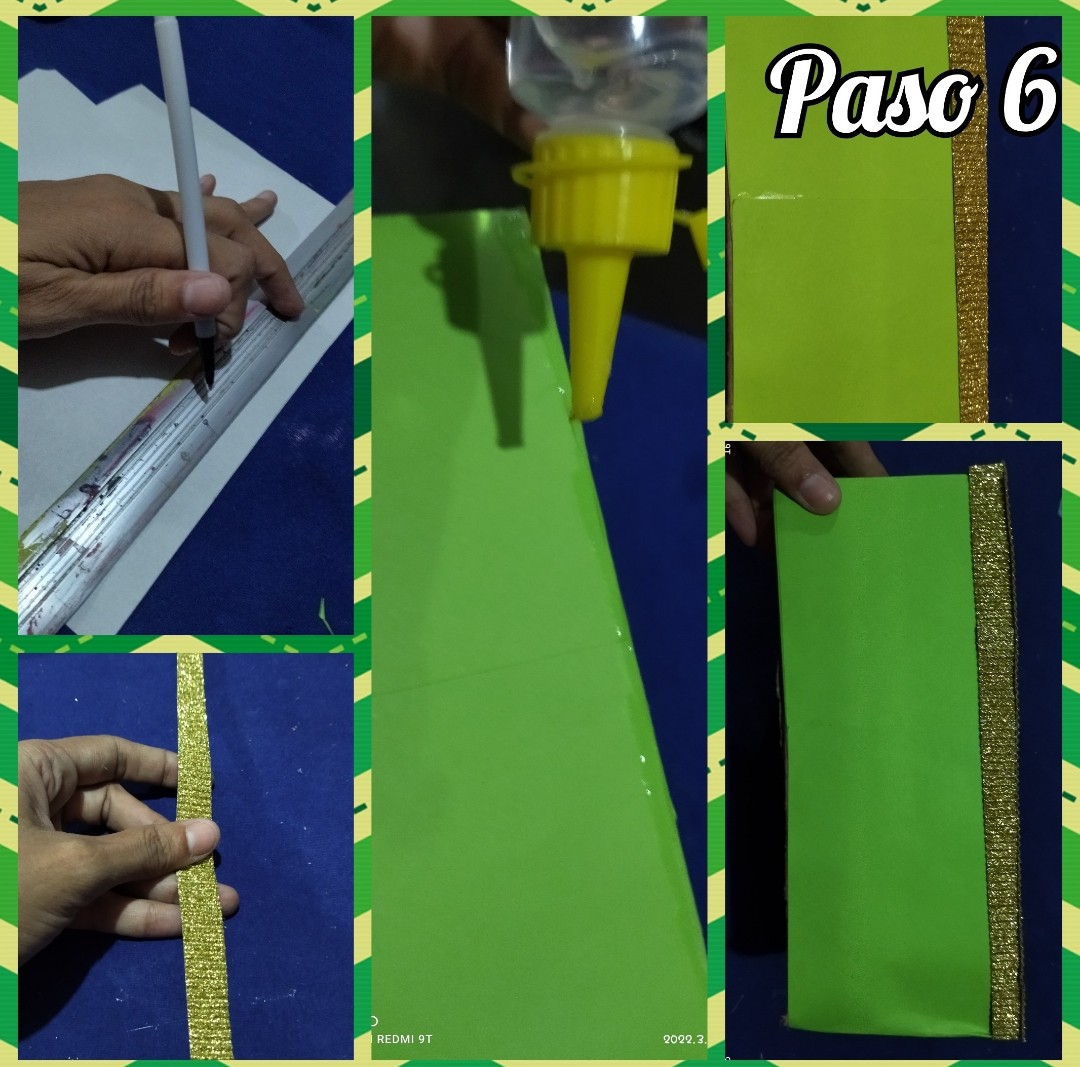
Luego en la cartulina escarchada marcamos una línea de aproximadamente 1 cm de ancho, que cubra el largo de la gaveta, después recortamos y aplicamos silicón por todo el borde al terminar le pegamos la tira de cartulina escarchada.
Then on the frosted cardboard we mark a line about 1 cm wide, covering the length of the drawer, then we cut and apply silicone around the edge and glue the frosted cardboard strip.
 🌹💖🌹💖🌹💖🌹💖🌹💖🌹
PASO 7 // STEP 7
🌹💖🌹💖🌹💖🌹💖🌹💖🌹
🌹💖🌹💖🌹💖🌹💖🌹💖🌹
PASO 7 // STEP 7
🌹💖🌹💖🌹💖🌹💖🌹💖🌹
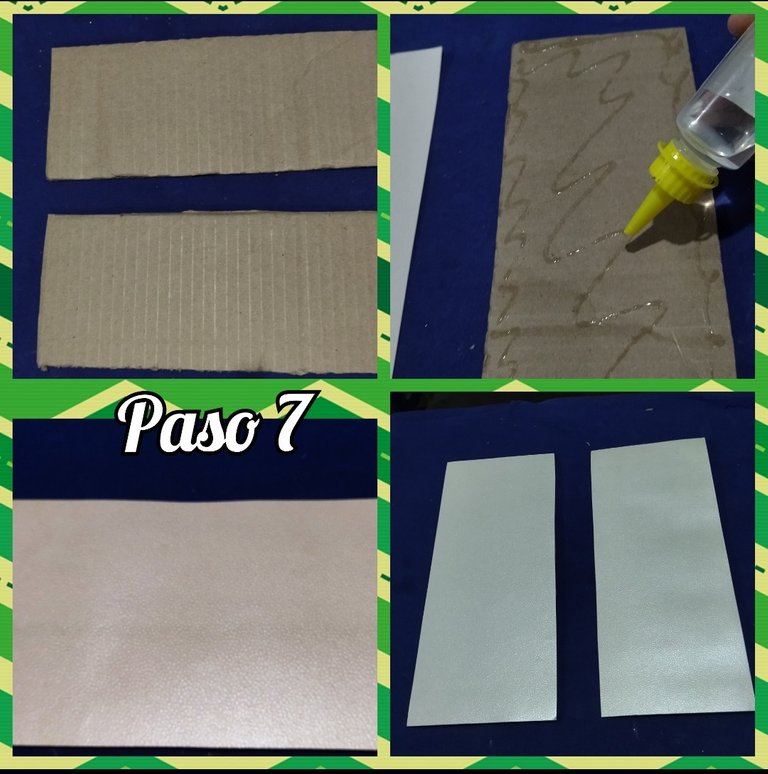
Luego recortaremos dos rectángulos de unos 15 cm de ancho y del largo de la caja, esto lo podemos hacer con los sobrantes de la caja.
Then cut out two rectangles about 15 cm wide and the length of the box, this can be done with the leftovers of the box.
Cuando ya hemos recortado tomamos una cartulina blanca y en ella marcamos el rectángulo que sacamos en cartón eso sí debemos dejarle unos milímetros demás para que sobresalga de la pieza de cartón.
When we have already cut out we take a white cardboard and on it we mark the rectangle that we took out of cardboard, but we must leave a few millimeters more so that it protrudes from the piece of cardboard.
Al tener ya todas las piezas preparadas tomamos el rectángulo de cartón y le aplicamos el silicón para luego colocarle encima la pieza de cartulina, dejando así con eso las dos piezas totalmente forradas y preparadas.
Once all the pieces are ready, we take the cardboard rectangle and apply the silicone and then place the cardboard piece on top of it, leaving the two pieces completely lined and ready.
 🌹💖🌹💖🌹💖🌹💖🌹💖🌹
PASO 8 //STEP 8
🌹💖🌹💖🌹💖🌹💖🌹💖🌹
🌹💖🌹💖🌹💖🌹💖🌹💖🌹
PASO 8 //STEP 8
🌹💖🌹💖🌹💖🌹💖🌹💖🌹
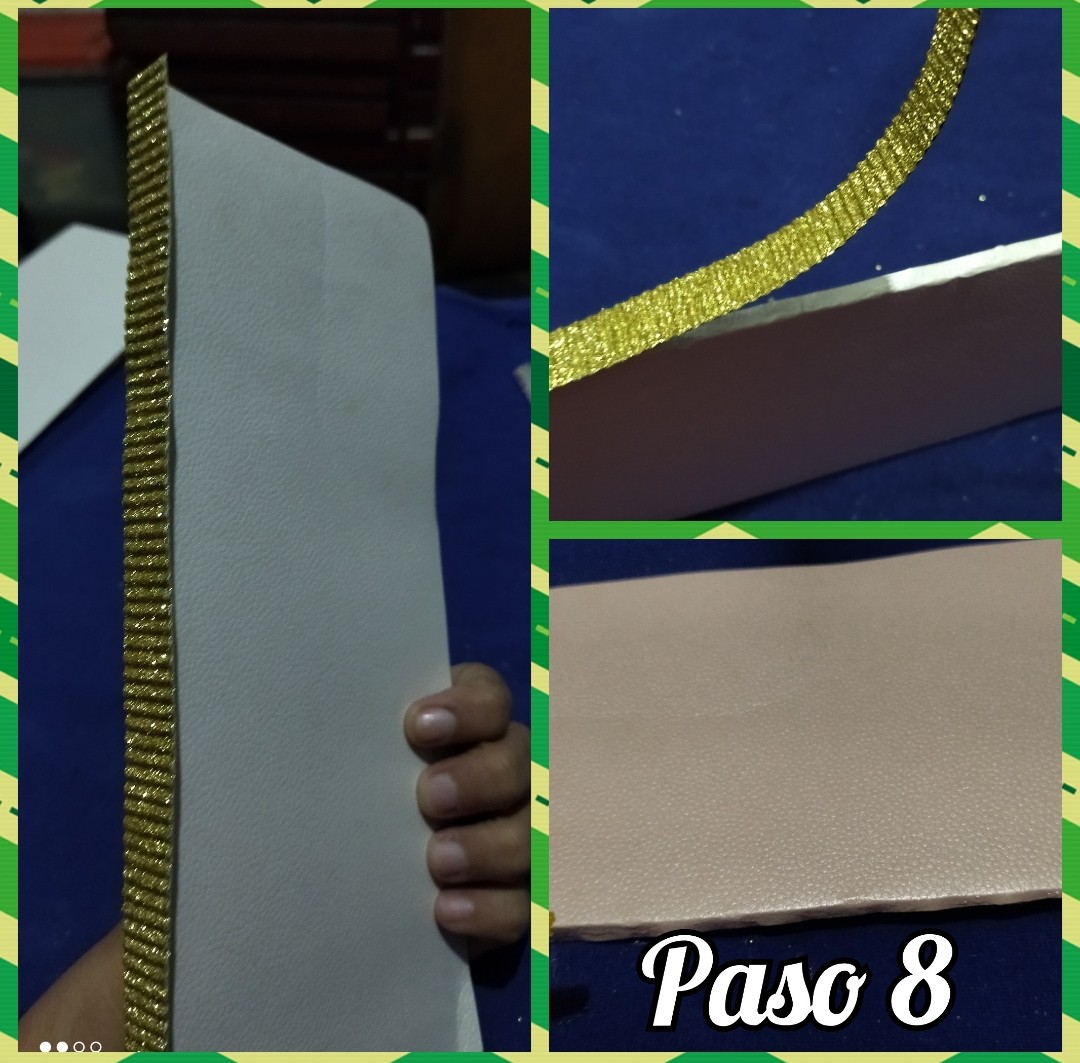
Marcamos en la cartulina escarchada una línea de aproximadamente 0,50 cm de ancho al recortarla le colocamos un poco de silicón a la orilla de las piezas que elaboramos en el paso 7.
We mark on the frosted cardboard a line of approximately 0.50 cm wide when we cut it out, we put a little silicone on the edge of the pieces we made in step 7.
 🌹💖🌹💖🌹💖🌹💖🌹💖🌹
PASO 9 // STEP 9
🌹💖🌹💖🌹💖🌹💖🌹💖🌹
🌹💖🌹💖🌹💖🌹💖🌹💖🌹
PASO 9 // STEP 9
🌹💖🌹💖🌹💖🌹💖🌹💖🌹
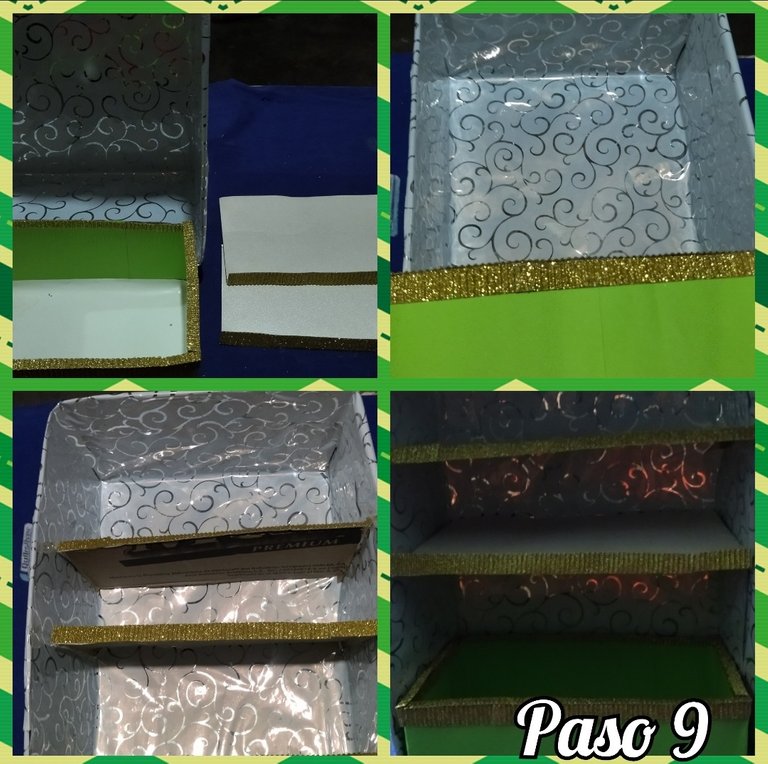
En este paso vamos a ensamblar todas las piezas que hemos elaborado previamente así que tomamos la pieza de la gaveta que hicimos y la colocamos dentro de la pieza grande,se puede apreciar mejor en la fotografía.
In this step we are going to assemble all the pieces we have previously made, so we take the piece of the drawer we made and place it inside the big piece, as you can see in the picture.
Después haremos lo mismo con las otras piezas a las que le coloque silicón en los lados y las pegue a la pieza grande.
Then we will do the same with the other pieces to which I put silicone on the sides and glue them to the big piece.
 🌹💖🌹💖🌹💖🌹💖🌹💖🌹
PASO 10 // STEP 10
🌹💖🌹💖🌹💖🌹💖🌹💖🌹
🌹💖🌹💖🌹💖🌹💖🌹💖🌹
PASO 10 // STEP 10
🌹💖🌹💖🌹💖🌹💖🌹💖🌹
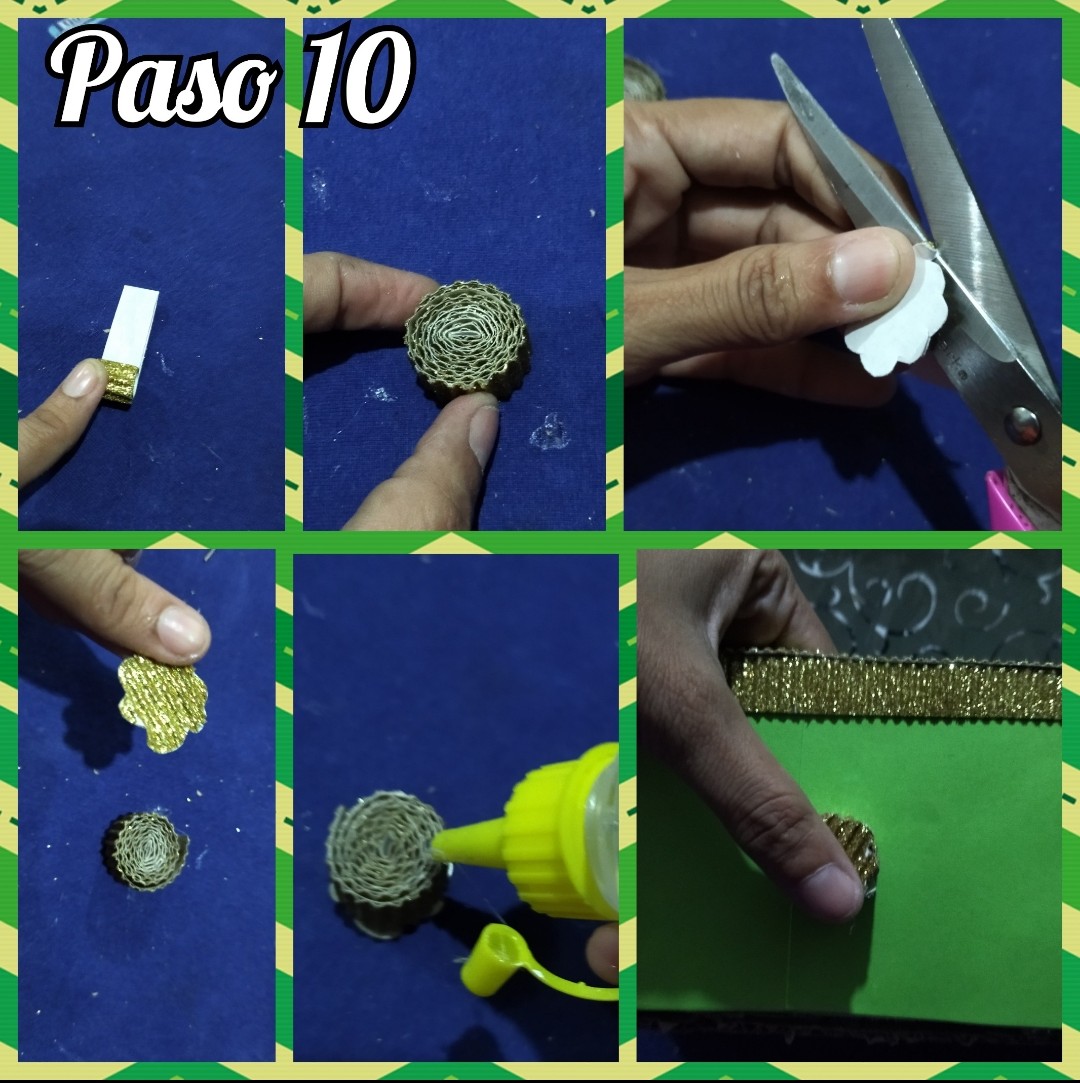
Luego tome la cartulina escarchada y marque la tira de medio centímetro de ancho y 25 cm de largo, la cual recorte.
Then take the frosted cardboard and mark the strip half a centimeter wide and 25 cm long, which you cut out.
Seguidamente coloque un poco de silicón frío en la punta y comenzamos a enrollar, mientras vamos enrollando le vamos colocando silicón para que quede fijo, al terminar en la misma cartulina recortamos una especie de flor, la cual pegue encima de la pieza enrollada que hicimos, esto va a servir como perilla de la gaveta del organizador, puede silicón suficiente y pegue a la pieza de la gaveta en el centro.
Then put a little cold silicone on the tip and begin to roll, while we are rolling we are placing silicone to be fixed, at the end in the same cardboard cut a kind of flower, which paste over the rolled piece we did, this will serve as knob drawer organizer, can enough silicone and stick to the piece of the drawer in the center.
 🌹💖🌹💖🌹💖🌹💖🌹💖🌹
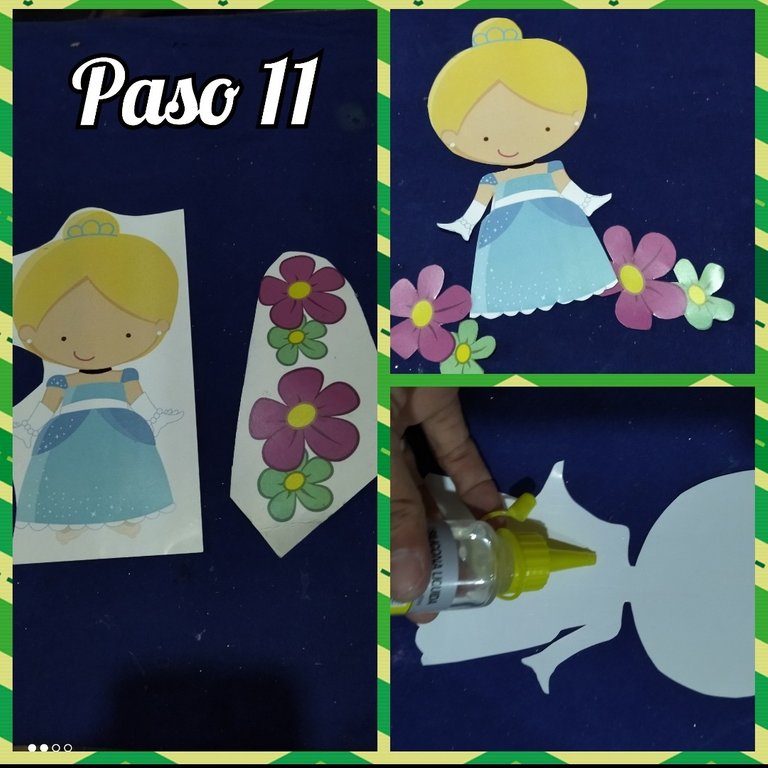
PASO 11 // STEP 11
🌹💖🌹💖🌹💖🌹💖🌹💖🌹
🌹💖🌹💖🌹💖🌹💖🌹💖🌹
PASO 11 // STEP 11
🌹💖🌹💖🌹💖🌹💖🌹💖🌹
Tome la figura que imprimí en papel glasé y la recorte, yo en esta ocasión lo hice de la Cenicienta pero ustedes pueden hacerlo del personaje que deseen, recortamos tanto la figura de la muñeca como las flores y le aplique un poquito de silicón frío y pegue en el organizador, las flores las pegué en la gaveta para distribuir las decoraciones en todo nuestro proyecto.
Take the figure that I printed in icing paper and cut it out, this time I did Cinderella but you can do the character you want, cut out both the figure of the doll and the flowers and apply a little bit of cold silicone and glue it on the organizer, the flowers I glued them in the drawer to distribute the decorations throughout our project.
 🌹💖🌹💖🌹💖🌹💖🌹💖🌹
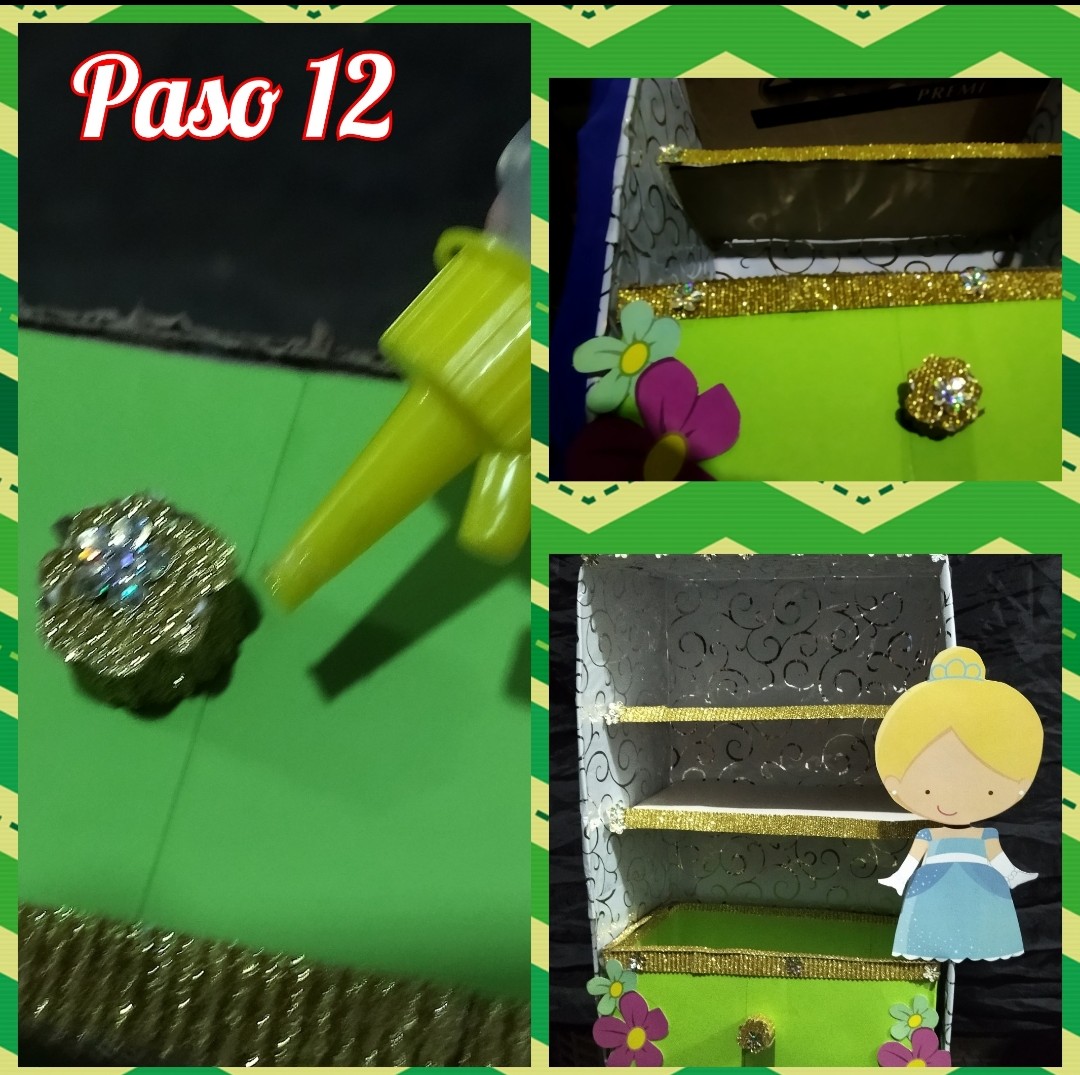
PASO 12 // STEP 12
🌹💖🌹💖🌹💖🌹💖🌹💖🌹
🌹💖🌹💖🌹💖🌹💖🌹💖🌹
PASO 12 // STEP 12
🌹💖🌹💖🌹💖🌹💖🌹💖🌹
Finalmente le estamos dando los toques decorativos finales por lo que tome las aplicaciones de las flores y las coloqué, algunas en la perilla de la gaveta y otras en distintas áreas del organizador.
Finally we are giving it the final decorative touches so I took the flower applications and placed them, some on the drawer knob and others in different areas of the organizer.
 🌹💖🌹💖🌹💖🌹💖🌹💖🌹
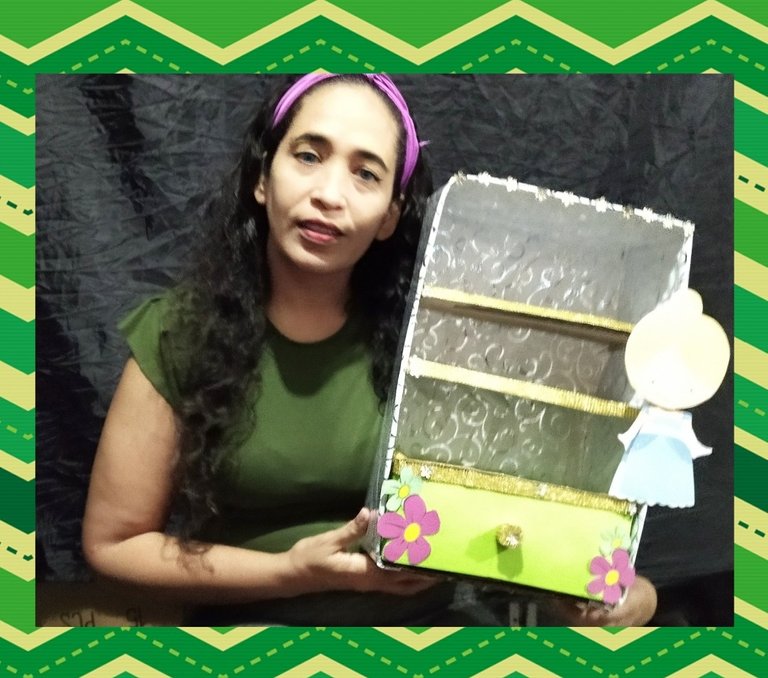
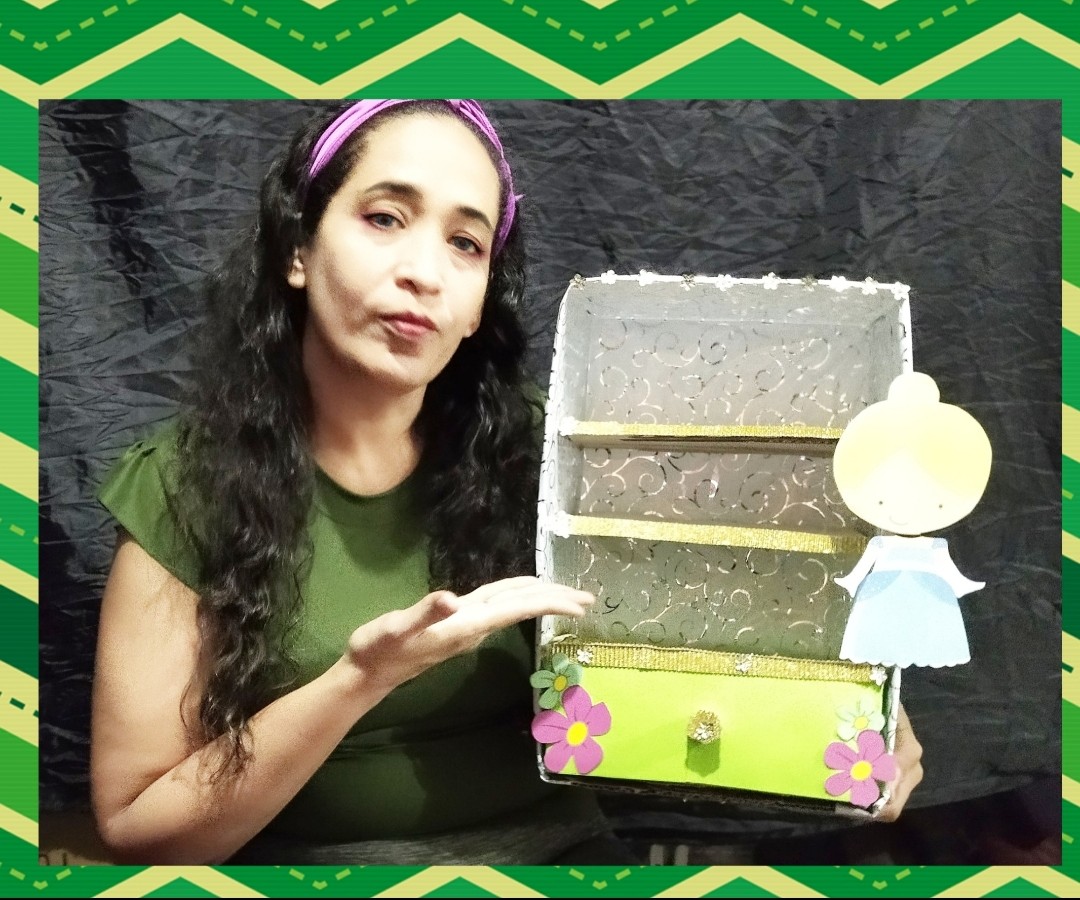
RESULTADO FINAL//FINAL RESULT
🌹💖🌹💖🌹💖🌹💖🌹💖🌹
🌹💖🌹💖🌹💖🌹💖🌹💖🌹
RESULTADO FINAL//FINAL RESULT
🌹💖🌹💖🌹💖🌹💖🌹💖🌹
 🌹💖🌹💖🌹💖🌹💖🌹💖🌹
 🌹💖🌹💖🌹💖🌹💖🌹💖🌹
 🌹💖🌹💖🌹💖🌹💖🌹💖🌹
 🌹💖🌹💖🌹💖🌹💖🌹💖🌹
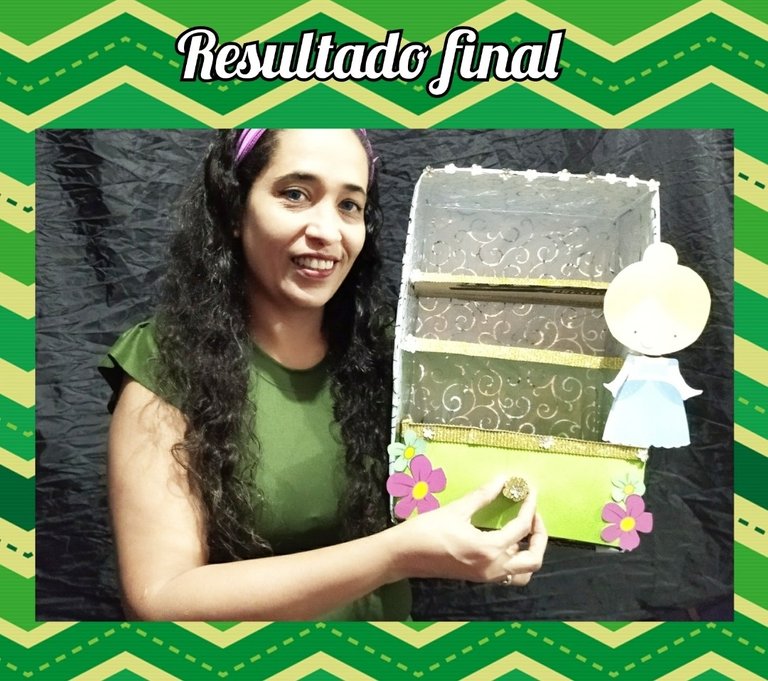
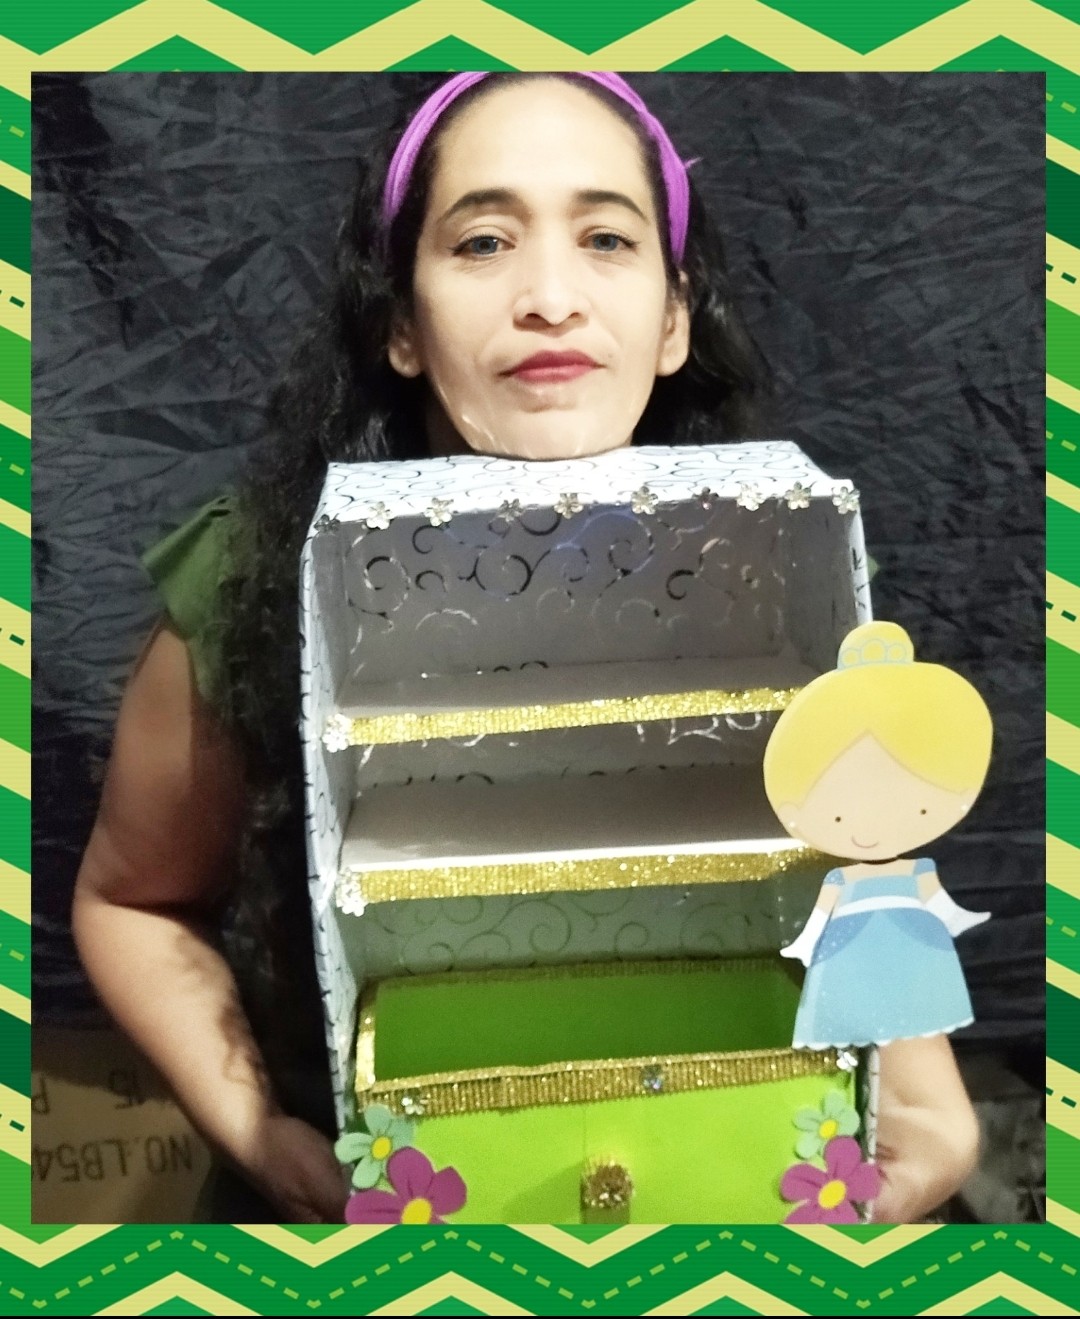
Bueno mis amores esto es todo por el día de hoy esperando que les haya gustado el resultado final del organizador, este es un proyecto de fácil elaboración y que tiene muchas utilidades, por lo que constituye un trabajo manual de provecho, así que los invito a poner en marcha esa lindas manitas, los invito a que dejen fluir la creatividad, y dejen volar la imaginación de seguro tendrán hermosos resultados como el que les muestro en mi proyecto, si realmente te gustó mi post te invito a que votes, rebloguea y dejame tu comentario que es muy importante para mí, y de ante mano muchas gracias.
Well my loves this is all for today hoping that you liked the final result of the organizer, this is an easy project and has many utilities, so it is a manual work of profit, so I invite you to put in place that cute little hands, I invite you to let your creativity flow, and let your imagination fly, for sure you will have beautiful results like the one I show you in my project, if you really liked my post I invite you to vote, reblog and leave me your comment that is very important to me, and thank you very much in advance.
📱 Todas las fotos fueron tomadas con mi teléfono Xiaomi readmi 9T y son de mi propiedad, utilice el traductor Deepl y el programa polish para la edición de las mismas.
📱 All photos were taken with my Xiaomi readmi 9T phone and are my property, use Deepl translator and polish program for editing them.
🌹💖🌹💖🌹💖🌹💖🌹💖🌹
 🌹💖🌹💖🌹💖🌹💖🌹💖🌹