
Saludos a todas y cada una de esas hermosas abejitas laboriosas que día a día son capaces de llenar a esta plataforma hermosa con todas y cada una de sus creaciones.
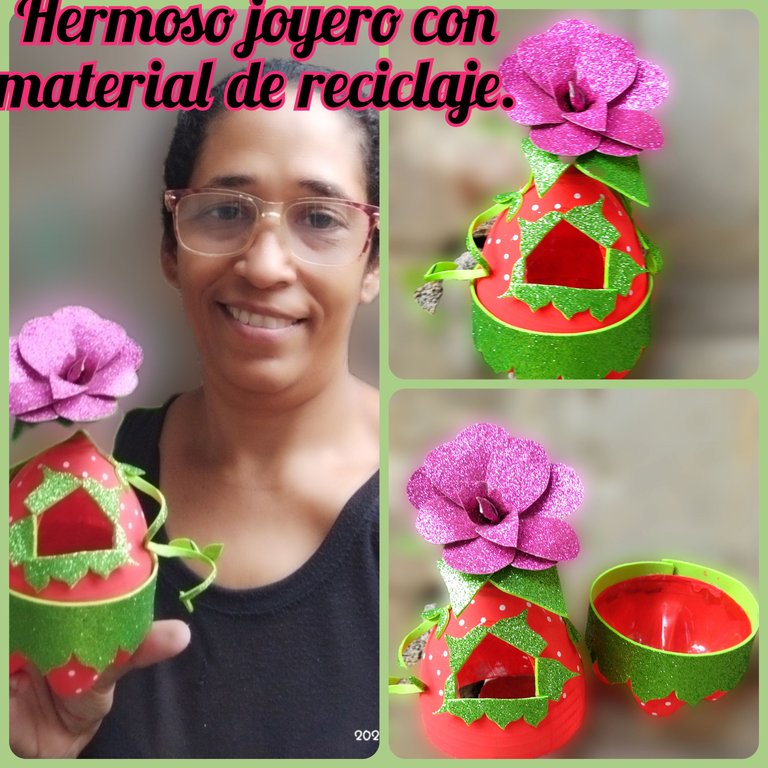
Reciban un fuerte abrazo virtual que esté cargado de buena vibra y de buenas energías, especialmente a todos los miembros talentosos con los que cuenta está increíble comunidad, hoy les traje un trabajo manual muy bonito, muy práctico, de bajo costo pero realmente muy lindo, está vez nuestro elemento principal será materiales de reciclaje, ya que me gusta ayudar con la conservación del medio ambiente, por eso hoy quiero invitarlos a qué realicen una pequeña parada en mi blog para que aprendan a realizar un lindo y practico joyero elaborado con una botella plástica.
MATERIALES
 🧴 Una botella plástica.
🧴 Silicón líquido.
🧴 Foami escarchado verde.
🧴 Foami escarchado fucsia.
🧴 Pintura al frío roja.
🧴 Pintura al frío Blanca.
🧴 Tijera.
🧴 Regla.
🧴 Exacto.
🧴 Palillo de altura.
💞🧴💞 PASO A PASO 💞🧴💞
🧴 Una botella plástica.
🧴 Silicón líquido.
🧴 Foami escarchado verde.
🧴 Foami escarchado fucsia.
🧴 Pintura al frío roja.
🧴 Pintura al frío Blanca.
🧴 Tijera.
🧴 Regla.
🧴 Exacto.
🧴 Palillo de altura.
💞🧴💞 PASO A PASO 💞🧴💞
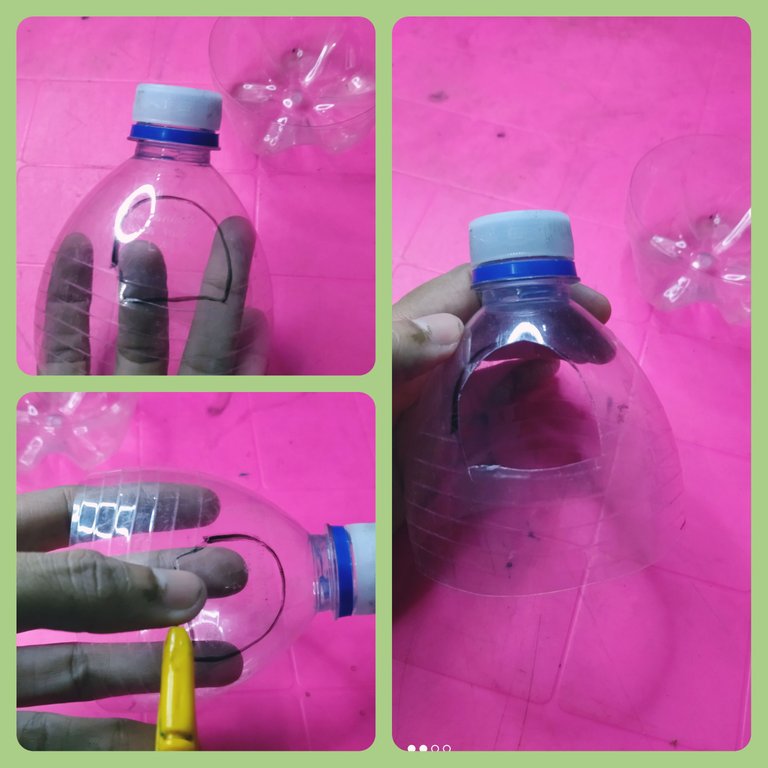
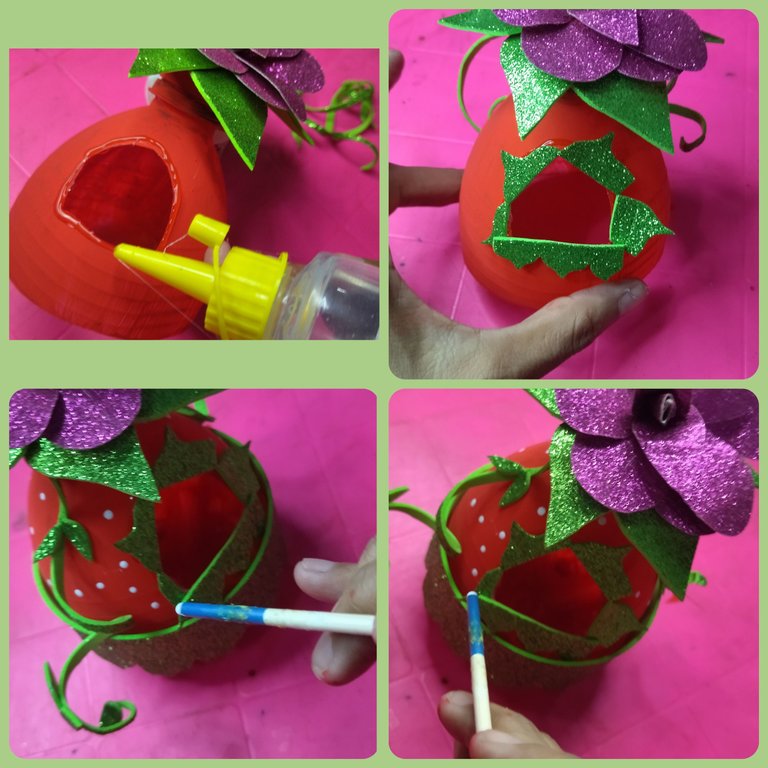
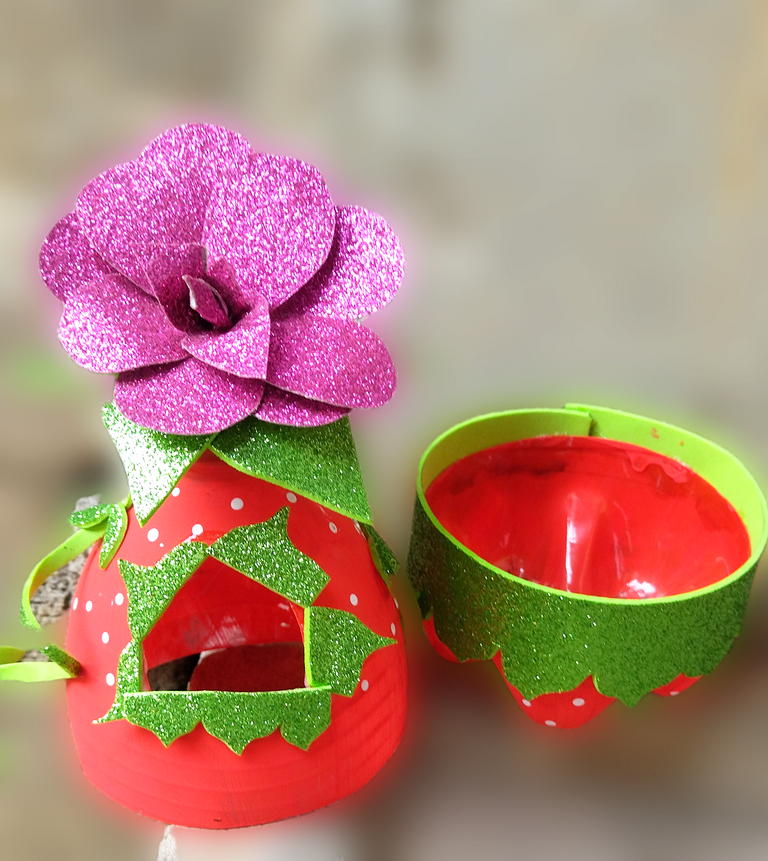
Primero picamos la punta de la botella plástica y el fondo, luego marque una pequeña ventanita, la cual posteriormente corte con el exacto, finalmente limpiamos bien.
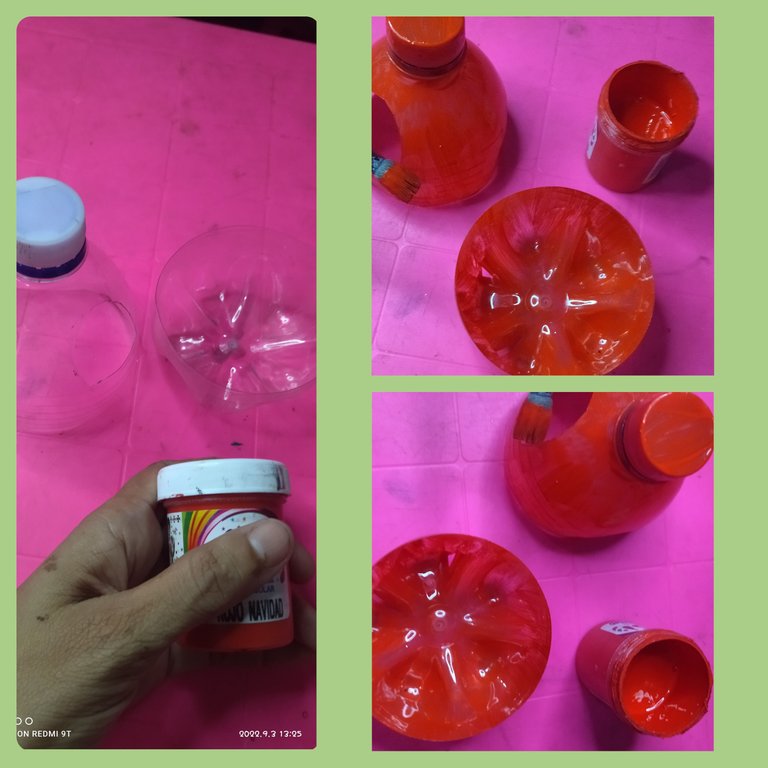
Tome la pintura roja al frío y con ayuda de un pincel grueso pinté todas las dos piezas de plástico, incluso yo le di di dos capas para lograr cubrir todo a la perfección, ya que quiero que el trabajo final sea de calidad, no porque sea elaborado con materiales de reciclaje tiene que quedar mal hecho, muy por el contrario me gusta demostrar que se pueden hacer cosas hermosas y prácticas con materiales de reciclaje.
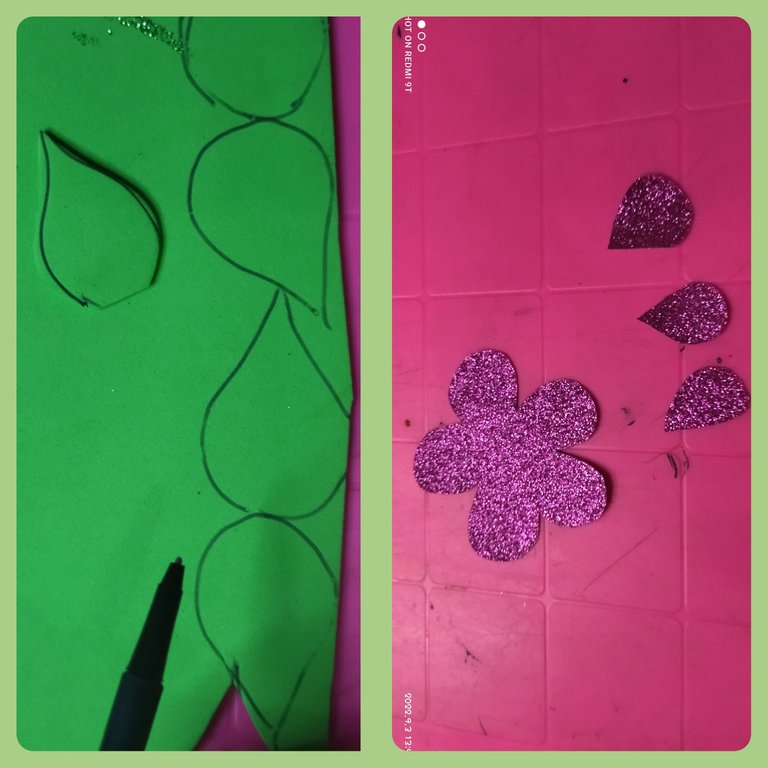
Luego agarre el foami escarchado verde y dibuje unas hojas, el tamaño va a depender de ustedes, yo las hice para que cubrieran lo suficiente la tapa.
Después dibuje en el foami escarchado fucsia la flor y varios pétalos, y todos los recortamos.
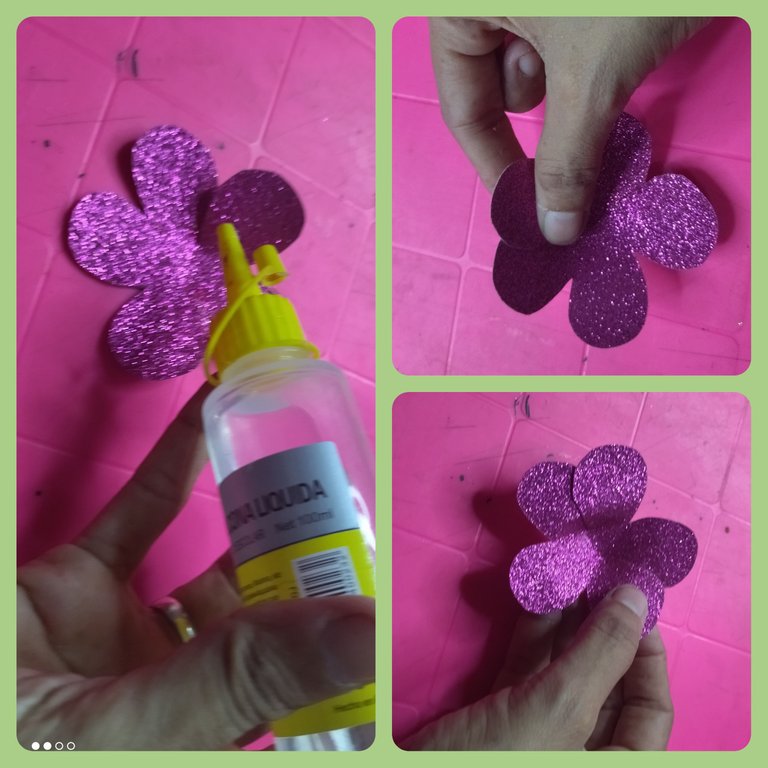
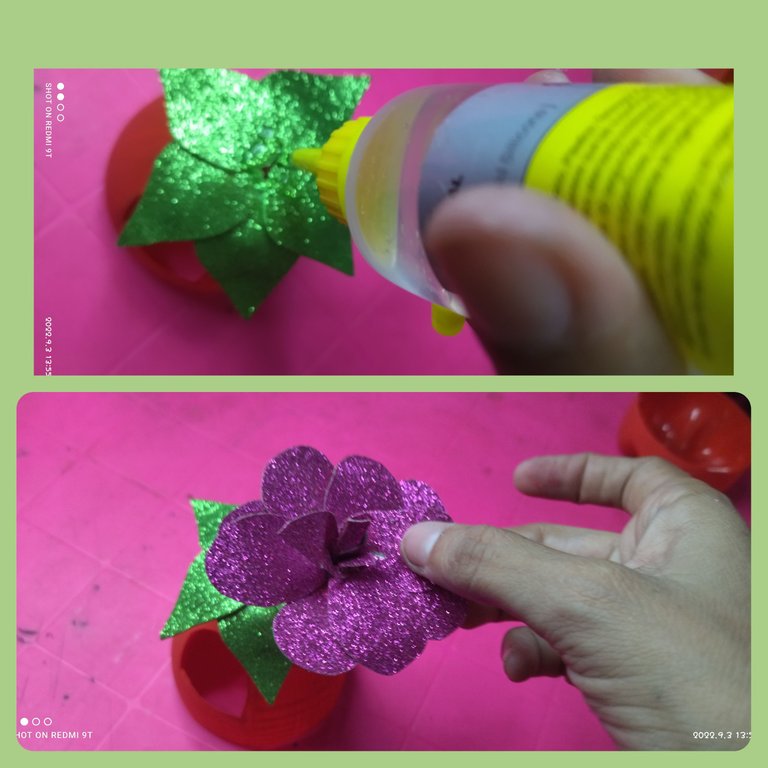
En este paso recorte la flor en dos de los pétalos para luego aplicarles silicón y pegarlas cómo se aprecia en la fotografía, también con los dedos fui apretando los para darles un poco de quiebre a los pétalos, este paso es bien fácil.
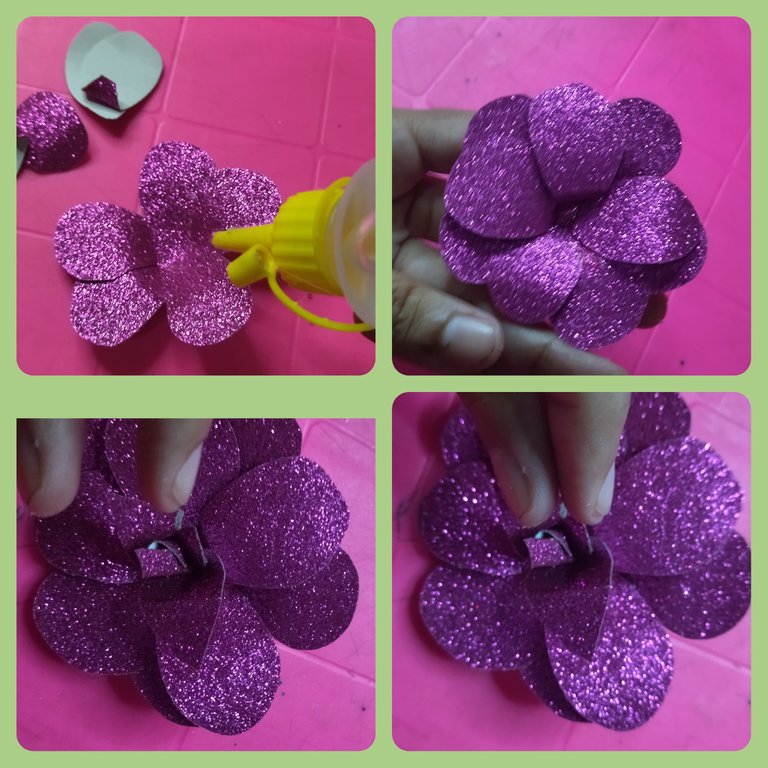
Primero forme el centro de la flor y para esto enrolle uno de los pétalos adicionales que pique luego lo cubrí con otro pétalo, y luego con otro, de esta forma pude crear el centro, y finalmente lo pegue con el silicón liquido.
Las cinco hojas que recorte las pegue en la tapa con ayuda de el sillón liquido, cuando las puse en su lugar les fui dando un poco de caída, esto lo logré jalando un poco el foami hacía la parte de abajo.
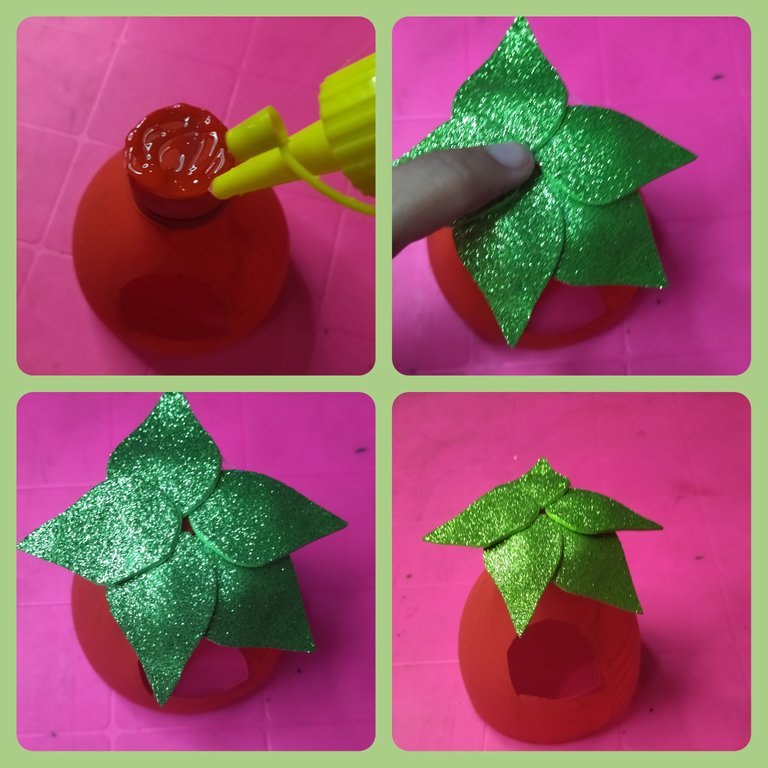
Cuando ya la flor está lista porque está completamente pegada, yo aplico un poco de silicón encima de las hojas y pego la flor para fijarla.
Ahora en el foami escarchado verde marque una tira de 28 cm de largo por 2 cm de ancho, y en las puntas las dibuje como unas punta de hojas, también recorte unas tiras muy delgadas y con los recorte fui sacando pequeñas hojas, hay que aprovechar todo.
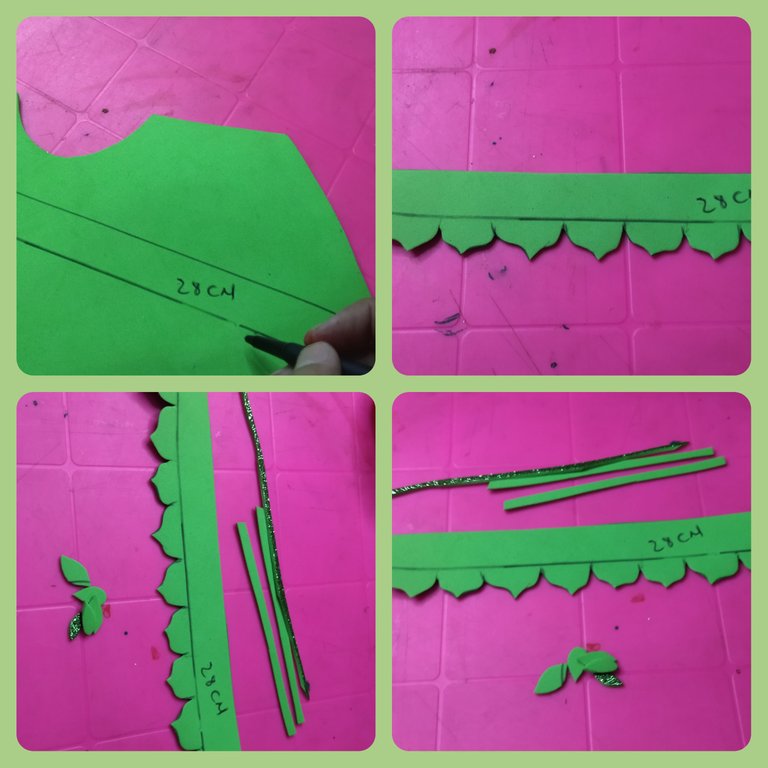
Luego aplique Silicón a la parte de abajo por toda la orilla, y pegamos la tira de foami que recortamos, eso sí le dejamos al menos un centímetro hacia arriba.

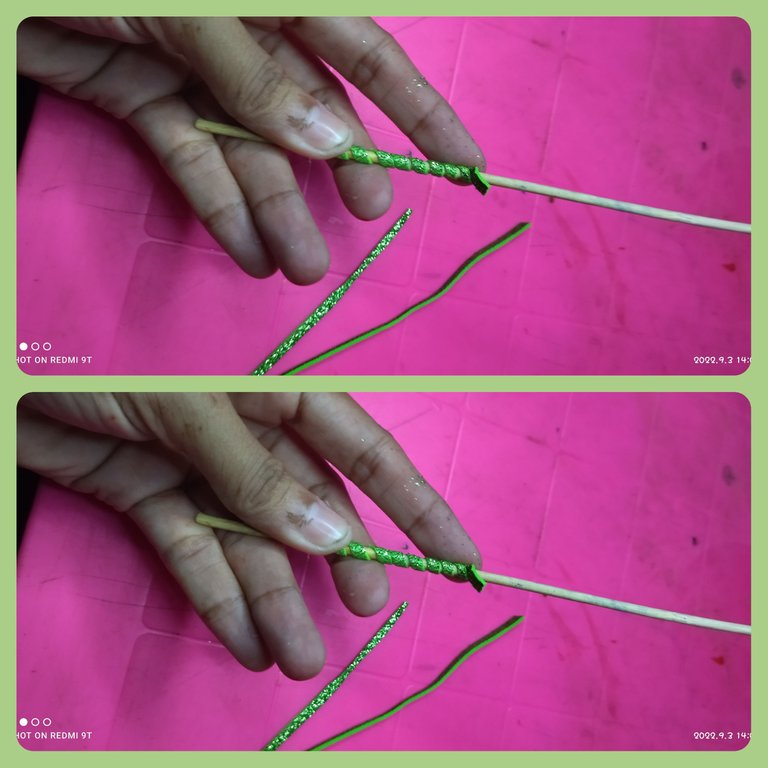
Las pequeñas líneas de foami que recorte las estire un poco, teniendo la precaución de no estirar mucho para no romperlas y las enrolle en el palillo de altura, hasta lograr que queden bien enroscadas.
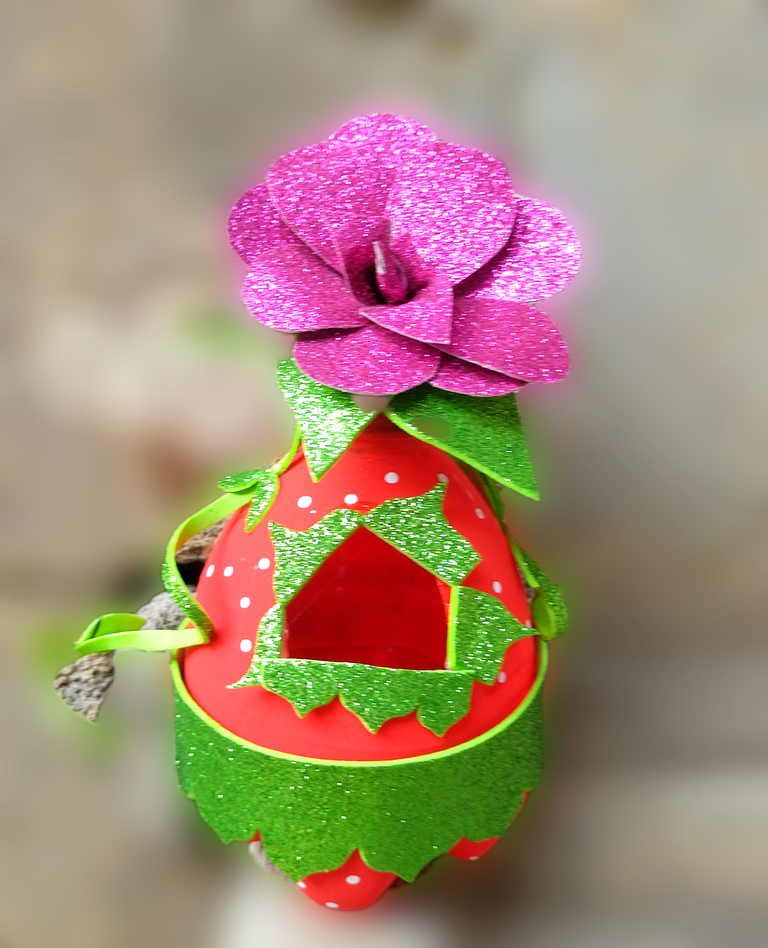
Finalmente recorte un trocito de foami verde el cuál pegue con el silicón liquido en la ventanita que pique, también tome las líneas enrolladas y las pegue debajo de la rosa y otras debajo de las hojas, y como toque final tome la pintura blanca y con un pincel fino dibuje puntos en diferentes partes de nuestro joyero.
De esta forma queda listo este pequeño detalle que puede servirnos a la hora de hacerle un regalo a un ser querido, y que mejor que este que fue hecho con nuestras propias manos, ahora les dejo el resultado final.
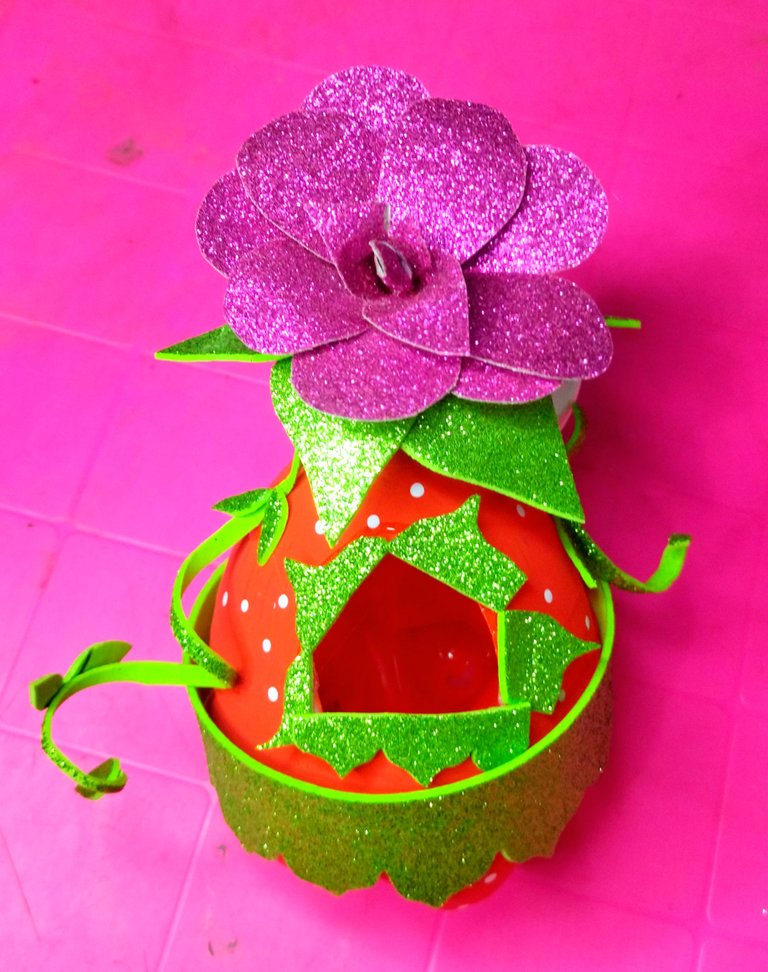
RESULTADO
Espero de todo corazón que este trabajo haya sido de ayuda y de provecho, porque esa es la idea que se quiere, mostrar detalles bonitos, y de fácil elaboración pero sobretodo que tengan un uso dentro de nuestras vidas, es decir es hacer un detalle que sea utilizable, por ahora me despido esperando que les guste este post, y que les pueda servir de guía para aquellos que buscan aprender a realizar un detalle con sus propias manos.
📸 Todas las fotos fueron tomadas con mi teléfono Xiaomi readmi 9T y son de mi propiedad utilice el programa polish y el traductor de Google.
 💞🧴💞 INGLES 💞🧴💞
Greetings to each and every one of those beautiful industrious bees that day after day are capable of filling this beautiful platform with each and every one of their creations.
Receive a big virtual hug that is loaded with good vibes and good energies, especially to all the talented members that this incredible community has, today I brought you a very beautiful, very practical, low cost but really very nice, this time our main element will be recycling materials, since I like to help with the conservation of the environment, that's why today I want to invite you to make a small stop on my blog to that they learn to make a beautiful and practical jewelry box made with a plastic bottle.
MATERIALS
🧴 A plastic bottle.
*** 🧴 Liquid silicone.
🧴 Green frosty foami.
🧴 Fuchsia frosted foami.
🧴 Red cold paint.
🧴 White cold paint.
🧴 Scissors.
🧴 Rule.
🧴 Exactly.
🧴 Height toothpick.***
💞 💞 STEP BY STEP 💞 💞
First we cut the tip of the plastic bottle and the bottom, then we mark a small window, which we later cut with the exact one, finally we clean well.
I took the cold red paint and with the help of a thick brush I painted all the two pieces of plastic, I even gave it two coats to cover everything perfectly, since I want the final work to be of quality, not because it is made with recycled materials it has to be poorly done, quite the contrary, I like to show that beautiful and practical things can be made with recycled materials.
Then grab the green frosted foami and draw some leaves, the size will depend on you, I made them to cover the lid enough.
Then I drew the flower and various petals on the fuchsia frosted foami, and cut them all out.
In this step, cut the flower into two of the petals and then apply silicone and glue them as you can see in the photograph, I also squeezed them with my fingers to give them a little break to the petals, this step is very easy.
First I formed the center of the flower and for this I rolled up one of the additional petals that itched then I covered it with another petal, and then with another, in this way I was able to create the center , and finally paste it with the liquid silicone.
The five sheets that I cut, I glued them to the cover with the help of the liquid chair, when I put them in their place I gave them a little sag, I achieved this by pulling a little the foami made the bottom part.
When the flower is ready because it is completely glued, I apply a little silicone on top of the leaves and glue the flower to fix it.
Now mark a strip of 28 cm long by 2 cm wide on the green frosted foami, and draw them at the ends as leaf tips, also cut out some very thin and with the trimming I took out small leaves, you have to take advantage of everything.
***
Then apply Silicone to the bottom part along the entire edge, and stick the strip of foami that we cut, that is, we leave it at least one centimeter up.
***
The small lines of foami that I cut, stretch them a little, being careful not to stretch too much so as not to break them, and roll them up on the height stick, until they are well curled .
Finally cut out a piece of green foami which stick with the liquid silicone on the little window that itches, also take the rolled lines and stick them under the rose and others under the leaves, and as a final touch take the white paint and with a fine brush draw dots in different parts of our jewelry box.
In this way this small detail is ready that can be used when giving a gift to a loved one, and what better than this one that was made with our own hands, now I leave you the final result.
RESULT
I hope with all my heart that this work has been of help and benefit, because that is the idea that is wanted, to show beautiful details, and easy to elaborate but above all that they have a use within our lives, that is, it is to make a detail that is usable, for now I say goodbye hoping that you like this post, and that it can serve as a guide for those who seek to learn how to make a detail with their own hands.</ div>
📸 All photos were taken with my Xiaomi readmi 9T phone and are my property, use the polish program and Google translate.