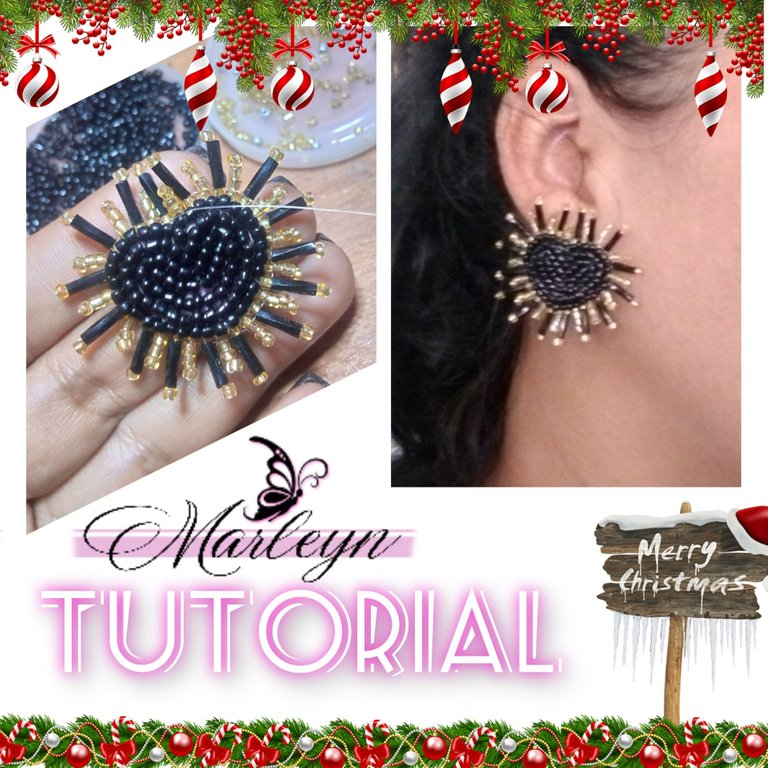
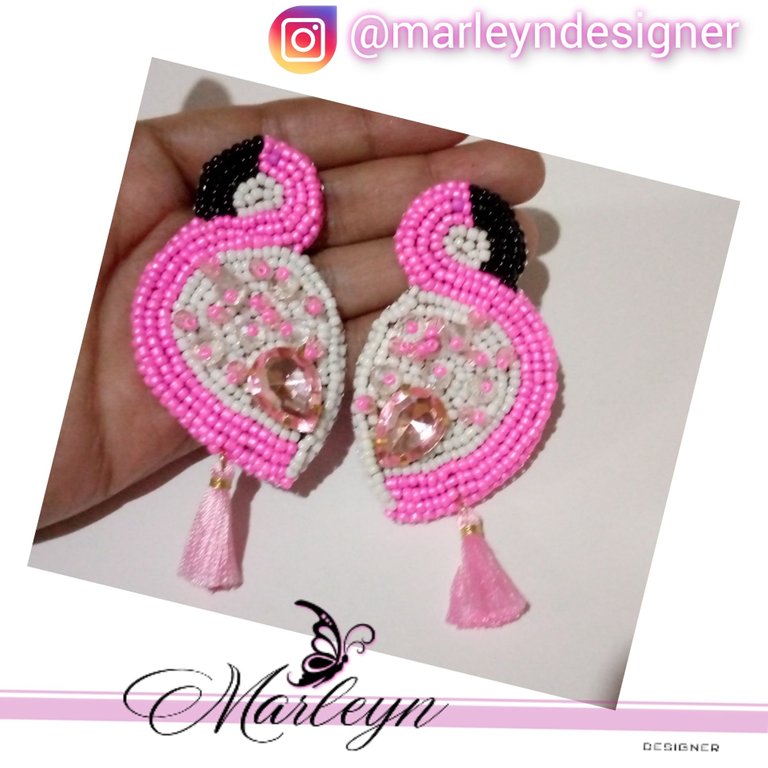
Feliz Navidad y bendecido nuevo día espero te encuentres muy bien, llenos de bendiciones, amor, salud y felicidad siendo cada día tu mejor versión, creciendo, brillando y creando... Hoy vamos a bordar Mostacillas, parece difícil pero realmente no lo es!!! Es fácil, dinámico, 100% manual, y con esta misma técnica puedes crear todo lo que te guste, tu límite es tu imaginación, está técnica me ha gustado desde hace mucho tiempo, y e venido practicando diferentes figuras, busque tutoriales, leí revistas bueno no imaginas la cantidad de tiempos que inverti buscando la.manera de aprender a bordar las Mostacillas y me percate que la mayoría de tutoriales eran inconclusos, no se... 🤪 con muy pocos aprendí realmente. Por eso me tomé el tiempo de practicar más y más, para el me ha leído o me conoce sabe que las agujas y yo no no las llevamos bien (Risas) es más las veces que me Puyo que las veces que logró coser, (muchas risas) aunque es importante acotar que eso que dicen, de que la práctica hace el maestro es así, eh logrado realizar diversas figuras con el bordado de Mostacillas el que mas me ha gustado y me sorprende cada vez que lo veo es unos flamencos que hice hace poco, es así como en serio ?? Eso lo hice yo? 🤪 A veces ni yo misma lo creo.
Merry Christmas and blessed new day I hope you are very well, full of blessings, love, health and happiness being every day your best version, growing, shining and creating.... Today we are going to embroider Mostacillas, it seems difficult but it really isn't!!!! It is easy, dynamic, 100% manual, and with this same technique you can create everything you like, your limit is your imagination, this technique I have liked for a long time, and I have been practicing different figures, I looked for tutorials, I read magazines, well you can not imagine the amount of time I invested looking for the way to learn to embroider the Mostacillas and I realized that most tutorials were inconclusive, I do not know .... 🤪 with very few I really learned. That's why I took the time to practice more and more, for those who have read me or know me know that needles and I don't get along well (laughs) is more times that I have been able to sew, (much laughter) although it is important to note that what they say, that practice makes perfect, I have managed to make various figures with the embroidery of beads the one I liked the most and surprises me every time I see it is some flamingos that I did recently, is that so seriously? I did that myself 🤪 Sometimes I don't believe it myself.
Como he mejorado tanto con mi costura les enseñare a ustedes a realizar un corazón bordado en mostacillas con canutillos alrededor, conste que como todos cada día sigo aprendiendo y si tienes algún consejo estaré feliz de leerte y te aseguro que lo tomare en cuenta ya que el conocimiento es para comprarlo, para transmitirlo y duplicarlo 🤗✨ así que vamos a empezar, y brillemos juntos! 🤗
As I have improved so much with my sewing I will teach you how to make an embroidered heart in beads with beads around, note that like everyone every day I am still learning and if you have any advice I will be happy to read it and I assure you that I will take it into account because knowledge is to buy it, to transmit it and duplicate it 🤗✨ so let's get started, and let's shine together!
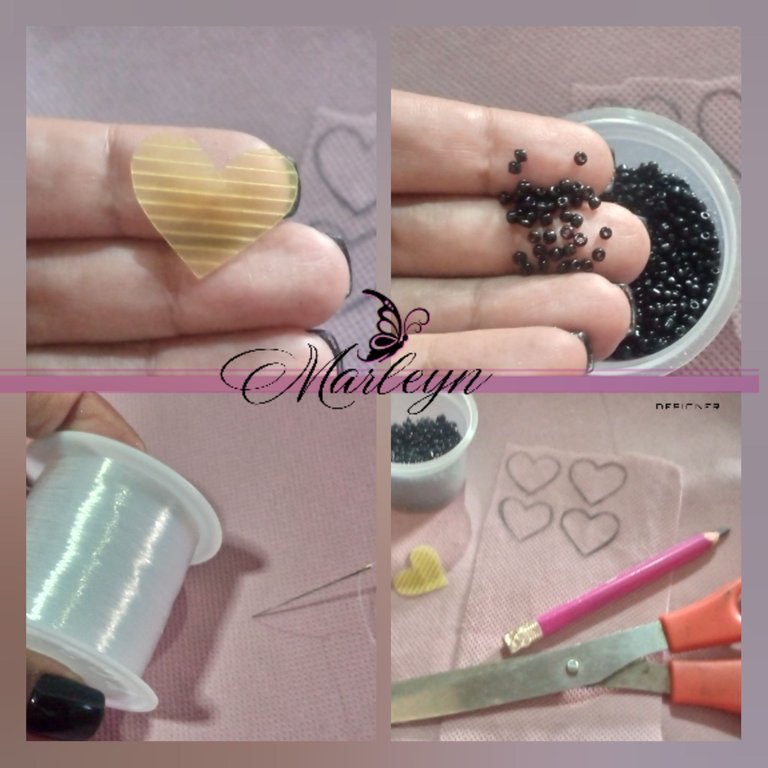
Materiales: Aguja para mostacillas, hilo nailon o hilo del color de la mostacilla que vas a bordar, tela Pop (es la tela de las batas de los cirujanos) o tela fina, cuero o tela gruesa para la base, mostacillas aproximadamente 10gr tijera, Silicon Liquido, base de zarcillo, Canutillos, Mucha paciencia y amor por aprender.
Nota: Es conveniente utilizar las telas y los hilos del mismo color que las mostacillas! Como podrás ver en las imágenes yo utilizo colores distintos de tela esto lo hago, para que tú en las fotos aprecies lo que estoy realizando con mejor detalle!
Materials: Needle for beads, nylon thread or thread of the color of the bead you are going to embroider, Pop fabric (it is the fabric of the surgeons' gowns) or thin fabric, leather or thick fabric for the base, beads approximately 10gr scissors, liquid silicon, tendril base, bobbins, lots of patience and love for learning.
Note: It is convenient to use fabrics and threads of the same color as the beads! As you can see in the pictures I use different colors of fabric, I do this so that you can see in the pictures what I am doing with better detail!
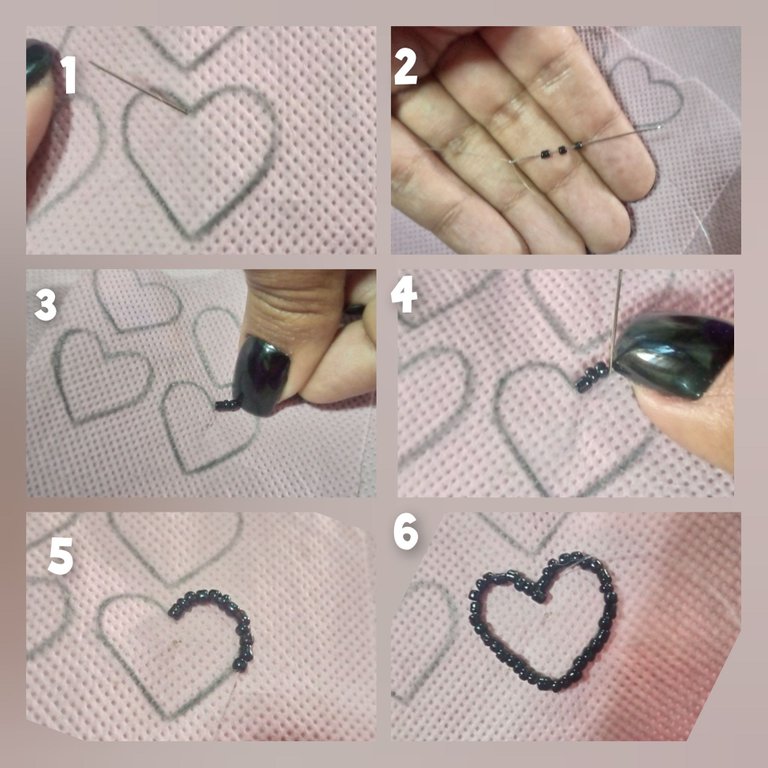
Paso 1: Dibuja con un lápiz de grafito la figura a bordar en este caso yo realice un corazón pequeño de 2 CM * 3cm, Ensarta la aguja con el hilo y realiza un amarre en la punta, introduce la aguja en el corazón de abajo hacia arriba en alguna parte de la orilla dibujada, introduce 3 mostacillas o 2 mide la distancia de las mismas y vas a introducir la aguja hacia abajo justo donde terminan las Mostacillas de manera que queden justas, ahora sube la aguja saliendo por la segunda mostacilla y repite el proceso anterior, regresando siempre por la segunda Mostacilla, para ir reforzando el bordado, sigue la secuencia hasta bordar la orilla del corazón completo.
Una Acotación, todas mis imágenes siempre seguirán esta misma secuencia didáctica, más por equivocación de mi parte no les coloque números a las demás!
Step 1: Draw with a graphite pencil the figure to embroider in this case I made a small heart of 2 CM * 3cm, thread the needle with the thread and make a tie at the tip, insert the needle into the heart from the bottom up somewhere on the edge drawn, introduce 3 beads or 2 measure the distance of the same and you are going to introduce the needle down just where the beads end so that they are just right, now go up the needle leaving the second bead and repeat the previous process, always returning by the second bead, to go reinforcing the embroidery, follow the sequence until embroidering the edge of the complete heart.
A note, all my images will always follow this same didactic sequence, but by mistake I did not put numbers on the others!
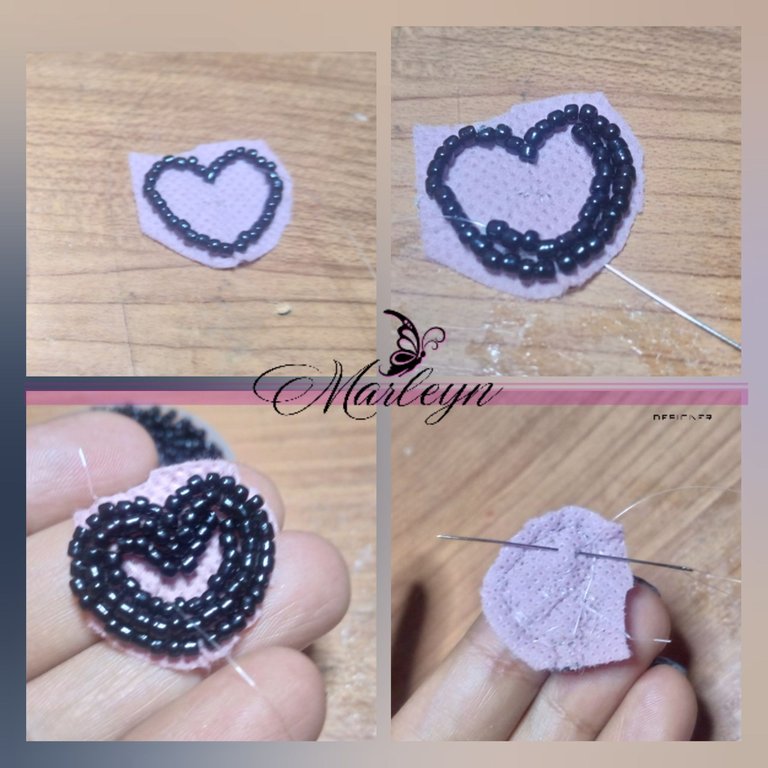
Paso 2: Luego de bordar toda la orilla vamos a continuar realizando el mismo proceso esta vez rellenando el corazón por adentro con las mostacillas! Al terminar realiza un amarre pequeño en la parte de atrás sin cortar el hilo.
Step 2: After embroidering the entire border we will continue the same process this time filling the heart inside with the beads! When finished, make a small tie at the back without cutting the thread.
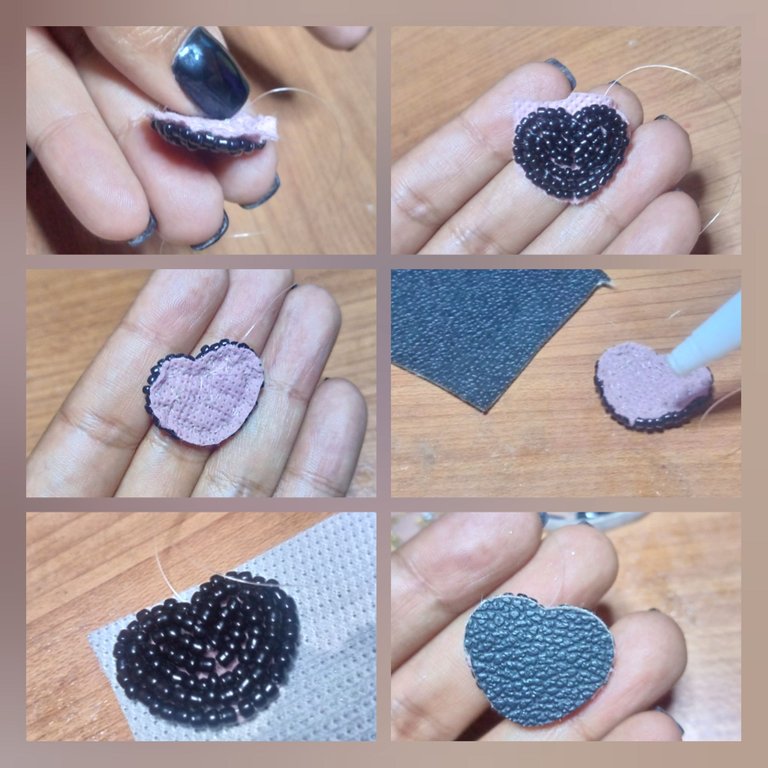
Paso 3: Con cuidado sin cortar los hilos, vamos a cortar la tela sobrante, luego coloca un poco de silicona líquido atrás de nuestra pieza y lo pegaremos en un trozo de cuero. Deja secar un poco y corta el cuero sobrante con cuidado.
Step 3: Carefully without cutting the threads, we will cut the excess fabric, then place some liquid silicone on the back of our piece and glue it on a piece of leather. Let it dry a little and cut the excess leather carefully.
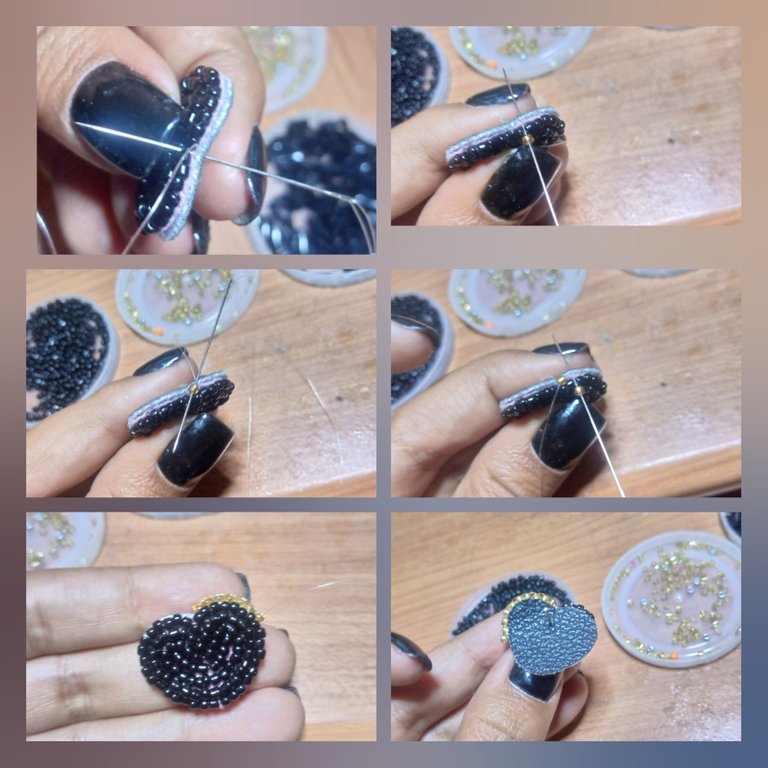
Paso 4: Vamos a bordar la orilla,yo e utilizado mostacilla dorada porque me gusta combinar colores, por favor puedes ir viendo las imagenes para empezar a guiarte! Vamos a introducir la aguja desde el cuero hacia arriba ahora agregamos una mostacilla y sacamos la aguja hacia el cuero, subimos la aguja por la mostacilla que acabamos de colocar y repetimos este proceso por toda la orilla tantas veces sea necesario para bordar hasta el otro lado.
Step 4: We are going to embroider the border, I have used gold beads because I like to combine colors, please see the pictures to start to guide you! We are going to introduce the needle from the leather upwards, now we add a bead and take the needle out towards the leather, we bring the needle up through the bead that we have just placed and repeat this process all along the border as many times as necessary to embroider up to the other side.
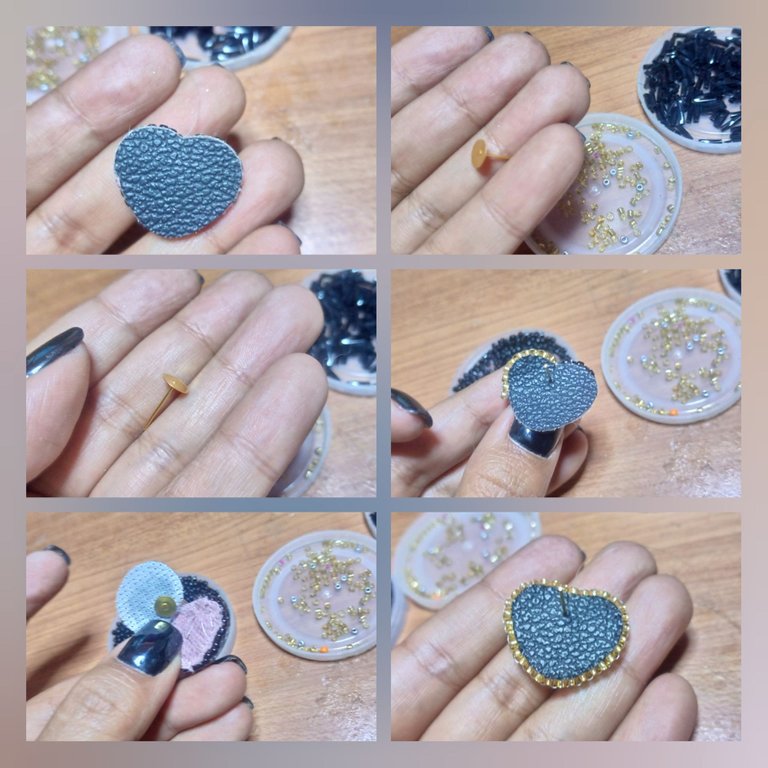
Como ves en esta parte e cometido una equivocación, no coloque el pin del zarcillo! En este momento no fue un problema ya que solo levante el cuero introduje el pin y seguí bordando! Pero en dado caso que a ti te pase y ya terminaste de bordar no te preocupes! Solo colocas un pin tipo anzuelo y listo de esta manera salvas la pieza! Equivocarnos es de humanos lo correcto es buscar soluciones no estresarnos... Ahora si continuamos! 😂
As you can see in this part I made a mistake, I didn't place the tendril pin! At this point it wasn't a problem because I just lifted the leather, inserted the pin and continued embroidering! But in case it happens to you and you're done embroidering don't worry! Just place a hook pin and that's it, this way you save the piece! To make mistakes is human, the right thing to do is to look for solutions, not to stress... Now if we continue! 😂
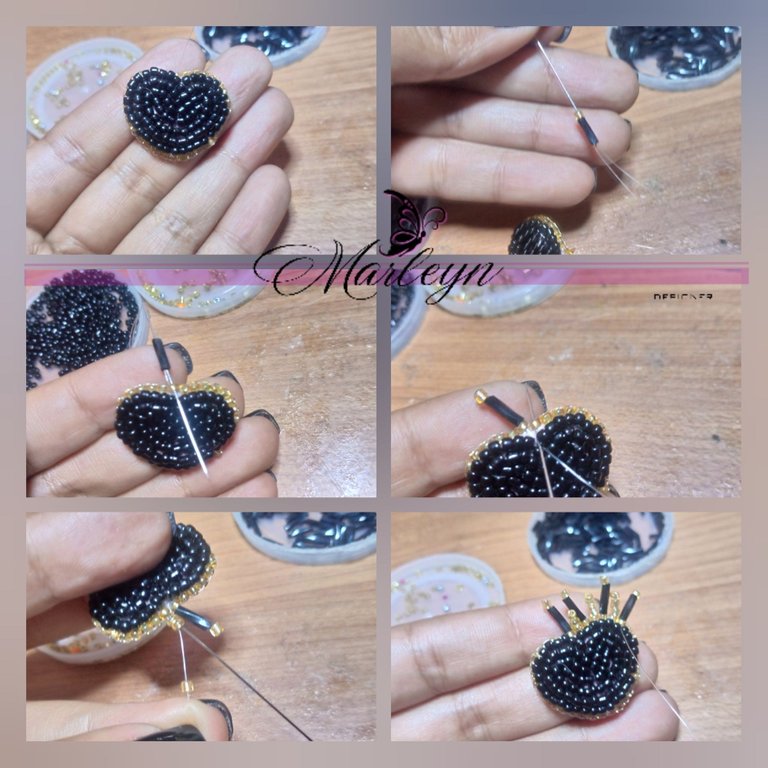
Paso 5: Vamos a colocarlos canutillos, a mi particularmente me gusta jugar con las texturas le da ese toque diverso y original a cada pieza, es importante ser diferente... Es muy fácil, desde la ultima mostacilla dorada vamos a colocar un canutillo seguido de una mostacilla, ahora regresamos la aguja por el canutillo dejando la mostacilla para un lado saliendo por la misma mostacilla que entramos, ahora saca la aguja por la siguiente mostacilla y ahora agregamos 3 mostacillas, deja la primera de un lado y te regresas por las siguientes 2 mostacillas. continua así por toda la orilla hasta llegar nuevamente al principio y de esta manera bordar completamente, te quedara hermoso! Solo debes tener paciencia es un trabajo 100℅ manual y didáctico.
Step 5: We are going to place the beads, I particularly like to play with the textures, it gives a different and original touch to each piece, it is important to be different... It is very easy, from the last golden bead we are going to place a bead followed by a bead, now we return the needle through the bead leaving the bead to one side leaving by the same bead that we entered, now take out the needle for the next bead and now add 3 beads, leave the first one on one side and you return for the next 2 beads. continue this way all along the edge until you reach the beginning again and in this way embroider completely, it will be beautiful! You just have to be patient, it is a 100℅ manual and didactic work.
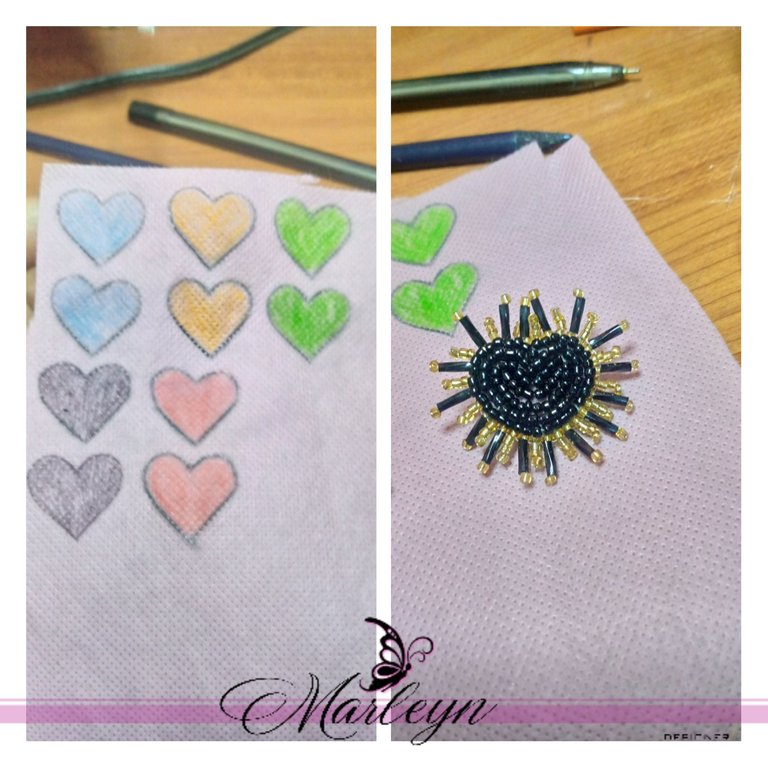
Concejo: Si no tienes tela del mismo color que las mostacillas puedes colorear la y continuar. Nunca dejes de crear, siempre hay opciones! Confía en ti y en tus capacidades 😁😁😁
Tip: If you don't have fabric of the same color as the beads, you can color it and continue. Never stop creating, there are always options! Trust in yourself and your abilities 😁😁😁😁.
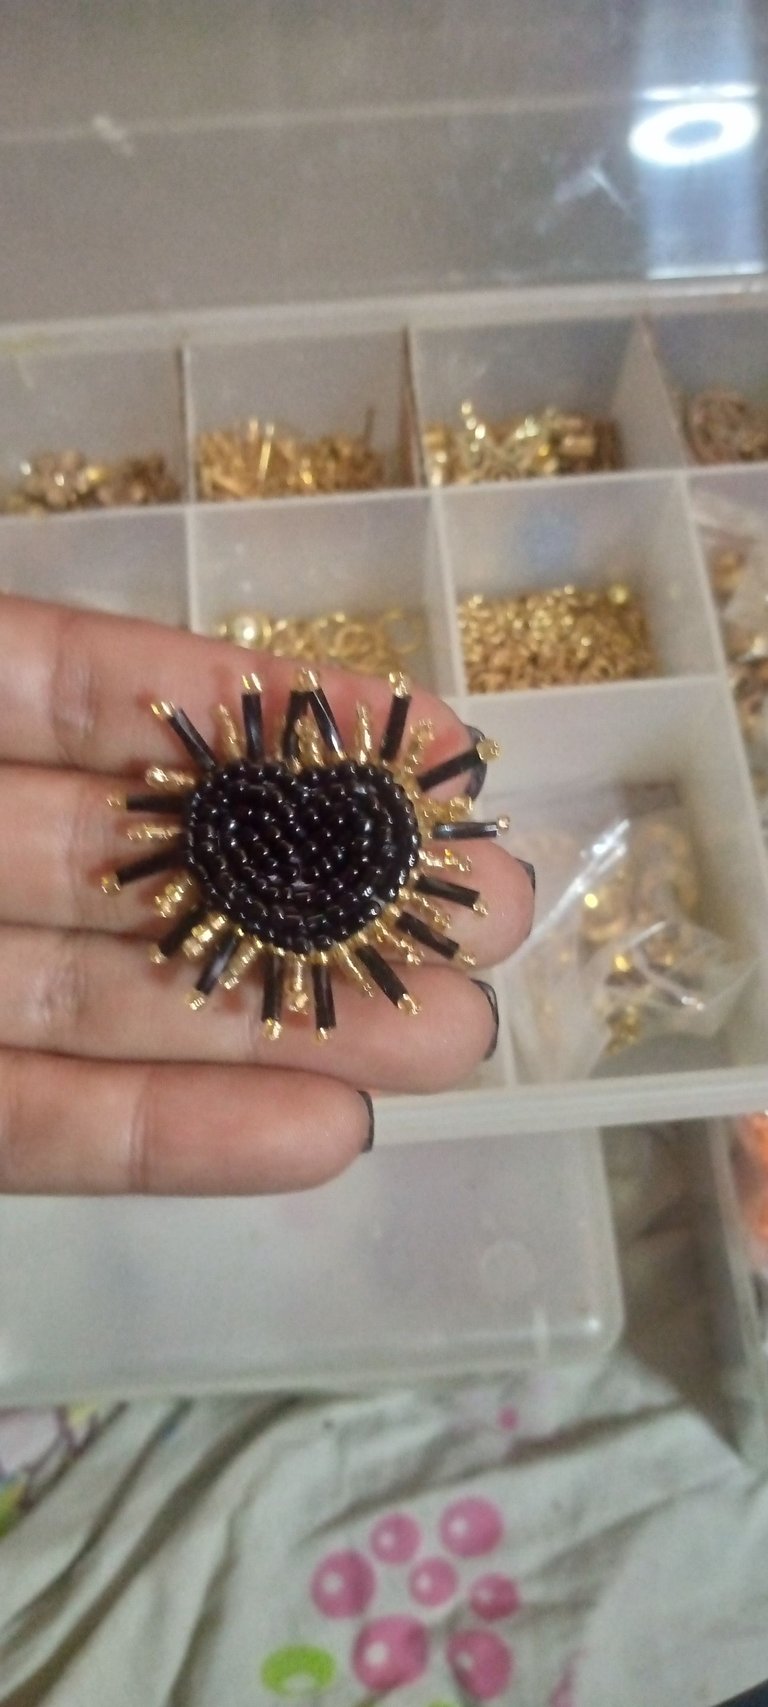


IMAGENES CREADAS EN CANVA
IMAGES CREATED IN CANVA

