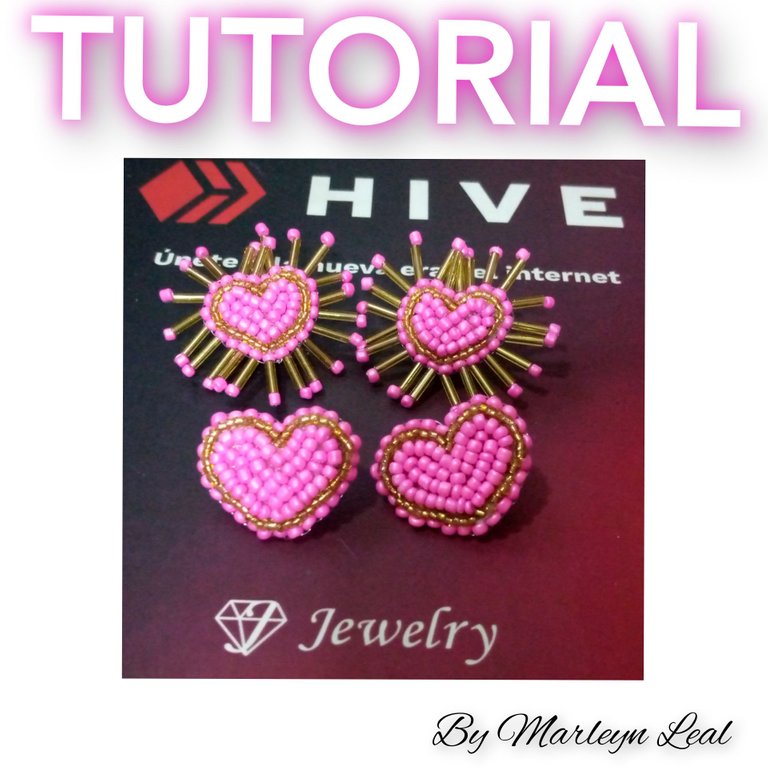
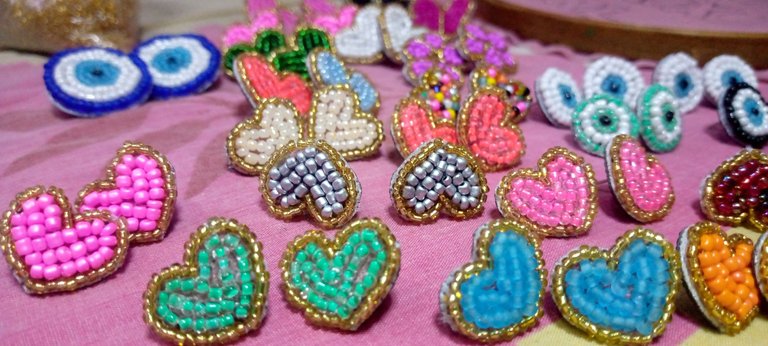
Feliz y Bendecido día, deseo se encuentren bien llenos de energía positiva y las mejores vibras del universo, llenos de salud, armonía y sobre todo brillando creciendo innovando, siendo cada día tu mejor versión 😁 estás últimas semanas realice nuevos modelos, y hoy quiero mostrarle unos corazones hermosos, súper sencillos aunque originales, son muy versátiles, quedarán bien con gran cantidad de atuendos dando ese toque increíble a tu outfit.
Outfit es un término en inglés que hace referencia a la combinación de ropa y accesorios determinados para una época del año, corriente específica de moda u ocasión social. El término se ha vuelto popular gracias a las redes sociales, en donde se utiliza para comentar la manera de vestir de alguien, especialmente de celebridades e influenciadores.
Todos los materiales son de fácil acceso, los colores puedes combinarlos según tus gustos! Yo te explicare mi proceso paso a paso con ayuda de una secuencia de imagenes! Estaré atenta si tienes dudas para ayudarte.
Materiales: Mostacillas fucsias #11, Mostacillas doradas más pequeñas, tela POP o tela fina para el bordado, aguja #11 para Mostacillas, hilo del color de la Mostacilla o nailon en su defecto, cuero, silicón líquido o E6000, base de Zarcillo plana. Opcional canutillo dorado.
Concejos: Para este modelo de zarcillo te recomiendo Utilizar hilo de talabartería sigue siendo nailon pero viene en diferentes presentaciones de colores y más fuerte que el hilo de costura normal
Outfit is a term that refers to the combination of clothes and accessories for a specific time of the year, fashion trend or social occasion. The term has become popular thanks to social media, where it is used to comment on the way someone dresses, especially celebrities and influencers.
All the materials are easily accessible, the colors can be combined according to your taste! I will explain my process step by step with the help of a sequence of images! I'll be attentive if you have doubts to help you.
Materials: Fuchsia beads #11, smaller gold beads, POP fabric or thin fabric for embroidery, needle #11 for beads, thread in the color of the beads or nylon, leather, liquid silicone or E6000, flat Zarcillo base. Optional gold-colored beading.
Tips: For this tendril model I recommend using saddlery thread, it is still nylon but it comes in different color presentations and stronger than normal sewing thread.
Recuerda aprende con amor por lo que haces, disfruta el proceso! Con paciencia, no te preocupes si al principio no te queda perfecto, la práctica la hace el maestro, todo lleva su tiempo y su aprendizaje dependerá de cada quien! Aunque ten presente siempre que Tu puedes con todo y más 💖✨
Remember to learn with love for what you do, enjoy the process! With patience, do not worry if at the beginning it is not perfect, practice makes perfect, everything takes time and learning will depend on each person! Although always keep in mind that you can do anything and more 💖✨
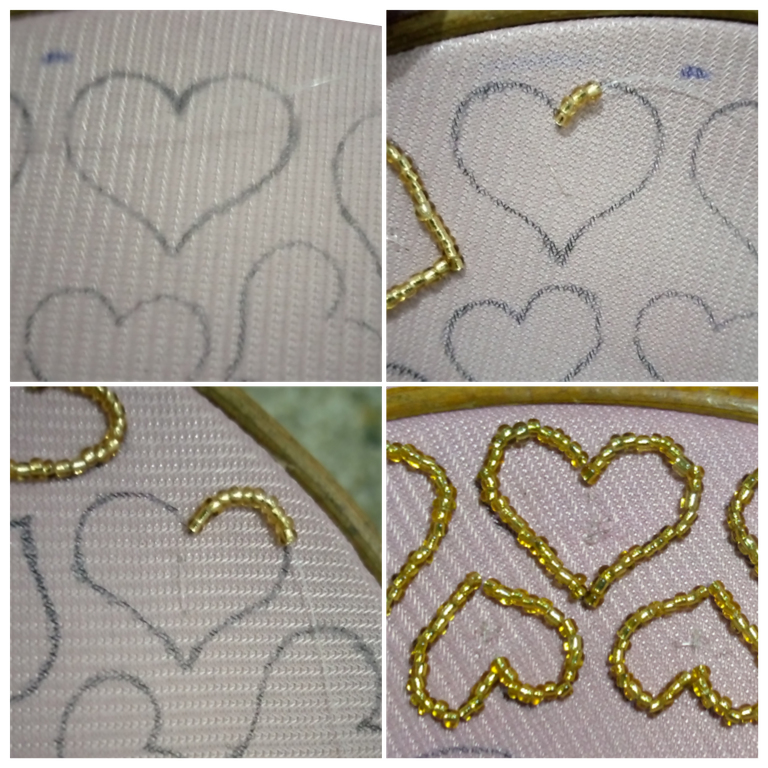
Paso 1: En la tela fina vamos a dibujar el corazón del tamaño que desees, yo realice 2 tamaños pequeño y mediano. Ensarta la aguja con el Nailon realiza un amarre en la punta, vamos a introducir la aguja de abajo hacia arriba por el centro del corazón, luego la sacamos por una de las orillas y comenzamos a bordar las Mostacillas dorada de 4 en 4 es decir introduces 4 Mostacillas en la aguja, verificas a qué distancia llegan y allí introduces la aguja hacia abajo, y la regresamos hacia arriba por el medio es decir entre la Mostacilla 2 y 3 la introduces por las Mostacillas 3 y 4 para salir y repetir el proceso hasta completar toda la orilla del corazón!
Step 1: On the thin fabric we are going to draw the heart of the size you want, I made 2 sizes small and medium. Thread the needle with the Nylon, make a tie at the tip, we will introduce the needle from the bottom up through the center of the heart, then we take it out by one of the edges and begin to embroider the gold beads 4 by 4, that is to say you introduce 4 beads in the needle, check how far apart they are and then insert the needle downwards, and return it upwards through the middle, i.e. between the 2 and 3 beads, insert it through the 3 and 4 beads to come out and repeat the process until completing the entire edge of the heart!
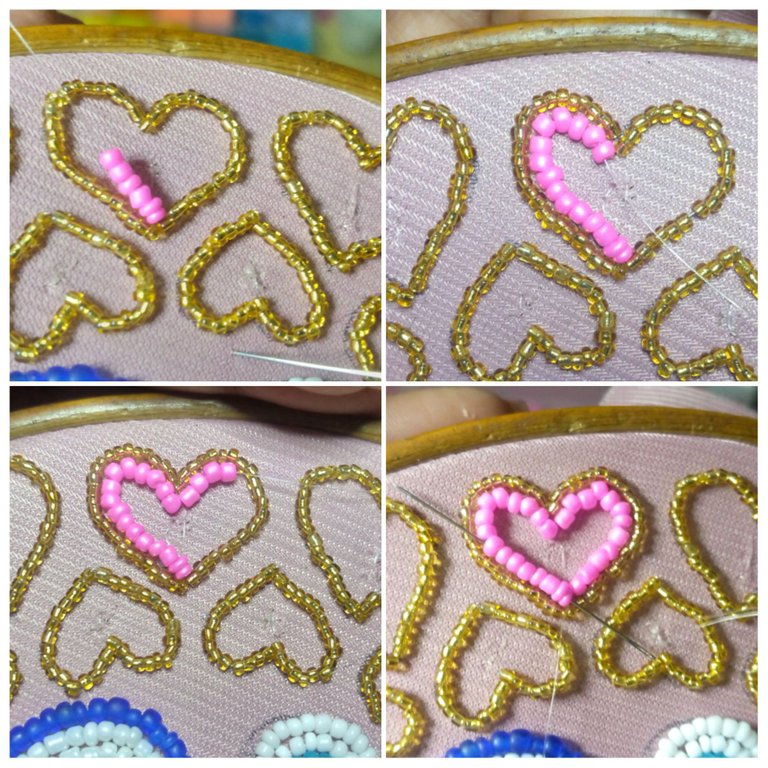
Paso 2: Realiza el mismo proceso que el paso anterior 🤗 esta vez vamos a rellenar la parte de adentro del corazón, es el mismo proceso anterior aunque esta vez yo lo hice de 6 en 6 Mostacillas subiendo por la Mostacilla 3 para salir en la Mostacilla 6 y así consecutivamente hasta llegar a dónde empezamos.
Step 2: Perform the same process as the previous step 🤗 this time we are going to fill in the inside of the heart, it is the same process as above although this time I did it 6 by 6 Little Beads going up through Little Bead 3 to come out on Little Bead 6 and so on consecutively until we get to where we started.
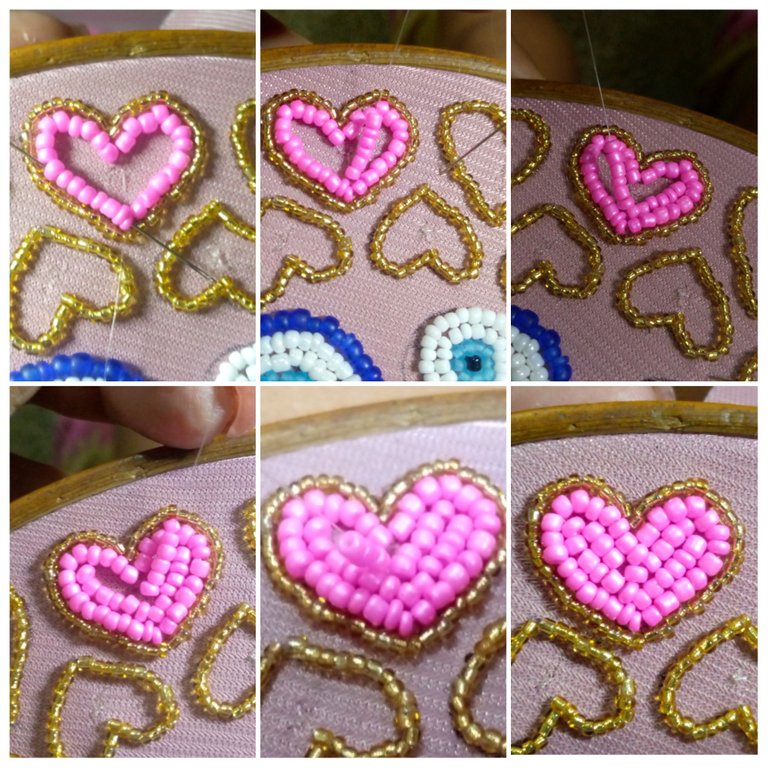
Paso 3: Continúa de la misma manera para rellenar el centro del corazón si es posible realiza un amarre cada vez que finalicen una parte de esta manera si se revienta el nailon no se dañara la pieza completa! Cuando termines, realiza un amarre corta el hilo y coloca una gota de silicón líquido o pega E6000 en la parte de atrás para que se fije la base plana de zarcillo.
Step 3: Continue in the same way to fill in the center of the heart if possible make a tie each time you finish a part this way if the nylon bursts it won't damage the whole piece! When finished, make a tie, cut the thread and place a drop of liquid silicone or E6000 glue on the back to attach the flat tendril base.
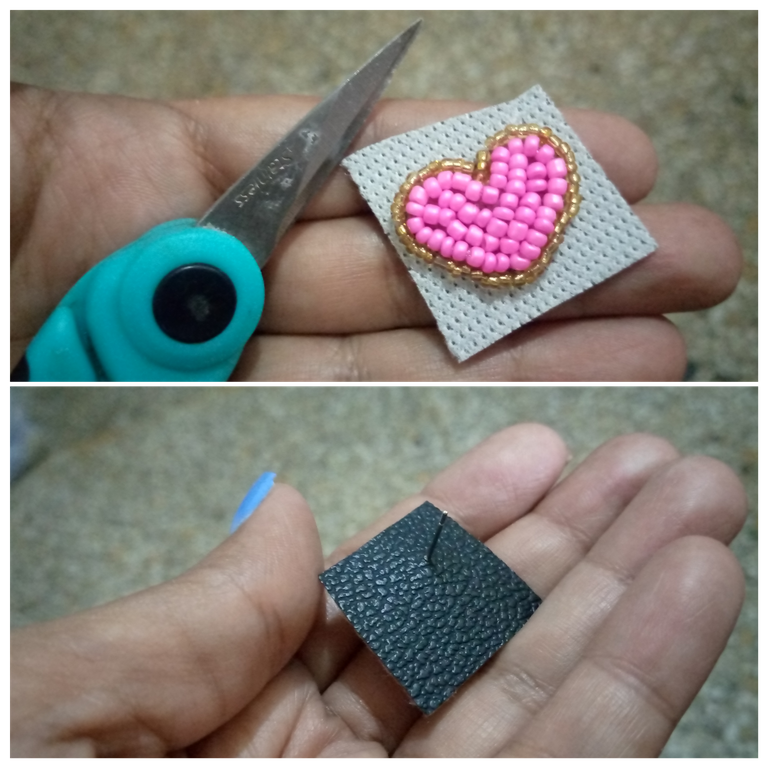
Paso 4: Pegamos el zarcillo en el cuero, dejamos secar preferiblemente varias horas y procedemos a cortar. No coloques pegamento por las orillas para que puedas bordar con facilidad, solo en la parte central para fijar la base y el zarcillo.
Step 4: Glue the tendril on the leather, let dry preferably several hours and proceed to cut. Do not put glue around the edges so you can embroider easily, only in the central part to fix the base and the tendril.
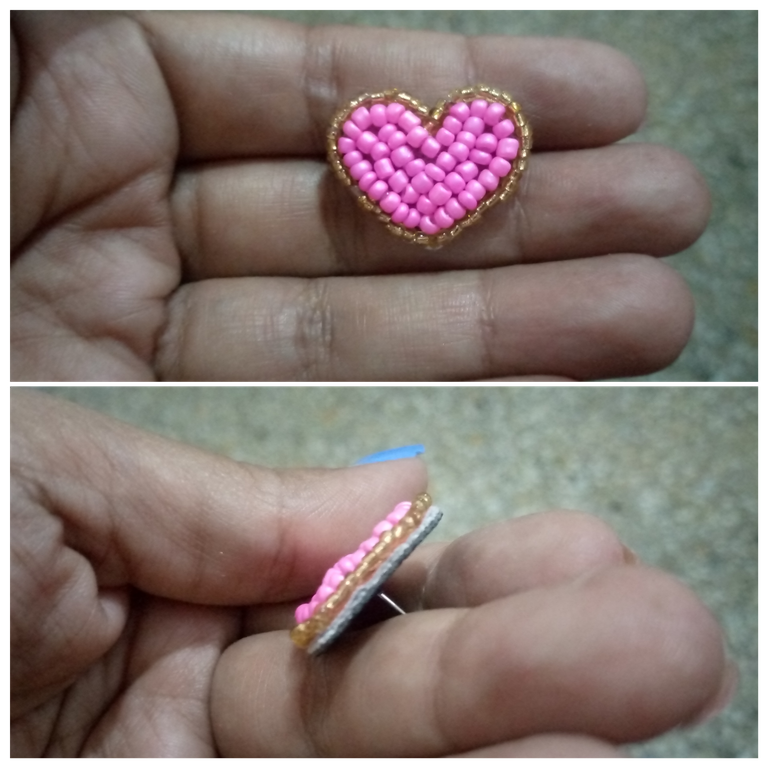
Paso 5: Luego de cortar todo el cuero, nuevamente ensartamos la aguja con el hilo y le vas a realizar un amarre en la punta introduces la aguja por abajo de las Mostacillas pero arriba del cuero, de manera que escondas el nudo, saca la aguja hacia arriba, pasa por encima del nailon de las Mostacillas doradas y baja por el cuero.
Step 5: After cutting all the leather, again thread the needle with the thread and you are going to make a tie at the tip, introduce the needle below the beads but above the leather, so that you hide the knot, pull the needle up, pass over the nylon of the golden beads and down the leather.
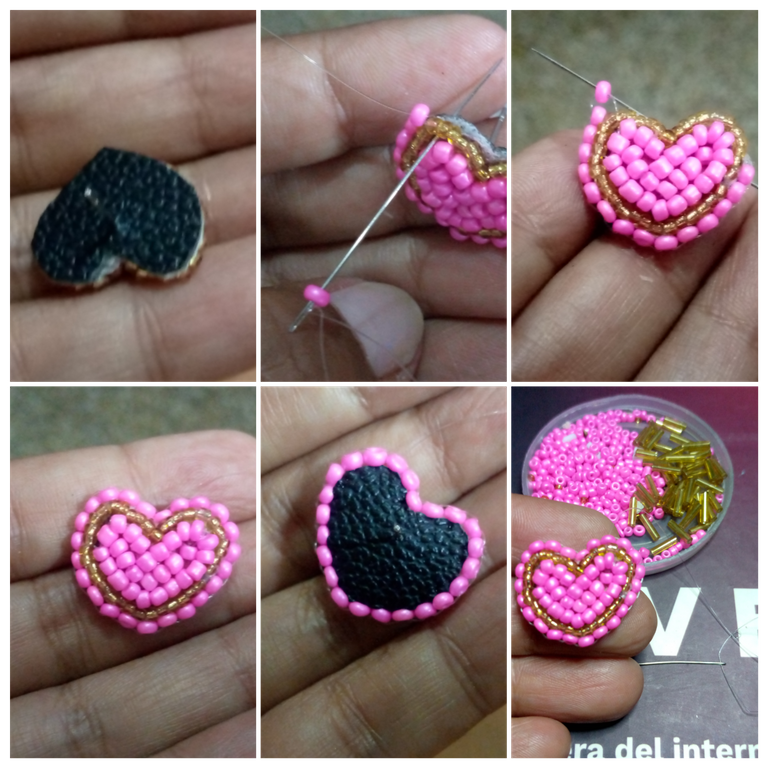
Paso 6: Siguiendo desde el paso anterior debes introducir una Mostacilla en la aguja y la meteremos nuevamente por el cuero agarrando el nailon de las Mostacillas doradas hacia abajo, y de esta manera consecutivamente para así bordar toda la orilla, al terminar realizar nudos escondiendo el nudo entre las Mostacillas, si quieres dejarlo así y te gusta solo corta el nailon sobrante y listo! Quedará un hermoso corazón, si quieres algo más podemos darle un toque diferente.
Step 6: Continuing from the previous step you must introduce a Mostacilla in the needle and we will put it again through the leather grabbing the nylon of the golden Mostacillas down, and in this way consecutively in order to embroider the entire edge, when finished make knots hiding the knot between the Mostacillas, if you want to leave it like this and you like just cut the excess nylon and that's it! It will be a beautiful heart, if you want something else we can give it a different touch.
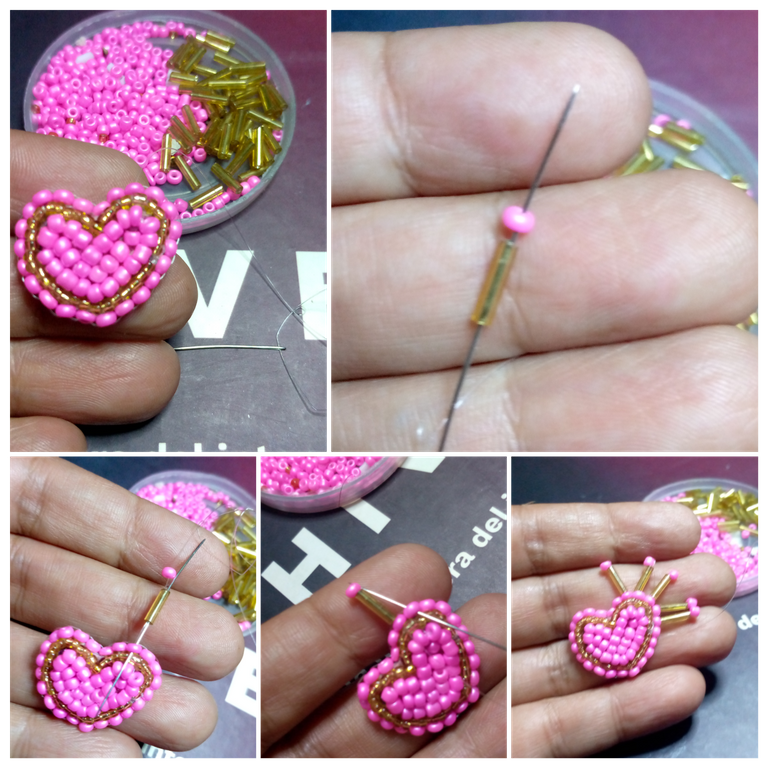
Si te gusta diferente puedes hacerlo de esta manera, o quizás colocando unos flecos de distintos tamaños! Para realizar esto solo debes subir la aguja por una de las Mostacillas que bordamos, y colocar un canutillo dorado y una Mostacilla, devuelve la.aguja por el canutillo dejando la Mostacilla para que sea el agarre, saca la aguja por la Mostacilla de abajo del bordado y ahora la subes por la Mostacilla siguiente y repetimos el proceso hasta llegar nuevamente a dónde empezamos, allí realiza un amarre y esconde el nudo por entre las mostacillas. De esta manera tenemos un Zarcillo distinto, hermoso y súper diferente a lo que estamos acostumbrados a ver en las tiendas.
If you like it different you can do it this way, or maybe with bangs of different sizes! To do this you just have to raise the needle through one of the beads that we embroidered, and place a golden bead and a bead, return the needle through the bead leaving the bead to be the grip, take the needle out through the bead below the embroidery and now you raise it through the next bead and repeat the process until you get back to where you started, there make a tie and hide the knot between the beads. In this way we have a Zarcillo different, beautiful and super different from what we are used to see in the stores.
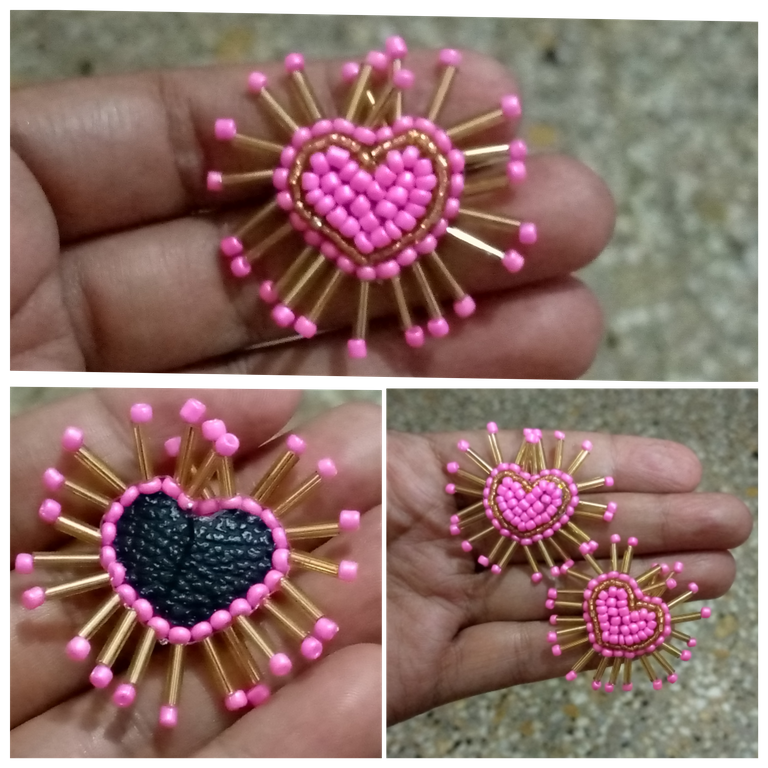
Espero que este tutorial sea de tu total agrado! Yo continuaré realizando esta pieza en diferentes colores, pero no quería dejar de mostrarte mi manera de como hacerlo!
I hope this tutorial is to your liking! I will continue to make this piece in different colors, but I didn't want to stop showing you my way of doing it!


IMAGENES CREADAS EN CANVA
IMAGES CREATED IN CANVA
