Greetings Community. I hope it's being a great day for you guys. For the one that isn't. Cheer up that everything is going to get better!. I'm dropping by to leave you a new tutorial on what has now become my main resource in terms of my content creations for the platform, as it is recycling. I hope you can enjoy this step by step and value it if you like. Today I will make a cute kitty with flowers in nail polish petals I hope you like it.
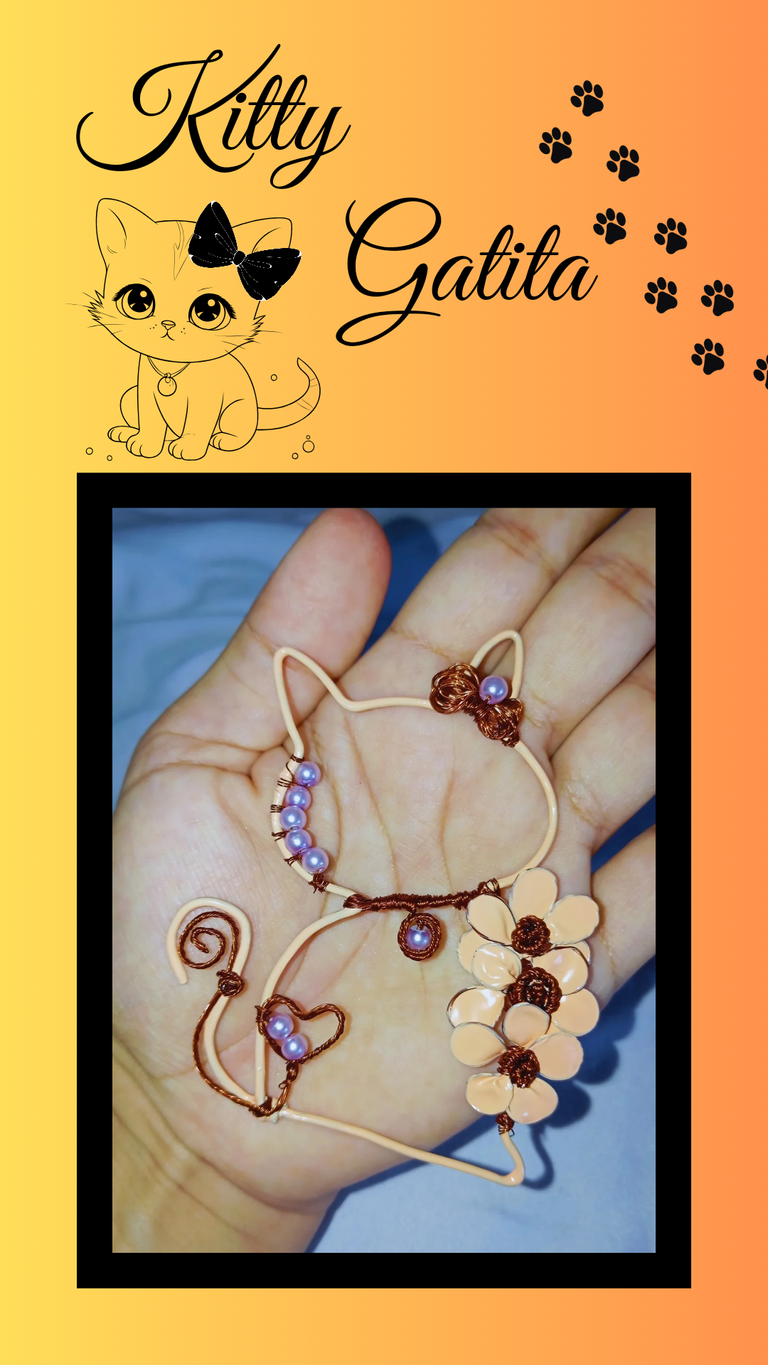
Saludos Comunidad. Espero esté siendo un día grandioso para ustedes. Para el que no sea así. Ánimos que todo va a mejorar!. Paso por acá a dejarles un nuevo tutorial en lo que ahora se ha convertido mi principal recurso en cuanto a mis creaciones de contenido para la plataforma, como lo es el reciclaje. Deseo que puedan disfrutar de este paso a paso y valorarlo si así gustan. Hoy haré una linda gatita con flores en pétalos de esmalte de uñas ojalá sea de su agrado.
Materials:
- Wire used in construction.
- Recycled copper wire.
- Nail polish. I used one that was already too sticky and I didn't use it.
- Beads.
- Needle.
- 2 thick sticks of the same size.
- Tweezers.
- Something round.
Materiales:
- Alambre de uso en construcción.
- Alambre de cobre reciclado.
- Esmalte de uñas. Yo usé uno que ya estaba muy pegajoso y no usaba.
- Cuentas.
- Aguja.
- 2 palitos gruesos del mismo tamaño.
- Pinza.
- Algo redondo.
Step 1:
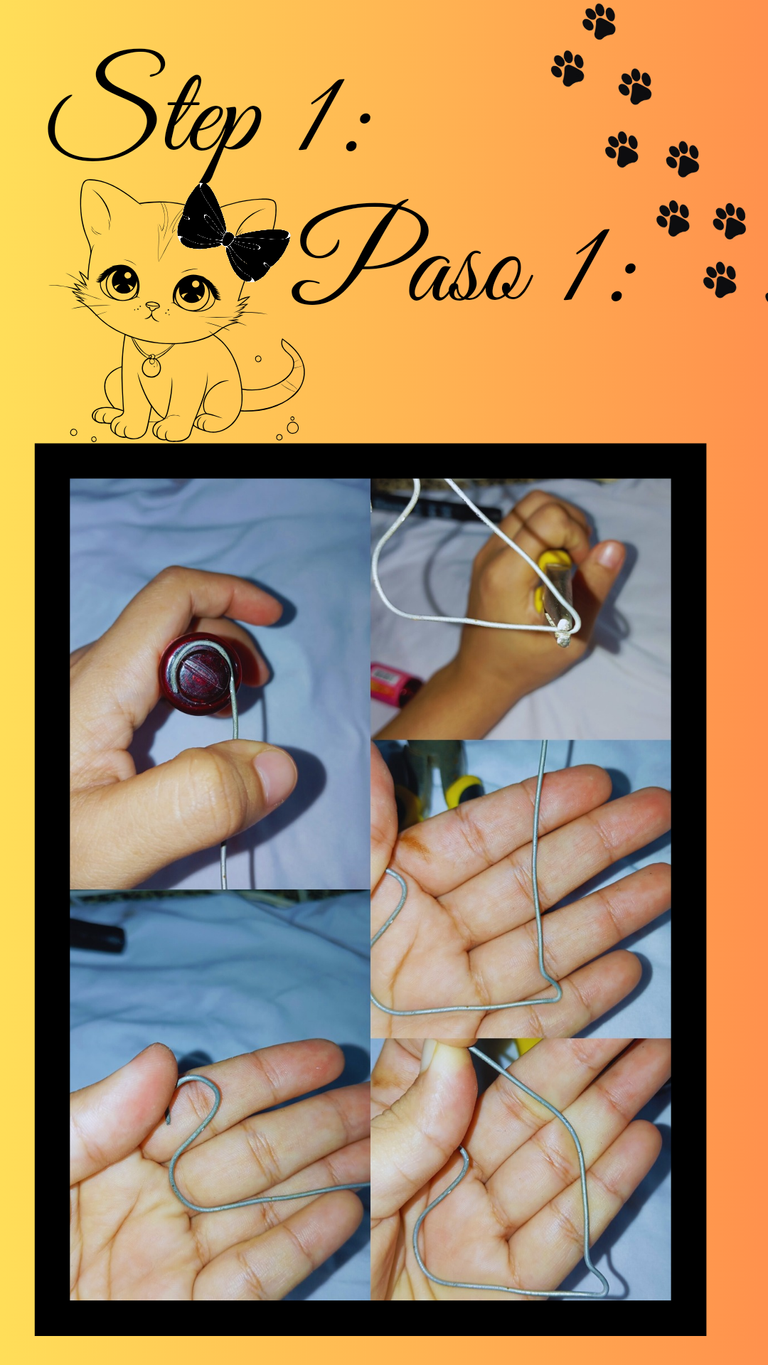
We will make the whole shape of our kitty in the construction wire, we will start with the tail and then the paw, we will give it a slight curve to make the division where the neck and head will go.
Paso 1:
Haremos toda la forma de nuestra gatita en el alambre de construcción, Comenzaremos por la cola y luego la patita, le daremos una leve curva para hacer la división dónde irá el cuello y la cabeza.
Step 2:
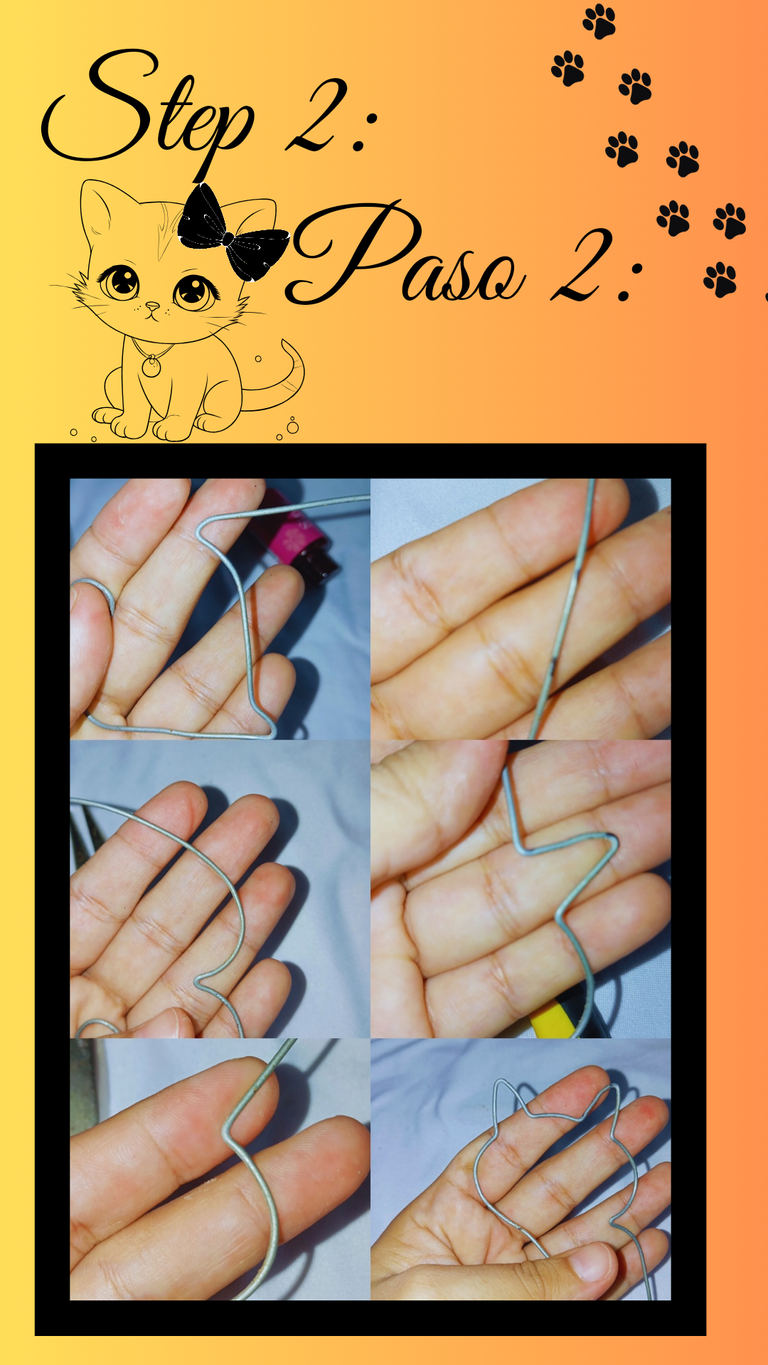
We will use the round object and we will shape the head leaving a small space to make the triangle of the first ear, we will leave another space and we will make the other ear this will be done with the help of the tweezers. I made two marks with a pencil so that the ears were exactly the same size.
Paso 2:
Usaremos el objeto redondo y le daremos forma a la cabeza dejando un pequeño espacio para hacer el triángulo de la primera orejita, volveremos a dejar otro espacio y haremos la otra orejita esto lo realizaremos con ayuda de la pinza. Yo hice dos marcas con un lapiz para que las orejitas me quedaran exactamente del mismo tamaño.
Step 3:
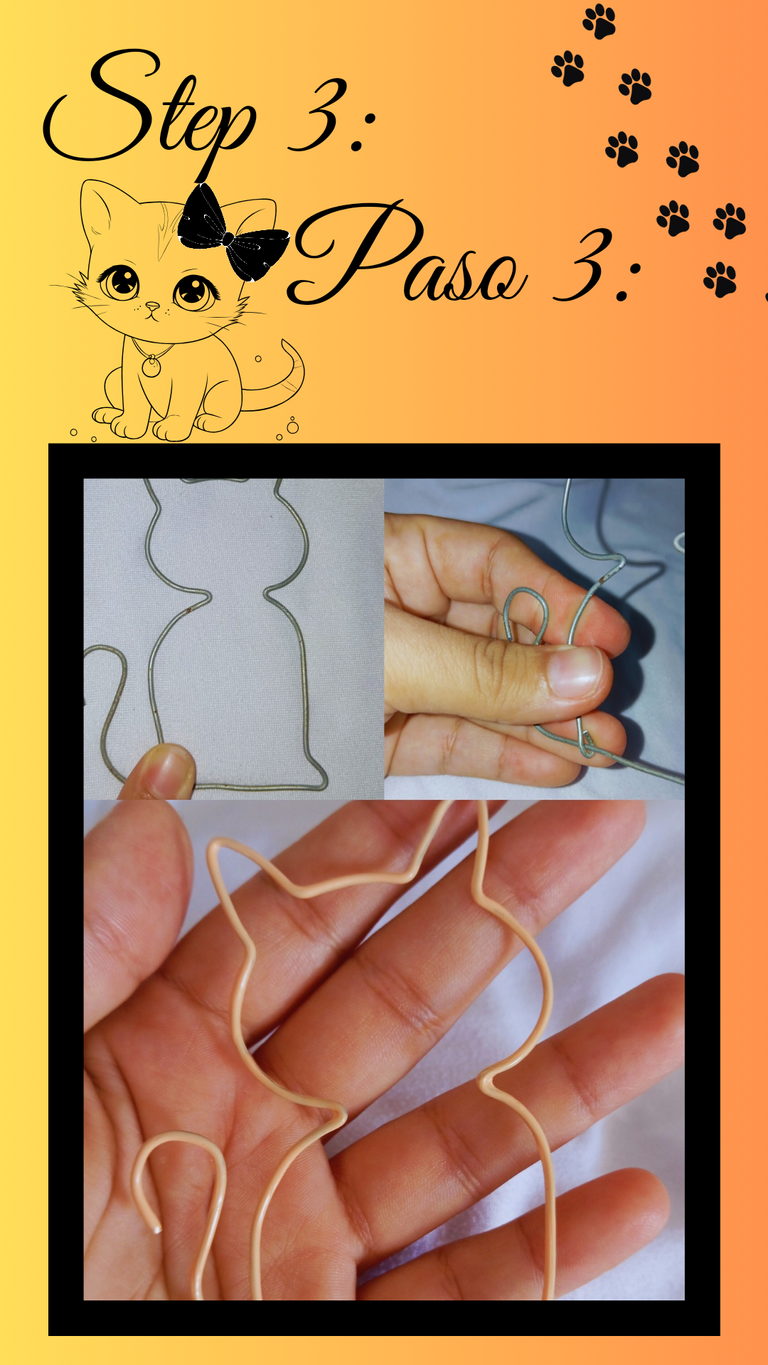
We will make another curve to make the rest of the kitty's body and with the help of the tweezers we will secure the end of the wire where the body will end. Once this is done, we will proceed to paint all the wire with nail polish.
Paso 3:
Realizaremos otra curva para hacer el resto del cuerpo de la gatita y con ayuda de la pinza aseguraremos al final del alambre donde terminará el cuerpo. Hecho esto procederemos a pintar todo el alambre con el esmalte de uñas.
Step 4:
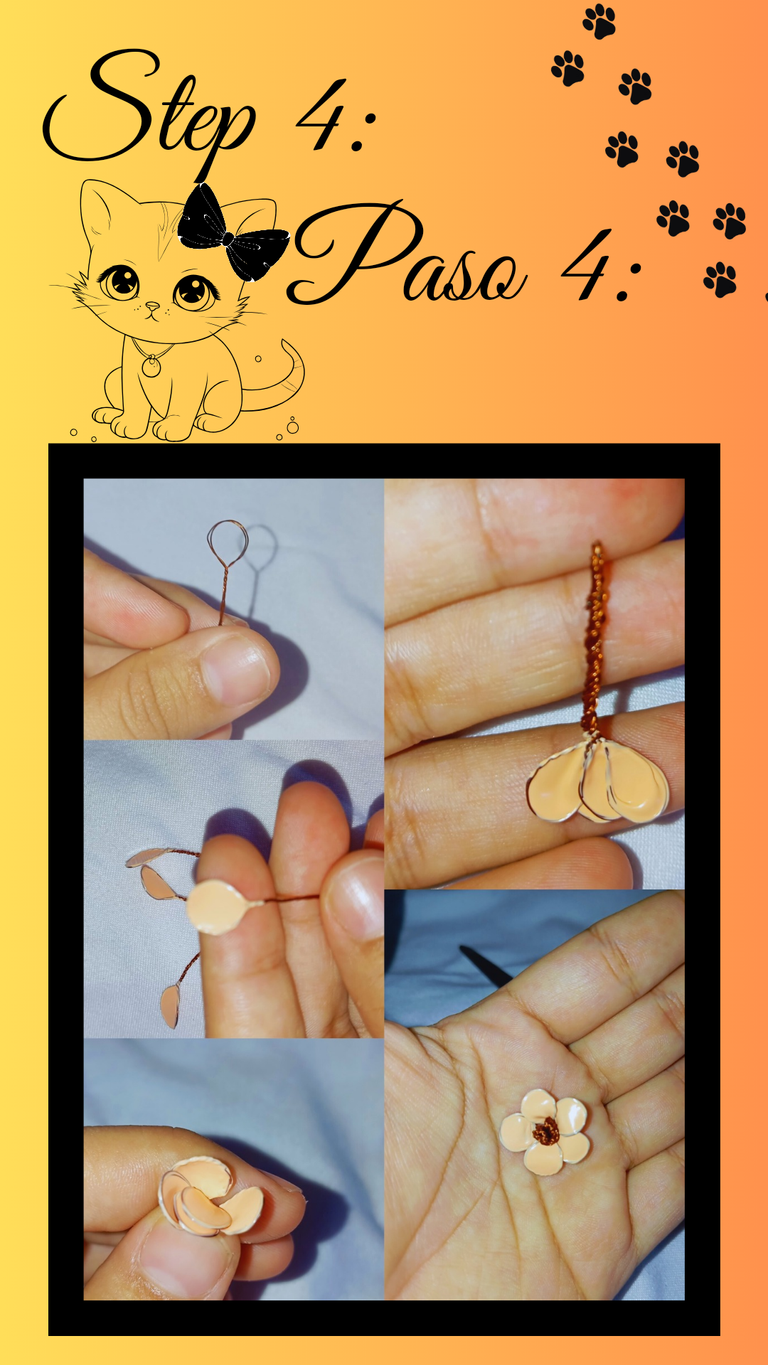
We will make a small ring with two short copper strands and we will twist well, with the enamel brush well moistened we will pass trying to cover the entire ring. Once we have made all our petals, we will let them dry and we will apply another layer to make it resistant. We will take five petals, we will twist them well, we will give a spiral shape and we will open the petals. We will make three little flowers.
Paso 4:
Haremos un pequeño arito con dos hebras de cobre cortas y entorcharemos bien, con la brocha del esmalte bien humada pasaremos tratando de cubrir todo el aro. Una vez logremos hacer todos nuestros pétalos dejamos secar y le pasaremos otra capa para que quede resistente . Tomaremos cinco pétalos entorcharemos bien, damos forma de espiral y abriremos los pétalos. Haremos tres florecitas.
Step 5:
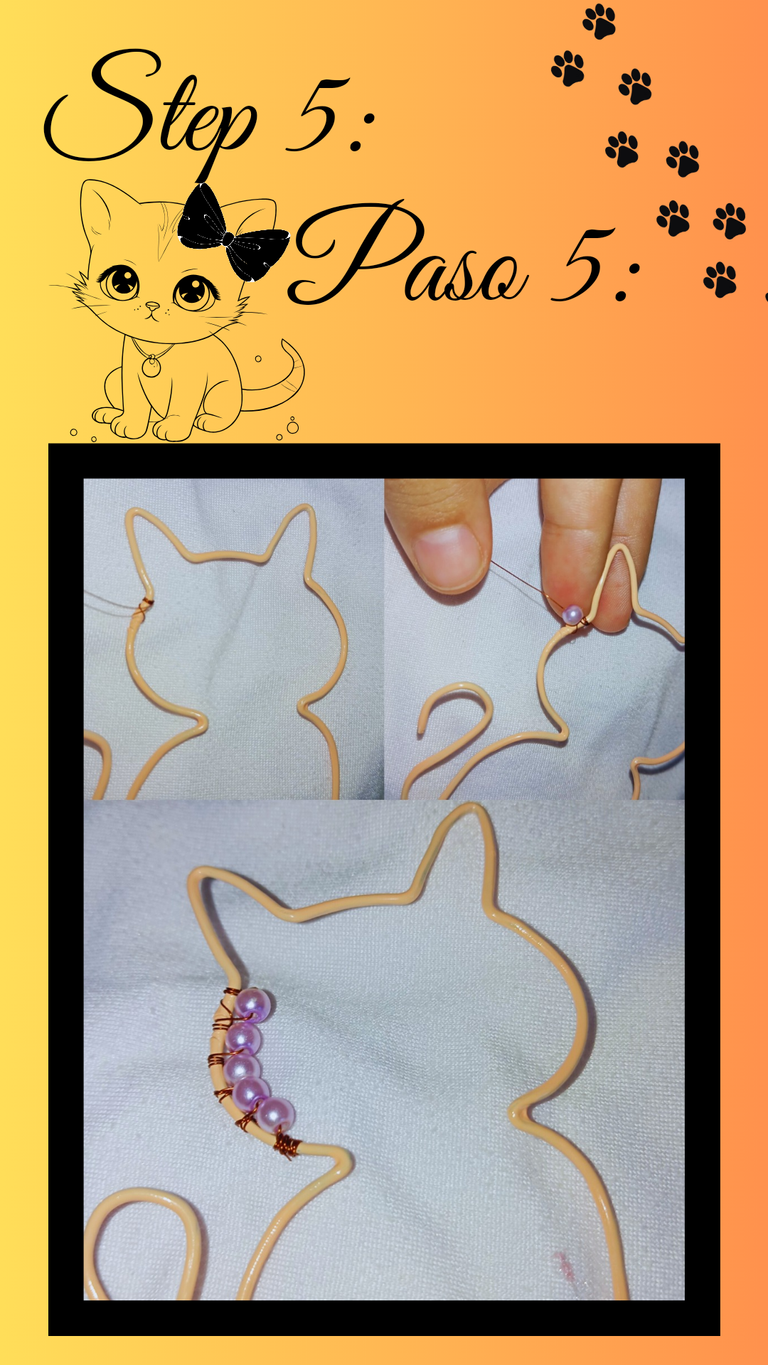
With a copper thread we will place five beads on one side of the face of the kitten.
Paso 5:
Con una hebra de cobre colocaremos de un lado de la cara de la gatita cinco cuentas.
Step 6:
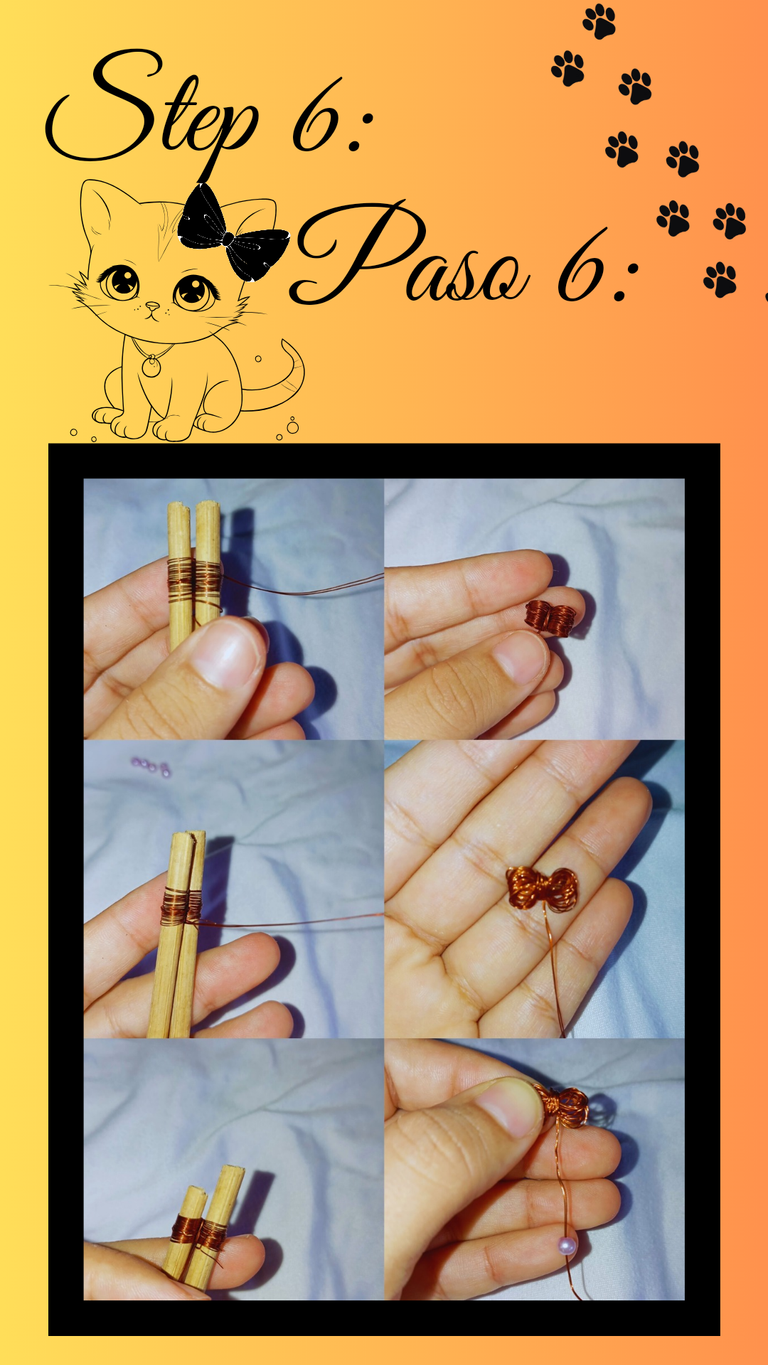
To make the kitty's bow, we roll 2 copper strands on the two sticks and pass through the center to ensure tension, flatten and shape, leave an excess and insert a bead to be the center of our bow.
Paso 6:
Para hacer el moño de la gatita, enrollamos en los dos palitos 2 hebras de cobre y pasaremos por el centro para asegurar haciendo tensión, aplastaremos y daremos forma, dejamos un sobrante e insertamos una cuenta para que sea el centro de nuestro moño.
Step 7:
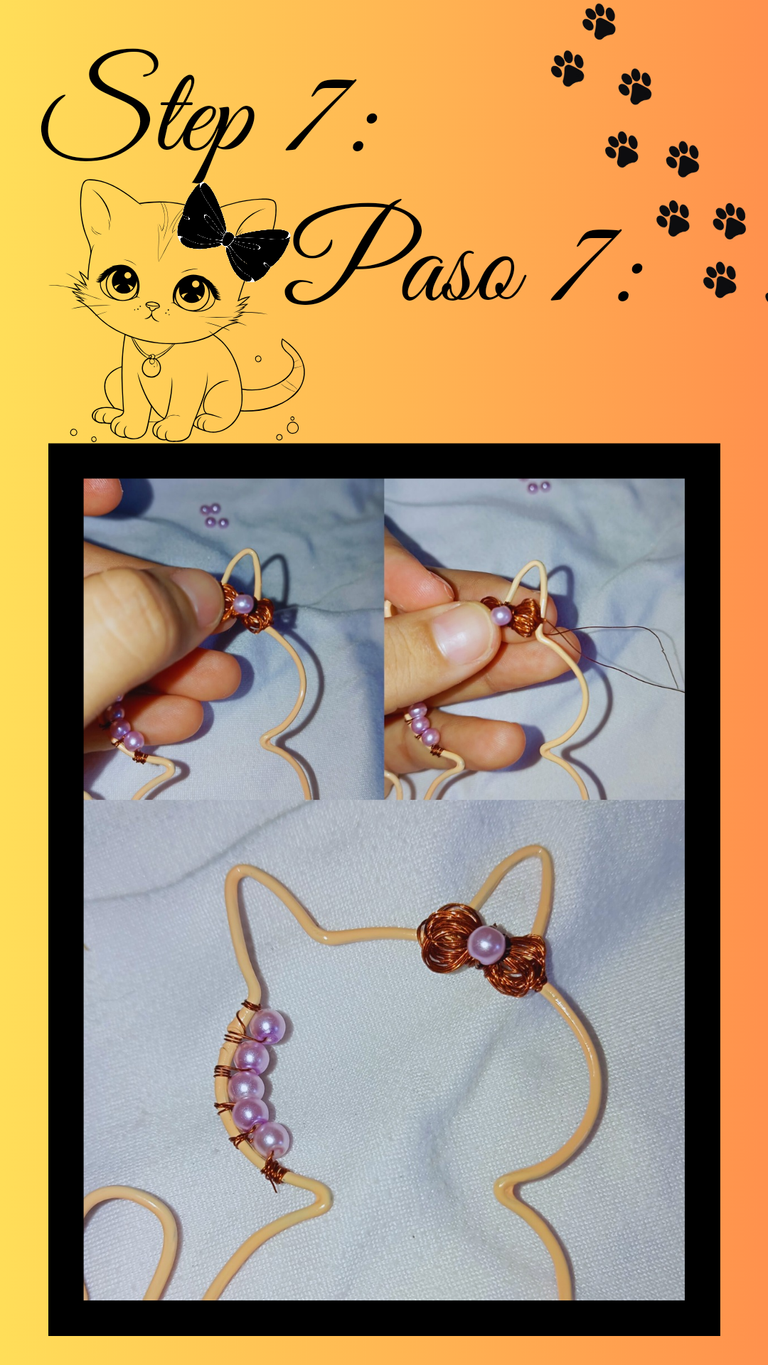
With a strand of copper we will secure the bow in one of the ears of our kitty.
Paso 7:
Con una hebra de cobre aseguraremos el moño en una de las orejitas de nuestra gatita.
Step 8:
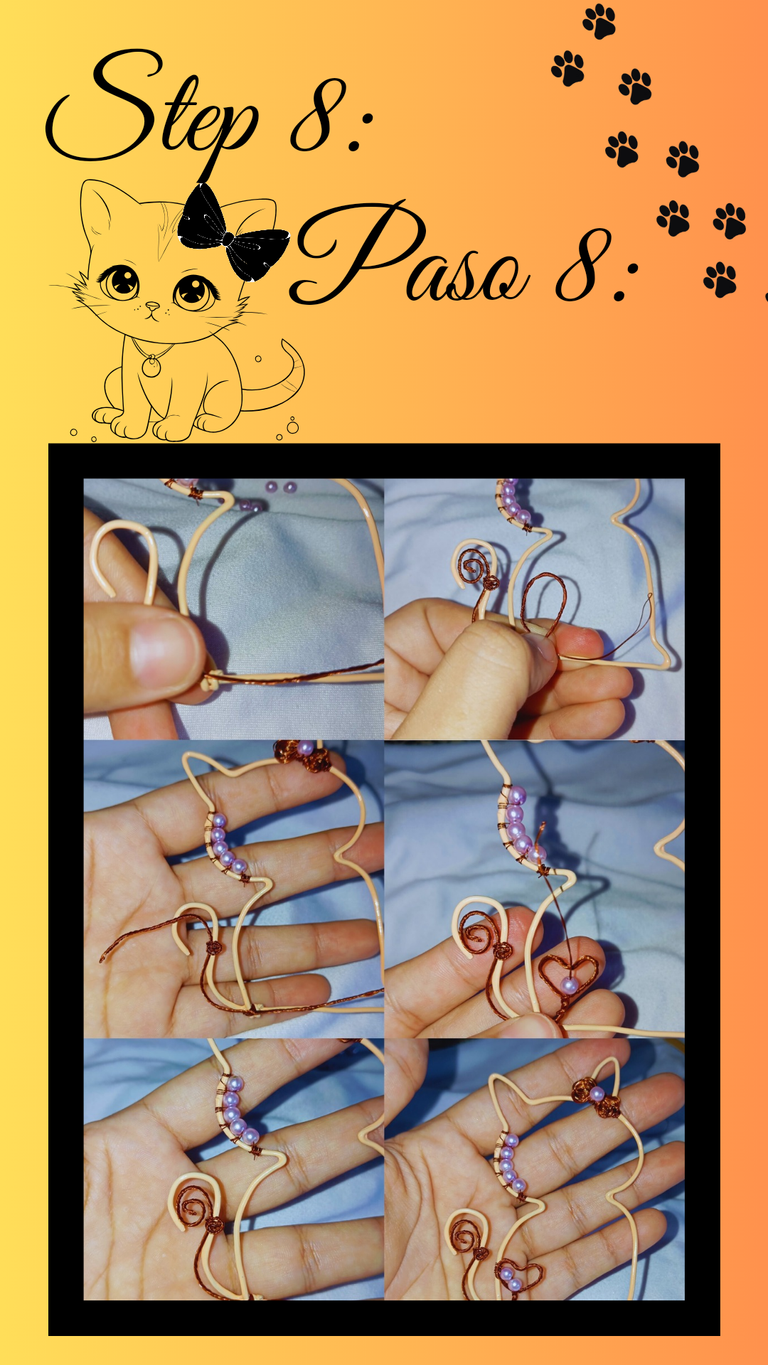
We will twist about 8 strands of copper to give it firmness, we will secure with a strand of copper where the thick wire tie would go and we will make the shape of the spiral tail, then with the excess that will remain in the center of the kitten we will make a little ring and we will give it the shape of a heart, we will place two beads and we will tie it to a little side.
Paso 8:
Entorcharemos unas 8 hebras de cobre para darle firmeza , aseguramos con una hebra de cobre en donde iría el amarre del alambre grueso y haremos la forma de la colita en espiral, luego con el sobrante que quedará en el centro de la gatita haremos un arito y daremos forma de corazón, le colocaremos unas dos cuentas y amarraremos a un ladito.
Step 9:
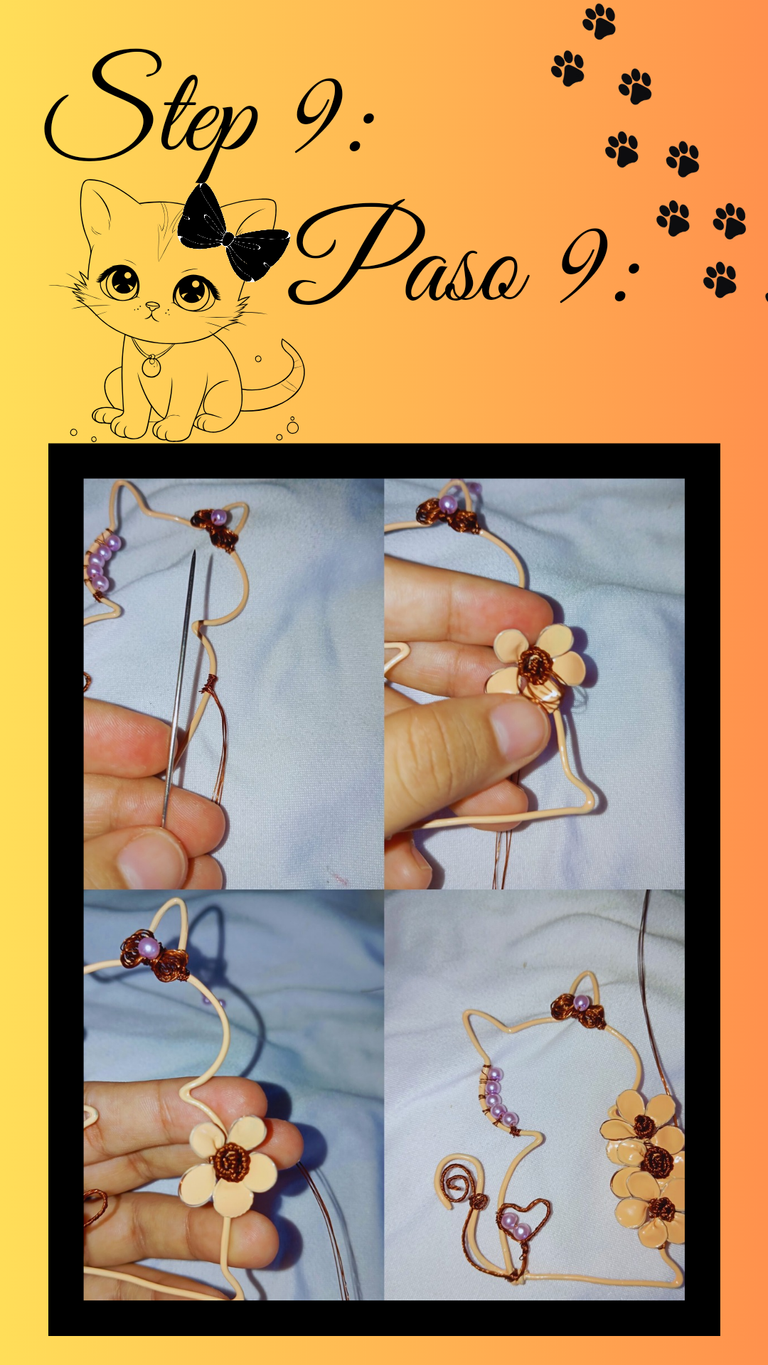
With the help of our needle we will secure all the flowers in what would be the chest of the kitten.
Paso 9:
Con ayuda de nuestra aguja aseguraremos en lo que sería el pecho de la gatita todas las flores.
Step 10:
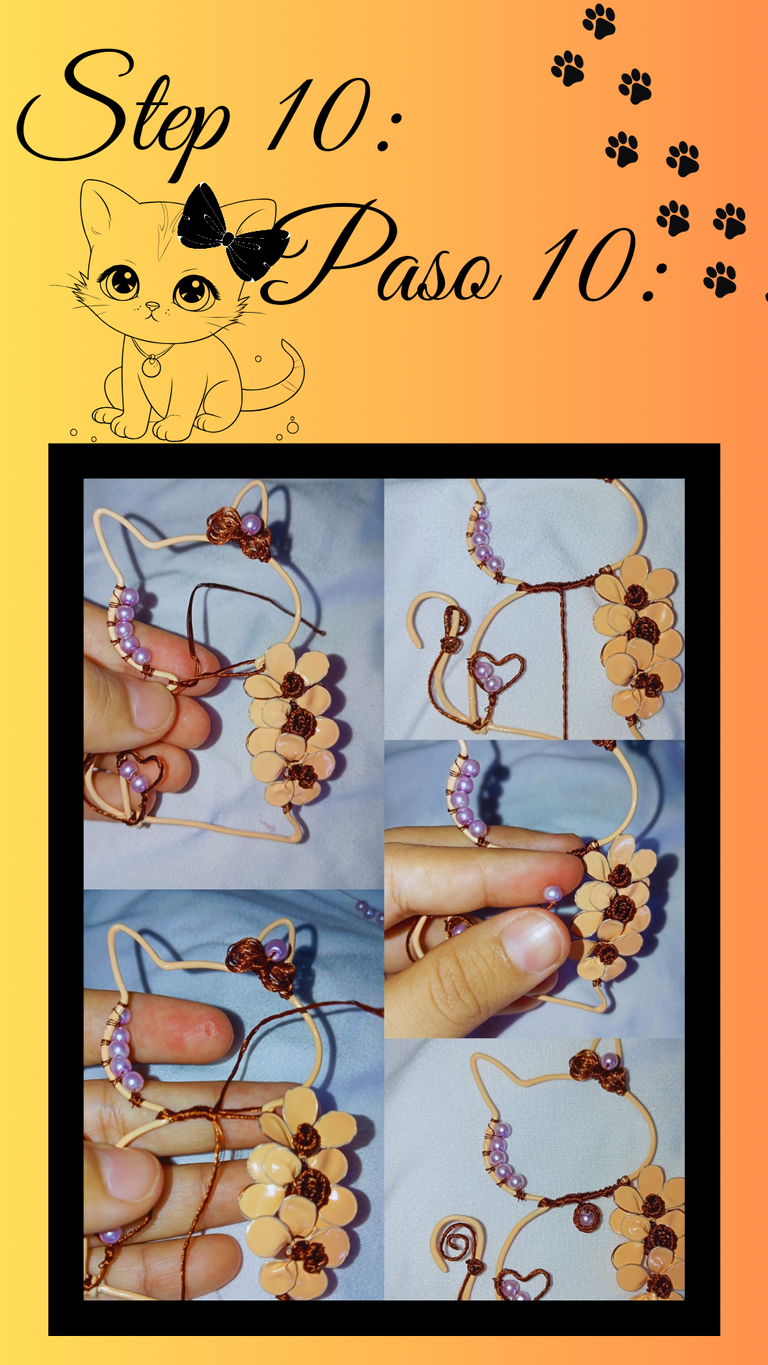
We will twist again other strands of copper wire, we will make the detail of the necklace of the kitten, we will place a bead and we will turn in spiral.
Paso 10:
Entorcharemos nuevamente otras hebras de alambre de cobre, haremos el detalle del collar de la gatita, colocamos una cuenta y giramos en espiral.
We finish our kitty figure. I hope you have enjoyed this content and I apologize if sometimes I do not know how to express myself.
Terminamos nuestra figura de gatita. Espero haya sido de su agrado este contenido y me disculpen si a veces no me sé expresar.
A hug from afar and take care of yourselves guys.
Un abrazo desde la distancia y cuídense mucho chicos.
Translation with DeepL
Photos taken with Redmi 12
Editing done in Canva
Traducción con DeepL
Fotos tomadas con Redmi 12
Edición realizada en Canva