✨💙Hello community! Welcome💙✨
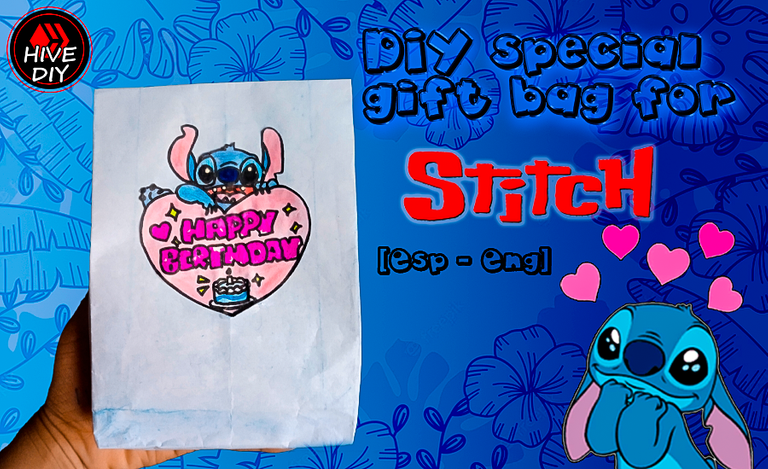
Hace una semana fue el cumpleaños de una amiga que conocí en la universidad por tal motivo le realizaré un regalito ya que ella me dio uno muy lindo cuando cumplí años celebrará su cumpleaños este fin de semana. A ella le gusta mucho el color azul por eso fue que para la decoración es de azul decidiendo así dibujarle un Stitch para que combinara y fuera más llamativo en el regalito. Así que aquí aprenderás a realizar un detallito sencillo con materiales que puedas tener en tu casa y además hasta te podría resultar económico. En fin, pasemos a los materiales que necesitaremos para este regalito especial:
¸.•´¨*•💖 Materials to be used💖•*¨`•.¸
*•💖 Materials to be used💖•*¨`•.¸
| - Scissor | - Tijera | |
|---|---|---|
| -White school glue | - Pega blanca escolar | |
| - Colored pencils | - Lápices de colores | |
| - Pencil | - Lápiz | |
| - Pink chalk and blue chalk | - Tizada rosada y azul | |
| - Bond paper or cardboard in the color of your choice | - Papel bond o cartulina del color que desees | |
| - Color markers | - Marcadores de colores | |
| - Gum | - Goma |
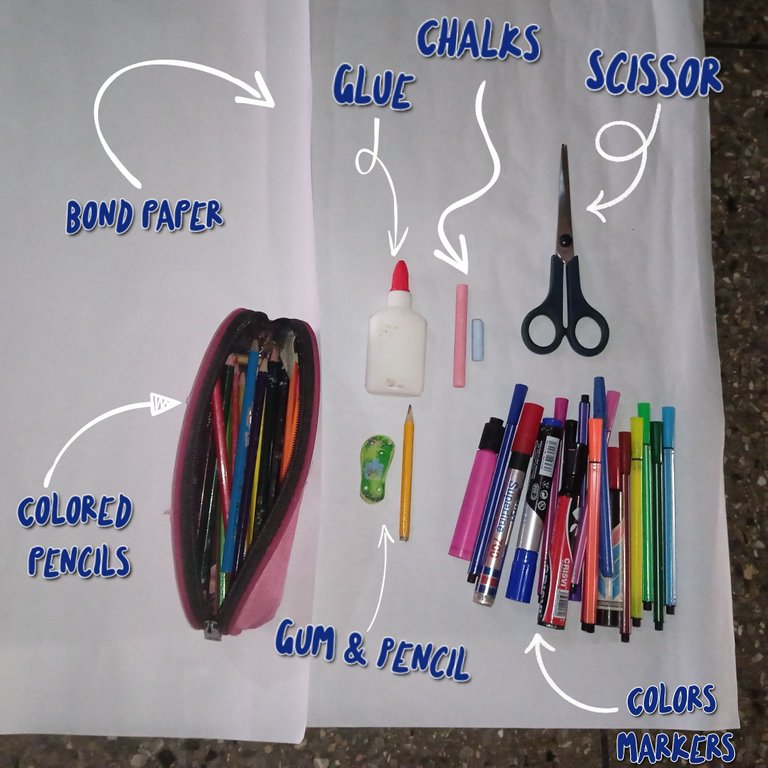
✨Note: I recommend cardboard because the bond paper is thinner while this is harder and will not tear or make ugly creases when folding.
✨Nota: Recomiendo más la cartulina ya que el papel bond es mas finito mientras que esta es mas dura y no se les romperá o se le harán pliegues feos a la hora de doblar.

¸.•´¨*•💖STEP BY STEP💖•*¨`•.¸
*•💖STEP BY STEP💖•*¨`•.¸ Realización de la bolsita de regalo
Si lo realizan con papel bond para que sea una bolsita pequeña van a agarrar su cinta métrica o su regla y van a medir 30 cm x 30 cm seguidamente la recortarán. Si no lo hacen con este material sáltense este paso y diríjanse al paso número 2.
Ya que tenemos el paso número 1 listo comenzamos doblando el papel por la mitad, pero solo marcaremos ligeramente los dos extremos del doblado, esto es para tener una referencia de donde está el centro. Ahora doblamos por un lado sobrepasando ligeramente el centro que se había marcador. Esta vez sí marcamos el doblado luego, doblamos el otro extremo hasta sobrepasar aproximadamente en 1cm el otro extremo marcando el doblado.
Ahora pasamos a pegar los dos lados que están uno encima del otro. Esperamos al menos un minuto a que seque el pegamento se seque.
Pasamos doblando la parte de abajo y nos debe de quedar un rectángulo de unos 4 cm de ancho. Desdoblamos y metemos para dentro los dos lados (como vemos en la imagen) marcando así los bordes. Seguidamente doblamos el lado de arriba sobrepasando en un centímetro aproximadamente hacia el centro hacemos lo mismo con el lado de abajo de forma que los vértices de los extremos queden simétricos. Ahora pegamos los cuatros triángulos que quedarían en las esquinas esperando así a que sequen bien.
En este paso doblamos los lados de la bolsa haciendo coincidir las solapas triangulares marcando bien las dos. Desdoblamos los lados y el fondo y abrimos la bolsa luego metemos para dentro los lados laterales, pero sin llegar abajo del todo, marcando bien los bordes exteriores. Y por último, después de meter el regalo la cerramos doblando la entrada en modo acordeón aunque si quieres la puedes dejar abierta.
Realization of the gift bag
If you are using bond paper to make it a small bag, take your tape measure or ruler and measure 30 cm x 30 cm and then cut it out. If you don't do it with this material skip this step and go to step number 2.
Now that we have step number 1 ready we start by folding the paper in half, but we will only lightly mark the two ends of the fold, this is to have a reference of where the center is. Now we fold on one side slightly exceeding the center that had been marked. This time we mark the fold, then we fold the other end until we exceed approximately 1cm the other end marking the fold.
Now we glue the two sides on top of each other. We wait at least a minute for the glue to dry.
We fold the bottom part and we should be left with a rectangle about 4 cm wide. Unfold and put inside the two sides (as shown in the image) marking the edges. Then we fold the top side overlapping about one centimeter towards the center and do the same with the bottom side so that the vertices of the ends are symmetrical. Now we glue the four triangles that would remain in the corners waiting for them to dry well.
In this step we fold the sides of the bag matching the triangular flaps marking well the two. Unfold the sides and bottom and open the bag, then tuck in the sides, but without going all the way down, marking the outer edges well. And finally, after putting in the gift, we close it by folding the entrance accordion style, although you can leave it open if you want.
*•💖IMAGES OF STEP 1, 2 & 3💖•*¨`•.¸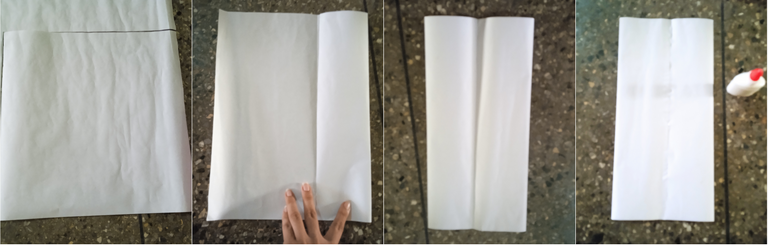
*•💖IMAGES OF STEP 4 💖•*¨`•.¸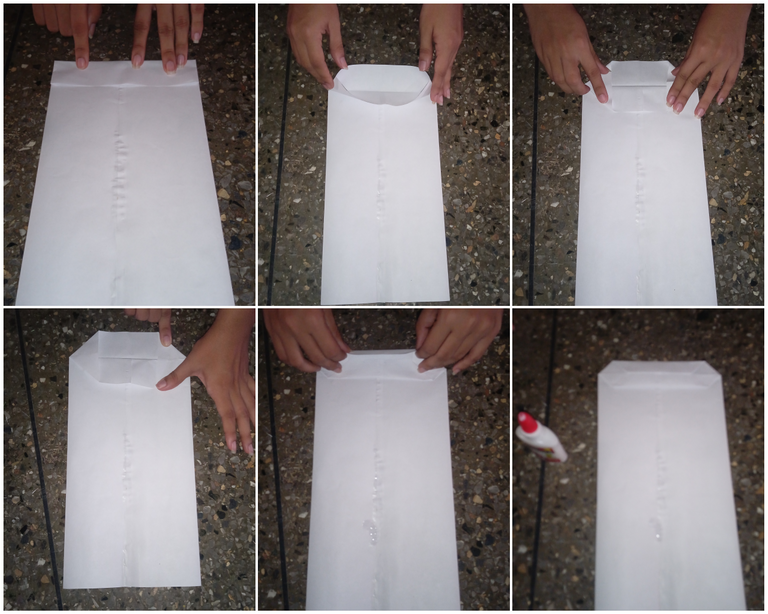
*•💖IMAGES OF STEP 5 💖•*¨`•.¸
✨Note: As I noticed that the bag was too long for the objects I was going to put in it, I decided to measure and cut it. The measure I took was 20cm as it seemed to me the most appropriate height.
✨Nota: Como noté que la bolsita quedó muy larga para los objetos que le iba a introducir decidí medirlo y cortarlo. La medida que tomé fueron 20cm ya que me pareció la altura más adecuada.
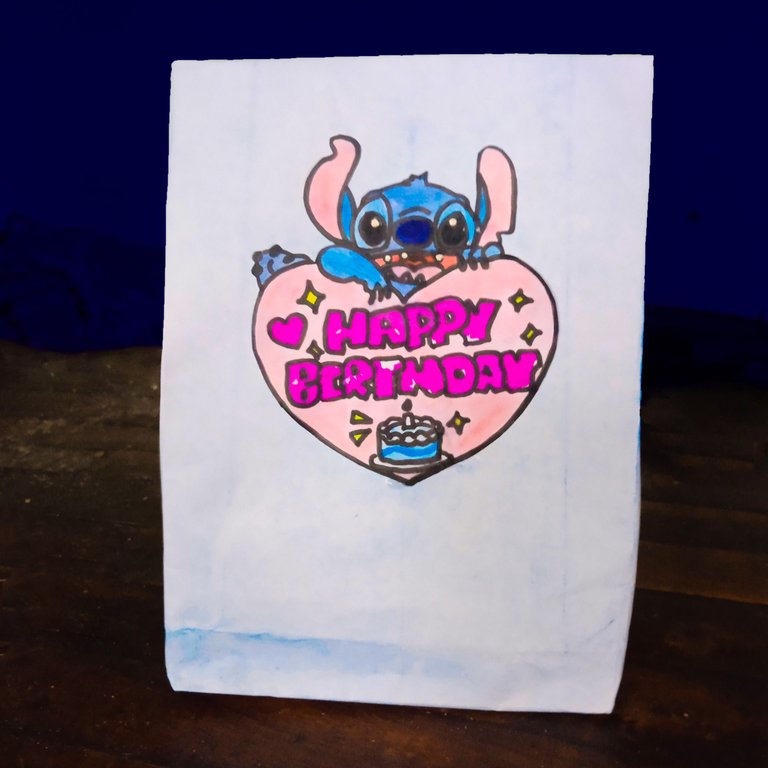
En esta segunda parte vamos a decorar la cajita, como había mencionado anteriormente elegí Stitch porque es de color azul y combinaría con la bolsita de regalo. Si deseas realizarlo como yo, aquí abajo te dejo la plantilla a utilizar y los pasos:
Decoración de la cajita de regalo
°•.✿ °•.❀ °•.✿ °•.❀Primero vamos a pasarle la tiza a toda la cajita difuminando con los dedos, ya que quede un color azul pero muy clarito vamos a agarrar un color más oscuro a la tiza, sacarle punta y con las virutas del mismo difuminé con la yema del dedo en forma circular para que quedara un poco más vivo y bonito.
Ahora con un pedacito de papel vamos a calcar al Stitch pero no sin antes observar que se ajuste al tamaño de la bolsita de regalo. Ya teniendo esto en claro, pasamos a calcarlo con lápiz.
Y, por último, trazamos en color negro toda la figura y coloreamos de la manera que más te gusté yo lo realicé así porque no tenia los colores exactos. Y ¡Listo! Recortamos y pegamos.
Decoration of the gift box
°•.✿ °•.❀ °•.✿ °•.❀First we are going to pass the chalk over the whole box blurring it with our fingers. Once the color is blue but very light, we are going to take a darker color than the chalk, we will proceed to take the tip and with the shavings of the same color we will blend with the fingertip in a circular way to make it a little more vivid and beautiful.
Now with a little piece of paper we are going to trace the Stitch but not before observing that it fits the size of the gift bag. Now that we have this clear, let's go on to trace it.
And, finally, we trace in black color the whole figure and color it in the way you like the most. I did it this way because I didn't have the exact colors. And that's it! Cut out and glue.
*•💖IMAGES OF STEP 1 💖•*¨`•.¸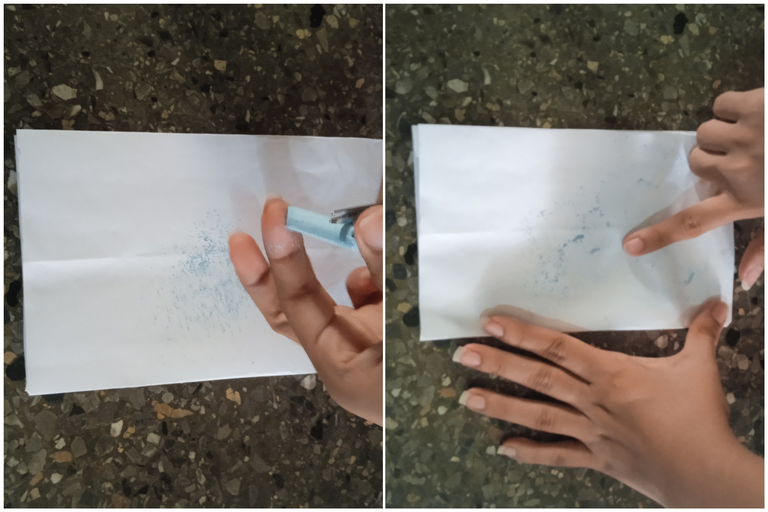
*•💖IMAGES OF STEP 2 & 3 💖•*¨`•.¸
¸.•´¨*•✿ Result ✿•*¨`•.¸
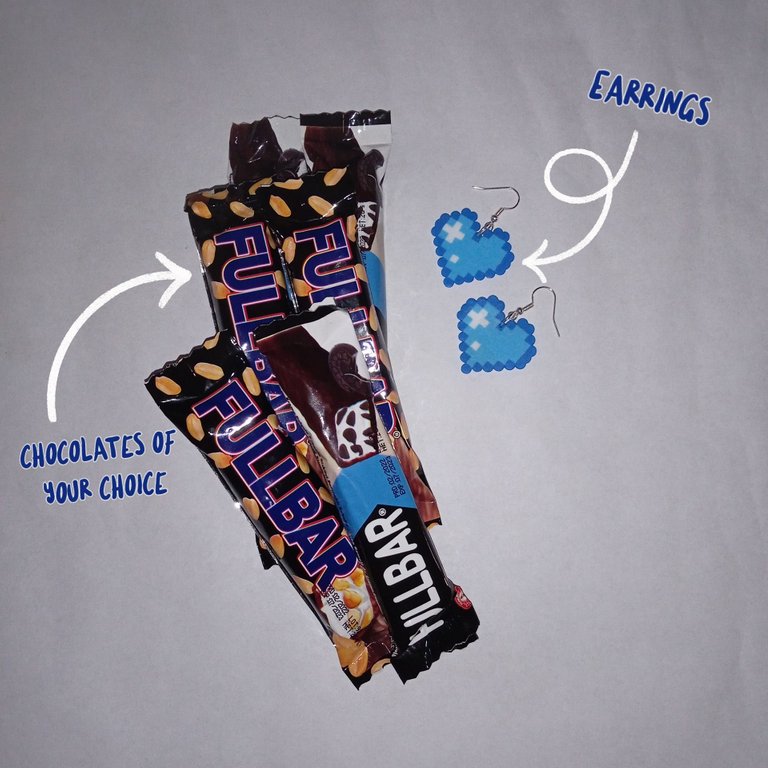
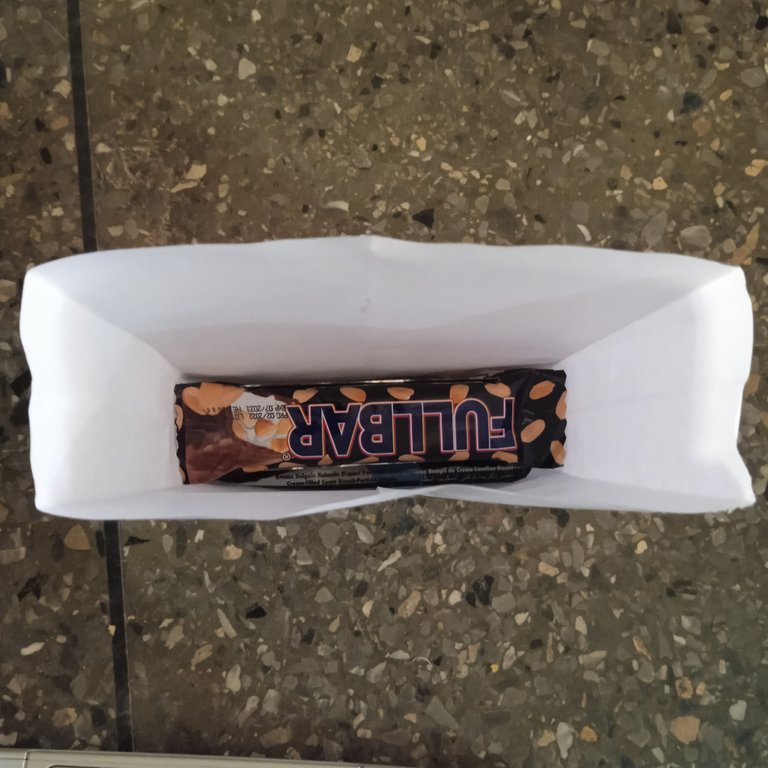
*•✿ Result ✿•*¨`•.¸Before I show you the result, I want you to know what I put in it:
Antes de mostrarles el resultado quiero que sepan que fue lo que le metí:
I really hope that my friend loved the gift as much as I loved making it and I also hope that when you make it, it looks very nice💞. Thank you so much for making it this far! I hope you liked my post, see you next time!
De verdad espero que a mi amiga le encanté el regalo como a mí me encanto hacerlo y también espero que cuando lo realicen les quede muy bonito💞.
💞¡Muchas gracias por llegar hasta aquí! Espero que te halla gustado mi post. ¡Nos vemos en una próxima oportunidad!💞
📲 Todas las fotografías fueron tomadas con un teléfono Xiaomi Redmi 9