🍒✨Hello community! Welcome ¡Hola comunidad! Bienvenido/a🍒✨
Espero te encuentres ¡muy, muy bien hoy! El post de hoy tratará de como hacer este hermoso collar de cerezas🍒 con perlas✨ para que lo luzcas para salir con tus amigos, ir a un lugar mágico e inclusive para el verano. Me divertí🤗 y me encantó mucho💗 realizar esta joyería ya que desde hace tiempo quería un chóker así debido a que todo el tiempo lo veía en mi feed de Facebook y por lo que dije: ¿En vez de comprarlo porque no lo hago y muestro como hacerlo para la comunidad de Jewelry? En fin, sin más habladuría aquí los materiales:
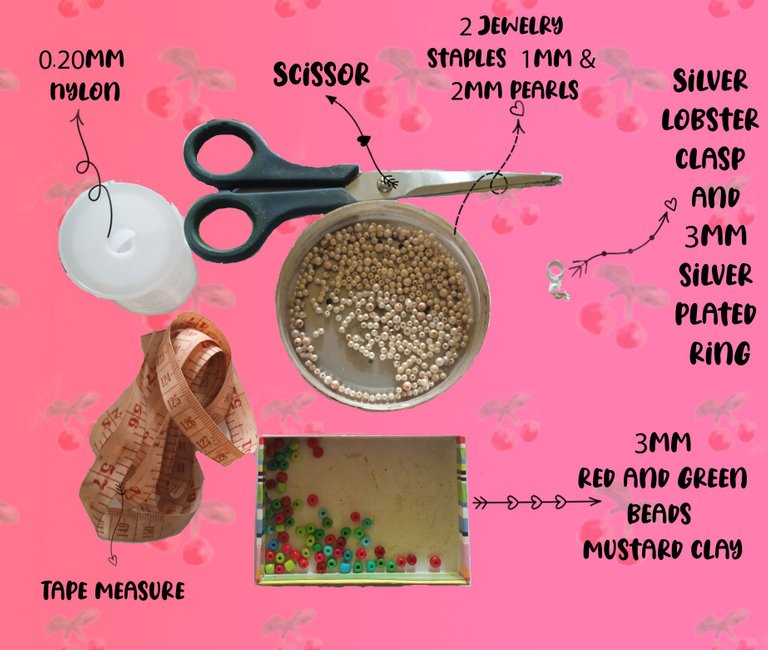
•🍒🍒Materials to be used🍒🍒•
•🍒🍒Materials to be used🍒🍒•
| - Scissor | - Tijera | |
|---|---|---|
| - 0.20MM Nylon | - Nilón 0.20MM | |
| - Tape measure | - Cinta métrica | |
| - 2 Jewelry staples 1MM | - 2 Grapas para bisutería de 1MM | |
| - 3MM red and green beads (mustard clay) | - Cuentas (mostacilla) rojas y verdes de 3MM | |
| - 2MM pearls | - Perlas de 2MM | |
| - Silver lobster clasp | - Cierre de langosta plateada | |
| - 3MM silver plated ring | - Aro de 3MM plateado |

•🍒🍒STEP BY STEP🍒🍒•
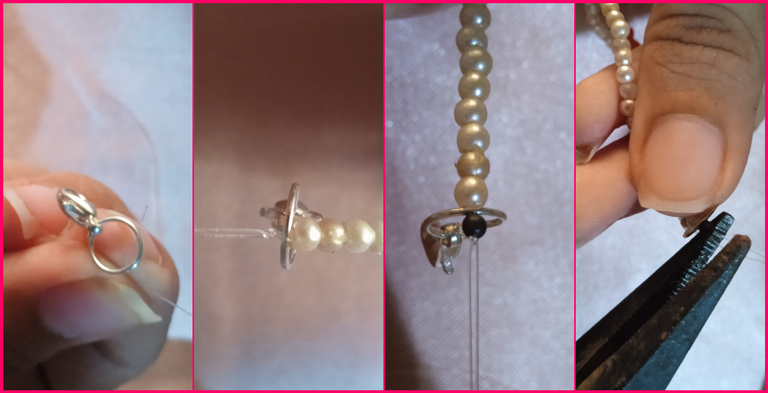
•🍒🍒STEP BY STEP🍒🍒• Vamos cortar 60cm de hilo nilón y lo doblaremos por la mitad, introduciremos el aro de plata con tal de que quede al centro de los dos hilos y luego para cerrarlo haremos tres nudos e introduciremos la grapa para posteriormente tomar nuestra pinza y con esta apretamos fuerte la grapa para que no se salga nuestro arito.
En este paso introduciremos treinta y seis (36) perlitas de 3MM con ayuda de una aguja (cosa de que nos sea más fácil y rápido). Al finalizar ustedes deben de ir observando midiéndole el hilo alrededor del cuello si creen que les hace falta mas perlitas o menos. Recuerden que no todas las medidas con iguales. Teniendo esto claro introduciremos tres (3) cuentas una 1) verde y dos (2) rojas.
Tomaremos la hebra de hilo nilón y la introduciremos por la cuenta verde, halamos fuerte, hasta que se vea la forma de una cereza luego introduciremos nueve (9) perlas y volvemos a repetir el paso: Colocamos tres (3) cuentas una verde y dos rojas e introducimos el hilo por el orificio de la cuenta verde, halamos y colocamos las perlas que serían nueve (9), hacemos esto hasta tener cinco (5) cerezas hechas.
Terminado el paso número tres (3) le colocamos las otras perlas, en este caso y como mencioné en el paso N°1 yo coloqué treinta seis (36) esto puede variar dependiendo de la medida de tu cuello y cuantas perlas requieras tú. Entonces pasamos a cerrar nuestro chóker. Introduciremos nuestro aro con el cierre de langosta y haremos tres nudos, luego introducimos la grapa y con la pinza apretamos fuerte para que estos no se nos salgan. Finalizamos cortando los excesos de hilo y ¡listo!
We will cut 60cm of nylon thread and we will fold it in half, we will introduce the silver ring so that it is in the center of the two threads and then to close it we will make three knots and we will introduce the clamp to later take our clamp and with this we tighten the clamp so that our earring does not come out.
In this step we will introduce thirty-six (36) 3MM beads with the help of a needle (to make it easier and faster). At the end of this step, you should measure the thread around the neck if you think you need more or less beads. Remember that not all measurements are the same. Having this clear we will introduce three (3) beads, one (1) green and two (2) red.
We will take the strand of nylon thread and introduce it through the green bead, pull hard, until we see the shape of a cherry, then we will introduce nine (9) beads and repeat the step: We place three (3) beads, one green and two red and introduce the thread through the hole of the green bead, pull and place the beads that would be nine (9), we do this until we have five (5) cherries made.
After step number three (3) we place the other beads, in this case and as I mentioned in step N°1 I placed thirty six (36) this may vary depending on the size of your neck and how many beads you require. Then we move on to close our choker. We will introduce our ring with the lobster clasp and we will make three knots, then we introduce the clip and with the clamp we tighten it strongly so that it does not come off. We finish by cutting the excess thread and that's it!
•🍒🍒IMAGES OF STEP 1&2🍒🍒•
•🍒🍒IMAGES OF STEP 1&2🍒🍒• 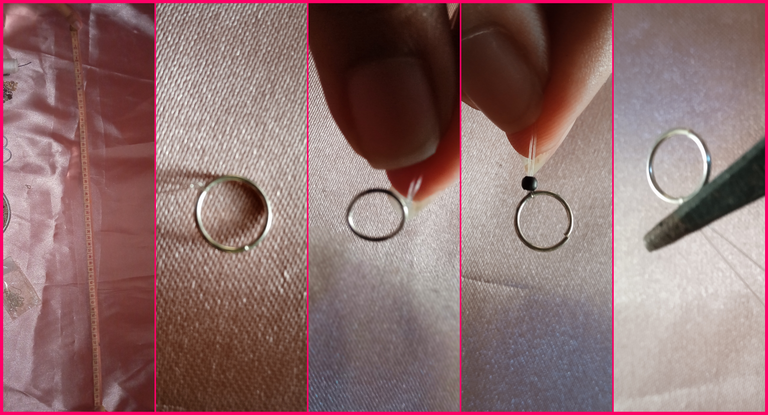

•🍒🍒IMAGES OF STEP 3&4🍒🍒•
•🍒🍒IMAGES OF STEP 3&4🍒🍒• 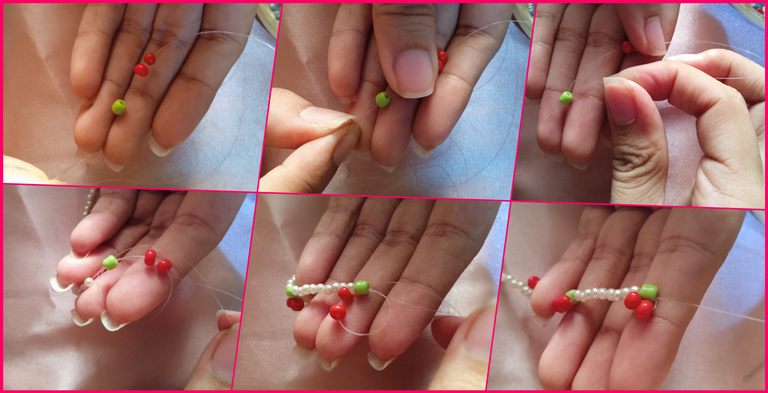
•🍒🍒RESULT🍒🍒•
•🍒🍒RESULT🍒🍒•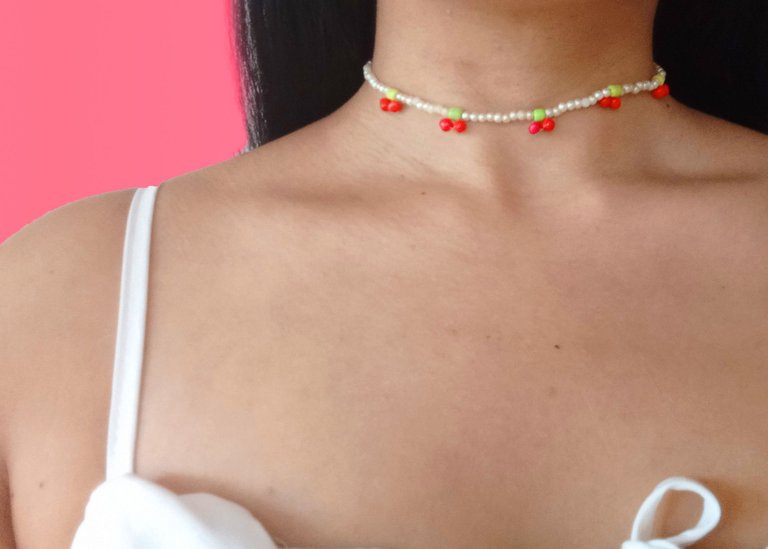

Making this choker was very entertaining and cute. I'm sure when you make it it will look beautiful and spectacular💞.
Hacer este chóker fue muy entretenido y bonito. Seguro que cuando lo realices te quedará hermoso y espectacular💞.

💞Thank you so much for making it this far! I hope you liked my post, I'll see you next time!💞
💞¡Muchas gracias por llegar hasta aquí! Espero que te halla gustado mi post. ¡Nos vemos en una próxima oportunidad!💞
📲 Todas las fotografías fueron tomadas con un teléfono Xiaomi Redmi 10C
📷 TODAS LAS FOTOS SON DE MI PROPIEDAD