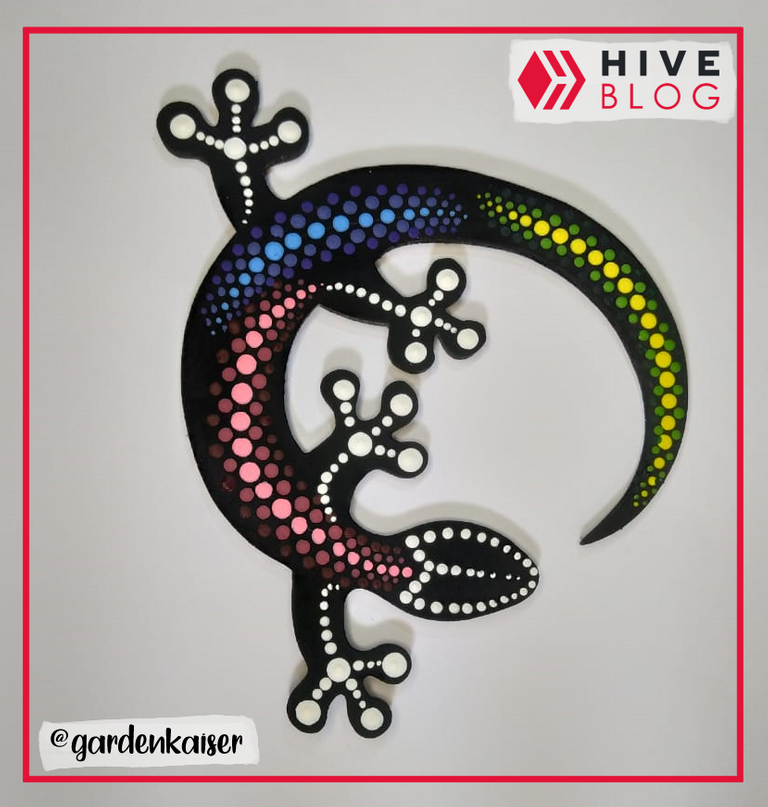
Hello Hivers, today I bring you a very easy and fast technique to paint called Pointillism. This artistic technique consists of making a work through the use of colored dots, which combined can create an image or dramatically emphasize, replacing strokes or brushstrokes. We can do it on different genres such as fabric, wood, cardboard, etc. I like working with this technique a lot because, as I said, it is very fast and consumes little material.
Hola Hivers, el día de hoy les traigo una técnica muy fácil y rápida para pintar llamada Puntillismo. Esta técnica artística consiste en hacer una obra mediante el uso de puntos de colores, que combinados pueden crear una imagen o enfatizar dramáticamente, sustituyendo trazos o pinceladas. Podemos realizarla sobre diferentes géneros como tela, madera, cartulina, etc. Trabajar con esta técnica me gusta mucho debido a que es como ya dije muy rápido y consume poco material.

Materials / Materiales

For this craft, the materials are as follows: Paints of various colors (use cold paint of the gold color brand), Brush, dot paint (they are purple stars), paper or napkins (to clean the paint from the dot paint ) and finally a canvas to work on, in my case I used a figure of a laser-counted salamander that I bought.
Para esta manualidad los materiales son los siguientes: Pinturas de colores variados (use pintura al frio de la marca oro color), Pincel, pinta puntos (son las estrellas de color morado), papel o servilletas (para limpiar la pintura de los pinta puntos) y por último un lienzo en donde trabajar, en mi caso use una figura de una salamandra contada a láser que compre.

Process / Proceso

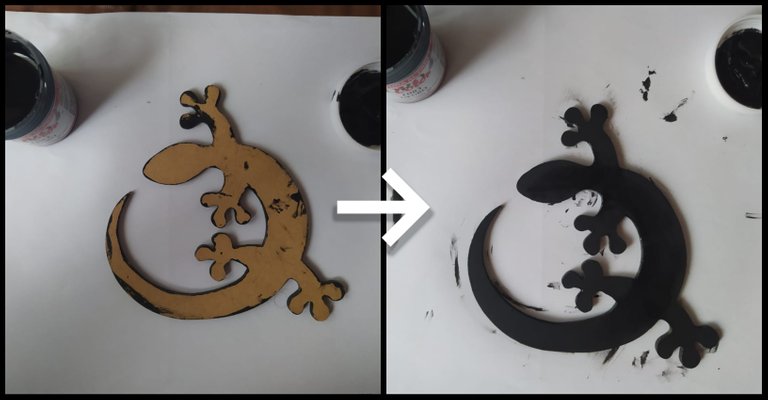
To begin, you have to anchor the figure, I recommend that there be at least two layers so that the wood absorbs the color well and you don't see streaks in the paint.
Para comenzar hay que fondear la figura, recomiendo que mínimo sean dos capas para que la madera absorba bien el color y no se vea betas en la pintura.

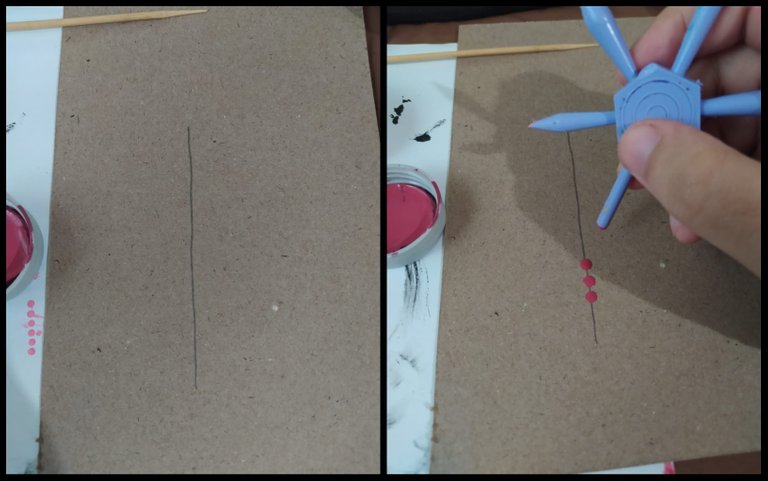
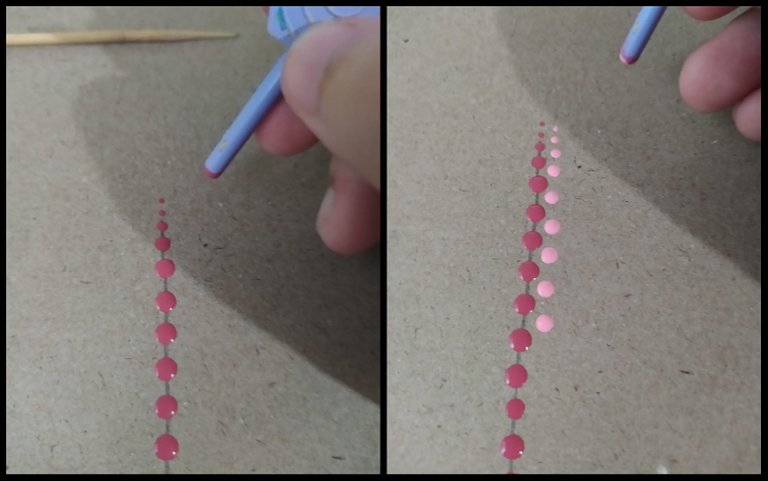
The technique to use is as follows: the first thing to do is to mark very clearly with a pencil the central axis where we are going to make our design. And we begin to mark the dots, trying to keep them with a similar distance of spacing, every time we mark one or two points we will wet the tip of the dot painter in the paint again. When we are already reaching the end of the line we will stop reloading paint so that the points that we are marking are getting smaller and smaller.
La técnica a utilizar es la siguiente: lo primero que hay que hacer es marcar con un lápiz de forma muy clara el eje central por donde vamos a hacer nuestro diseño. Y comenzamos a marcar los puntos, tratando de que queden con una distancia similar de espaciado, cada vez que marquemos uno o dos puntos volveremos a mojar la punta del pinta puntos en la pintura. Cuando ya estemos llegando la final de la línea dejaremos de recargar pintura para que los puntos que vayamos marcando vayan saliendo cada vez de menor tamaño.

After we have the central dotted line ready, we will begin to make another, but in a different color, in this case for the second dotted line use the light pink color, we will proceed in the same way, but with the difference that we will make the points so that they are close to the spaces, which are between point and point of the central line.
Después que tengamos la línea de puntos central lista, comenzaremos hacer otra, pero de otro color, en este caso para la segunda línea de puntos emplee el color rosado claro, procederemos de la misma manera, pero con la diferencia de que los puntos los haremos de forma de que queden cerca de los espacios, que quedan entre punto y punto de la línea central.


To draw the guide lines I recommend that they be in pencil and that they be made super clear so that they are hardly visible, it is only necessary that you can see them so that when our work is finished I do not know that line, besides erasing that line is very difficult due to the design and that we could damage it trying to erase the line.
Para dibujar las líneas guías recomiendo que sean con lápiz y que las hagan super claras que casi no se vean, solo es necesario que ustedes las puedan ver para que al momento de tener nuestra obra terminada no se esa línea, además que borrar esa línea es muy difícil debido al diseño y que lo podríamos dañar tratando de borrar la línea.


You can play with the colors, for example, I start at the center line with the lightest color and as I move away from it I use darker colors each time and a smaller tip. It should be noted, that if you don't have a dot paint you can use the back of a brush.
Ustedes pueden jugar con los colores, por ejemplo, yo comienzo en la línea central con el color más claro y según me voy alejando de este uso colores más oscuros cada vez y una punta más pequeña. Cabe señalar, que si no tienen un pinta puntos puedes usar la parte de atrás de un pincel.


Once I have the design ready, eating to do with the largest tip and the white color, dots on the fingers and palms of the legs to later add some small white dots that give the feeling that they are joined. To conclude, I make a dotted border to the head to give it more emphasis, but I don't add eyes because I thought it could look cartoonish and it's not the effect I'm looking for.
Una vez tengo el diseño listo comiendo a hacer con la punta mas grande y el color blanco, puntos en los dedos y palmas de las patas para posteriormente agregar unos puntos pequeños blancos que den la sensación de que los unen. Para concluir, le hago un borde de puntos a la cabeza para darle más énfasis, pero no le agrego ojos debido a que me pareció que se podría ver como de caricatura y no es el efecto que busco.

FINAL WORK / TRABAJO FINAL

I hope you like this painting tutorial with a technique that you don't see much. This is a technique that I really like and I was already looking forward to showing other things on my blog apart from my main content, which is digital illustration. Soon, I will be bringing you more of my own designs and tutorials, remember to leave support and your like if you liked it and want more content, if you have any questions you can leave them in the comments and I will be answering them. I send you a strong hug!
Espero que les guste este tutorial de pintura con una técnica que no se ve mucho. Esta es una técnica que me gusta mucho y ya estaba deseoso de mostrar otras cosas en mi blog aparte de mi contenido principal que es la ilustración digital. Próximamente, les estaré trayendo más diseños propios y tutoriales, recuerden dejar apoyo y su like si les gustó y quieren más contenido, si tienen alguna duda las pueden dejar en los comentarios y se las estaré respondiendo. ¡Les mando un fuerte abrazo!

Collages made with: befunky
Translator: Google Translate
Photos: Xiaomi Redmi Note 8
All photos are my own
Collages realizados con: befunkyTraductor: Google Translate
Fotos: Xiaomi Redmi Note 8
Todas las fotos son de mi autoría
Instagram: @gardenkaiser
Discord: Garden#7637


