
I don't want to sound cheesy, but honestly, I've been waiting to finally be able to write this post for a long while now. Not only that it's my first post in the DIY Hub which I've been following and supporting closely, but also because those who know me in real life could easily consider myself as belonging to this place just for the sake that I absolutely love crafting things or simply assembling stuff no matter if it's furniture or something that I've seen working together in my head.
So with no further chatter as no one enjoys long intros, let's take a look at what you will get at the end of the tutorial/guide or whatever you want to call this post:
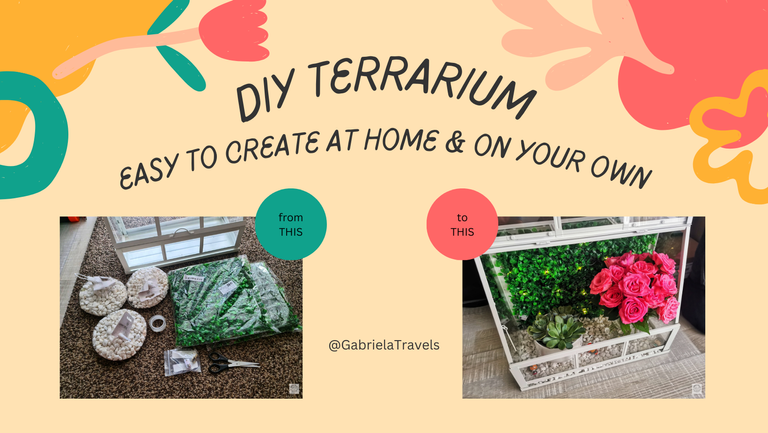
DIY Terrarium (Intro)

First of all, I love flowers, plants, and nature in general. So being able to build a small corner of nature at the place that I'm calling home was definitely a must-do at one point in my life but I've never thought of doing more than just buying lots of plants and arranging them accordingly.
Happily, this change was brought when on the occasion of my birthday, I received this little terrarium as a present from my cousin, which even though it didn't come with anything else other than the parts that needed to be assembled, I knew from the first moment that I could do something to make it turn out even more beautiful.
 |  |
|---|
Assembling the whole terrarium happened pretty quick due to clear instructions received within the box and also being quite intuitive about what you have to do based on just looking at the picture with the final product.
However, there was one issue from the production with the main window of the terrarium which can also be opened where some holes were placed wrong and that did make me not 100% confident if it's everything fitted as it should, but after a bit of research, I figured out that it won't cause any problems even using it like that.
By the way, the terrarium I received as a gift was bought from IKEA and it can be found pretty easily in the shops of most of the countries if I'm not wrong.
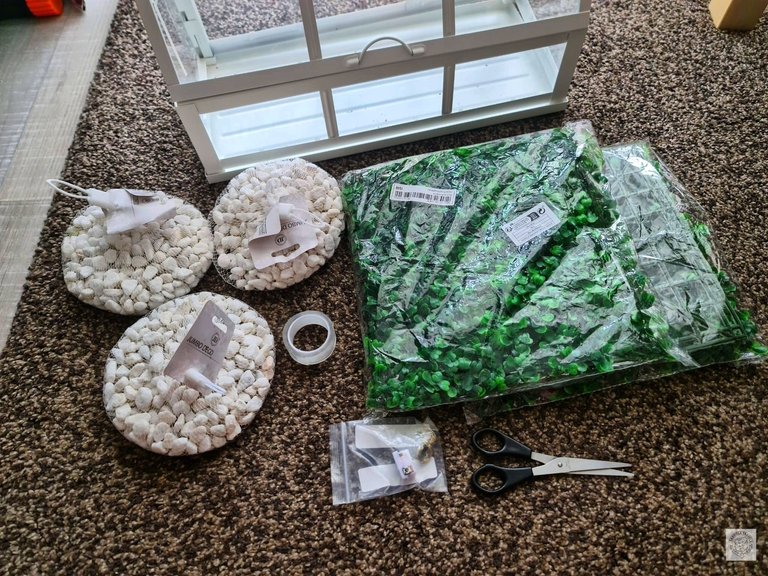
In order to get the terrarium to look the same as mine, please consider the following list:
- 3x small bags of stones each of 100g
- 2x artificial plants background each of 25x25cm
- 1m of light
- 1m of double-sided adhesive
- 8 plastic cable ties
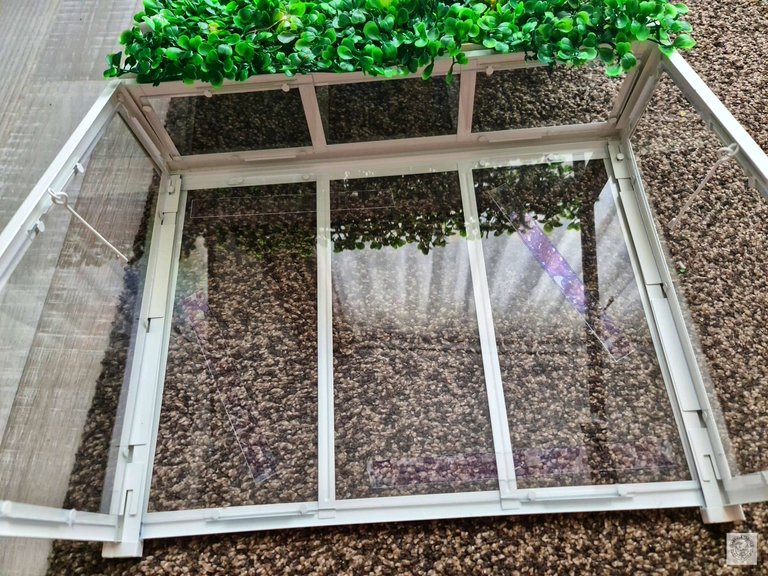
1. Measuring and cutting the artificial background
 |  |
|---|
As the squares I bought with artificial plants for the background were a bit too large for what I needed, I decided to measure them and sacrifice one of these by cutting it into three different parts that would fill the gaps and end up with a fully consolidated artificial background.
You can also use natural plants or replace those I used with lichens which is also something that I initially thought about, but since sticking them on the surface as well as maintaining their life further would involve more costs and efforts, for a first try I decided to go with the quick and easy method.
2. Adding light and tying it up
 |  |
|---|
For the light, I preferred to go with a cheap one which is often used for DIY crafts that usually don't have it as the main character of the final product. This one works just with a single button cell which is the battery that you usually find inside the watches.
The lights were glued on a malleable wire which allowed me to arrange it easily and hide the wire under the leaves of the plants. To make sure that this won't end up falling after a while which would make it a bit harder to fix it back, I decided to use 8 plastic cable ties to make it become part of the whole background and avoid any further risks.
3. Adding glue for the background
Personally, I used one meter of double-sided adhesive that I cut into 4 pieces and placed them in some sort of a frame that would make the background be sustained from all angles.
At first, my intention was to add this adhesive on the whole surface but I calculated wrong how much I needed and it wasn't enough anymore. Though, if it's a good adhesive, applying it as I did, would make the whole background be sustained with no problems.
You can replace the adhesive with a glue gun but if you use one with a hot temperature, the window might end up melting since it's not made of glass but of perspex.
4. Adding the stones
 |  |
|---|
Adding the stones is the easiest and the final step before assembling the terrarium and bringing it to an end. It only involved adding 300g of stones without any other magic tricks like sticking them to the ground because they are heavy enough not to fall.
Of course, the stones represent just what I thought was working the best but you can always replace it with sand, tree bark, or anything else. But make sure to leave the corners empty so the rest of the terrarium will stay on a smooth surface.
The white tray didn't come with any options to make it fully connected with the rest of the terrarium which makes it get detached anytime is needed, so I decided to leave it that way since it's also a lot easier to arrange the plants inside.
5. Adding other decorations and the plants
 |  |
|---|
As I love keeping the inner kid alive in all my actions, I decided to add three more decorations within the terrarium which are some characters I've got from Kinder Joy chocolate eggs with surprise toys inside.
Also, the plants that got themselves a new home with the occasion of building this terrarium are mostly succulents, focusing on those that don't require a lot of watering, but any kind of plant might work just fine.
Outro
I've seen videos on YouTube with people using the same terrarium but about which they complained of not being well isolated, so in case you are looking for a terrarium that would isolate the plants entirely, you will need to invest in some sort of pomps too, that will ensure the air circulation and optimal temperature with this purpose.

Here's another picture of how everything looks like during the night. I might end up adding some extra lights on the sides in the future, but for now, it looks like a great place to see some light coming out during the night.
Looking forward to hearing your thoughts on this one and seeing if you've crafted something similar, but bear with me! This is my first DIY post and I'm still learning. Also, I had no documentation behind my actions but only crafted everything as I envisioned working the best in my head.

Gabriela Travels is the FOUNDER of "Festival Mania" who started this community from the passion of attending various festivals and with the purpose of encouraging more people to explore festivals all around the world and share their experiences. At the same time, Gabriela is an independent Graphic Design Freelancer since 2019 completing over 600+ orders in this time and collaborating with various businesses and people from all over the globe. Additonally, Gabriela has her own corner on the internet since 2017 where she writes various articles for her blog, the most popular being the travel ones (260+ articles written on this field), but also abording other topics as well, like game reviews, movie and series reviews, photography posts, cooking recipes and more, boosting the total number of articles written to 550+ blog posts. Gabriela is also a gamer since she was 11 years old and gaming remains one of her biggest passions along with traveling, editing, cooking, and doing various sports activities.

Let's keep in touch:
↪ Blog: http://gabrielastravels.wordpress.com/
↪ Fiverr: https://www.fiverr.com/gabrielatv/
↪ YouTube: https://www.youtube.com/@GabrielaTravels
↪ Instagram: https://www.instagram.com/GabrielaTravels/
↪ TikTok: https://tiktok.com/@gabrielastravels/
↪ Discord: GabrielaTravels
↪ Facebook: https://www.facebook.com/gabrielaistraveling/
↪ Twitter: https://twitter.com/GabrielaTravels