Hola a todos... 🐱🐾💕
Hola a mis queridos Hiver y a la querida comunidad de artistas #HiveDiy, como siempre muy complacida y emocionada de encontrarme por acá nuevamente, mostrándole mi trabajo hecho con mucho amor y especialmente para ustedes.
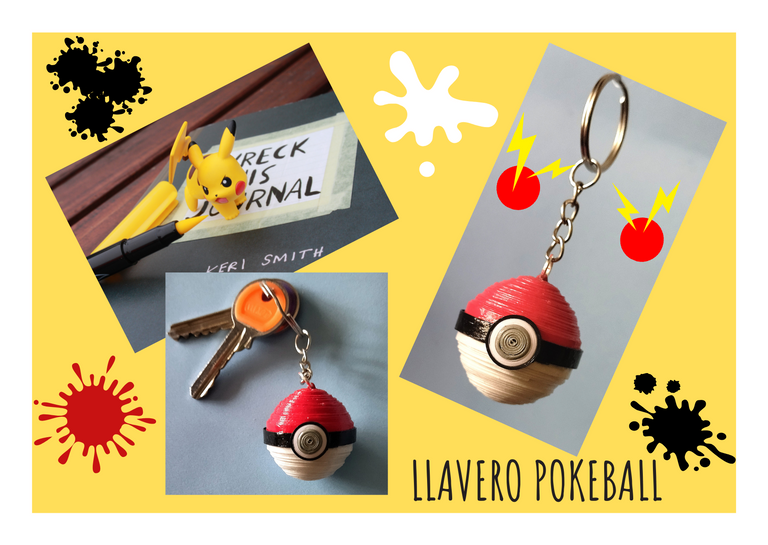
En esta oportunidad pensé en los amantes del tan nombrado anime japonés Pokemon, y por eso les traigo un bonito llavero Pokeball, trabajado con materiales reciclados. Es un trabajo que puedes muy fácilmente elaborar junto a los pequeños de la casa y por supuesto que les va a encantar, ya que es muy sencillo de realizar y lo mejor es que puedes de esta manera reutilizar, papel, cartulinas, pinturas, y algún llavero que tengas en casa. 😃
🐾🐾🐾
Hello everyone... 🐱🐾💕
Hello to my dear Hiver and the dear community of artists #HiveDiy, as always very pleased and excited to find me around here again, showing you my work made with a lot of love and especially for you.
This time I thought about the lovers of the so called Japanese anime Pokemon, and that's why I bring you a nice Pokeball keychain, made with recycled materials. It is a job that you can easily make with the little ones of the house and of course they will love it, because it is very simple to make and the best thing is that you can reuse paper, cardboard, paints, and any keychain you have at home. 😃
🐾🐾🐾
Comencemos:😃
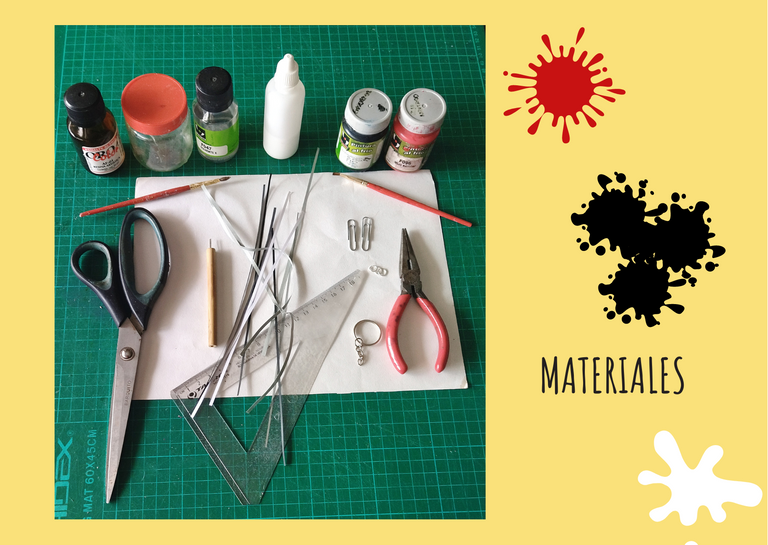
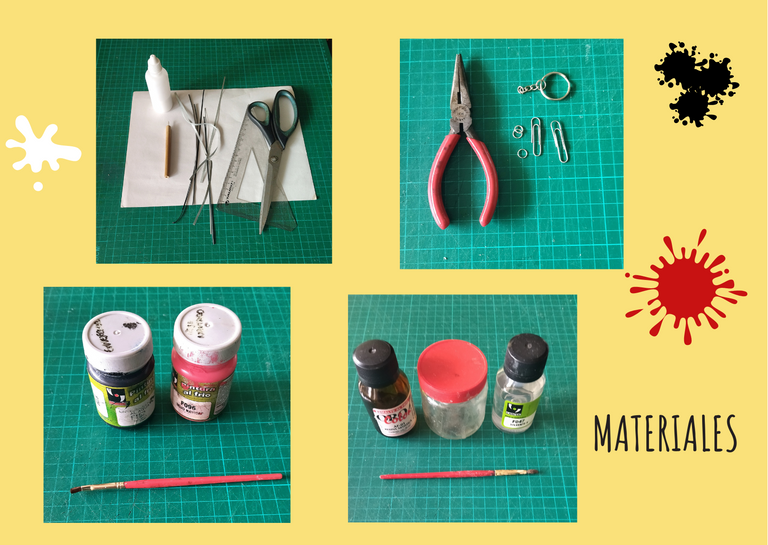
Materiales:📏✏️✂️
• Cartulina blanca que tengan sobrante.
• Algunas cintas de papel (quilling), o papel de diversos colores, blanco, negro, gris, que tengan sobrante en casa.
• Pinturas al agua, roja, negra, gris. (opcional).
• Pinceles.
• Regla.
• Aguja para quilling.
• Tijera.
• Pega blanca.
• Alicate punta fina.
• Clips.
• Argolla de bisutería mediana.
• Argolla con cadena para llavero.
• Resina.
• Solvente X
• Frasco de vidrio.
🐾🐾🐾
Let's get started: 😃
Materials:📏✏️✂️
- White cardboard that you have leftover.
- Some paper ribbons (quilling), or paper of different colors, white, black, gray, that you have left over at home.
- Water-based paints, red, black, gray. (optional).
- Paintbrushes.
- Ruler.
- Needle for quilling.
- Scissors.
- White glue.
- Needle nose pliers.
- Paper clips.
- Medium jewelry ring.
- Ring with chain for key ring.
- Resin.
- Solvent X
- Glass bottle.


Paso a paso:💖
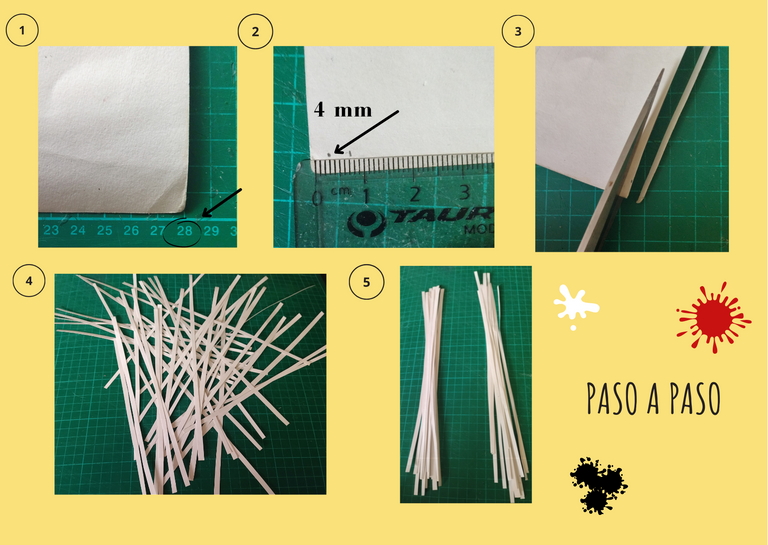
• En mi caso, tome una cartulina que tenía en casa algo arrugada sin uso, también pueden usar hojas blancas o cualquier trozo de papel blanco que tengan a la mano, lo primero que debemos tomar en cuenta es la medida de la hoja, en este caso la que use tiene una medida de 28 cms de largo.
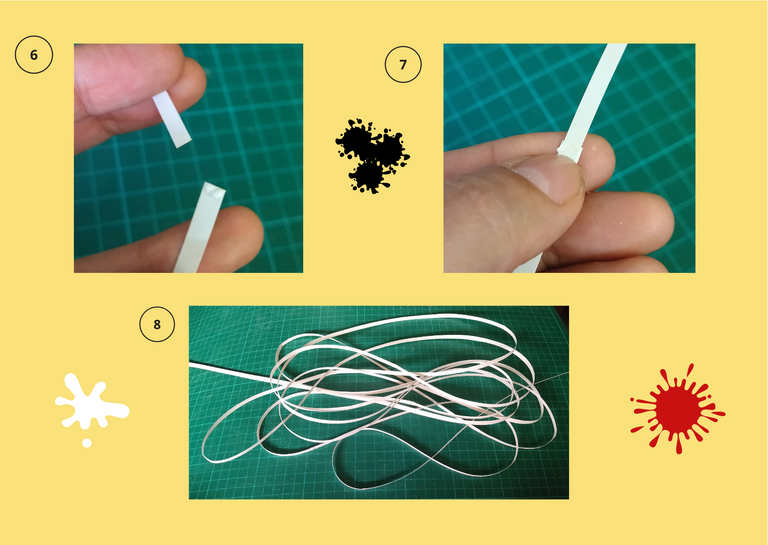
• A partir de aquí procedemos a picar tiras de aproximadamente 4 milímetros de ancho, no tienen que quedar totalmente lineales, pero hagamos el intento. 😋
• Una vez cortadas las tiras de cartulina, separamos en dos grupos de 10 tiras, (vamos a reservar una para usarla luego), ahora comenzamos a unir con pega, una por una en sus puntas, hasta unir una sola tira con las 10.
🐾🐾🐾
Step by step:💖
In my case, I took a cardboard that I had at home, a little crumpled and unused, you can also use white sheets or any piece of white paper you have at hand, the first thing to take into account is the size of the sheet, in this case the one I used is 28 cms long.
From here we proceed to chop strips of approximately 4 millimeters wide, they don't have to be completely linear, but let's give it a try. 😋
Once the cardboard strips are cut, we separate them into two groups of 10 strips, (we are going to reserve one for later use), now we begin to join them with glue, one by one at their ends, until we join one strip with the 10 strips.


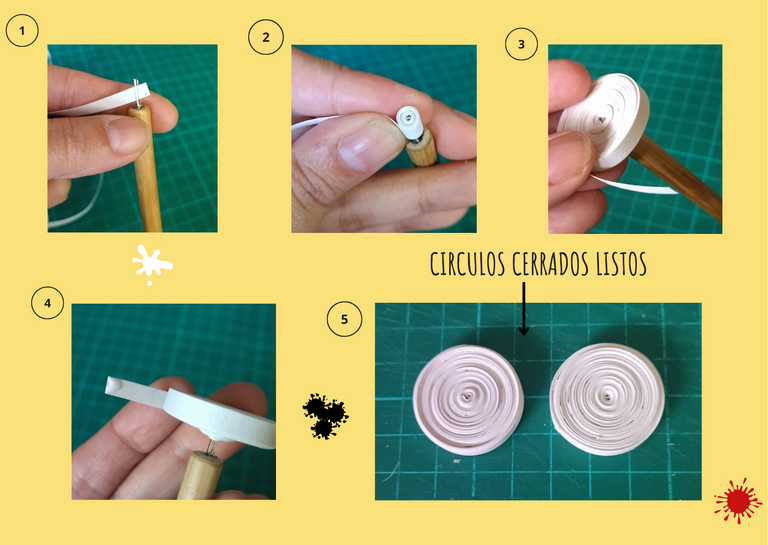
• Tomamos la aguja de quilling, colocamos el primer extremo y comenzamos a enrollar toda la tira, para formar un círculo cerrado, al terminar con la tira, colocamos un punto de pega y sellamos. Con la otra tira de 10 que tenemos unida, repetimos el mismo proceso, enrollamos con la aguja y sellamos. Ahora tenemos dos círculos cerrados.
🐾🐾🐾
- We take the quilling needle, place the first end and begin to roll the entire strip, to form a closed circle, when we finish with the strip, we place a glue stitch and seal. With the other strip of 10 that we have joined, we repeat the same process, roll up with the needle and seal. Now we have two closed circles.


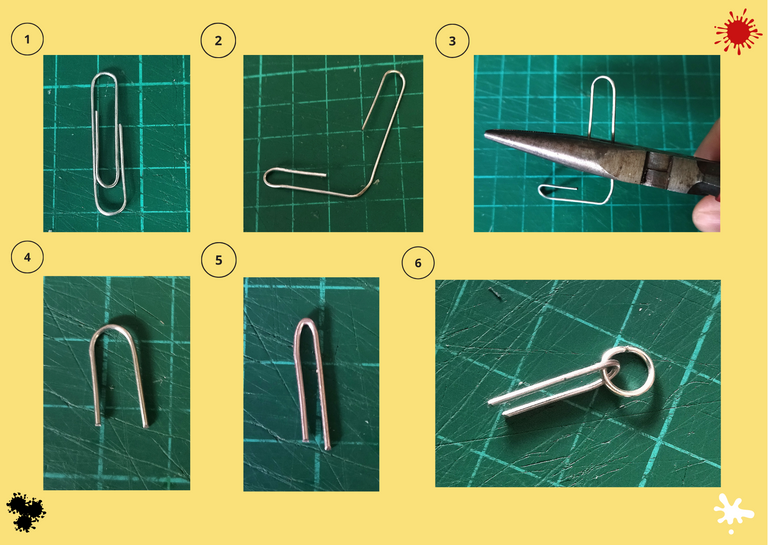
• Ya que tenemos nuestros círculos cerrados listos, tomamos el clip, lo abrimos, con la ayuda de nuestro alicate punta fina cortamos un trozo, lo cerramos un poco con el alicate, y en el medio metemos la argolla de bisutería.
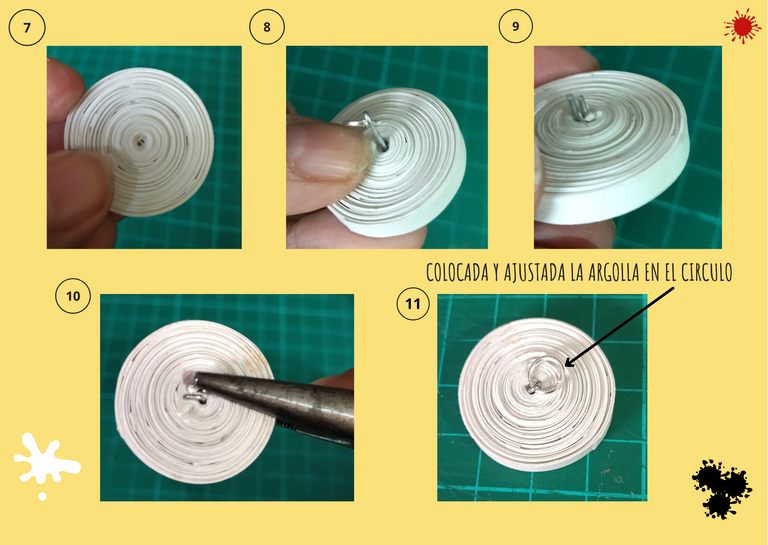
• Ahora procedemos a meter ese trozo de clip por el agujero que queda en el centro de nuestro circulo cerrado, y con la ayuda de nuestro alicate doblamos las puntas del clip para que nuestra argolla no se salga, nos queda de esta manera.
🐾🐾🐾
Now that we have our closed circles ready, we take the paper clip, we open it, with the help of our needle-nose pliers we cut a piece, we close it a little with the pliers, and in the middle we put the bijouterie ring.
Now we proceed to put that piece of clip through the hole that remains in the center of our closed circle, and with the help of our pliers we bend the ends of the clip so that our ring does not come out, it looks like this.


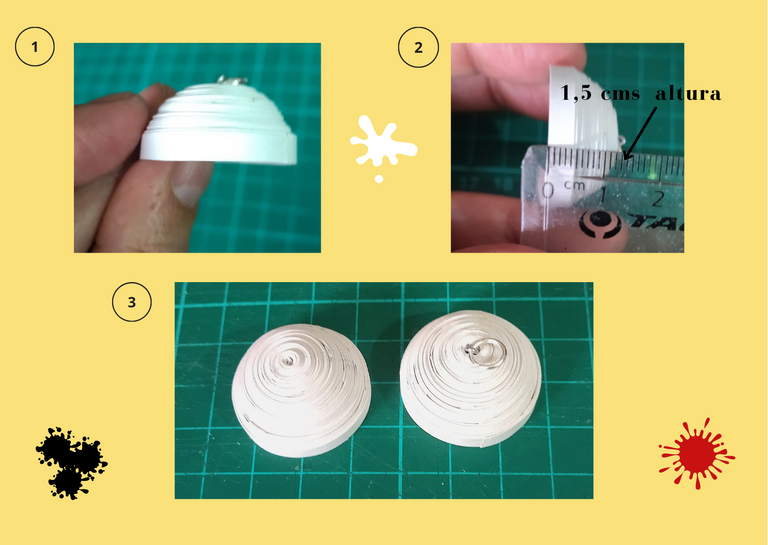
• Vamos a darle forma a nuestro circulo, con la ayuda de los dedos pulgares le damos profundidad a nuestro circulo, tratando de que quede lo mas redondo posible y con una altura de aproximadamente 1.5 centímetros de altura, repetimos con el círculo que no tiene la argolla.
🐾🐾🐾
• We are going to shape our circle, with the help of our thumbs we give depth to our circle, trying to make it as round as possible and with a height of approximately 1.5 centimeters high, we repeat with the circle that does not have the ring.


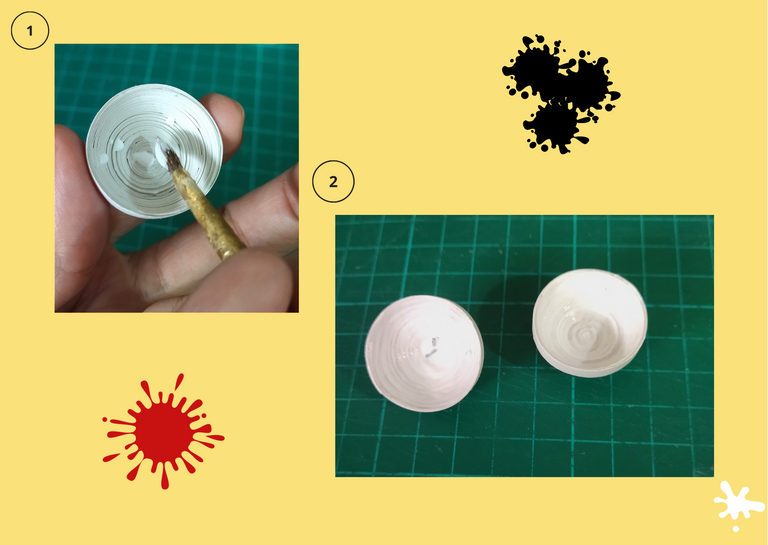
• Le colocamos pega con un pincel a nuestros círculos por la parte trasera para que no se muevan y queden uniformes, esperamos que sequen.
🐾🐾🐾
- We put glue with a brush on the back of our circles so that they do not move and remain uniform, we wait for them to dry.


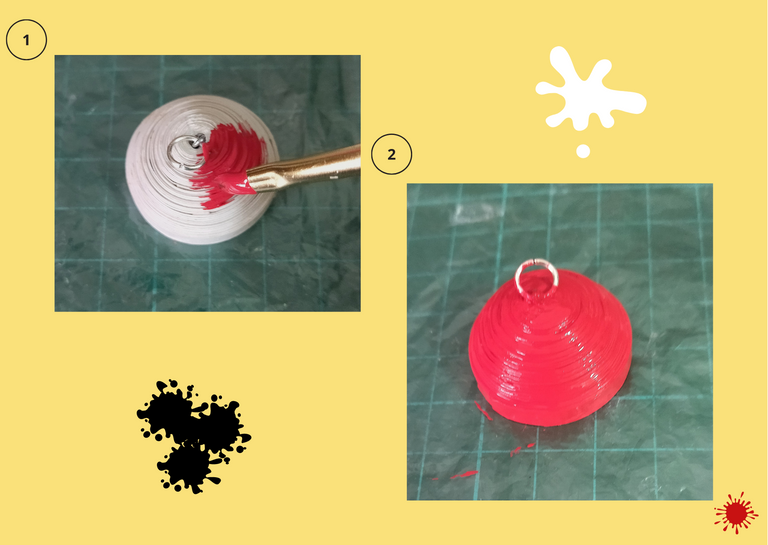
• Ya secos nuestros círculos, tomamos el que le colocamos la argolla y procedemos a pintar con la pintura al agua color rojo, dejamos secar.
🐾🐾🐾
- Once our circles are dry, we take the one with the ring and proceed to paint it with the red water-based paint and let it dry.


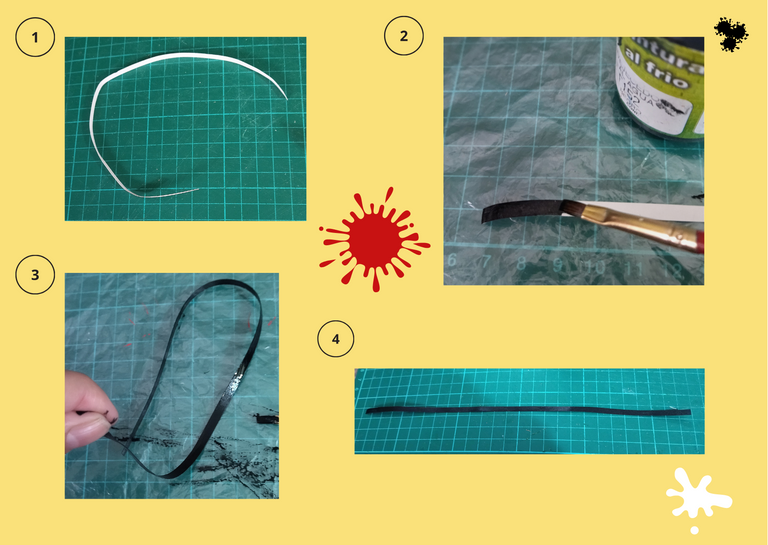
• Tomamos la tira de cartulina que teníamos reservada y procedemos a pintarla con nuestra pintura al agua color negro, esperamos que seque.
🐾🐾🐾
- We take the strip of cardboard that we had reserved and proceed to paint it with our black water-based paint and wait for it to dry.


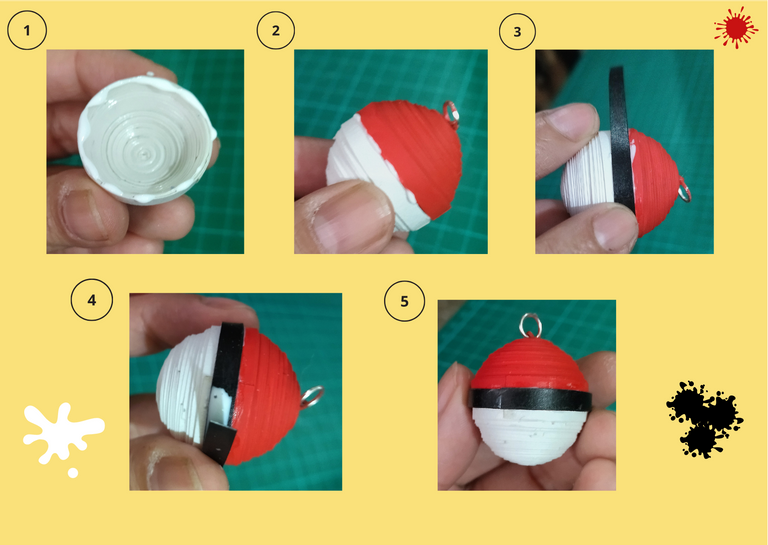
• Ya tenemos nuestra tira negra seca, ahora vamos a proceder a unir los dos círculos, le colocamos pega unimos ambos extremos, tomamos la cinta negra y la colocamos céntricamente alrededor de nuestro círculo.
🐾🐾🐾
- Now we have our dry black strip, we are going to proceed to join the two circles, we glue both ends together, take the black ribbon and place it centrally around our circle.


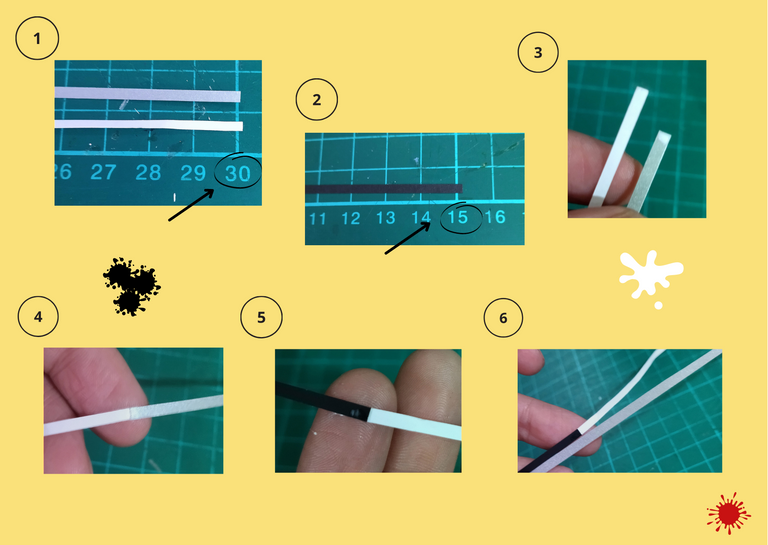
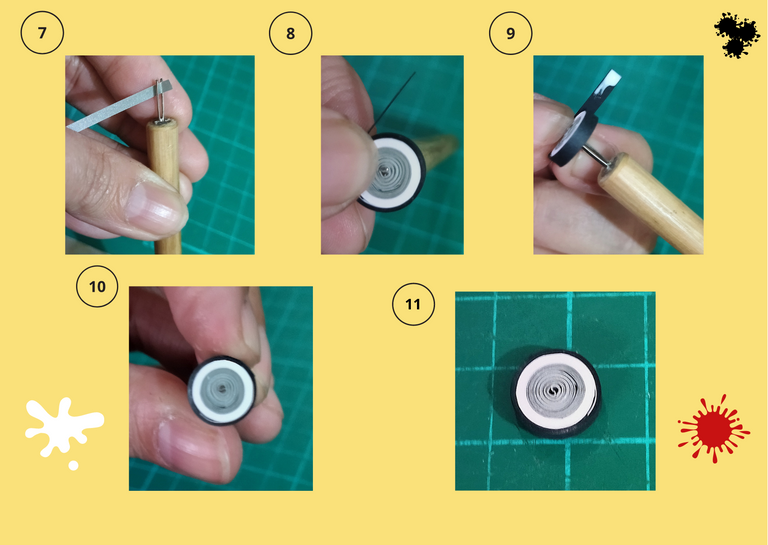
• Ahora procedemos a realizar el botón que lleva en el medio nuestra pokeball, realizaremos un círculo cerrado, tomamos 30cms de cinta blanca y gris de 3 milímetros de ancho, junto a otro pedazo negro de 15cms x 3 centímetros de ancho, pegamos nuestras cintas, así como lo hicimos con la tiras blancas de cartulina, al unirlas procedemos a enrollar con la aguja de quilling y luego sellamos con un punto de pega blanca al final. Ya tenemos nuestro botón (círculo cerrado), listo.
🐾🐾🐾
- Now we proceed to make the button that has our pokeball in the middle, we will make a closed circle, we take 30cms of white and gray ribbon 3 millimeters wide, together with another black piece of 15cms x 3 centimeters wide, we glue our ribbons, as we did with the white strips of cardboard, when we join them we proceed to roll with the quilling needle and then seal with a point of white glue at the end. Now we have our button (closed circle), ready.


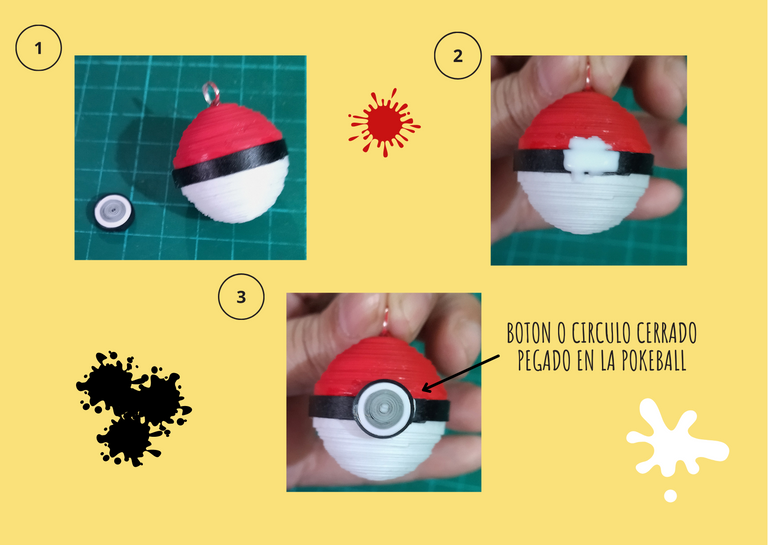
• Tomamos la pokeball, colocamos pega en el centro de la cinta negra y pegamos el botón que realizamos.
🐾🐾🐾
- We take the pokeball, place glue in the center of the black ribbon and glue the button we made.


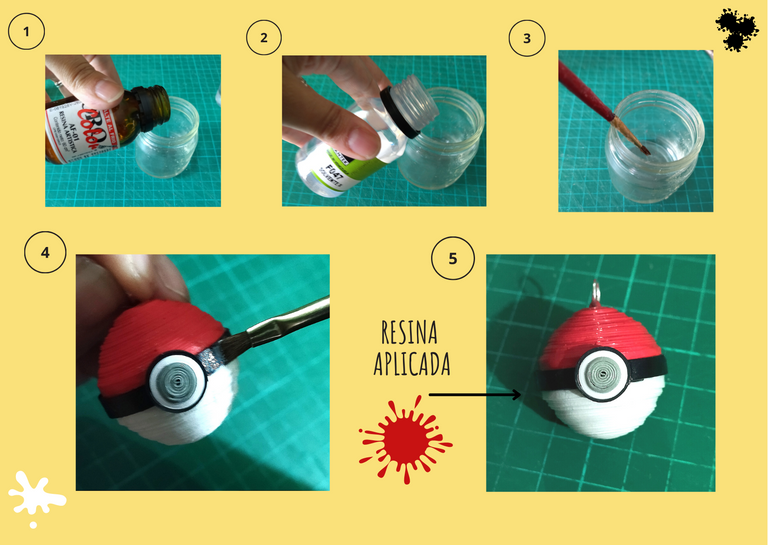
• Llegado a este punto, vamos a aplicar nuestra protección líquida, tomamos la resina, solvente y vertemos una parte de cada una en un frasco de vidrio, revolvemos con el pincel y podemos a aplicar en todas las superficies de nuestra bola, dejamos secar de un día para otro.
🐾🐾🐾
- At this point, we will apply our liquid protection, we take the resin, solvent and pour a part of each in a glass jar, stir with the brush and we can apply on all surfaces of our ball, let dry overnight.


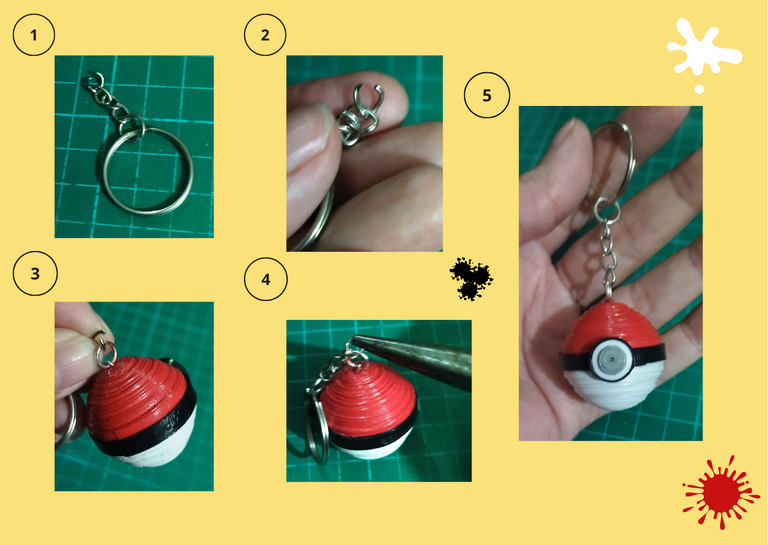
• Seca nuestra pieza procedemos a colocarle el aro y cadena para llavero, (podemos reutilizar cualquiera que tengamos en casa), con ayuda de nuestro alicate punta fina abrimos la argolla de la cadena del llavero, la colocamos en la argolla que previamente le colocamos a la pieza cerramos con el alicate y ya tenemos nuestra hermosa pokeball tipo llavero, lista para usar. 😄💙
🐾🐾🐾
- Once our piece is dry, we proceed to place the ring and chain for the keychain (we can reuse any we have at home), with the help of our pliers we open the ring of the keychain chain, we place it in the ring that we previously placed to the piece, we close it with the pliers and we have our beautiful pokeball keychain type, ready to use. 😄💙


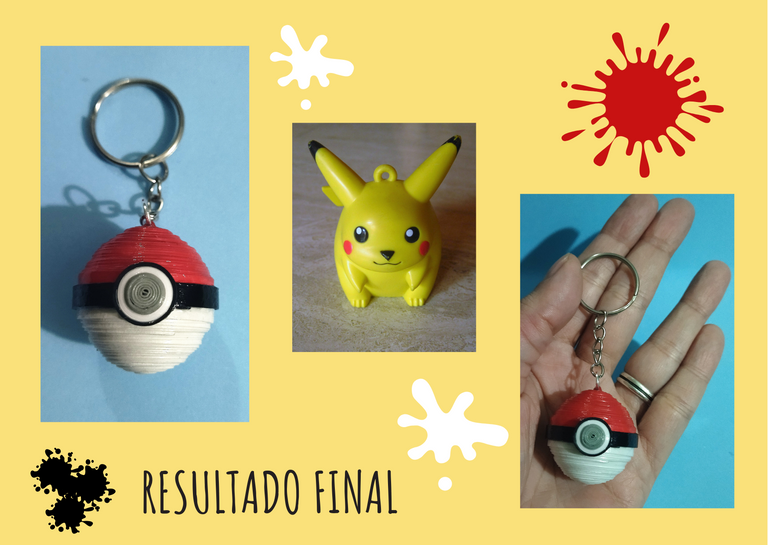
Resultado Final:💕
🐾🐾🐾
Final Result:💕


Tips 💡
• Siempre suelo hacer pruebas antes de llevar a cabo una pieza, en este caso realice la pokeball con una cartulina que tenía en casa, como la cartulina es más gruesa que una hoja de papel utilice solo 10 tiras para llegar al tamaño que estaba buscando, pero les cuento que, si lo realizan con hojas blancas que tengan en casa, estas por ser más delgadas deben realizar 20 tiras para llegar al tamaño adecuado para una pieza de llavero mediano.
•Todos mis trabajos los protejo con resina artística disuelta en solvente, para que sean duraderos al tener una cubierta plástica, pero si van a trabajar con niños por esos químicos ser muy fuertes, pueden optar también por cubrir el trabajo con pega blanca, eso para un tipo de trabajo como este, y por proteger a nuestros niños de cualquier efecto toxico que le pueda causar, pero para realizar trabajos de bisutería como les he venido mostrando en mis post anteriores, por ser piezas más delicadas y tener muchos detalles, si se debe usar en mi opinión resina artística, para hacerlos bastante resistentes y darles un bello acabado.
• No necesariamente tienen que usar los materiales que yo menciono, pueden jugar con ellos, yo use pinturas para ahorrar material, pero también use tiras de quilling que tenía sobrantes de diversos colores, ustedes pueden usar solo hojas o cartulina blanca, y si tienen pinturas, buscar todos los colores para armar las piezas necesarias, pero también pueden tomar trozos de papel de colores y cortar con una tijera los que requieran usar, es decir para realizar este tipo de trabajos podemos aprovechar todo lo que tengamos a la mano, y dejar volar nuestra imaginación. 💖
¿Que les pareció, les gustó?
Espero que sí, que les haya gustado mi explicación, procedimiento y fotos, los hice con mucho cariño por y para ustedes.
"Deja salir esa musa que te inspira, y deja volar tu imaginación".
Gracias a todos, nos vemos en la próxima. 🐾🐱💕
🐾🐾🐾
Tips 💡
- I always do tests before carrying out a piece, in this case I made the pokeball with a cardboard I had at home, as the cardboard is thicker than a sheet of paper I used only 10 strips to reach the size I was looking for, but I tell you that if you do it with white sheets that you have at home, these being thinner you should make 20 strips to reach the right size for a medium size keychain piece.
- All my works I protect them with artistic resin dissolved in solvent, so that they are durable by having a plastic cover, but if you are going to work with children because those chemicals are very strong, you can also choose to cover the work with white glue, that for a type of work like this, and to protect our children from any toxic effect that may cause, but to make jewelry work as I have been showing in my previous posts, for being more delicate pieces and have many details, if you should use in my opinion artistic resin, to make them quite resistant and give them a beautiful finish.
- You don't necessarily have to use the materials I mention, you can play with them, I used paints to save material, but I also used quilling strips that I had leftovers of different colors, you can use only sheets or white cardboard, and if you have paints, look for all the colors to assemble the necessary pieces, but you can also take pieces of colored paper and cut with a scissors the ones you require to use, that is to say to make this type of work we can take advantage of everything we have at hand, and let our imagination fly. 💖
What did you think, did you like it?
I hope you did, I hope you liked my explanation, procedure and photos, I made them with love for you.
"Let out that muse that inspires you, and let your imagination fly".
Thank you all, see you next time. 🐾🐱💕

🐾🐾🐾
All photos used in this post are of my authorship and have been taken on my personal cell phone a Redmi 9T and edited in Canva Dividers and banner made by me in Paint Tool Sai Translated with the help of DeepL


