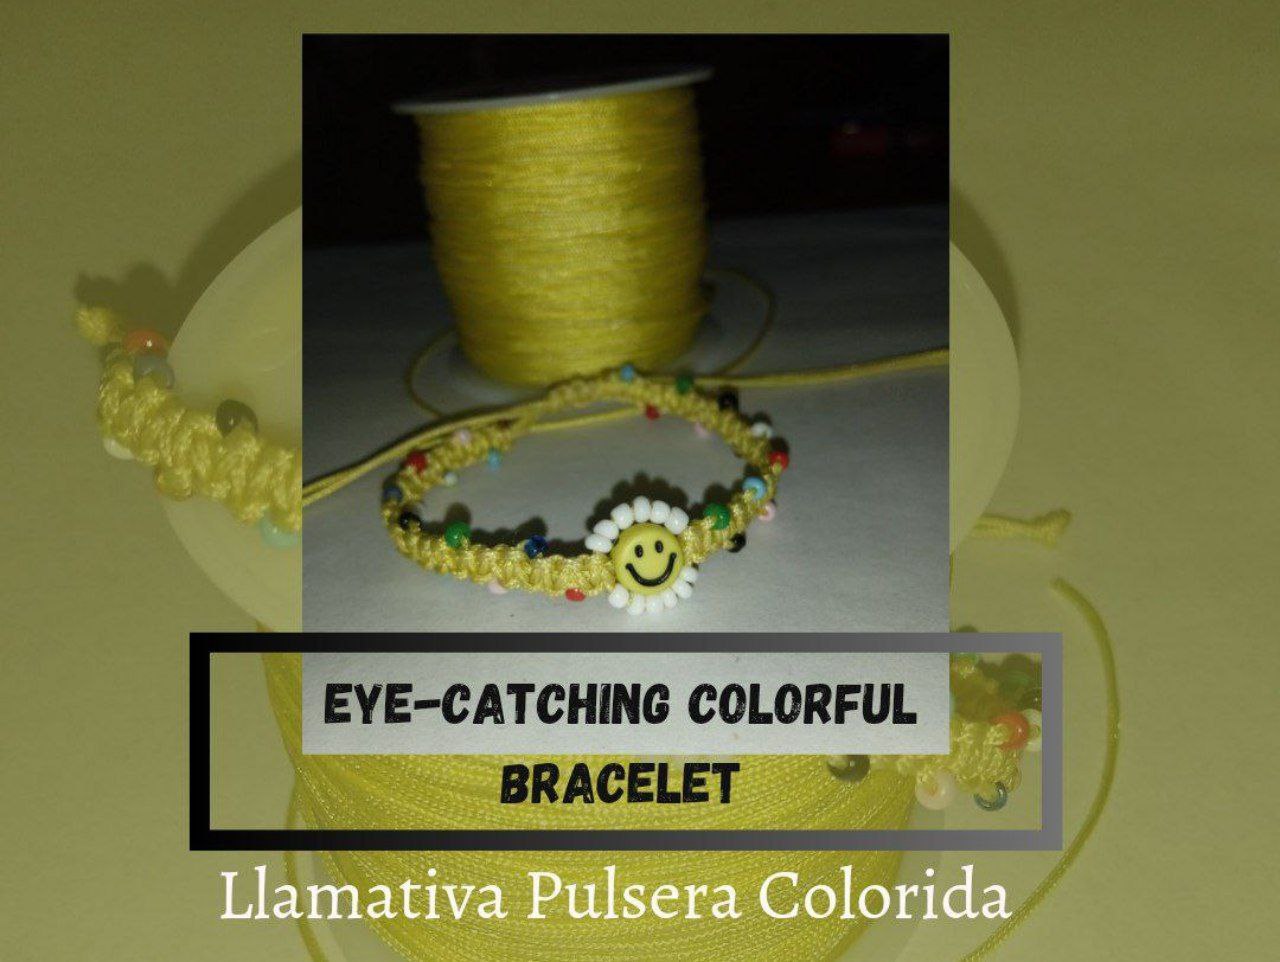
Hello hello, creative people in the Jewelry community. Today I come with the intention of showing you a very beautiful and striking bracelet with many colors that is easy to make. If you like colorful things, you will surely like this idea. I used Chinese thread and beads for its creation, so it is also very economical to make.
Hola hola, personas creativas de la comunidad de Jewelry. El día de hoy vengo con la intención de mostrarles una pulsera muy bonita y llamativa con muchos colores fácil de hacer. Si te gustan las cosas coloridas seguro te gusta mucho esta idea, utilicé hilo chino y mostacillas para su creación por lo que también sale muy económica hacerla.

Materials:
- 2.25 m of yellow Chinese thread.
- 12 small white beads.
- Small beads of various colors.
- Happy face.
- Scissors.
- Lighter.
Materiales:
- 2.25 m de hilo chino amarillo.
- 12 mostacillas pequeñas blancas.
- Mostacillas pequeñas de colores variados.
- Carita feliz.
- Tijera.
- Encendedor.

1.- I will start this bracelet by cutting two threads, one that measures 60cm and the other must measure 1.5 m.
1.- Iniciaré esta pulsera cortando dos hilos, uno que mida 60cm y el otro debe de medir 1,5 m.


2.- I will take the 60cm thread and fold it in half, placing it on a board and holding it with some hooks. I will leave a space of about eight centimeters below the hooks. And I'm going to place half of the thread about five feet below the center thread. I will pass the thread on the right side under the threads in the center and leave it above the thread on the left side, then I will take the thread on the left side and pass it over the threads in the center and then put it in the middle of the space in the thread on the right side, and I pull the tip of both sides to form the first knot. This is a little confusing to understand but you can guide yourself by looking at the photos.
2.- Tomaré el hilo de 60cm y lo doblaré por la mitad colocándolo en una tabla y sosteniéndolo con unos ganchos, dejaré un espacio de unos ocho centímetros por debajo de los ganchos. Y voy a colocar la mitad del hilo de un metro y medio por debajo del hilo del centro. Pasaré el hilo del lado derecho por debajo de los hilos del centro y dejaré por encima del hilo del lado izquierdo, luego tomaré el hilo del lado izquierdo y pasaré por encima de los hilos del centro para luego meterla por el medio del espacio que hay en el hilo del lado derecho, y jalo la punta de ambos lados para formar el primer nudo. Esto es un poco confuso de entender pero se pueden guiar mirando las fotos.

3-. I will do the same on the other side, I will pass the thread on the left side under the center threads, leaving it above the thread on the right side, which I am going to take to go over the center threads and passing through the middle of the hole which is formed in the thread on the left side.
3-. Haré lo mismo del otro lado, pasaré el hilo del lado izquierdo por debajo de los hilos del centro dejándolo por encima del hilo del lado derecho, el cual voy a tomar para pasar por encima de los hilos del centro y pasando por en medio del agujero que se forma en el hilo del lado izquierdo.


4.- Now I will take a small blue bead and I will put it through the thread on the right side and I will form another knot again, passing the thread on the right side under the center and leaving it above the thread on the left side, which I'm going to take it and go over the center threads to get it into the center of the right thread.
4.- Ahora tomaré una mostacilla de color azul y la voy a meter por el hilo del lado derecho y volveré a formar otro nudo, pasando el hilo del lado derecho por debajo del centro y dejando por encima del hilo de lado izquierdo, el cual voy a tomar y pasar por encima de los hilos del centro para meterlo en el centro del hilo derecho.


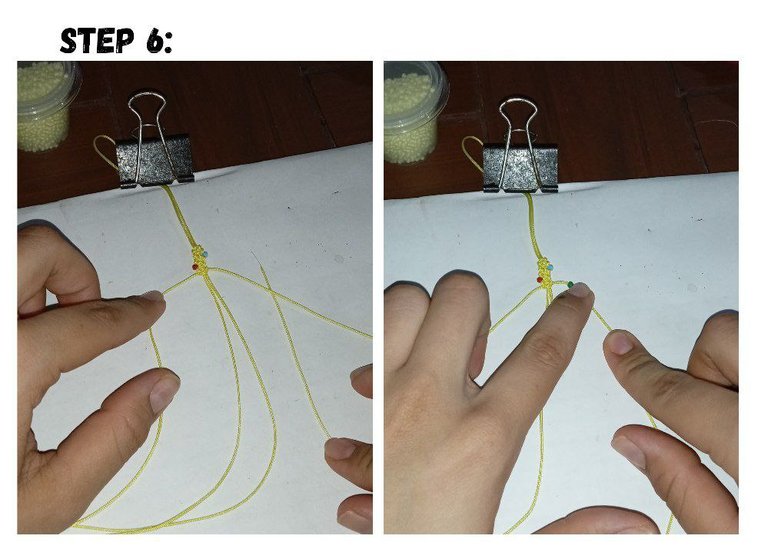
5.- Now I will take a bead of another color and pass it through the thread on the left side and then tie a knot starting with the thread on this side.
5.- Ahora tomaré una mostacilla de otro color y lo pasaré por el hilo del lado izquierdo para luego hacer un nudo comenzando con el hilo de este lado.

6.- I will do this procedure alternating sides and colors until I reach the center of the bracelet.
6.- Haré este procedimiento alternado de lado y de colores hasta llegar al centro de la pulsera.

7.- Once I reach the middle I will take the happy face and insert it through the two middle threads.
7.- Una vez llegado a la mitad tomaré la carita feliz y la introduciré por los dos hilos del medio.


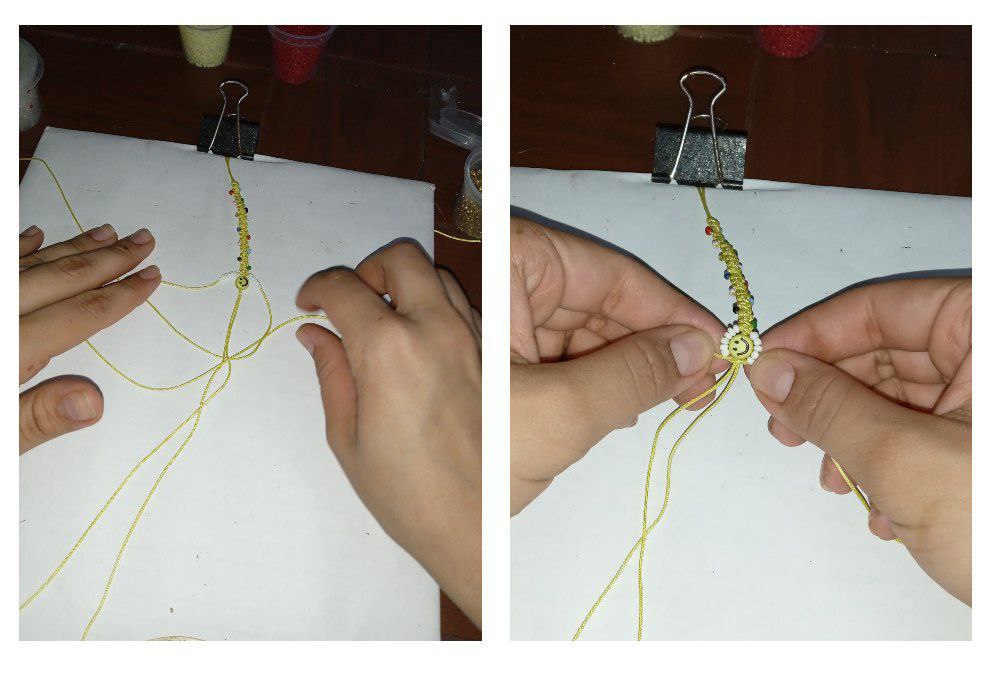
8.- Then I am going to introduce six white beads on each side of the side threads. I will take the thread on the right and pass it under the center threads, leaving it above the thread on the left and I take the thread on the left and introduce it through the center of the thread on the right. To do the same with the left side.
8.- Luego voy a introducir seis mostacillas blancas de cada lado de los hilos de los laterales. Tomaré el hilo de la derecha y lo paso por debajo de los hilos del centro dejándolo por encima del hilo de la izquierda y tomo el hilo de la izquierda y lo introduzco por el centro del hilo de la derecha. Para hacer lo mismo con el lado izquierdo.


9.- I will do the same thing as on the other side, I will put a bead on one side, I will tie a knot and the same on the other side, and so on until I reach the end. I'm going to cut the excess thread and then burn it to seal it.
9.- Volveré a hacer lo mismo que en el otro lado, meteré una mostacilla de un lado, hago un nudo y lo mismo del otro lado, y así sucesivamente hasta llegar al final. Voy a cortar el hilo sobrante y luego lo quemaré para sellarlo.

10.- I am going to join both threads on both sides with the help of my hands, giving shape to the bracelet.
10.- Voy a juntar ambos hilos de los dos lados con ayuda de las manos, dándole forma a la pulsera.


11.- I am going to take a 16cm thread and put it under the threads and make a flat knot starting in the same way on the right side.
11.- Voy a tomar un hilo de 16cm y lo pondré por debajo de los hilos y haré un nudo plano empezando de igual forma del lado derecho.

12.- I will tie about four more knots or until the thread allows it.
12.- Haré unos cuatro nudos más o hasta que me lo permita el hilo.

13.- I am going to cut the excess thread with the scissors and burn it, as I did previously.
13.- Voy a cortar el hilo excedente con la tijera y lo voy a quemar, como hice anteriormente.


14.- I am going to measure the ends of the threads and cut them of the same length and then tie a knot at the ends which I am going to cut and burn.
14.- Voy a medir los extremos de los hilos y los cortaré del mismo largo para luego hacerle un nudo en las puntas las cuales voy a cortar y quemar.

And this is how pretty it turned out, I hope you liked it and understood the step by step. Thank you for reading me until the end.
Y así es como quedó de bonita, espero que les haya gustado y hayan entendido el paso a paso. Gracias por leerme hasta el final.


