Click on English version
Greetings, fellow lovers of repairs and DIY, I hope you are very well, in this publication I bring you a bit of religious imagery, repair objects of faith, it should be noted that some support images were lost to me, but these are enough to tell the process, I hope it will be helpful for similar Projects, because one of the missions is to give second and third life to functional objects and history.
Saludos, compañeros amantes de las reparaciones y el bricolaje, espero que estén muy bien, en esta publicación les traigo un poco de imaginería religiosa, reparar objetos de fe, cabe destacar que algunas imágenes de apoyo me fueron perdidas, pero estas son suficiente para contar el proceso, espero que le sea de ayuda para proyectos similares, pues unas de las misiones es dar segunda y tercera vida a los objetos funcionales y con historia.
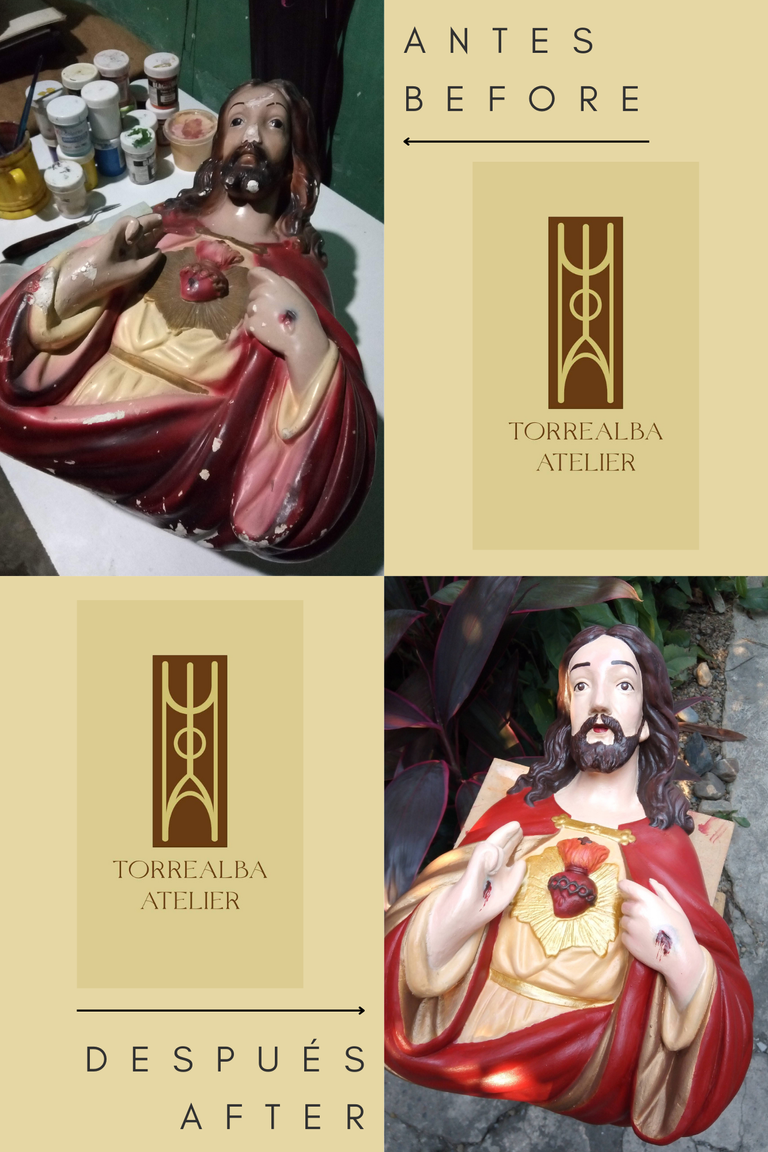
The present image is a hollow plaster sculpture (sacred heart of Jesus), they are sculpture of casts in series, therefore, they are very thin approximately of 2.5 mm, it is for this reason that many of these images with a small blow fracture, but having ingenuity, patience and a little skill we can leave it better than it was when leaving the factory, enjoy and be useful.
La presente imagen es una escultura de yeso hueca ( sagrado corazón de Jesús), son escultura de vaciados en serie, por lo tanto, son muy finas aproximadamente de 2.5 mm, es por esta razón que muchas de estas imágenes con un pequeño golpe se fracturan, pero teniendo ingenio, paciencia un poco de habilidad podemos dejarla mejor de lo que estuvo al salir de la fábrica, que disfruten y le sea de utilidad.
Click on English version
Materials to be used:
- Carpenter's glue
- Construction plaster.
- Cold paint or acrylics
- Soft wire.
- Water
- Brushes
- Water based polish or polyurethane varnish.
- 2 inch brush
- Spatula
Materiales a usar:
- Cola de carpintero
- Yeso de construcción.
- Pintura al frío o acrílicos
- Alambre dulce.
- Agua
- Pinceles
- Lustre a base de agua o barniz poliuretano
- Brocha de 2 pulgadas
- Espátula
Paso 1 / Step 1
 |  |  |
Click on English version
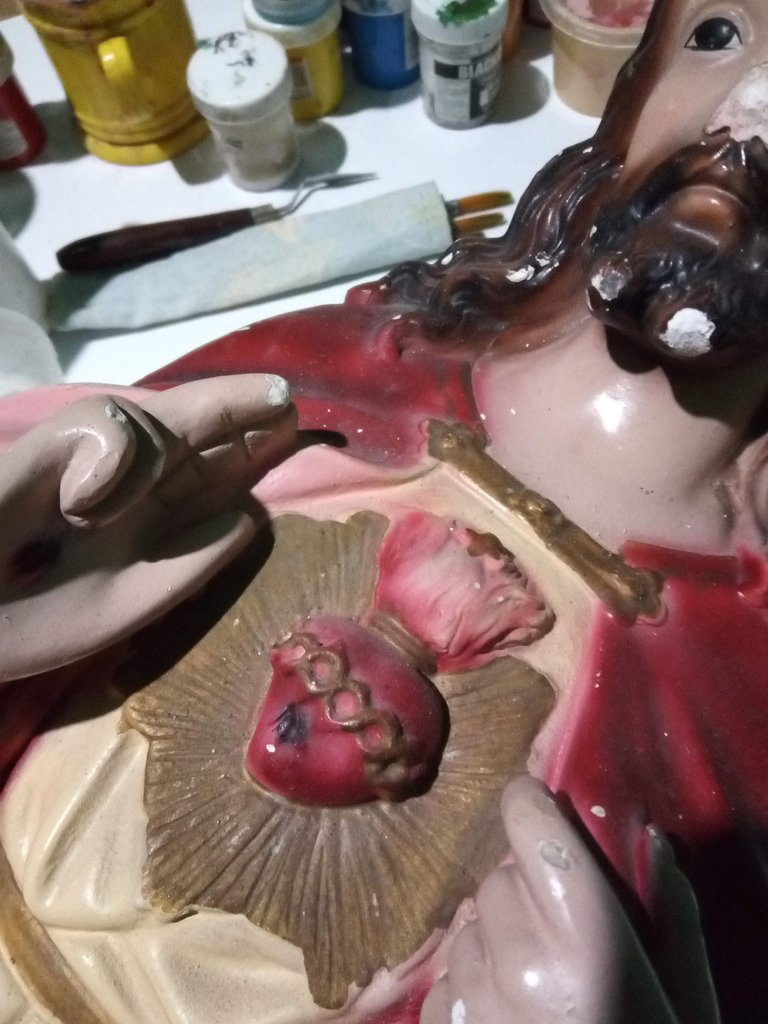
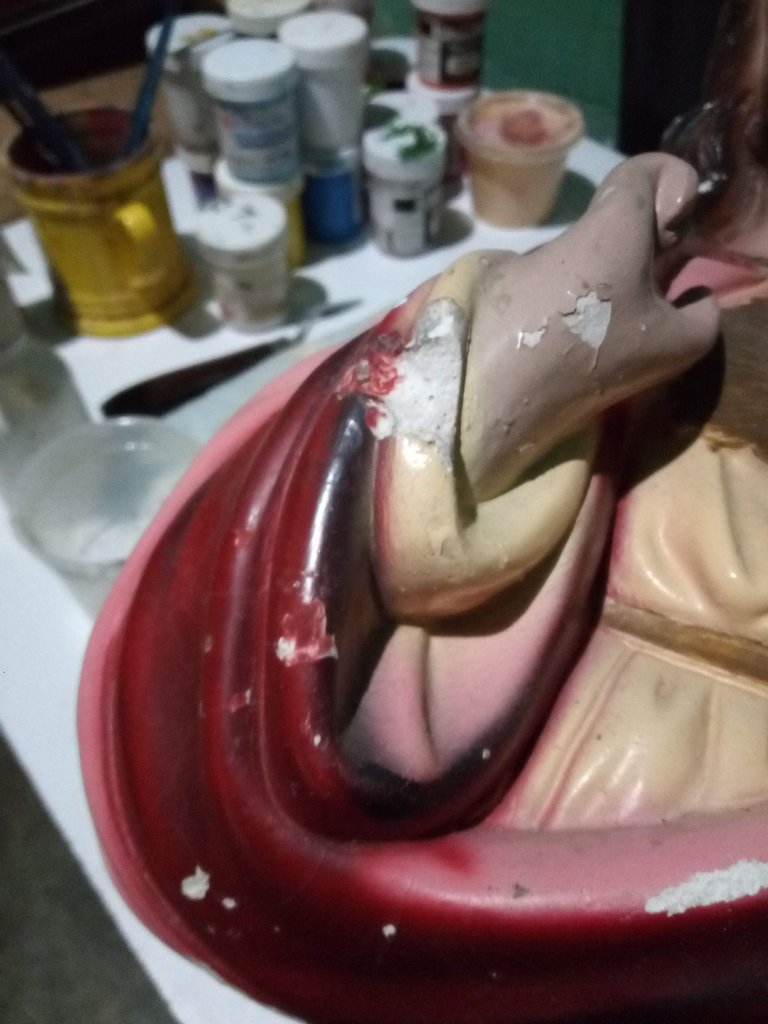
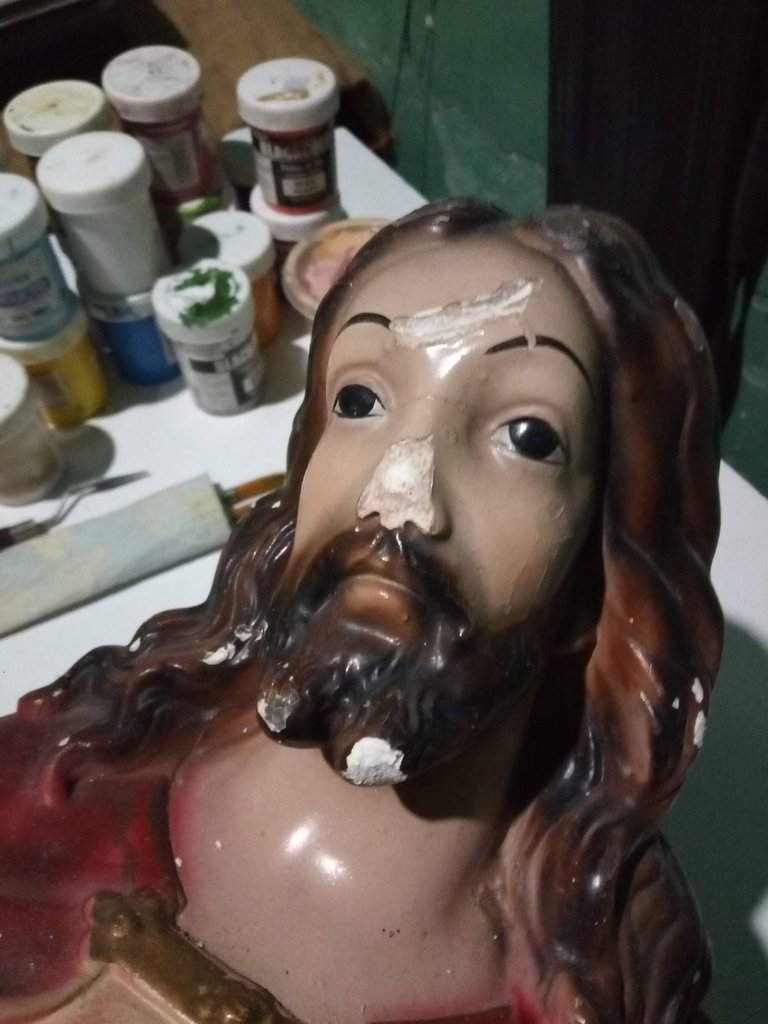
In this first step we must make the inspection of the piece, we make a diagnosis to know what problem we are going to treat, we clean with a 2 inch brush and with a spatula we proceed to remove the raised paint, in this way we can observe if there are cracks in the object.
En este primer paso debemos hacer la inspección de la pieza, realizamos un diagnóstico para saber qué problema vamos a tratar, limpiamos con una brocha de 2 pulgadas y con una espátula procedemos a remover la pintura levantada, de esta manera podemos observar si yacen fisuras en el objeto.
Paso 2 / Step 2
Click on English version
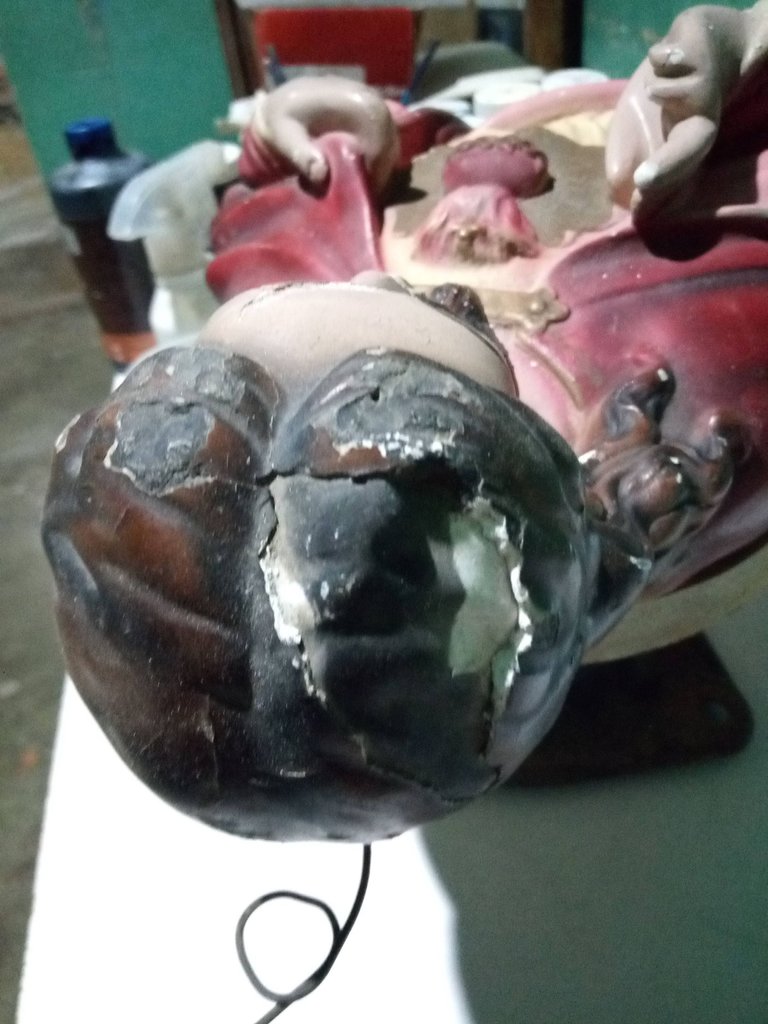
One of the particularities of the image is that it suffered a damage after falling and lost the nose, in this step we are going to make this important reconstruction, what I usually do in these parts that are exposed to friction and can easily come off, is to place a structure where the plaster can adhere.
Here I made two deep perforations and draw with the wire the shape of the nose as shown in the picture and at the ends of the wire bend, insert into the holes and in a container prepare glue with plaster, (first place a little glue and then a little plaster) mix and that its consistency is pasty and place it in the hole and let it dry for a while, always reserve aside a little of the mixture to observe its drying.
Una de las particularidades de la imagen es que sufrió un daño tras caerse y perdió la nariz, en este paso vamos a realizar esa reconstrucción importante, lo que suelo hacer en estas parte que se exponen ante un roce y puede desprenderse fácilmente, es colocar una estructura, donde el yeso pueda adherirse.
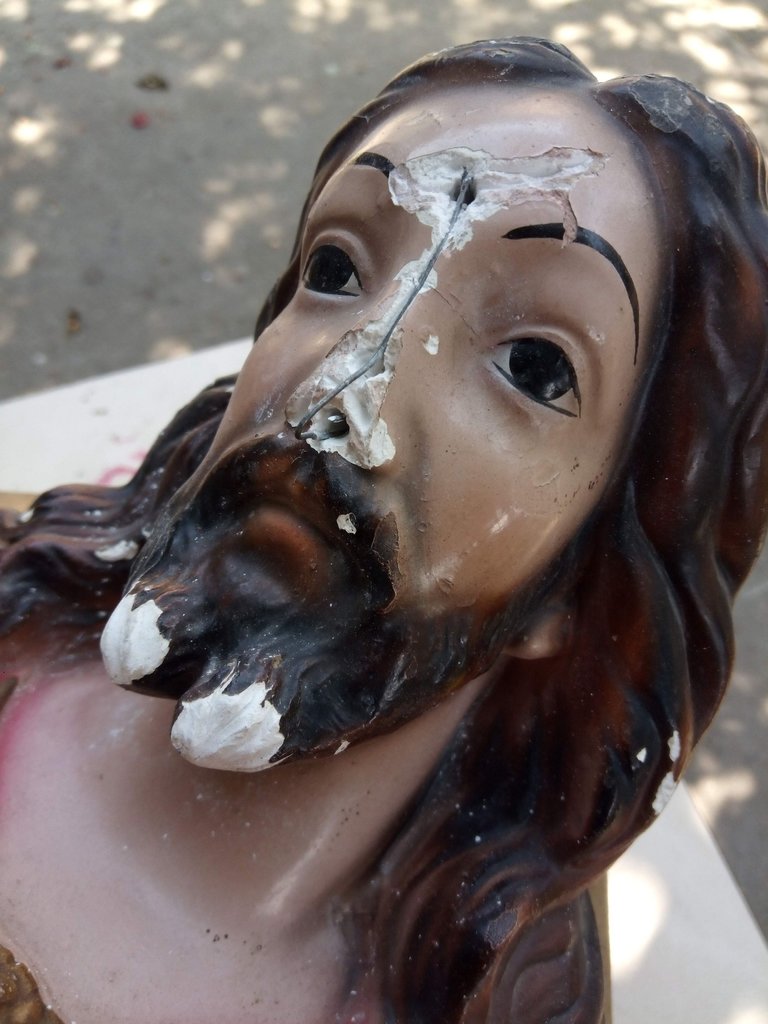 | 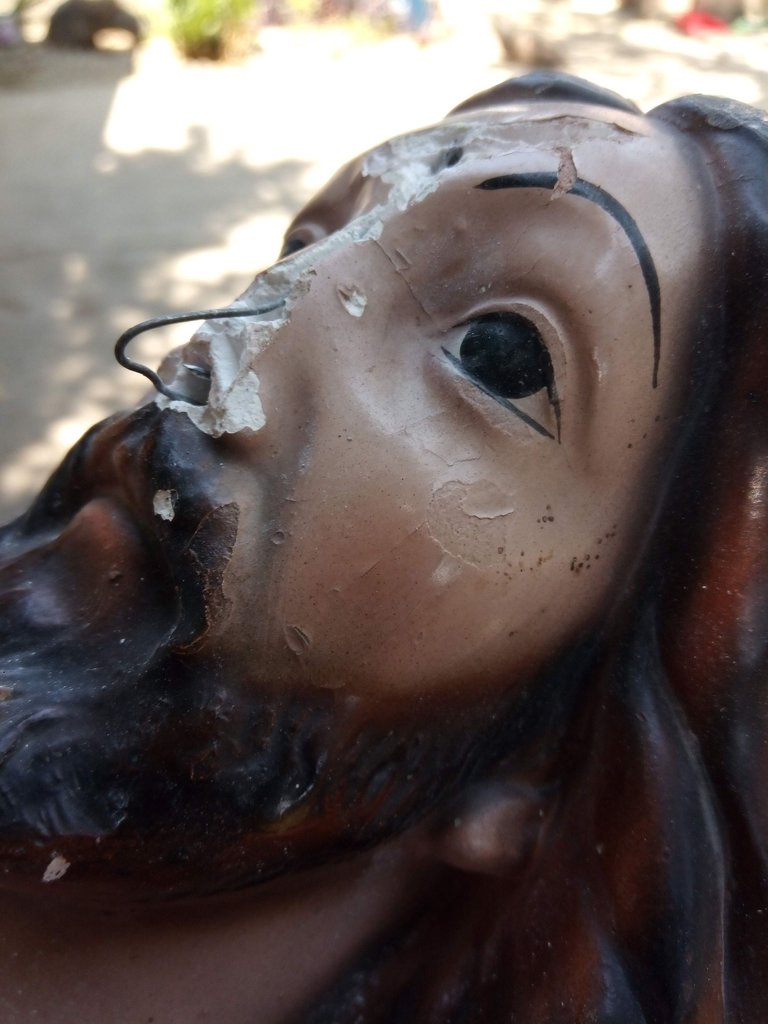 |
Acá realicé dos perforaciones profunda y dibujamos con el alambre la forma de la nariz tal cual como se observa en la imagen y en las puntas del alambre doblamos, insertamos en los orificios y en un envase preparamos cola con yeso, (primero colocamos un poco de cola y luego un poco de yeso) mezclamos y que su consistencia quede pastosa la colocamos en el orificio y dejamos secar por un buen rato, siempre reservemos aparte un poco de la mezcla para observar su secado.
Paso 3 / Step 3
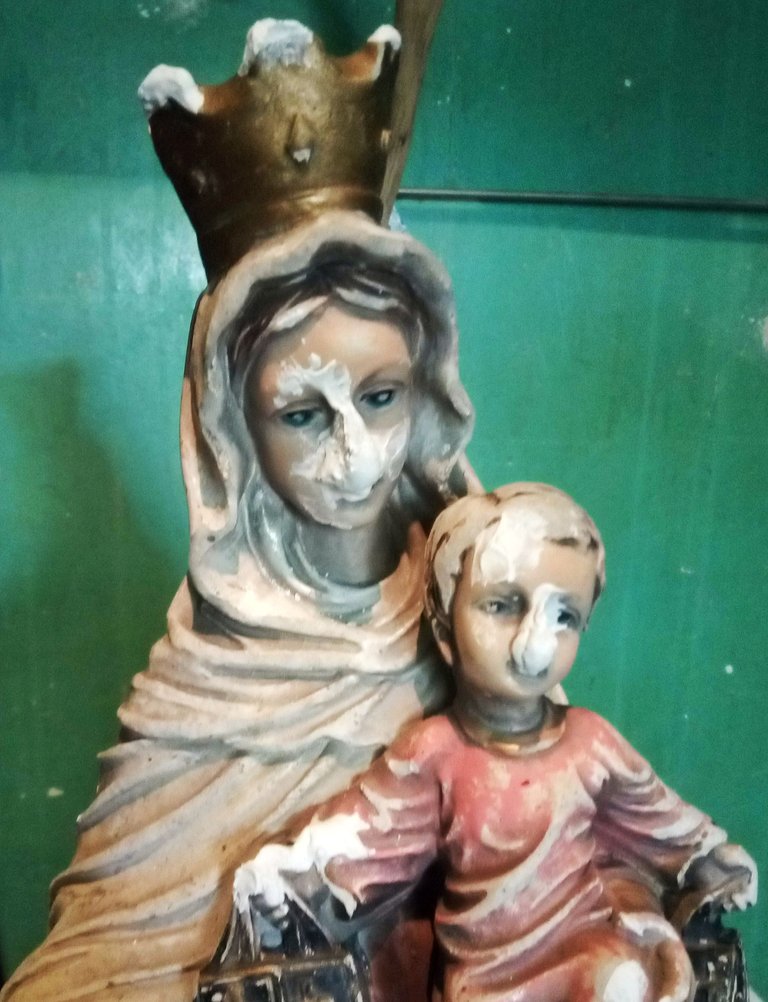
Aunque esta imagen no corresponde al trabajo presente, la intención es presentar el ejemplo de como debería quedar este paso para dar forma a una nariz y observar el volumen que debemos hacer con el yeso
Click on English version
Although this image does not correspond to the present work, the intention is to present the example of how this step should look like to shape a nose and to observe the volume that we must make with the plaster .
Once it is dry, we prepare the plaster with water, the proportions can be 2 parts of plaster to 1 part of water or 1 part of water to 1 part of plaster, the idea is that it is thick, like a kind of paste, there we will place it on the wire and the first idea is to create a volume, let it set and when it is almost 60% dry we mold with a spatula to model a nose, with a soft bristle brush we wet and pass over the surface to smooth, let the piece dry for a day.
Ya al estar seco, preparamos el yeso con agua, las proporciones pueden ser 2 partes de yeso por una de agua o 1 parte de agua por 1 de yeso, la idea es que quede espesa, como una especie de pasta, allí la colocaremos sobre el alambre y la idea primera es crear un volumen, dejamos fraguar y cuando esté casi seca a su 60% moldeamos con una espátula hasta modelar una nariz, con un pincel de cerda suave mojamos y pasamos sobre la superficie para alisar, dejamos secar la pieza por un día.
Paso 4 / Step 4
Click on English version
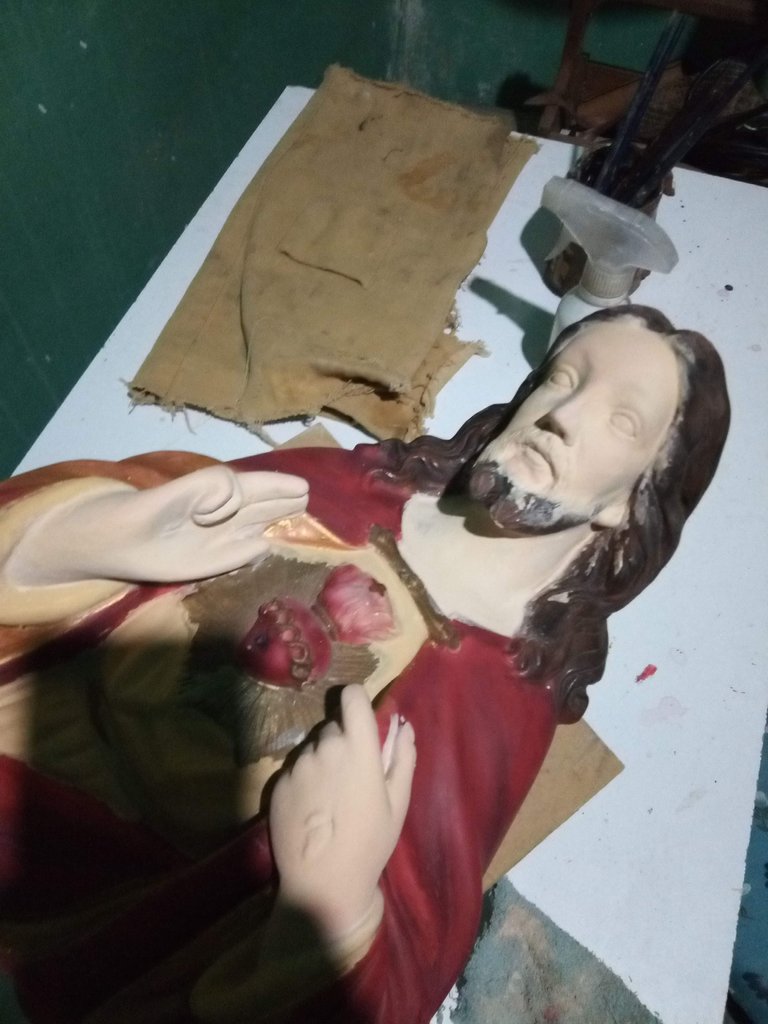
Once the nose is dry we proceed to put some water-based varnish, to use it as a pore sealant, (this only in places where plaster was used) in this step we can also cover cracks, using paint and plaster we can use it as when we cover a crack in the house, prepare 2 parts of paint for one part of plaster of creamy consistency and we put it in the part that requires, after drying it is passed in the places where it was placed paste, a sandpaper of 320 in case it has some texture.
| Note: sealing the plaster is very necessary before the polychrome, as this material has the particularity of absorbing and this does not suit us because the piece gets wet, in large pieces can leave a mold on the inside. |
Una vez seca la nariz procedemos a colocarle algún barniz a base de agua, para usarlo como sellador de poros, (esto solo en los lugares que se usó yeso) en este paso podemos al igual tapar fisuras, usando pintura y yeso podemos usarlo como cuando tapamos una fisura en la casa, preparamos 2 partes de pintura por una de yeso de consistencia cremosa y lo colocamos él la parte que requiera, tras secar se le pasa en los lugares donde se le colocó pasta, una lija de 320 por si tiene alguna textura.
| Nota: sellar el yeso es muy necesario antes de la policromía, ya que este material tienen la particularidad de absorber y esto no nos conviene porque la pieza se humedece, en piezas grandes puede salir un moho en la parte interna. |
Paso 5 / Step 5
Click on English version
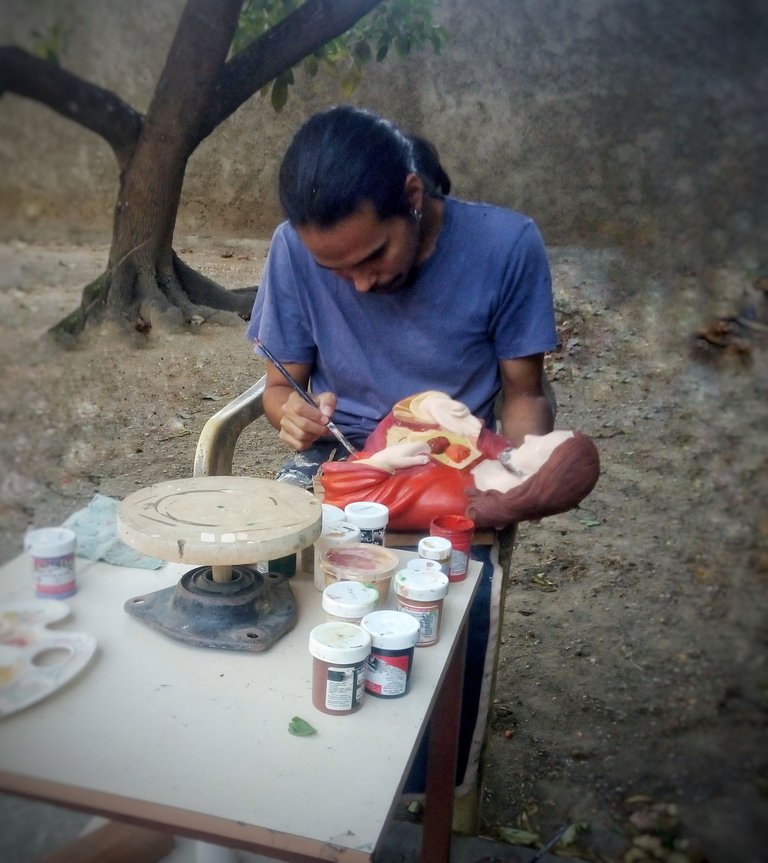
In this step we move on to the moment we are all waiting for, the polychromy of the image, it is necessary to know a little color theory to carry out this practice, usually I work with primary colors and from there I get the tones to generate shades and the result is more artistic and generate some sensitivity, but this can not be a limitation, if you get ready-made paintings with good tones, go ahead, we move on ...
This particularity of the polychromy is what differentiates a work sustained through the use of the plastic arts from a merely factory one, which only uses flat tones, it is evident that we can always improve a product by adding the substance that was missing.
After the arduous work of painting it is necessary to lacquer the image, this more than a fact that embellishes the piece, is a material that protects it from humidity and dust, giving us the possibility to clean it in an easier way without damaging the sculpture.
En este paso pasamos al momento que todos esperamos, la policromía de la imagen, es necesario saber un poco de teoría del color para llevar a cabo esta práctica, por lo general trabajo con colores primarios y de allí saco los tonos para generar matices y el resultado sea más artístico y genere cierta sensibilidad, pero esto no puede ser una limitación, si consigues pinturas preparadas con buenos tonos, adelante, seguimos en marcha...
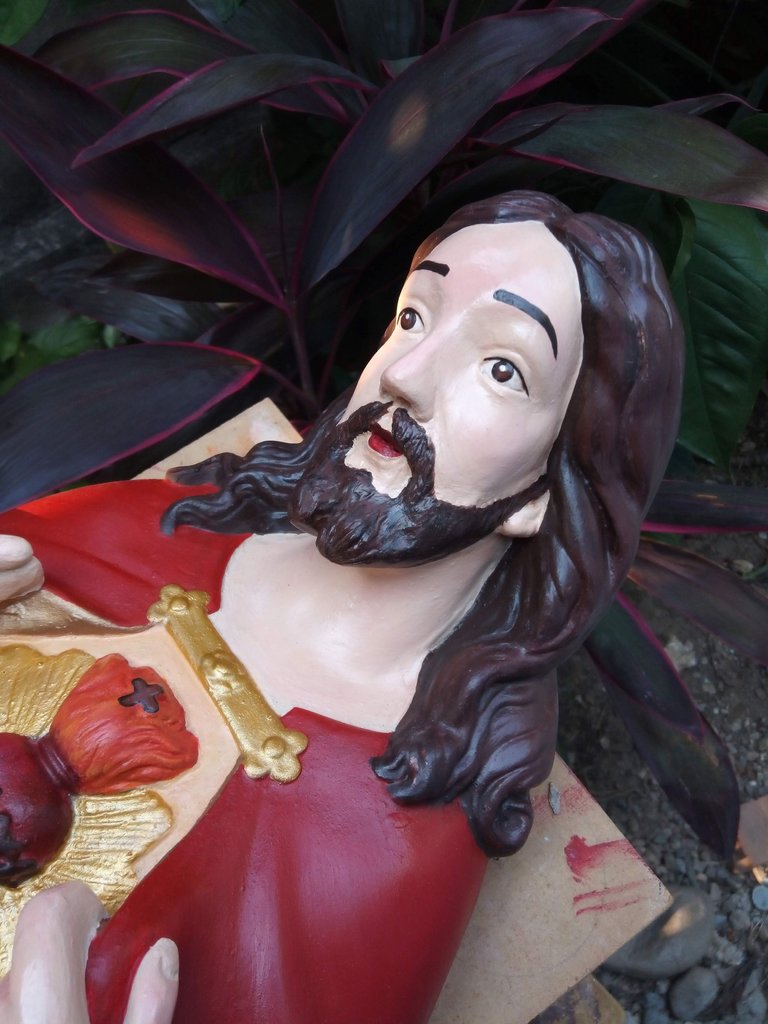 | 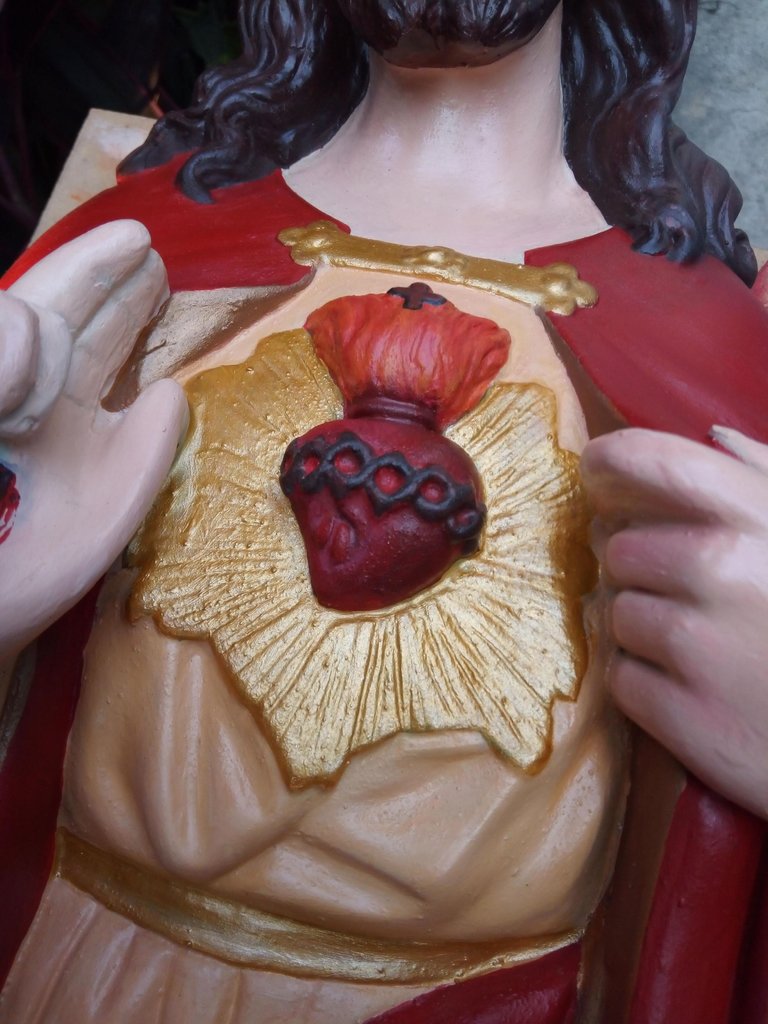 | 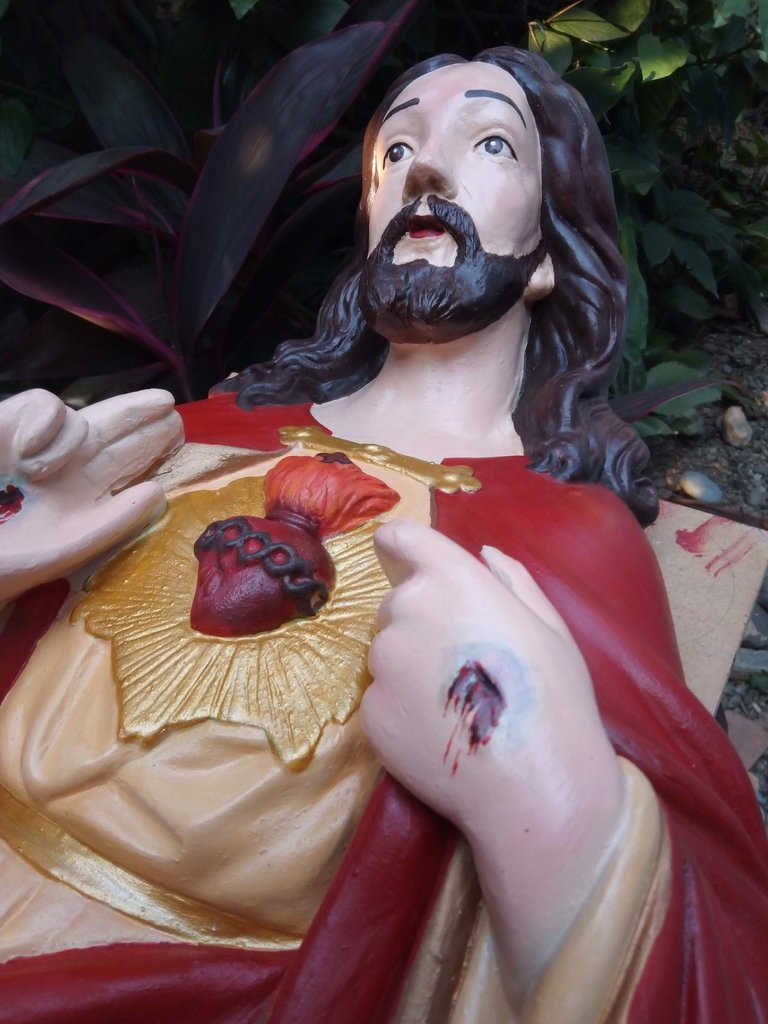 |
Esta particularidad de la policromía es lo que diferencia un trabajo sustentado a través del uso de las artes Plástica a uno meramente de fábrica, que solo usas tonos planos, es evidente que podemos siempre mejorar un producto agregándole las sustancia que les hacía falta.
Tras la ardua labor de la pintura es necesario lacar la imagen, esto más que un hecho que embellece la pieza, es un material que la protege de la humedad y el polvo, dándonos la posibilidad de limpiar de manera más fácil si dañar la escultura.
Click on English version
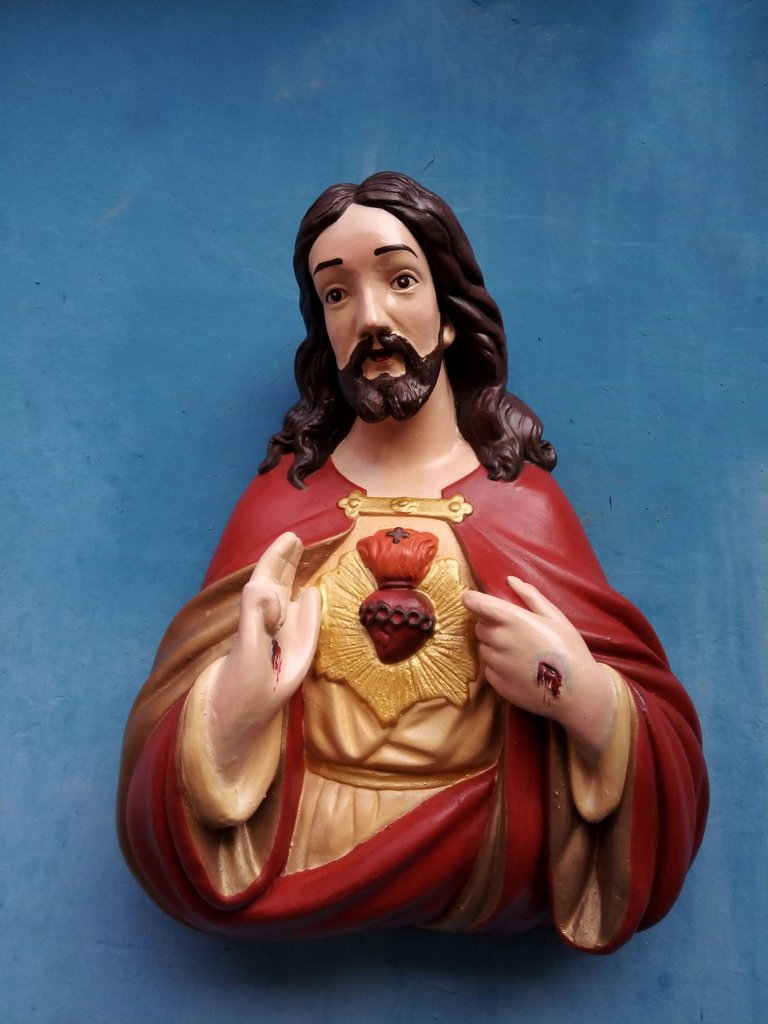
After finishing the piece of the Sacred Heart of Jesus, we spent three days giving love and beauty to this piece that was considered lost, forgotten, that is to say, through technique and patience, we achieved a result which does not resemble the same one that arrived at the workbench, it leaves totally renewed and with its polychromy improved.
Thank you for having read my post about some of the ways to repair an object, so; .
¡ How to prepare plaster and glue, two miraculous and indispensable materials in the restoration of images and sculpture!
I hope I have encouraged you, if you want to ask any questions or suggestions see you in the comments section, until a next publication Deep Peace.
- Personal photographs, taken with my cell phone.
- Text translation:
https://www.deepl.com/translator-mobile#en/es/%0AClick%20on%20English%20version
- Images edited in Snapseed App
if you have any question or support any project and/or fix any part you can also contact me by the following link : https://www.instagram.com/torrealba_atelier?igsh=ODIwM2RreGF3MG5r
Finalizada la pieza del sagrado corazón de Jesús, fueron tres días dándole cariño y belleza a esta pieza que estaba dada por perdida, olvidada, es decir a través de la técnica y la paciencia, logramos un resultado el cual no se parece al mismo que llego al banco de trabajo se va totalmente renovado y con su policromía mejorada.
Gracias por haber leído mi post sobre unas de las formas de reparar un objeto, así que;
¡ A preparar el yeso y la cola, dos materiales milagrosos e indispensables en la restauración de imágenes y escultura!
Espero haberles animado, si desean hacer alguna pregunta o sugerencia nos vemos en la sección de comentarios, hasta una próxima publicación Paz profunda.
- Fotografías personales, tomadas con mi celular.
- Traducción de texto:
https://www.deepl.com/translator-mobile#en/es/%0AClick%20on%20English%20version
- Imágenes editadas en App Snapseed
si tienes alguna pregunta o apoyar algún proyecto y/o arreglar alguna pieza me puedes contactar también por el siguiente link :
https://www.instagram.com/torrealba_atelier?igsh=ODIwM2RreGF3MG5r


