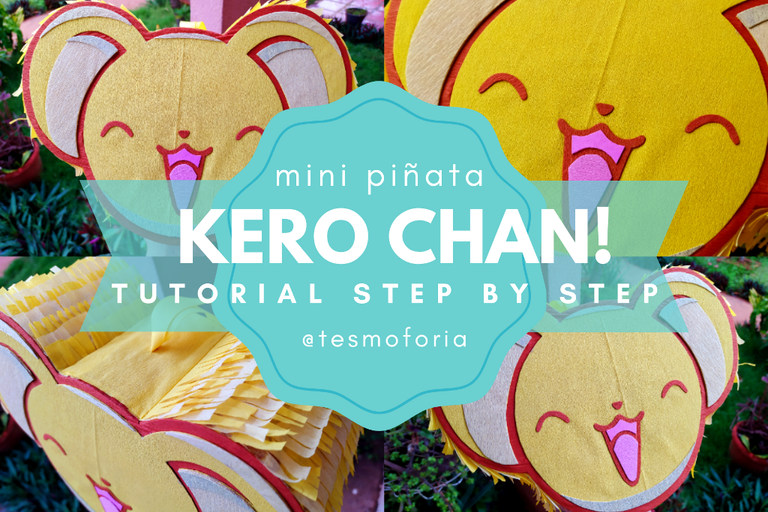
✦ To give away or to decorate your special room in a fabulous way! - Collage & Edition in FotoJet, photos by @Tesmoforia ✦

🇪🇸 ~ ¡Hola a todos! ✌ ✨ ¿conoces al grupo CLAMP?, quizá no pero sí conoces una de sus obras: Card Captor Sakura 🌸 🪄
Un dato que te encantará si eres fan de Sakura Kinomoto y su historia es que el mundo de Card Captor Sakura no esta aislado, y se conecta de múltiples maneras con otras historias (Tsubasa Reservoir Chronicles o xxxHolic por ejemplo).
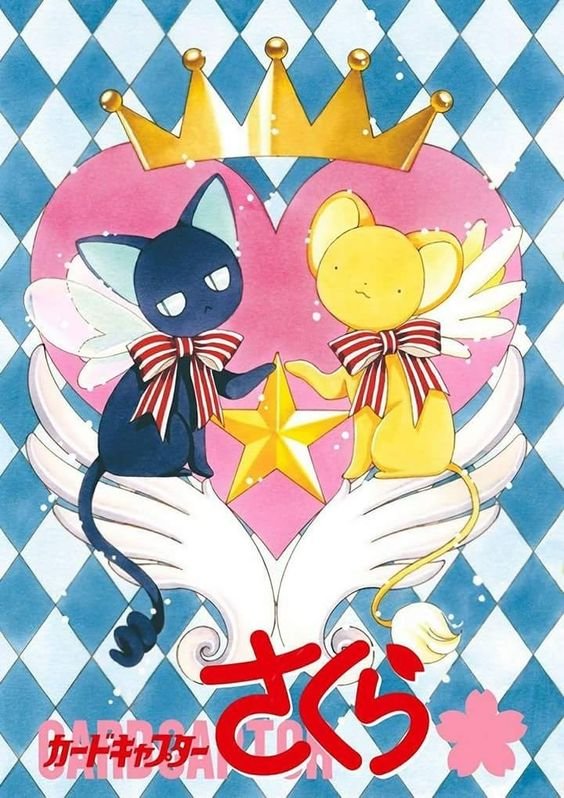
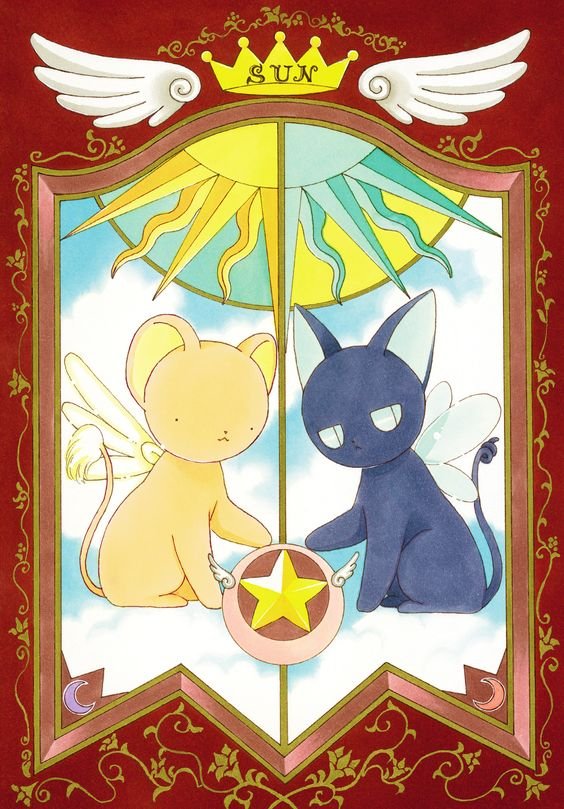
Hoy como fan a manera de tributo, ¡te enseño paso a paso cómo elaborar una mini piñata de Kerberos (el Guardian del Libro Clow) en su forma chibi! ヽ (> ∀ <☆) ノ
🇺🇸 ~ Hello everyone! ✌ ✨ Do you know the group CLAMP?, maybe not but you know one of their works: Card Captor Sakura 🌸 🪄
A fact that you will love if you are a fan of Sakura Kinomoto and her story is that the world of Card Captor Sakura is not isolated and is connected in many ways with other stories (Tsubasa Reservoir Chronicles or xxxHolic for example).
Today, as a fan's tribute, I'll show you step by step how to make a mini-piñata of Kerberos (the Guardian of the Clow Book in his chibi form! ヽ (> ∀ <☆) ノ
 |  |  |
|---|
✦ "¿Por qué realizar este proyecto?" ✦
Es el regalo perfecto para tu amigo geek/otaku, un elemento decorativo rarísimo para tu room, sirve para Cumpleaños temáticos o si quieres elaborar piñatas para la venta, ¡Kero Chan es siempre irresistible! 🤌 💖
⏳ Tiempo: ⭐⭐⭐⭐/ 5.
🚀 Dificultad: ⭐⭐⭐/ 5.
🪙 Costo aproximado: ⭐⭐/ 5.
✦ "Why do this project?" ✦
It's the perfect gift for your geek/otaku friend, a **weird decorative element for your room, suitable for themed birthdays or if you want to make piñatas to sell, Kero Chan is always irresistible! 🤌 💖
⏳ Time: ⭐⭐⭐⭐/ 5.
🚀 Difficulty: ⭐⭐⭐/ 5.
🪙 Approximate cost: ⭐⭐/ 5.

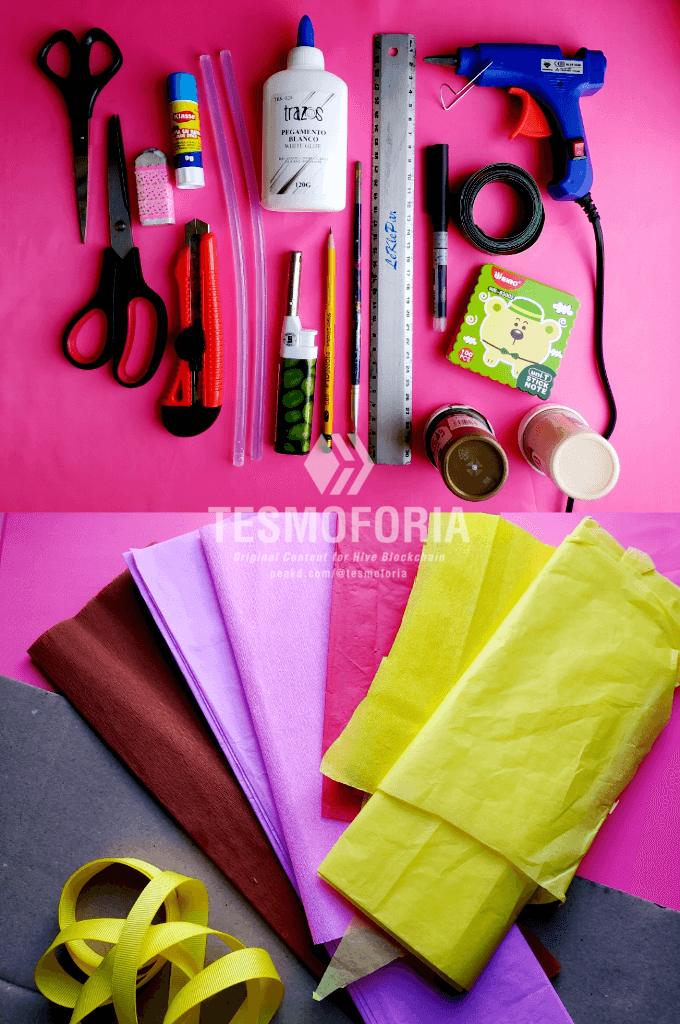
« 𝕋 𝕆 𝕆 𝕃 𝕊 • 𝔸 ℕ 𝔻 • 𝕄 𝔸 𝕋 𝔼 ℝ 𝕀 𝔸 𝕃 𝕊 »

 |
|---|
| 🇪🇸 ✦ Las herramientas y materiales que necesitas para elaborar este proyecto son: Lápiz, marcador fino, borrador, regla, cinta métrica, tijeras, cutter grande, notas adhesivas, pincel mediano, pintura acrílica, barras de silicón, pistola de silicón, pegamento en barra, pegamento escolar, carton de caja corrugado, carton fino o de reciclaje, cinta de tela, papel crepe de distintos colores, papel para patronar. |
| 🇺🇸 ✦ The tools and materials you need to make this project are: Pencil, fine marker, eraser, ruler, ribbon measure, scissors, large cutter, sticky notes, medium brush, acrylic paint, silicone sticks, silicone gun, glue stick, school glue, corrugated cardboard, thin cardboard or recycled cardboard, fabric ribbon, crepe paper in different colors, pattern paper. |
• 𝕄 𝔸 ℕ 𝕌 𝔸 𝕃 𝕀 𝔻 𝔸 𝔻 •
« 𝚂𝚝𝚎𝚙 𝚋𝚢 𝚂𝚝𝚎𝚙 𝚃𝚞𝚝𝚘𝚛𝚒𝚊𝚕: "𝙺𝚎𝚛𝚋𝚎𝚛𝚘𝚜 𝙼𝚒𝚗𝚒 𝙿𝚒ñ𝚊𝚝𝚊" »


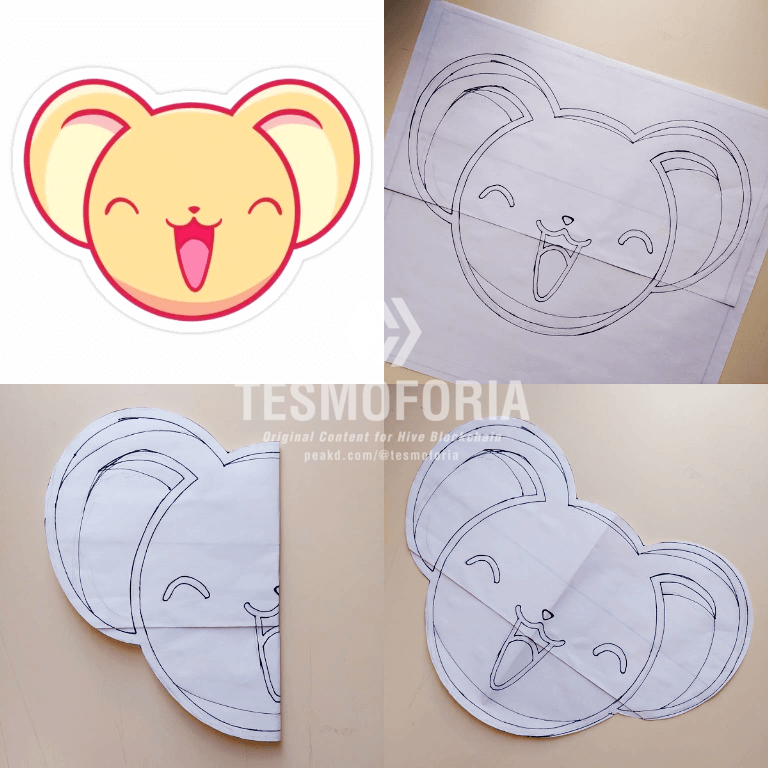
✦ You can print the image and make your pattern guide in the same order as you cut the sections, but this is a more economical way to make a pattern for mini-piñatas (just draw the lines) / / Kero Chan ✦
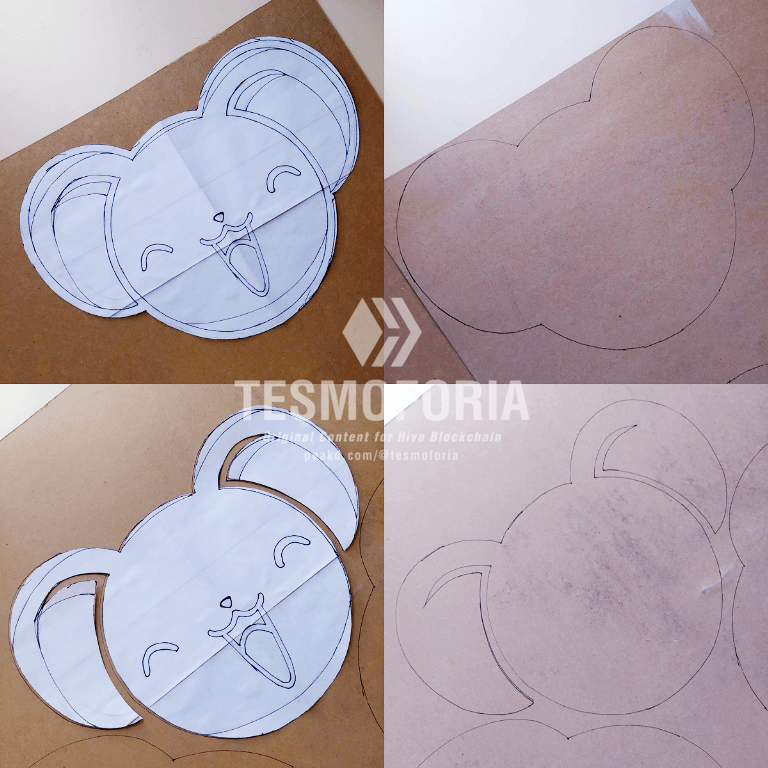
✦ The same pattern will work for several stages of the project, so treat it with care and don't break it or throw it away! ✦


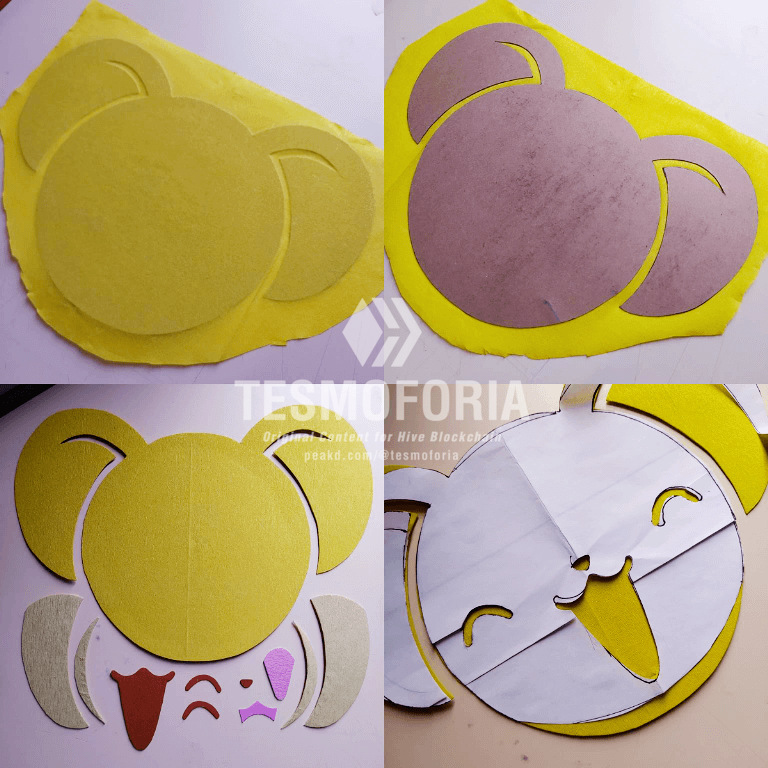
【 PASO 1 】 Recomiendo empezar con una imagen guía únicamente de la cabeza del personaje, las curvas son simples de seguir e ideales para el crafter amateur. Dibuja en el papel para patronar solo las líneas contorno de cada sección del dibujo, recorta la silueta, y replícala en el carton de reciclaje o cartón fino. Después recortar el "borde" del dibujo, y repite el proceso.
【 STEP 1 】 I recommend starting with just the head of the character as the curves are easy to follow and ideal for the hobbyist. Draw on the pattern paper only the contour lines of each section of the drawing, cut out the silhouette, and reproduce it on the recycled cardboard or thin cardboard. Then cut out the "border" of the drawing and repeat the process.


✦ Try to select pieces of cardboard that are not damaged or warped ✦
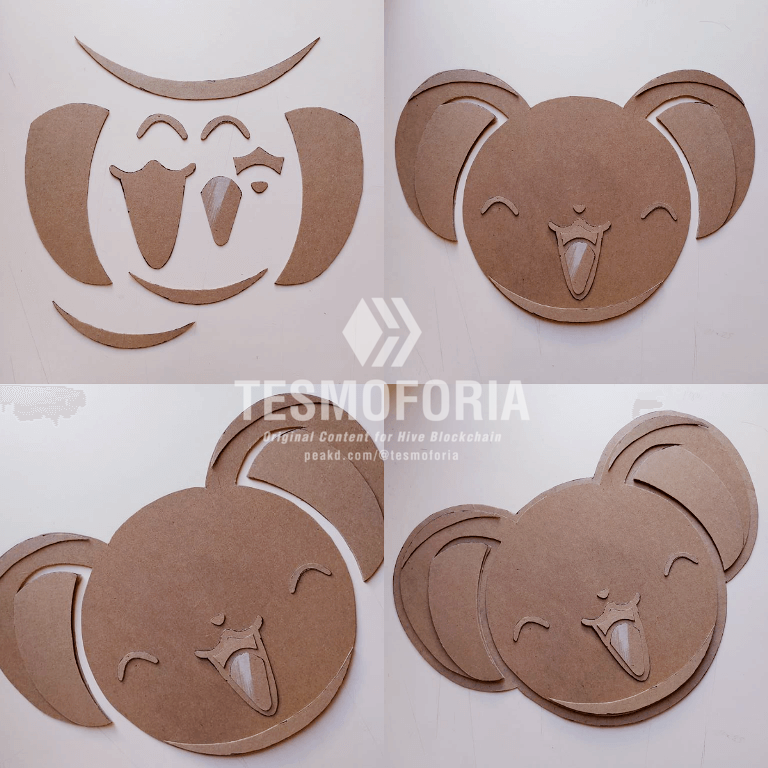
✦ When cutting the secondary pieces, do it calmly and try to mistreat the cardboard as little as possible, especially the smaller pieces ✦
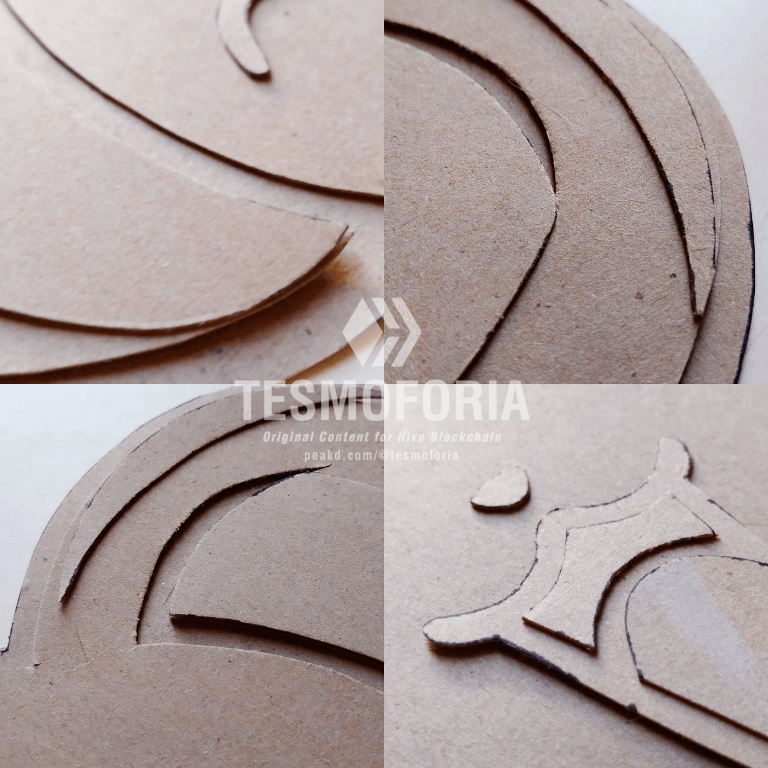
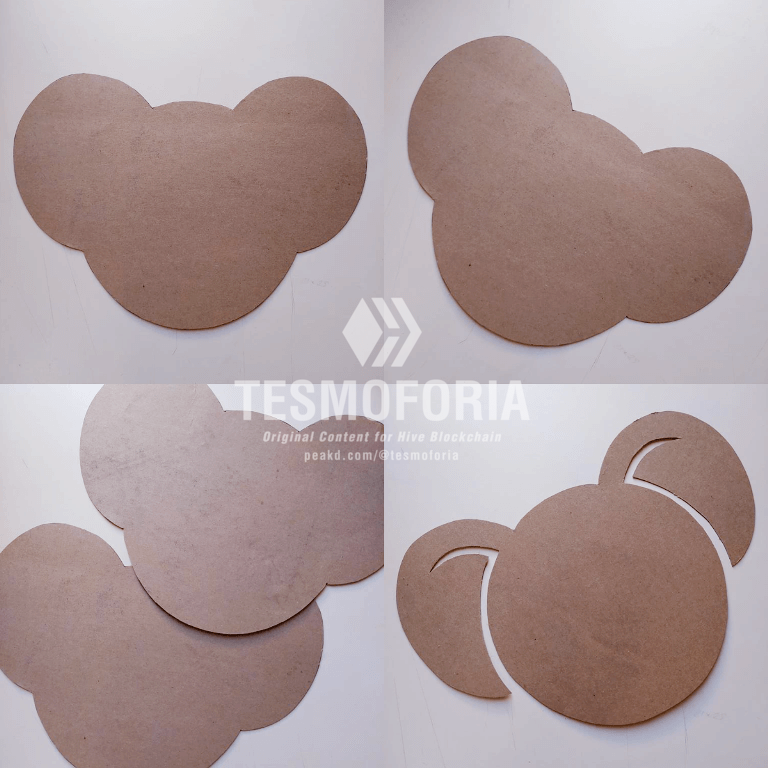
✦ If you have done it correctly so far, you will end up with something like these pictures: Notice how the cardboard pieces stay flat and fit together like a puzzle ✦


【 PASO 2 】 De la silueta completa de Kero necesitas 2 piezas iguales, de la silueta sin el contorno necesitas 1 pieza, y cuando tengas estas 3 piezas, procede a cortar todos los detalles del personaje y replícalos en la cartulina fina: Ojos, nariz, boca, secciones de luz y sombra.
【 STEP 2 】 From the complete silhouette of Kero you need 2 equal pieces, from the silhouette without the outline you need 1 piece, and when you have these 3 pieces, proceed to cut all the details of the character and replicate them on the thin cardboard: Eyes, nose, mouth, light and shadow sections.


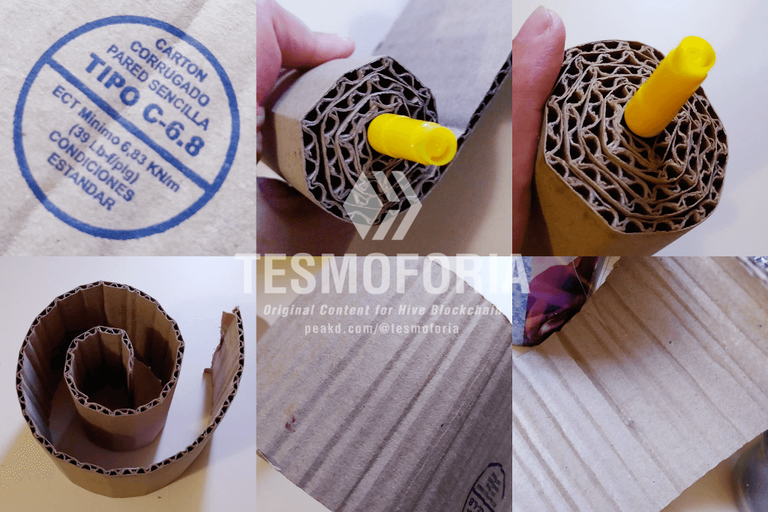
✦ Prefabricated accordion board is expensive! This is an economical way to make accordion cardboard at home ✦
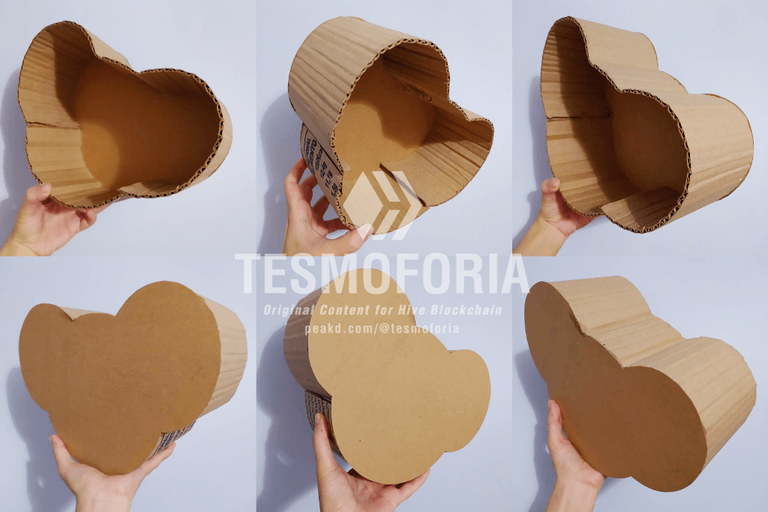
✦ Start assembling the piñata with the front side, because the back side will have a window; always start with the front side of the piñata ✦


【 PASO 3 】 Para el cuerpo de la piñata mide el contorno de la silueta de Kero y ese será tu largo. Corta una tira de cartón de caja de ese largo x 11 cm de ancho. Enrosca el cartón alrededor de un lápiz, y luego enróscalo de nuevo en la dirección opuesta. Para unir todo, utiliza la pistola de silicón.
【 STEP 3 】 For the body of the piñata measure the outline of Kero's silhouette and that will be your length. Cut a strip of cardboard that long x 11 cm wide. Twist the cardboard around a pencil, then twist it back in the opposite direction. Use the silicone gun to attach everything together.


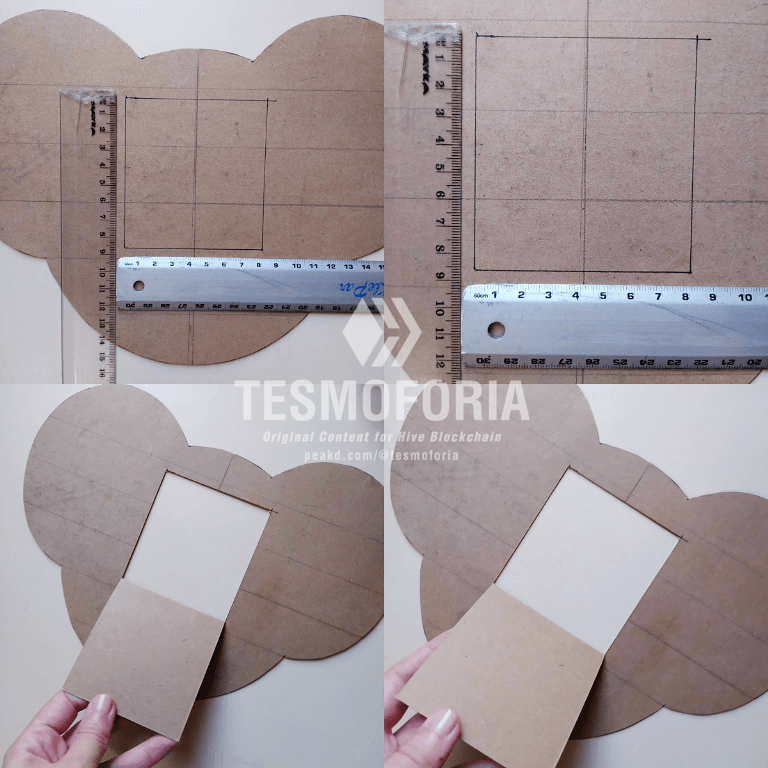
✦ Try to keep the window as centered as possible ✦
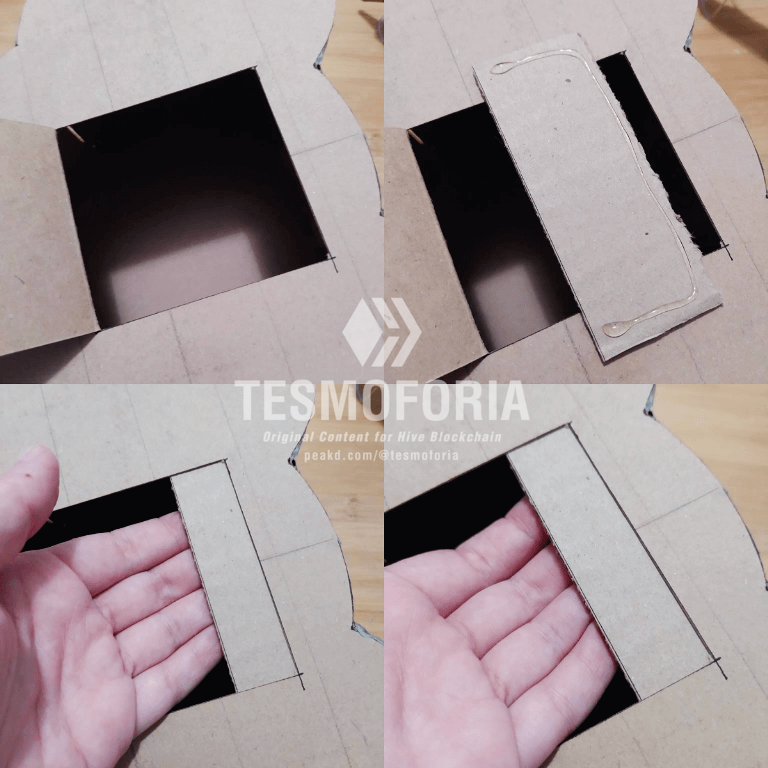
✦ This safety tab will prevent the door of the piñata from moving inward and getting stuck ✦
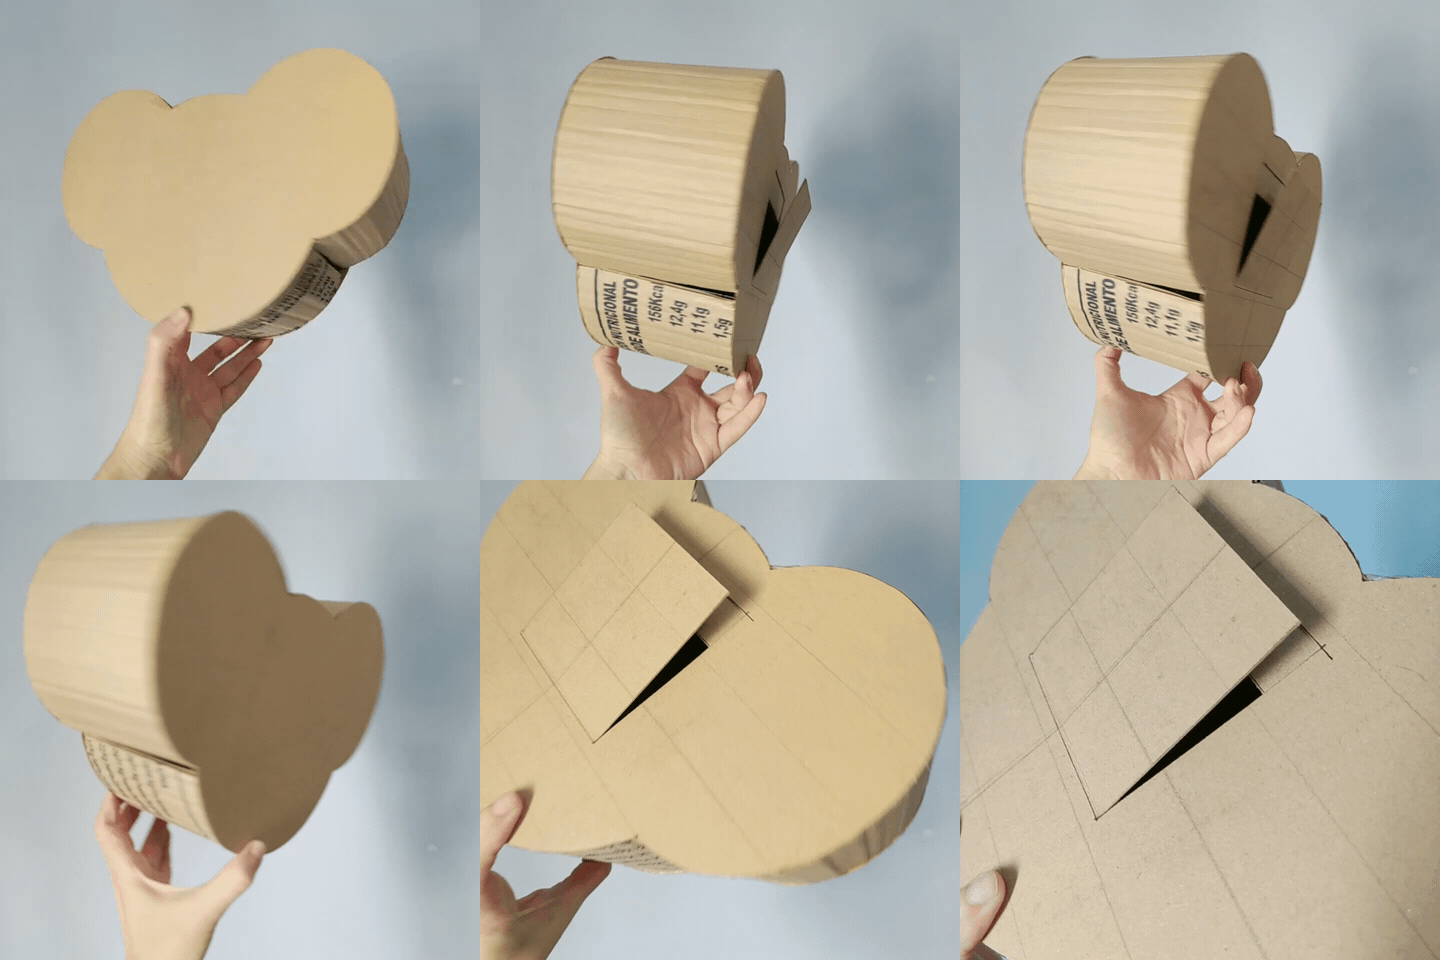
✦ The body of the piñata is finished at this stage and should feel very sturdy, but if you want to give it extra strength, you can apply paper and school glue to the inside at the joints of the faces with the accordion outline ✦


【 PASO 4 】 Para la cara posterior de la piñata hay que elaborar una pequeña ventana, las medidas y forma es a gusto personal pero yo recomiendo que no sea menor a 8 cm x 8 cm; corta con el cutter solo la parte superior y los lados, dobla la "ventana" hacia abajo, y agrega una pestaña de cartón en la parte superior de la ventana pegándolo del lado interior. Finalmente une esta cara al cuerpo de la piñata con más silicón caliente.
【 STEP 4 】 For the back of the piñata, make a small window, the size and shape is up to you, but I recommend no smaller than 8 cm x 8 cm;cut with the cutter only the top and sides, fold the "window" down, and add a cardboard tab to the top of the window, gluing it to the inside. Finally, attach this side to the piñata body with more hot silicone.


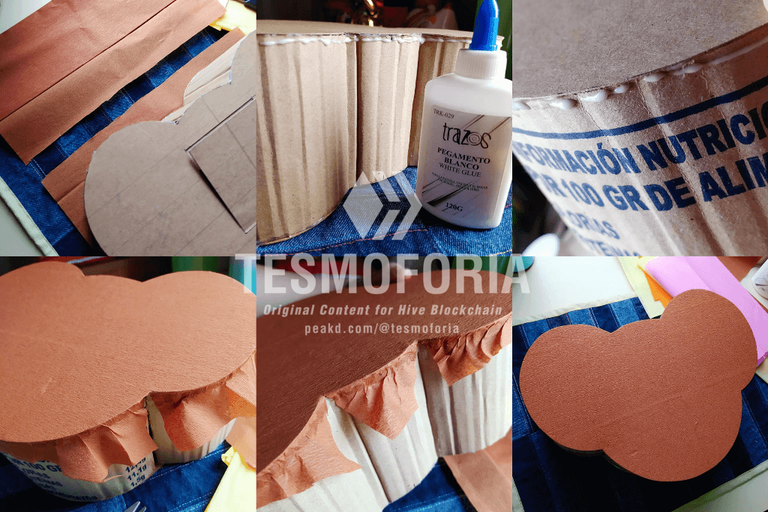
✦ Cut 1 rectangle of brown crepe paper. Apply a small amount of school glue to the edge of the entire outline corresponding to the front of the piñata and spread the paper out to glue it, stretching it a bit ✦
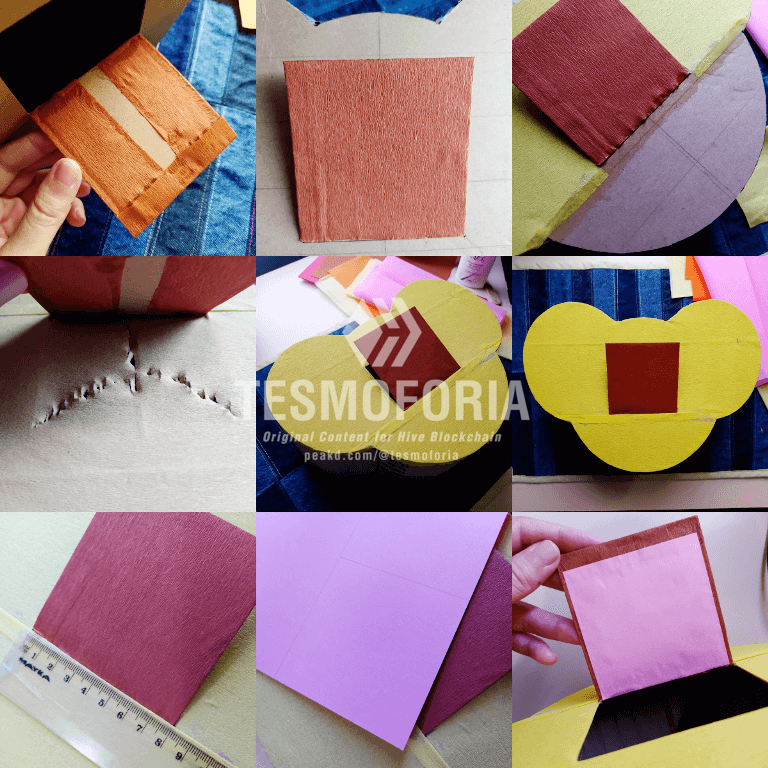
✦ This part can be all the same color but I really like the contrast of yellow, chocolate and pink ✦


【 PASO 5 】 A continuación hay que forrar las caras de la piñata, primero el reverso, y luego el frente. Para el frente recomiendo un color marrón suave, el contraste con el amarillo es mas bonito así, y para el reverso primero forra la puerta de la ventana, y luego en dos partes el resto de esta cara; corta el papel que "tapa" la ventana y pegado hacia dentro, y agrega papel de color para la parte interna de la puerta.
【 STEP 5 】 For the front, I recommend a soft brown color, the contrast with the yellow will be nicer, and for the back, first line the door of the window, and then in two parts the rest of that side; cut the paper that "covers" the window and glue it inside, and add colored paper for the inside of the door.


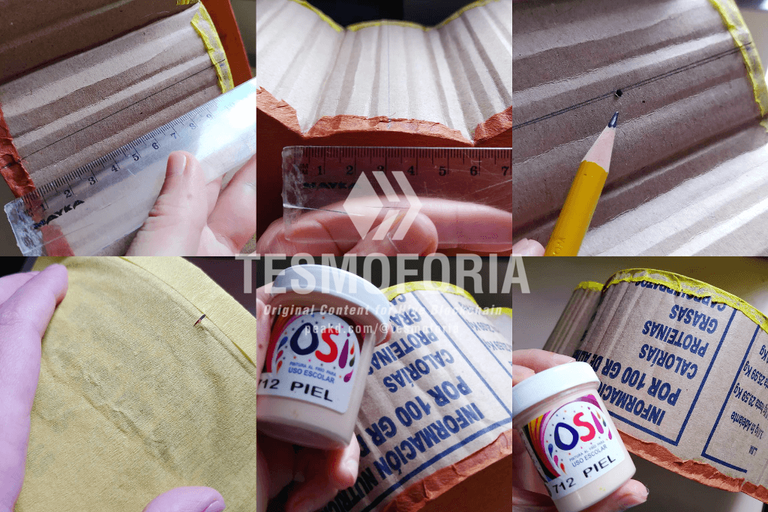
✦ Make a hole in the top of the piñata, centered 5.5 cm between the two sides. Then line with crepe paper and line the bottom of the piñata as well ✦


【 PASO 6 】 El siguiente paso es marcar el lugar donde instalaremos al final del tutorial la cinta por la que se sostendrá la mini-piñata. Después, forra con papel la parte superior e inferior pero si el cartón tiene telas impresas o manchas, aplica una capa generosa de pintura acrílica, y una vez que seque instala el papel. Es un tema estético pero importante.
【 STEP 6 】 The next step is to mark the place where, at the end of the tutorial, we will install the ribbon by which the mini-pinata will be held. Next, line the top and bottom with paper but if the cardboard has printed fabric or stains, apply a generous coat of acrylic paint, and when it dries, install the paper. This is an aesthetic question, but an important one.


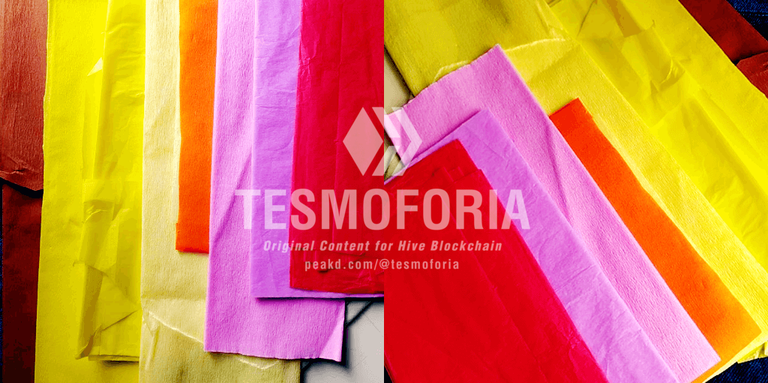
✦ It is good to combine different shades of the same color. For this project, I used 2 different shades of yellow ✦
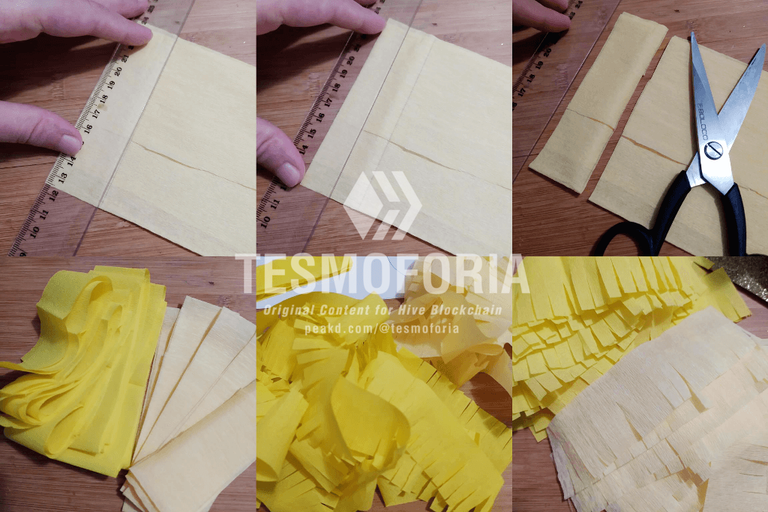
✦ Cut strips 3.5 cm wide, or the width of a school ruler, then cut to 0.5 cm to create the piñata paper ✦
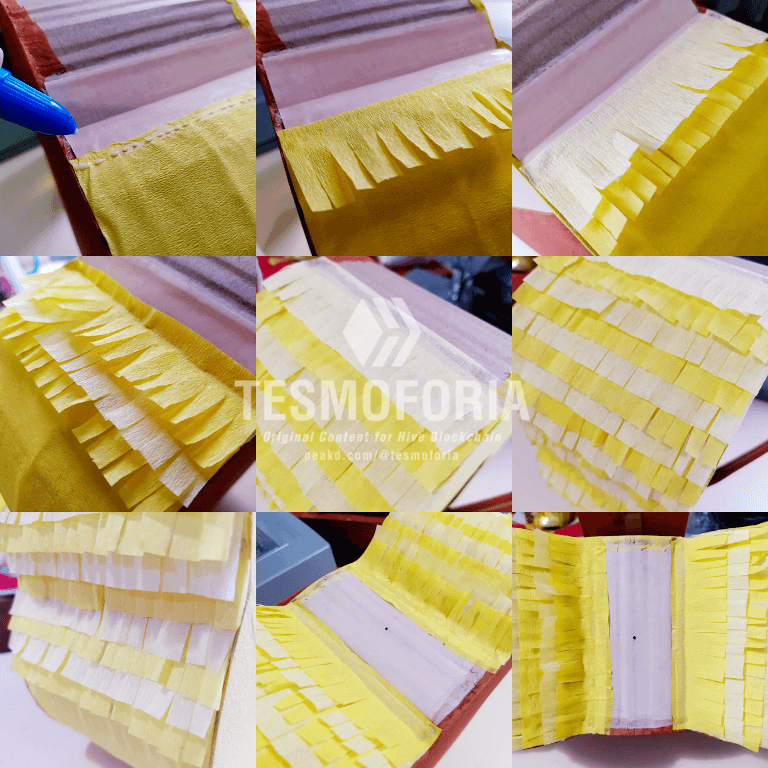
✦ Start from the bottom up to glue sections of paper, interspersing bright tones with desaturated tones ✦


【 PASO 7 】 Para forrar los laterales de la piñata toma 3 tonos de papel crepe amarillo, marca con una regla secciones de 3 a 3.5 cm de ancho, y luego cortes a lo largo de medio centímetro. Divide el papelillo en piezas de 11 cm de largo y pega una por una con poco pegamento escolar, si usas mucho la tinta del papel puede correrse.
【 STEP 7 】 To line the sides of the piñata, take 3 shades of yellow crepe paper, mark with a ruler 3 to 3.5 cm wide sections, and then cut along the length of half a centimeter. Divide the paper into pieces of 11 cm long and stick them one by one with a little school glue, if you use too much, the color of the paper may run.


✦ The glue stick applied very superficially does not cross or stain the crepe paper ✦
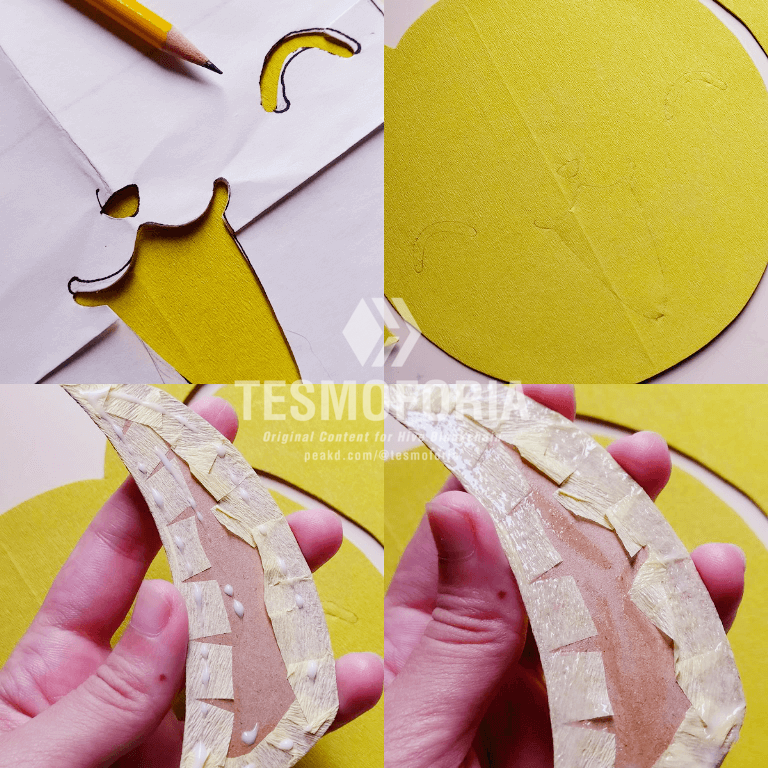
✦ Remember how I told you not to throw anything away? Now it all makes sense: The remnants of the pattern you drew now serve as a template to mark and know where to glue all the details ✦
✦ To prevent the moisture from the glue and the glue stick from deforming the cardboard, the secret is to place a heavy book on the piece for at least 20 to 30 minutes ✦


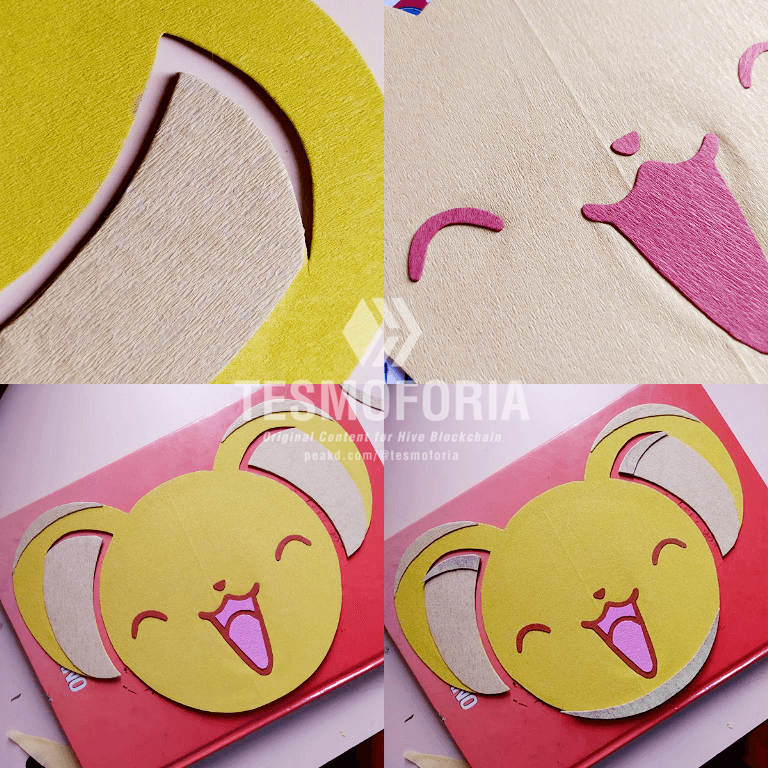
【 PASO 8 】 Esta es la parte delicada de este proyecto: Ahora hay que forrar todas las piezas que componen el rompecabezas del rostro de Kero Chan. Para comenzar aplica un poco de pegamento en barra, después usa pegamento escolar en el reverso para pegar los excesos del papel crepe (observa las imágenes guía).
【 STEP 8 】 This is the tricky part of the project: Now you need to line up all the pieces that make up the puzzle of Kero Chan's face. First, apply a small amount of glue stick, then use school glue on the back to stick the excess crepe paper (see pictures in the instructions).
Marca con lápiz muy suavemente utilizando los restos del patrón guía la posición en que van todas las pequeñas piezas de la composición, agrega cantidad moderada de pegamento en cada pieza (lejos de su borde) y pega una por una lentamente.
Mark with a pencil very carefully, using the remnants of the pattern as a guide, the position where all the small pieces of the composition will go, apply a moderate amount of glue to each piece (away from the edge) and glue them one by one.
Para lograr más tonalidades de amarillo, puedes pintar con pintura acrílica las piezas previamente antes de forrarlas, pero siempre usando un color más oscuro que el color del carton.
To get more shades of yellow, you can paint the pieces with acrylic paint before lining them, but always darker than the color of the cardstock.


 |  |  |
|---|


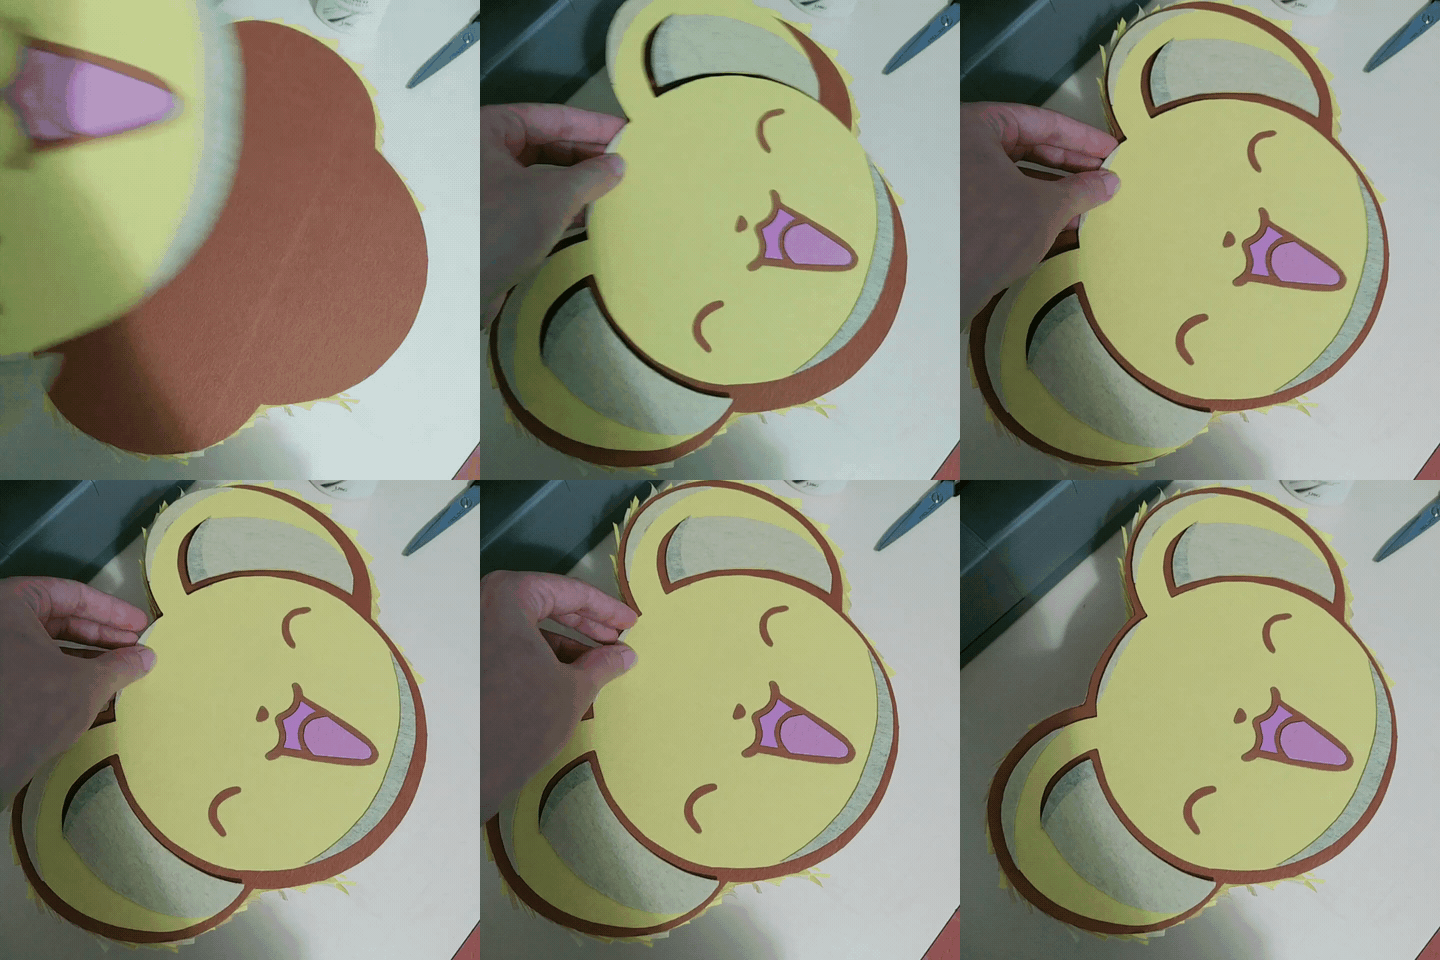
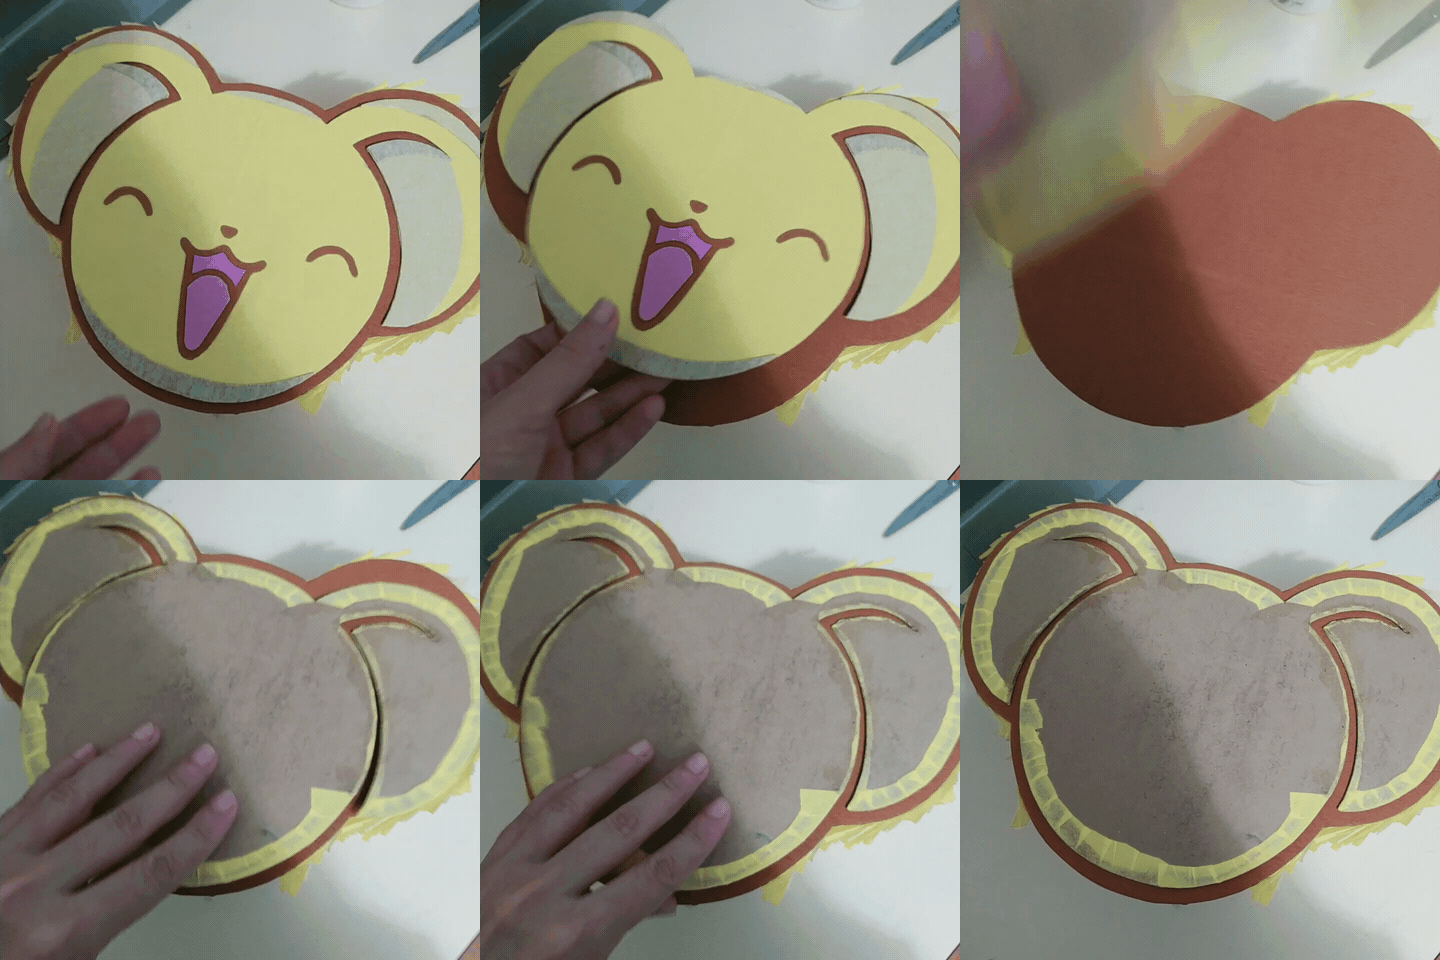
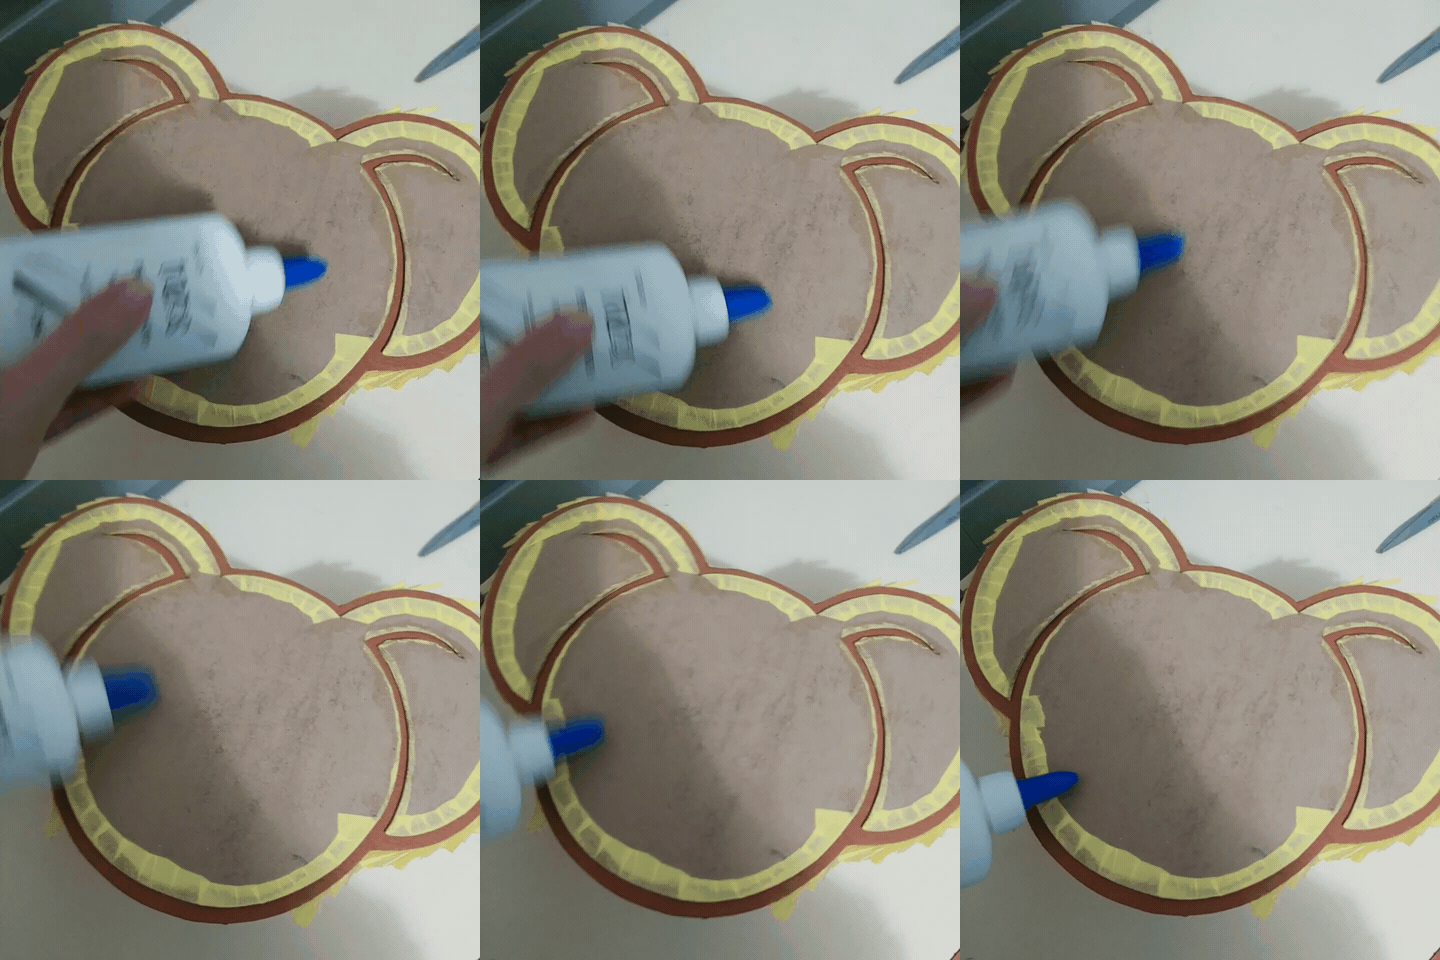
【 PASO 9 】 Saca de debajo del libro la cara de Kero Chan, prueba previamente la posición de la pieza sobre el cuerpo de la piñata, retírala, voltéala, agrega pegamento y distribúyelo bien, finalmente pega en su lugar con mucho cuidado.
【 STEP 9 】 Remove the face of Kero Chan from under the book, check the position of the piece on the body of the piñata, remove it, turn it upside down, add glue and spread it well, finally glue it in place very carefully.


✦ You can also use pretty string, the point is that the piñata can be hung on the wall in case you want to use it as a decoration ✦
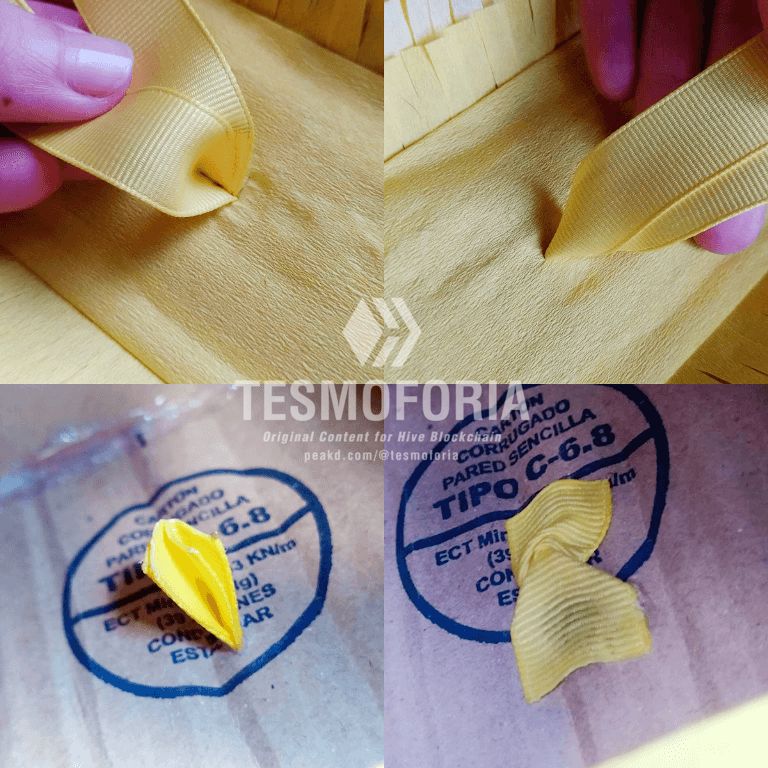
✦ Do you remember the small gap in the previous steps? Now use the cutter and make a small incision of 1.5 to 2 cm ✦


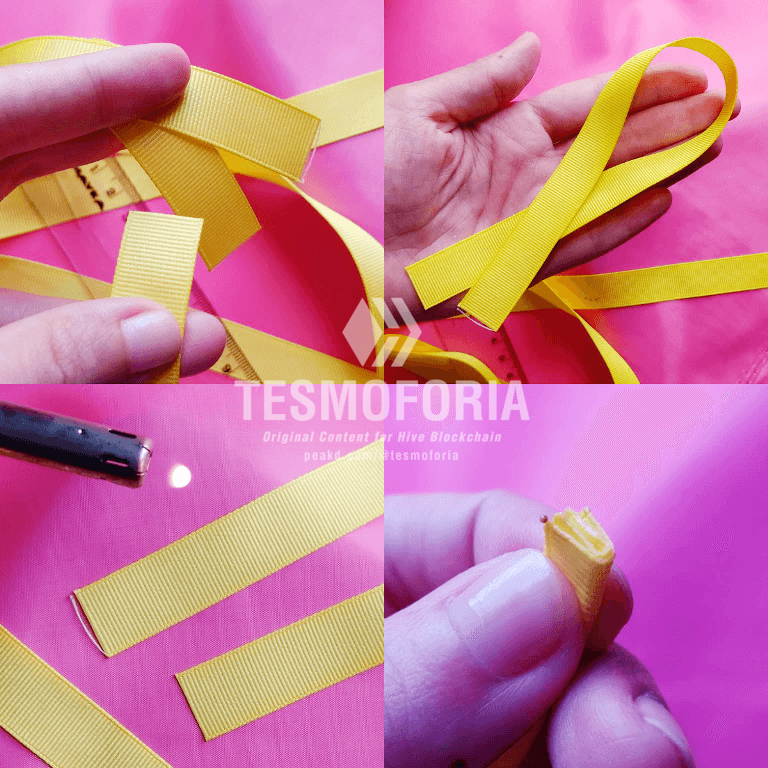
【 PASO 10 】 Toma la cinta y corta una pieza de 30 cm de largo, sella los bordes con el encendedor, une ambos extremos y dobla por la mitad. Has un corte justo en el centro de la parte superior de la piñata, mete los extremos unidos y doblados de la cinta, jala un poco, aplica una gota de silicón caliente en cada extremo de la cinta y pega de forma permanente (abre los extremos de la cinta como se aprecia en las imágenes guía).
【 STEP 10 】 Take the ribbon and cut a 30 cm long piece, seal the edges with the lighter, join both ends and fold in half. Make a cut in the center of the top of the piñata, insert the joined and folded ends of the ribbon, pull a little, apply a drop of hot silicone to each end of the ribbon and glue permanently (open the ends of the ribbon as shown in the instructions).
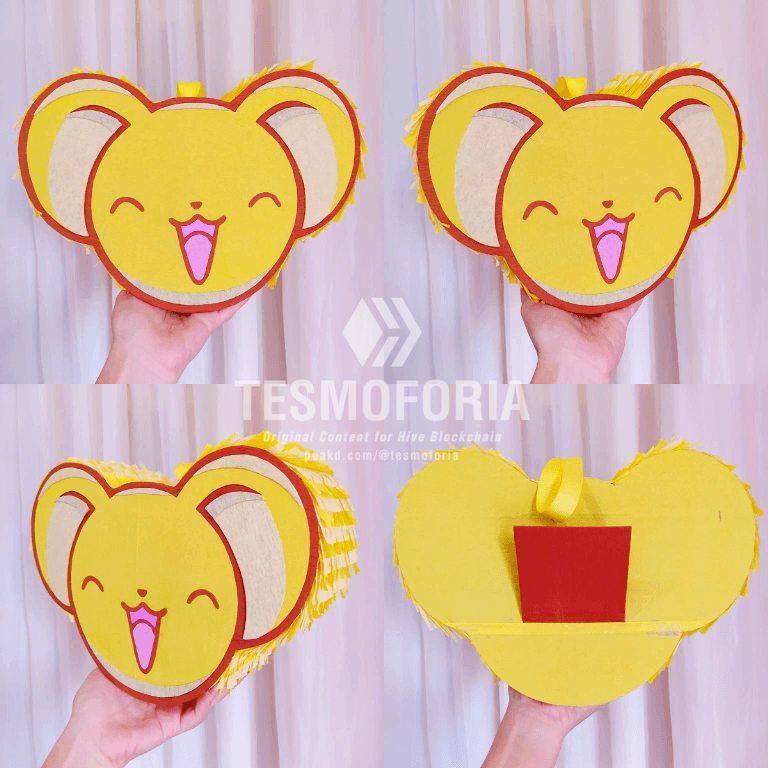
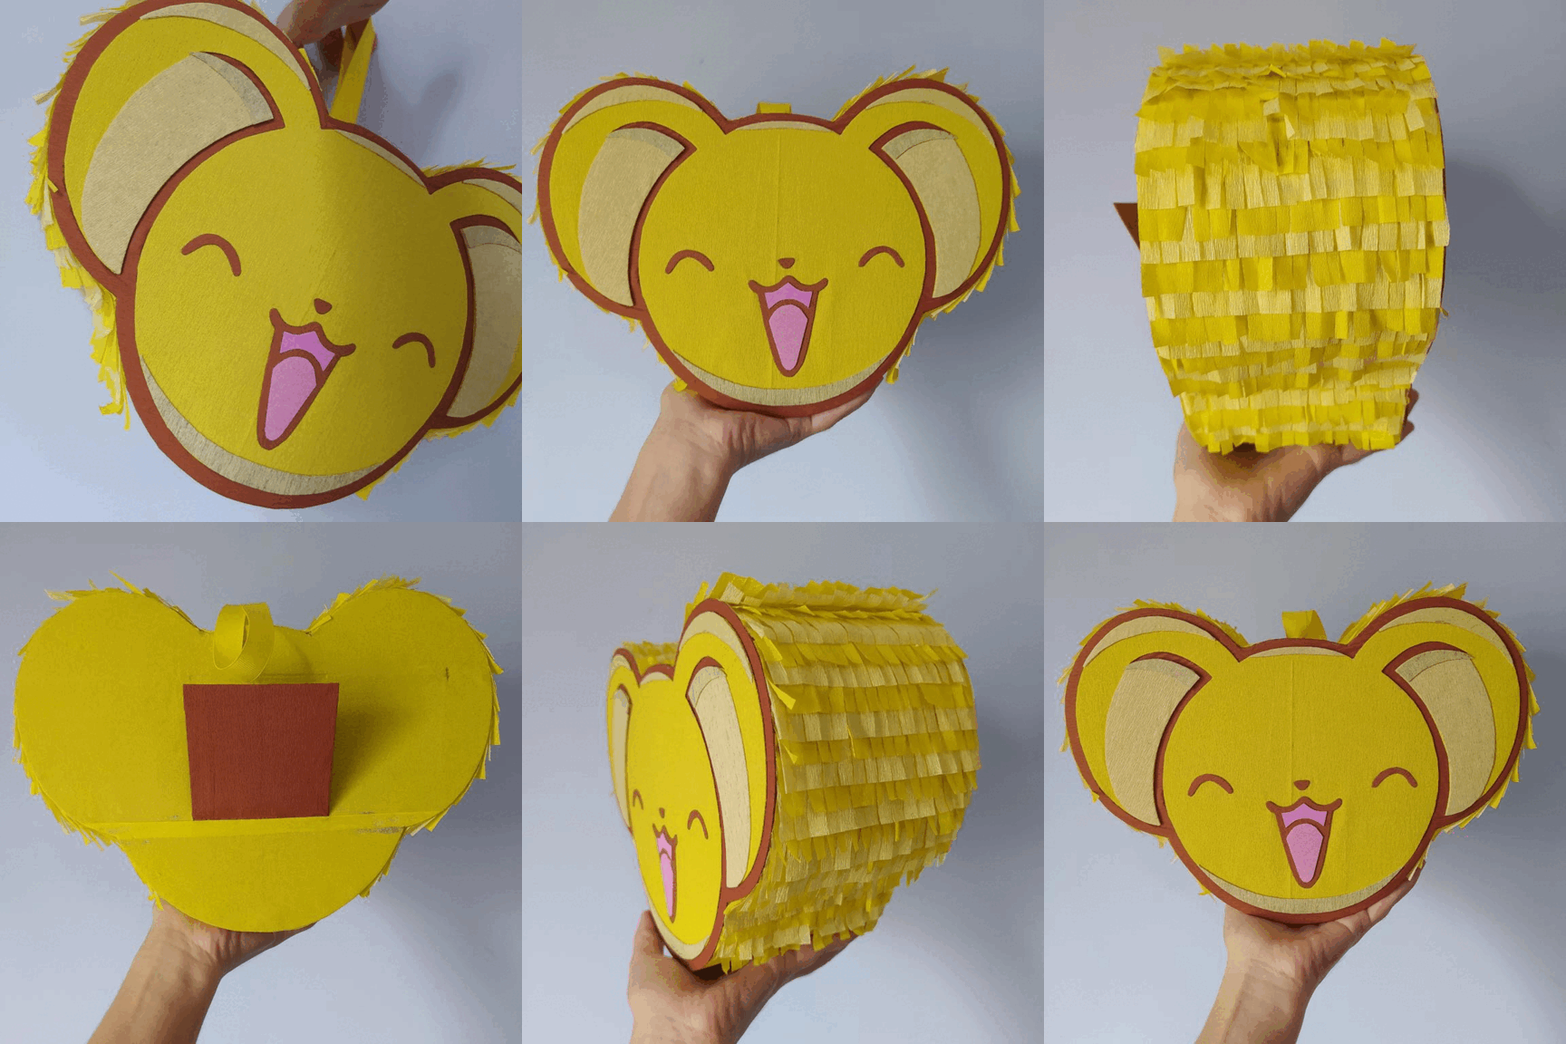
« 𝔸𝕟𝕚𝕞𝕖 𝕋𝕙𝕖𝕞𝕖𝕕 ℙ𝕚ñ𝕒𝕥𝕒 ℂ𝕒𝕣𝕕 ℂ𝕒𝕡𝕥𝕠𝕣 𝕊𝕒𝕜𝕦𝕣𝕒: ℂ𝕙𝕚𝕓𝕚 𝕂𝕖𝕣𝕓𝕖𝕣𝕠𝕤 »


 |  |  |
|---|---|---|
 |  |  |
 |  |  |
|---|


『 Resumen 』~
Una mini piñata tematizada es una propuesta versátil y hermosa porque puede ser: Alternativa de caja de regalo, objeto decorativo, o ítem súper rentable para tu emprendimiento.
『 Recomendaciones Finales 』~
Busca inspiración en más ilustraciones de CLAMP para agregar decoraciones extra a esta mini piñata, como colgantes o flores debajo de las orejas, así conseguirás variedad de diseños con el mismo personaje.
Aunque el tamaño de la mini piñata es a gusto del crafter, sugiero una medida de 28 cm de largo x 20 cm de alto x 11 cm de ancho.
Para un resultado con colores más brillantes, pinta primero toda la piñata con pintura acrílica color amarillo.
『 Summary 』~
A themed mini-piñata is a versatile and beautiful proposal because it can be: A gift box alternative, a decorative object, or a super profitable item for your business.
『 Final Tips 』~
Find inspiration in other CLAMP artwork to add extra decorations to this mini-piñata, such as pendants or flowers under the ears, to get a variety of designs with the same character.
Although the size of the mini-piñata is up to the crafters, I suggest a size of 28 cm long x 20 cm high x 11 cm wide.
For a result with brighter colors, first paint the entire piñata with yellow acrylic paint.
📸 Tools: Smartphone 📲 Snow 🎬 Remini 🌓 FotoJet 📐
🚨 ¡Please do not take, edit or republish my material without my permission! 🚨
💌 ¿Do you wish to contact me? Discord #tesmoforia 💌
🌙 Banner, signature and separators by Keili Lares / / FlatIcon: 1 - 2 - 3 - 4 - 5 🌸
Posted Using InLeo Alpha
