Hello! Good afternoon to all my creative Hive Diy family. Happy and blessed Sunday to everyone around here. I wish you an excellent month, loaded with the best vibes, creativity, productivity, love and lots of happiness for everyone, may it be a greatly blessed month for all family.♡
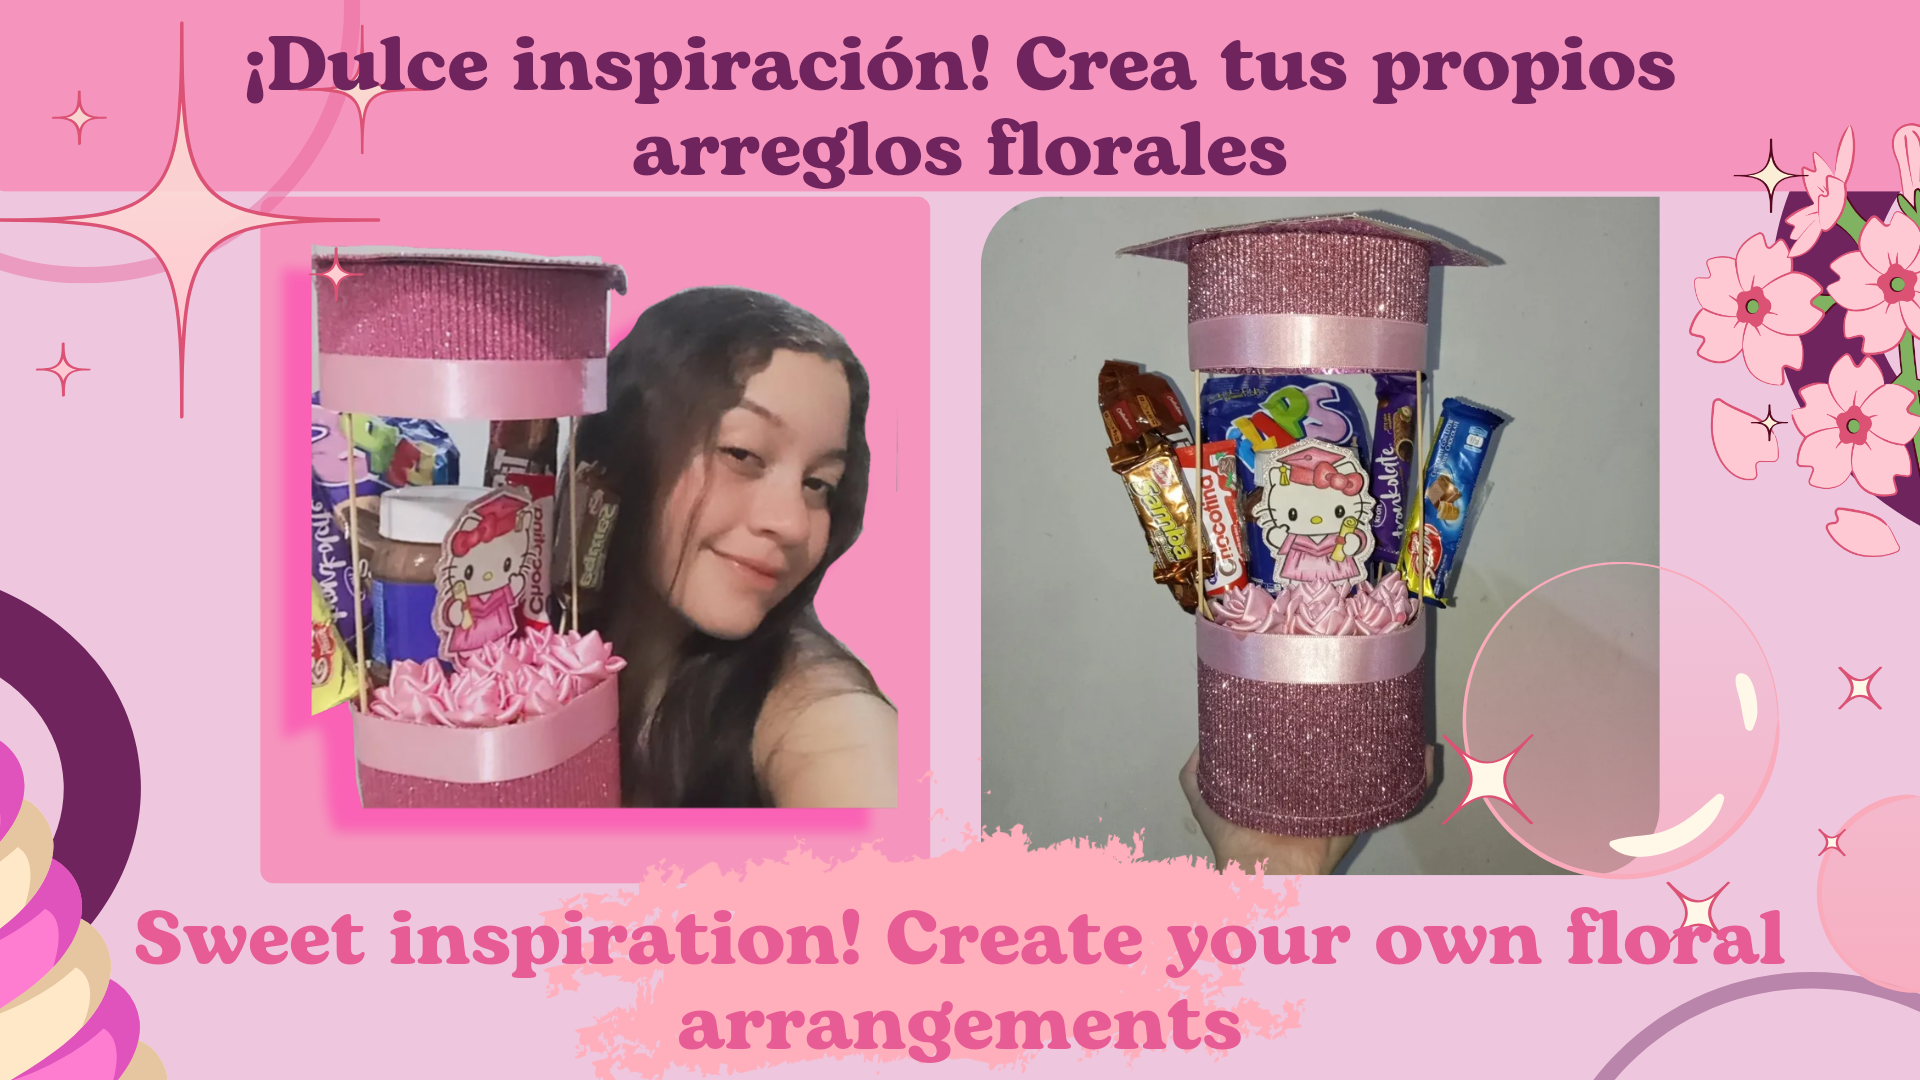
¡Holii! Sean bienvenidos a una nueva manualidad hecha totalmente a mano, en este blog, el día de hoy les tengo el tutorial paso a paso de como elabore un hermoso arreglo de dulces, como regalo para una persona muy especial para mí en su día de graduación. Este es un diseño que podemos personalizar a nuestro gusto, desde el tamaño, hasta la temática, colores, relleno, entre otros, la cosa es que se adapta a cualquier presupuesto, así les muestro a continuación el procedimiento.✨
Holii! Welcome to a new handmade craft in this blog, today I have the step by step tutorial on how to make a beautiful candy arrangement, as a gift for a very special person for me on her graduation day. This is a design that we can customize to our liking, from the size, to the theme, colors, filling, among others, the thing is that it adapts to any budget, so I show you below the procedure.
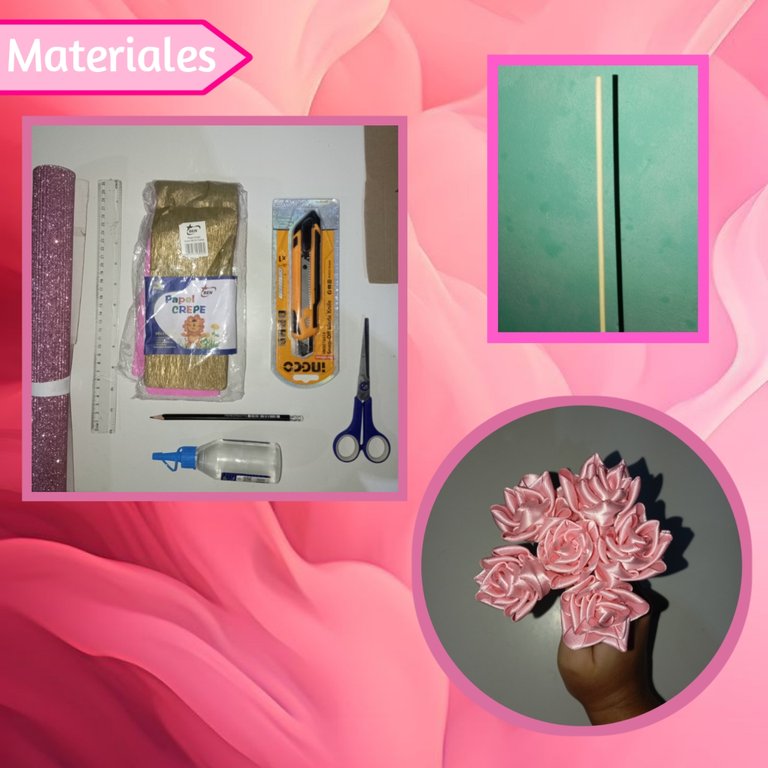
♡💗🍓Materials🍓💗♡
- Cartón reciclado
- Palitos de altura
- Cartulinas
- Silicón (de preferencia caliente)
- Flores eternas
- Dulces y demás
- Papel crepe
- Regla
- Tijeras
- Lápiz
- Cutter
- Recycled cardboard
- High sticks
- Cardboard
- Silicone (preferably hot)
- Everlasting flowers
- Candies and others
- Crepe paper
- Ruler
- Scissors
- Pencil
- Cutter
♡💗🌷Step by Step🌷💗♡
Paso 1:
Step 1:
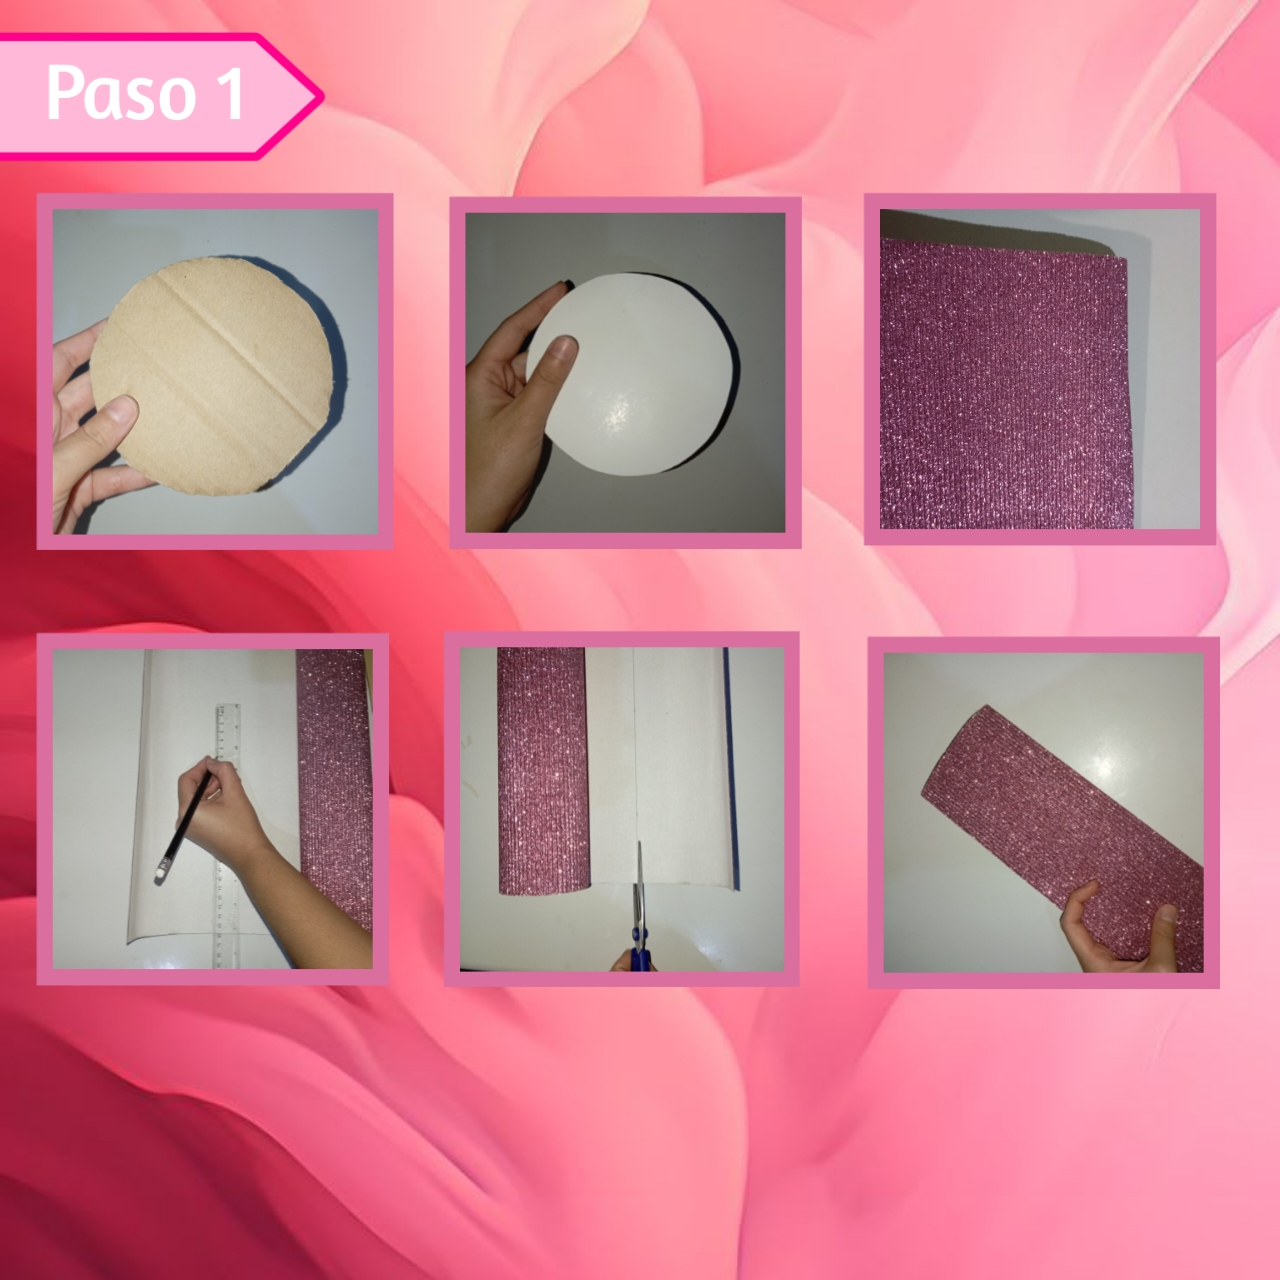
Iniciaremos tomando nuestro cartón y la plantilla de nuestro círculo del tamaño de nuestra elección y requerimiento, así marcaremos y recortaremos, igualmente haremos una misma pieza en cartulina y uniremos pegando con silicón. Luego marcamos y recortamos una tira de cartulina de 10cm de ancho y un largo que cubra el círculo y como 1.5cm más, así recortamos muy bien con la tijera.
We will start by taking our cardboard and the template of our circle of the size of our choice and requirement, so we will mark and cut it out, we will also make the same piece in cardboard and we will glue it together with silicone. Then we mark and cut a strip of cardboard 10cm wide and a length that covers the circle and about 1.5cm more, so we cut very well with the scissors.
Paso 2:
Step 2:
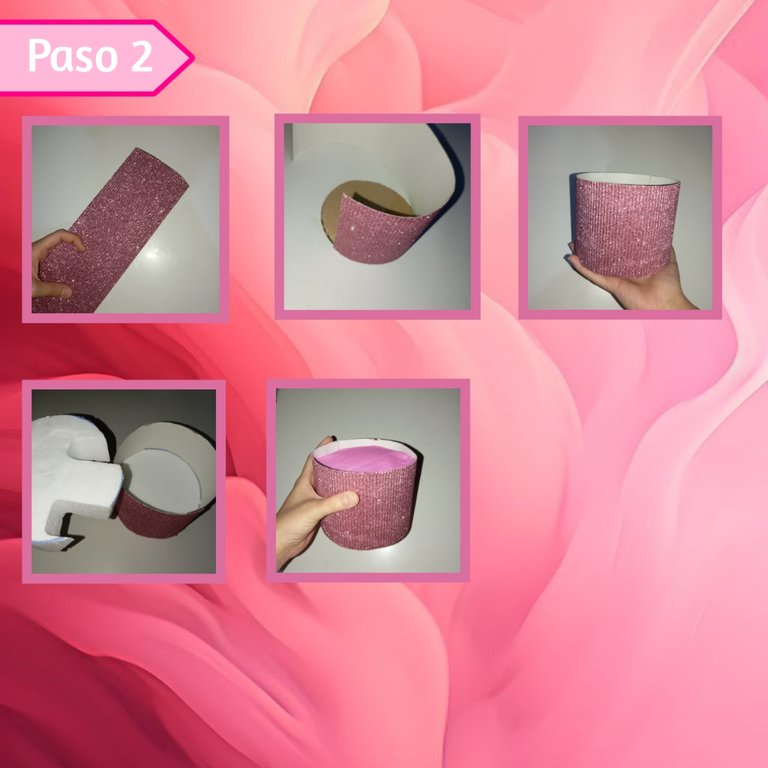
Tomaremos nuestro círculo base y la tira que recortamos anteriormente, así iremos pegando con silicón la tira, alrededor del círculo, hasta cubrir todo y pegar por encima de 1cm de ancho aproximadamente, formando nuestro cilindro. Continuamos recortando piezas de anime que encajen justamente y que lleguen hasta nuestra altura deseada, 1.5cm debajo de la base, así la última pieza la forraremos con papel crepé y pondremos en la base.
We will take our base circle and the strip we cut out previously, and we will glue the strip with silicone around the circle, until it covers everything and glue over 1cm wide approximately, forming our cylinder. We continue cutting out pieces of anime that fit exactly and that reach our desired height, 1.5cm below the base, so the last piece will be lined with crepe paper and we will put it on the base.
Paso 3:
Step 3:
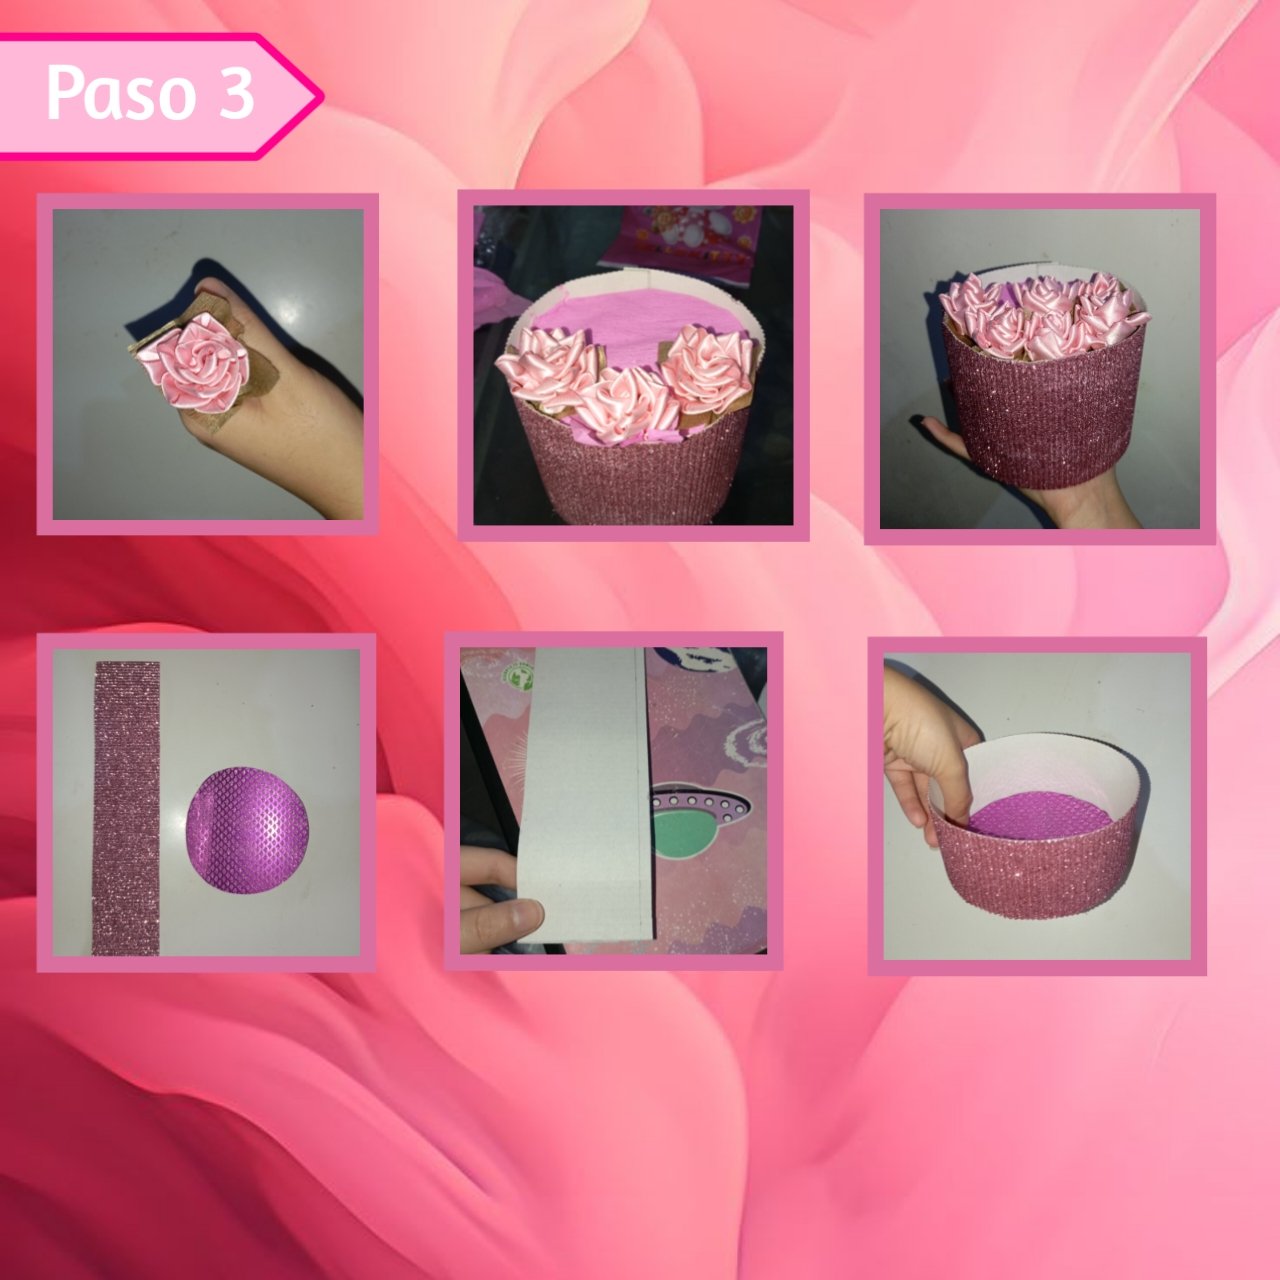
Ahora bien, continuamos tomando nuestras rosas eternas y colocando debajo de estás, atravesando el palilo con un rectángulo de papel crepé dorado, así haremos un pequeño hueco con un alambre o algo fino y procedemos a introducir rosa por rosa, hasta llenar cómo la mitad, yo use 6 rosas pequeñas. Por otro lado, recortaremos un círculo igual al de la base, y una tira de cartulina de 6.5cm de ancho, a la cuál le haremos un dobles de 0.5cm y haremos cortes a lo largo para poder doblarlo, así como el anterior armaremos un cilindro pequeño.
Now, we continue taking our eternal roses and placing them underneath, crossing the stick with a rectangle of gold crepe paper, so we will make a small hole with a wire or something thin and proceed to introduce rose by rose, until we fill how half, I used 6 small roses. On the other hand, we will cut a circle equal to the base, and a strip of cardboard 6.5cm wide, to which we will make a double of 0.5cm and make cuts along the length to be able to fold it, as well as the previous one we will assemble a small cylinder.
Paso 4:
Step 4:
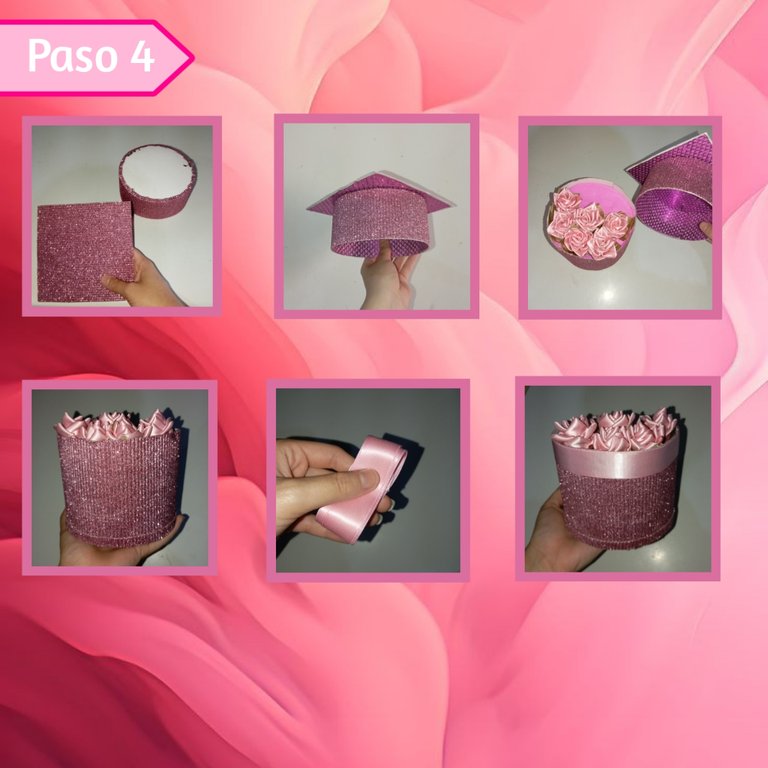
Procedemos a tomar nuestra pieza hecha en el paso anterior, también tomamos un cuadrado con la cartulina corrugada que sea 2cm más grande de cada lado, comparado con el cilindro, así las vamos a unir con silicón, formando completamente el birrete, además lo forraremos por dentro con cartulina decorada. Seguimos con los detalles, recortaremos una tira de 1cm de ancho y que cubra el largo del cilindro, así en el borde inferior del primer cilindro lo pegaremos muy bien, también le pegaremos a este mismo cinta en el borde superior, como pueden apreciar.
We proceed to take our piece made in the previous step, we also take a square with corrugated cardboard that is 2cm larger on each side, compared to the cylinder, so we are going to join them with silicone, completely forming the biretta, also we will line it inside with decorated cardboard. We continue with the details, we will cut a strip of 1cm wide and that covers the length of the cylinder, so in the lower edge of the first cylinder we will glue it very well, we will also glue to this same tape on the top edge, as you can see.
Paso 5:
Step 5:
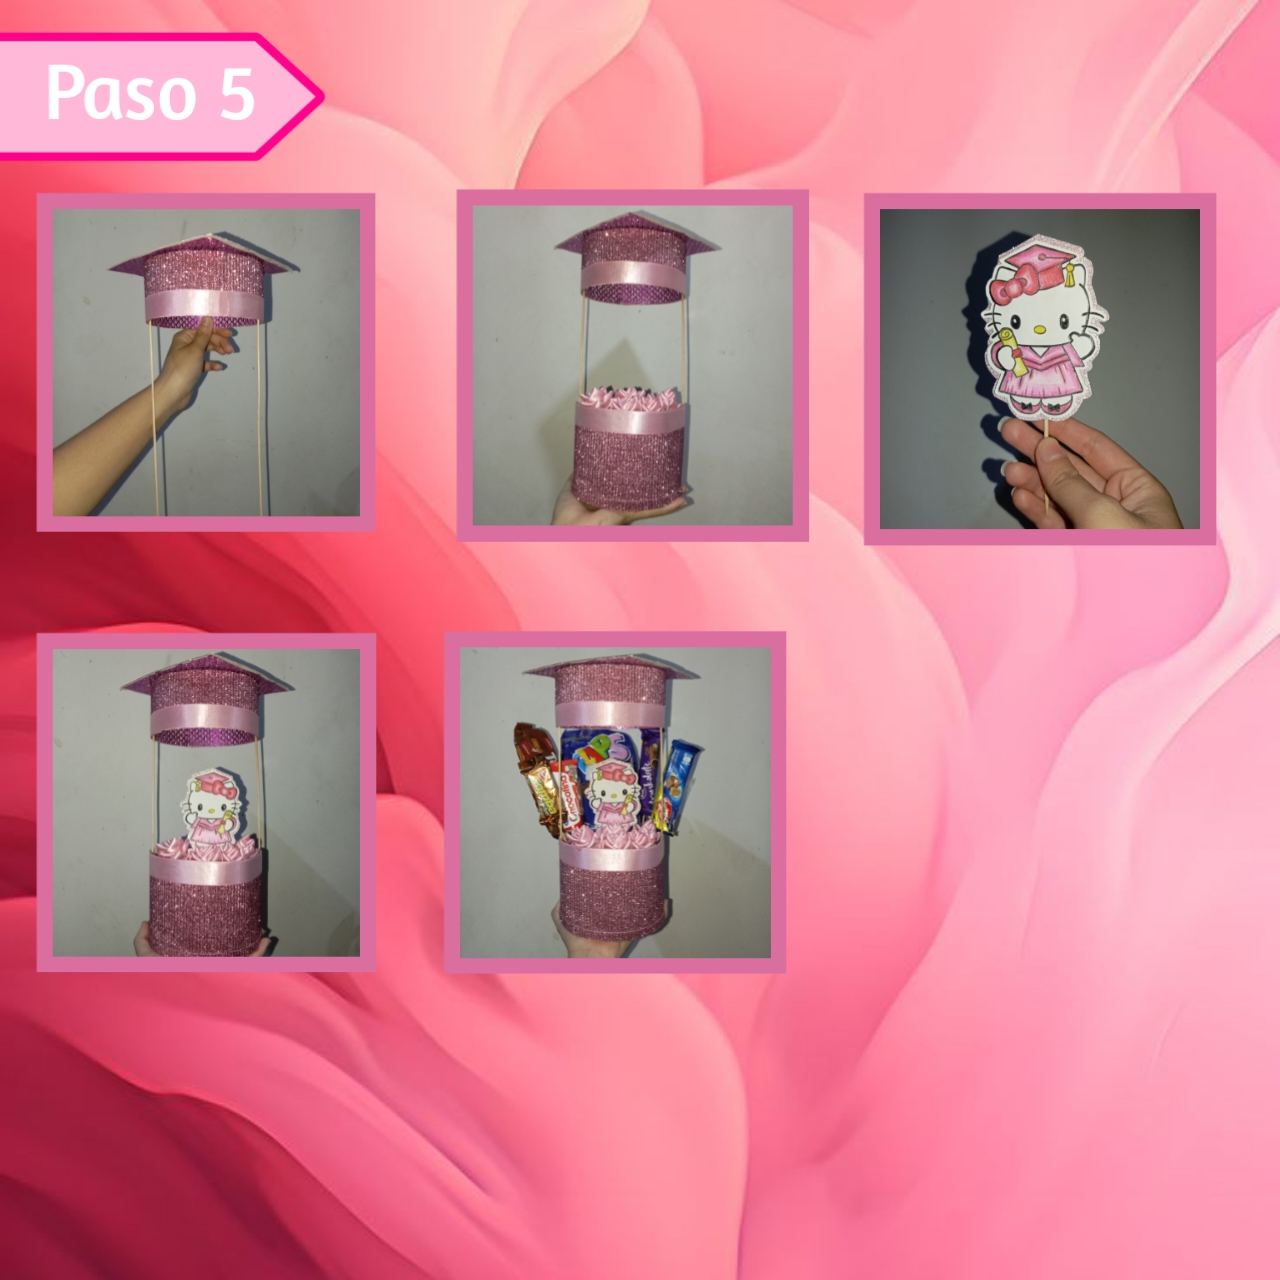
En este punto, también le vamos a agregar la cinta al birrete, en la parte inferior, además de unos palitos de altura de forma paralela entre sí, en el centro pegando con silicón, así uniremos esta pieza a la base también. Por último, agregamos en el centro con un palito, el dibujo o impresión de nuestra elección, según la temática, este yo lo dibuje, para finalizar agregamos los dulces que queramos con un palitos de altura y ya está.
At this point, we are also going to add the ribbon to the biretta, at the bottom, plus some sticks of height parallel to each other, in the center sticking with silicone, so we will attach this piece to the base as well. Finally, we add in the center with a stick, the drawing or print of our choice, according to the theme, I drew this one, to finish we add the candy we want with a height sticks and that's it.
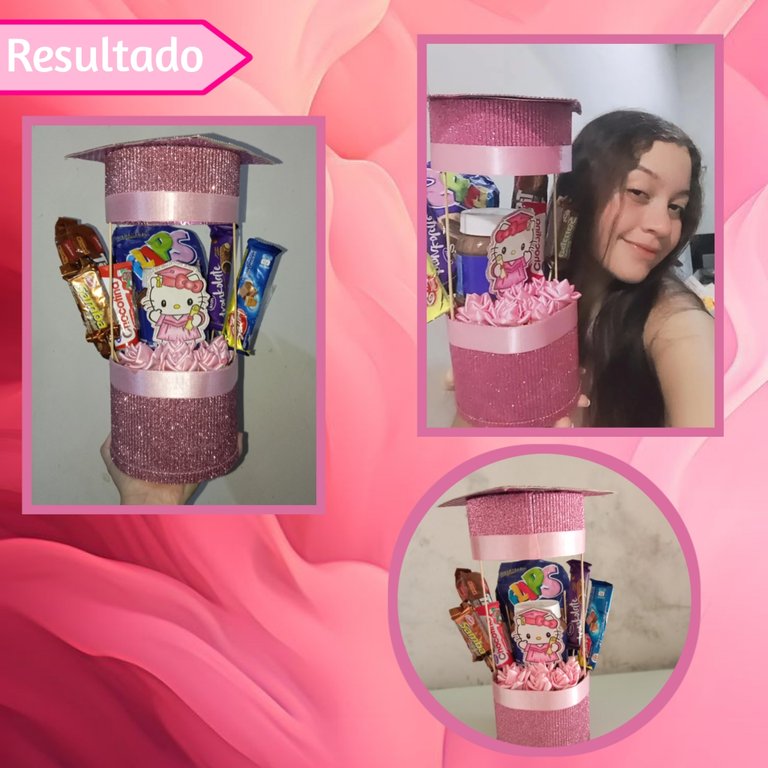
Así, es como en unos sencillos pasos, esfuerzo y amor, podemos hacer un hermoso arreglo desde casa para nuestros graduados, ajustando el modelo a nuestro presupuesto y personalizando a total elección y gusto. Aprender a hacer arreglos siempre es algo útil, debido a qué siempre hay ocasiones especiales que ameritan este tipo de regalos, otra alternativa de no ser para un graduado, sería quitar el birrete y ya, todo es cuestión de creatividad y visión.
This is how in a few simple steps, effort and love, we can make a beautiful arrangement from home for our graduates, adjusting the model to our budget and customizing to total choice and taste. Learning to make arrangements is always useful, because there are always special occasions that merit such gifts, another alternative would be to remove the biretta and that's it, it's all a matter of creativity and vision.
Esto es todo por el tutorial de hoy, espero les haya gustado esta idea y que no duden en ponerla en práctica, encantada de compartir con ustedes está tarde, me despido muy contenta y con un fuerte abrazo, espero leerlos Dios mediante en los comentarios, hasta luego.✨
This is all for today's tutorial, I hope you liked this idea and do not hesitate to put it into practice, delighted to share with you this afternoon, I say goodbye very happy and with a big hug, I hope to read you God willing in the comments, see you soon.✨
💗🌷Gracias por leer, hasta pronto🌷💗
💗🌷Thanks for reading, see you soon 🌷💗
Photos of my authorship taken from my Xiaomi Redmi 13C phone, edited in the free version of PixeLab ando Canva.📸🖌️