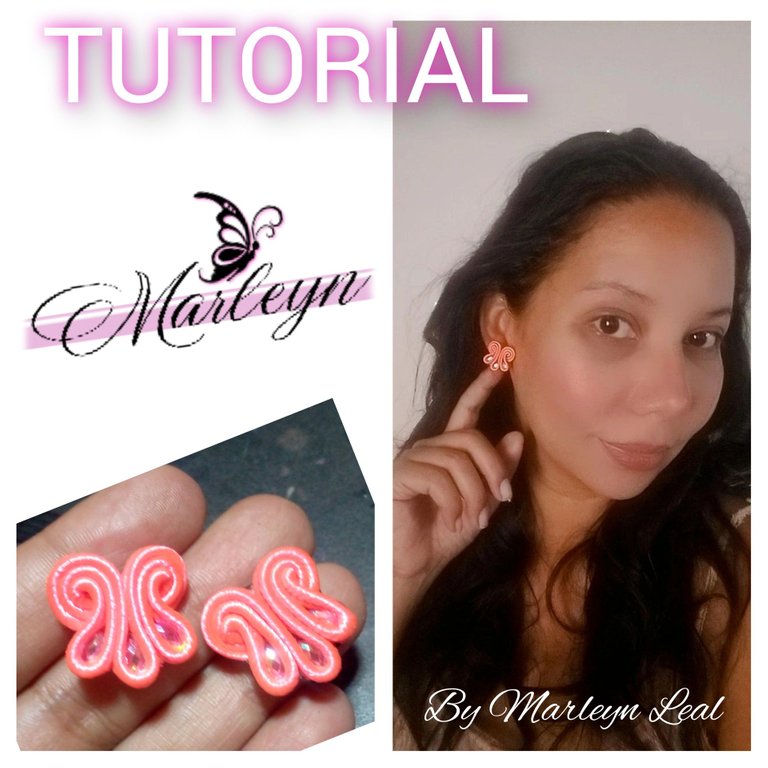
Feliz y Bendecido día, espero se encuentren super bien llenos de bendiciones, sanos, felices, siendo cada día su mejor versión! Estamos de aniversario #Jewelry Felices por cada día tener la oportunidad de aprender juntos, creciendo, innovando y creando lo que mas amamos, compartiendo entre nosotros y con el mundo ya #hive es una ventana abierta al mundo donde todos entramos... Este día les e realizado un tutorial paso a paso de unos zarcillos realmente delicados, pequeños, se ven bellos, te los explicare paso a paso a través de una secuencia de imágenes y su explicación escrita en la parte de abajo de cada collage.. Yo que no utilizo accesorios los utilizaría unos 3 segundos para las fotos (Risas), bueno saben que amo mi trabajo, es mas mi pasión que mi trabajo pero no utilizo los accesorios, mi suegra me dice que un refrán que me causa mucha risa, ella dice: “En casa de herrero cuchillo de palo” es un refrán popular que se refiere a la paradoja de que falten determinadas cosas en lugares donde deberían abundar, que en este caso para mi serian los accesorios. estere atenta a sus comentarios, si tienes dudas o sugerencias, ante todo Gracias por estar, por leerme, por ser quien eres! Recuerda eres grandioso simplemente por ser tu.Todos los materiales son de fácil acceso, si estas en Venezuela y no los encuentras escríbeme que con gusto te puedo orientar! Estos pequeños zarcillos han gustado mucho, son realmente fáciles de realizar, en este momento estoy sacando 23 colores espero venderlos todos porque la situación se a estado complicando un poco, las tiendas que distribuían mis accesorios cerraron, aunque eso no me desanima cuando se cierra una puerta se abren millones!
Happy and Blessed day, I hope you are super well full of blessings, healthy, happy, being every day your best version! We are on our anniversary #Jewelry Happy for every day having the opportunity to learn together, growing, innovating and creating what we love, sharing with each other and with the world as #hive is an open window to the world where we all enter.... This day I made a step by step tutorial of some really delicate tendrils, small, they look beautiful, I will explain them step by step through a sequence of images and written explanation at the bottom of each collage.... I do not use accessories I would use them for about 3 seconds for the photos (laughs), well you know I love my work, it is more my passion than my job but I do not use accessories, my mother in law tells me a saying that makes me laugh a lot, she says: "In the blacksmith's house a wooden knife" is a popular saying that refers to the paradox that certain things are missing in places where they should abound, which in this case for me would be the accessories. I will be attentive to your comments, if you have questions or suggestions, first of all Thank you for being, for reading me, for being who you are! Remember you are great just for being you, all the materials are easily accessible, if you are in Venezuela and you can't find them write me and I'll be happy to guide you! These little tendrils have been very popular, they are really easy to make, at this moment I am making 23 colors I hope to sell them all because the situation has been getting a little complicated, the stores that distributed my accessories closed, but that does not discourage me when one door closes, millions open!
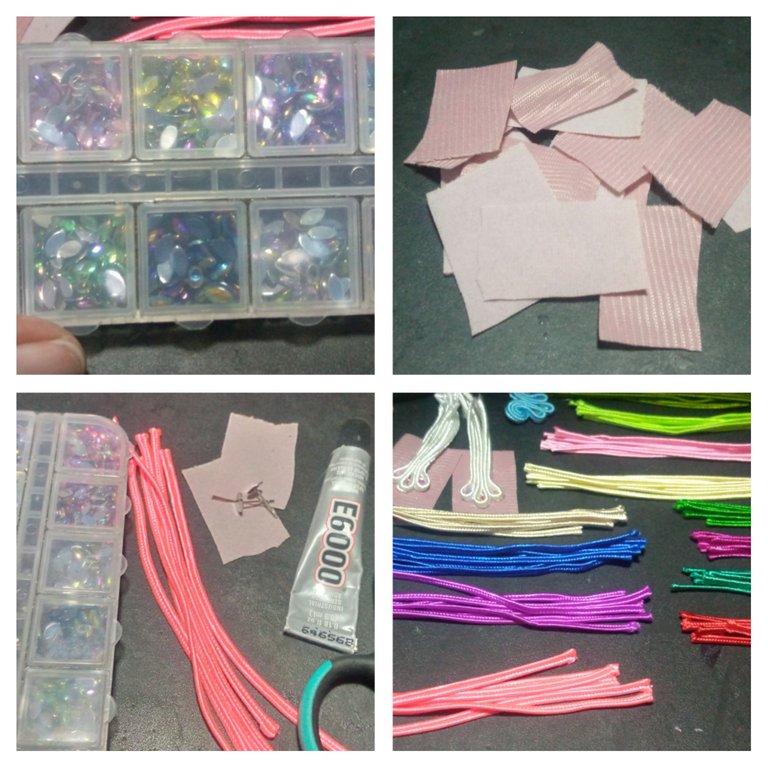
Materiales: Hilo Soutache 6 tiras de 12 centímetros aproximadamente, pega E6000 o la que tengas a la mano puedes utilizar incluso silicon liquido, base de zarcillo plano del pequeño 0.5 milímetros aproximadamente de diámetro, tijera, encendedor, apliques pequeños estos son los apliques que utilizo para las uñas, son perfectos y traen colores hermosos, tela POP para la base, tela Gamuza para tapar atrás al terminar.
Materials: Soutache thread, 6 strips of approximately 12 centimeters, E6000 glue or whatever you have at hand, you can even use liquid silicon, flat tendril base of approximately 0.5 millimeters in diameter, scissors, lighter, small appliqués, these are the appliqués that I use for the nails, they are perfect and have beautiful colors, POP fabric for the base, Chamois fabric to cover the back at the end.
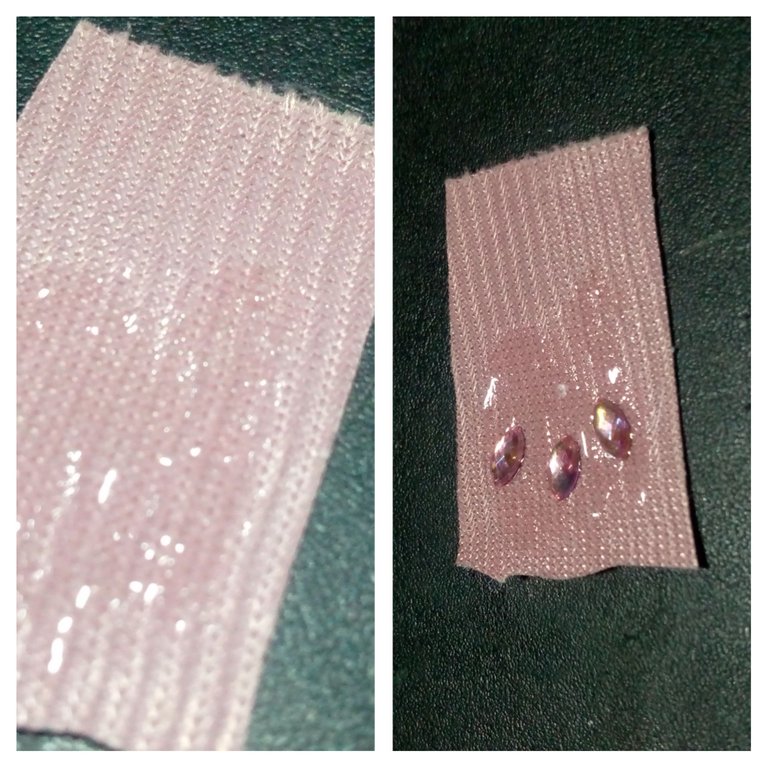
Paso 1: Corta un trozo de tela pequeño el mio mide 2.5 * 2.5 centímetros, coloca un poco de pegamento y coloca los apliques como te muestro en la imagen, con algo de separación.
Step 1: Cut a small piece of fabric, mine measures 2.5 * 2.5 centimeters, put some glue and place the appliqués as shown in the image, with some separation.
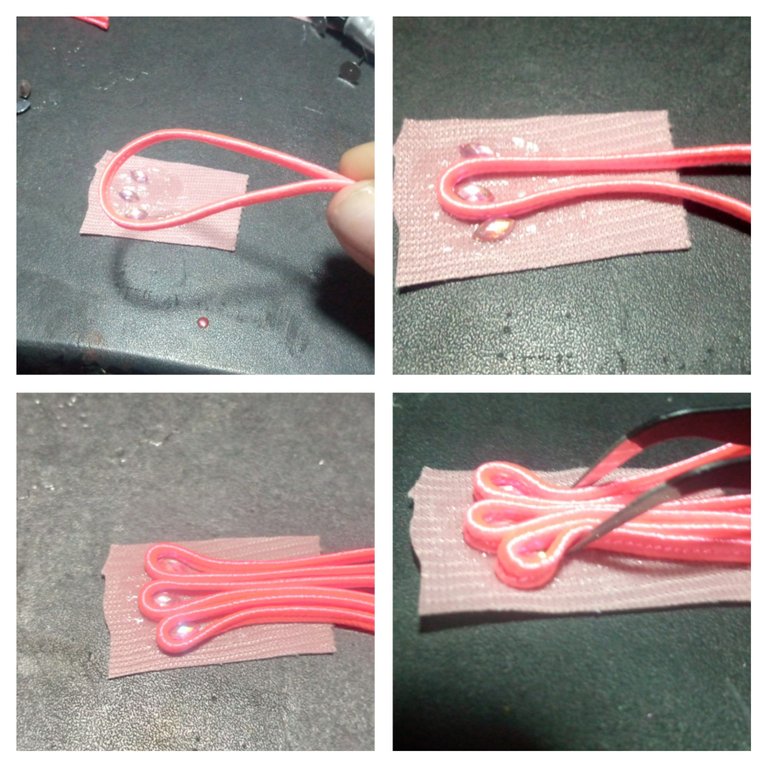
Paso 2: Toma los hilos punta con punta para medir el centro y procede a colocarlos uno a uno sobre la pega, puedes ayudarte con una pequeña pinza, el hilo central vamos a colocarlo un poco mas abajo que los otros dos, luego realiza presión por un corto tiempo para que se los hilos sequen con esa forma en particular.
Step 2: Take the threads tip to tip to measure the center and proceed to place them one by one on the glue, you can help yourself with a small tweezers, the central thread we will place it a little lower than the other two, then make pressure for a short time so that the threads dry with that particular shape.
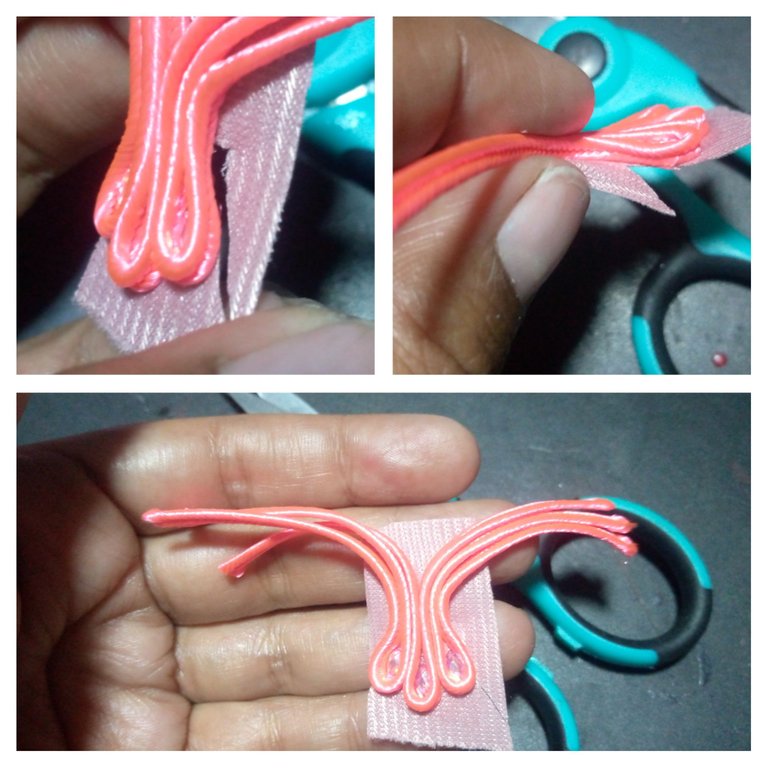
Paso 3: Vamos a dejarlo secar un poco, yo como fabrique muchos primero realice estos pasos anteriores y los deje secar para continuar con esta parte... corta las orillas de abajo hacia arriba como ves en la imagen y separa los hilos por la mitad 3 de un lado y 3 del otro. Mira todos los que estoy haciendo
Step 3: Let's let it dry a little, as I made many first I did these steps above and let them dry to continue with this part... cut the edges from the bottom up as you see in the picture and separate the threads in half 3 on one side and 3 on the other. Look at all the ones I am making
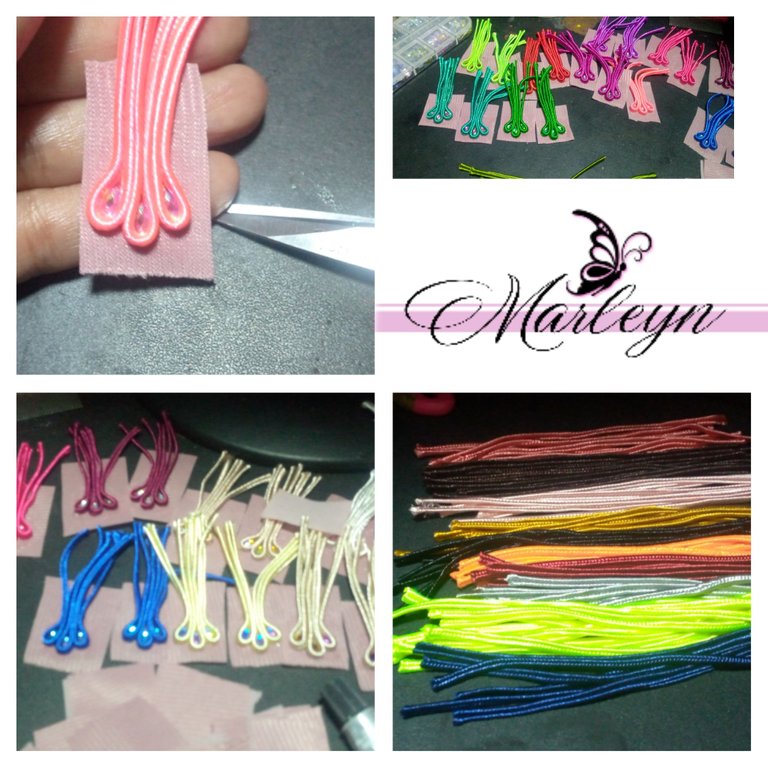
Continuamos...
Continue...
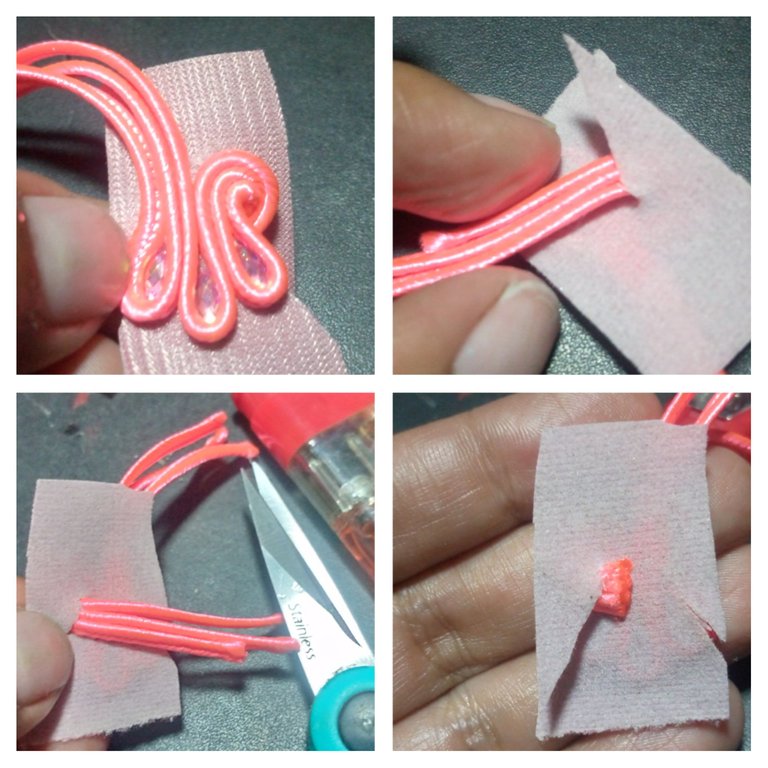
Paso 4: Toma 3 hilos y vamos a realizar un circulo con ellos pasándolos por atrás de la tela, por el corte que realizamos en pasos anteriores, si ves la segunda imagen quedara así. Ahora corta el hilo que sobra y quema las puntas... Puedes colocar un poco de pegamento allí atrás para que quede fijo.
Step 4: Take 3 threads and we are going to make a circle with them passing them through the back of the fabric, through the cut we made in previous steps, if you see the second image it will look like this. Now cut the remaining thread and burn the ends... You can put some glue back there to fix it.
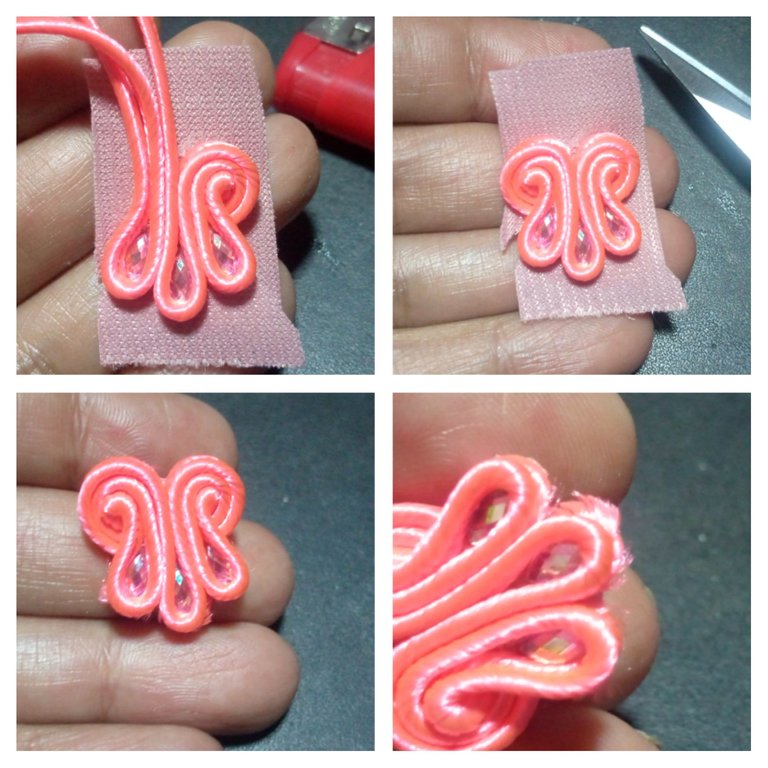
Paso 5: Realiza el mismo proceso del paso anterior del otro lado de nuestra pieza, Deja secar unos minutos y corta toda la tela restante. Al cortar la tela puede ser que te suceda algo así como ves en las ultimas imágenes, no te preocupes! al pasar el encendedor por la llama azul, sellas los hilos y queda como nuevo aunque lo mas recomendable es tenes mas cuidado porque con algunos hilos al sellar con el encendedor se dañan y hay que repetir la pieza.
Step 5: Perform the same process of the previous step on the other side of our piece, let dry a few minutes and cut all the remaining fabric. When cutting the fabric you may have something like you see in the last images, do not worry! passing the lighter through the blue flame, you seal the threads and it is like new although it is best to be more careful because some threads are damaged by sealing with the lighter and you have to repeat the piece.
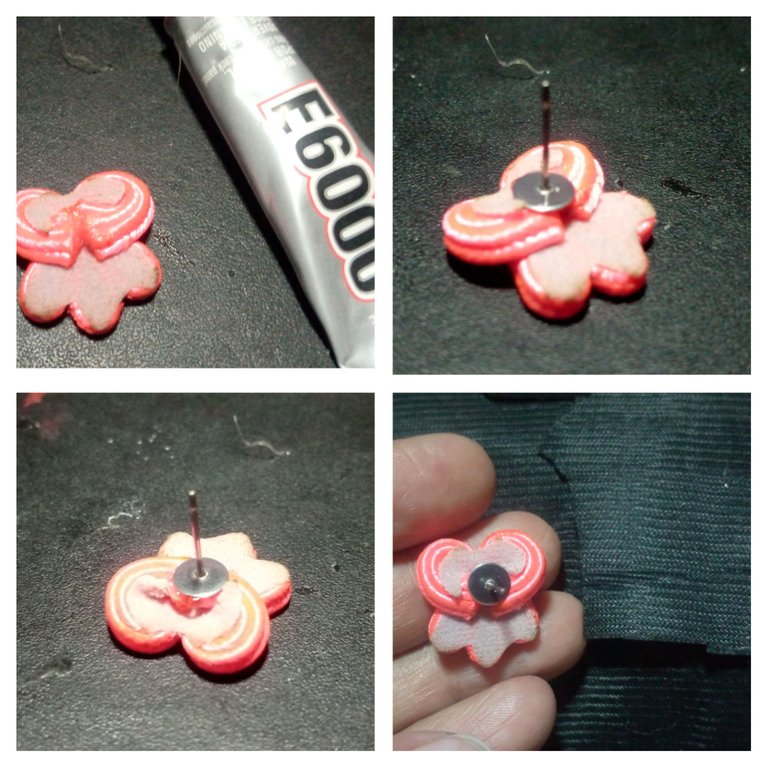
Paso 6: Ahora coloca una gota de pega pequeña en la parte de atrás depende de donde quieras colocar el pin del zarcillo, luego pega el pin y deja secar, yo lo dejo secar de un día para otro, me da la seguridad que quedara estable y no se soltara.
Step 6: Now place a small drop of glue on the back depending on where you want to place the tendril pin, then glue the pin and let it dry, I let it dry overnight, it gives me the security that it will be stable and will not come loose.
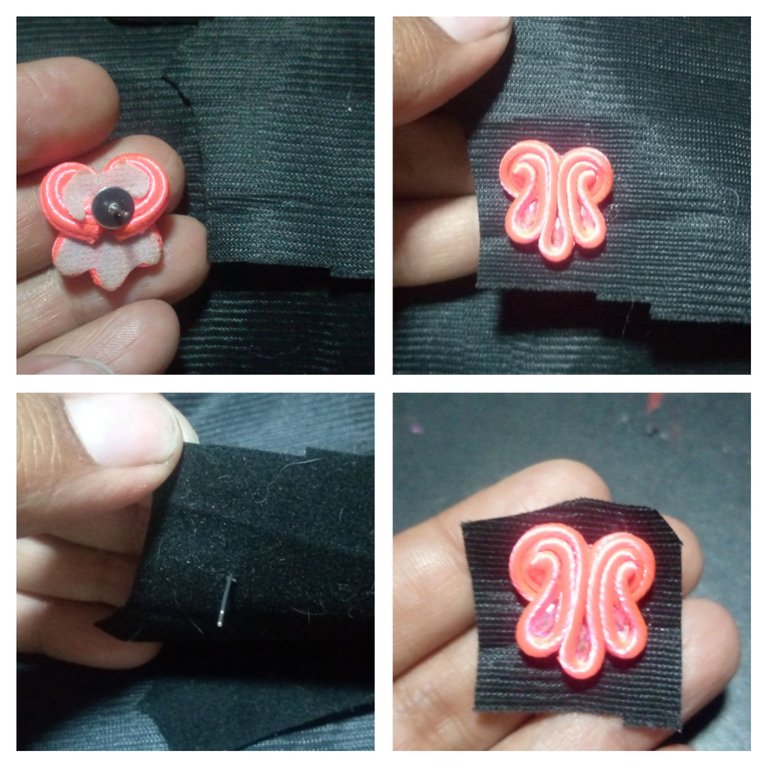
Paso 7: Al secar colocaremos pega por toda la parte posterior del zarcillo, y lo vamos a pegar con cuidado de no manchar con pega nada a la tela gamuza o a la que sea de tu elección. Deja secar un buen rato antes de cortar la tela sobrante. Mientras se seca realizamos el otro zarcillo para tener el par.
Step 7: When dry we will put glue all over the back of the tendril, and we will glue it being careful not to stain with glue anything to the chamois fabric or the one of your choice. Let it dry for a while before cutting the excess fabric. While it dries we make the other tendril to have the pair.
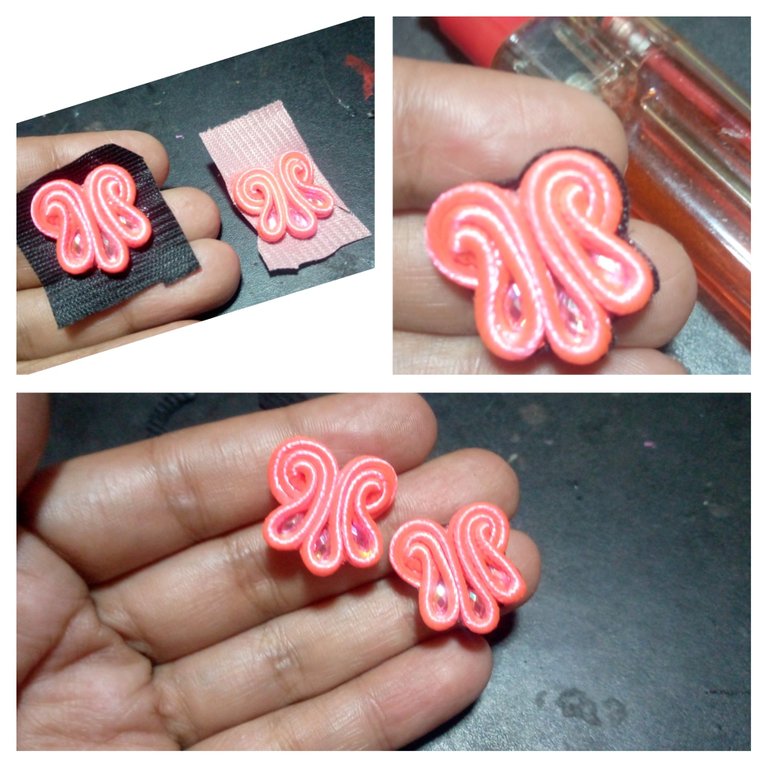
Paso 8: Vamos a cortar la tela sobrante dejando aproximadamente 1 milímetro de tela sobrante, esto es para que al pasar el encendedor la gamuza como que se derrite y se pega al hilo. Eso te dará la seguridad que no se va a desprender con el uso del día a día. Porque no solo debemos realizar una pieza bonita, debemos mantener calidad. Así de esta manera hemos terminado estas piezas preciosas espero que sean de tu agrado, yo amo enseñar y así cultivar junto a ustedes nuevos conocimientos... Si deseas mis productos puedes visitarme por instagram @marleyndesigner
Step 8: We are going to cut the excess fabric leaving approximately 1 millimeter of excess fabric, this is so that when you pass the lighter the chamois will melt and stick to the thread. This will give you the security that it will not come off with day to day use. Because we must not only make a beautiful piece, we must maintain quality. So in this way we have finished these beautiful pieces I hope they are to your liking, I love to teach and thus cultivate with you new knowledge... If you want my products you can visit me on instagram @marleyndesigner


IMAGENES CREADAS EN CANVA
IMAGES CREATED IN CANVA


