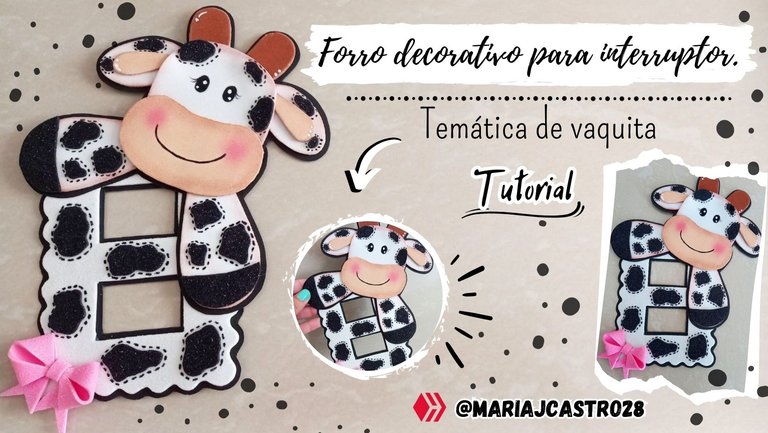

¡Feliz día amigos creativos de Hive Diy! Espero que se encuentren excelente, por mi parte lo estoy y como ya les había comentado anteriormente he retomado las manualidades y esta vez me he estado enfocando en decorar un poco mi cocina y la temática que he elegido es la de vaquita porque creo que es la más adecuada y luego de elaborar un imán para el refrigerador con esta temática pude comprobarlo, así que quise seguir haciendo más adornos de este tipo, esta vez les traigo la elaboración de un lindo forro para decorar el interruptor de la cocina que luce hermoso y perfecto, espero que les guste tanto como a mí, ahora sin más, ¡vamos a crear!
Happy day creative friends from Hive Diy! I hope you are feeling excellent, for my part I am and as I had already told you before, I have resumed crafts and this time I have been focusing on decorating my kitchen a little and the theme I have chosen is the cow because I think it is the more suitable and after making a refrigerator magnet with this theme I was able to prove it, so I wanted to continue making more ornaments of this type, this time I bring you the making of a nice cover to decorate the kitchen switch that looks beautiful and perfect , I hope you like it as much as I do, now without further ado, let's create!

• Foami escarchado rosado, blanco y negro.
• Pintura negra y blanca.
• Cartulina negra.
• Sombra marrón y blanca.
• Regla.
• Rubor.
• Pincel fino.
• Brocha.
• Lápiz.
• Tijera.
• Silicón.
• Pink, white and black frosty foam.
• Black and white paint.
• Black cardboard.
• Brown and white shade.
• Ruler.
• Blush.
• Fine brush.
• Brush.
• Pencil.
• Scissors.
• Silicone.


✦ PASO 1. Lo primero que hice fue tomar las medidas del interruptor de la cocina con ayuda de una regla, luego marqué esas medidas en el foami escarchado blanco y recorté dejando el espacio en el centro para los 2 botones solo que un poco más ancho que estos y además le dejé un par de cm extra en sus 4 extremos para que no quedara tan justo y al recortar lo hice ondulando sus orillas.
✦ STEP 1. The first thing I did was take the measurements of the kitchen switch with the help of a ruler, then I marked those measurements on the white frosted foam and cut out, leaving space in the center for the 2 buttons, only a little wider than these and I also left a couple of extra cm at its 4 ends so that it would not be so tight and when trimming I did it by curling its edges.


✦ PASO 2. Pegué la pieza de foami escarchado blanco sobre cartulina negra y recorté el exceso dejando un borde delgado de esta alrededor del foami y a su vez hice lo mismo en la parte de los botones para que también tuvieran un borde negro.
✦ STEP 2. I glued the piece of white frosted foam on black cardboard and trimmed the excess, leaving a thin edge around the foam and in turn I did the same on the buttons so that they also had a black edge .


✦ PASO 3. Hice las piezas para formar la vaquita en foami cada una de su respectivo color, en total hice 12 piezas y recorté, luego tomé un poco de sombra para ojos color marrón con una brocha y se la apliqué a los bordes de las piezas de color blanco y piel mientras que a las piezas de color marrón les apliqué sombra para ojos de color blanco.
✦ STEP 3. I made the pieces to form the cow in foam, each in its respective color, in total I made 12 pieces and cut them out, then I took a little brown eye shadow with a brush and applied it to the edges of the white and skin-colored pieces while I applied white eye shadow to the brown pieces.


✦ PASO 4. Comencé a formar la vaquita uniendo las piezas de sus orejas y sus patitas.
✦ STEP 4. I began to form the cow by joining the pieces of its ears and legs.


✦ PASO 5. Luego comencé a formar la cabeza de la vaquita pegando el hocico en la parte superior, los cuernos en la parte superior trasera y las orejas a los lados en la parte trasera de la vaquita.
✦ STEP 5. Then I began to form the head of the cow by gluing the snout on the top, the horns on the top back and the ears on the sides on the back of the cow.


✦ PASO 6. Con pintura negra le dibujé los ojos y la sonrisa a la vaquita, con pintura blanca hice algunos detalles en los ojos y el resto de la cabeza, por ultimo le dibujé las mejillas con un poco de rubor.
✦ STEP 6. With black paint I drew the cow's eyes and smile, with white paint I made some details in the eyes and the rest of the head, finally I drew the cheeks with a little blush.


✦ PASO 7. Pegué los brazos de la vaquita en la parte trasera de la cabeza, cado uno en un sentido diferente (uno hacia un lado y otro hacia abajo). Hice algunas piezas pequeñas de foami escarchado negro y las pegué sobre la vaquita para simular sus manchas.
✦ STEP 7. I glued the cow's arms to the back of the head, each one in a different direction (one to the side and the other down). I made some small pieces of black frosted foam and glued them on the cow to simulate its spots.


✦ PASO 8. Luego pegué la vaquita sobre cartulina negra y le recorté los bordes dejando uno muy delgado de la cartulina negra como fondo para la vaquita y luego la pegué en una de las esquinas superiores de la pieza de foami blanco con la forma del interruptor.
✦ STEP 8. Then I glued the cow on black cardboard and cut out the edges, leaving a very thin one of the black cardboard as a background for the cow and then I glued it to one of the upper corners of the white foam piece with the shape of the switch.


✦ PASO 9.Hice un lazo de foami escarchado rosado y recorté algunas piezas más de foami escarchado negro, pegué el lazo en la esquina contraria a la vaquita y las piezas de foami negro las pegué sobre la pieza con la forma del interruptor, como último detalle dibujé los bordes en todas las manchas de la vaquita con pintura negra y un pincel fino.
✦ STEP 9.I made a pink frosted foam bow and cut out some more pieces of black frosted foam, I glued the bow in the opposite corner to the little cow and I glued the black foam pieces on the piece in the shape of the cow. switch, as a last detail I drew the edges on all the spots on the cow with black paint and a fine brush.


¡Y listo! De esta manera tan sencilla fue como elaboré este lindo adorno con temática de vaquita para decorar el interruptor de mi cocina y darle un lindo y mejor aspecto pasando de ser un simple interruptor a uno más lindo y divertido ¿Qué les pareció a ustedes? ¡Yo lo amé! Espero que les haya gustado, gracias por pasar, nos vemos pronto con una nueva idea creativa.
¡And ready! In this simple way, I made this cute cow-themed ornament to decorate my kitchen switch and give it a nice and better look, going from being a simple switch to a cuter and fun one. What did you think? I loved him! I hope you liked it, thanks for stopping by, see you soon with a new creative idea.


Todas las fotografías son de mi propiedad.
Fotografías capturadas con mi Samsung Galaxy A12
Separador de texto elaborado en Canva.
Nos vemos en mi próxima publicación.
¡Tengan un feliz día!
All photographs are my property.
Photos captured with my Samsung Galaxy A12
Text separator made in Canva.
See you in my next post.
¡Have a happy day!


