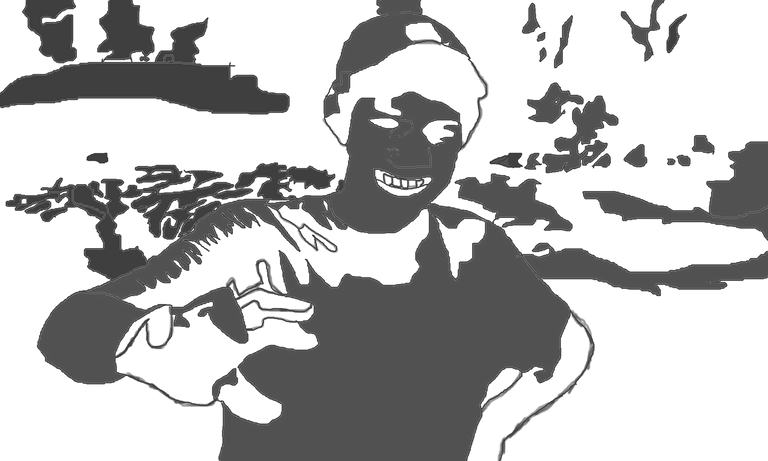
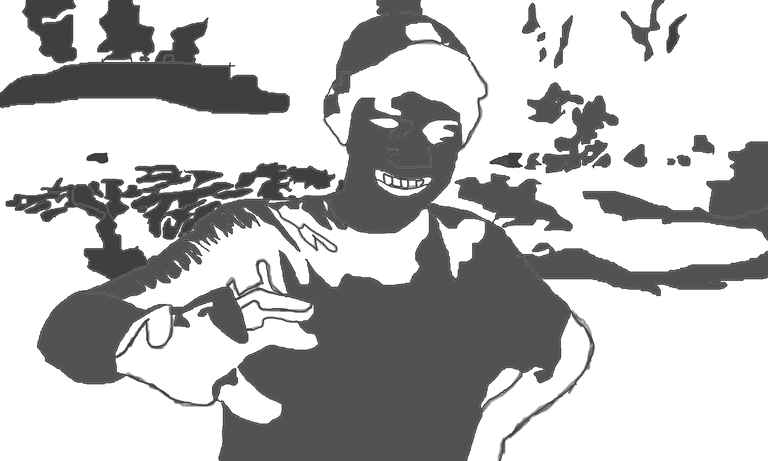
Final art made by me, based on a photo of my ex-girlfriend in a jungle.
Arte final hecho por mi, partiendo de una foto de mi ex-novia en una selva.

Friends of hive, how are you doing? My post today is to show you this sketch that I made to incorporate it into some stickers that will be the logo of a brand of cookies from the venture of who was my partner at the time.
Amigos de hive ¿como les va?, mi publicación de hoy es para mostrarles este boceto que hice para incorporarlo en unos stickers que serán el logo de una marca de galletas del emprendimiento de quien en el momento fue mi pareja.
I want to tell you that I am just learning to do this because I have always been concerned, I saw a tutorial on YouTube, and from there I was encouraged to practice, because all this seems really fascinating to me and I look at the result I got and I don't I can't believe that I could have done something so good, since I am someone who has no ability or knowledge for these things.
To do everything I used GIMP 2.10 and it was done in linux.
Quiero decirles que apenas estoy aprendiendo a hacer esto porque siempre he tenido la inquietud, me vi un tutorial por youtube, y a partir de alli me anime a ir practicando, porque me parece realmente fascinante todo esto y el resultado que obtuve lo miro y no me puedo creer que yo haya podido hacer algo tan bueno, ya que soy alguien que no tiene habilidad o conocimiento para estas cosas.
Para realizar todo use GIMP 2.10 y fue hecho en linux.
The process of how I did it | El proceso de hacerlo
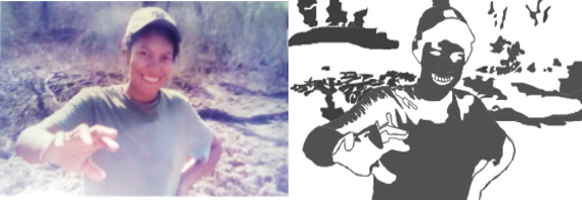
First I show you the original photo I took to make the sketch. This photograph is from 2005 and I had to digitize it by taking a picture with my phone because the photo itself was already deteriorating. Luckily I turned out very well doing it.
Primero les muestro la foto original que tome para realizar el boceto. Esta fotografía es del año 2005 y tuve que digitalizarla tomándole una foto con mi telefono porque la foto en si ya estaba deteriorándose. Afortunadamente quedo muy bien al hacerlo.

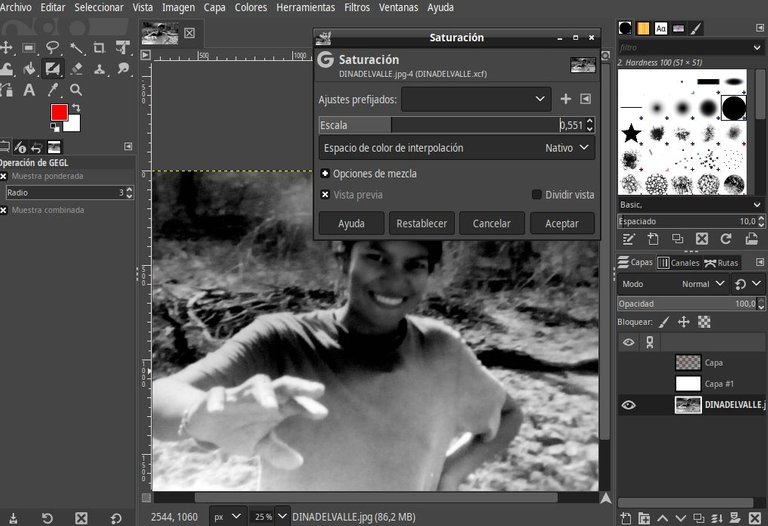
Then I take the original photo and I modify the saturation until I have it in black and white to be able to start working on it as I want, the result was this. The next thing I did was choose a hard brush and set an opacity of 75% even though it was you can adjust for convenience. In this case use brush #4.
Luego entonces tomo la foto original y le modifico la saturacion hasta tenerla en blanco y negro para poder comenzar a trabajarla como yo quiero, el resultado fue este.Lo siguiente que hice fue escoger un pincel duro y colocarle una opacidad de un 75% aunque se puede ajustar a conveniencia. En este caso use el pincel #4.
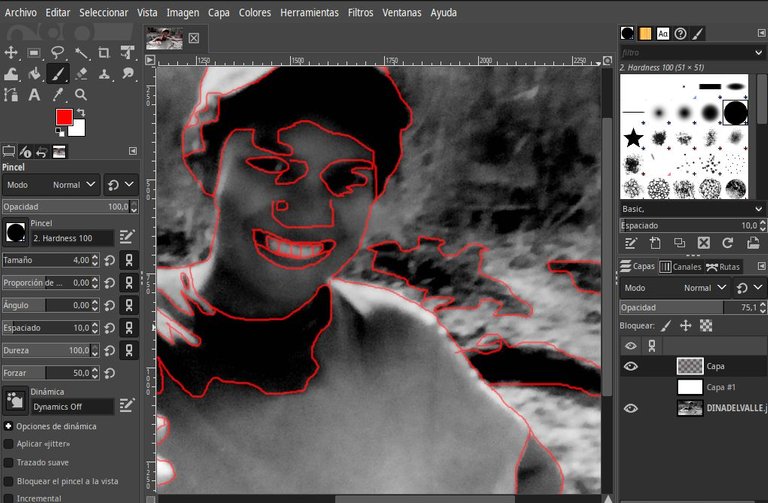
Once with the brush and the image ready to work, I added a new transparent layer and I began to work on the sketch using the red color as a guide to be able to vectorize the entire image, taking care to zoom in on the most difficult parts and taking care that I didn't have any unjoined space left so that later the whole image would not be colored in a single tone.
Una vez con el pincel y ya la imagen lista para trabajar, agregue una nueva capa transparente y me puse a trabajar el boceto usando el color rojo como guía para poder vectorizar toda la imagen, teniendo cuidado de hacer zoom en las partes mas difíciles y cuidando de que no me quedase ningún espacio sin unir para que luego no se me coloreara toda la imagen de un solo tono.
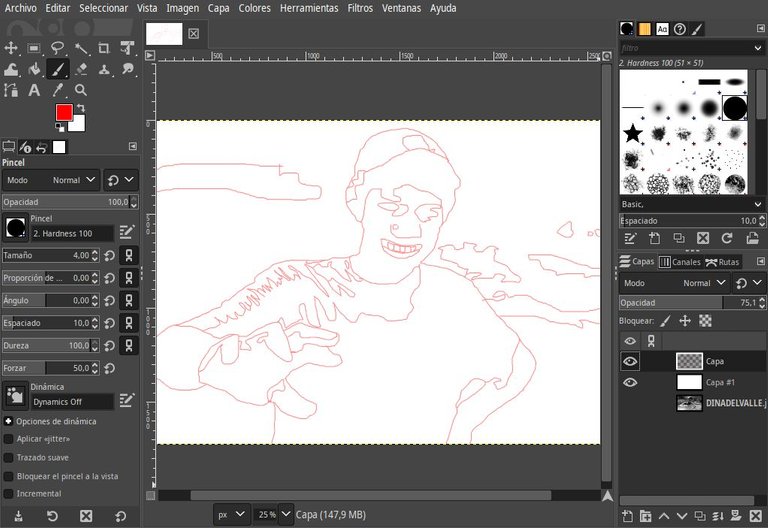
Once the process of correctly marking the patterns is finished, being a bit intuitive and using common sense to know approximately when it can be right, add a layer of white to see how the work is turning out.
Una vez terminado el proceso de ir marcando correctamente los patrones, siendo un poco intuitivo y usando el sentido común para saber aproximadamente cuando puede estar bien, agregue una capa de color blanco para ir mirando como va quedando el trabajo.
Already being satisfied with how it looks, I proceed to fill in all the spaces with red, taking care that other parts of the image are not filled in because it would be incorrect.
Ya al estar conforme con como queda paso a rellenar todos los espacios de color rojo, cuidando que no se rellenen otras partes de la imagen porque quedaría incorrecto.
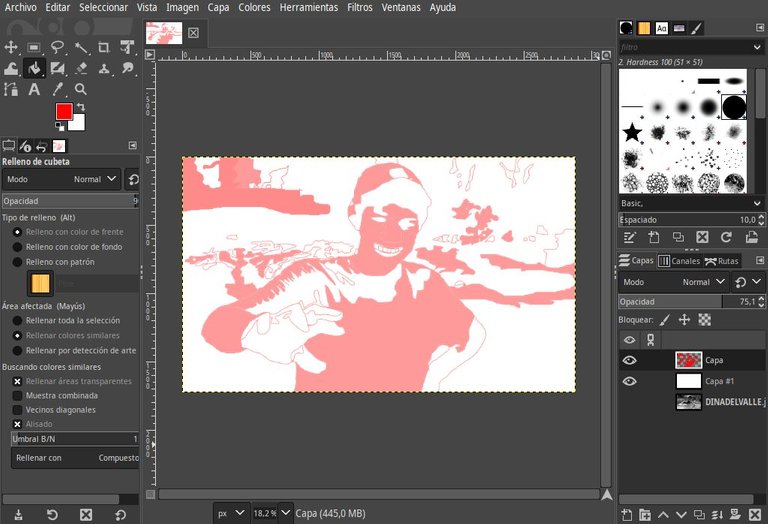
And once this is done, I hide the other layers, leaving only the red one that interests me, making the work have a transparent background. At this point I modify the threshold to look like this.
Y ya hecho esto, oculto las otras capas dejando solamente la de color rojo que es la que me interesa, haciendo que el trabaje quede con un fondo transparente. En este punto modifico el umbral para que se vea asi.
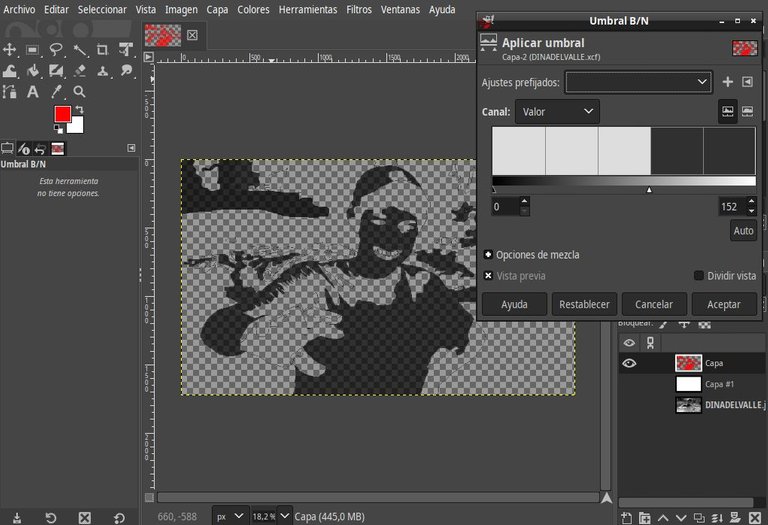
Resulting in the final art that I convert into a .png to be able to export it and make the vector graphic that I will use for her stickers.
Dándome por resultado el arte final que convierto en un .png para poder exportarlo y realizar el gráfico vectorial que usare para los stickers de ella.
And here you can enjoy the comparison between the original and the sketch for the stickers.
I hope you liked my work, give it upvote and comment.
Y aquí pueden disfrutar de la comparación entre el original y el boceto para los stickers.
Espero les haya gustado mi trabajo, le den upvote y me comenten.

All the photos was captured with my phone KRIP 4B and my computer. The separators and the signature were made using pixlr.com and are entirely my own.

