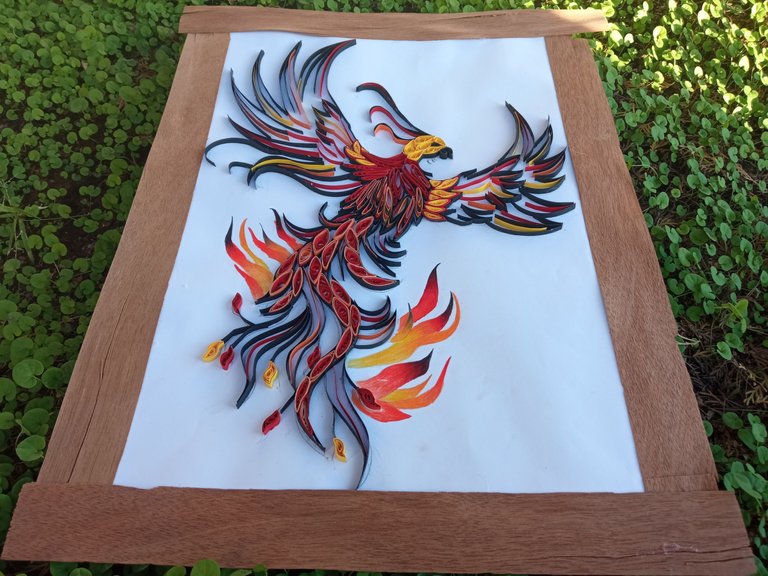
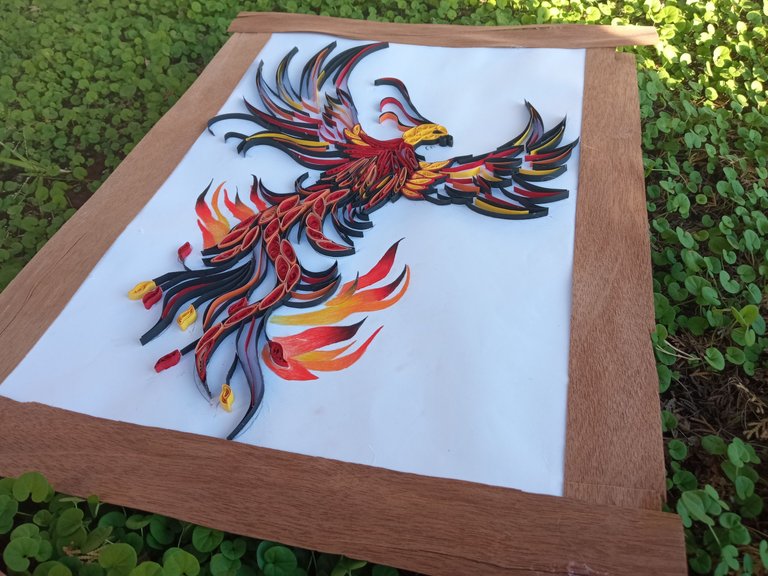
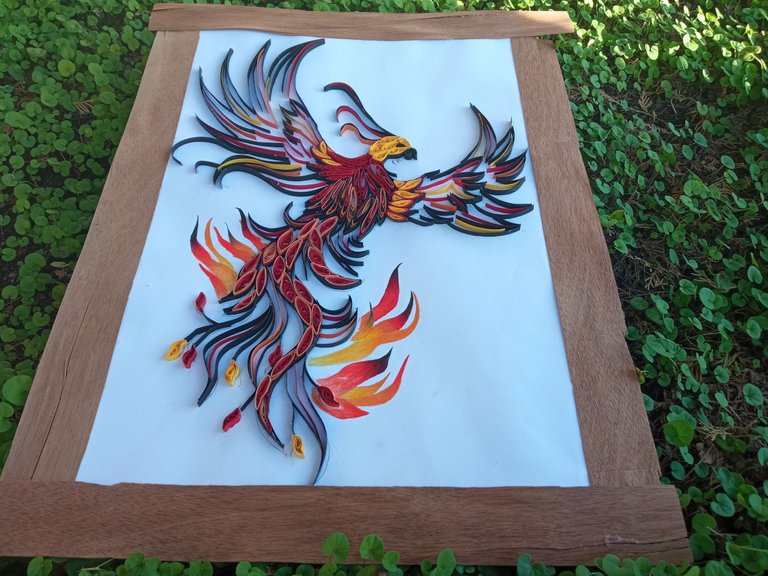
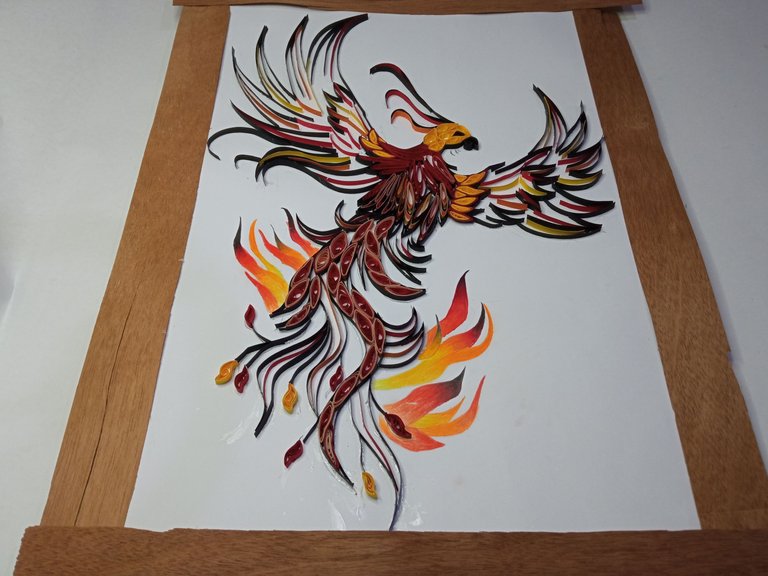
Hola queridos amigos, hoy vengo a compartir con todos ustedes un bello cuadro, me inspiré en un ave fénix para realizar este hermoso trabajo, desde que ví Harry Potter me convertí en fan de las aves fénix, todos sabemos que el ave fénix es una leyenda mitológica, representa el fuego, muere y renace de sus cenizas , Fawkes era el compañero de Albus Dumbledore y me pareció lindo representarlo con la bella técnica del filigrana.
Hello dear friends, today I come to share with you all a beautiful painting, I was inspired by a phoenix to make this beautiful work, since I saw Harry Potter I became a fan of phoenixes, we all know that the phoenix is a mythological legend, represents fire, dies and is reborn from its ashes, Fawkes was the companion of Albus Dumbledore and I thought it was nice to represent it with the beautiful technique of filigree.
Para realizar este cuadro usé materiales muy económicos y que se consiguen fácilmente en cualquier librería, algunos son reciclados de sobrantes que tenía en casa, es un adorno muy lindo para colocar en las paredes de nuestras casas y también para obsequiar, así que vamos acompáñame a realizarlo.
To make this picture I used very inexpensive materials that are easily available in any bookstore, some are recycled from leftovers I had at home, it is a very nice decoration to place on the walls of our homes and also to give as a gift, so come with me to make it.
Bello cuadro de ave fénix
.
Beautiful phoenix painting
Materiales
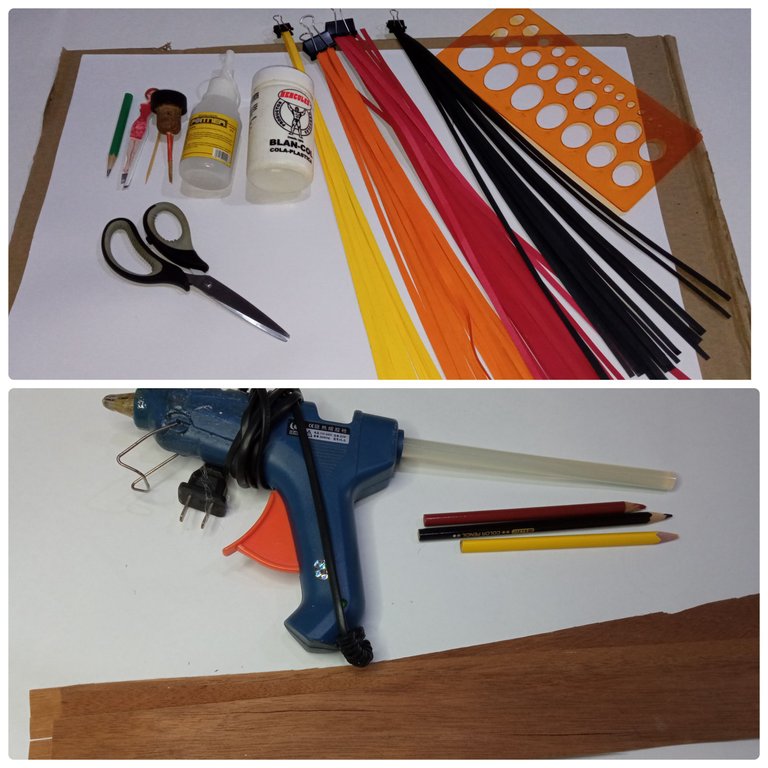
Materials
17 cm by 0.5 cm strips of cardboard (red, yellow, orange, orange and black) White cardboard Cardboard Liquid silicone Hot glue White glue Rolling pin Stick Scissors Template Colors, yellow, red, orange and black Wooden planks Clamp
Paso 1
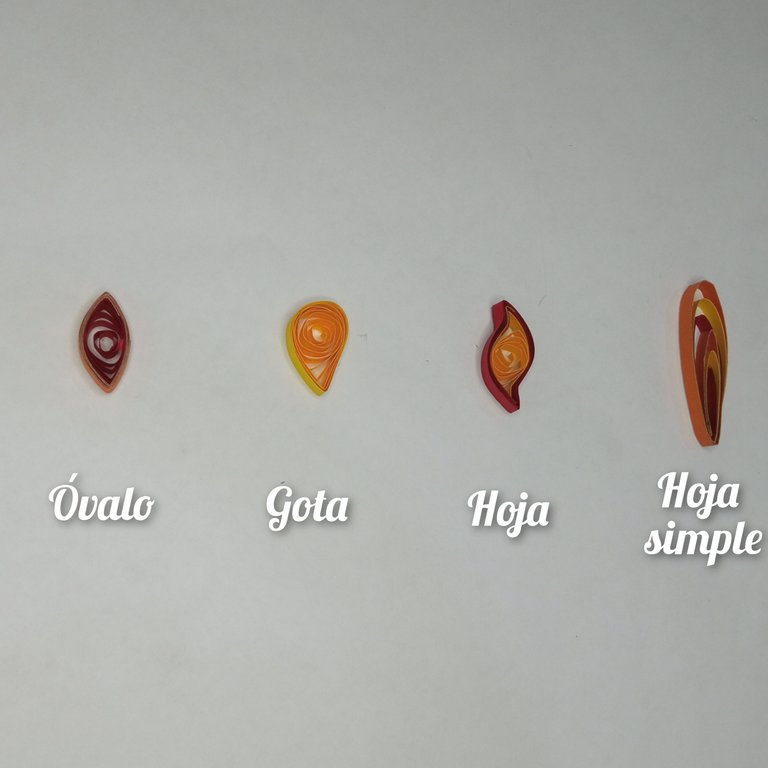
Lo primero que haremos es mostrar algunas formas básicas del filigrana y qué usaremos para elaborar el cuadro, entre ellas el óvalo, la gota, la hoja y la hoja simple.Step 1
The first thing we will do is show some basic filigree shapes and what we will use to make the picture, among them the oval, the drop, the leaf and the simple leaf.
Paso 2
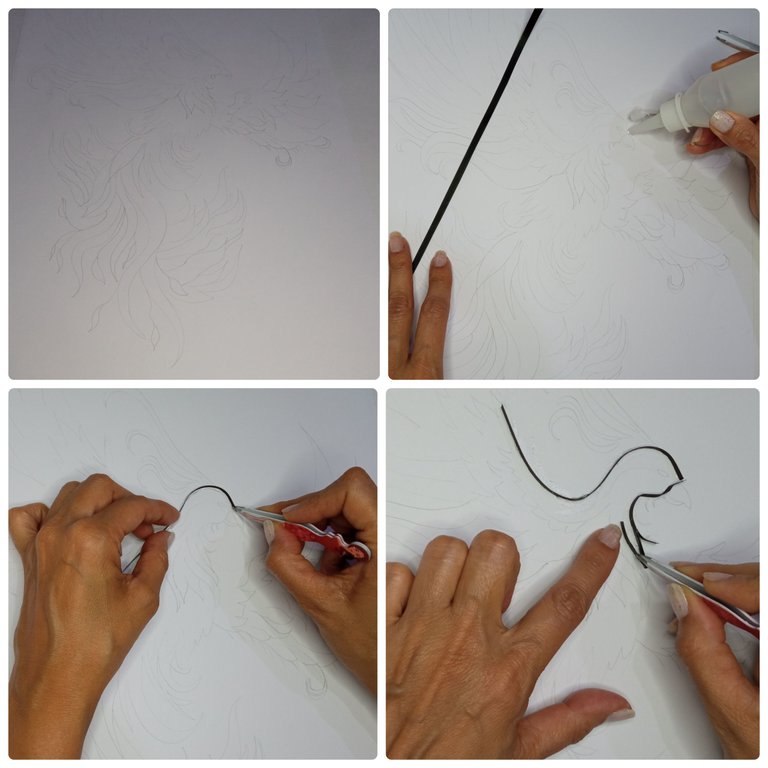
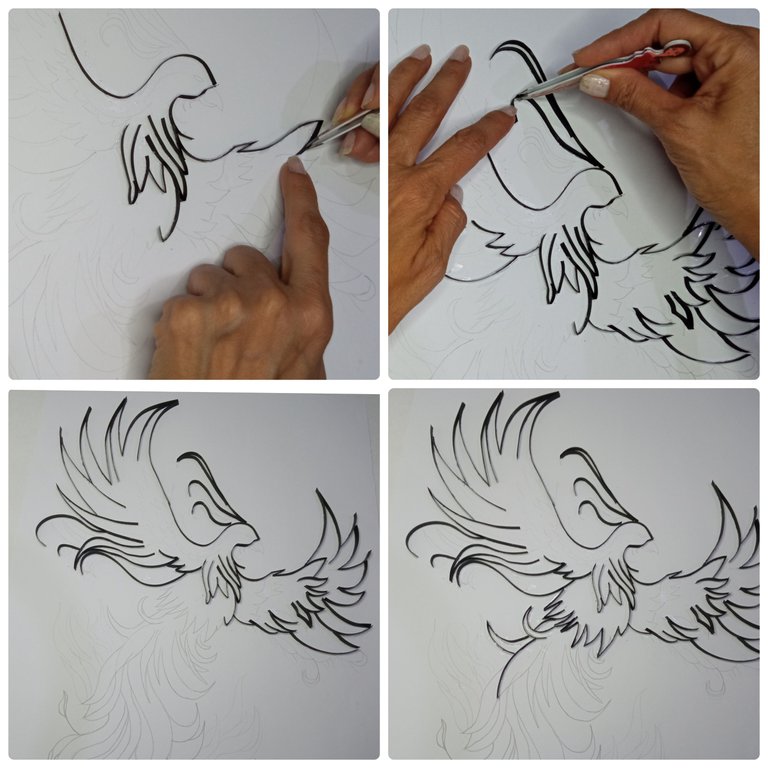
Luego dibujamos el ave fénix, haremos la silueta para que sea más fácil trabajar sobre él, luego colocamos silicón líquido en el borde de la cabeza y con una tira negra bordeamos, nos ayudamos con una pinza para que sea más fácil.Step 2
Then we draw the phoenix, we will make the silhouette to make it easier to work on it, then we place liquid silicone on the edge of the head and with a black strip we border, we help us with a tweezers to make it easier.
Paso 3
Seguimos bordeando el ave con tiras negras, las alas, las plumas de la cabeza y parte del cuerpo, debemos tener paciencia ya que tenemos que sostener las tiras con la pinza por unos segundos para que se fijen bien.Step 3
We continue bordering the bird with black strips, the wings, the feathers of the head and part of the body, we must be patient because we have to hold the strips with the tweezers for a few seconds so that they are well fixed.
Paso 4
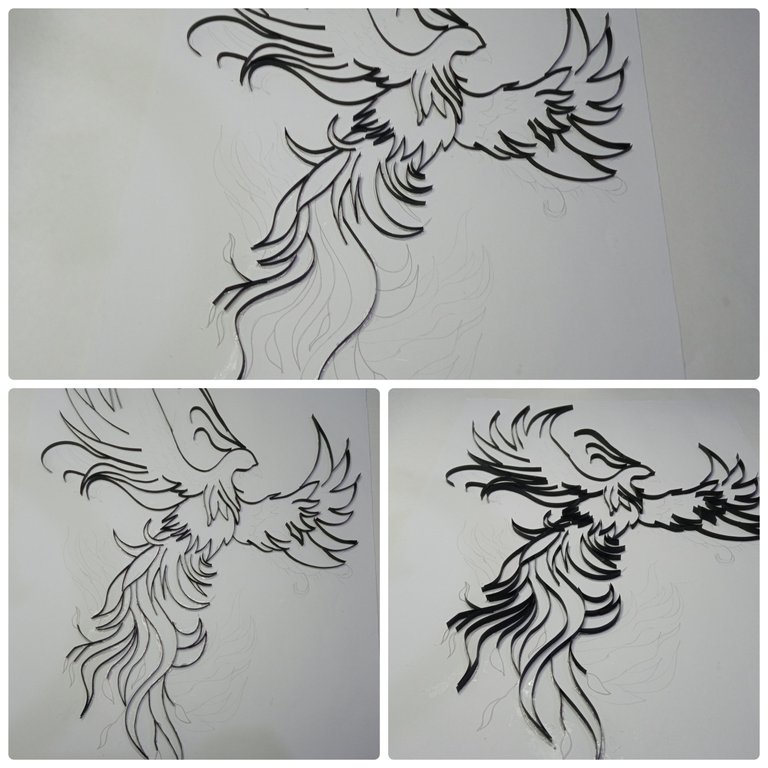
Terminamos bordeando la cola, ya el ave está tomando forma y se ve hermoso.Step 4
We finish edging the tail, the bird is already taking shape and looks beautiful.
Paso 5
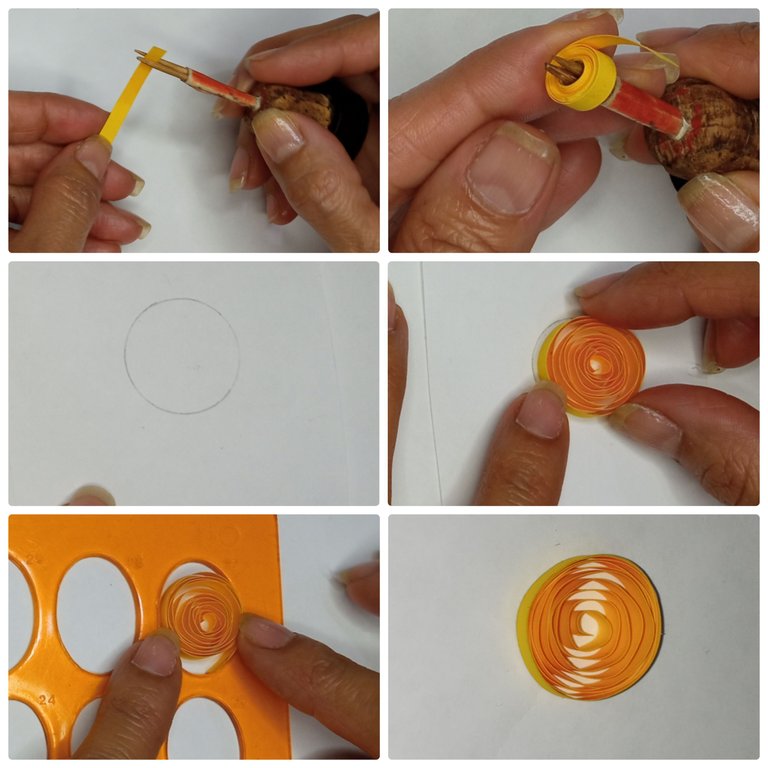
Haremos un círculo abierto, esta es una de las formas básicas más usadas en el filigrana, ya que a partir de ella se hacen muchas formas, entonces vamos a elaborarla, tomamos una tira y la introducimos en el enrrollador, luego damos vueltas hasta el final de la tira, luego lo soltamos en la plantilla, si no tenemos plantilla podemos dibujar un círculo en una hoja y usarla, en este caso el círculo es de 2 cm de diámetro, luego pegamos la tira con pegamento blanco y ya tenemos el círculo abierto listo, el enrrollador es muy sencillo de hacerlo, solo necesitamos un corcho, dos palitos y un pedacito de tirro.Step 5
We will make an open circle, this is one of the most used basic forms in the filigree, since from it many forms are made, then we are going to elaborate it, we take a strip and we introduce it in the coiler, then we give turns until the end of the strip, then we release it in the template, if we don't have a template we can draw a circle on a sheet of paper and use it, in this case the circle is 2 cm in diameter, then we glue the strip with white glue and we have the open circle ready, the enrrollador is very easy to make, we only need a cork, two sticks and a little piece of string.
Paso 6
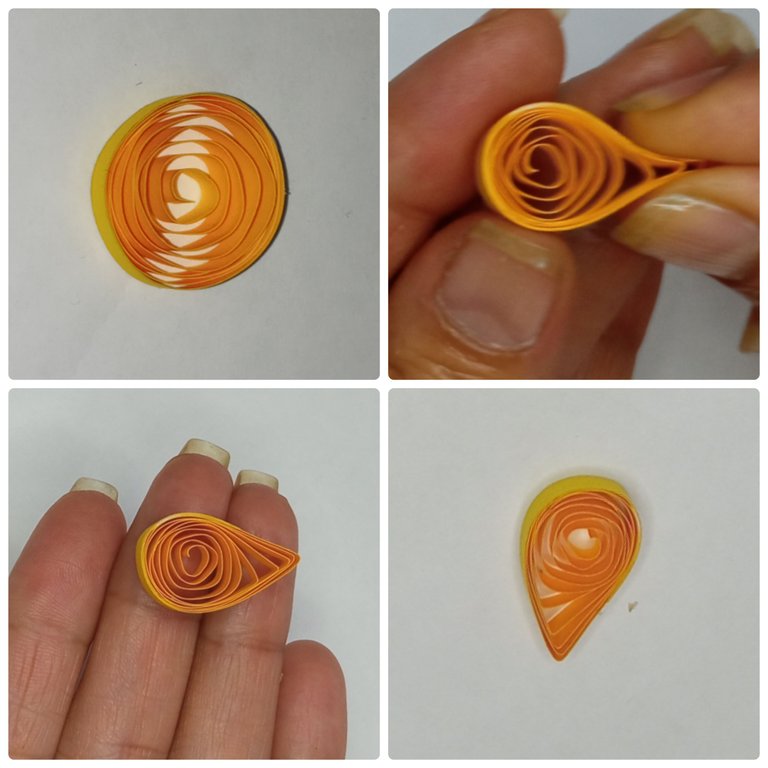
Ahora partiendo del círculo abierto haremos la forma de gota, solo tendremos que tomar un círculo abierto y con los dedos índice y pulgar de la mano derecha hacemos presión formando una gota, haremos 6 para la cabeza del ave fénix.Step 6
Now starting from the open circle we will make the drop shape, we will only have to take an open circle and with the index finger and thumb of the right hand we make pressure forming a drop, we will make 6 for the head of the phoenix.
Paso 7
Comenzamos a rellenar el ave y partiremos pegando el ojo, para este enrollaremos una tira negra sobre si misma y pegamos, luego vamos pegando las gotas amarillas en la cabeza del ave.Step 7
Start filling the bird and glue the eye, for this we will roll a black strip on itself and glue, then we will glue the yellow drops on the head of the bird.
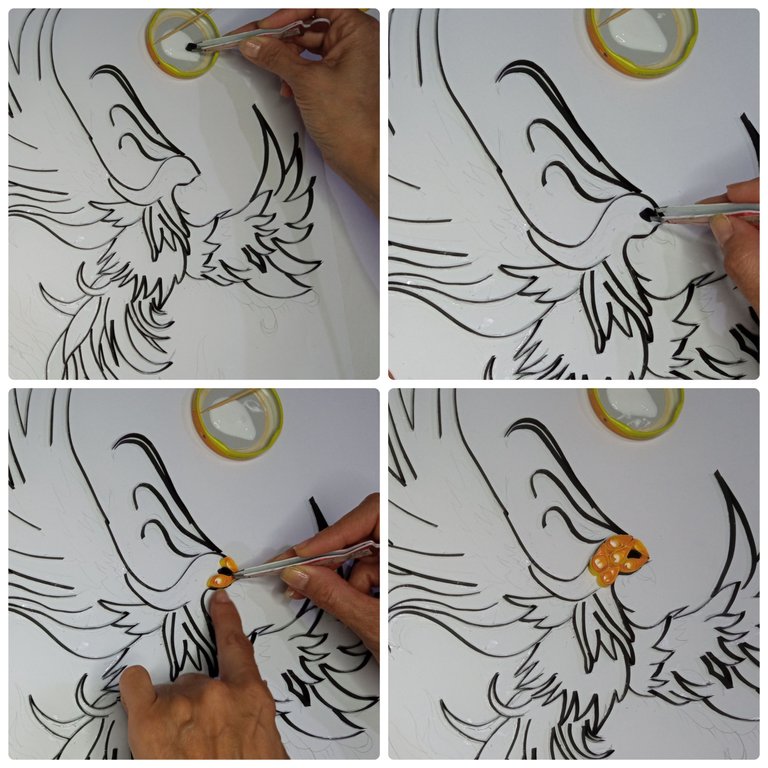
Paso 8
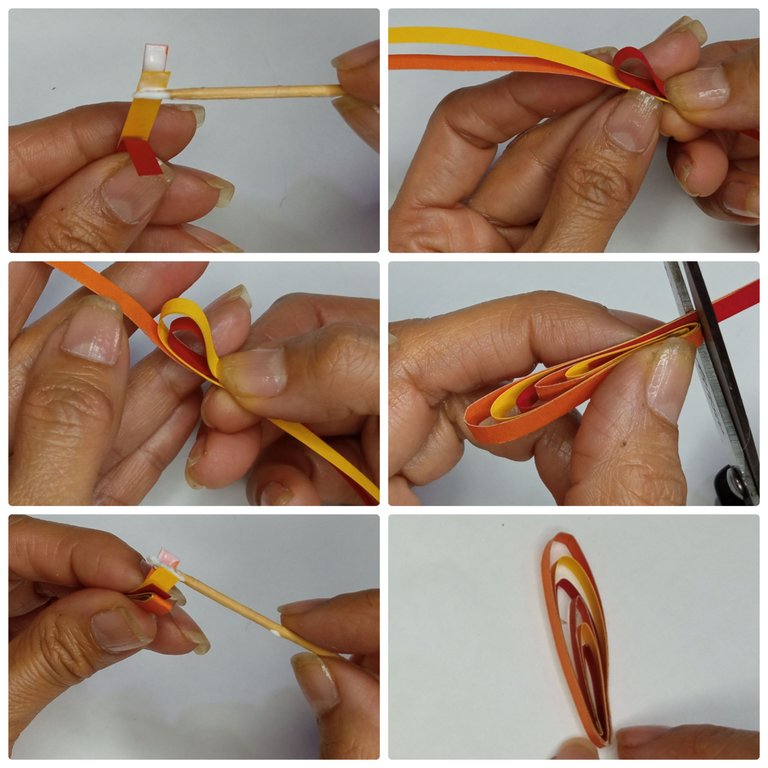
Tomamos 3 tiras, las pegamos con pegamento blanco, luego vamos pasando una por encima de la otra hasta llegar al final, luego cortamos el excedente y pegamos, a esta forma la llamaremos hoja simple, haremos 10 hojas rojas y 10 hojas intercalando los colores, rojo, amarillo y naranja, después los pegamos en el cuerpo del ave fénix.Step 8
Take 3 strips, glue them with white glue, then we pass one over the other until we reach the end, then cut the excess and glue, we will call this form simple leaf, we will make 10 red leaves and 10 leaves interspersed colors, red, yellow and orange, then glue them on the body of the phoenix.
Paso 9
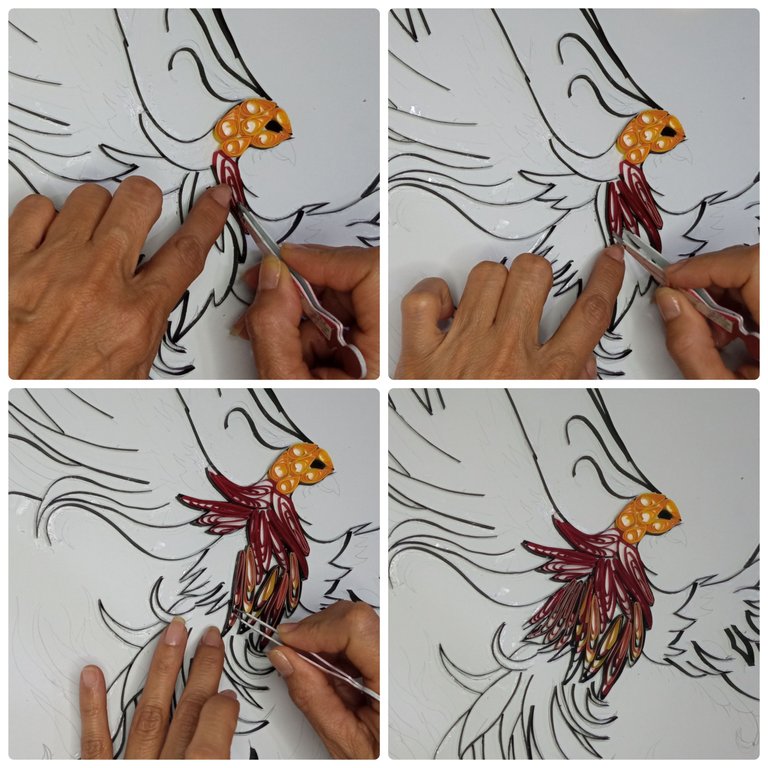
Pegamos hojas rojas sencillas en la parte del cuello del ave y luego pegamos las otras de colores intercalados.Step 9
Paste single red leaves on the neck part of the bird and then glue the other colored leaves in between.
Paso 10
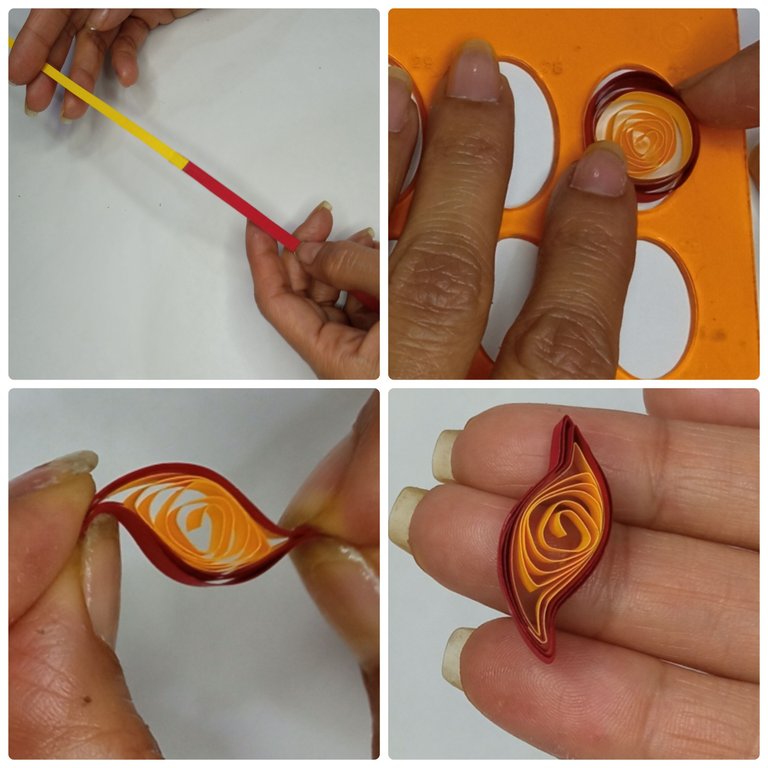
Unimos dos tiras una roja y una amarilla y hacemos una hoja, con ayuda de ambas manos y los dedos índice y pulgar presionamos los extremos y damos un pequeño giro hacia arriba para darle la forma, de esta haremos 8.Step 10
We join two strips, one red and one yellow and make a leaf, with the help of both hands and the index finger and thumb we press the ends and give a little twist upwards to give it the shape, from this we will make 8.
Paso 11
Después pegamos tiras en las alas, alternando los colores, amarillo, rojo y naranja, luego pegamos las formas de hoja en el comienzo de las alas, le darán un bello toque con los dos colores.Step 11
Then we glue strips on the wings, alternating the colors, yellow, red and orange, then we glue the leaf shapes at the beginning of the wings, they will give a beautiful touch with the two colors.
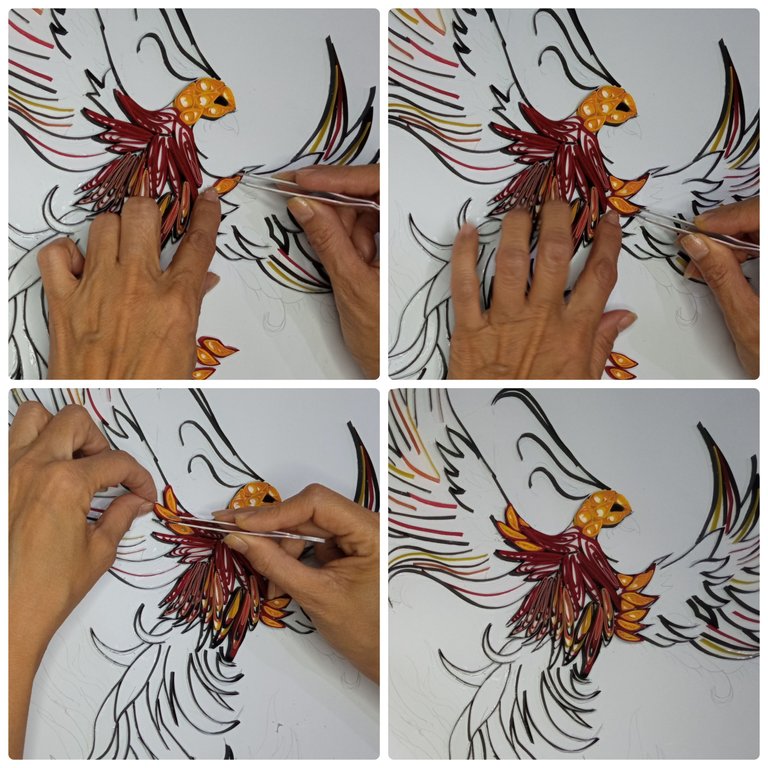
Paso 12
Para la cola del ave fénix usaremos también la forma de hoja ya explicada en el paso 10, haremos 22 de éstas hojas y las pegamos con pegamento blanco.Step 12
For the tail of the phoenix we will also use the leaf shape already explained in step 10, we will make 22 of these leaves and glue them with white glue.
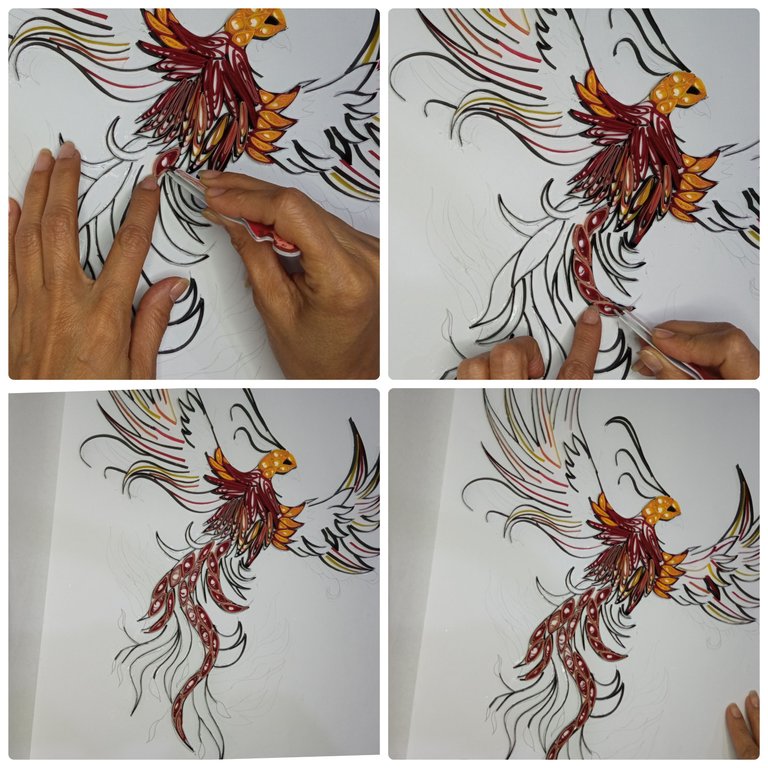
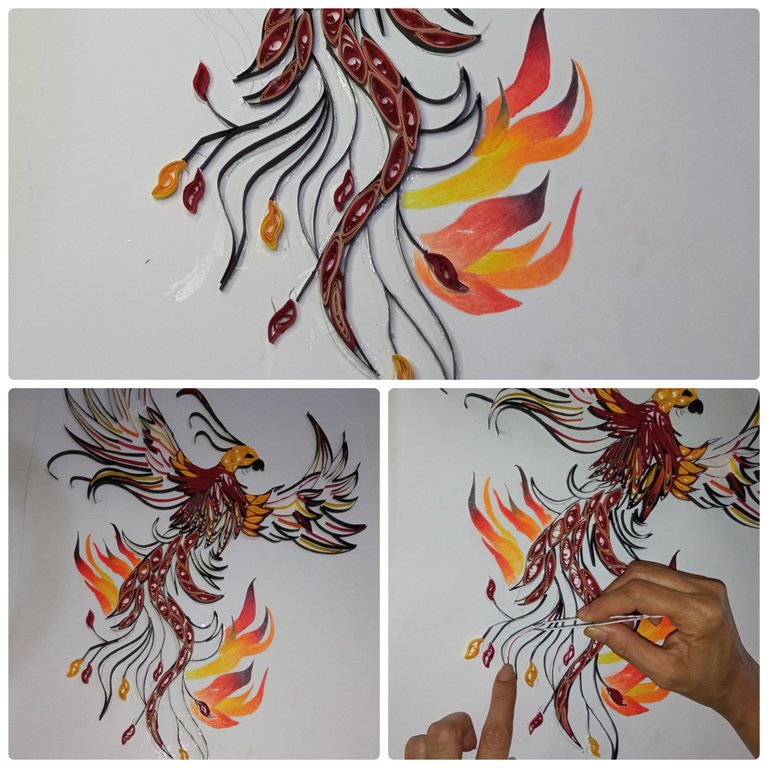
Paso 13
Con colores pinté la parte del fuego difuminando los colores naranja, amarillo,rojo y negro, después seguimos colocando tiras en la cola.Step 13
With colors I painted the part of the fire blurring the colors orange, yellow, red and black, then we continue placing strips on the tail.
Paso 14
Para finalizar pegamos con silicón caliente las láminas de madera haciendo un marco y así el cuadro quedará más bello y mejor presentado.Step 14
Finally, we glue the wooden sheets with hot silicone to make a frame and thus the picture will be more beautiful and better presented.
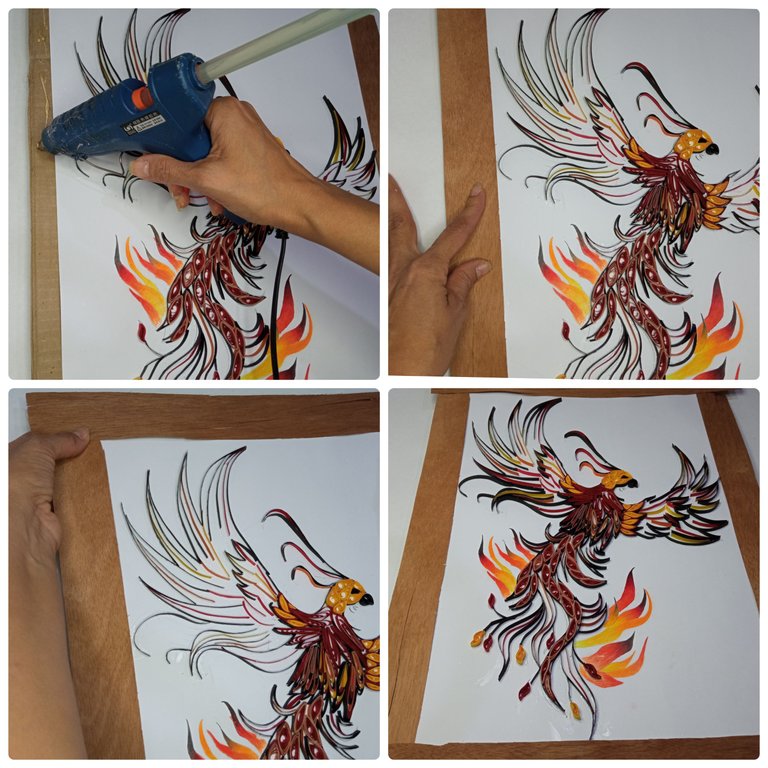
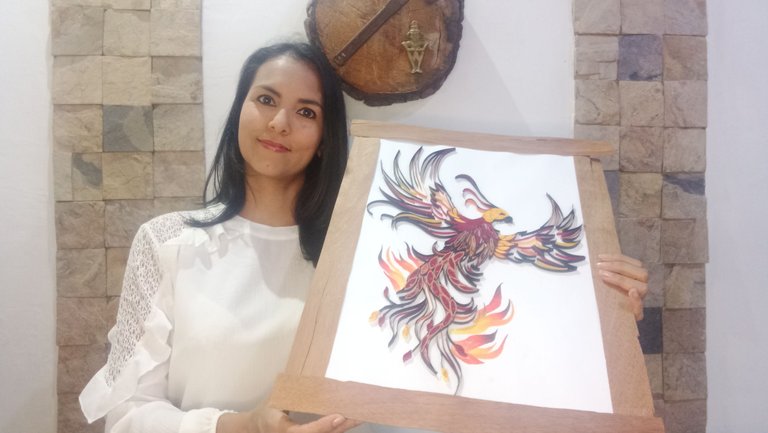
Listo amigos, así quedó mi hermoso cuadro, espero sea del agrado de todos ustedes
Ready friends, this is how my beautiful painting turned out, I hope you all like it.
Todas las fotos son tomadas de mi teléfono Redmi 9, para los collages usé la aplicación collage maker y para la traducción usé DeepL traductor.
All photos are taken from my Redmi 9 phone, for the collages I used the collage maker application and for the translation I used DeepL translator.


