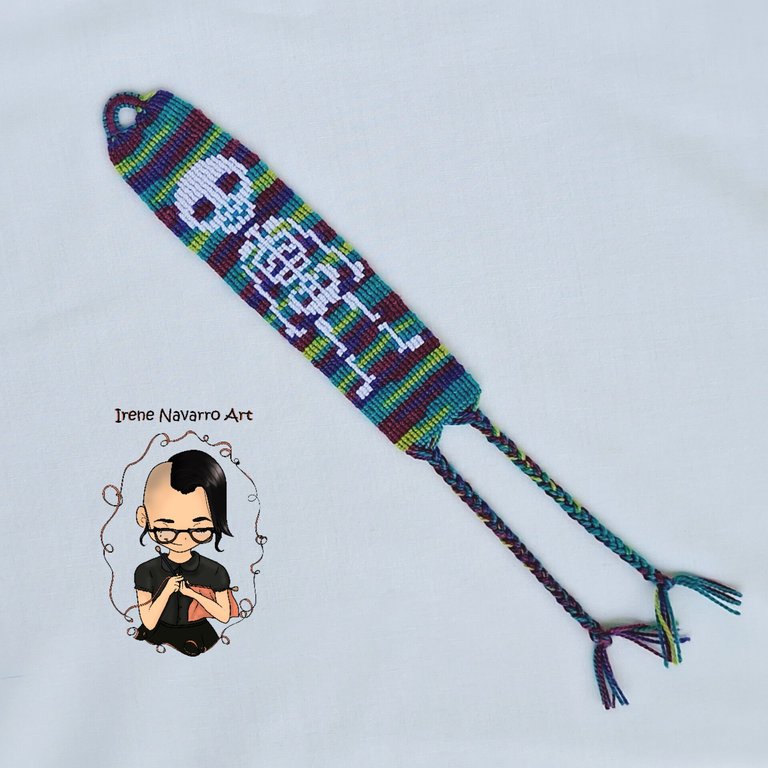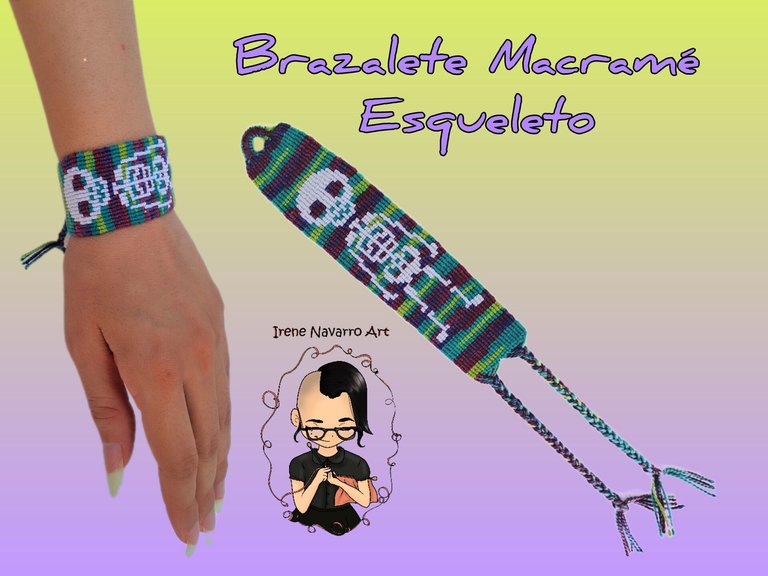
Brazalete Macramé Esqueleto

InShot_20230913_135538312.jpg

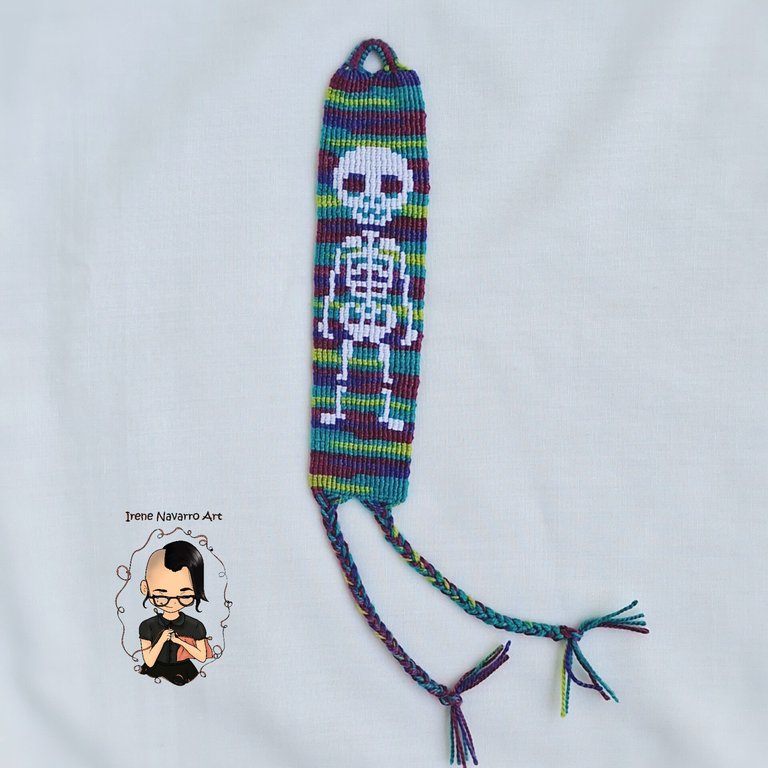
Saludos a todos, es septiembre pero ya quiero que llegue a octubre para entrar de lleno en la temática de Halloween que es mi favorita todo el año 😁, así que navegando por la web me encontré con un hermoso patrón de esqueleto, así que quise hacerlo de inmediato en un brazalete, en el momento no tenía a la mano hilo negro pero decidí hacerlo con un hilo matizado para el fondo, para que quedara colorido como una calavera del Día de los Muertos, así que con los materiales listos puse manos a la obra y acá les comparto todo el proceso.


Greetings everyone, it's September but I already want it to get to October to fully enter into the Halloween theme which is my favorite all year 😁, so while browsing the web I found a beautiful skeleton pattern, so I wanted to do it immediately into a bracelet, at the time I didn't have black thread on hand but I decided to do it with a tinted thread for the background, so that it would be colorful like a Day of the Dead skull, so with the materials ready I put my hands to the work and here I share the whole process.

Materiales/ Materials


  • Hilo acrílico para crochet: blanco para el esqueleto y matizado para el fondo.
  • Regla de 30 cm
  • Tijera
  • Tabla con gancho
  • Patrón de esqueleto
  • Acrylic thread for crochet: white for the skeleton and shaded for the background.
  • 30 cm ruler
  • Scissors
  • Board with hook
  • Skeleton pattern

Proceso / Process

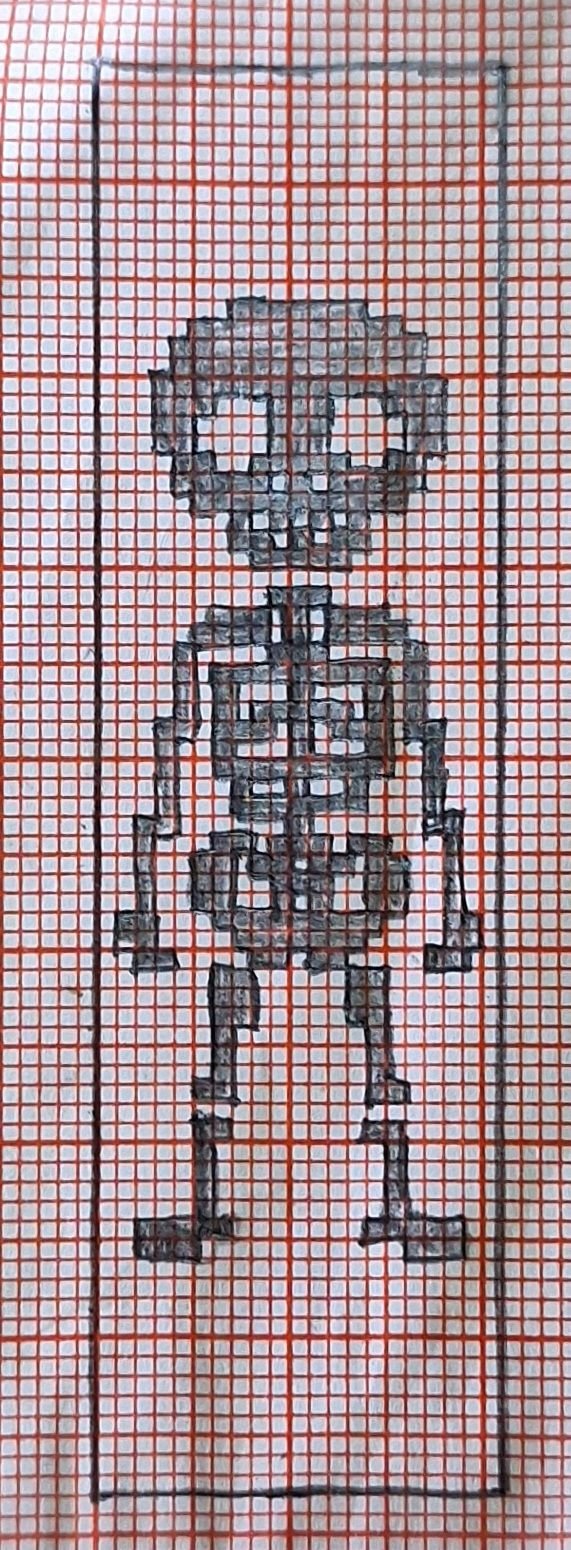
Lo primero que hice fue pasar el diseño de calavera a un papel milimetrado, usando 21 cuadros de ancho por 74 cuadros de largo, esto quiere decir que para el brazalete se necesitan 21 hilos guía. Cada cuadro corresponde a un nudo simple.

The first thing I did was transfer the skull design to graph paper, using 21 squares wide by 74 squares long, this means that 21 guide threads are needed for the bracelet. Each square corresponds to a simple knot.
20230912_103917.jpg

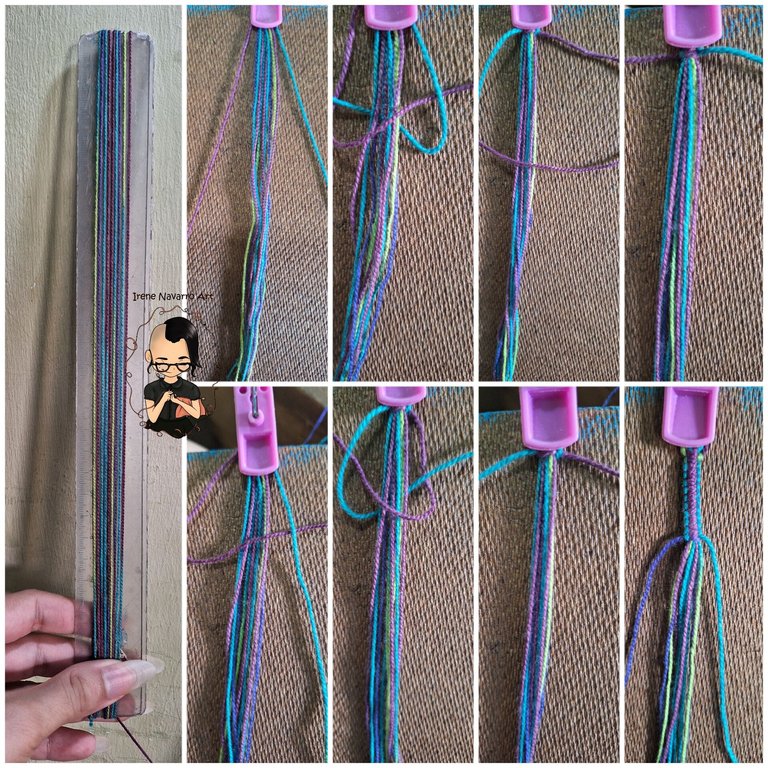
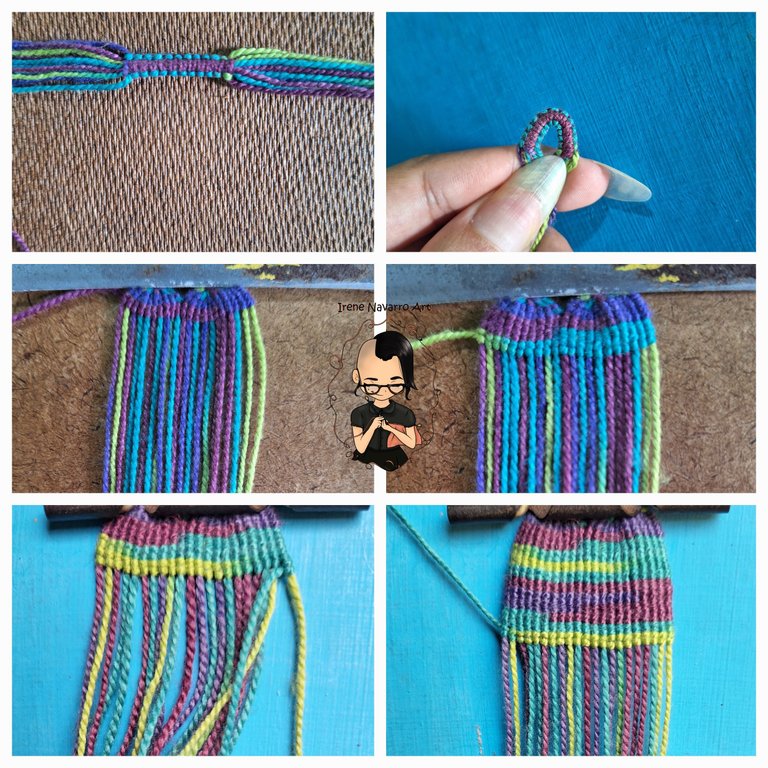
Con el hilo matizado para el fondo, cortar 9 hebras de 60cm, 1 hebra de 80 cm y una hebra dejarla unida al ovillo. Sujetar las hebras con el gancho a la mitad, dejando las hebras largas en los bordes. Con las hebras largas hacer 20 nudos planos que envuelvan a las hebras del centro. Los nudos planos se hacen alternando el nudo en forma de 4 y el nudo en forma de P hasta completar 20 nudos.

With the dyed yarn for the background, cut 9 strands of 60cm, 1 strand of 80cm and leave one strand attached to the ball. Fasten the strands with the hook in the middle, leaving the long strands at the edges. With the long strands, make 20 flat knots that wrap around the center strands. Flat knots are made alternating the figure-4 knot and the P-shaped knot until 20 knots are completed.
InShot_20230913_124733569.jpg

Doblar en forma de U, sujetar con el gancho dejando la hebra unida al ovillo en la esquina izquierda. Con la hebra unida al ovillo de hacer los nudos. Hacer 12 hileras de nudos simples, es decir que la hebra de anudar envuelve a la cada uno de los 21 hilos guía dos veces, de ida y vuelta hasta completar 12 hileras.

Fold into a U shape, secure with the hook, leaving the yarn attached to the ball in the left corner. With the thread attached to the ball of knots. Make 12 rows of simple knots, that is, the knotting thread wraps around each of the 21 guide threads twice, back and forth until completing 12 rows.
20230913_124847.jpg

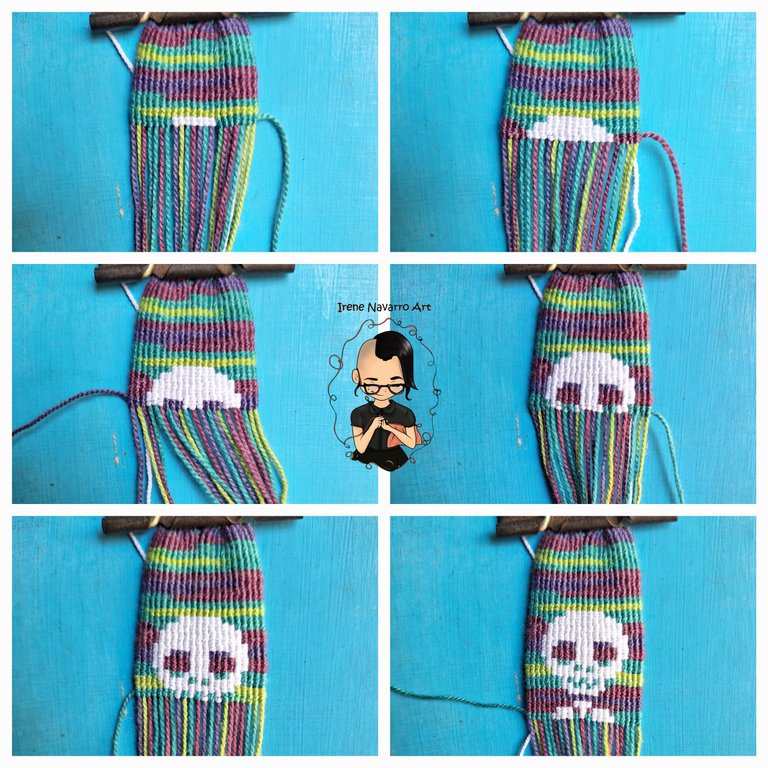
Agregar el hilo blanco por detrás y sujetar con el gacho. En la 13 hilera hacer 7 nudos con el color de fondo, 7 nudos blancos y 7 nudos con el color de fondo, esa es la primera hilera del dibujo del cráneo, conforme se va a avanzando se toma de referencia la primera hilera para efectuar los demás cambios de color según corresponde en el gráfico.

Add the white thread from behind and secure with the hook. In the 13th row make 7 knots with the background color, 7 white knots and 7 knots with the background color, that is the first row of the skull drawing, as you progress the first row is taken as a reference to make the other color changes as appropriate in the chart
20230913_124930.jpg

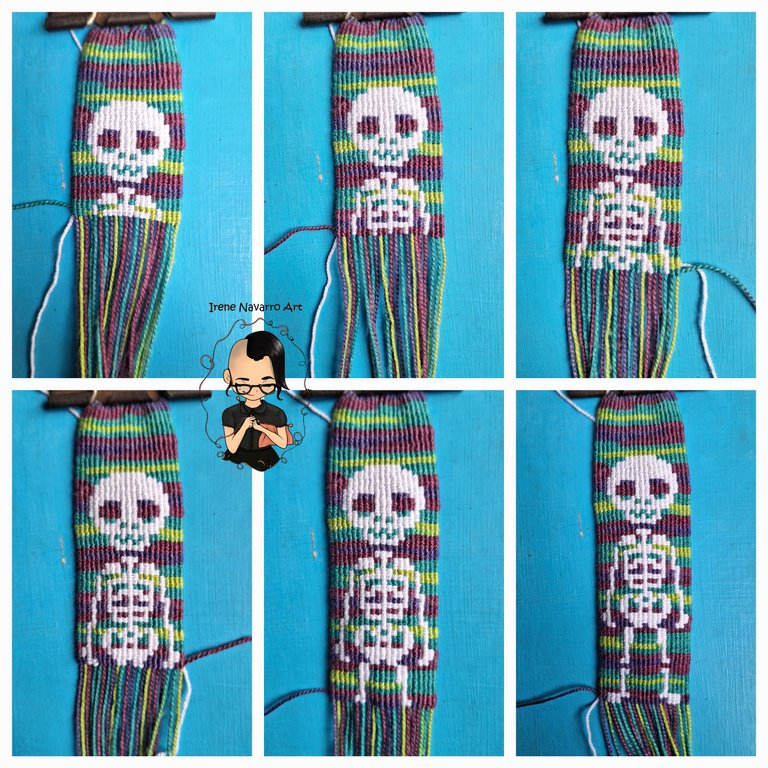
En la hilera 27 todos los nudos se hacen del color del fondo, porque esta es la hilera que separa el cráneo del resto del esqueleto, en la hilera 28 de hacen 9 nudos con hilo de fondo, 3 nudos blancos y 9 hilos matizados. Se toma esta hilera como referencia para seguir el gráfico hasta el final.

In row 27 all the knots are made in the color of the background, because this is the row that separates the skull from the rest of the skeleton. In row 28, 9 knots are made with background thread, 3 white knots and 9 tinted threads. This row is taken as a reference to follow the graph until the end.
20230913_125021.jpg

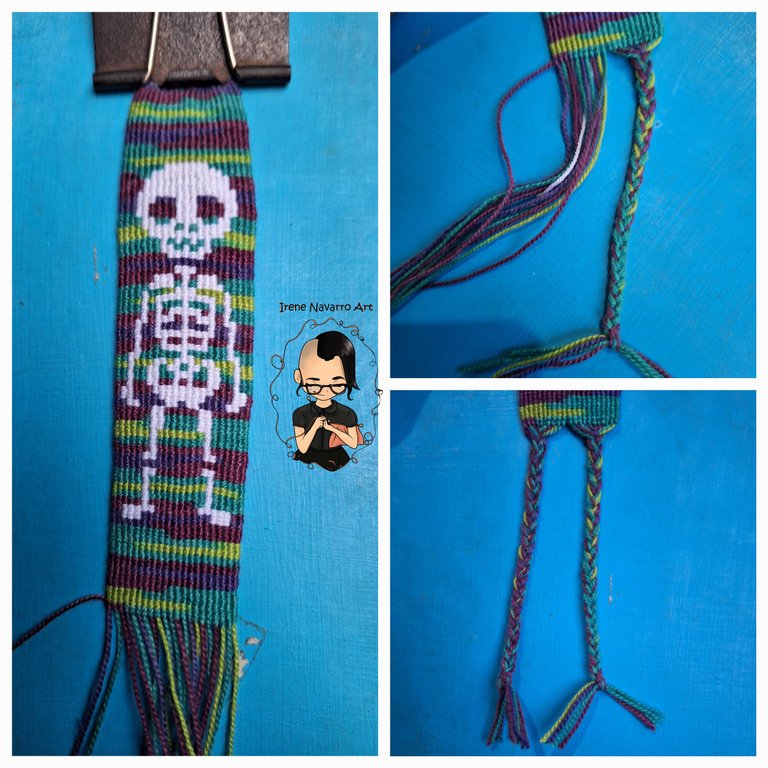
Al terminar el dibujo se hacen 12 hileras de nudos solo con hilo matizado del fondo. Se dividen los hilos guía junto con la hebra de anudar en dos grupos de 11 y se hacen dos trenzas, terminar con un nudo y cortar las puntas de forma recta.

When the skeleton is finished, 12 rows of knots are made only with the dyed thread from the background. Divide the guide threads together with the knotting thread into two groups of 11 and make two braids, finish with a knot and cut the ends straight.
20230913_125051.jpg

Resultado / Result

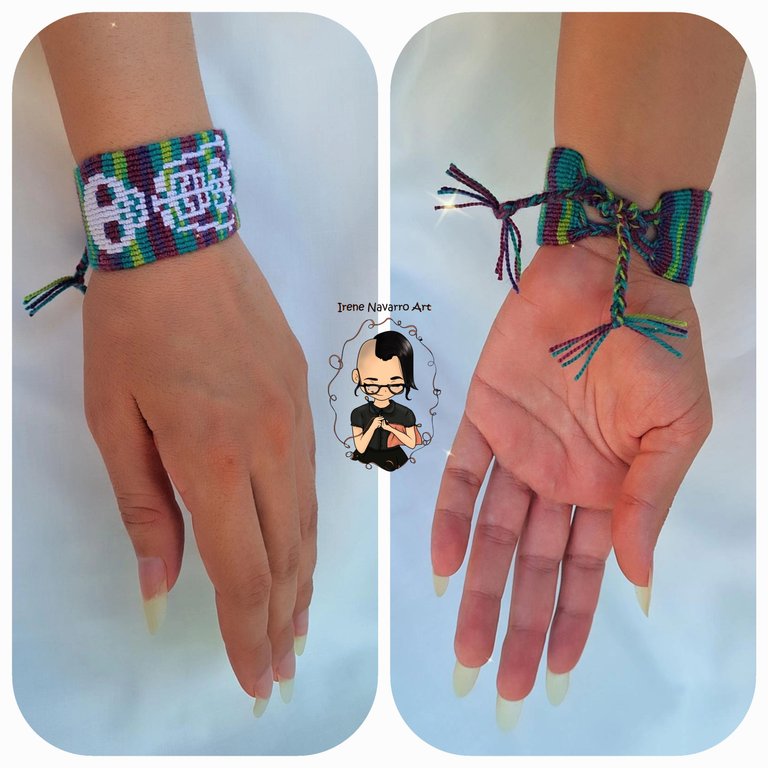
Hacer este brazalete me encantó tanta así era mi emoción que rompí mi récord, generalmente nunca termino un brazalete en un solo día, pero este sí, supongo que es porque solo son dos colores de hilo pero también creo que lo hermoso del diseño me mantuvo trabajando más tiempo de lo que debía, pues terminé en la noche y eso no es bueno para mis ojos 😆 espero a ustedes les guste tanto como a mi.

I loved making this bracelet so much so it was my excitement that I broke my record, usually I never finish a bracelet in a single day, but this one did, I guess it's because there are only two colors of thread but I also think that the beauty of the design kept me working longer than I should have, because I finished at night and that is not good for my eyes 😆 I hope you like it as much as I do.
InShot_20230913_135235857.jpg

20230913_125351.jpg

InShot_20230913_135314479.jpg


Imágenes tomadas con dispositivo Samsung A54. Portada editada en Inshot
Pictures taken with Samsung A54 device. Cover edited in Inshot


Invítenme un Café/Support Me on Ko-Fi


https://ko-fi.com/irenenavarroart


Si deseas apoyar mi contenido también puedes hacer donaciones por el valor de un café en Ko-Fi

If you want to support my art you can also make donations for the value of a coffee (Ko-Fi)


Espero les haya gustado. Les invito a leer mis próximas publicaciones y siempre estaré dispuesta a responder sus preguntas y comentarios, también pueden seguirme y contactarme en cualquiera de mis redes sociales. ¡Muchas gracias!

I hope you liked it. I invite you to read my next publications and I will always be willing to answer your questions and comments, you can also follow me and contact me on any of my social networks. Thank you!

Facebook
Twitter
Instagram
Discord: irenenavarroart#0361

Sort:  

https://leofinance.io/threads/irenenavarroart/re-leothreads-38spt1ift
The rewards earned on this comment will go directly to the people ( irenenavarroart ) sharing the post on LeoThreads,LikeTu,dBuzz.

Wow, quedó genial. Creo que el hilo matizado le da un constraste interesante. Con negro, quizá se vería un poco más plana la combinación. También debo decir que hacer ese tipo de manualidades con las uñas largas es todo un nivel.

Saludos 😄

Muchas gracias 🤗 es verdad el hilo matizado en este caso en muy útil porque le da más visibilidad a los nudos, en general lo tejidos con hilo negro no se ven jeje y por eso muchas tejedoras le huyen a trabajar con negro, pero bueno a mi me encanta sobre todo porque así queda bien con toda mi ropa 😄

Saludos

No sabía eso. Lo que se aprende por HIVE.

Hermoso trabajo amiga @irenenavarroart, la verdad soy fans de estas pulseras que haces ojala algun día aprenda a hacerlas. Bueno en general soy fans de todo lo que haces jjajaja. Un abrazo ✨

!DIY

Muchas gracias bella y yo soy tu fan, ya me quiero comprar una guillotina para cortar papel y hacer cositas tan lindas como tu. Un abrazo 🤗💕

Te quedó muy bonito Iré, me encantaaa💗
Gracias por compartir!

Muchas gracias 🤗 😘

@dayadam just sent you a DIY token as a little appreciation for your post dear @irenenavarroart! Feel free to multiply it by sending someone else !DIY in a comment :) You can do that x times a day depending on your balance so:

Don't be shy - share some DIY!

You can query your personal balance by !DIYSTATS

Gracias por el apoyo 💚

I admire your ability @irenenavarroart. The bracelet you made was amazing, i love it!

Thank you very much 😊 💕

You're welcome :)

Lo vuelvo a repetir, me encanta ese hilo matizado y los patrones que deja al anudarse para formar la pulsera, el diseño está precioso ya falta poco para hallowen y se siente !

Siiii ya quiero hacer muchas cositas bonitas para la fecha 🥰

Me encantaaaaaa! Muy hermoso de verdad 😍☠️

Muchas gracias 🤗 😘

Que bonito te quedó el esqueleto, a mi nieta le encantó, te felicito y bendigo tus manos, Dios la bendiga

Muchas gracias, saludos para tu nieta 🤗

Que bello trabajo, me encanto 😍

Gracias 🖤

Como siempre, usted nos comparte un trabajo bastante atractivo. Le quedo bastante bonito.
Que tenga una excelente semana.

Muchas gracias. Igualmente 😊