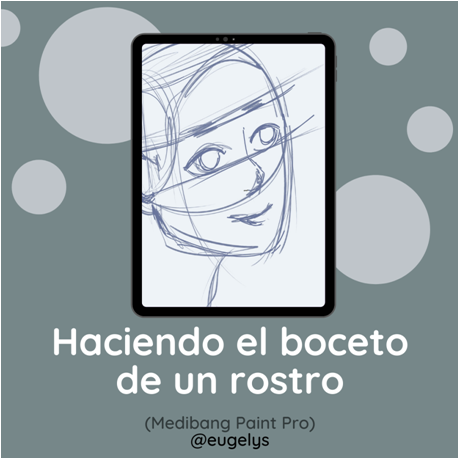
En este recorrido por diferentes comunidades voy generando ideas sobre contenido para compartir, en esta ocasion visito la comunidad HiveDiy para compartir la manera en la cual realicé el boceto de un rostro en Medibang Paint Pro. Este boceto lo hice con el uso de un lápiz digital y la tableta gráfica Huion H420.
He estado tomando cursos de dibujo digital en Crehana el primero de ellos llamado Ilustración para no ilustradores no cumplió con mis expectativas pues sentí que tenía un nivel muy avanzado para estar dirigido a "no liustradores" así que hice una pausa y tomé otro llamado Dibujo Anatómico para Ilustración Digital (Amorelli) que sí me ha complacido y por eso me motivé a hacer una práctica con el dibujo digital, el dibujo lo hice a mano alzada en la tableta gráfica pero para esta explicación haré uso de formas geométricas y líneas en las imágenes que estaré compartiendo pues considero que se podrá entender de una mejor manera, eta es una práctica basada en el Método de dibujo Loomis.
Aún me falta mucho por aprender pero tenía muchas ganas de compartir con ustedes el avance y hacer esta especie de tutorial de una newbie para newbies. ¡Espero que les sea de utilidad!
In this journey through different communities I am generating ideas about content to share, this time I visit the HiveDiy community to share the way in which I made the sketch of a face in Medibang Paint Pro. This sketch was made with the use of a digital pencil and the Huion H420 graphic tablet.
I have been taking digital drawing courses in Crehana the first one called Illustration for non-illustrators did not meet my expectations because I felt it had a very advanced level to be aimed at "non-illustrators" so I paused and took another one called Anatomical Drawing for Digital Illustration (Amorelli) which has pleased me and that's why I was motivated to make practice with digital drawing, I did the drawing freehand on the graphic tablet but for this explanation, I will make use of geometric shapes and lines in the images that I will be sharing because I believe that it can be understood in a better way, eta is a practice based on the Loomis Drawing Method.
I still have a lot to learn but I really wanted to share with you the progress and make this kind of tutorial of a newbie for newbies, I hope you find it useful!
¿Cómo lo hice? How did I do?
Para hacer este boceto en Medibang Paint Pro abrí un nuevo documento con medidas de 21 x 29.7 allí comencé a dibujar a mano alzada usando el pincel de lápiz en tamaño 22, se me hizo más fácil hacer el boceto en una escala de menor tamaño que el tamaño de la página y luego elegir las capas y aplicar la transformación con las teclas Control + T, modificar el tamaño del boceto y luego para salir de esta opción basta pulsar las teclas Control + D.
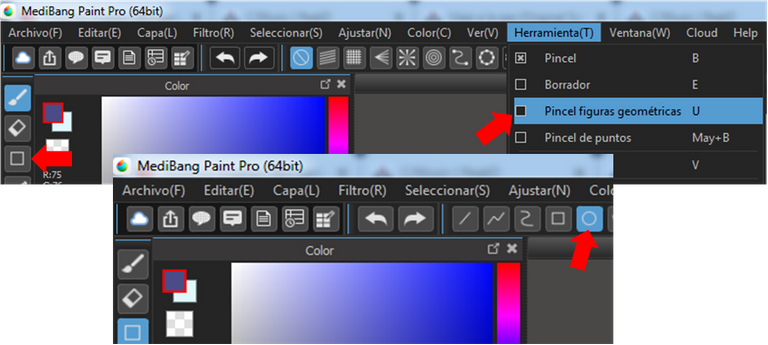
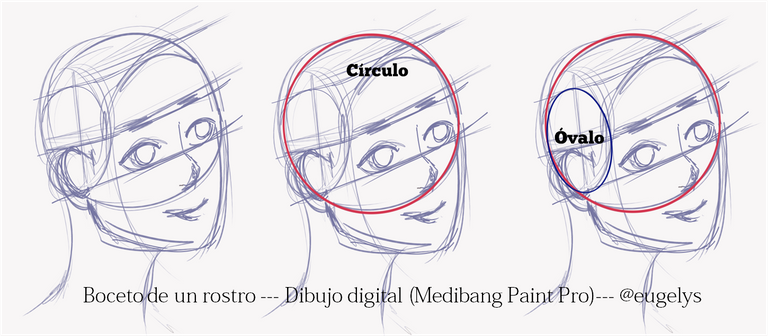
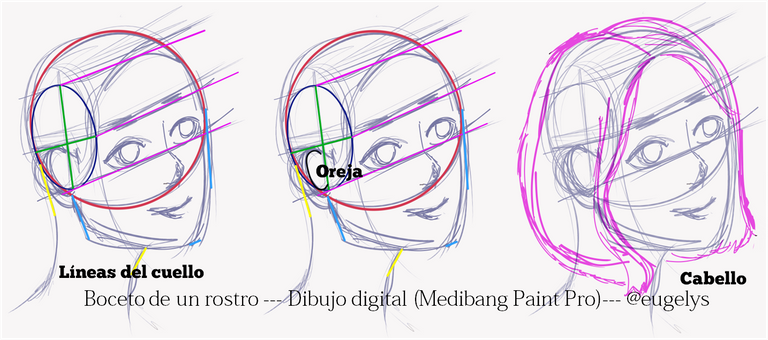
Si bien hice este boceto a mano alzada también podemos ayudarnos a realizarlo con el uso de formas geométricas. Te explicaré el orden en que lo dibujé: Empecé trazando un círculo quiero destacar que al final del círculo va ubicado el final de la nariz, en Medibang Paint Pro puedes ubicar el círculo en Herramienta Pincel figuras geométricas.
To make this sketch in Medibang Paint Pro I opened a new document with measures of 21 x 29.7 there I started to draw freehand using the pencil brush in size 22, it was easier to make the sketch on a scale smaller than the size of the page and then choose the layers and apply the transformation with the Control + T keys, modify the size of the sketch and then to exit this option just press the Control + D keys.
Although I made this sketch freehand we can also help us to make it with the use of geometric shapes. I will explain the order in which I drew it: I started by drawing a circle I want to emphasize that at the end of the circle is located the end of the nose, in Medibang Paint Pro you can locate the circle in Brush Tool geometric shapes.
- Luego de trazar el círculo, procedí a dibujar un óvalo que indicará la dirección del rostro.
After tracing the circle, I proceeded to draw an oval that will indicate the direction of the face.
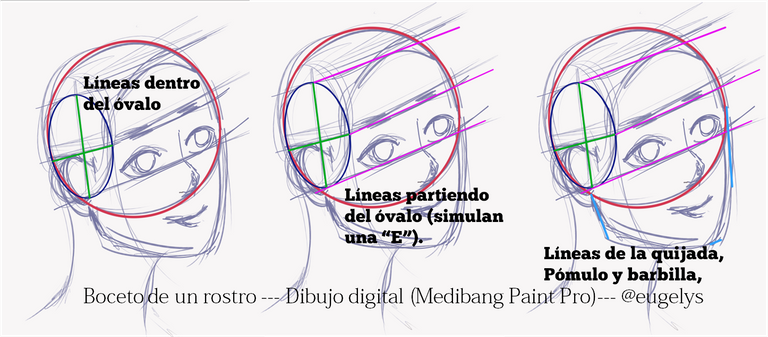
- Dentro de ese óvalo demarqué unas líneas que se cruzan entre sí, fíjate que simulan una cruz, la línea en el programa la encontramos en el mismo menú donde ubicamos el círculo.
Inside that oval I demarcated some lines that cross each other, notice that they simulate a cross, the line in the program can be found in the same menu where the circle is located.

- Una vez que tracé las líneas dentro del óvalo procedí a trazas tres líneas que si te fijas simulan una E, gracias a estas líneas ubicaremos las cejas y ojos. Posteriormente tracé la línea de la quijada, pómulos y barbilla. Recordemos que el boceto no tiene que ser perfecto sino más bien una guía para poder realizar nuestro lineart.
Once I drew the lines inside the oval I proceeded to draw three lines that if you notice simulate an E, thanks to these lines we will place the eyebrows and eyes. Then I drew the jawline, cheekbones, and chin. Remember that the sketch does not have to be perfect but rather a guide to be able to make our lineart.
- Luego procedí a hacer las líneas del cuello, coloqué la oreja que verás que va en el cuadrante inferior de la izquierda, posteriormente hice los trazos del boceto correspondientes al cabello. La boca estará ubicada en el espacio que queda entre el final de la línea inferior del círculo y la barbilla.
- Then I proceeded to make the lines of the neck, I placed the ear that you will see that goes in the lower left quadrant, then I made the strokes of the sketch corresponding to the hair. The mouth will be located in the space between the end of the bottom line of the circle and the chin.
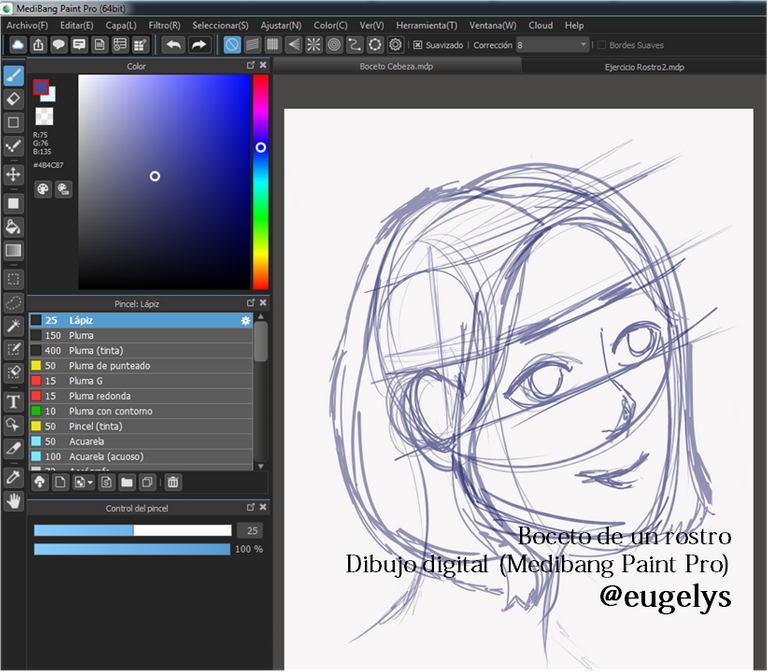
Me queda muchísimo por aprender y mucho más para practicar pero me siento feliz del avance que he tenido hasta el momento. Usar una tableta gráfica, así se trate de una bien sencilla como la que poseo, hace una gran diferencia al momento de dibujar de manera digital, mis experiencias anteriores habían sido usando el ratón y esto me hacía la labor cuesta arriba.
I still have a lot to learn and much more to practice but I am happy with the progress I have made so far, using a graphic tablet even if it is a simple one like the one I have makes a big difference when drawing digitally, my previous experiences had been using the mouse and this made the work difficult.
Espero que esta información sea de utilidad y quiero decirte que no te pongas límites, ubica las herramientas necesarias, apuesta por prepararte en un área que te motive y seguro vas a lograr grandes cosas.
I hope this information is useful and I want to tell you not to set yourself limits, find the necessary tools, bet on preparing yourself in an area that motivates you and you will surely achieve great things.

