🐾🐾🐾
Hola a todos... 🐱🐾💕
Hola a mis queridos Hiver y a la querida comunidad de artistas #HiveDiy, esperando que tengan un día lleno de muchísimas bendiciones y de grandes ideas. Como siempre me encuentro por acá, muy complacida y emocionada, para mostrarles mi trabajo, que esta hecho con mucho amor, y especialmente para ustedes. Pese a mi proceso de adaptación a esta maravillosa plataforma, a los problemas eléctricos, de conexión a internet, entre otros, que han acontecido hace unos días en mi país Venezuela, que hace el trabajo más lento, y que muchas veces este rodeado de un clima de ansiedad ya que uno desea dar más, aquí me encuentro para brindarles algo nuevo esperando que lo disfruten, y les sea de mucho provecho.
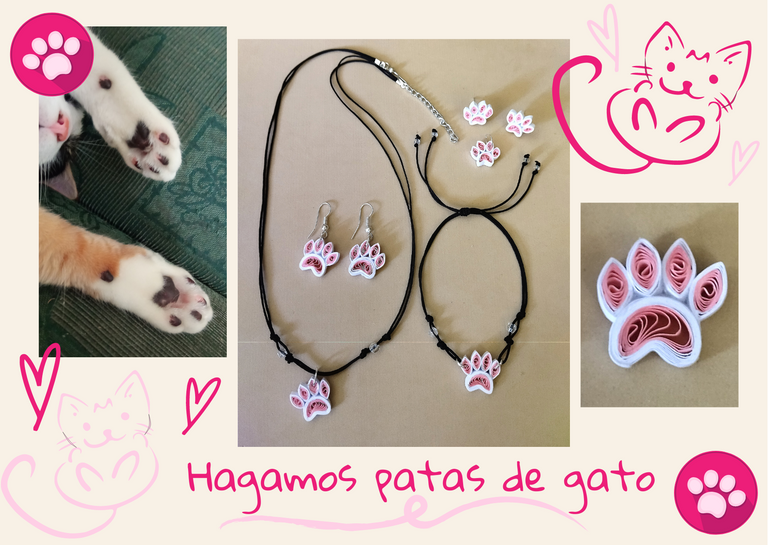
Es bien sabido por aquellas personas que me siguen, y han revisado mis post anteriores, mi amor por los peluditos gatunos, de echo saben que tengo en casa una bella peluda, que es "Mi Asistente Michi" 🐱🐾💕 jajajajajaja.😃 Es por ello que le traigo en esta oportunidad un conjunto de collar, pulsera y zarcillos, con un hermoso dije de unas patas de gato, (podríamos llamarlos las patitas de Mi Asistente Michi😂), elaborado en la técnica de quilling la cual me apasiona, y más en la parte de la bisutería. Esta es la primera parte en cuanto a gatitos se refiere, ya en mis próximos post les compartiré más figuritas de gatitos que podrán ser lucidos tantos por niños, y adultos con sus oufits del día…
Vamos esta vez con un proceso un poquito más complicado, vamos a trabajar a partir de un circulo abierto para formar otras figuras básicas de quilling, para poder formar nuestras patitas de gato.
Si quieres disipar alguna duda con respecto a la técnica o paso a paso, usado en este post, puedes visitar el siguiente link, por acá abajo te lo dejo:

Hello everyone... 🐱🐾💕
Hello to my dear Hiver and the dear community of artists #HiveDiy, I hope you have a day full of many blessings and great ideas. As always I am here, very pleased and excited to show you my work, which is made with love, and especially for you. Despite my process of adaptation to this wonderful platform, the electrical problems, internet connection, among others, that have happened a few days ago in my country Venezuela, which makes the work slower, and that often is surrounded by a climate of anxiety because one wants to give more, here I am to bring you something new hoping you enjoy it, and it will be of much benefit.
It is well known by those who follow me, and have reviewed my previous posts, my love for the furry cats, in fact you know that I have at home a beautiful furry, which is "My Assistant Michi" 🐱🐾💕 hahahahahahaha . 😃 That's why I bring you this time a set of necklace, bracelet and earrings, with a beautiful pendant of cat paws, (we could call them the paws of My Assistant Michi😂), made in the quilling technique which I love, and more in the part of the jewelry. This is the first part as far as kittens are concerned, and in my next posts I will share more kitten figurines that can be worn by both children and adults with their oufits of the day ....
Let's go this time with a little more complicated process, we are going to work from an open circle to form other basic quilling figures, in order to form our cat paws.
If you want to dispel any doubts regarding the technique or step by step, used in this post, you can visit the following link, below:
🐾🐾🐾
Comencemos:😃
Materiales:📏✏️✂️
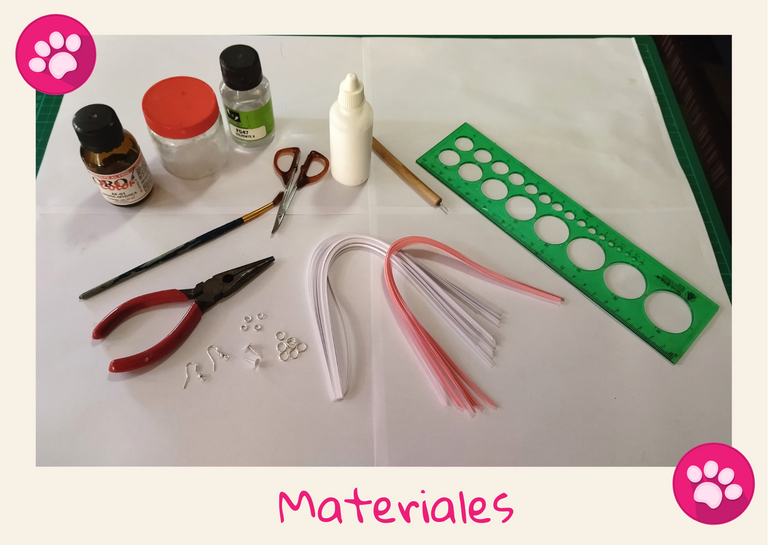
• Cintas de quilling de 3mm de ancho, rosadas y blancas 8 o del color de tu preferencia).
• Aguja para quilling.
• Pega blanca.
• Tijera.
• Regla con diversas medidas de circunferencia.
• Alicate punta fina.
• Base para zarcillos fija, y colgantes (anzuelos).
• Argollas medianas de bisutería.
• Solvente X.
• Resina Artística.
• Frasco de vidrio.
• Pincel.

Let's get started: 😃
Materials:📏✏️✂️
- 3mm wide quilling ribbons, pink and white 8 or the color of your choice.)
- Quilling needle.
- White glue.
- Scissors.
- Ruler with different circumference measures.
- Fine-nosed pliers.
- Base for fixed tendrils, and pendants (hooks).
- Medium size costume jewelry rings.
- Solvent X.
- Artistic resin.
- Glass flask.
- Brush.
🐾🐾🐾
Paso a paso:💖
- Para las garritas de las patitas:
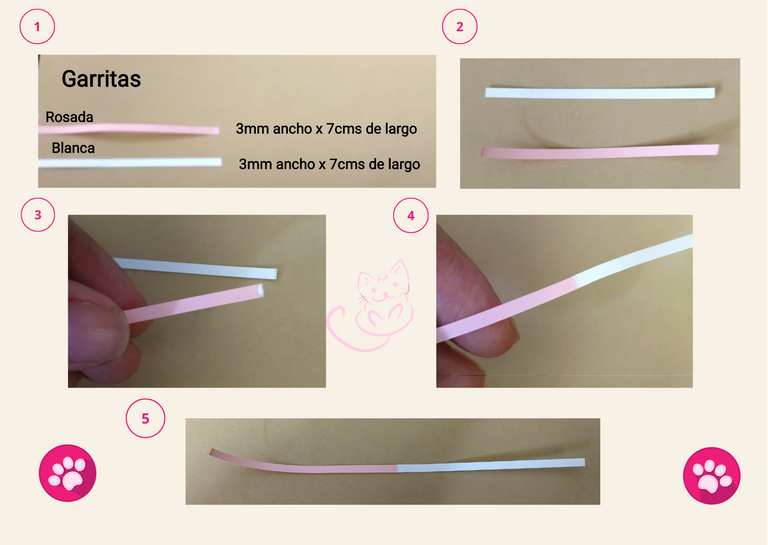
• Vamos a necesitar cintas de quilling de 3mm de ancho de color blanco y rosado, como indica en la foto, para las garritas que en total son 4 para cada pieza, comenzamos midiendo, 7cms de largo de color blanco, y 7cms de largo de color rosado, una vez medidas procedemos a crear una sola cinta uniendo ambas con un punto de pega.

Step by step:💖
- For the little claws of the paws:
- We are going to need 3mm wide quilling ribbons of white and pink color, as indicated in the photo, for the little claws that in total are 4 for each piece, we start by measuring, 7cms long in white color, and 7cms long in pink color, once measured we proceed to create a single ribbon joining both with a glue stitch.
🐾🐾🐾
🐾🐾🐾
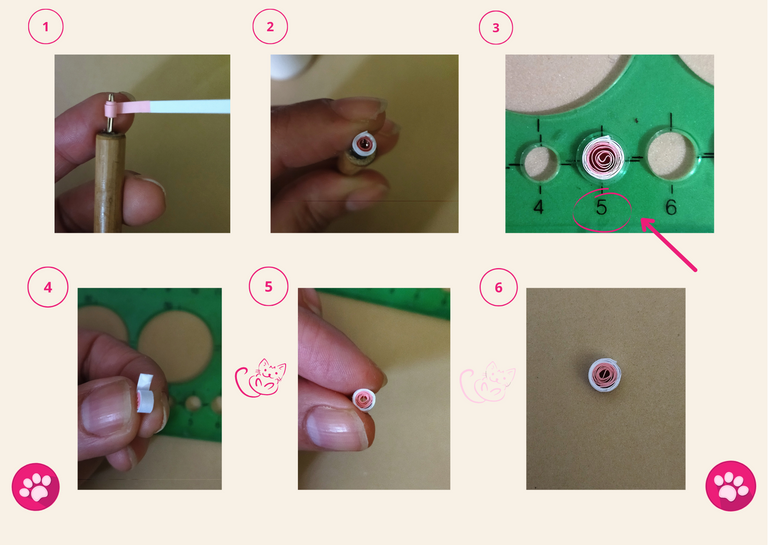
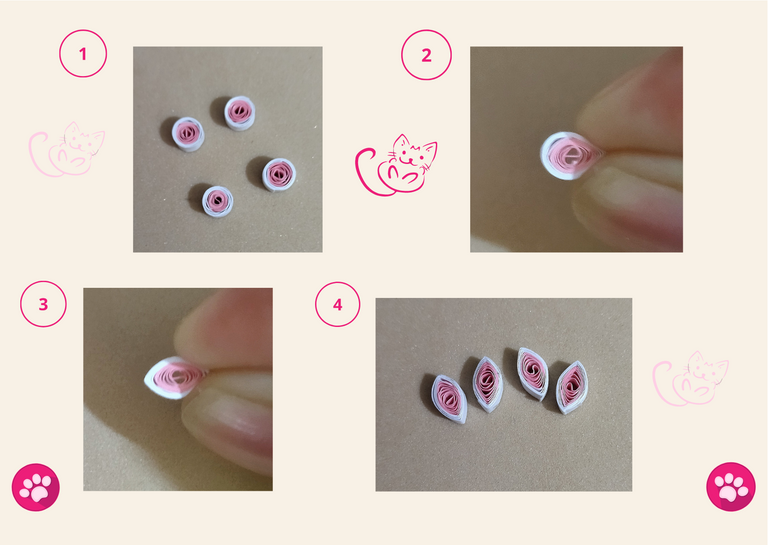
• Una vez unidas nuestras cintas tomamos nuestra aguja de quiiling vamos a comenzar por el extremo rosado y enrollamos, tomamos la regla de circunferencias y colocamos en el número 5, de esta manera vamos a obtener un círculo abierto, sacamos de la regla con sumo cuidado y procedemos a sellar nuestro circulo con pega. Ya tenemos uno de los círculos que vamos a usar para realizar nuestras garritas, como les dije antes son 4 por piezas, es decir que en mi caso ya que voy a realizar un par de zarcillos, un dije para collar, y un dije para pulsera, serían en total 16 círculos abiertos como este que debemos realizar.
Les voy a mostrar el procedimiento de una sola pieza ya que todas son iguales, al tenerlas todas elaboradas les mostraré lo que debe llevar cada una para ser montada en su base de zarcillos, collar, y pulsera.

Once our ribbons are joined we take our quiiling needle, we are going to start with the pink end and roll it up, we take the circumference ruler and place it on number 5, in this way we are going to obtain an open circle, we take it out of the ruler very carefully and proceed to seal our circle with glue. We already have one of the circles that we are going to use to make our little claws, as I said before there are 4 pieces per piece, that is to say that in my case since I am going to make a pair of earrings, a pendant for necklace, and a pendant for bracelet, there would be a total of 16 open circles like this one that we have to make.
I am going to show you the procedure of a single piece since they are all the same, when I have them all elaborated I will show you what each one must have to be mounted on its base of earrings, necklace, and bracelet.
🐾🐾🐾
🐾🐾🐾
• Para realizar una pieza, debemos tener elaboradas como dije anteriormente 4 círculos que serán las garritas de la patita de gato, al tenerlas todas listas le daremos forma, con la ayuda de nuestros dedos índice y pulgar presionaremos ambos extremos para formar un pequeño rombo, repetimos con los tres círculos restantes. De esta manera tenemos nuestras 4 garritas listas.

- To make a piece, as I said before, we must have made 4 circles that will be the claws of the cat's paw, when we have them all ready we will shape them, with the help of our index finger and thumb we will press both ends to form a small rhombus, we repeat with the remaining three circles. In this way we have our 4 claws ready.
🐾🐾🐾
🐾🐾🐾
- Para la almohadilla de las patitas:
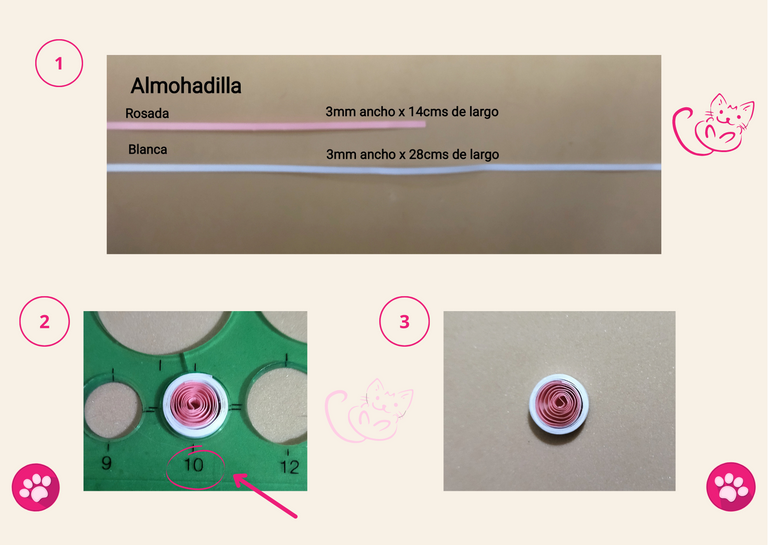
• Para este paso también vamos a necesitar cinta blanca y rosada de 3mm de ancho, la diferencia serán las medidas de largo. De la blanca tomaremos 28cms de largo, y de la rosada 14cms de largo, repetiremos los mismos pasos anteriores para formar un círculo abierto, la diferencia que lo haremos en el círculo número 10 de la regla de circunferencia, de esta manera tendremos nuestro circulo abierto listo.

- For the pad of the paws:
- For this step we will also need 3mm wide white and pink ribbon, the difference will be the length measurements. From the white one we will take 28cms long, and from the pink one 14cms long, we will repeat the same steps above to form an open circle, the difference is that we will do it in the circle number 10 of the circumference ruler, this way we will have our open circle ready.
🐾🐾🐾
🐾🐾🐾
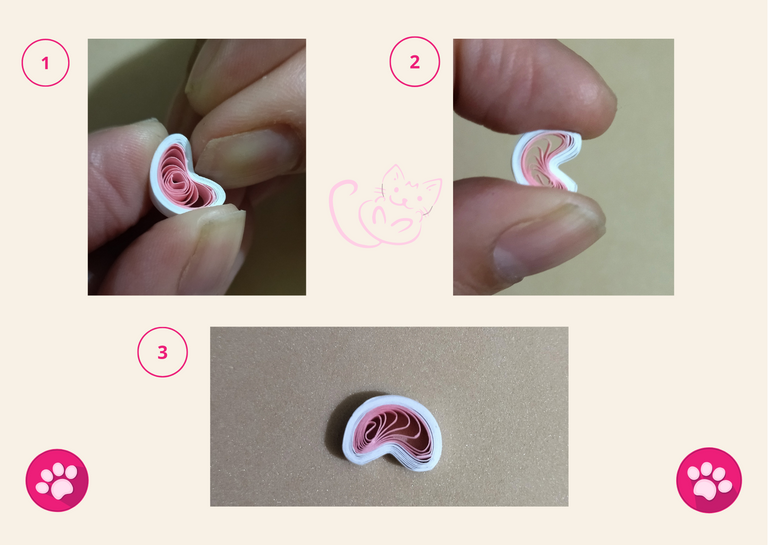
• Ahora procederemos a darle forma de almohadita, con la ayuda de nuestro dedo índice y pulgar de la mano izquierda, sostenemos el círculo, y con el pulgar de la mano derecha presionamos en el centro, moldeando de manera redondeada, soltamos la pieza y tenemos nuestra almohadilla lista. Esto lo repetiremos con los 3 restantes que nos faltan.

- Now we will proceed to give it the shape of a pillow, with the help of our index finger and thumb of the left hand, we hold the circle, and with the thumb of the right hand we press in the center, molding in a rounded way, we release the piece and we have our pillow ready. We will repeat this with the remaining 3 that we are missing.
🐾🐾🐾
🐾🐾🐾
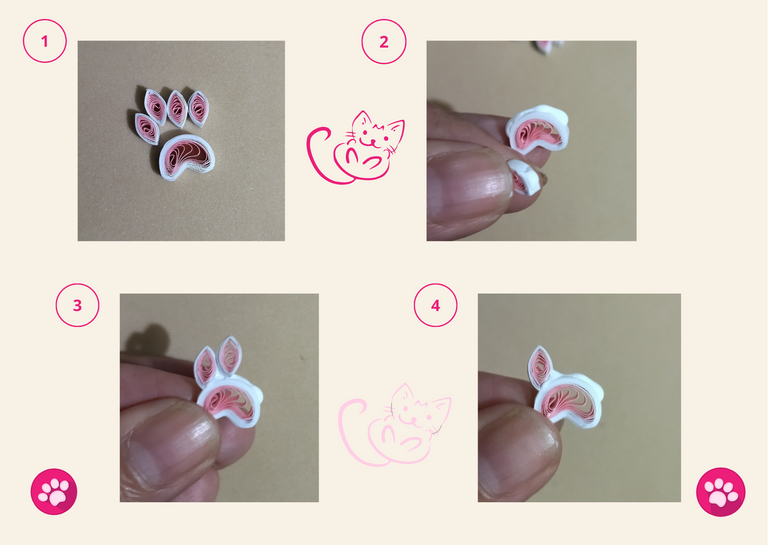
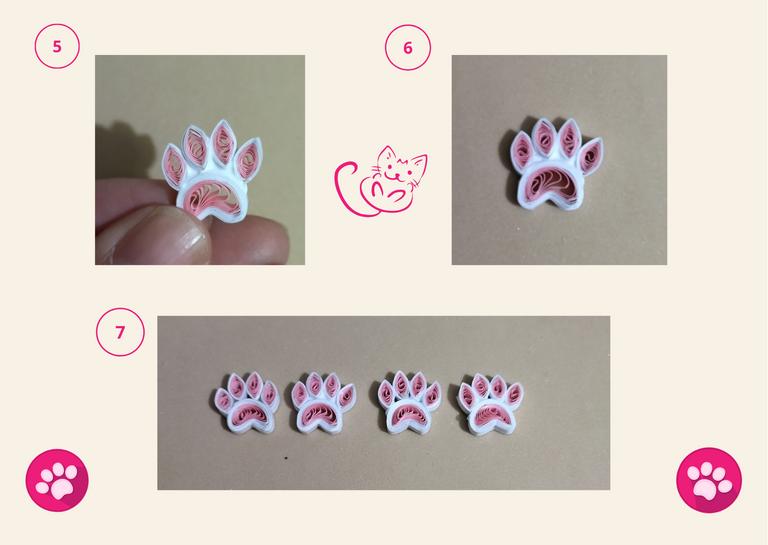
• Llegado a este punto unimos las garritas a la almohadilla para formar finalmente nuestra patita de gato, tomaremos cada garrita le colocamos pega blanca, y vamos uniendo en armonía a la almohadilla, así como ven en las imágenes, de esta manera tendremos nuestra pieza armada. Ya tenemos nuestras 4 patitas listas. 🐾

- At this point we join the claws to the pad to finally form our cat's paw, we will take each claw we put white glue, and we will join in harmony with the pad, as you can see in the images, in this way we will have our piece assembled. Now we have our 4 little paws ready. 🐾
🐾🐾🐾
🐾🐾🐾
🐾🐾🐾
• Vamos a colocar las argollas a nuestros dijes, para los zarcillos y collar, tomaremos 3 de las patitas y colocaremos la argolla de bisutería mediana con la ayuda de nuestro alicate punta fina en una de sus garritas, yo lo hare en la segunda garrita.
• Para el dije del collar cerraremos una de las argollas, (reservamos el dije).

- For the earrings and necklace, we will take 3 of the legs and we will place the medium size jewelry ring with the help of our fine tip pliers in one of its claws, I will do it in the second claw.
- For the pendant of the necklace we will close one of the rings, (we reserve the pendant).
🐾🐾🐾
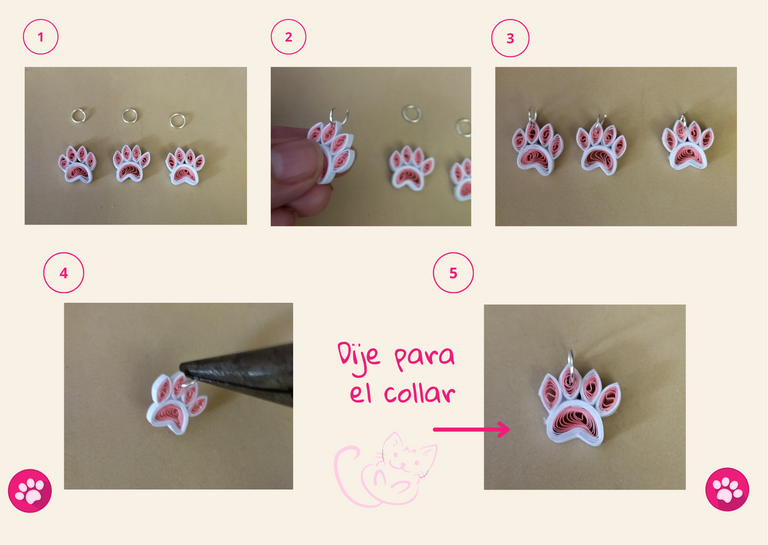
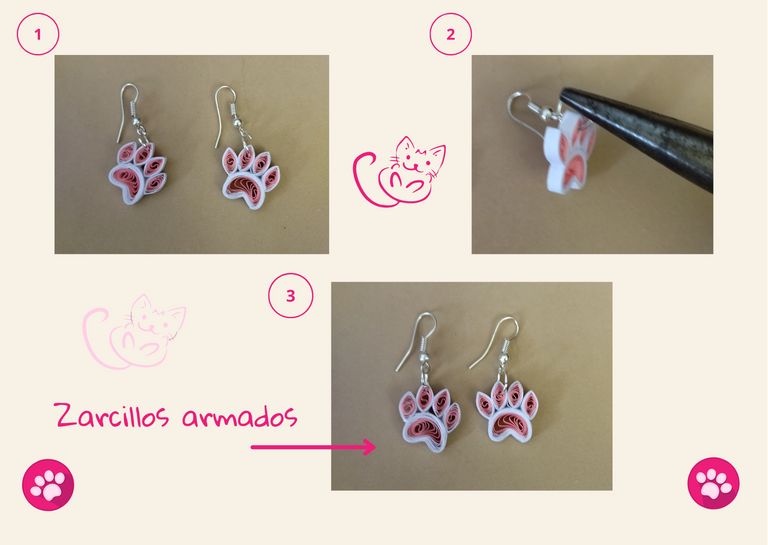
🐾🐾🐾
• Para los zarcillos antes de cerrar las argollas le colocaremos su base de zarcillo colgante (anzuelo), procedemos a cerrar las argollas con la ayuda de nuestro alicate punta fina, (reservamos).

- For the tendrils, before closing the rings, we will place its base of hanging tendril (hook), we proceed to close the rings with the help of our fine tip pliers (reserve).
🐾🐾🐾
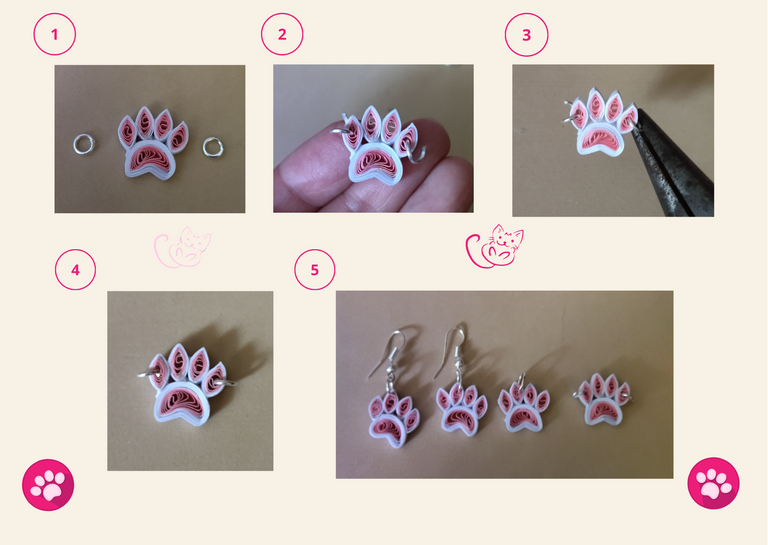
🐾🐾🐾
• Ahora vamos a colocar las argollas restantes al dije que nos queda para la pulsera, para este tomaremos dos argollas pequeñas de bisutería y las colocaremos a los lados del dije, cerramos las mismas. Ya tenemos todos nuestros dijes de patitas con sus respectivas argollas.

- Now we are going to place the remaining rings to the charm that we have left for the bracelet, for this we will take two small costume jewelry rings and we will place them on the sides of the charm, we close them. Now we have all our paw charms with their respective rings.
🐾🐾🐾
🐾🐾🐾
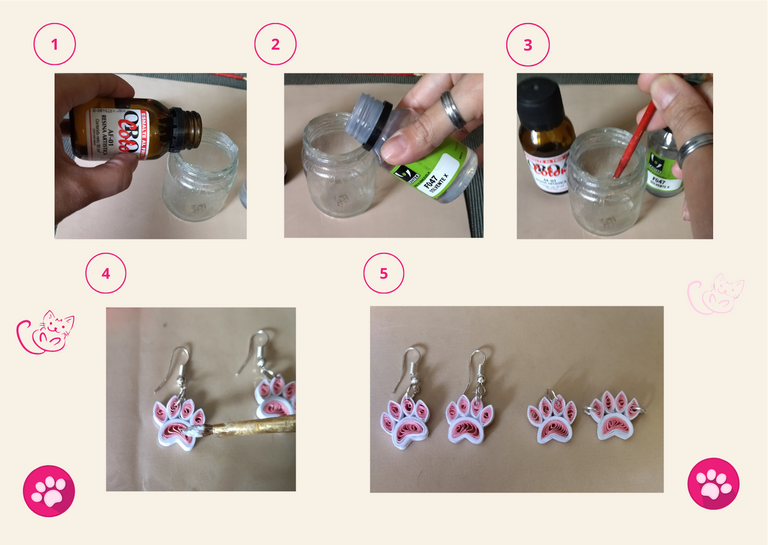
• Ya que tenemos nuestros dijes listos, vamos a colocarle su protección liquida, tomaremos el frasco de vidrio, colocaremos una parte de resina artística y otra parte de solvente x, mezclamos con la ayuda de un pincel y procedemos a aplicar a nuestras piezas por todos sus lados, dejamos secar de un día para otro.
• Ya tenemos nuestras piezas listas y secas, los zarcillos instalados en sus bases, y las dos piezas restantes para ser montadas en el collar, y pulsera de nuestra preferencia.

- Now that we have our charms ready, we are going to place its liquid protection, we will take the glass bottle, we will place a part of artistic resin and another part of solvent x, we mix with the help of a brush and proceed to apply to our pieces on all sides, let dry overnight.
- Now we have our pieces ready and dry, the tendrils installed on their bases, and the two remaining pieces to be mounted on the necklace and bracelet of our preference.
🐾🐾🐾
🐾🐾🐾
Resultado Final:💕
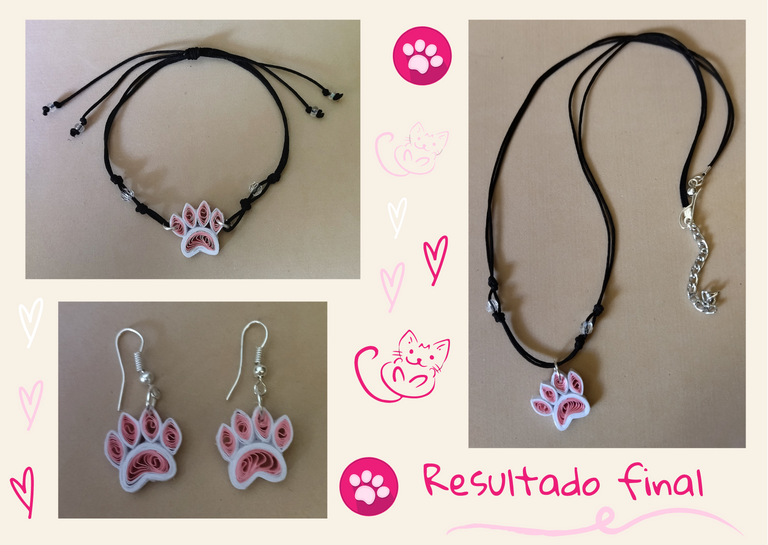
• Decidí hacer un collar, y una pulsera muy sencilla de hilo chino negro fino, con nudos simples de elaborar, la pulsera tiene un nudo corredizo para mayor adaptabilidad. A ambas les añadí unos brillitos transparentes para darle mayor delicadeza y vistosidad, pero recuerden que pueden colocar sus piezas en el collar y pulsera que sea de su preferencia, pueden hacer el que más les guste, o pueden usar los que tengan ya elaborados en casa, simplemente colocar las piezas. Deja volar tu imaginación.

Final Result:💕
- I decided to make a necklace and a very simple bracelet of fine black Chinese thread, with simple knots to make, the bracelet has a sliding knot for greater adaptability. To both I added some transparent glitter to give it more delicacy and attractiveness, but remember that you can place your pieces in the necklace and bracelet of your choice, you can make the one you like the most, or you can use the ones you have already made at home, just place the pieces. Let your imagination fly.
🐾🐾🐾
🐾🐾🐾
- Extra: ✨
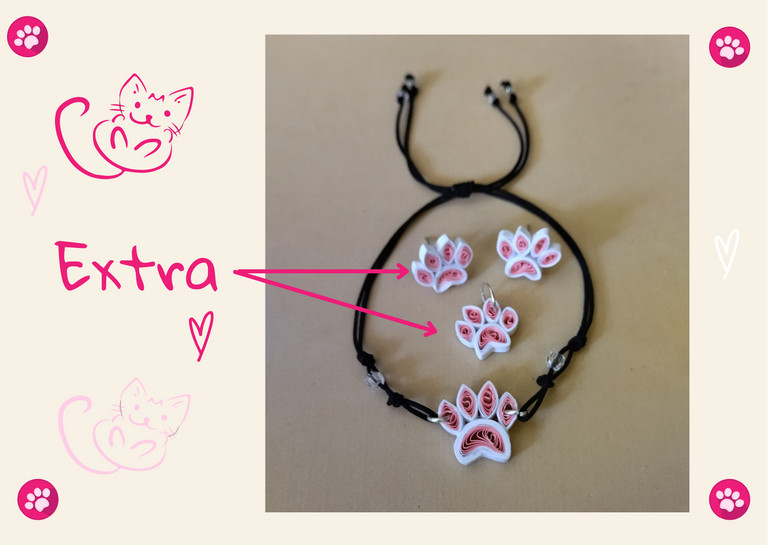
• Como extra podrán observar que en medio del proceso mi hija quiso que le elaborara unos zarcillos fijos, y un dije para collar aún más pequeños de los que ya había hecho, simplemente deben ajustar las medidas de las cintas si desean elaborar sus piezas más grandes o más pequeñas, y pueden hacer las combinaciones con las cintas de los colores que deseen.

Extra✨:
- As an extra you may notice that in the middle of the process my daughter wanted me to make her some fixed tendrils, and a necklace charm even smaller than the ones she had already made, simply adjust the ribbon sizes if you want to make your pieces larger or smaller, and you can make the combinations with the ribbons in the colors you want.
🐾🐾🐾
🐾🐾🐾
Colaboración de mi “Asistente Michí”:🐱🐾😍💕
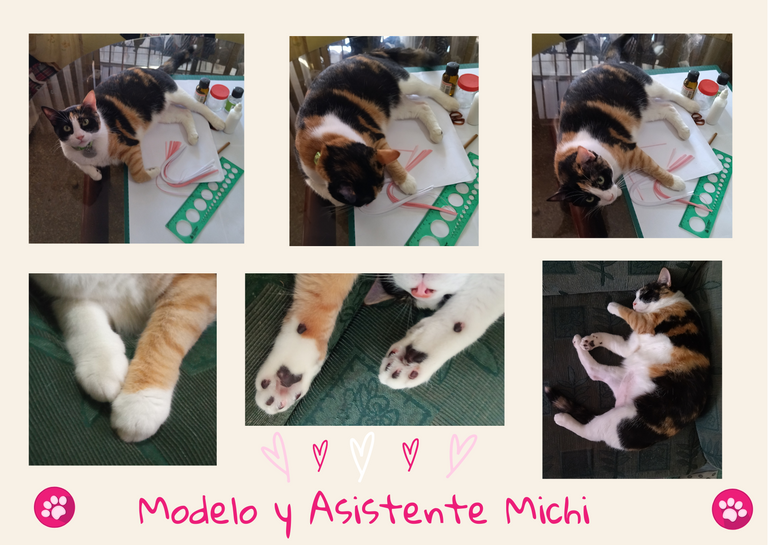
No podía dejar de mostrarles el trabajo arduo que realizo hoy, mi amada “Asistente Michí” como modelo en la elaboración de sus patitas, la cual después de tanto posar, y ayudar en esta faena, se retiró a descansar…

Collaboration of my "Assistant Michí":🐱🐾😍💕
I could not fail to show you the hard work I do today, my beloved "Assistant Michí" as a model in the elaboration of her paws, which after so much posing, and helping in this task, she retired to rest....
🐾🐾🐾
🐾🐾🐾
¿Que les pareció, les gustó?
Espero que sí, que les haya gustado mi explicación, procedimiento y fotos, los hice con mucho cariño por y para ustedes.
"Deja salir esa musa que te inspira, y deja volar tu imaginación".
Gracias a todos, nos vemos en la próxima. 🐾🐱💕

What did you think, did you like it?
I hope you did, I hope you liked my explanation, procedure and photos, I made them with love for you.
"Let out that muse that inspires you, and let your imagination fly".
Thank you all, see you next time. 🐾🐱💕
🐾🐾🐾

All photos used in this post are of my authorship and have been taken on my personal cell phone a Redmi 9T and edited in Canva Dividers and banner made by me in Paint Tool Sai Translated with the help of DeepL


