🐾🐾🐾
Hola a todos... 🐱🐾💕
Hola a mis queridos Hiver, y en especial a esta nueva "Comunidad de #jewelry", gracias por la invitación de unirme a su comunidad, y a participar en su primer concurso de zarcillos o pendientes estilo libre, me uno a esta iniciativa, esperando aportar un granito de arena para el próximo crecimiento de tan interesante comunidad. Éxitos…
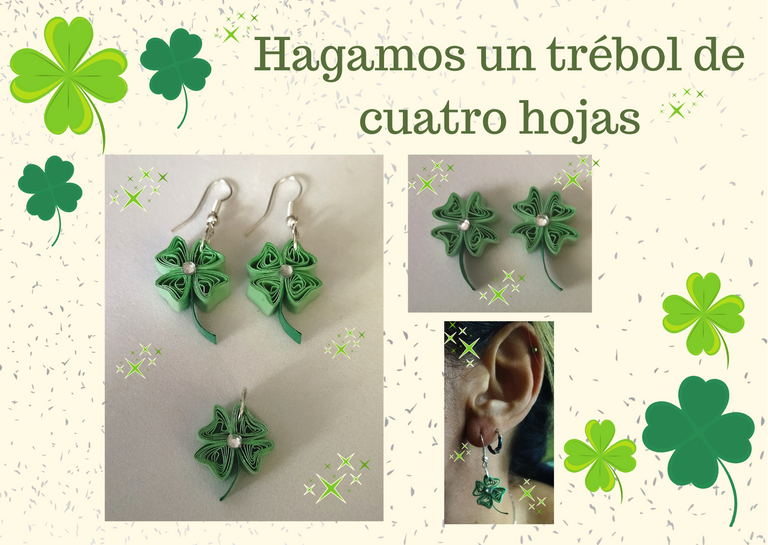
Es bien sabido que muchas personas consideran de gran fortuna conseguir un trébol de cuatro hojas, esto tiene un significado de abundancia y dinero, si es así porque no hacerlo nosotros mismos sin tener que conseguirlo, y llevarlo con nosotros día a día.
Por esta razón hoy les traigo unos bonitos zarcillos con un trébol de cuatro hojas, con la técnica de quilling art, en un tutorial paso a paso. Espero lo disfruten, les sea de gran utilidad, y se entusiasmen en llevarlos a cabo.
Si quieres disipar alguna duda con respecto a la técnica o paso a paso, usado en este post, puedes visitar el siguiente link, por acá abajo te lo dejo:

Hello everyone... 🐱🐾💕
Hello to my dear Hiver, and especially to this new "Jewerlry Community ", thank you for the invitation to join your community, and to participate in your first contest of free style earrings, I join this initiative, hoping to contribute a grain of sand for the next growth of such an interesting community. Good luck...
It is well known that many people consider of great fortune to get a four-leaf clover, this has a meaning of abundance and money, if so why not do it ourselves without having to get it, and carry it with us day by day.
For this reason today I bring you some beautiful tendrils with a four-leaf clover, with the technique of quilling art, in a step by step tutorial. I hope you enjoy it, I hope you find it useful, and I hope you are enthusiastic about making them.
If you want to dispel any doubts regarding the technique or step by step, used in this post, you can visit the following link, here below I leave it for you: [Basic quilling figures].
🐾🐾🐾
Comencemos:😃
Materiales:📏✏️✂️
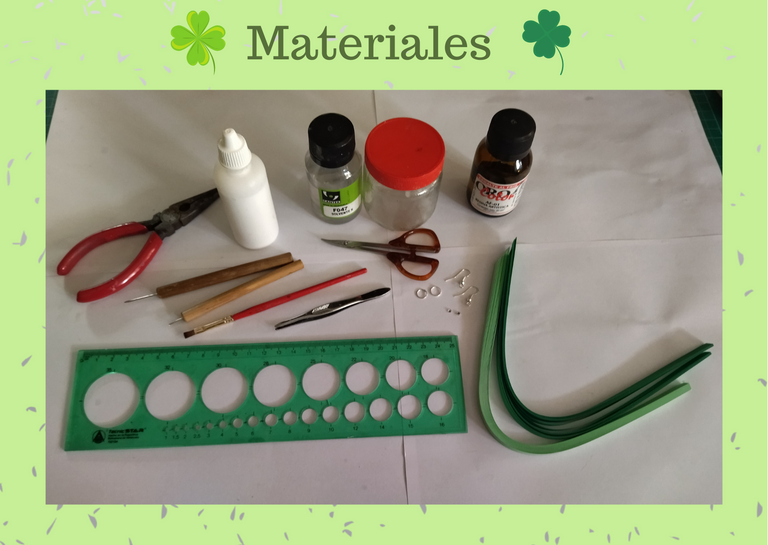
• Cintas de quilling de 6mm de ancho, verde claro y verde oscuro.
• Aguja para quilling.
• Aguja para quilling punta larga.
• Pega blanca.
• Tijera.
• Regla con diversas medidas de circunferencia.
• Alicate punta fina.
• Base para zarcillos colgante (anzuelos).
• Argollas medianas de bisutería.
• Cristales para bisutería.
• Pinza punta fina.
• Solvente X.
• Resina Artística.
• Frasco de vidrio.
• Pincel.

Let's get started: 😃
Materials:📏✏️✂️
- Quilling ribbons 6mm wide, light green and dark green.
- Quilling needle.
- Long quilling needle.
- White glue.
- Scissors.
- Ruler with different circumference measures.
- Fine nose pliers.
- Base for hanging tendrils (hooks).
- Medium size costume jewelry earrings.
- Crystals for costume jewelry.
- Fine tip tweezers.
- Solvent X.
- Artistic resin.
- Glass flask.
- Brush.
🐾🐾🐾
🐾🐾🐾
Paso a paso:💖
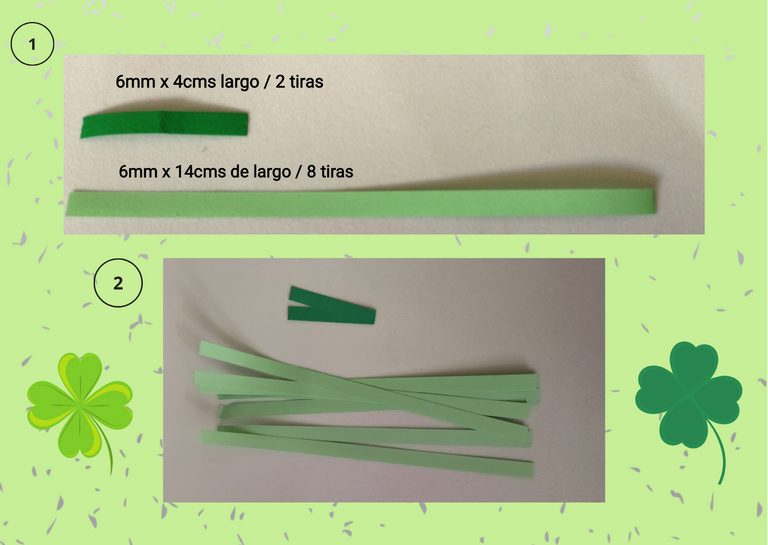
• Primordialmente vamos a necesitar 8 tiras de quilling verde claro de 6mm x 14cms de largo, y 2 tiras de quilling verde oscuro de 6mm x 4cms de largo como se muestra en la foto.

Step by step:💖
- Primarily we will need 8 strips of light green quilling 6mm x 14cms long, and 2 strips of dark green quilling 6mm x 4cms long as shown in the photo.
🐾🐾🐾
🐾🐾🐾
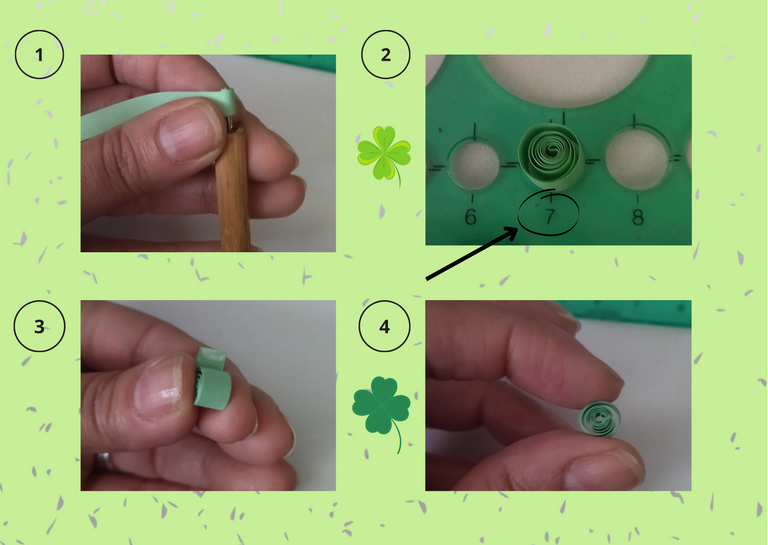
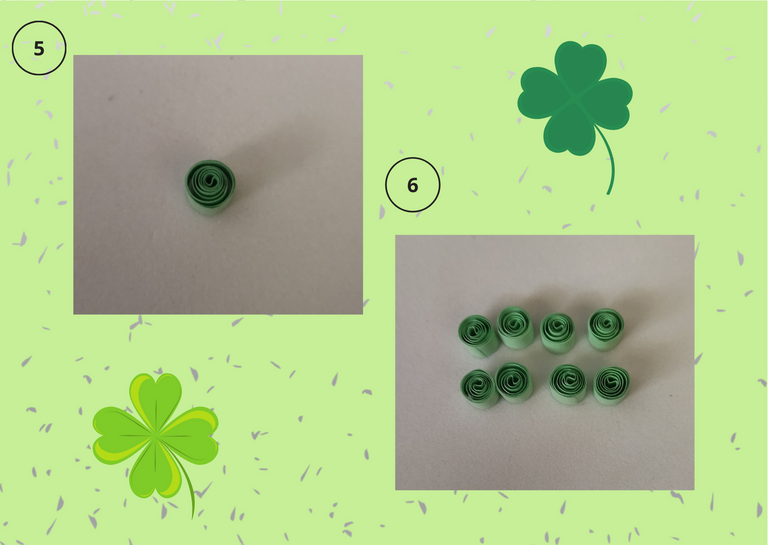
• Para comenzar con la pieza tomaremos una de las cintas verde claro y con la aguja para quilling enrollaremos hasta llegar al final de la misma, sacaremos con mucho cuidado y meteremos en el círculo número 7 de nuestra regla de circunferencia, para formar un circulo abierto, sacamos de la regla y con un punto de pega blanca sellaremos nuestra cinta, esperemos que seque. Vamos a repetir el mismo proceso hasta tener 8 círculos abiertos elaborados.

- To start with the piece we will take one of the light green ribbons and with the quilling needle we will roll it until we reach the end of it, we will take it out very carefully and we will put it in the circle number 7 of our circumference ruler, to form an open circle, we will take it out of the ruler and with a white glue dot we will seal our ribbon, wait for it to dry. We will repeat the same process until we have 8 open circles made.
🐾🐾🐾
🐾🐾🐾
🐾🐾🐾
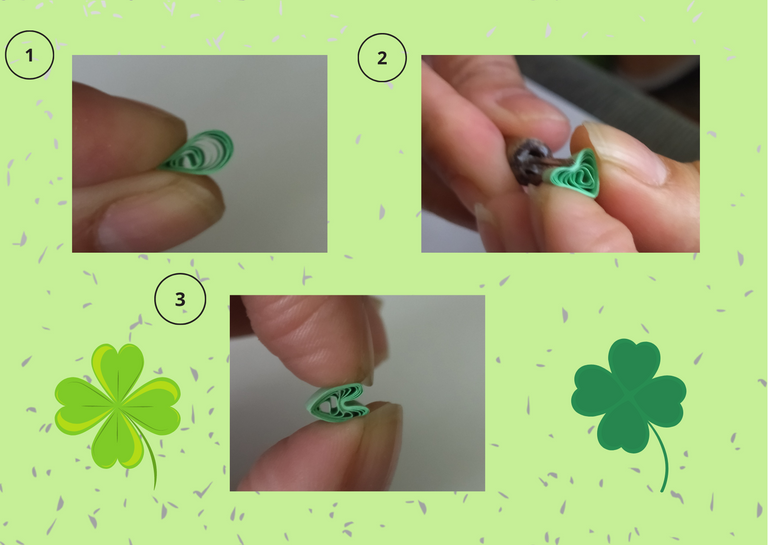
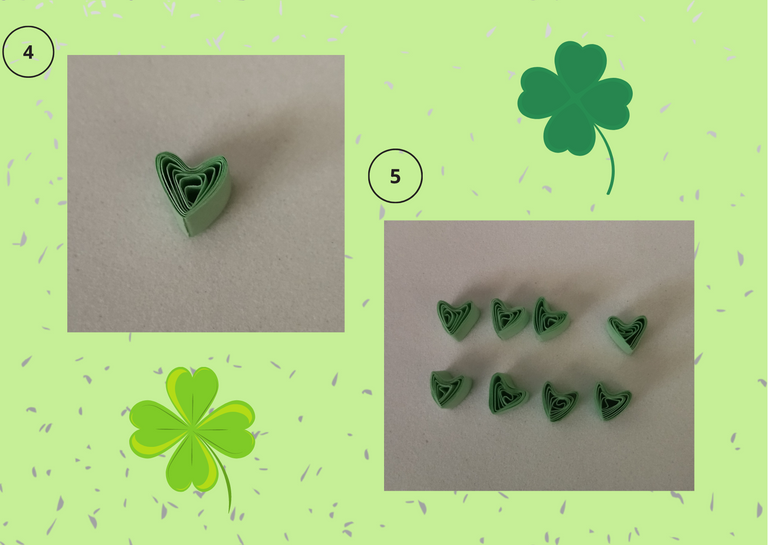
• Ya tenemos nuestros 8 círculos abiertos elaborados, ahora procedemos a darle forma de corazón, con la ayuda de nuestro dedo índice y pulgar, pellizcamos una de las puntas del círculo, y luego con una de las agujas de quiiling o algún objeto alargado que tengan en casa como una aguja gruesa, empujamos el otro extremo en el medio retiramos la aguja y damos forma con los dedos. De esta manera vamos a repetir el mismo procedimiento con los 7 círculos restantes, tendremos nuestros 8 corazones realizados.

- We already have our 8 open circles made, now we proceed to give it a heart shape, with the help of our index finger and thumb, we pinch one of the ends of the circle, and then with one of the quiiling needles or some elongated object that you have at home as a thick needle, we push the other end in the middle we remove the needle and shape it with our fingers. In this way we will repeat the same procedure with the remaining 7 circles, we will have our 8 hearts made.
🐾🐾🐾
🐾🐾🐾
🐾🐾🐾
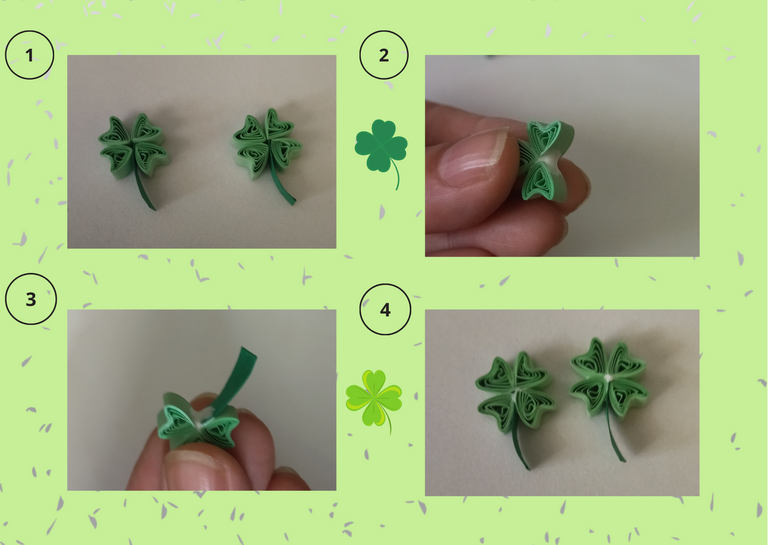
• Ahora vamos a formar nuestro trébol juntando todas las piezas, para cada zarcillo uniremos cuatro corazones con una de las cintas verde oscuro tal como aparece en la imagen, le colocamos pega a las piezas, procedemos a unir, la cinta verde oscura le daremos una forma redondeada en la punta, esto lo podemos hacer antes o después de unir las piezas.

- Now we are going to form our clover joining all the pieces, for each tendril we will join four hearts with one of the dark green ribbons as shown in the image, we put glue to the pieces, we proceed to join, the dark green ribbon will give a rounded shape at the tip, this can be done before or after joining the pieces.
🐾🐾🐾
🐾🐾🐾
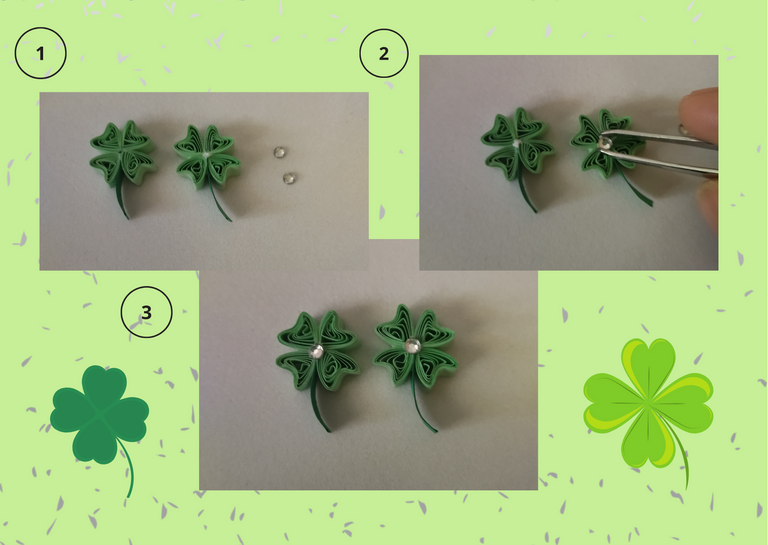
• Ya tenemos nuestra pieza pegada y formada, ahora procedemos a colocar el cristal de bisutería en el medio con la ayuda de la pinza punta fina, colocamos un punto de pega ponemos nuestro cristal.

- We already have our piece glued and formed, now we proceed to place the crystal of costume jewelry in the middle with the help of the fine tip tweezers, we place a point of glue and put our crystal.
🐾🐾🐾
🐾🐾🐾
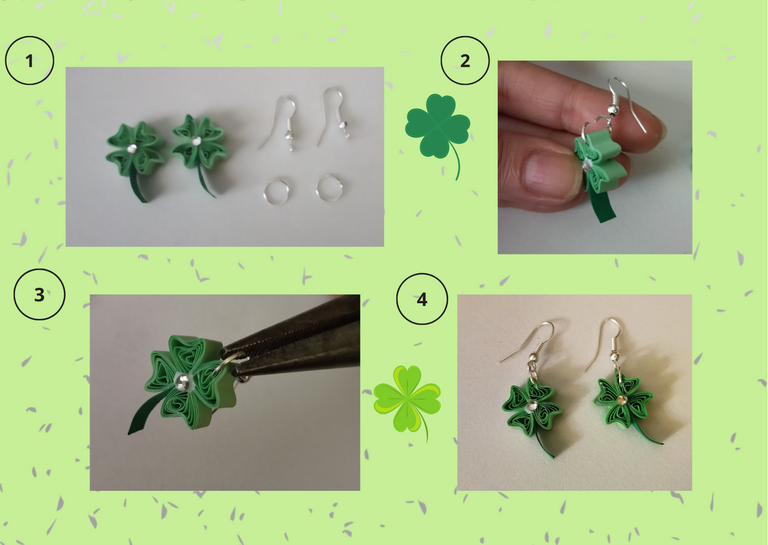
• Ya en este punto procedemos a colocar la argolla y la base para zarcillos colgante, esto lo haremos con la ayuda del alicate punta fina, en medio de una de las hojas colocamos la argolla mediana y le ponemos su base (anzuelo), cerramos la argolla con el alicate.

- At this point we proceed to place the ring and the base for hanging tendrils, we will do this with the help of the fine tip pliers, in the middle of one of the leaves we place the medium ring and we put its base (hook), we close the ring with the pliers.
🐾🐾🐾
🐾🐾🐾
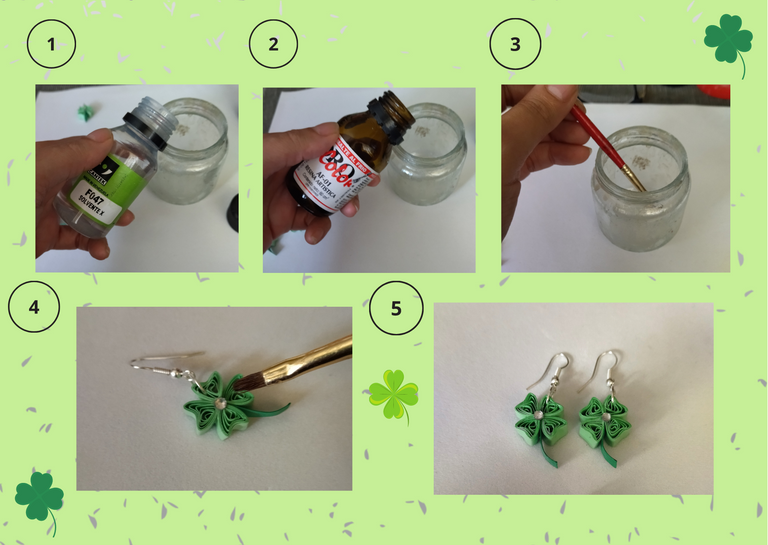
• Ya tenemos nuestros zarcillos casi listos, vamos a colocarle su protección liquida para finalizar, tomamos una parte de solvente x, otra parte de resina artística y la colocamos en el frasco de vidrio, revolvemos con la ayuda de un pincel y añadimos a nuestros zarcillos por todos sus lados, dejamos secar de un día para otro. Ya tenemos nuestros bonitos zarcillos de trébol colgantes listos para su uso, aun amuleto ideal para llevar con nosotros día a día.😄💙

- We have our tendrils almost ready, we are going to place its liquid protection to finish, we take a part of solvent x, another part of artistic resin and we place it in the glass bottle, we stir with the help of a brush and we add to our tendrils by all its sides, we let it dry from one day to another. Now we have our beautiful hanging clover tendrils ready for use, an ideal amulet to carry with us day by day. 😄💙
🐾🐾🐾
🐾🐾🐾
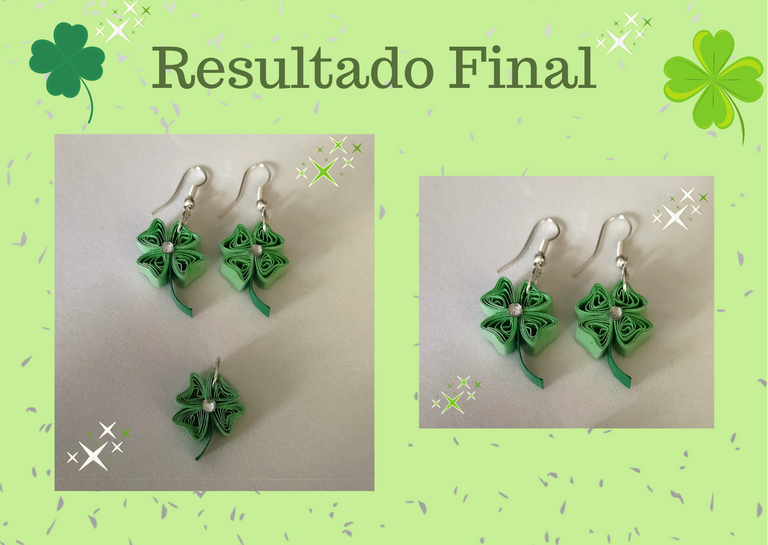
Resultado Final:💕

Final Result:💕
🐾🐾🐾
🐾🐾🐾
Tips 💡
• En mi caso le coloque una base colgante, pero también le pueden colocar una base fija para zarcillos, y así lucir unos bonitos zarcillos ajustados a la oreja.
• Si solo le dejan a su pieza una argolla de bisutería, pueden lucir un bonito dije en el collar o pulsera de su preferencia.
• El trébol normalmente es de color verde, pero pueden utilizar las cintas del color y combinación de su preferencia. Deja volar tu imaginación.
¿Que les pareció, les gustó?
Espero que sí, que les haya gustado mi explicación, procedimiento y fotos, los hice con mucho cariño por y para ustedes.
"Deja salir esa musa que te inspira, y deja volar tu imaginación".
Gracias a todos, nos vemos en la próxima. 🐾🐱💕

Tips 💡
In my case I placed a pendant base, but you can also place a fixed base for earrings, and thus show off beautiful earrings tight to the ear.
If you only leave your piece with a costume jewelry ring, you can wear a nice charm on the necklace or bracelet of your choice.
The shamrock is usually green, but you can use the ribbons in the color and combination of your choice. Let your imagination fly.
What did you think, did you like it?
I hope you did, I hope you liked my explanation, procedure and photos, I made them with love for you.
"Let out that muse that inspires you, and let your imagination fly".
Thank you all, see you next time. 🐾🐱💕
🐾🐾🐾

All photos used in this post are of my authorship and have been taken on my personal cell phone a Redmi 9T and edited in Canva Dividers and banner made by me in Paint Tool Sai Translated with the help of DeepL


