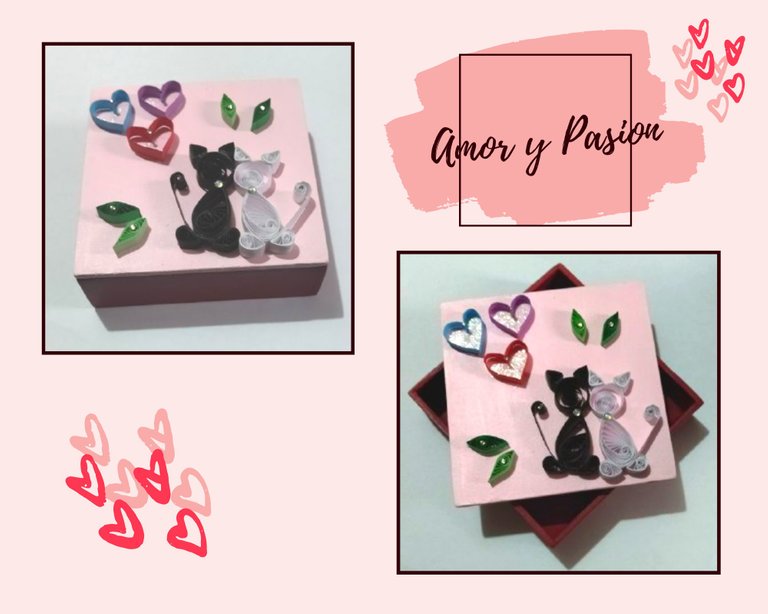
Hola a todos. 😃😺💕
Hola a mi gente de Hive, y en especial a la comunidad de #HiveDiy y al @equipodelta. En esta oportunidad vengo llena de gran emoción ya que por primera vez, siendo nueva en esta plataforma y en esta bella comunidad de grandes artistas, vengo a participar en el concurso, Amor y Pasión. Muchas gracias por la oportunidad. 😃💕🐱
En mis publicaciones anteriores que son pocas, comencé con una introducción de lo que amo hacer, trabajar con quilling y de allí he querido iniciar algo muy sencillo, para que puedan ir entendiendo, poco a poco y avanzar hacia procedimientos más complejos. En esta oportunidad hice una excepción de realizar algo un poco más complicado, para cumplir con las exigencias y reglas de la comunidad para la participación en este concurso.
Para mí el amor una de las cosas más importantes que existe en la vida, hay diferentes amores y para mí todos son importantes y tienen el mismo peso. Existe amor a la madre, hermanos, familia en general, pareja, hijos, amigos, todos esos amores son especiales y te llenan la vida y el corazón de gran felicidad.
Hello everyone.
Hello to my people of Hive, and especially to the #HiveDiy community and the @equipodelta. This time I come full of great excitement because for the first time, being new to this platform and this beautiful community of great artists, I come to participate in the contest, Love and Passion. Thank you very much for the opportunity. 😃💕🐱
In my previous publications, which are few, I started with an introduction of what I love to do, working with quilling and from there I wanted to start something very simple, so that you can understand, little by little and move towards more complex procedures. This time I made an exception to make something a little more complicated, to comply with the requirements and rules of the community for participation in this contest.
For me love is one of the most important things in life, there are different loves and for me they are all important and have the same weight. There is love for the mother, siblings, family in general, partner, children, friends, all those loves are special and fill your life and heart with great happiness.
Para este concurso quise escoger como mi personita especial, a mi hija Aydanna Valentina, ella pertenece a la gran familia de Hive @Shinfxx los invito a ver su trabajo. ¿Porque la escogí a ella? Porque es un amor enorme, es ese amor que te enseña como persona, como humano y como madre a qué puedes amar a una persona más que a ti misma, es el regalo más grande que Dios y la vida me ha dado. Está a mi lado día a día y le pido al cielo me de vida y salud para disfrutar de su compañía, poderla acompañar durante sus logros y éxitos por muchísimos años más. Por ello quiero compartir este detalle especial con ella, creado especialmente para su persona.
Invito a mi hermana @rakta, también perteneciente a esta plataforma y a esta bella comunidad a participar en el concurso Amor y Pasión.
Ahora comenzamos con la elaboración de este hermoso detalle, una caja joyero con apliques decorativos en quilling. ¿Preparados?
Si quieres disipar alguna duda con respecto a la técnica o paso a paso, usado en este post, puedes visitar el siguiente link, por acá abajo te lo dejo:
For this contest I wanted to choose as my special person, my daughter Aydanna Valentina, she belongs to the great family of Hive @Shinfxx I invite you to see her work. Why did I choose her? Because she is a huge love, she is that love that teaches you as a person, as a human and as a mother what you can love a person more than yourself, she is the greatest gift that God and life has given me. She is by my side day by day and I ask heaven to give me life and health to enjoy her company, to be able to accompany her during her achievements and successes for many, many more years. That's why I want to share this special detail with her, created especially for her.
I invite my sister @rakta, also a member of this platform and this beautiful community to participate in the Love and Passion contest.
Now we begin with the elaboration of this beautiful detail, a jewelry box with decorative appliqués in quilling. Ready?
If you want to dispel any doubts regarding the technique or step by step, used in this post, you can visit the following link, here below:
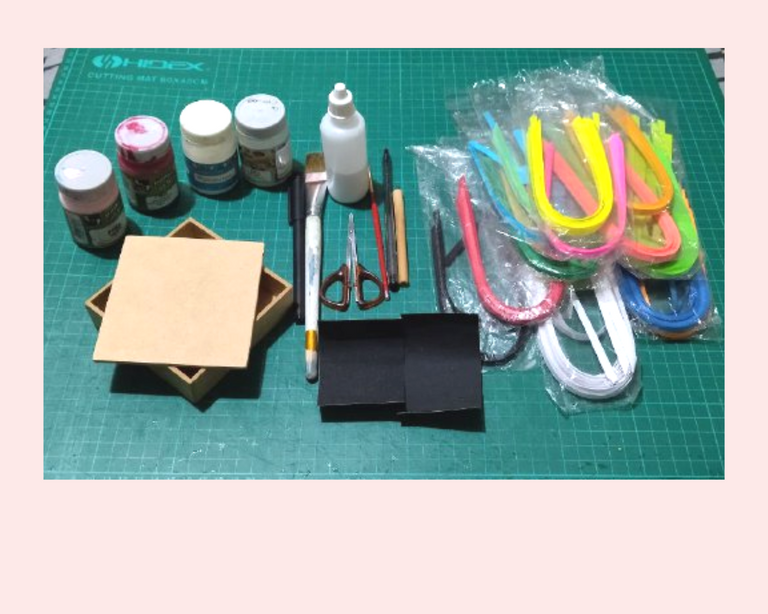
Materiales:
(Para el trabajo de madera):
• 1 caja cruda de MDF de 3 milímetros, de 10x10 centímetros de largo x 3 centímetros de ancho.
• Pinturas al agua, color escarlata y rosadito.
• Gel disco.
• Brillo sellador.
• Pincel de cerdas o punta gruesa.
• Lija gruesa número 240 y lija fina número 360.
Materials:
(For woodworking):
- 1 raw 3 millimeter MDF box, 10x10 centimeters long x 3 centimeters wide.
- Scarlet and pink water paints.
- Gel disc.
- Sealing gloss.
- Brush of bristles or thick tip.
- Coarse sandpaper number 240 and fine sandpaper number 360.
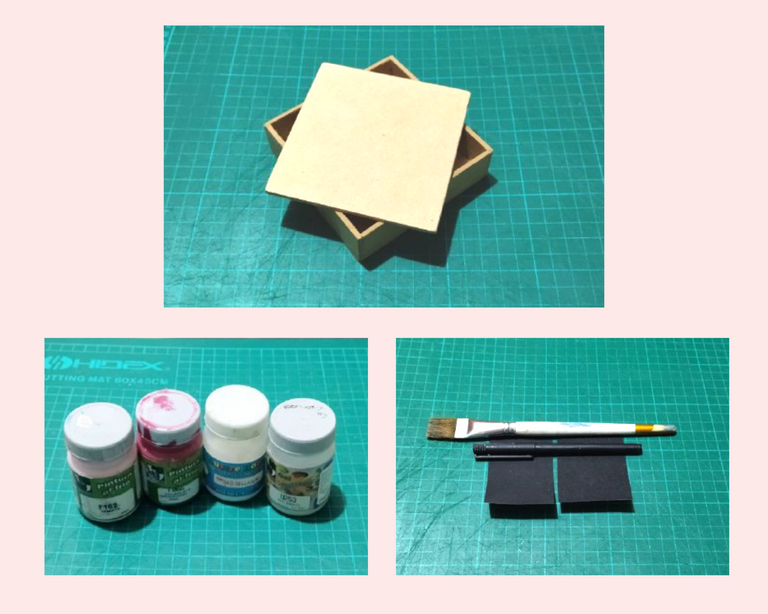
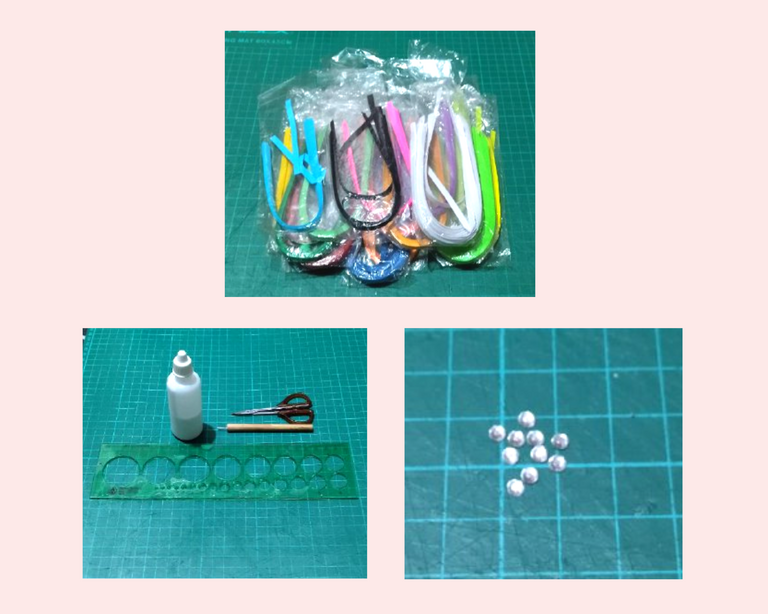
(Para el detalle con quilling):
• Quilling o cintas de papel de 6 milímetros de diversos colores.
• Aguja para quilling.
• Regla con diversas medidas de circunferencia.
• Pega blanca.
• Tijera.
• Cristales opcionales.
(For the detail with quilling):
- Quilling or 6 millimeter paper ribbons of various colors.
- Quilling needle.
- Ruler with different circumference measures.
- White glue.
- Scissors.
- Optional crystals.
Vamos con el paso a paso, para el trabajo con la caja de madera:
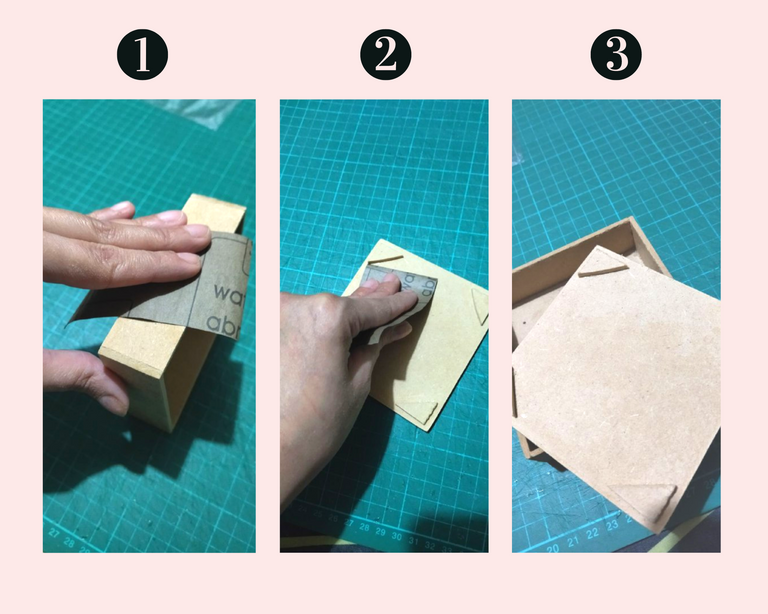
• Procedemos a pasar primero la lija gruesa número 240, por todas las superficies internas y externas de la caja, normalmente las cajas crudas vienen con muchas imperfecciones, ¿para que está lija gruesa? para quitar todas esas imperfecciones y que a la hora de colocar la pintura nuestro trabajo quedé impecable. Al terminar con la lija gruesa, al observar qué nuestra caja no tienes detalles en sus superficies, procedemos a pasar la lija fina, ¿para que está lija fina? para que nuestra caja tome porosidad y de esta manera pueda absorber óptimamente la pintura que le vamos a aplicar. Ya nuestra caja está lista para aplicarle la pintura.
Let's go with the step by step for the work with the wooden box:
- We proceed to pass first the coarse sandpaper number 240, for all the internal and external surfaces of the box, normally the raw boxes come with many imperfections, why this coarse sandpaper? to remove all these imperfections and that at the time of placing the paint our work will be impeccable. When we finish with the coarse sandpaper, when we observe that our box has no details on its surfaces, we proceed to pass the fine sandpaper, why is this fine sandpaper? so that our box takes porosity and thus can optimally absorb the paint that we are going to apply. Now our box is ready to apply the paint.
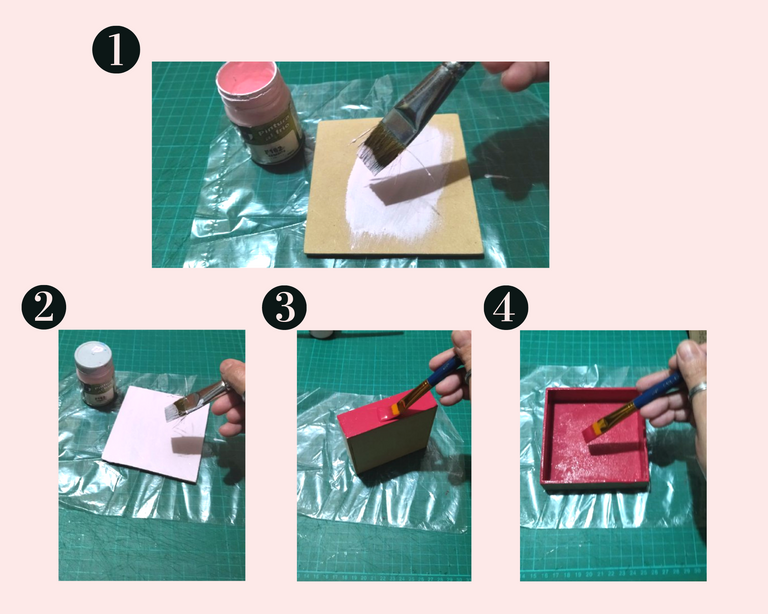
• Para la tapa tomamos la pintura color rosadito, pintamos por todas las superficies de la misma, aplicamos una mano dejamos secar. Para la base de la caja, tomamos la pintura escarlata y también pintamos todas sus superficies, dejamos secar.
- For the lid, we took the pink paint, painted all the surfaces of the lid, applied a coat and let it dry. For the base of the box, we took the scarlet paint and also painted all surfaces, let dry.
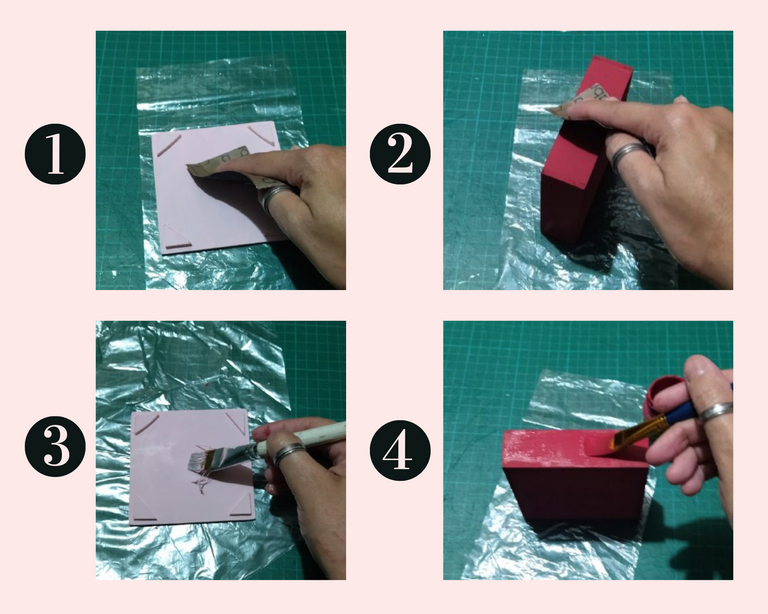
• Al estar secas la tapa y la base, tomamos la lija fina numero 360 y con mucha delicadeza pasamos la misma, por todas las superficies de ambas (tapa y base), esto lo hacemos para crear algo de porosidad en la pintura y al aplicar una segunda mano, la pintura quedé totalmente uniforme. De esta manera ya tenemos pintada nuestra caja de adorno tipo joyero.
- Once the lid and the base are dry, we take the fine sandpaper number 360 and very delicately pass it over all the surfaces of both (lid and base), this is done to create some porosity in the paint and when applying a second coat, the paint will be completely uniform. This way we have already painted our jewelry box ornament box.
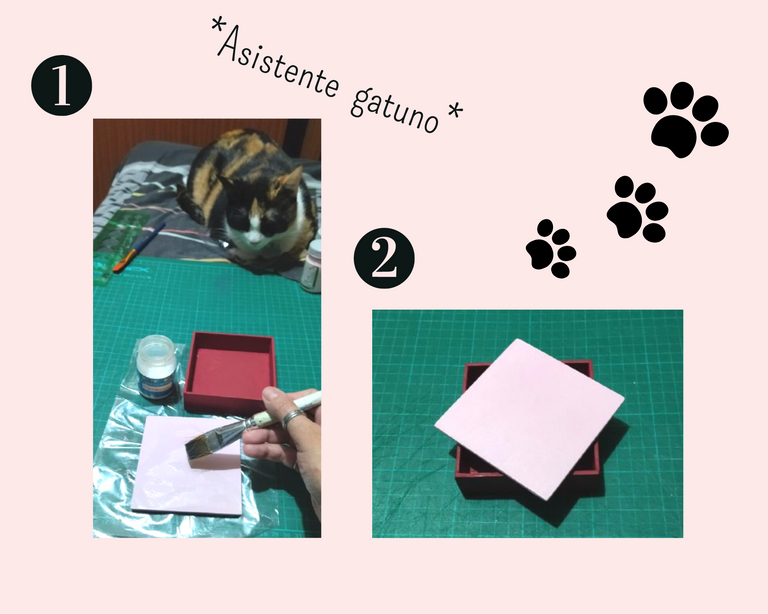
• Como último paso, procedemos a tomar un pincel y aplicar el brillo secador en todas las superficies de la caja, (tapa y base), dejamos secar, luego tomamos un trozo de tela limpio y seco y pasamos con suavidad por todas las superficies para sellar la pintura y dar brillo a nuestra caja. Todo este proceso es según el gusto del cliente o de la persona a quien vayas a hacerle el regalo, en mi caso solo me gusta que selle la pintura, me gusta un efecto menos brillante y más mate en la pintura sobre madera, por ello solo aplicó una sola mano de brillo secador y omito el paso de pasarle un paño limpio y seco a la caja, si en tu caso te gusta un efecto brillante puedes pasar varias manos de brillo secador a las superficies, dejas secar entre mano y mano, luego pasas tu paño como si estás puliendo y te queda un efecto totalmente brillante, de esta manera ya tenemos lista nuestra caja.
Nota: Cómo pondrán ver en la foto, tuve compañía de mi asistente gatuna... 😻😹
- As a last step, we proceed to take a brush and apply the drying gloss on all surfaces of the box, (lid and base), let dry, then take a clean and dry piece of cloth and gently pass over all surfaces to seal the paint and give shine to our box. All this process is according to the taste of the client or the person to whom you are going to make the gift, in my case I only like to seal the paint, I like a less shiny and more matte effect in the paint on wood, so I only apply a single coat of gloss dryer and skip the step of passing a clean, dry cloth to the box, if in your case you like a shiny effect you can apply several coats of gloss dryer to the surfaces, let dry between coats, then pass your cloth as if you are polishing and you get a totally shiny effect, in this way we have our box ready.
Note: As you can see in the picture, I had the company of my cat assistant.... 😻😹
Para los gatitos: 🐱
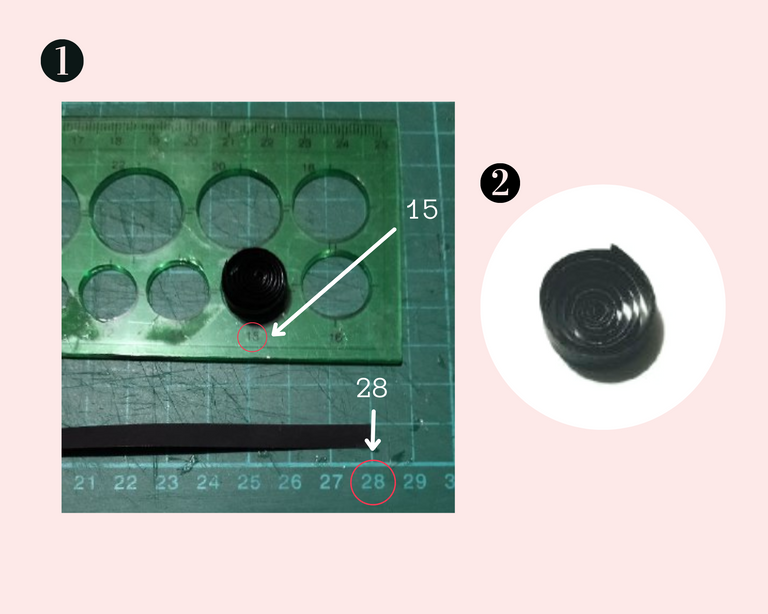
• Para hacer la cabeza: tomamos una cinta negra de quilling de 6mm x 28 cms de largo, tomamos la regla de circunferencias y hacemos un círculo cerrado en el círculo de 15. Para el paso a paso del círculo cerrado, ver el link de figuras básicas de quilling, que se encuentra antes de iniciar el proceso de elaboración de nuestra cajita.
For the kittens:
- To make the head: we take a black quilling ribbon 6mm x 28 cms long, take the circumference ruler and make a closed circle in the circle of 15. For the step by step of the closed circle, see the link of basic quilling figures, found before starting the process of making our little box.
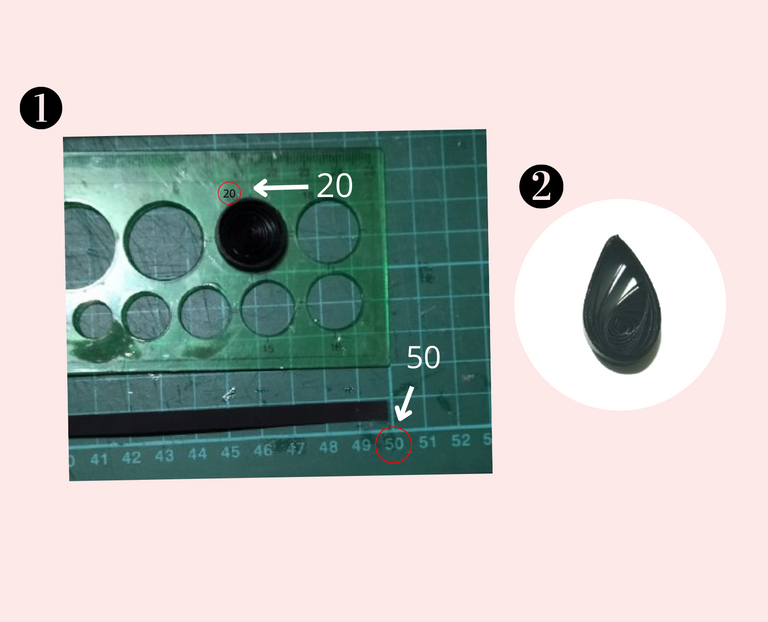
• Para hacer el cuerpo: tomamos una cinta negra de quilling de 6mm x 50 cms de largo, tomamos la regla de circunferencia y hacemos un círculo cerrado en el círculo 20. A partir del círculo cerrado procedemos a realizar una gota, hoja o lágrima. Este será el cuerpo de nuestro gatito. Para el paso a paso de la gota, ver el link de figuras básicas de quilling.
- To make the body: we take a black quilling ribbon 6mm x 50 cms long, we take the circumference ruler and we make a closed circle in circle 20. From the closed circle we proceed to make a drop, leaf or teardrop. This will be the body of our kitten. For the step by step of the drop, see the link of basic quilling figures.
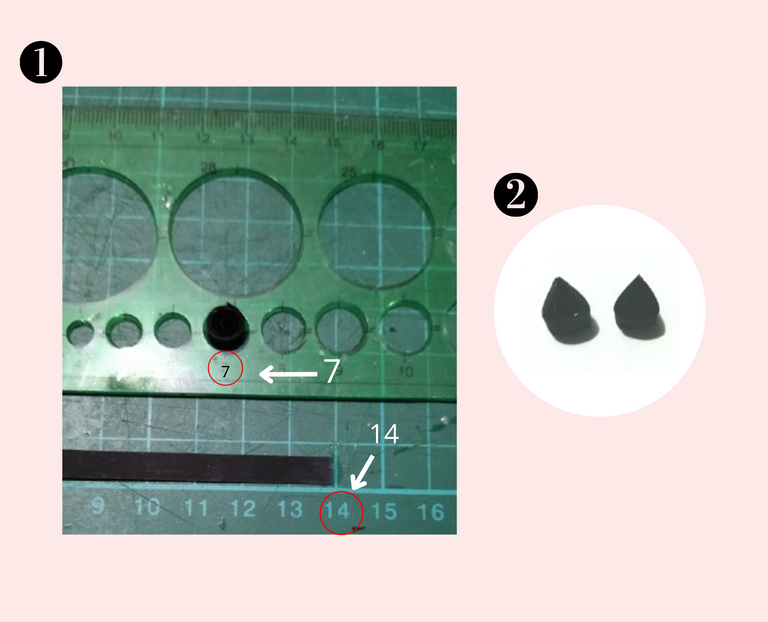
• Para las orejas de nuestro gato: tomamos una cinta negra de quilling de 6mm x 14 cms de largo, tomamos la regla de circunferencia y hacemos un círculo cerrado en el círculo 7. A partir de este círculo hacemos un triangulo. Para la segunda oreja repetimos el mismo procedimiento. Para visualizar el paso a paso del triángulo ver el link.
- For the ears of our cat: we take a black quilling ribbon 6mm x 14 cms long, we take the circumference ruler and we make a closed circle in circle 7. From this circle we make a triangle. For the second ear we repeat the same procedure. To visualize the step by step of the triangle see the link.
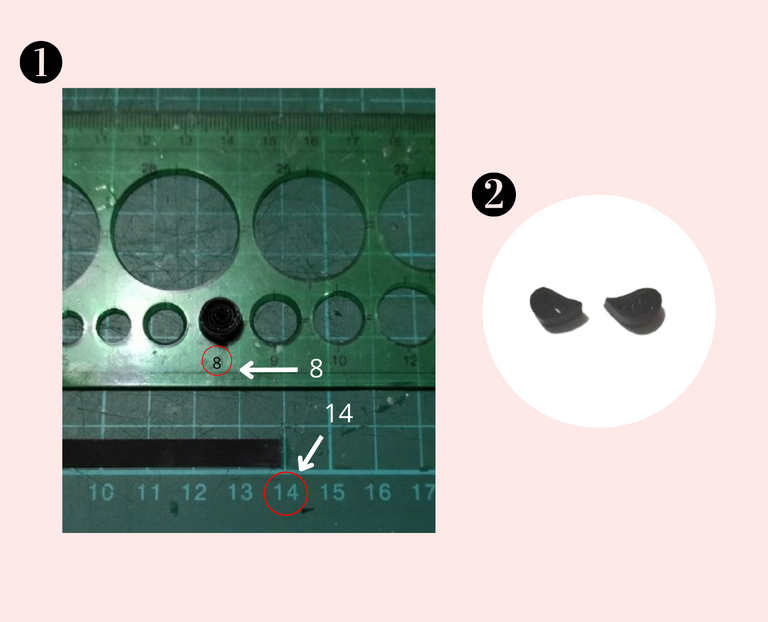
• Ahora vamos con las patas de nuestro gato: tomamos una cinta negra de quilling de 6mm x 14 cms de largo, tomamos la regla de circunferencia y hacemos un círculo cerrado en el círculo 8. A partir de este círculo hacemos una gota, hoja o lágrima con forma. Para el segundo pie, repetimos el mismo procedimiento. Para visualizar la gota con forma veamos el muestrario que aparece en el link, y a su vez allí podemos observar el paso a paso de la gota, hoja o lágrima y tener la idea de su realización.
- Now let's go with our cat's feet: we take a black quilling ribbon 6mm x 14 cms long, take the circumference ruler and make a closed circle in circle 8. From this circle we make a drop, leaf or teardrop shape. For the second foot, we repeat the same procedure. To visualize the shaped drop, let's see the sample that appears in the link, and in turn there we can observe the step by step of the drop, leaf or teardrop and have the idea of its realization.
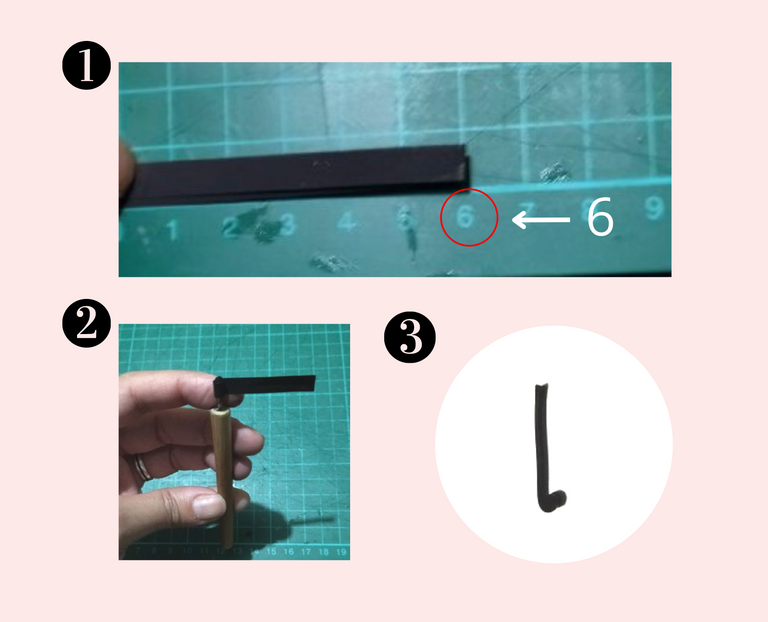
• Para la colita del gato: tomamos una cinta negra de quilling de 6mm x 7 cms de largo, tomamos la aguja de quilling y solo damos un par de vueltas en la punta de la cinta, soltamos dejando aproximadamente 3 cms de cinta sin enrollar. De esta manera tendremos la cola de nuestro gato.
- For the cat's tail: we take a black quilling ribbon 6mm x 7 cms long, we take the quilling needle and we only make a couple of turns at the end of the ribbon, we release leaving approximately 3 cms of ribbon without winding. This way we will have the tail of our cat.
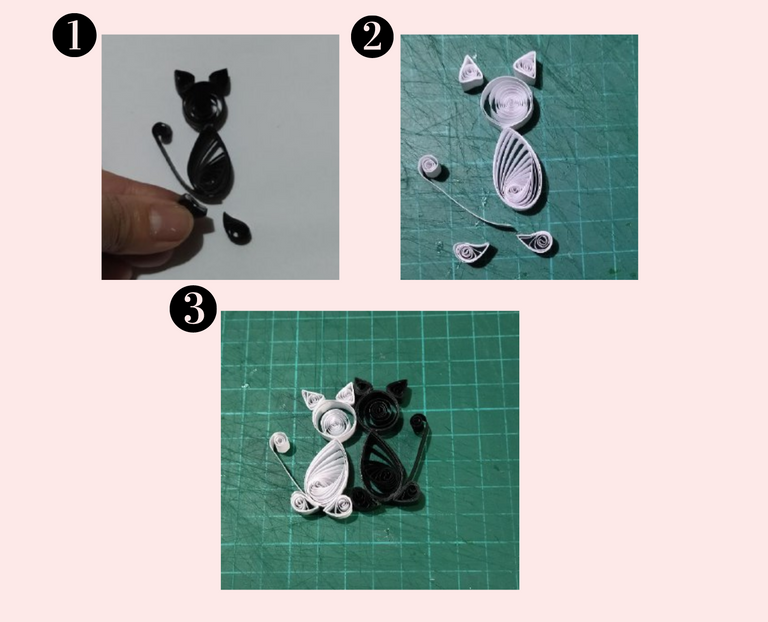
Teniendo todas las partes listas de nuestro gato, procedemos a ensamblar, tomamos pega blanca y vamos uniendo todas las partes en el sitio correspondiente, las orejas en la cabeza, luego unimos esa parte al cuerpo, luego la cola en la parte de abajo del cuerpo y para finalizar colocamos los pies del gato. De esta manera tenemos nuestro gato finalizado. Adicional a esto, procedo a realizar otro gatito de color blanco, siguiendo los mismos lineamientos del gatito anterior, lo único que varía es el color de la cinta.
Having all the parts of our cat ready, we proceed to assemble, we take white glue and we join all the parts in the corresponding place, the ears of the head, then we join that part to the body, then the tail at the bottom of the body and finally we place the feet of the cat. In this way we have our cat finished. In addition to this, I proceed to make another white kitten, following the same guidelines of the previous kitten, the only thing that varies is the color of the ribbon.
Vamos con los corazones:
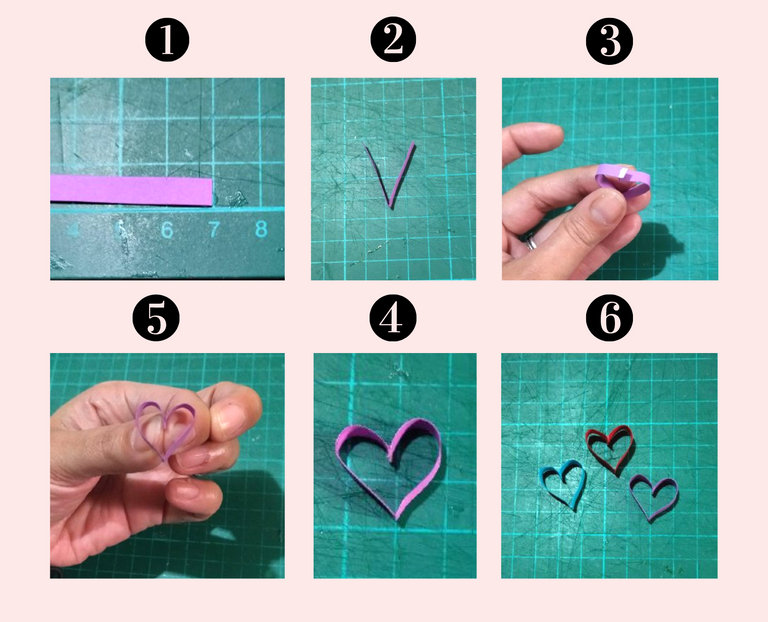
• Tomamos quilling color morado de 6mm por 7cms de largo, la doblamos a la mitad, abrimos la cinta, colocamos pega blanca en uno de los extremos y procedemos a pegar las dos puntas de manera inversa, para formar el corazón. Moldear con los dedos para darle forma. Repetimos el procedimiento en mi caso, con cintas azules y rojas. Pero ustedes pueden hacerlo del color de su preferencia 😃
Let's go with the hearts:
- We take purple quilling 6mm by 7cms long, fold it in half, open the ribbon, place white glue on one of the ends and proceed to glue the two ends in reverse, to form the heart. Mold with your fingers to give it shape. Repeat the procedure in my case, with blue and red ribbons. But you can do it with the color of your choice 😃
Rombos decorativos:
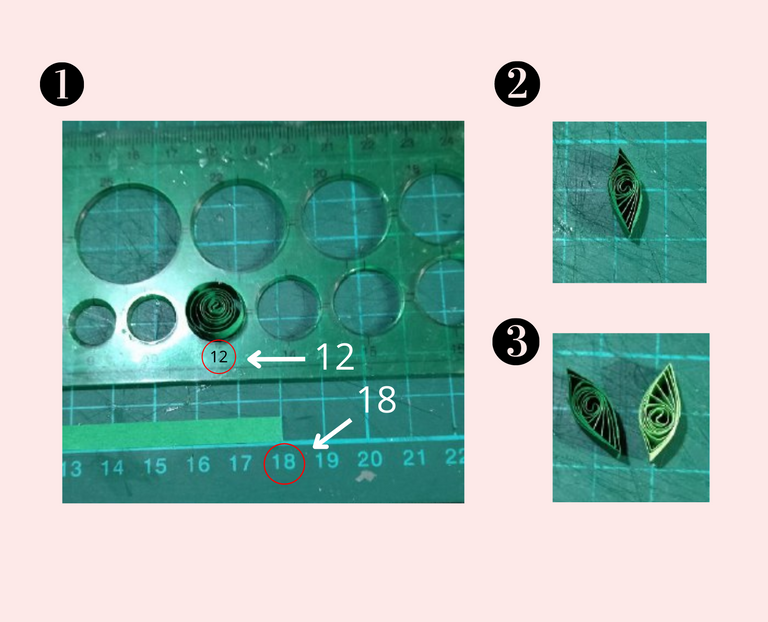
• Tomamos quilling color verde grama, de 6mm x 18 cms de largo, tomamos la regla de circunferencia y hacemos un círculo cerrado en el círculo 12. A partir de este círculo hacemos un rombo. Repetimos el mismo procedimiento con cinta color verde agua. Para visualizar el rombo, veamos el muestrario que aparece en el link, y a su vez allí podemos observar el paso a paso de la gota, hoja o lágrima y tener la idea de su realización.
Decorative rhombuses:
- We take green grass quilling, 6mm x 18 cms long, we take the circumference ruler and make a closed circle in circle 12. From this circle we make a rhombus. Repeat the same procedure with the aqua green ribbon. To visualize the rhombus, let's see the sample that appears in the link, and in turn there we can observe the step by step of the drop, leaf or teardrop and have the idea of its realization.
• Opcional: le coloque a cada gatito, corazones y rombos, unos cristales para darle un toque delicado, pero ustedes pueden decidir si se lo desean colocar o no, pueden optar por el detalle que más le agrade, como siempre digo dejen volar su imaginación, yo les doy una idea mis queridos Hive y ustedes hacen lo demás, añadiendo toda la creatividad que tengan en mente.
• Ahora procedemos a pegar la decoración que realizamos de quilling en la caja, colocamos todas las partes ubicadas a nuestro gusto.
• Por último tomamos un pincel y el gel disco, podemos aplicar en cualquier parte de la decoración o caja, a nuestro gusto para que le dé un efecto escarchado, en mi caso colocaré el gel, dentro de los corazones para darle brillo.
- Optionally: I put some crystals on each kitten, hearts and diamonds to give it a delicate touch, but you can decide if you want to put them or not, you can choose the detail you like the most, as I always say let your imagination fly, I give you an idea my dear Hive and you do the rest, adding all the creativity you have in mind.
- Now we proceed to glue the quilling decoration we made on the box, we place all the parts located to our liking.
- Finally we take a brush and the disco gel, we can apply anywhere on the decoration or box, to our liking to give it a frosted effect, in my case I will place the gel inside the hearts to give it shine.
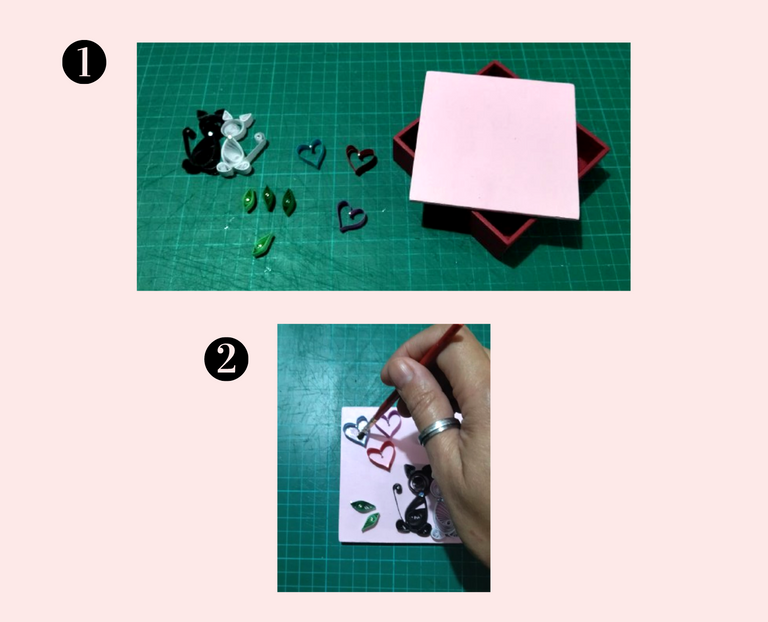
Resultado final: 😄🐱💞
Final result: 😄🐱💞
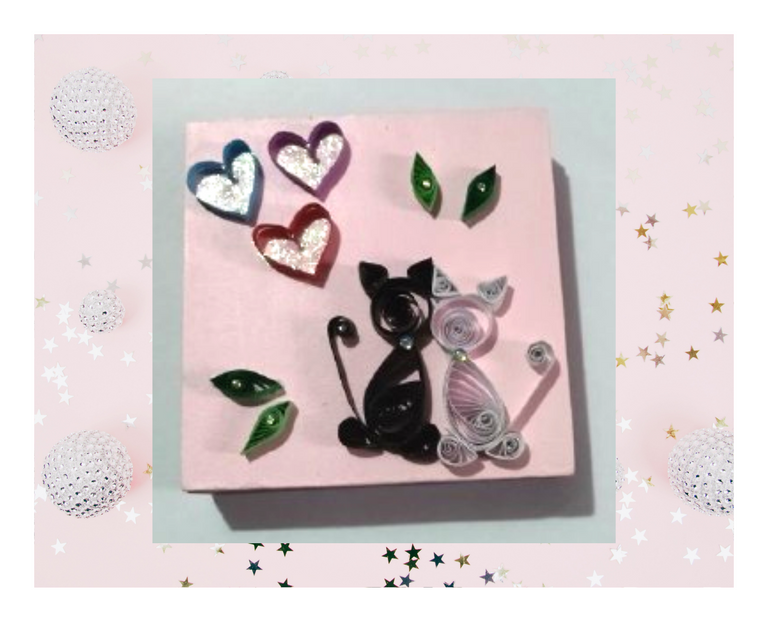
Todos los procedimientos utilizados, medidas, colores, se hicieron adaptándolos a lo que mi persona quería obsequiar. Como podrán ver, en casita amamos a los gatitos, tenemos un amor gatuno en nuestro hogar, que es nuestra adoración y parte de nuestra familia, por ello decidí agregar gatitos a la caja que voy a obsequiar a mi niña🐱 Existen diversos tipos de cajas, modelos y tamaños puedes usar el que desees, las cintas su tamaño, grosor y color puedes usar el que más te guste, al igual que los apliques y detalles.
Este obsequio creado para mí personita especial, está hecho con todo el amor del mundo para ella y para ustedes, mostrándole el paso a paso, para que lo puedan usar y crear cosas hermosas, todo está en llenar nuestra cabecita de toda la creatividad y las intenciones de hacer bellas cosas. Cómo siempre lo reitero en cada una de mis publicaciones, así suene repetitiva, deja salir esa musa que te inspira y deja volar tu imaginación...
All the procedures used, measures, colors, were made adapting them to what my person wanted to give as a gift. As you can see, in casita we love kittens, we have a cat love in our home, which is our adoration and part of our family, so I decided to add kittens to the box that I am going to give to my girl🐱 There are different types of boxes, models and sizes you can use the one you want, the ribbons its size, thickness and color you can use the one you like, as well as the appliques and details.
This gift created for my special person, is made with all the love in the world for her and for you, showing you the step by step, so you can use it and create beautiful things, everything is in filling our little head with all the creativity and intentions to make beautiful things. As I always reiterate in each of my publications, even if it sounds repetitive, let out that muse that inspires you and let your imagination fly...
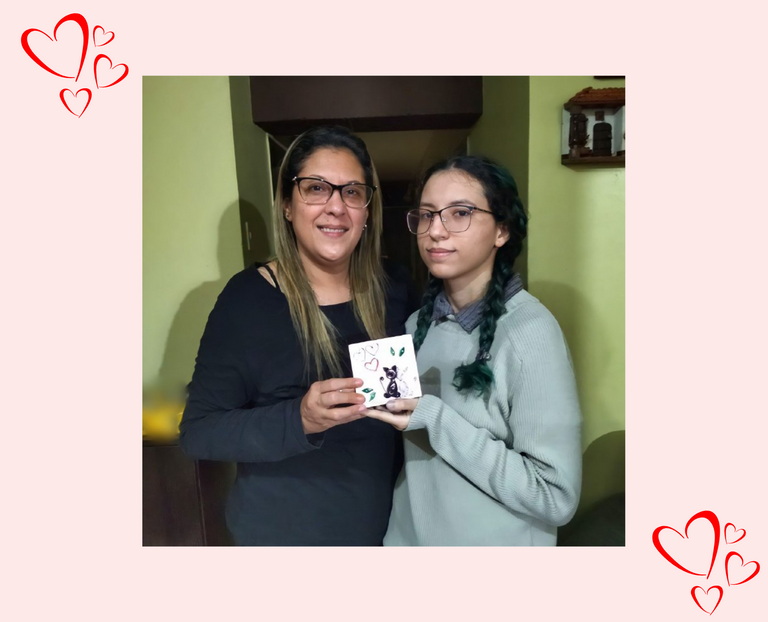
My special little person... 💓
¿Que les pareció, les gustó?
Espero que sí, que les haya gustado mi explicación, procedimiento y fotos, los hice con mucho cariño por y para ustedes.
Gracias a todos, nos vemos en la próxima 🐾🐱💕
What did you think, did you like it?
I hope you did, I hope you liked my explanation, procedure and photos, I made them with a lot of love for you.
Thank you all, see you next time 🐾🐱💕
Todas las fotos usadas en este post, son de mi autoría y han sido sacadas en mi celular personal un Redmi 9T y editadas en Canva.
All photos used in this post, are of my authorship and have been taken on my personal cell phone a Redmi 9T and edited in Canva.


