¿Alguna vez escucharon hablar de una gata tejedora? ¡Pues, yo no! he escuchado de arañas pero gatas ¡jamás! al final de este post encontraran que Mara va en serio con la comunidad de las agujas y ya está dando sus primeros pasos en el crochet.
¡Es broma! la verdad es que Mara aun no quiere portarse bien y dejarme tejer tranquila; pero mientras la enseño a comportarse como debe ser, les vengo a mostrar lo último que hice en tejido crochet. Se trata de mi segundo intento por realizar mis amapolas soñadas. Desde que comenzó este año me propuse conseguir la perfección; tal vez muchos de ustedes recordaran mi proyecto de amapola anterior en verdad quede muy contenta pero quería seguir intentándolo.
Esta vez realicé unas amapolas completamente distintas al patrón anterior, estas son más pequeñas y se inician a partir de un círculo negro.

.jpeg)
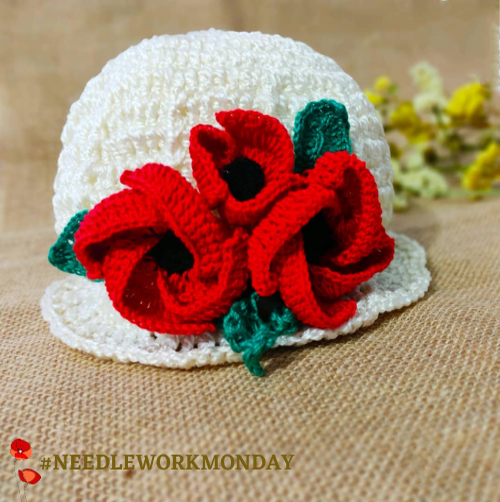
¿Se imaginan un sombrero rodeado de puras amapolas rojas por todo el contorno? En carnavales podemos utilizar muchas cosas bonitas que llamen la atención. Hoy quise traerles este lindo gorro que hice para Andrea valentina quien cumple su primer año la próxima semana; también quise dejar mi proyecto antes de irme unos días de vacaciones, para descansar y relajarme un poco; así que por unos días voy a estar ausente. Espero que todas ustedes la pasen bien y disfruten unos días de fiesta con el Rey Momo. ¡Luego me cuentan de que se disfrazaron!

El Gorro

Para realizar este lindo gorro he utilizado un patrón básico, donde solo utilicé 3 puntos básicos del tejido en crochet, cadeneta, punto alto y punto en relieve.
Lo primero que hacemos es tejer dentro de un aro mágico 12 puntos altos, cerramos con punto deslizado en la tercera cadeneta de inicio, en la segunda vuelta tejemos 3 cadenetas nuevamente y tejemos aumentos, es decir, dos puntos altos en cada punto de base. Para la tercera vuelta tejemos un punto alto y en el siguiente punto de base tejemos un aumento, repetimos hasta terminar la vuelta. Cuarta vuelta tejemos un aumento y dos puntos altos, un aumento y nuevamente dos puntos altos, uno en cada punto de base. Repetimos hasta terminar la vuelta, así continuamos haciendo aumentos + puntos altos según sea el tamaño del gorro que vayamos hacer. En mi caso termine esta circunferencia con un aumento y cinco puntos altos, aumento y cinco puntos altos, repitiendo hasta terminar la vuelta.
A partir de la siguiente vuelta vamos a tejer 6 puntos altos, un punto relieve y nuevamente 6 puntos altos, repetimos el mismo proceso hasta terminar la vuelta, cerrando con punto deslizado en la tercera cadeneta de inicio.

Para la pestaña o borde del gorro he seguido este patrón que conseguí en internet, aquí puedes trabajar a tu gusto, en mi caso quise hacer algo mas elaborado, que resaltara la pieza.
Pinterest

La Flor

Para la flor utilicé una hebra de hilo de crochet delgada de la marca "pescadora".
Nuevamente utilizamos unos puntos básicos, por eso, si estas iniciando en el tejido no será nada dificultoso. Iniciamos con un aro mágico y dentro realizamos un punto bajo, dos cadenetas y luego tejemos 12 medios puntos, cerramos el círculo con punto deslizado en la segunda cadeneta de inicio. Hacemos puntada de seguridad y cortamos la hebra.
Luego cambiamos de hebra para tejer el pétalo de la flor. Realizamos un punto bajo en una de las cadenetas de base y tejemos 3 cadenetas que equivalen a nuestro primer punto alto. En ese mismo punto tejemos dos puntos altos, (es decir hemos tejido un aumento de 3 puntos altos) repetimos dos veces más el mismo proceso. En la siguiente vuelta tejemos aumentos de dos puntos altos en cada punto de base y he elaborado una tercera vuelta para ampliar más el pétalo y así mi flor quedara más grande; para eso he tejido un punto alto en cada punto de base, tal cual como lo ves en la imagen. Hacemos puntada de seguridad y cortamos una hebra de hilo larga que luego vamos a utilizar para armar la flor.

En total tejemos 4 pétalos de la flor, luego tomamos la hebra larga y lo vamos a ensartar tal como se ve en la imagen, vamos haciendo el mismo proceso dejando 3 cadenas de separación y por ultimo amarramos los 4 hilos en la parte posterior.
.jpeg)
Decoramos con hojas y una tira larga de color verde, hecha con cadenetas.


Bien amigas crocheteras, manualistas y amantes de la creatividad, espero que les haya gustado este gorro, sencillo pero hermoso. Yo seguiré mientras tanto en busca de mi amapola perfecta; por ahora me voy a buscar inspiración en las playas de Venezuela. Espero que ustedes también aprovechen de descansar y pasarla bien junto a sus seres queridos, en especial con los niños que son los verdaderos reyes del carnaval.


Have you ever heard of a knitting cat? Well, I haven't! I've heard of spiders but cats, never! At the end of this post you'll find that Mara is serious about the needle community and is already taking her first steps in crochet.
Just kidding! the truth is that Mara still doesn't want to behave and let me knit in peace; but while I teach her to behave as it should be, I'm going to show you the last thing I made in crochet. This is my second attempt to make my dream poppies. Since the beginning of this year I set out to achieve perfection; maybe many of you remember my previous poppy project I was really happy but I wanted to keep trying.
This time I made some poppies completely different from the previous pattern, these are smaller and start from a black circle.

.jpeg)
Can you imagine a hat surrounded by pure red poppies all around? At carnivals we can use a lot of pretty things that catch the eye. Today I wanted to bring you this cute hat I made for Andrea valentina who turns one year old next week; I also wanted to leave my project before I leave for a few days of vacation, to rest and relax a little; so for a few days I will be absent. I hope you all have a great time and enjoy a few days of partying with King Momo. ***Let me know what you dressed up as later!

The Hat

To make this cute hat I used a basic pattern, where I only used 3 basic crochet knitting stitches, chain stitch, stockinette stitch and relief stitch.
The first thing we do is knit inside a magic ring 12 double crochet stitches, we close with slip stitch in the third chain, in the second round we knit 3 chains again and we knit increases, that is, two double crochet stitches in each base stitch. For the third row we knit a single crochet and in the next base stitch we knit an increase, repeat until the end of the row. Cuarta vuelta tejemos un aumento y dos puntos altos, un aumento y nuevamente dos puntos altos, uno en cada punto de base. Repetimos hasta terminar la vuelta, así continuamos haciendo aumentos + puntos altos según sea el tamaño del gorro que vayamos hacer. En mi caso termine esta circunferencia con un aumento y cinco puntos altos, aumento y cinco puntos altos, repitiendo hasta terminar la vuelta.
From the next row we will knit 6 double crochet stitches, a relief stitch and again 6 double crochet stitches, repeating the same process until the end of the row, closing with a slip stitch on the third chain of the beginning chain.

For the flap or edge of the cap I followed this pattern that I got on the internet, here you can work to your liking, in my case I wanted to do something more elaborate, to highlight the piece.
Pinterest

The Flower

For the flower I used a strand of thin "fisherwoman" brand crochet thread.
Again, we used some basic stitches, so if you are just starting to knit, it won't be difficult at all. We start with a magic ring and inside we knit a single crochet, two chain stitches and then we knit 12 half stitches, we close the circle with a slip stitch on the second starting chain. We knit a safety stitch and cut the yarn.
Then we change yarn to knit the flower petal. We knit a single crochet on one of the base chains and we knit 3 chains that are equivalent to our first double crochet. In that same stitch we knit two double crochet stitches, (i.e. we have knit an increase of 3 double crochet stitches) we repeat the same process two more times. In the next row we knit two high stitch increases in each base stitch and I have made a third row to enlarge the petal more and so my flower will be bigger; for that I have knit a high stitch in each base stitch, as you can see in the image. We make safety stitch and cut a long strand of yarn that we are going to use later to assemble the flower.

In total we weave 4 petals of the flower, then we take the long strand and we are going to thread it as seen in the image, we are doing the same process leaving 3 chains of separation and finally we tie the 4 threads in the back.
.jpeg)
We decorate with leaves and a long strip of green color, made with chain stitches.


Well friends crocheters, crafters and lovers of creativity, I hope you liked this hat, simple but beautiful. I will continue in the meantime in search of my perfect poppy; for now I'm going to look for inspiration on the beaches of Venezuela. I hope you also take the opportunity to rest and have a good time with your loved ones, especially with the children who are the true kings of carnival.

𝕋𝕠𝕕𝕠 𝕧𝕒𝕝𝕖 𝕝𝕒 𝕡𝕖𝕟𝕒 𝕤𝕚 𝕝𝕝𝕖𝕧𝕒, 𝕙𝕚𝕝𝕠𝕤, 𝕥𝕖𝕝𝕒𝕤 𝕪 𝕞𝕦𝕔𝕙𝕒𝕤 𝕡𝕦𝕟𝕥𝕒𝕕𝕒𝕤 𝕕𝕖 𝔸𝕄𝕆ℝ.
𝕀𝕥'𝕤 𝕒𝕝𝕝 𝕨𝕠𝕣𝕥𝕙 𝕚𝕥 𝕚𝕗 𝕚𝕥 𝕥𝕒𝕜𝕖𝕤, 𝕥𝕙𝕣𝕖𝕒𝕕𝕤, 𝕗𝕒𝕓𝕣𝕚𝕔𝕤 𝕒𝕟𝕕 𝕝𝕠𝕥𝕤 𝕠𝕗 𝕃𝕆𝕍𝔼 𝕥𝕚𝕡𝕤.

