.gif)
Hola a todos mis queridos amigos de la comunidad HiveDIY, sé que todas están ocupadas realizando cosas maravillosas para publicar en el concurso de esta semana; yo me he sincerado un poco y creo que esa parte de las manualidades no se me da muy bien, por eso quiero felicitar a todas las manualistas que hacen bellezas con cualquier papel o cinta que se ponga en sus manos. Yo prefiero darle paso a otras cosas con las que me siento más cómoda trabajando y aparte me relajo y soy feliz.

Bordado en punto de cruz
El punto de cruz es una forma popular de bordado en la que se usan puntadas que quedan en forma de equis.
Esta semana he estado muy entretenida, el día martes nació Sebastián, el hijo de mi vecina Mercedes y me tomo por sorpresa ya que todos lo esperábamos para la semana entrante, pero bueno, así son los niños y cuando quieren nacer no hay nadie que los pueda parar.
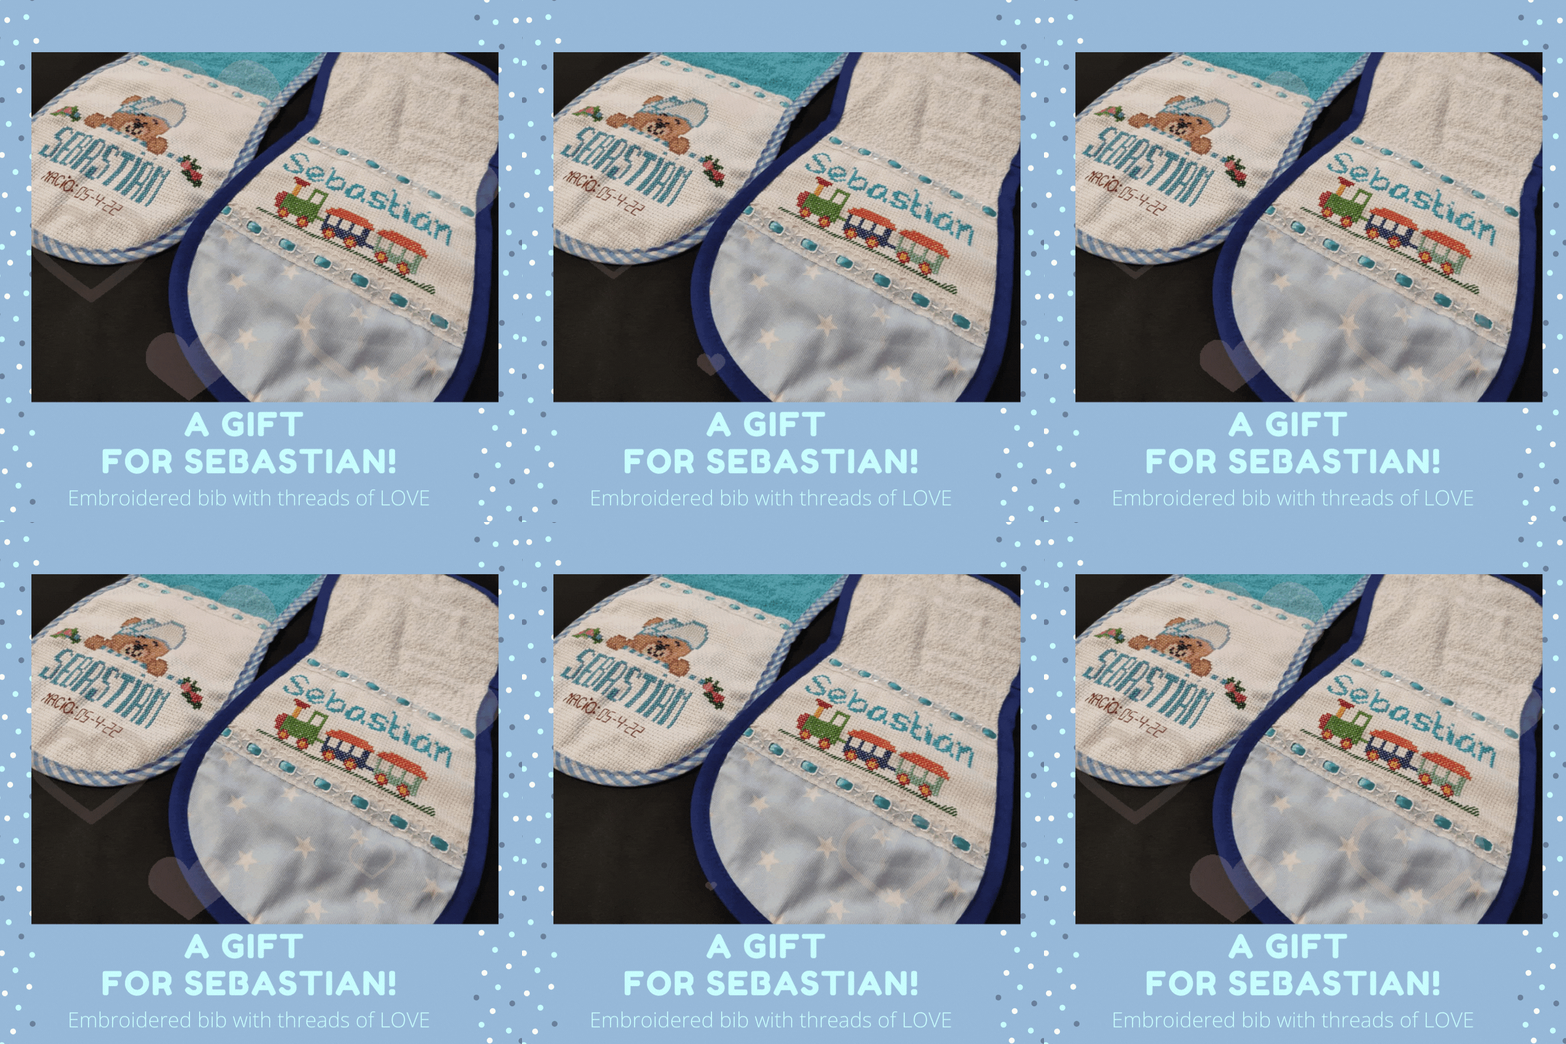
Por eso he bordado dos bucheros súper rápido para poder llegar con algo a conocerle. Los bucheros son muy necesarios ya que los bebés a cada rato hay que sacarle los gases luego de darle el biberón y que mejor que tener un paño lindo y cómodo para ponernos en nuestro hombro mientras le damos palmaditas en la espalda.
Por otra parte este tipo de trabajos son lindos porque son personalizados, es decir que llevan el nombre del bebé y de seguro quedaran como un lindo recuerdo para cuando crezcan.

Bordar, no es para los viejos.
Hace unos días escuché en la televisión que los bordados era cosas de viejos, pero no pueden estar más equivocados; bordar es un trabajo que está más vivo que nunca, hay muchísima gente que todavía se dedica a esto de forma artesanal y dejan en cada punto todo su amor y empeño para que lo que se esté haciendo salga bien.
Sí, es verdad que no es un trabajo fácil y también es cierto que la tecnología ha creado maquinas que hacen bellezas y le ahorran a uno tiempo, pero una maquina no le imprime esas sensaciones o emociones que se sienten cuando uno está bordando. ¡Ustedes dirán que estoy loca! Pero es que cuando yo me siento a bordar me imagino cosas lindas, me imagino la cara del bebé, su sonrisa, la emoción de sus padres y abuelos cuando éste nazca, cuando llegue a su casa por primera vez y todos lo abracen y lo quieran visitar.
Otra cosa que me imagino es la cara de la mamá cuando vea el bordado y se emocione al ver ese nombre tan lindo que con tanto cariño escogió para su hijo ahora decora una linda pieza, ya sea una toalla, una manta o almohadas.
Pues bien, que les parece si me siguen en este sencillo paso a paso y con él se emocionan aprender la técnica y quien quita más a delante ustedes mismas son las que elaboran cosas lindas para sus hijos o nietos.


Materiales que vamos a utilizar:
- Tela de paño
- Tela Etamina
- Tela para combinar
- encajes y cintas
- sesgo
- sedalinas
- aguja de bordar #22
- máquina de coser
- y mucho amor y paciencia.

Paso a paso

Cuando vamos a comenzar a bordar debemos tener en cuenta varias cosas, primero que pieza vamos a cortar, que forma tiene, que telas vamos a combinar. En base a esto cortamos la tela Etamina que es la especial para este tipo de bordados; también venden unas cintas para bordar que ya vienen con el borde decorado y eso facilita la costura.
Buscamos revistas o patrones en internet del tipo de letra y el tipo de imagen que quieras bordar. Aquí debo decirte que he conseguido clientas que no les gusta ningún muñeco y solo prefieren el nombre del bebé. Hoy en día está muy de moda dibujar el nombre y colocarle una corona encima. Cuando ya tienen claro este punto dividimos la tela en la mitad y contamos los puntos, tanto para arriba hacia abajo y también hacia los lados. El nombre del bebé es el que más debe resaltar, por eso debes colocarlo en un color llamativo.

Al bordado le puedes imprimir cualquier cosa que te guste, en este caso como teníamos la fecha del nacimiento decidí colocársela, pero también le colocan el peso, la hora o todo el nombre si es posible.
En este caso comencé por la cara del oso, la nariz la ubique en el centro y a partir de allí fui bordando por todo el contorno hasta que se formó la imagen.

Los bucheros tienen esta forma de pera, pero también los hay ovalados. Con esta forma sacamos la forma de la tela, aquí quise mostrarles dos formas, una tiene la forma completa, en cambio el otro es un semi rectángulo y se completa la forma con una tela para combinar.

Luego colocamos los encajes, a mí me gusta fijarlos primero con los alfileres y luego les paso unas puntas con aguja e hilo para que no se muevan al pasarle la costura recta en la máquina de coser.

Por ultimo colocamos por todo el borde un sesgo que combine con el bordado y haga resaltar aún más la pieza.
¡Que les parece!

Y ustedes, ¿Qué opinan del bordado en punto de cruz? ¿les gustaría aprender? Esta es una práctica que amerita de mucha concentración, calma, paciencia, pero luego que vez realizado el trabajo y ves la sonrisa de las personas es cuando te das cuenta que valió la pena todo el esfuerzo y cariño que invertiste.
Espero que les haya gustado y solo me queda despedirme, cuídense mucho y espero que pasen un hermoso fin de semana


Hello to all my dear friends of the HiveDIY community, I know you are all busy making wonderful things to publish in this week's contest; I have been a little honest and I think that part of the crafts I am not very good at, so I want to congratulate all the craftswomen who make beauties with any paper or ribbon that is put in their hands. I prefer to give way to other things that I feel more comfortable working with and besides I relax and I'm happy.

Cross stitch embroidery
Cross stitch is a popular form of embroidery in which stitches that are left in the shape of an X are used.
This week I have been very entertained, on Tuesday Sebastian was born, the son of my neighbor Mercedes and it took me by surprise since we were all expecting him for next week, but well, that's how children are and when they want to be born there is no one who can stop them.
That's why I have embroidered two bucheros super fast to be able to arrive with something to meet him. The bucheros are very necessary because babies need to have their gasses removed after bottle feeding and what better than to have a nice and comfortable cloth to put on our shoulder while we pat him on the back.
On the other hand this type of work is nice because they are personalized, that is to say that they carry the baby's name and for sure they will remain as a nice souvenir for when they grow up.

Embroidery, it's not for old people.
A few days ago I heard on TV that embroidery was for old people, but they could not be more wrong; embroidery is a job that is more alive than ever, there are many people who are still dedicated to this craft and leave in each stitch all their love and commitment to what is being done comes out well.
Yes, it is true that it is not an easy job and it is also true that technology has created machines that make beauties and save you time, but a machine does not give you those sensations or emotions that you feel when you are embroidering. You will say that I am crazy! But when I sit down to embroider I imagine beautiful things, I imagine the baby's face, his smile, the excitement of his parents and grandparents when he is born, when he arrives home for the first time and everyone hugs him and wants to visit him.
Another thing I imagine is the face of the mother when she sees the embroidery and is excited to see that beautiful name that she so lovingly chose for her son now decorates a nice piece, whether it is a towel, a blanket or pillows.
Well, what do you think if you follow me in this simple step by step and with it you get excited to learn the technique and who takes away more ahead yourselves are the ones who elaborate cute things for your children or grandchildren.


Materials we are going to use:
- Cloth cloth
- Etamine fabric
- Matching fabric
- lace and ribbons
- bias
- fishing line
- embroidery needle #22
- sewing machine
- and a lot of love and patience.

Step by step

When we are going to start embroidering we must take into account several things, first what piece we are going to cut, what shape it has, what fabrics we are going to combine. Based on this we cut the Etamina fabric which is the special one for this type of embroidery; they also sell some tapes for embroidery that already come with the decorated edge and that facilitates the sewing.
We look for magazines or patterns on the internet for the type of lettering and the type of image you want to embroider. Here I must tell you that I have had customers who do not like any doll and only prefer the baby's name. Nowadays it is very fashionable to draw the name and put a crown on top. When this point is clear, we divide the fabric in half and count the stitches, both up and down and also to the sides. The baby's name is the one that should stand out the most, that's why you should place it in a striking color.
To the embroidery you can print anything you like, in this case as we had the date of birth I decided to place it, but you can also place the weight, the time or the whole name if possible.
In this case I started with the face of the bear, I placed the nose in the center and from there I embroidered all around until the image was formed.

The bucheros have this pear shape, but there are also oval ones. With this shape we get the shape of the fabric, here I wanted to show you two shapes, one has the complete shape, instead the other one is a semi rectangle and you complete the shape with a fabric to match.

Then we place the laces, I like to fix them first with the pins and then I pass them a few points with needle and thread so that they do not move when passing the straight seam in the sewing machine.

Finally, we place a bias binding around the edge to match the embroidery and make the piece stand out even more.
What do you think!

And you, what do you think about cross stitch embroidery? would you like to learn? This is a practice that requires a lot of concentration, calm, patience, but after you have done the work and see the smile of the people is when you realize that it was worth all the effort and love you invested.
I hope you liked it and it only remains for me to say goodbye, take care and I hope you have a beautiful weekend.
𝕋𝕠𝕕𝕠 𝕧𝕒𝕝𝕖 𝕝𝕒 𝕡𝕖𝕟𝕒 𝕤𝕚 𝕝𝕝𝕖𝕧𝕒, 𝕙𝕚𝕝𝕠𝕤, 𝕥𝕖𝕝𝕒𝕤 𝕪 𝕞𝕦𝕔𝕙𝕒𝕤 𝕡𝕦𝕟𝕥𝕒𝕕𝕒𝕤 𝕕𝕖 𝔸𝕄𝕆ℝ.


