Hello! Good morning creative friends of #Hive, happy start of the month, I hope you are enjoying good health. I've been a bit absent due to my teaching work, and thanks to that today I'm back again with a craft. This third of May the May Cross will be celebrated in my country Venezuela, the date on which the rainy season begins, which are conducive to cultivation and where our landscapes are painted by the flourishing of ornamental plants and our araguaney, in In view of this, at school they have asked me to make a Maypole full of flowers with many colors, and with great respect and gratitude I have expressed my participation and collaboration in the Maypole wake.
¡Hola! Muy buenos días amigos creativos de #Hive, feliz inicio de mes, espero que se encuentren disfrutando de grata salud. He estado un poco ausente debido a mis labores de docencia, y gracias a ello el día de hoy vuelvo nuevamente a hacer presencia con una manualidad. Este tres de mayo se celebrar la cruz de mayo en mí país Venezuela, fecha en la que se inicia la temporada de lluvias que son propicias para el cultivo y dónde nuestros paisajes se pintan por el florecer de las plantas ornamentales y de nuestro araguaney, en vista de ello en la escuela me han pedido que elaborara una cruz de mayo repleta de flores con muchos colores, y con mucho respeto y agradecimiento he manifestado mi participación y colaboración en el velorio de cruz de mayo.
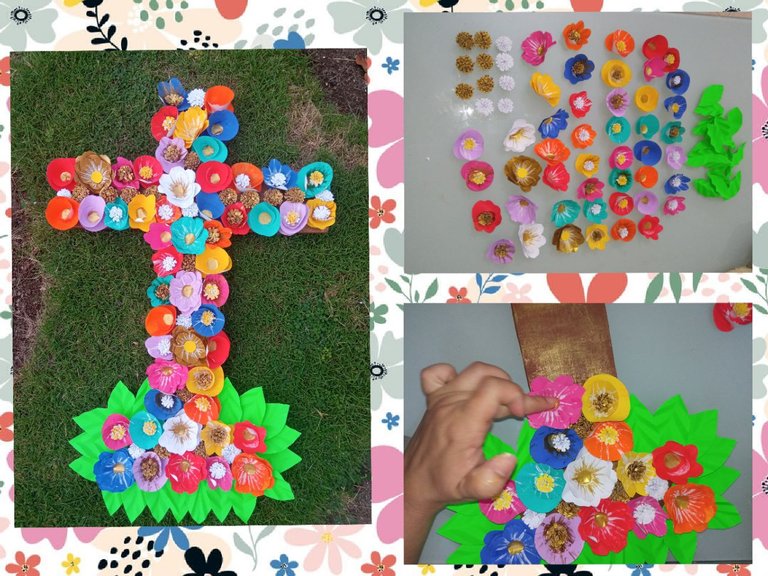
The wake of the Cruz de Mayo is a religious and cultural manifestation of our beloved country, this event is celebrated throughout the national territory, the great reason for this event is to honor and thank our mother nature for being the month of May the beginning of harvests and the beginning of the rainy season. To celebrate this day, the tree is creatively dressed or decorated with various materials, in which flowers always stand out because May is also the month of flowers. I want to share with you how to make a Maypole, with three different types of simple flowers made from circles of recycled paper sheets that will serve to decorate any event. Let's get started!
El velorio de cruz de mayo es una manifestación religiosa y cultural de nuestro amado país, este evento se celebra en todo el territorio nacional, el gran motivo de este evento es homenajear y agredecer a nuestra madre naturaleza por ser el mes de mayo el inicio de las cosechas y el comienzo de la temporada de lluvias. Para celebrar este día se viste o se de adorna el madero de forma creativa con diversos materiales, en los que simpre destacan las flores por ser también mayo el mes de las flores. Te quiero compartir como elaborar una cruz de mayo, con tres tipos diferentes de flores sencillas apartir de círculos de hojas de papel recicladas que te servirán para decorar cualquier evento. ¡Comencemos!
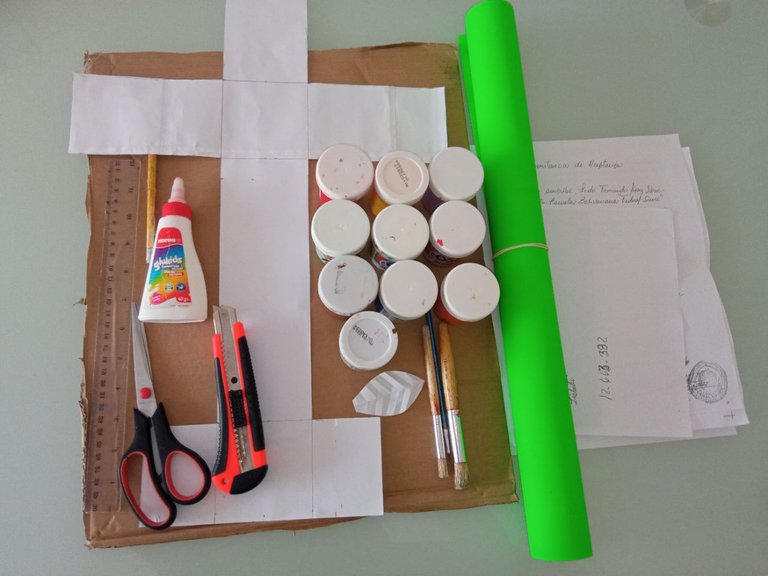
Used materials:
✓ Recycled paper sheets.
✓ Cold paints of different colors, essential: white, brown and gold.
✓ Cross pattern 50cmx8cm wide.
✓ Apple green card.
✓ Thick and liner brushes.
✓ Leaf pattern.
✓ Exact or scalpel
✓ Glue or cold silicone.
✓ Rule.
✓ Paperboard.
✓ Pencil.
✓ Pair of scissors.
Materiales utilizados:
✓ Hojas de papel recicladas.
✓ Pinturas al frío de diferentes colores, indispensables: blanca, marrón y oro.
✓ Patrón de la cruz de 50cmx8cm de ancho.
✓ Cartulina verde manzana.
✓ Pinceles grueso y para delinear.
✓ Patrón de la hoja.
✓ Exacto o bisturí
✓ Pega o silicón frío.
✓ Regla.
✓ Cartón.
✓ Lápiz.
✓ Tijeras
We start our creative craft:
Step 1: Make the wood.
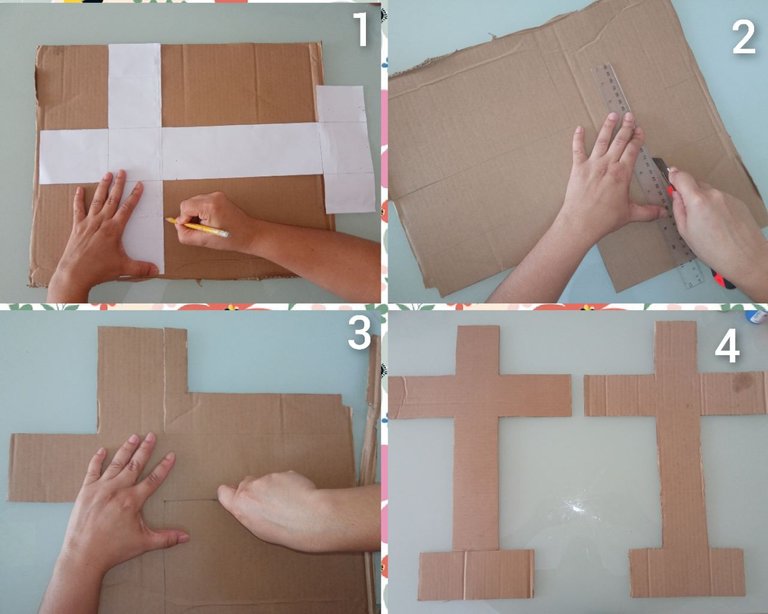
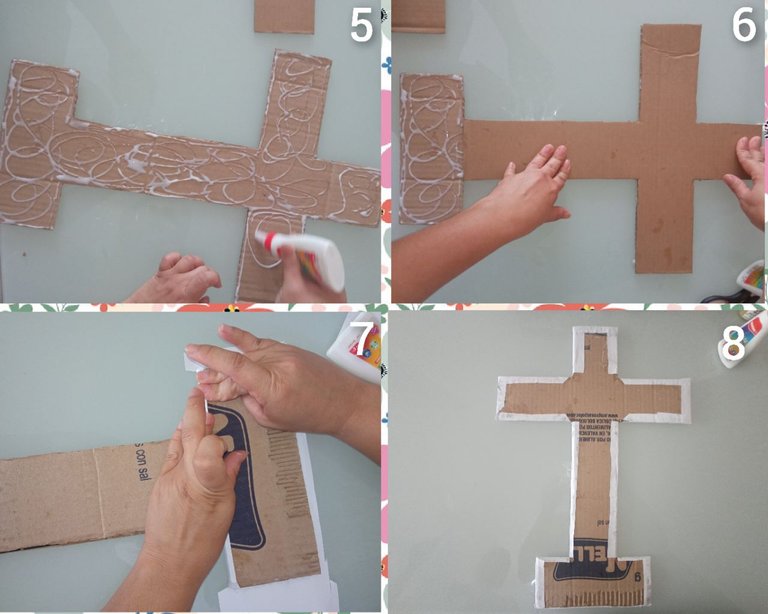
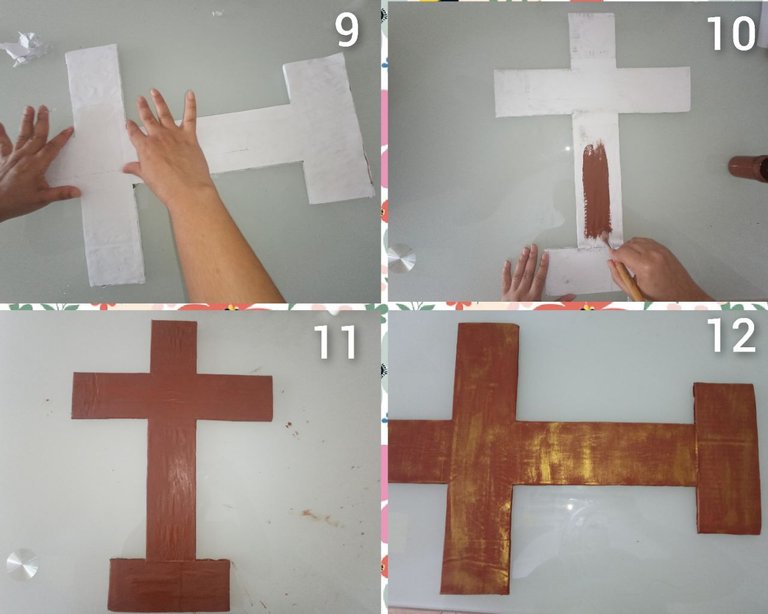
Take the pattern of the cross and mark its shape with the pencil on the cardboard, mark the cross twice on the cardboard and cut out its shape with the exact and ruler. Now, with the white glue, glue both crosses to give greater support and then with the sheets of paper, line the shape of the cross on both sides and then paint brown, touch up with a little gold. Let the paint on the wood dry.
Comenzamos nuestra manualidad creativa:
Paso 1: Elaborar el madero.
Toma el patrón de la cruz y marca su forma con el lápiz en el cartón, marca dos veces la cruz en el cartón y recorta su forma con el exacto y la regla. Ahora, con el pegamento blanco pega ambas cruces para dar mayor soporte y luego con las hojas de papel forra la forma de la cruz por ambos lados y luego pintas de color marrón, retoca con un poquito de color oro. Deja secar la pintura del madero.
Step 2: We make the flowers.
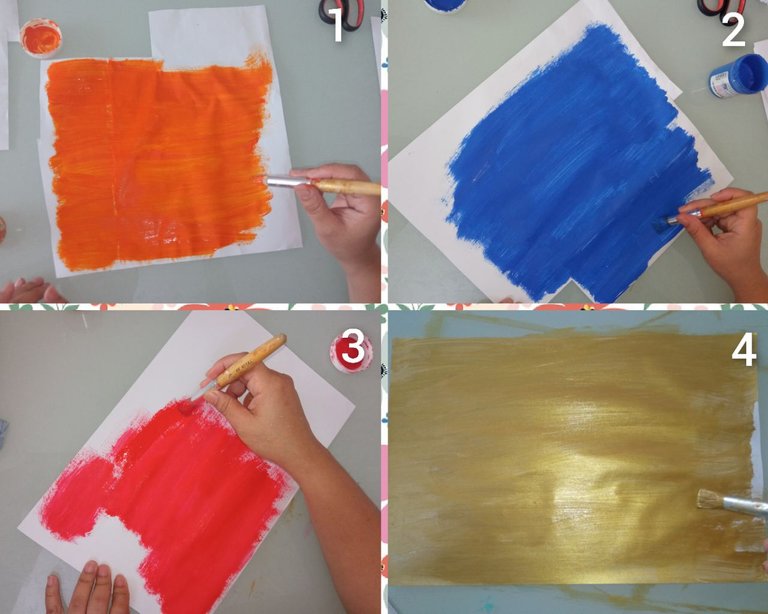
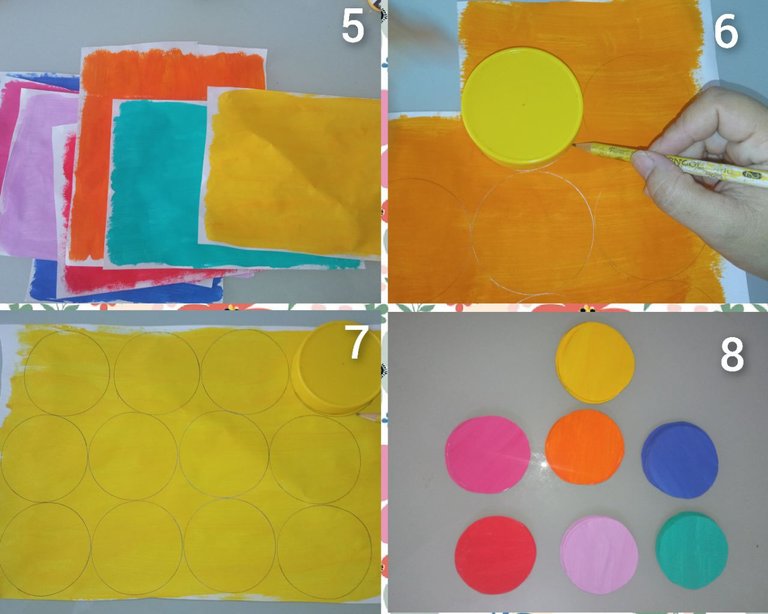
We begin by painting the sheets of recycled paper with the colors chosen according to your preference, paint at least three sheets of gold color since they will be the internal decorations of the flowers and let the sheets of paper dry, if you have colored cardboard it would be ideal, or you have like me and recycle your sheets of paper. Let your leaves dry and with a circular lid mark circles on all the leaves and cut them out with scissors.
Paso 2: Elaboramos las flores.
Iniciamos pintando las hojas de papel reclidas con los colores escogidos según tu preferencia, pinta al menos tres hojas de color oro ya que serán los adornos internos de las flores y deja secar las hojas de papel, si tienes cartulina de colores sería ideal, o has como yo y recicla tus hojas de papel. Deja secar tus hojas y con una tapa circular marca en todas las hojas círculos y recortalos con las tijeras.
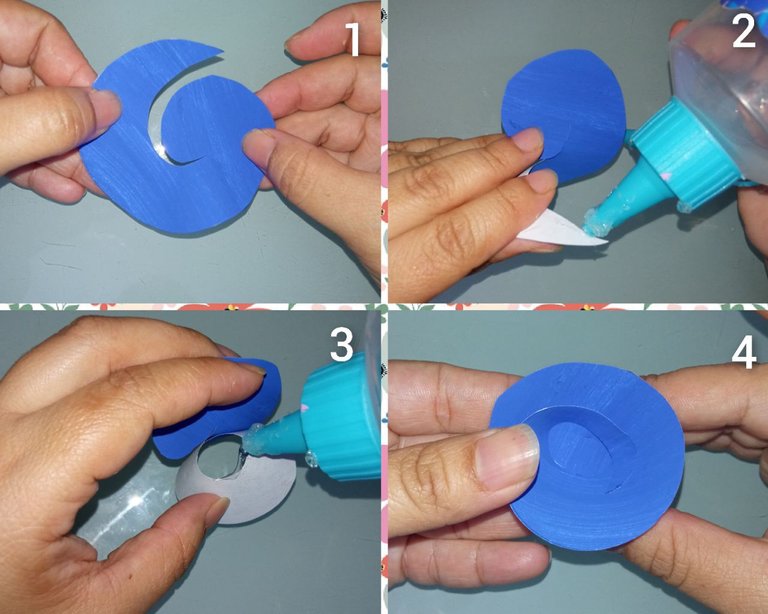
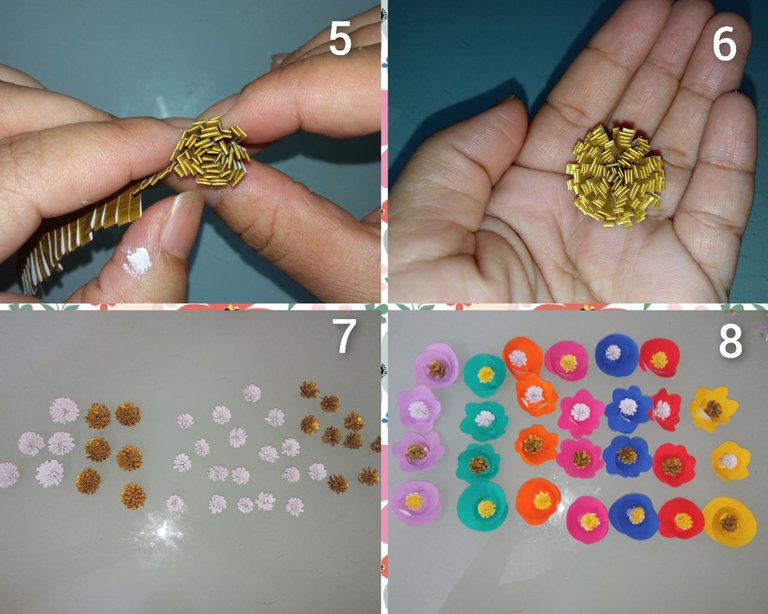
Flower No. 1: flower without border.
Take your circle of paper and cut it out with the scissors in the form of a spiral, the tip must be glued in the middle of the length of the spiral and paste the base with the glue. Make about 20 pieces of different colors.
Flor N° 1: flor sin borde.
Toma tu círculo de papel y recorta con las tijeras en forma de espiral, la punta la debes pegar a mitad del largo del espiral y pega la base con la pega. Realiza unas 20 piezas de diferentes colores.
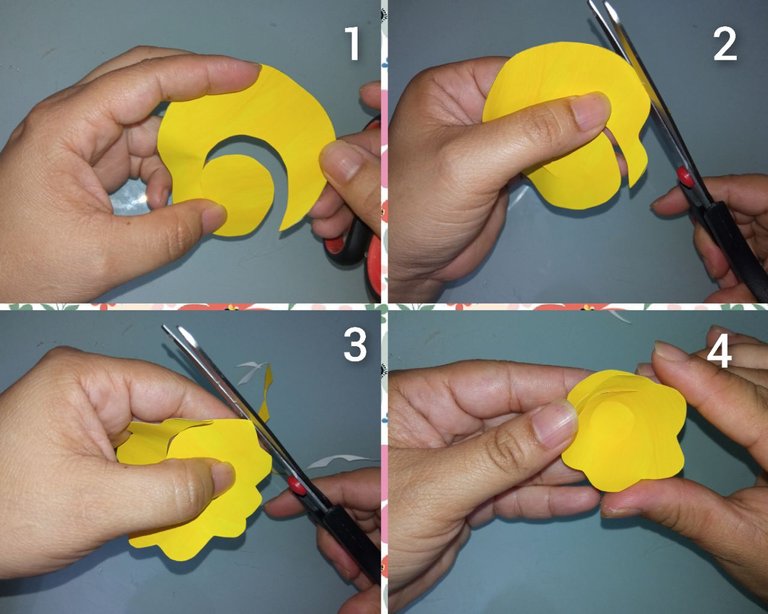
Flower No. 2: flowers with borders.
Take the scissors, cut out the circle of paper in a spiral shape and cut ripples on the outer edge and proceed to glue as you initially glued the other flowers. Make at least 20 pieces of different colors.
Flor N° 2: flores con bordes.
Toma las tijeras, recorta el círculo de papel en forma de espiral y recorta ondulaciones en el borde externo y procede a pegar como pegaste inicialmente las otras flores. Realiza al menos 20 piezas de diferentes colores.
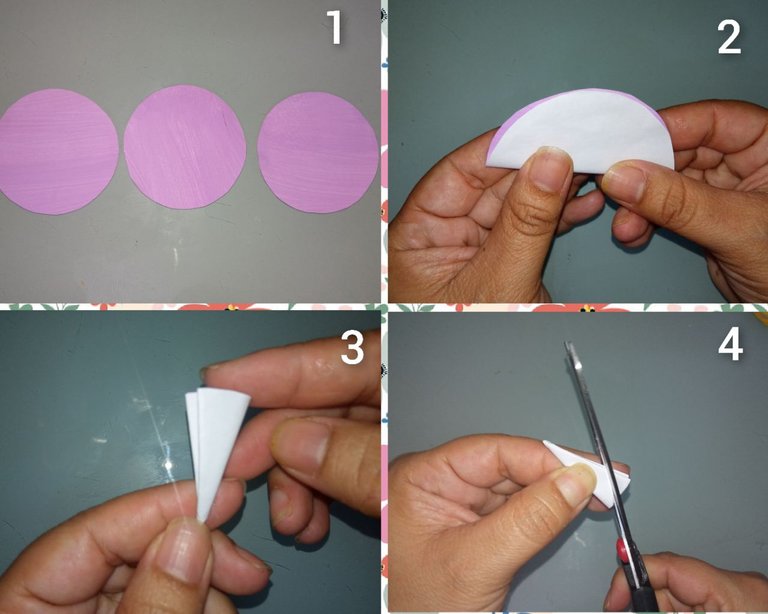
Flowers N°3: roses with three circles.
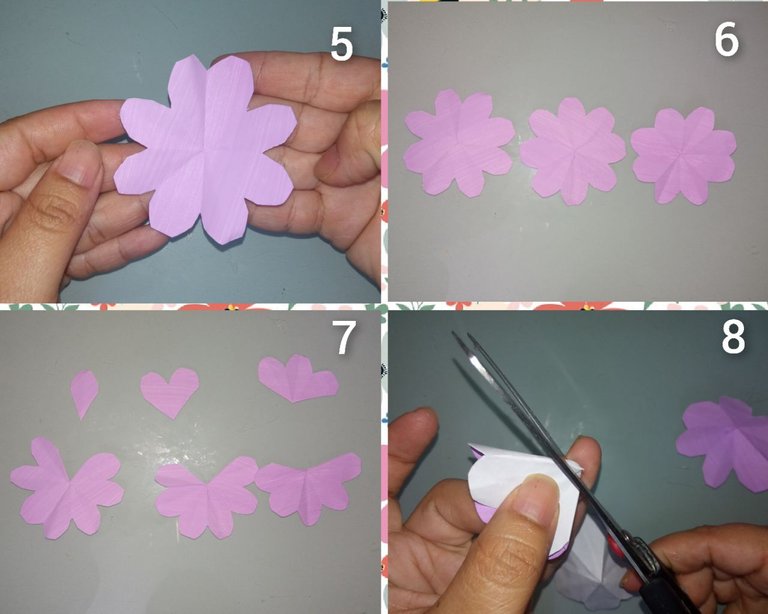
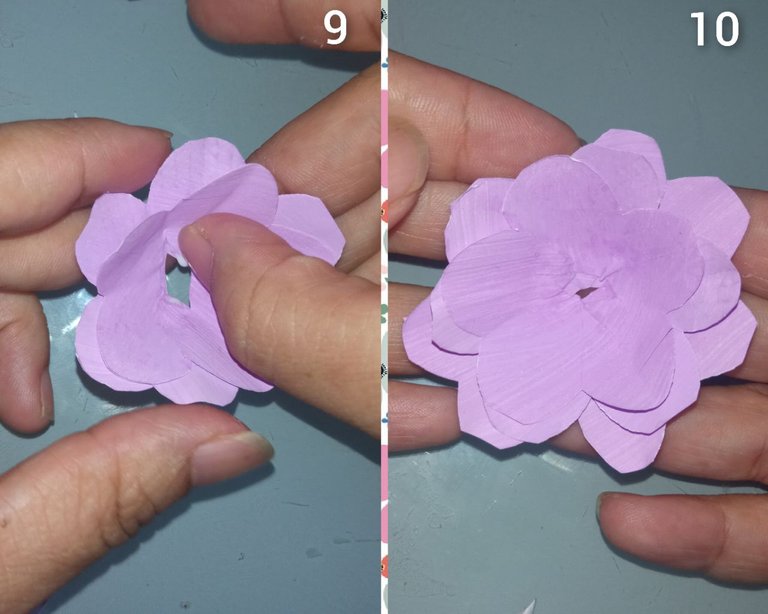
Take three circles of the same color, fold in half and fold four more times on itself, take the scissors and cut the oval shape from the thicker edge, open the circles and you will have three flowers. Now, cut one petal from one of your flowers, cut two from the next, and cut three of its petals from the next one. With the glue, glue both edges of the three flowers. Cut out the pointed shape of the base and glue each flower together from largest to smallest to form the flower. Make 15 pieces of different colors.
Flores N°3: rosas con tres círculos.
Toma tres círculos de igual color, dobla a la mitad y vuelve a doblar cuatro veces más sobre si mismo, toma las tijeras y recorta la forma oval del borde más grueso, abre los círculos y tendrás tres flores. Ahora, a una de tus flores recorta un pétalo, a la siguiente corta dos y a la que continúa corta tres de sus pétalos. Con el pegamento, pega ambos bordes de las tres flores. Recorta la forma puntiaguda de la base y pega entre sí de mayor a menor cada florecilla para formar la flor. Realiza 15 piezas de diferentes colores.
Step 3:
Decorate the center of the flowers and make the leaves.
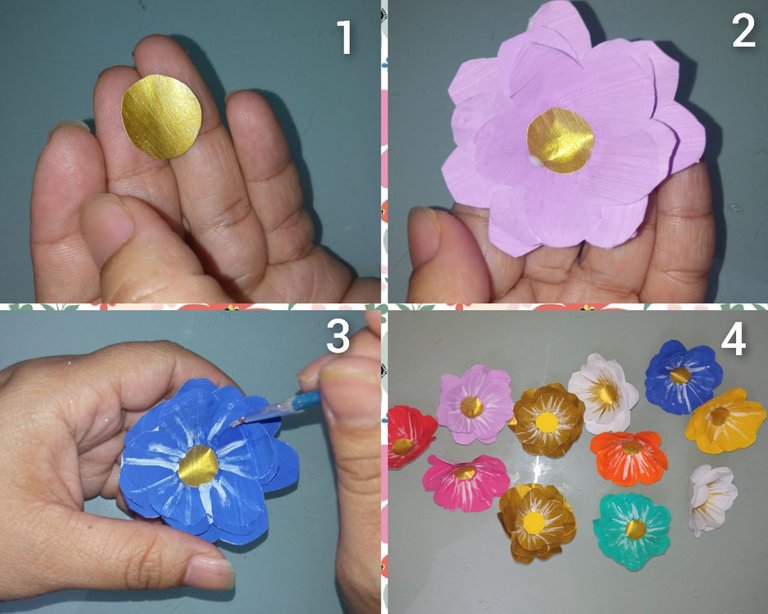
To decorate the roses in the center, cut out small circles in the gold colored paper and paste from the center of them, with the thin brush and the white paint paint the inner edges of the flowers.
Paso 3:
Decorar el centro de las flores y elaborar las hojas.
Para decorar las rosas en el centro, recorta círculos pequeños en el papel color oro y pega del centro de estás, con el pincel finito y la pintura blanca pinta los bordes internos de las flores.
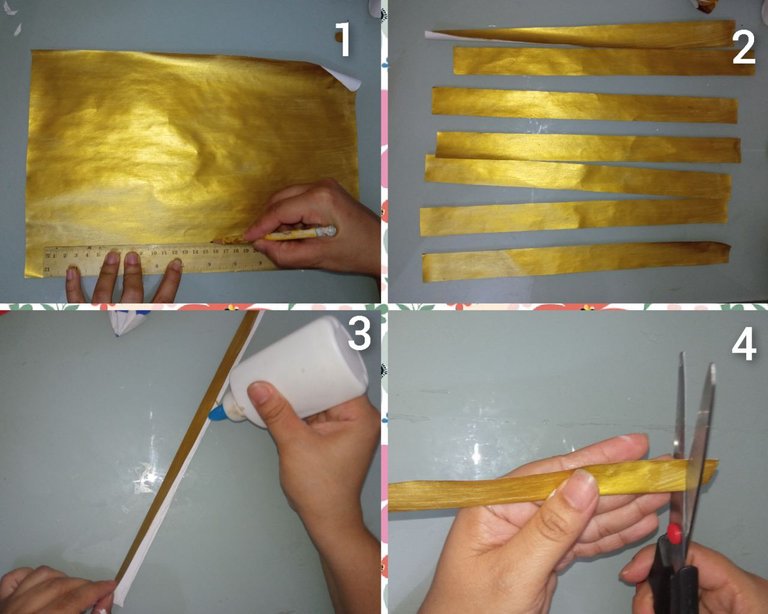
For the center of the other flowers: mark on the gold-colored paper and on the white sheets, bars 4 centimeters wide by 36 centimeters long with the ruler. Cut out the bars with the scissors, fold each bar in half, glue both edges together and trim the folded area of the bar with vertical slits with the scissors. Roll up each bar and glue the end point (make more flowers than you are by gluing two of your bars to decorate the empty areas). Paste from the center of the other flowers and paint some white, others gold in their center.
Para el centro de las demás flores: marca en el papel color oro y en las hojas blancas, barras de 4 centímetros de ancho por 36 centímetros de largo con la regla. Recorta las barras con las tijeras, dobla a la mitad cada barra, pega ambos bordes entre sí y recorta con las tijeras la zona doblada de la barra con cortes verticales. Enrolla cada barra y pega la punta final ( realiza más florecillas de estás pegando dos de tus barras para decorar las zonas vacías). Pega del centro de las demás flores y pinta algunas de color blanco, otras de color oro en su centro.
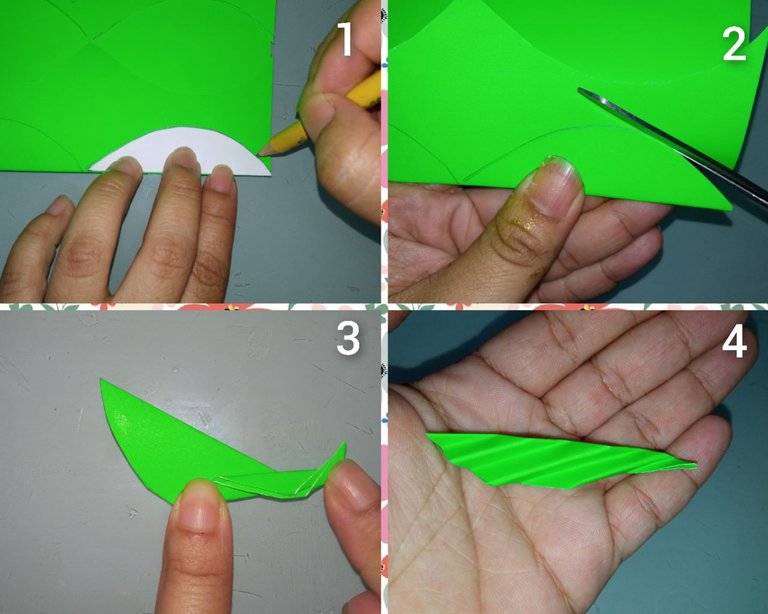
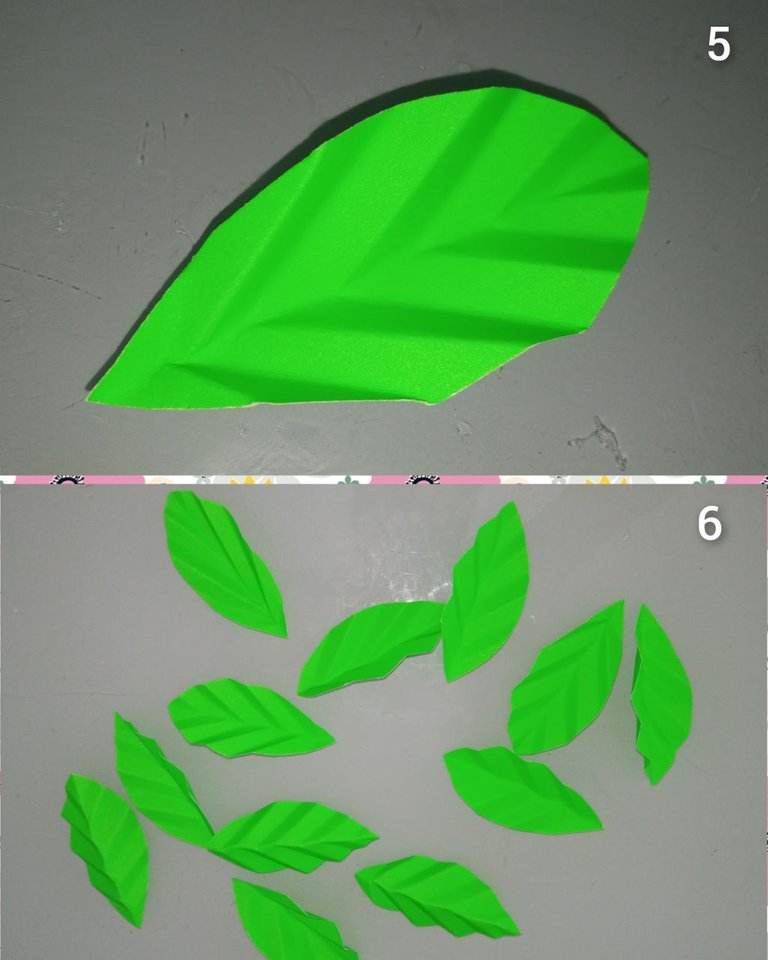
For the leaves: mark the pattern of the leaves on the apple green cardboard, cut out the shape with scissors and fold each leaf diagonally, make at least 20 leaves.
Para las hojas: maraca el patrón de las hojas en la cartulina verde manzana, recorta la forma con las tijeras y dobla cada hoja de forma diagonal, realiza al menos 20 hojas.
Step N°4:
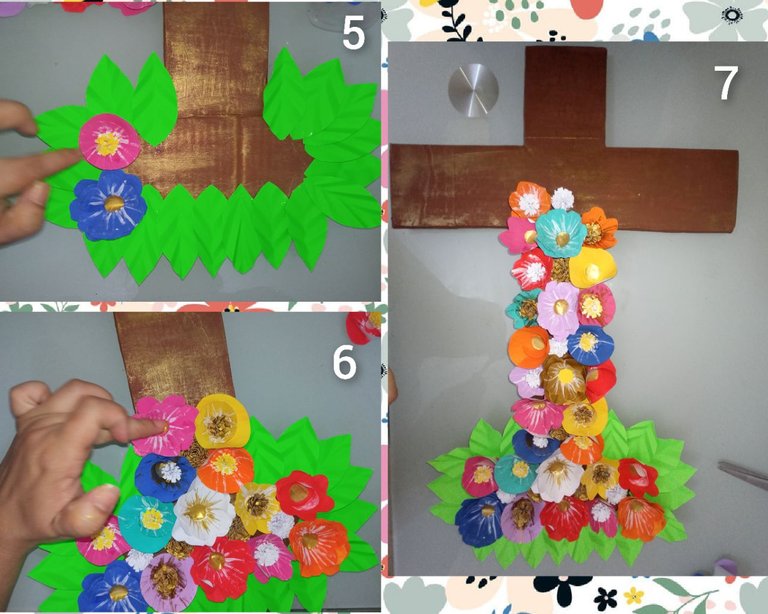
With each element of our elaborated wood, we are going to proceed to decorate the cross. Glue the leaves from the base and then in no specific order, but alternating the colors of the flowers.
Paso N°4:
Con cada elemento de nuestro madero elaborado, vamos a proceder a decorar la cruz. Pega de la base las hojas y luego sin orden específico, pero alternando los colores de las flores.
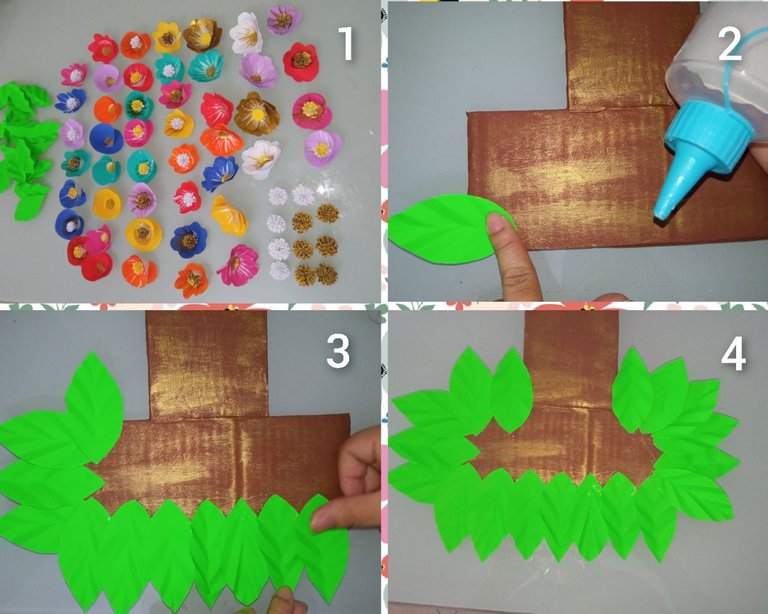
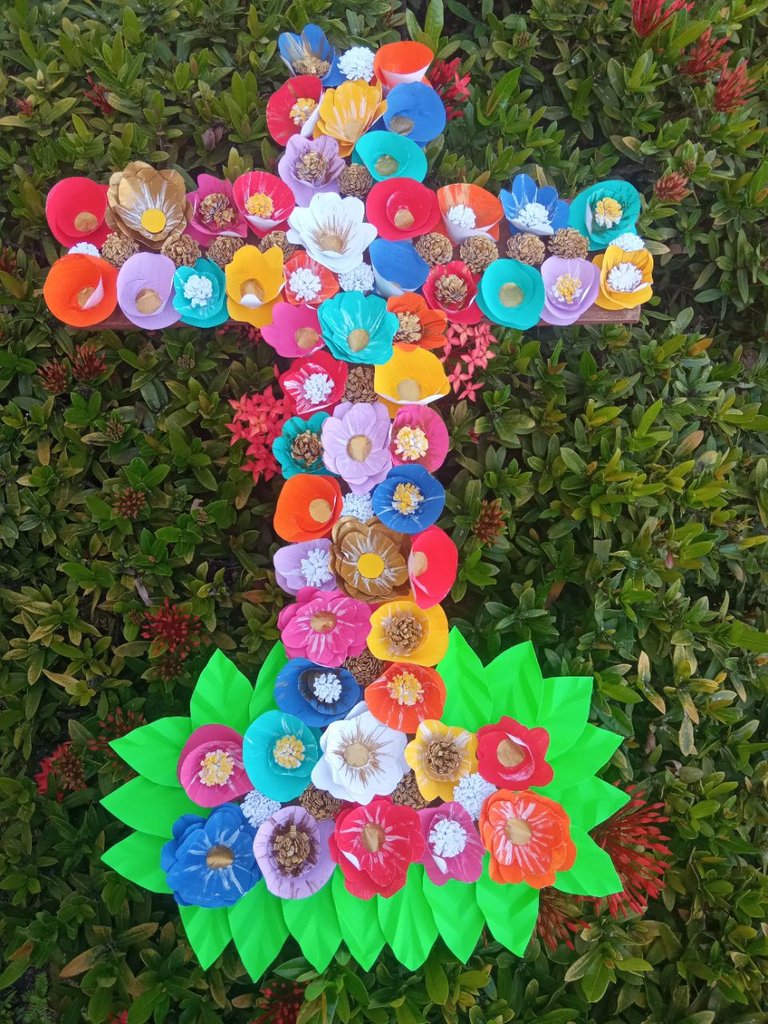
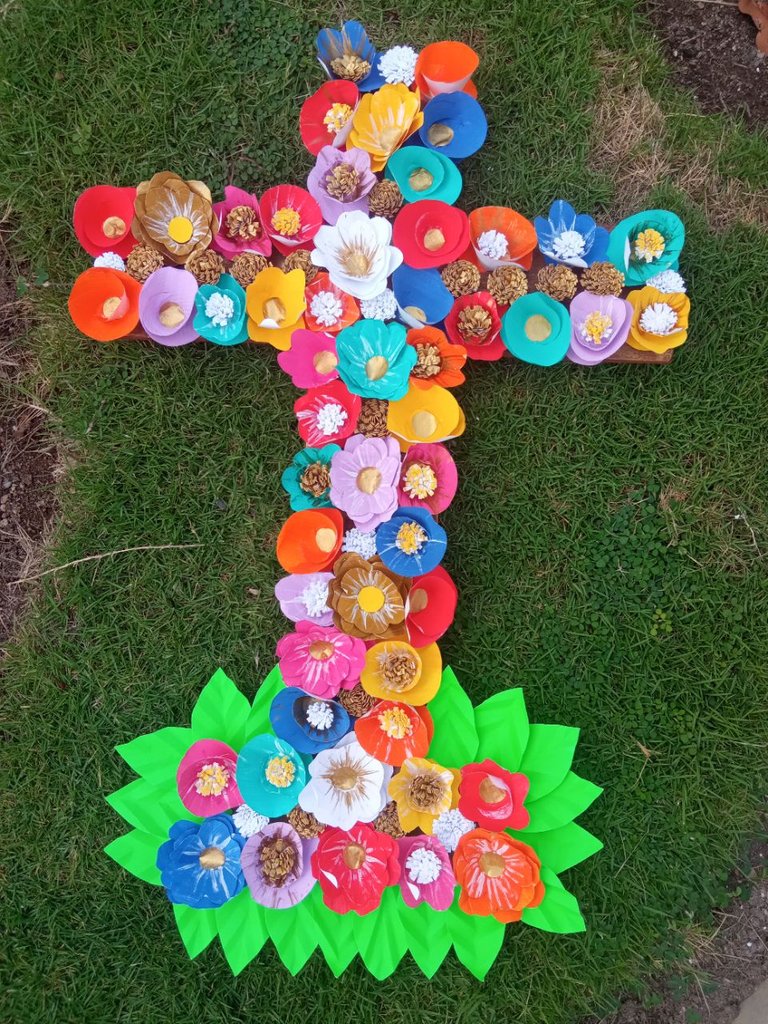
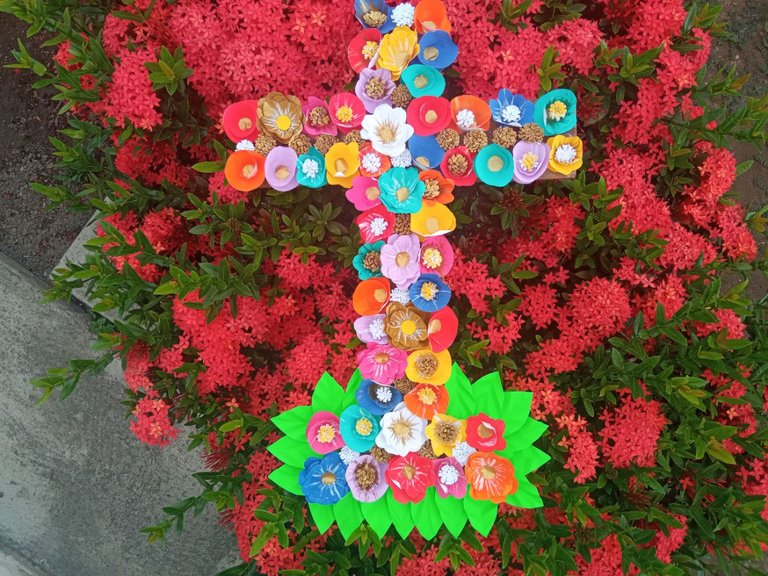
This has been the final result of my Maypole, so we start the month of cultivation, the month of the worker, the month of the rainy season, the month of flowers, the month of nurses and the month of mothers. This arduous project was finished in two days, I hope you like it. God bless you 🙏 and have a great day.
Este ha sido el resultado final de mi cruz de mayo, así damos inicio al mes del cultivo, al mes del trabajador, al mes de las temporada de lluvias, al mes de las flores, ales de las enfermeras y al mes de las madres. Este arduo proyecto fue terminado en dos días, espero que les guste. Dios les bendiga 🙏 y que tengan un excelente día.


THANKS FOR READING ME // GRACIAS POR LEERME.
Translated by: google translator // Traducido por: google traductor.
Camera 13 MP Xiaomi Redmi 9. // Camara 13 MP Xiaomi Redmi 9.
All photos are my property // Todas las fotos son de mi propiedad.
The collage were made with the collage maker android app // Los collage fueron realizado con la app para android collage maker.

