Hello hello, my creative people from the hive diy community. Before starting I want to tell you about a tradition that has become a trend in recent years, every September 21, yellow flowers are given to a special person, this gift has a special meaning, according to the trend of this day. It would mean love and affection towards a person, in addition, it would express the intention of spending a life together.This tradition of giving yellow flowers began with a television series that aired many years ago called Floricienta, where the protagonist dreamed since she was little that the boy she liked would come one day and give her flowers of this color, to show her love and since This became famous every September 21, every woman longs for this gift. Since I also wanted my yellow flowers and knew I wouldn't receive them, I decided to give myself my flowers by making them with materials I had at home.
Hola hola, mi gente creativa de la comunidad de hive diy. Antes de comenzar quiero contarles sobre una tradición que se ha vuelto tendencia en los últimos años, cada 21 de septiembre se le obsequia flores amarillas a una persona especial, este regalo tiene un significado especial, según la tendencia de este día. Significaría amor y cariño hacia una persona, además, expresaría la intención de pasar una vida juntos. Esta tradición de regalar flores amarillas comenzó con una serie de televisión que daban hace muchos años llamada Floricienta, donde la protagonista soñaba desde pequeña que el chico que le gustaba vendría un día y le regalaría flores de este color, para demostrarle su amor y desde que se hizo famoso este esto cada 21 de septiembre, toda mujer anhela este regalo. Como yo también quería mis flores amarillas y sabía que no las recibiría, decidí regalarme mis flores haciéndolas con materiales que tenía en casa.

Materials:
- Yellow cardboard.
- Green cardboard.
- Job.
- Scissors.
- Pencil.
- Ruler.
Materiales:
- Cartulina amarilla.
- Cartulina verde.
- Pega.
- Tijera.
- Lapiz.
- Regla.
Step by Step:
Paso a paso:


1.- To begin, I am going to take the yellow cardboard and mark 6 8cmx8cm squares.
1.- Para comenzar, voy a tomar la cartulina amarilla y marcaré 6 cuadros de 8cmx8cm.


2.- When I have the six squares marked, I am going to proceed to cut them out.
2.- Cuando ya tenga los seis cuadros marcados voy a proceder a recortarlos.


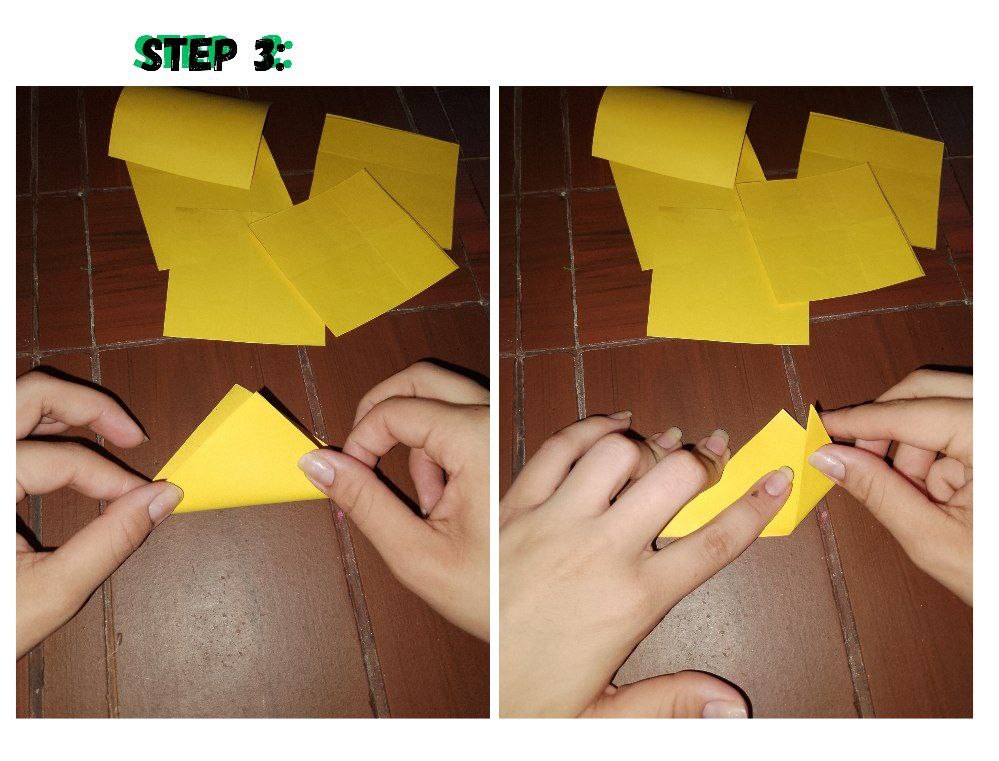
3.- Now I will take one of the cardboard squares and begin by folding it into the shape of a triangle, bringing two of the ends together. To then take one of the corners and I will take it to the middle, aligning it with the tip of the center, and I will do the same with the other.
3.- Ahora tomaré uno de los cuadros de cartulina y comenzaré doblándolo en forma de un triángulo juntando dos de las puntas. Para luego tomar una de las esquinas y la llevaré al medio alineándola con la punta del centro, y haré lo mismo con la otra.


4.- Now I will take one of the sides and bring it to where it was and then press down and to the center as I show you in the photos. Then cut the part that sticks out above the triangle.
4.- Ahora tomaré uno de los lados y lo llevo hacia donde estaba y luego presiono hacia abajo y al centro como les muestro en las fotos. Para luego cortar la parte que sobresale por encima del triángulo.

5.- Now I will fold the corners along the division that you have already marked in the middle. From the outside in.
5.- Ahora doblaré las esquinas por la división que estás ya tienen marcadas en la mitad. De afuera hacia adentro.

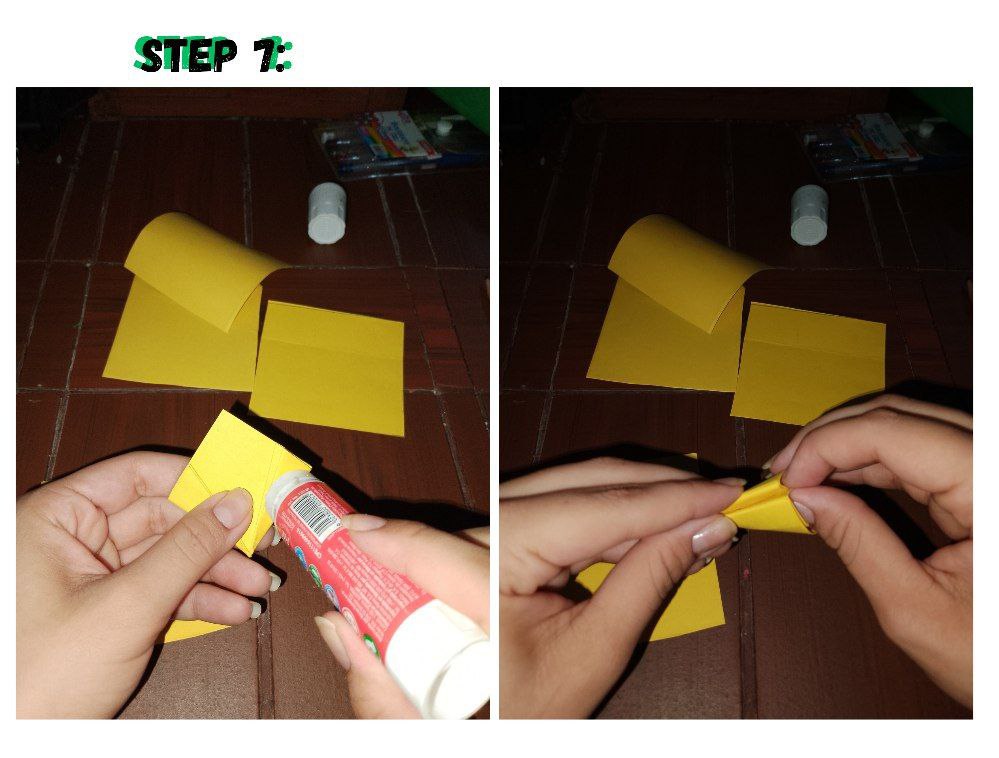
6.- I'm going to put a little glue on the sides and join both ends.
6.- Voy a colocar un poco de pega en los lados y junto ambos extremos.

7.- And I will do the same procedure with the rest of the paintings.
7.- Y haré el mismo procedimiento con el resto de los cuadros.

8.- I am going to take the green cardboard and make a painting with the same size as the others, 8cmx8cm.
8.- Voy a tomar la cartulina verde y haré un cuadro con la misma medida de los otros de 8cmx8cm.


9.- I will take the picture and I will join two points making a triangle as I did before, I will fold it in half, and in the middle of the half.
9.- Tomaré el cuadro y voy a juntar dos puntas haciendo un triángulo como hice anteriormente, doblaré por la mitad, y por la mitad de la mitad.


10.- I am going to draw a kind of arrow or triangle at the upper end and I am going to cut it and the tip a little. These would be the leaves of the flower.
10.- Voy a dibujar una especie de flecha o de triángulo en el extremo superior y lo voy a recortar y un poco la punta. Esto vendrían siendo las hojas de la flor.


11.- I will draw a 12cmx18cm square on the same green cardboard and then I will cut it out. This would be the stem of the flower.
11.- Dibujaré un cuadro de 12cmx18cm en la misma cartulina verde y luego lo voy a recortar. Esto sería el tallo de la flor.

12.- I take one of the ends and I will roll until the end of the sheet, to which I will add a little glue and finish rolling.
12.- Tomo una de las puntas e iré enrollando hasta el final de la hoja, a la cual le echaré un poco de pega y termino de enrollar.


13.- Now I am going to form the flower by taking the petals one by one and I will add a little glue to the edges of the center and glue them together.
13.- Ahora voy a formar la flor tomando uno por uno de los pétalos y le iré echando un poco de pega en los bordes del centro y pegaré unos con otros.

14.- To finish I am going to put a little glue on the tips, or I can use silicone to make it dry faster, and I am going to glue the green stick that we made.
14.- Para finalizar voy a echarle un poco de pega en la puntas, o puedo utilizar silicon para que seque más rápido, y le voy a pegar el palito verde que realizamos.


15.- Once it is fixed and dry, I am going to take the leaf and insert it through the stick until I have the beginning of the flower.
15.- Una vez este fijo y seco, voy a tomar la hoja y la introduciré por el palo hasta llevar el inicio de la flor.
And this is how it turns out, I can make as many as I want and in whatever color I want, they are super easy and very pretty.
Y así es como queda, puedo hacer cuantas quiera y del color que quiera, son super faciles y muy bonitas.


