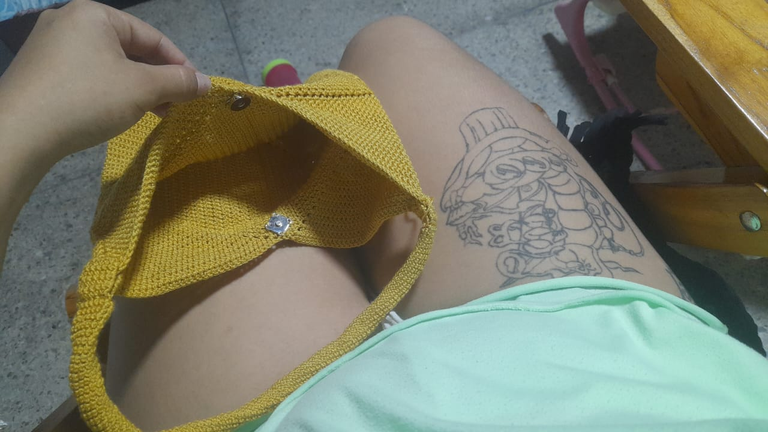
A while ago I knitted a bag for my sudden outings and to store my things, it was a project that I completed without any guidance. I found this bag on the internet, but I couldn't find anything that explained the patterns, so I ended up making it cleverly and managed to get a good result.
Hace un tiempo tejí un bolso para mis repentinas salidas y guardar mis cosas, fue un proyecto que completé sin ninguna guía. Este bolso me lo encontré por internet, pero no encontré nada que me explicara los patrones, así que lo terminé haciendo con astucia y logrando obtener un buen resultado.

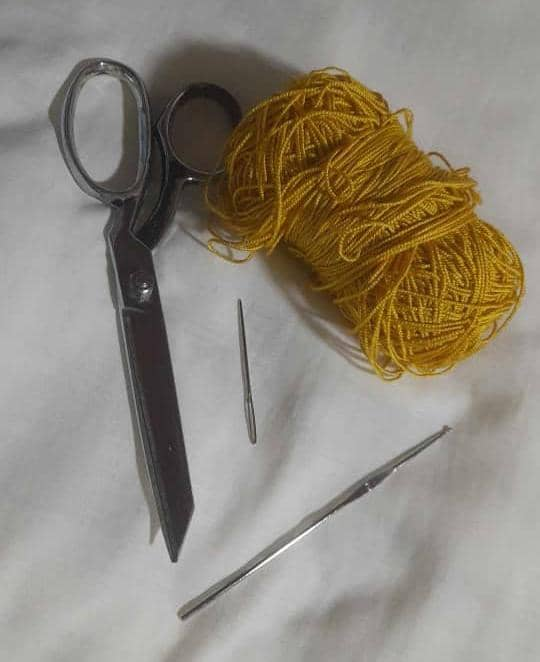
Coral yarn 100% anti-allergic acrylic.
2mm needle.
Sewing needle (Wool).
Scissors or some tool that allows you to cut the thread easily.
MATERIALES A USAR:
Hilo coral 100% acrílico antialérgico.
Aguja de 2mm.
Aguja de coser (Lanera).
Tijera o alguna herramienta que te permita cortar el hilo con facilidad.


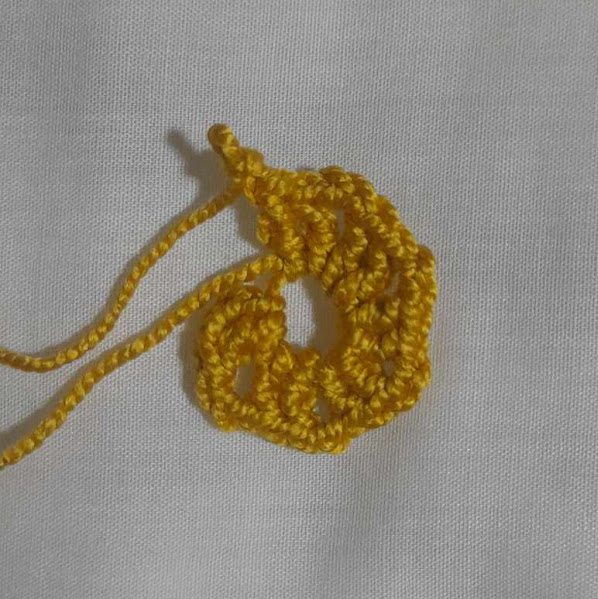
To make our two hexagons:
Round 1: 24 double crochets.
Round 1:
Start by making a magic ring. Inside the magic ring, make 3 chains and 1 double crochet, 2 chains and 2 double crochets, 2 chains and 2 double crochets, and so on until you have 6 groups of 2 double crochets plus 2 chains. Finally, after the 6 groups of 2 double crochets and 2 chains, make only one chain and close the round with 1 single crochet in the third starting chain. When you finish this round, you should have 24 stitches in total.
Para hacer nuestros dos hexágonos:
Vuelta 1: 24 puntos altos.
1.ª vuelta:
Iniciamos haciendo un anillo mágico. Dentro del anillo mágico hacemos 3 cadenas y 1 punto alto, 2 cadenas y 2 puntos altos, 2 cadenas y 2 puntos altos, y así hasta tener 6 grupitos de 2 puntos altos más 2 cadenas. Al final, después de los 6 grupos de 2 puntos altos y 2 cadenas, hacemos solo una cadena y cerramos la vuelta con 1 punto bajo en la tercera cadena de inicio. Al terminar esta vuelta, debemos tener 24 puntos en total.

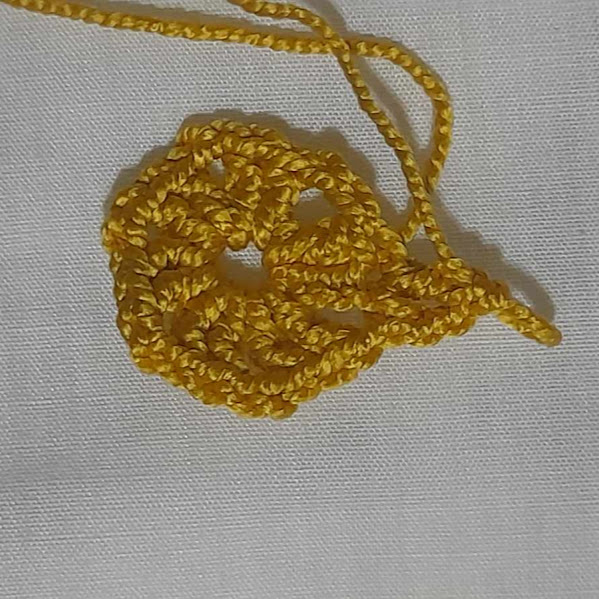
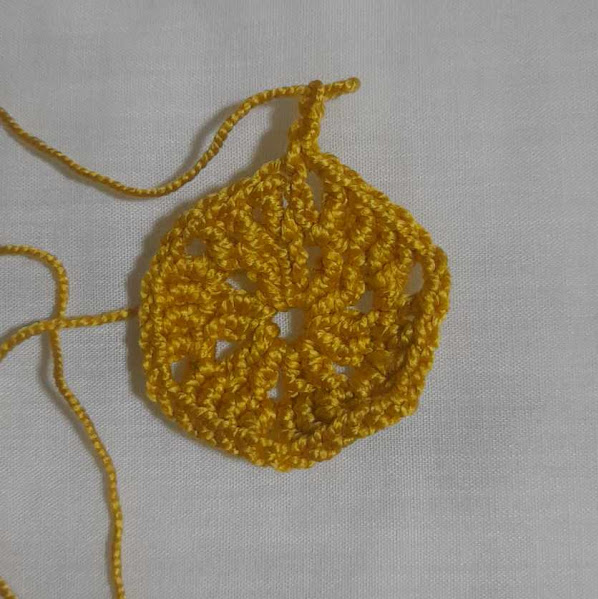
2nd Round:
We make 2 chains in the stitch that follows a double crochet, in the next a double crochet and in the following 2 chains a double crochet, we separate with 2 chains and make a double crochet over the two chains of the previous round, a double crochet over a double crochet and two double crochets separated from 2 chains and so on until finishing this round. When finishing the 6th group of double crochets and increasing in the two chains we make only one chain and a single crochet over the second starting chain. At the end we should have 36 stitches in total.
2.ª vuelta:
Hacemos 2 cadenas. En el punto que sigue, un punto alto. En el siguiente, un punto alto y en las siguientes 2 cadenas, un punto alto. Separamos con 2 cadenas y hacemos un punto alto sobre las dos cadenas de la vuelta anterior, un punto alto sobre punto alto y dos puntos altos separados de 2 cadenas, y así hasta terminar esta vuelta. Al terminar el 6.º grupo de puntos altos y aumento en las dos cadenas, hacemos solo una cadena y un punto bajo sobre la segunda cadeneta de inicio. Al final debemos tener 36 puntos en total.

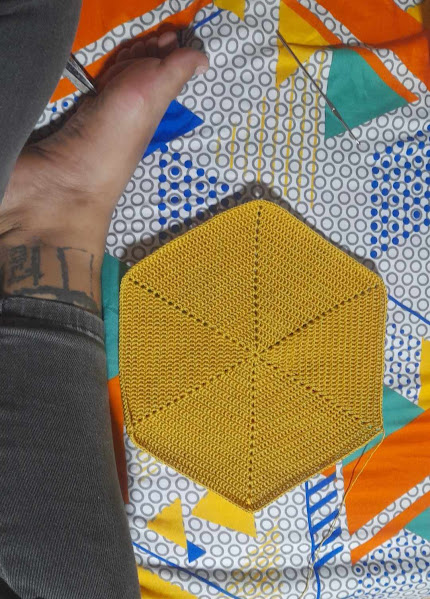
To avoid being too repetitive, we are going to repeat this round by round. We are always going to do the same procedure: we close the round with a chain and a single crochet in the second starting chain, two chains, stitch over double crochet and increase of two double crochets separated by two chains, stitch over double crochet. This way until we get the number of rounds that we want; I made it with only 19 rounds for each hexagon.
Para no ser tan repetitiva, esto es lo mismo que vamos a repetir vuelta por vuelta. Siempre vamos a hacer el mismo procedimiento: cerramos la vuelta con una cadena y un punto bajo en la segunda cadena de inicio, dos cadenas, punto sobre punto alto y aumento de dos puntos altos separados de dos cadenas, punto sobre punto alto. Así hasta obtener la cantidad de vueltas que quieran; yo la hice de solo 19 vueltas para cada hexágono.

Here is the number of stitches per round:
- Round 1: 24 double crochets
- Round 2: 36 double crochets
- Round 3: 48 double crochets
- Round 4: 60 double crochets
- Round 5: 72 double crochets
- Round 6: 84 double crochets
- Round 7: 96 double crochets
- Round 8: 108 double crochets
- Round 9: 120 double crochets
- Round 10: 132 double crochets
- Round 11: 144 double crochets
- Round 12: 156 double crochets
- Round 13: 168 double crochets
- Round 14: 180 double crochets
- Round 15: 192 double crochets
- Round 16: 204 double crochets
- Round 17: 216 high points
- Round 18: 228 high points
- Round 19: 240 high points
Acá les dejo la cantidad de puntos por vueltas:
- Vuelta 1: 24 puntos altos
- Vuelta 2: 36 puntos altos
- Vuelta 3: 48 puntos altos
- Vuelta 4: 60 puntos altos
- Vuelta 5: 72 puntos altos
- Vuelta 6: 84 puntos altos
- Vuelta 7: 96 puntos altos
- Vuelta 8: 108 puntos altos
- Vuelta 9: 120 puntos altos
- Vuelta 10: 132 puntos altos
- Vuelta 11: 144 puntos altos
- Vuelta 12: 156 puntos altos
- Vuelta 13: 168 puntos altos
- Vuelta 14: 180 puntos altos
- Vuelta 15: 192 puntos altos
- Vuelta 16: 204 puntos altos
- Vuelta 17: 216 puntos altos
- Vuelta 18: 228 puntos altos
- Vuelta 19: 240 puntos altos
Make two pieces of these hexagons.
Hacer dos piezas de estos hexágonos.

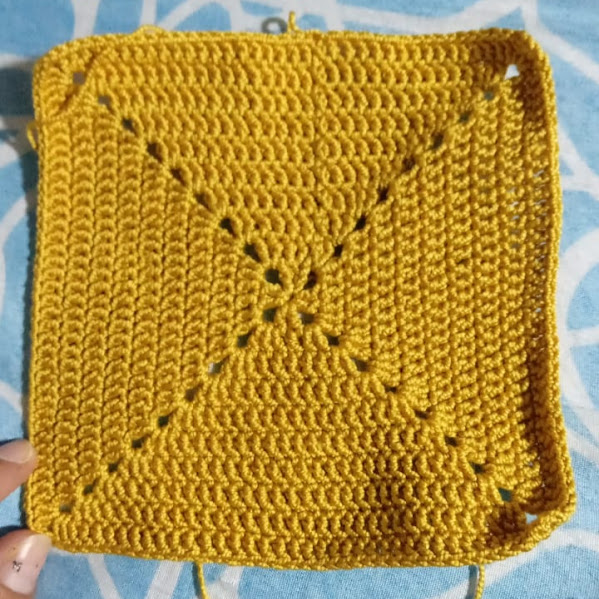
For the square we are going to do 10 rounds.
This is the number of stitches per round in the base square, taking into account that for each round we make 4 increases in groups, 16 per round.
Para el cuadrado vamos a hacer 10 vueltas.
Esta es la cantidad de puntos que hay por vuelta en el cuadrado de base, teniendo en cuenta que por cada vuelta hacemos 4 aumentos por grupos, 16 por vuelta.

Here is the number of stitches per round: Table.
- Round 1: 16 double crochets
- Round 2: 32 double crochets
- Round 3: 48 double crochets
- Round 4: 64 double crochets
- Round 5: 80 double crochets
- Round 6: 96 double crochets
- Round 7: 112 double crochets
- Round 8: 128 double crochets
- Round 9: 144 double crochets
- Round 10: 160 double crochets
Acá les dejo la cantidad de puntos por vueltas: Cuadro.
- Vuelta 1: 16 puntos altos
- Vuelta 2: 32 puntos altos
- Vuelta 3: 48 puntos altos
- Vuelta 4: 64 puntos altos
- Vuelta 5: 80 puntos altos
- Vuelta 6: 96 puntos altos
- Vuelta 7: 112 puntos altos
- Vuelta 8: 128 puntos altos
- Vuelta 9: 144 puntos altos
- Vuelta 10: 160 puntos altos


To make the bag handle:
First part:
Start with a chain of 9. Start the first round by leaving a chain, make a single crochet in each chain (there will be 8 single crochets in total). Make a chain, turn and crochet single crochet over single crochet. Repeat this step until you have 14 rounds of 8 single crochets each.
Next, make 8 chains and slide the hook into the beginning of the single crochets, in the first single crochet of the round. We will start to crochet in a spiral only through the back loop. Look carefully at each single crochet, you will see a kind of chain; we will crochet the single crochet behind that chain. We will continue to crochet in a spiral without slipping at the end of each round, until we get the desired length. In my case, I made a strip of approximately 20 cm.
When the length is finished, we turn the fabric and make 8 double crochets, just like at the beginning. We repeat this step for 14 more turns to obtain the same length as the first part of the strip.
To glue the parts we need a wool needle or a blunt needle and we take a long strand of thread. We pass the needle through as if we were going to sew and we fold the hexagons in half so that there are 3 sides of the hexagon. We will make this fold by putting the front part of the fabric inside the fold and we look in the middle of that fold and we can see the strands together on each side. Likewise, taking only the front strand, we will glue part number 2 of the three that are seen when folding and that are also the only ones that are found in the hexagon. We glue the first side, we fold the square of the base so that it looks like a triangle placing the front wall inwards just like the hexagons and we will glue the square in the same way until we go all the way around and glue all the sides correctly. And now we can see how the bag begins to take shape.
After gluing all the parts, all that's left to do is glue the handle, which we're going to glue with the same wool needle (blunt tip). We put the strips through the second hole left in the hexagon, the little hole that separates the chains in the turns of the hexagon. In the second hole we're going to pass through the flat part of the low stitches on the handle. We fold it in half and with a sufficiently long strand of thread we're going to pass the thread from side to side along all the edges until we seal the strip and secure it well on each side. All that's left to do now is hide the threads in the same fabric so that they can't be seen on the back of the fabric. (Optional) We can add a magnet button to seal your bag.
Para hacer el asa del bolso:
Primera parte:
Comenzamos con una cadena de 9. Empezamos la primera vuelta dejando una cadena, hacemos un punto bajo en cada cadena (en total serán 8 puntos bajos). Hacemos una cadena, damos vuelta y tejemos punto bajo sobre punto bajo. Repetimos este paso hasta obtener 14 vueltas de 8 puntos bajos cada una.
A continuación, hacemos 8 cadenas y deslizamos el ganchillo al inicio de los puntos bajos, en el primer punto bajo de la vuelta. Empezaremos a tejer en espiral solo por la hebra de atrás. Fíjate bien en cada punto bajo, verás una especie de cadena; tejeremos el punto bajo por detrás de esa cadena. Continuaremos tejiendo en espiral sin deslizar al final de cada vuelta, hasta obtener el largo deseado. En mi caso, hice una tira de aproximadamente 20 cm.
Al terminar el largo, damos vuelta al tejido y hacemos 8 puntos altos, al igual que al inicio. Repetimos este paso durante 14 vueltas más para obtener la misma longitud que la primera parte de la tira.
Para pegar las partes necesitamos una aguja lanera o punta roma y tomamos una hebra de hilo larga. Traspasamos la aguja como si fuera a coser y doblamos los hexágonos a la mitad de modo que queden 3 caras del hexágono. Este doblez lo haremos poniendo la parte delantera del tejido por dentro del doblez y miramos en la mitad de ese doblez y se ven las hebras juntas de cada lado. Así mismo, tomando solo la hebra de adelante, vamos a ir pegando la parte número 2 de las tres que se ven al doblar y que también son las únicas que se encuentran del hexágono. Pegamos el primer lado, doblamos el cuadrado de la base de forma que se vea como un triángulo colocando la pared delantera hacia adentro igual que los hexágonos y vamos pegando de la misma forma el cuadrado hasta dar toda la vuelta y pegar todos los lados correctamente. Y ahí empezamos ya a ver el bolso como empieza a agarrar forma.
Después de pegar todas las partes, solo queda pegar el asa la cual vamos a pegar con la misma aguja lanera (punta roma). Metemos las tiras por el segundo hueco que queda en el hexágono, el huequito que hacen la separación de las cadenas en las vueltas del hexágono. En el segundo hueco vamos a traspasar la parte plana de puntos bajos en el asa. Doblamos a la mitad y con una hebra de hilo suficientemente larga vamos a ir traspasando el hilo de lado a lado por todas las orillas hasta sellar la tira y asegurarla bien de cada lado. Ya solo queda esconder los hilos entre el mismo tejido de forma que no se vea por el lado reverso del tejido. (Opcional) Le podemos agregar un botón de imán para sellar tu bolsita.

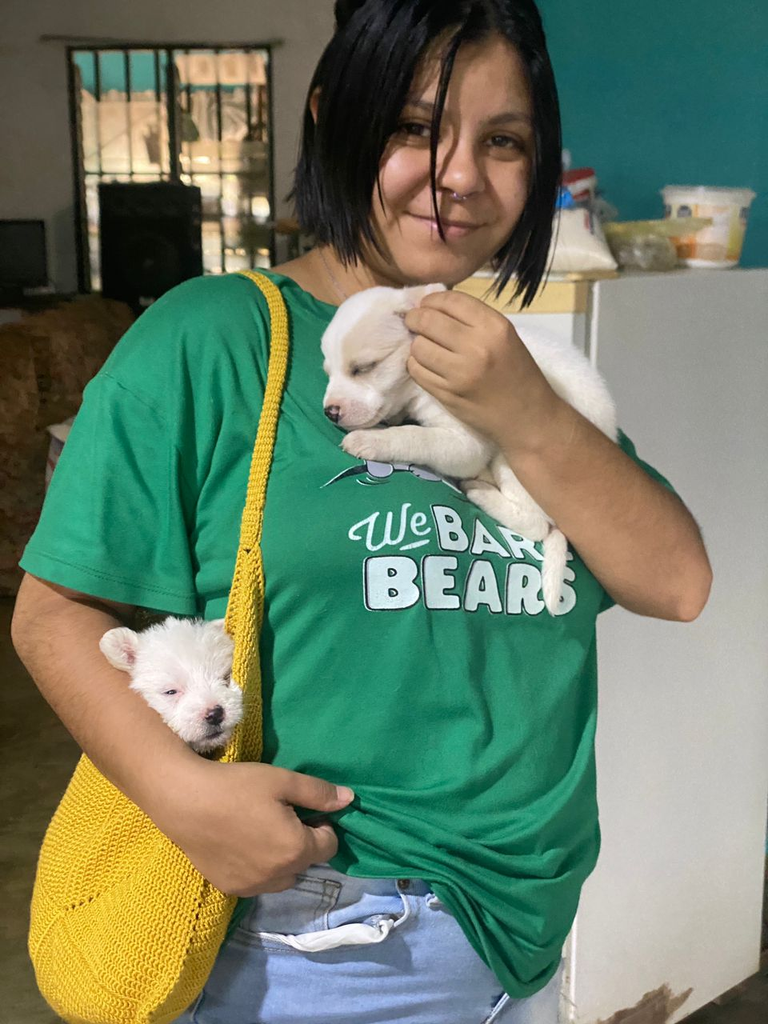
I gave this bag to my best friend, whom I hadn't seen for a long time, since I've been living in Colombia for 6 years. My current visit made me meet her again and it seemed like one of the best moments of this visit.
Este bolso se lo regalé a mi mejor amiga a quien no veía desde hace mucho tiempo, ya que vivo en Colombia desde hace 6 años. Mi actual visita me hizo reencontrarme con ella y me pareció uno de los mejores momentos en esta visita.

Considera unirte a nuestro trail de curación en HIVEVOTE haciendo click en la imagen inferior, Les agradecemos todo el apoyo.
A todos los artistas ahí afuera en HIVE, si alguna vez se sienten solos y perdidos, unanse al canal de discord de Bokura No Digital World


