Saludos Comunidad de artistas de @DiyHub, estoy muy complacida de participar para este CONTEST, en conjunto con la comunidad de @skatehive, donde el tema de este mes serán las abejas.
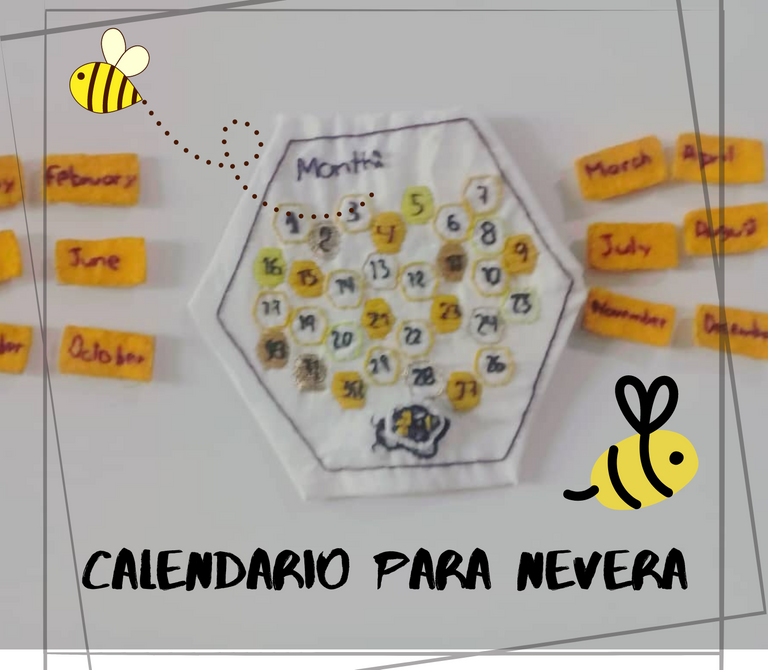
Les traigo como creación para participar, un calendario bordado para nevera, solo con materiales que tenia en casa, una bonita e ideal decoración para saber los días y el mes. Calendario que, nos hará recordar siempre lo esencial que este pequeño animal para el planeta tierra. Debo destacar que, hace apenas un mes fue que aprendí a bordar, por lo que aun desconozco el nombre de ciertas técnicas y los hilos a usar, no obstante, poco a poco les mostraré como fue su fabricación.
Antes de continuar, quiero invitar a
@yasmarit y
@mvart a que participen. Y gracias
@irenenavarroart por motivarme a participar.
-Aguja para bordar
-Hilos para bordar, de diferentes tonos de amarillo.
-Hilos de ovillo de color negro y morado.
-Hilo negro y blanco
-Cualquier cartón o carpeta vieja que sirva de soporte
-Telas (preferiblemente de tramas un poco separadas, una donde la aguja pase más fácil)
-Pega (en mi caso use la pega de zapato y me funcionó)
-Imán
Paso 1. Dibujo de patrones
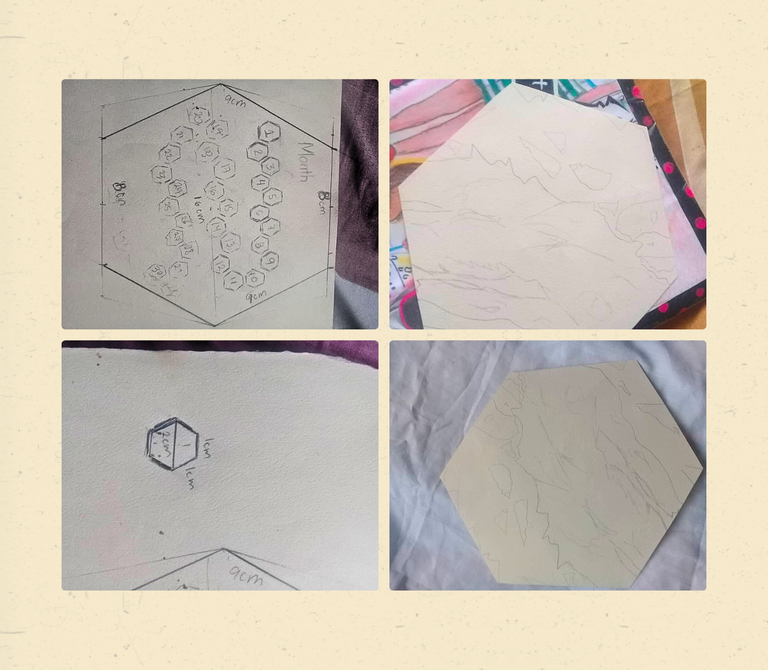
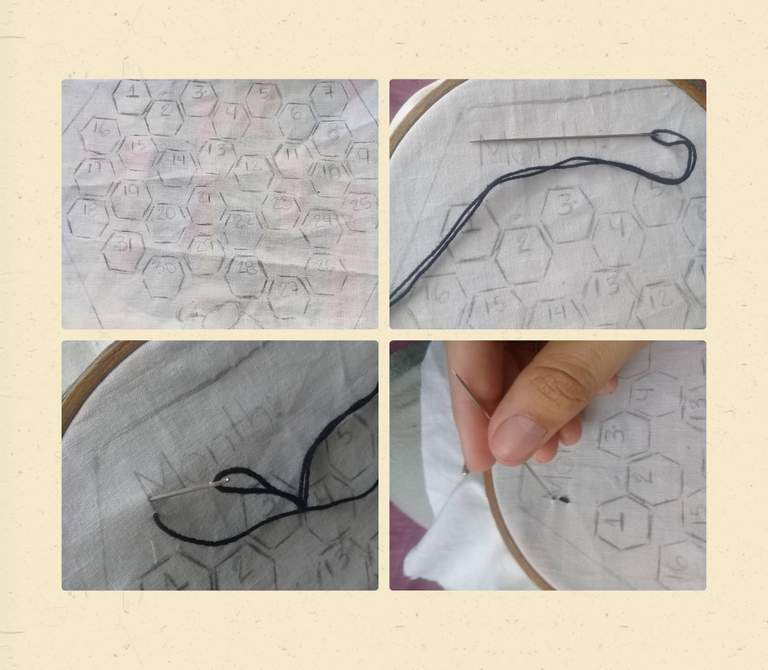
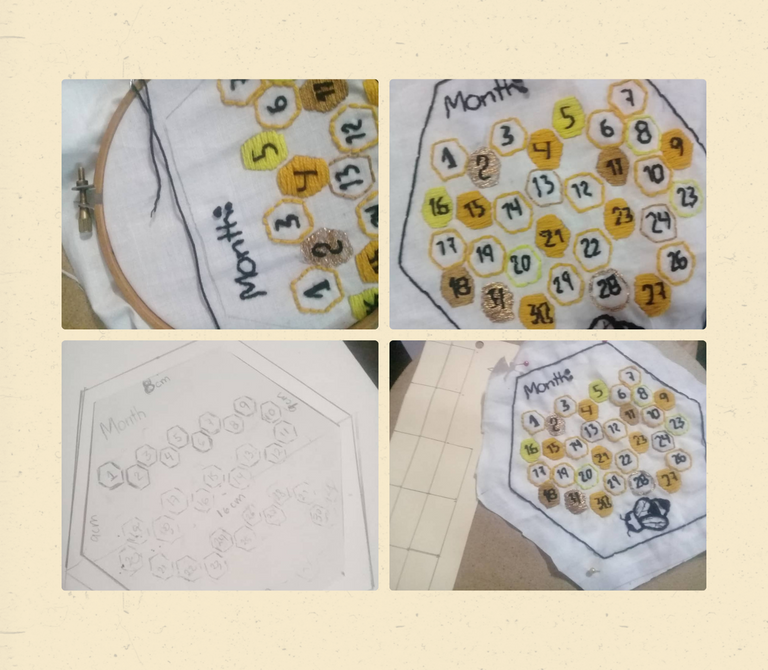
Primero realice un dibujo con la silueta de un panal de abeja en una carpeta vieja, para luego dibujar en su interior, pequeños panales, donde estarían los números, más la palabra mes, esto con el objetivo de ver como estarían ubicados y extraer el tamaño adecuado de ese mini panal, donde irían los números. Dibujé ese mini panal aparte, para tenerlo como patrón y así todos quedarían del mismo tamaño.
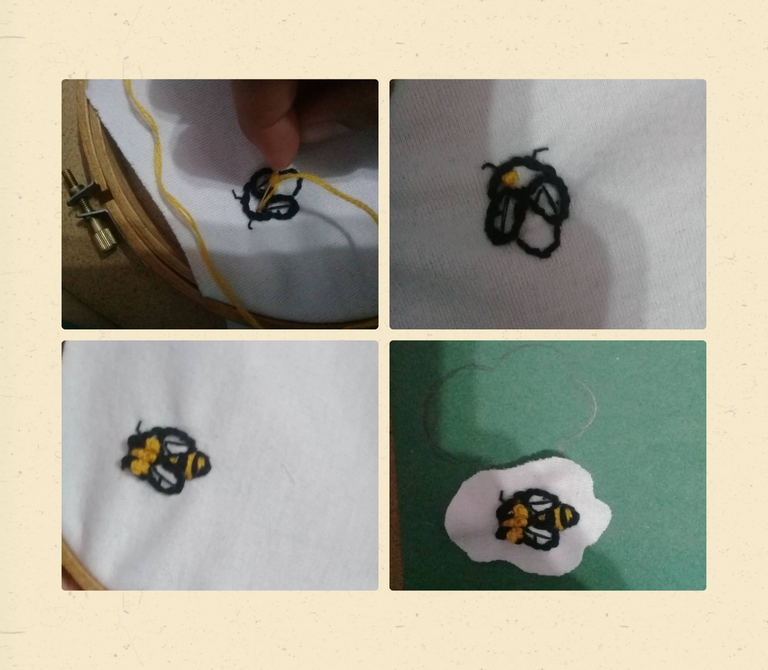
Al tener listo estos patrones, pase esas siluetas a una tela blanca fina que tenía a la mano, le escribí la palabra mes y como vi que tenia un poco de espacio, le dibuje una pequeña abeja, tomando como referencia una imagen de internet.
Paso 2. Bordar
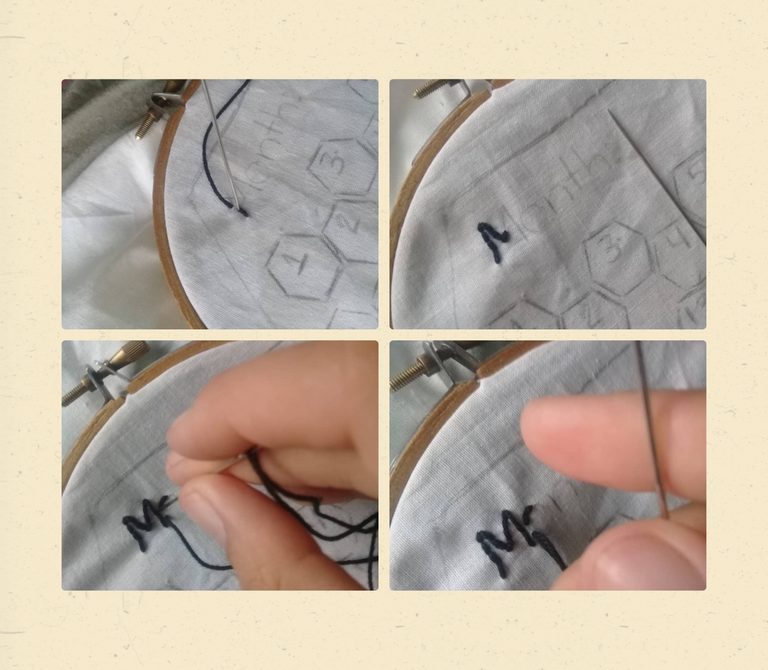
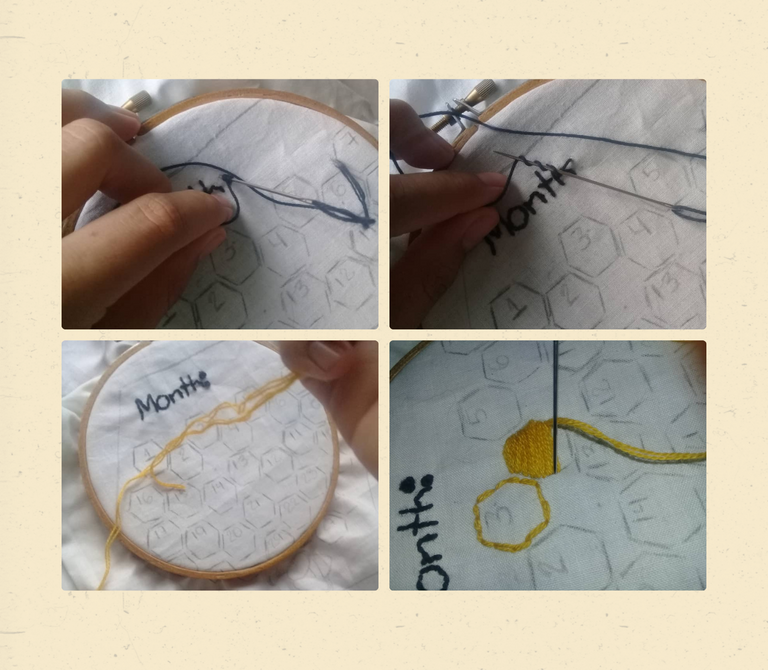
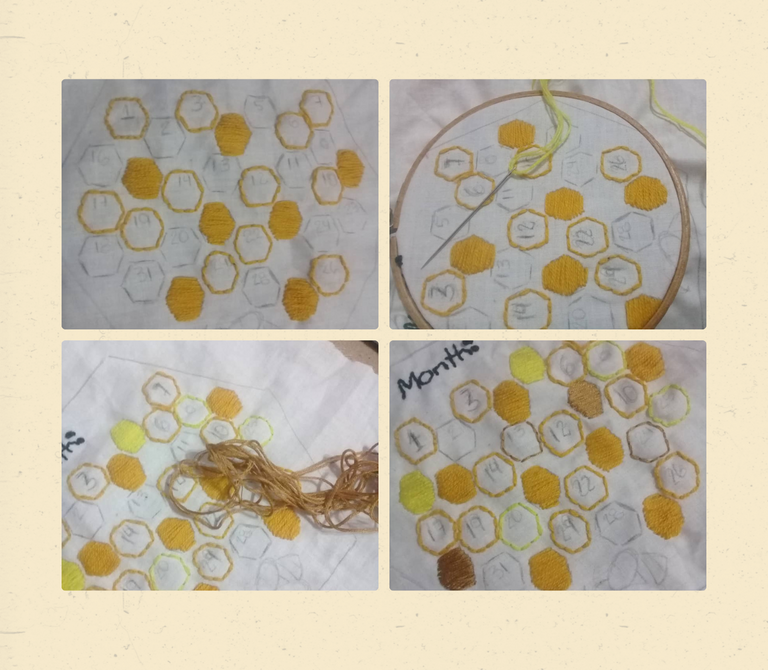
Luego de tener todo dibujado, procedí a tomar una aguja y el hilo negro para así empezar a bordar. Con la palabra “mes” aplique la técnica de paso atrás, en donde prácticamente consiste en sacar el hilo de detrás de la tela hasta el frente, introducirlo de nuevo en la misma, más delante de este primer punto, luego se vuelve a sacar, pero no cerca de este punto final, si no un poco más adelante, al volver a introducir en la tela, se devuelve a ese segundo punto y así sucesivamente.
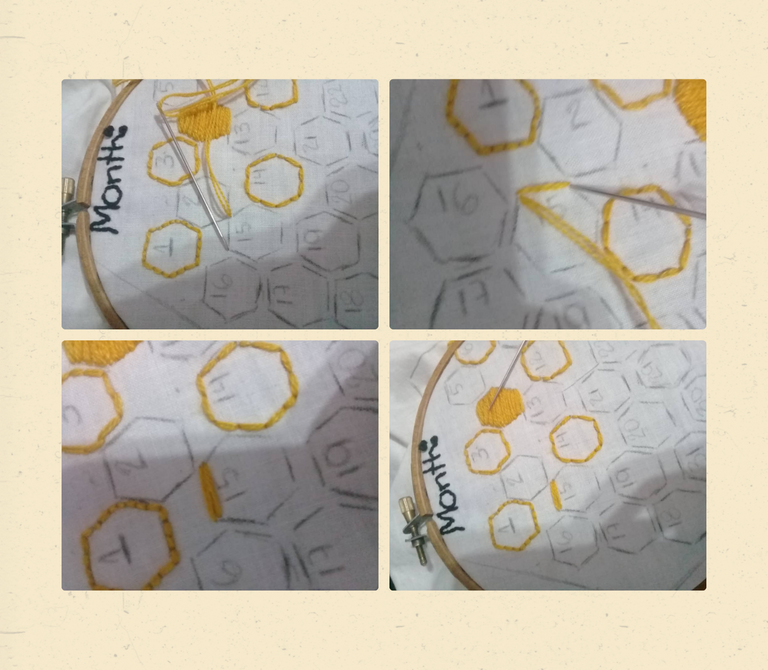
Este mismo punto lo aplique con los enjambres, en algunos solo remarcando la silueta, en otros, aplique la técnica de relleno, que es como un punto atrás, pero mucho más largo, enlazando de punta a punta de la silueta dibujada. En cada uno de estos enjambres, varie los hilos y el color, para darle más textura a la composición, incluso le agregue hilo dorado, que le da una sensación distinta.
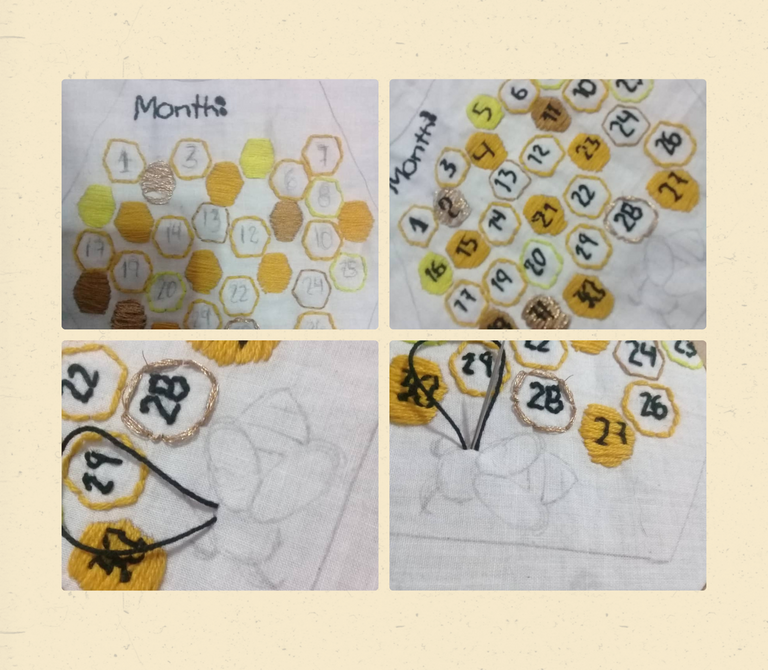
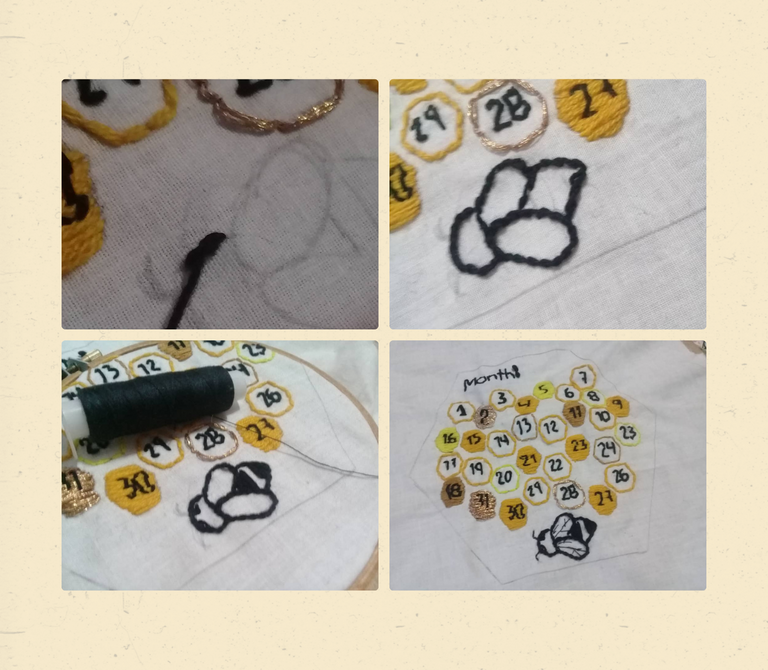
Para los números también aplique el paso atrás, pero para la abeja, contornee con la técnica de la puntada de tallo, que es el mismo paso atrás, pero antes de bajar el hilo en la puntada dos, se deja un pequeño tramo del mismo, se vuelve a sacar la aguja, pero en el medio de la puntada 1 y 2, jalas el hilo, luego la vuelves a introducir más adelante de la puntada 2 y así sucesivamente. Asimismo, para darle textura, varia la cantidad de hebras para que los grosores de las líneas se vieran distinto, en caso de las alas use un hilo normal, de color negro.

Source
Paso 3. Abeja pequeña y nombre de los meses
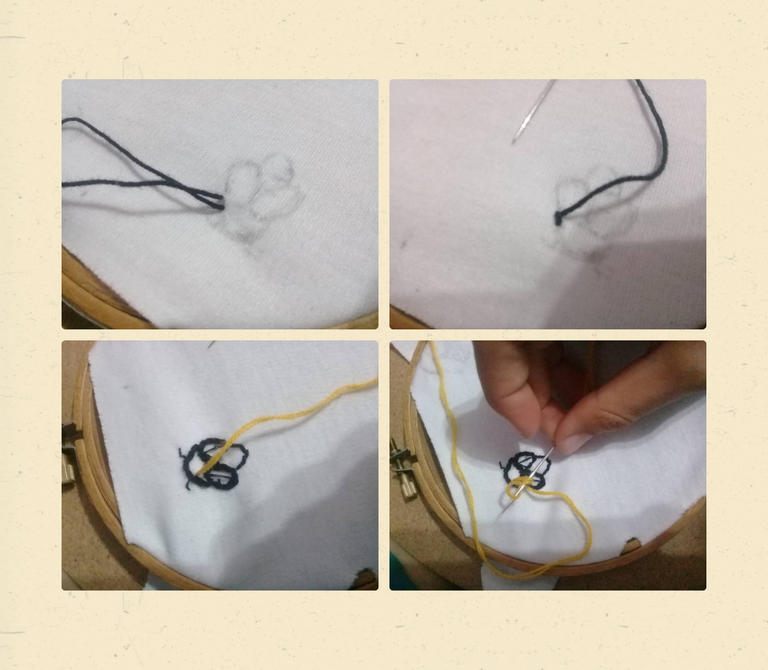
Aparte de la abeja dibuja dentro del panal, la volví a dibujar en otra tela blanca, pero de algodón, pero más pequeña y agregándole amarillo. Aplique las mismas técnicas que la abeja anterior, agregándole el nudo francés para la cabeza. Este nudo francés consiste en sacar la aguja con hilo, enrollar en la aguja ese mismo hilo, 2 veces, volver a introducir la aguja por donde mismo salió, pero sin soltar el enrollado y se baja hasta que quede como un punto. Este aun me cuesta lograrlo, pero la práctica hace al maestro.
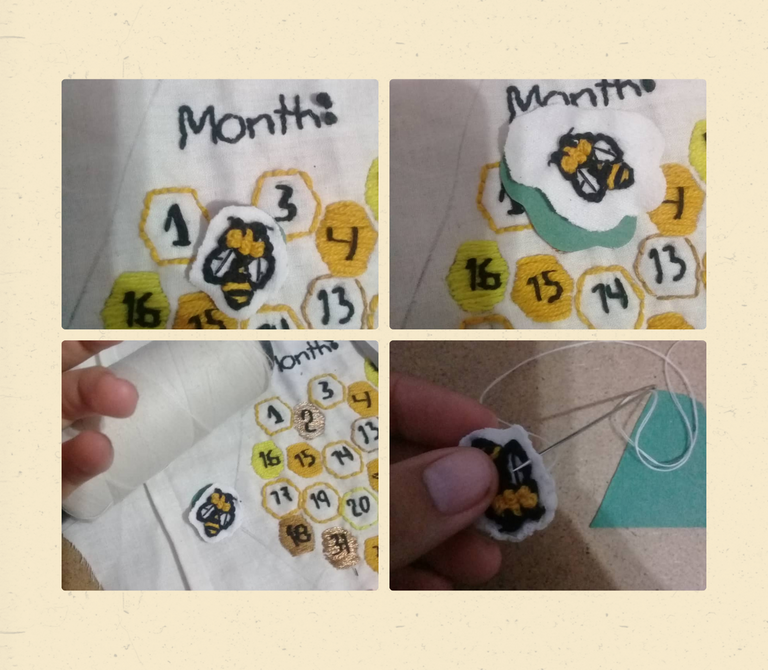
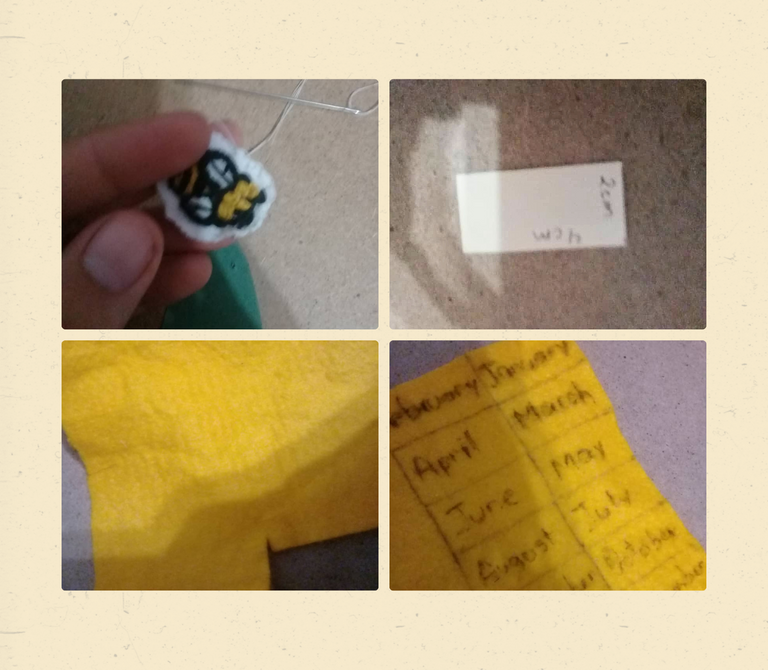
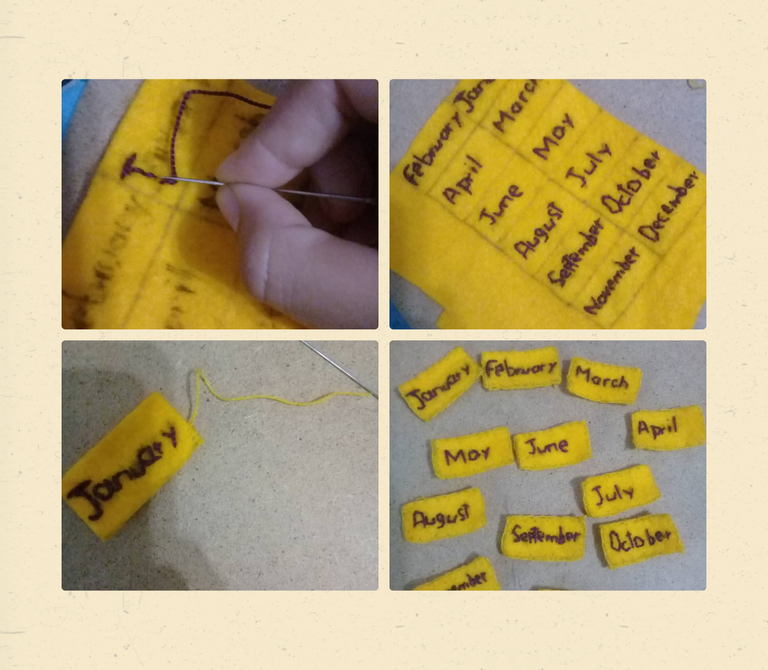
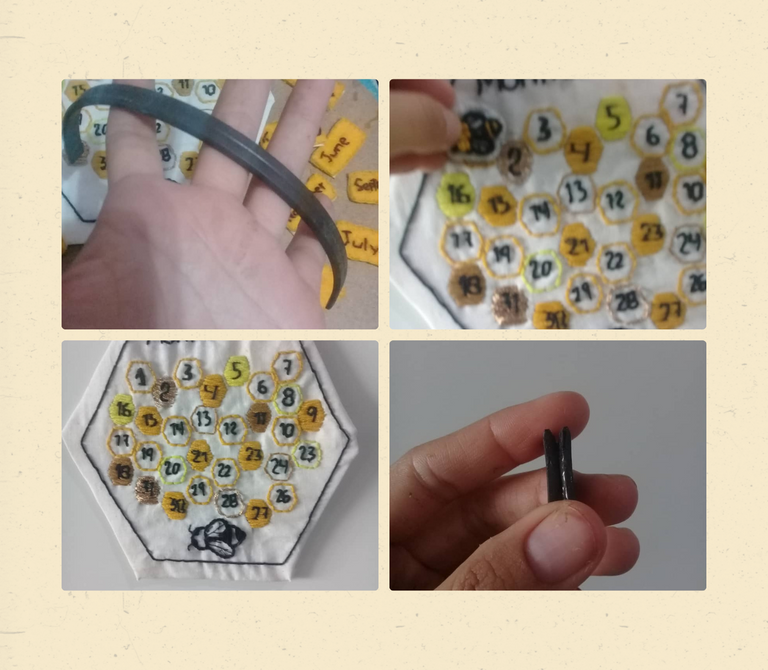
Al terminar de rellenarla, la corte, le borde las orillas, para que no se deshilache y se viera más bonito, la pegue en una carpeta con su misma forma, para obtener mayor resistencia. Ahora con los meses, realice un patrón con el tamaño ideal para encajar dentro de la forma del panal con los números. Hice 12 cuadros en total en una tela de fieltro amarilla, donde a cada uno le escribí un mes distinto, con la puntada de paso atrás con el color morado, para generar un poco de contraste. Estas mismas, también les borde las orillas con hilo amarillo y las pegue en cartón.
Borde el contorno del panal del calendario con negro y la puntada paso atrás y lo pegue a un cartón, de la misma forma, pero con una dimensión un poco mayor al mismo, 1 centímetro de más, aproximadamente. En este momento, me di cuenta que escribí dos veces 23, así que lo acomode.
Paso 4. Pegar imanes.
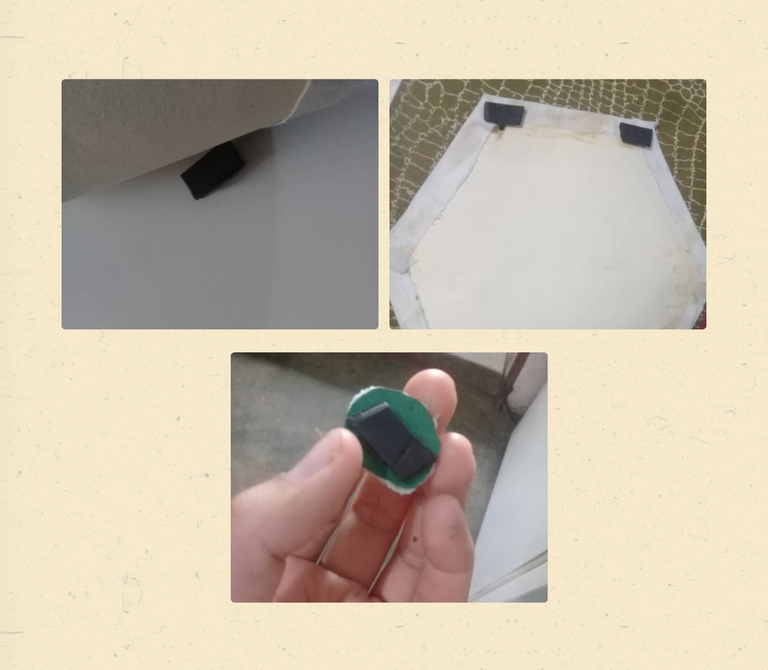
Tenia poco imán, así que, tenía que ingeniármela para no poner un pedazo a cada número. Le pegue unos a la figura central, un pedazo a cada uno de los meses y a la abeja pequeña. Pero para mi sorpresa, no había problemas con que se adhiera a la nevera la figura del panal, el problema fue que, no se adhiera los meses y la abeja a este, el cartón no lo permitía, puesto que el imán no servía para ambos lados, solo funcionaba de uno. Así corte dos pedazos del mismo tamaño, pegue las caras que no se adhieren, así que una de las caras se fijaba a la nevera y la otra sostendría las demás formas.
Y este fue el resultado.
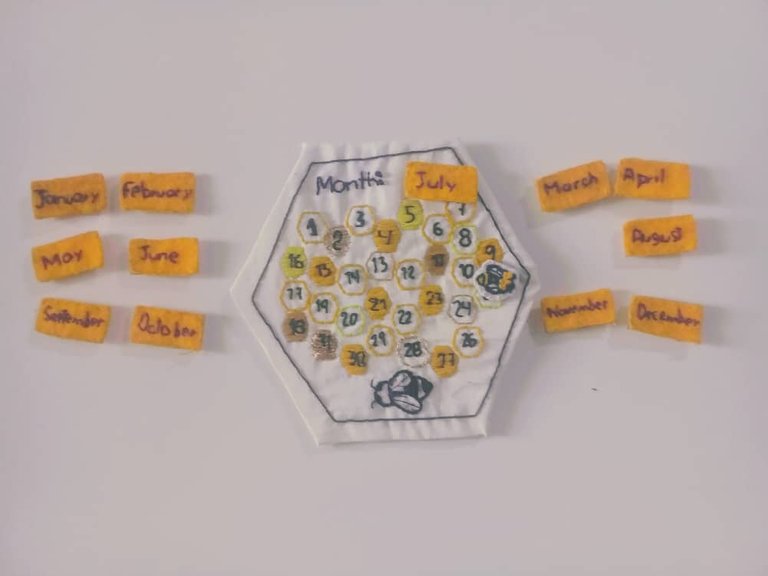
Gracias por leer mi post y espero revisen mi blog para que veas más de mis contenidos.
Las fotos en la publicación son de mi archivo personal. Tomadas con mi celular Samsung J2 Prime. Menos la foto de referencia de la abeja
Los banners y separadores fueron hechos en Canva.

ENGLISH
Greetings @DiyHub Artist Community, I am very pleased to participate for this CONTEST, in conjunction with the @skatehive community, where this month's theme will be bees.
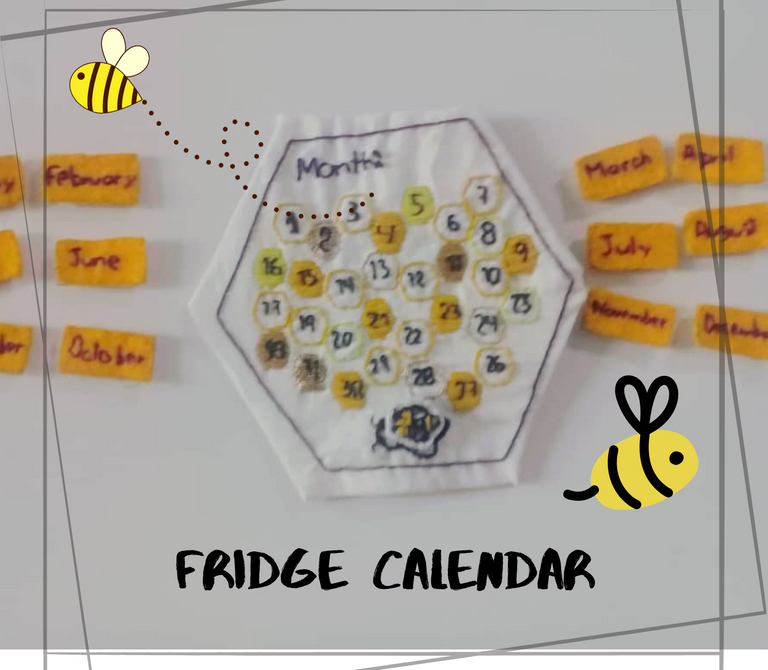
I bring you as a creation to participate, an embroidered calendar for fridge, only with materials that I had at home, a nice and ideal decoration to know the days and the month. Calendar that will always remind us how essential this little animal is for the planet earth. I must emphasize that I only learned to embroider a month ago, so I still don't know the name of certain techniques and the threads to use, however, little by little I will show you how it was made.
Before I continue, I want to invite
@yasmarit and
@mvart to participate. And thank you
@irenenavarroart for motivating me to participate.
-Embroidery needle
-Embroidery threads in different shades of yellow.
-Black and purple ball yarns.
-Black and white thread
-Any old cardboard or binder that can be used as a support
-Fabrics (preferably of slightly separated wefts, one where the needle passes more easily)
-Glue (in my case I used shoe glue and it worked).
-Iman
Step 1. Pattern drawing
First make a drawing with the silhouette of a honeycomb in an old folder, and then draw inside, small honeycombs, where the numbers would be, plus the word month, this in order to see how they would be located and extract the appropriate size of the mini honeycomb, where the numbers would go. I drew that mini honeycomb apart, to have it as a pattern and so they would all be the same size.
Once I had these patterns ready, I transferred these silhouettes to a thin white cloth that I had at hand, I wrote the word "mes" and as I saw that I had a little space, I drew a small bee, taking as a reference an image from the internet.

Step 2. Embroidery
After having everything drawn, I proceeded to take a needle and black thread to start embroidering. With the word "mes" I applied the step back technique, where it practically consists of taking the thread from behind the fabric to the front, introducing it back into the fabric, more in front of this first stitch, then it is taken out again, but not near this final stitch, but a little further on, when it is introduced back into the fabric, it is returned to that second stitch and so on.
I applied this same stitch with the swarms, in some just highlighting the silhouette, in others, I applied the filling technique, which is like a back stitch, but much longer, linking from end to end of the drawn silhouette. In each of these swarms, vary the threads and color, to give more texture to the composition, I even added golden thread, which gives it a different feel.
For the numbers I also applied the step back, but for the bee, outline with the stem stitch technique, which is the same step back, but before lowering the thread in stitch two, you leave a small section of it, you take the needle out again, but in the middle of stitch 1 and 2, you pull the thread, then you reintroduce it further ahead of stitch 2 and so on. Also, to give texture, vary the amount of strands so that the thickness of the lines look different, in the case of the wings I used a normal black thread.


Source

Step 3. Small bee and name of the months
Apart from the bee drawn inside the honeycomb, I drew it again on another white fabric, but made of cotton, but smaller and adding yellow. I applied the same techniques as the previous bee, adding the French knot for the head. This French knot consists of taking out the needle with thread, winding the same thread on the needle, 2 times, reinsert the needle where it came out, but without releasing the winding and lowering it until it is like a point. This one is still difficult for me to achieve, but practice makes perfect.
When I finished filling it, I cut it, trimmed the edges, so that it would not fray and would look nicer, and glued it in a folder with the same shape, to obtain greater resistance. Now with the months, I made a pattern with the ideal size to fit inside the shape of the honeycomb with the numbers. I made 12 squares in total in a yellow felt fabric, where I wrote a different month on each one, with the back stitch with the purple color, to generate a little contrast. I also bordered the edges of these squares with yellow thread and glued them on cardboard.
Edge the outline of the calendar honeycomb with black and backstitch and glue it to a cardboard, in the same shape, but with a slightly larger dimension to it, 1 centimeter more, approximately. At this point, I realized that I had written 23 twice, so I arranged it.


Step 4. Gluing magnets
I had little magnet, so I had to figure out how not to put a piece on each number. I glued some to the central figure, one piece to each of the months and to the little bee. But to my surprise, there was no problem with the honeycomb figure sticking to the fridge, the problem was that the cardboard did not allow it, since the magnet did not work on both sides, it only worked on one. So I cut two pieces of the same size, glued the faces that do not adhere, so one of the faces was fixed to the fridge and the other would hold the other shapes.


And this was the result.

Thanks for reading my post and I hope you check out my blog to see more of my content.
The photos in the publication are from my personal archive. Taken with my Samsung J2 Prime cell phone. Except the reference photo of the bee.
The banners and dividers were made in Canva
Translated using DeepL.


