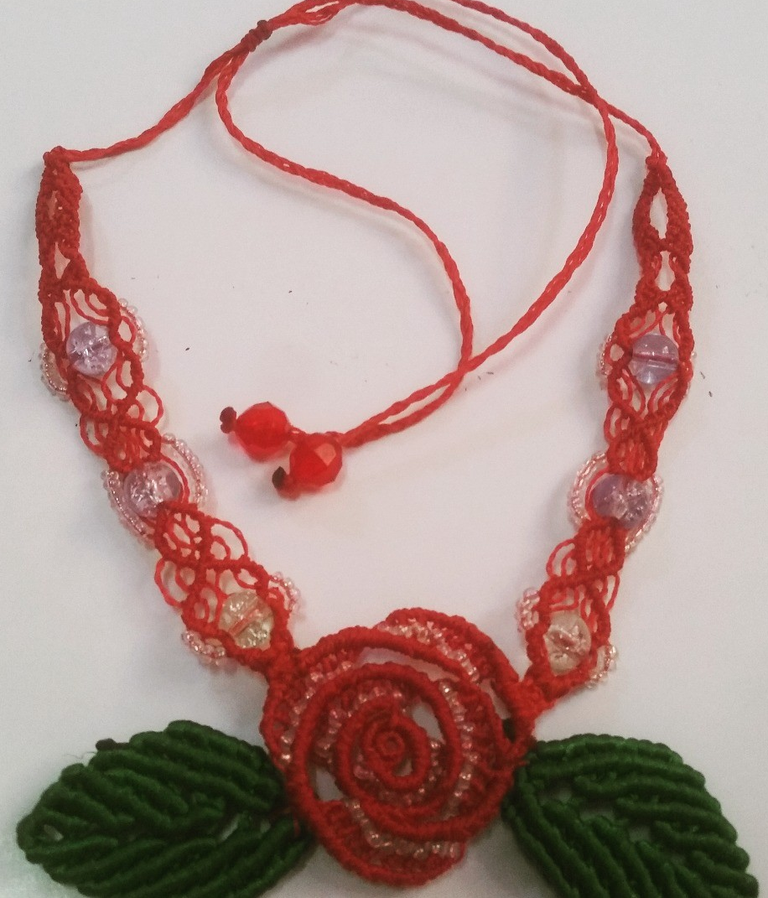
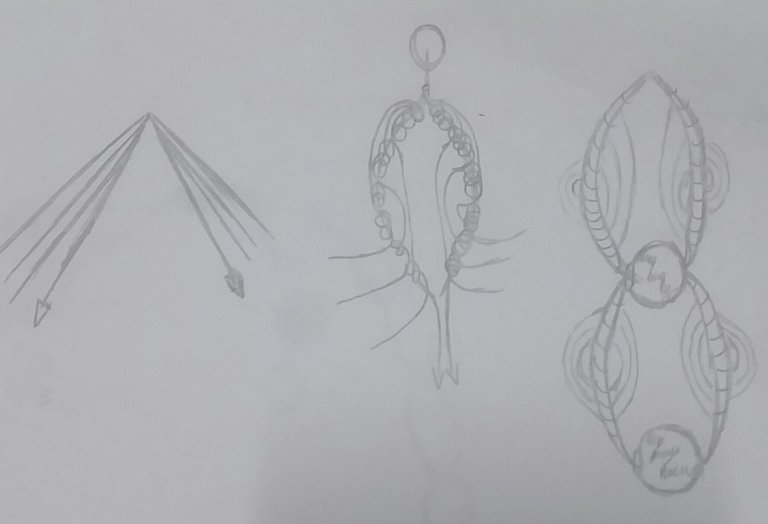
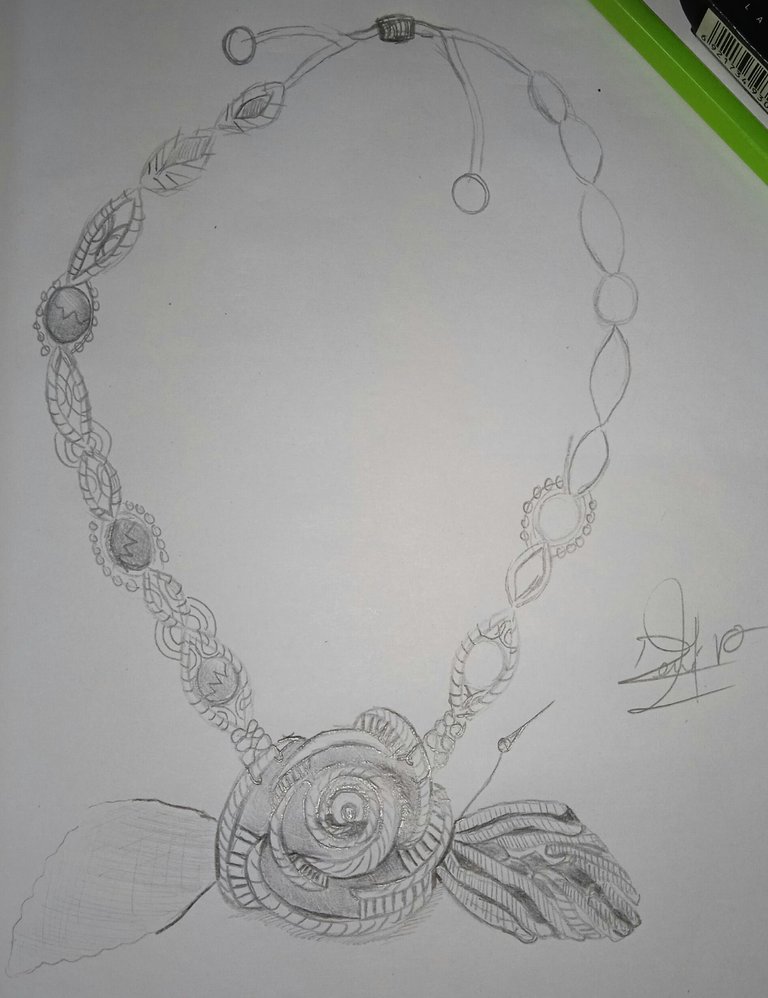
The proposal that I present today is a rose-shaped necklace tutorial, adorned with crackled stones and transparent iridescent beads. This work is inspired by the incomparable beauty of roses, because I love nature, there is nothing more perfect than their creations. It makes me feel alive, I'm excited to be able to wear this marvel in macramé style, to accompany the outfit in any occasion. This new type of tutorial, based on drawings, is beneficial for works that you have done, and wish to bring them to the present day.
Key words:
- Full knot: either two turns or knot twice.
- Semi-hard: either knot once.
- Forward closure: this is a half-stitch closure where you pass the right hand yarn over the left hand yarn, turn it under, pulling it out through the center up and tightening, then repeat the same procedure.
La propuesta que presento en el día de hoy, es un tutorial de collar en forma de rosa, adornado con piedras craqueladas y mostacillas transparentes tornasoladas. Esta obra está inspirada en la belleza inigualable de las rosas, ya que me encanta la naturaleza, no existe nada más perfecto, que sus creaciones. Me hace sentir vivo, me emociona poder llevar esa maravilla al estilo macramé, para acompañar el outfit en cualquier ocasión. Este nuevo tipo de tutorial, basado en dibujos, es beneficioso para obras que hayan hecho, y deseen traerlas a la actualidad.
Palabras Claves:
- Nudo completo: ya sea dos vueltas o anudar dos veces.
- Semiduro: ya sea anudar una vez
- Cierre hacia adelante: es un cierre de puntos medios donde pasas el hilo de la derecha sobre el hilo de la mano Izquierda, lo giras por debajo del mismo, sacándolo por el centro hacia arriba y ajustando, luego repites el mismo procedimiento.
Materials for the rose and leaves:
- 6 waxed threads of 120 cm.
- 4 waxed threads of 100 cm.
- 10 rat tail threads of 0.80 cm.
Materials for the branches:
- 8 waxed strands of 120 cm.
- 68 small transparent iridescent beads.
- 6 clear crackle stones.
Materiales para la rosa y las hojas:
- 6 hilos encerados de 120 cm.
- 4 hilos encerados de 100 cm.
- 10 hilos cola de rata de 0.80 cm.
Materiales para las ramas:
- 8 hilos encerados de 120 cm.
- 68 mostacillas pequeñas transparentes tornasoladas.
- 6 piedras craqueladas transparentes.

# Procedure:
Step 1
We start the rose by first developing the inner core. Taking a 120 cm thread and folding it in half, leaving 6 cm on the right side, we make a knot and fix it on the board, both ends with two pins.
Step 2
Then we take 4 more threads of 120 cm and fold it in half and knot each one on the one we have fixed. Then we adjust the fabric by passing the ends of the guide through the loop on the right, so we close and form the core of the rose. The next step is to fix it on the board to start with the petals.
Spanish Version - Click here!Procedimiento:
Paso 1
Empezamos la rosa desarrollando primero el núcleo interno. Tomando un hilo de 120 cm y doblándolo a la mitad, dejando 6 cm al lado derecho y hacemos un nudo y lo fijamos en la tabla, ambas puntas con dos alfileres.
Paso 2
Luego tomamos 4 hilos más de 120 cm y lo doblamos a la mitad y los anudamos cada uno sobre el que tenemos fijado. Seguido ajustamos el tejido pasando los extremos de la guía por el lazo de la derecha, así cerramos y formamos el núcleo de la rosa. Lo siguiente es fijarlo en la tabla para empezar con los pétalos.
Step 3
We make the second core ring, taking one of the ends of the two guide wires that have been formed. Then we take the guide with the right hand and with the left hand the strand that we are going to knot, then we knot a complete knot to the right, we leave that strand, we go turning the weave and fixing it with a pin. We take other strands consecutively in the same direction until we knot the last strand that will be the other guide thread, being a total of 9 strands.
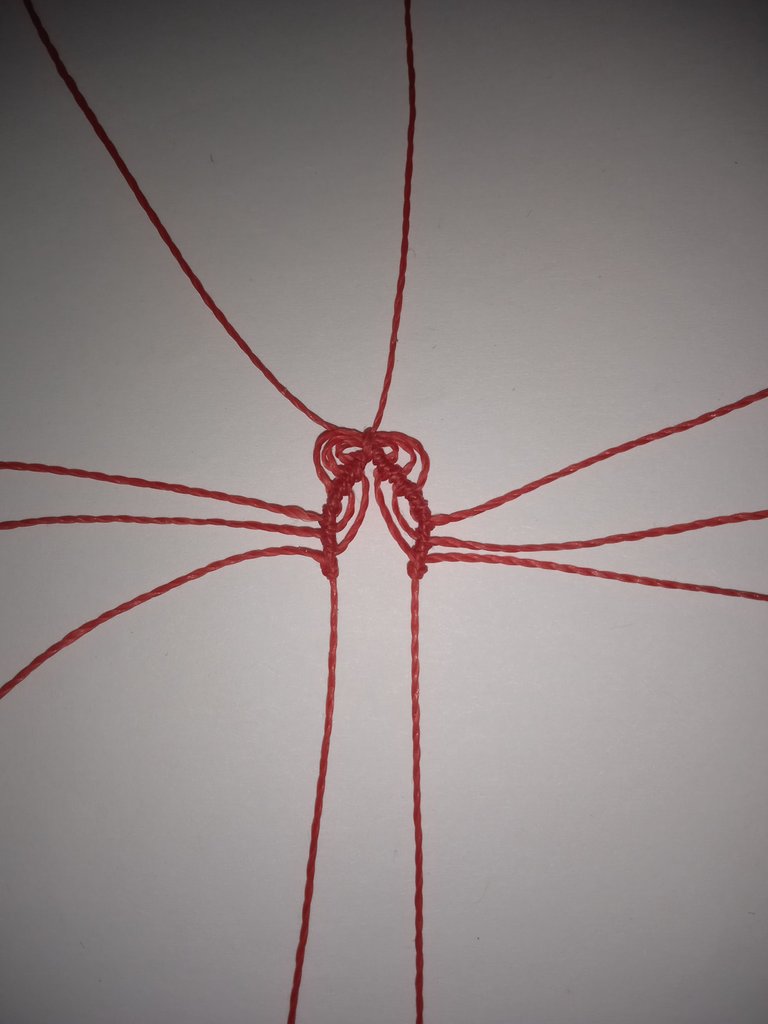
Step 4
After knotting the ninth strand, we join it with the guide thread, we will repeat the previous steps, this time with 8 strands, always turning the fabric, with the difference that we will pick up the strands from left to right until we form a mallet. To then repeat the process in reverse, then we will release each strand that we knot leaving it behind. We form what we call a sprout.
Then we change the position of the fabric to horizontal to work with the strands in the petal. Thus we begin to develop the petals. We place a small bead on each thread, then we take the thread from the right end and knot in a left direction over all the strands, making a complete knot, that is, two turns. Once this part is finished, repeat the process of step 4.
Thus we form the first petal. We close the first row of petals of the rose, passing the guide thread through a needle or something that creates a hole in the edges of the third core, we fix it with a pin, without knotting. We repeat the step of the petal and when we reach the end with the last thread we close and it is fixed and closed.
Spanish Version - Click here!Paso 3
Hacemos el segundo anillo núcleo, tomando uno de los extremos de los dos hilos guías que se han formado. Luego la guía la tomamos con la mano derecha y con la mano izquierda la hebra que vamos a anudar, entonces anudamos un nudo completo a la derecha, dejamos esa hebra, vamos girando el tejido y fijándolo con un alfiler. Tomamos otras hebras consecutivamente en la misma dirección hasta anudar la última hebra que será el otro hilo guía, siendo un total de 9 hebras.
Paso 4
Después de anudar la novena hebra, la juntamos con el hilo guía, repetiremos los pasos anteriores, esta vez con 8 hebras, siempre ir girando el tejido, con la diferencia que iremos recogiendo de izquierda a derecha las hebras hasta formar un mazo. Para luego repetir el proceso a la inversa, luego vamos soltando cada hebra que anudemos dejándola atrás. Logramos formar lo que llamamos retoño.
Entonces cambiamos la posición del tejido a horizontal para trabajar con las hebras en el pétalo. Así empezamos a desarrollar los pétalos. Vamos colocando una mostacilla pequeña en cada hilo, entonces tomamos el Hilo del extremo derecho y anudamos en dirección hacia la izquierda sobre todas las hebras, haciendo un nudo completo, o sea dos vueltas. Una vez terminada esta parte volvemos a repetir el proceso del paso 4.
Así conformamos el primer pétalo. Autoseguido cerramos la primera hilera de pétalos de la rosa, pasando el hilo guía por una aguja o algo que cree un orificio en los bordes del tercer núcleo, lo fijamos con un alfiler, sin anudar. Repetimos el paso del pétalo y cuando lleguemos al final con el último hilo cerramos y queda fijado y cerrado.

Step 5
Repeat the same process to create 6 petals.
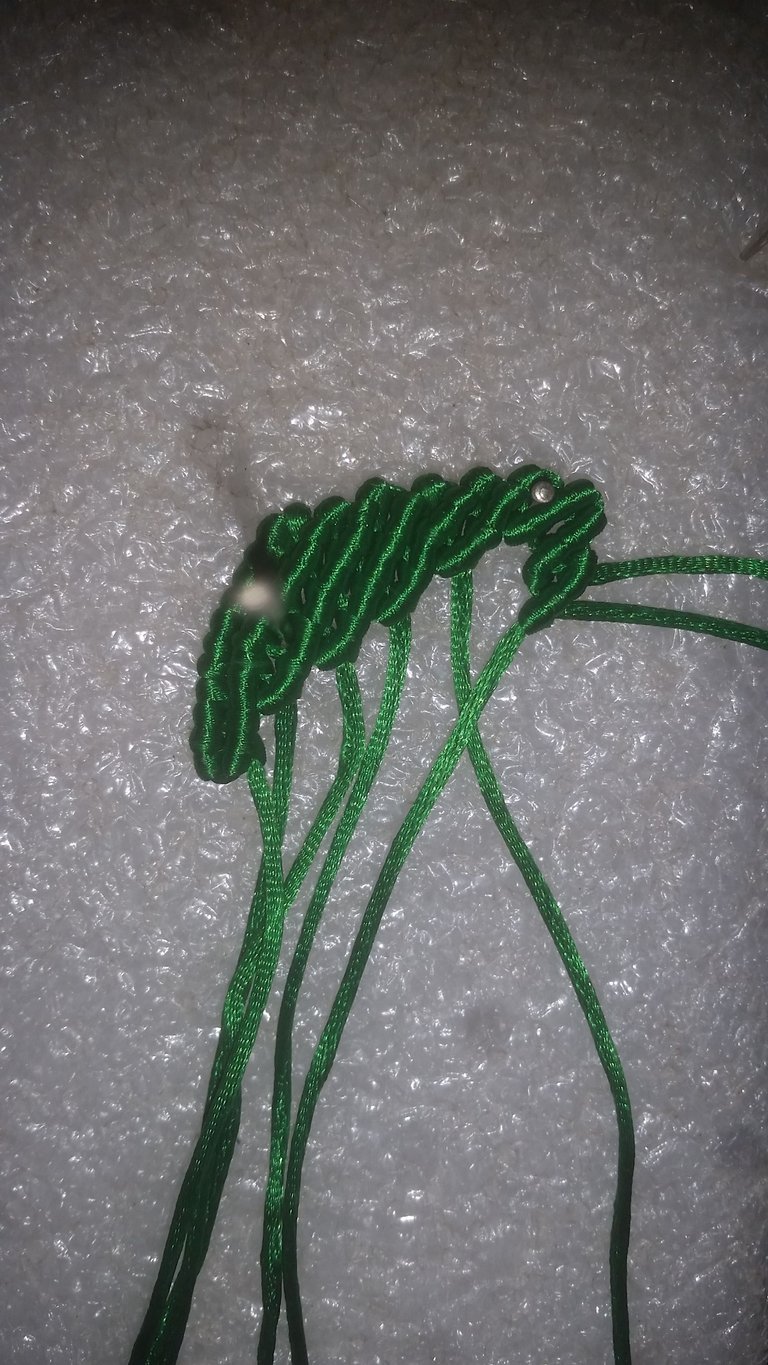
Step 6
We make the leaves, take a thread of 0.80 cm, we fold it in half, we make a knot, we fix it with a pin. Then we add four threads on this half of guide thread, each one we add, we knot half a knot on the left with one end and half a knot on the right with another end, and we adjust them. In a consecutive way we take the excess ends of the guide and we begin to knot the strands on this towards the left, when we finish the first apex and with all the strands knotted, we leave behind the first strand and we take the next one as a guide. We repeat the process until we finish the remaining eight apexes.
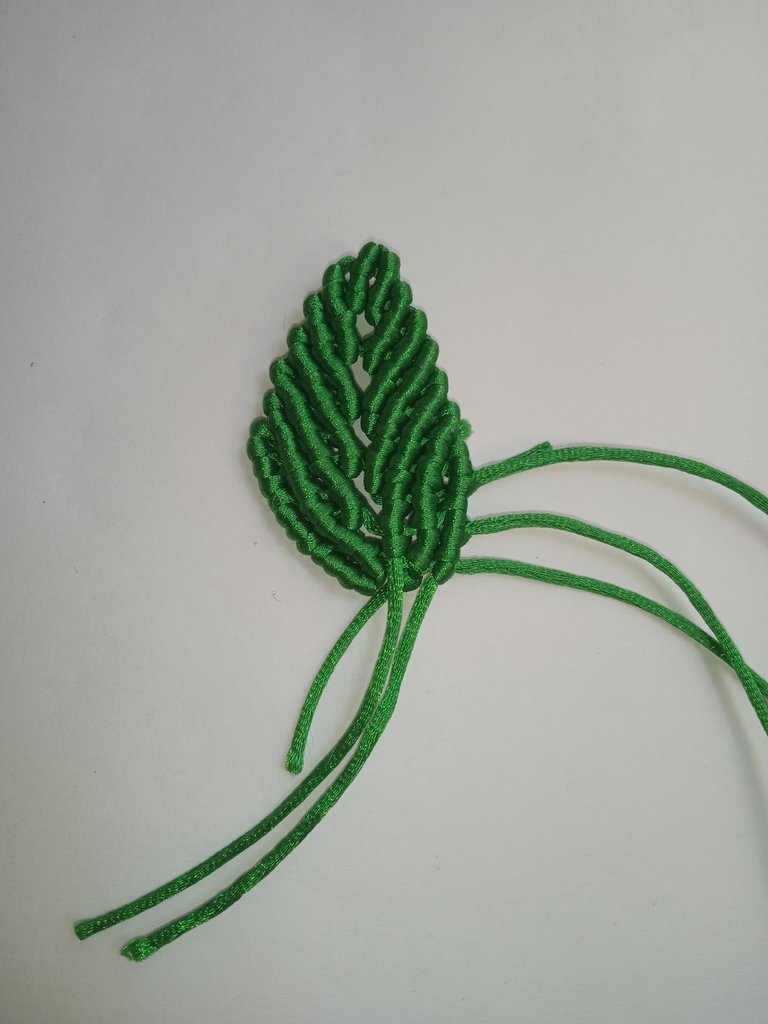
We turn the fabric, fix it at each end and repeat the same process, in reverse, to make the other half of the leaf. We start and knot the yarns up to the third thread. We only knot up to the third thread, we start another apex with the first thread up to the third thread that we left and after knotting we close with one of the threads that we had left. We repeat the process until we finish the leaf. In this way we make the two leaves for the necklace.
Spanish Version - Click here!Paso 5
Repetir el mismo proceso hasta crear 6 pétalos.
Paso 6
Hacemos las hojas, tomamos un hilo de 0.80 cm, lo doblamos a la mitad, le hacemos un nudo, lo fijamos con un alfiler. Luego le agregamos cuatro hilos sobre esta mitad de hilo guía, cada uno que agreguemos, anudamos medio nudo a la izquierda con un extremo y medio nudo a la derecha con otro extremo, y los ajustamos. De forma consecutiva tomamos los extremos sobrantes de la guía y empezamos a anudar las hebras sobre esta hacia la izquierda, cuando terminemos el primer ápice ya con todas las hebras anudadas, dejamos atrás la primera hebra y tomamos la siguiente como guía. Repetimos el proceso hasta terminar los ocho restantes ápices.
Giramos el tejido, lo fijamos en cada extremo y repetimos el mismo proceso, al contrario, para hacer la otra mita de la hoja. Empezamos y anudamos los hasta el tercer hilo. Solo anudamos hasta el tercer hilo, empezamos otro ápice con el primer hilo hasta el tercer hilo que dejamos y luego de anudar cerramos con una de las hebras que habíamos dejado. Repetimos el proceso hasta terminar la hoja. De esta manera hacemos las dos hojas para el collar.
 [Taken with my dad's phone Xiaomi Redmi 9A/Tomada con el telefono de mi papa Xiaomi Redmi 9A]
Step 7
We attach the leaves to the rose, using a needle to pass the threads through the ends and thus knot in a continuous way to seal. Once the leaves are added, proceed with the branches.
Step 8
We add four threads to each end of the rose with the help of a needle. Once added, we make three to four flat knots and begin the traditional macramé weaving. On two guides you are going to knot a full knot and a half knot to the right with all the strands, before knotting the last one put beads and then knot a full knot to the left. That is, we knot the first strand to the right, then the second and finally the third, then the same process to the left with a full knot each strand. Then we go through the guide, a crackle stone used in my case. We do the same pattern, this time with a full knot each strand to the left and right. We repeat the pattern about four more times interspersing the weaves and stones. At the end of the traditional weaving, we make two more links but this time with the same pattern as the leaves. Then we close, cut and burn the leftovers.
We close the necklace with a flat knot adding one more thread. This is the end of the necklace.
Thank you for reading.
Spanish Version - Click here!Paso 7
Le anexamos las hojas a la rosa, usando una aguja para pasar los hilos por los extremos y así anudar de forma corrida para sellar. Una vez añadida las hojas, procedemos con las ramas.
Paso 8
Le agregamos cuatro hilos a cada extremo de la rosa con ayuda de una aguja. Ya agregados, hacemos de tres a cuatro nudos planos y empezamos el tejido tradicional del macramé. Sobre dos guías van a anudar un nudo completo y medio nudo hacia la derecha con todas las hebras, antes de anudar la última ponerle mostacillas y luego anudamos uno nudo completo hacia la izquierda. O sea, anudamos la primera hebra a la derecha, luego la segunda y por último la tercera, luego el mismo proceso hacia la izquierda con un nudo completo cada hebra. Luego pasamos por la guía, una piedra craquelada usada en mi caso. Hacemos el mismo patrón, esta vez con nudo completo cada hebra hacia la izquierda y la derecha. Repetimos el patrón unas cuatro veces más intercalando los tejidos y las piedras. Al finalizar el tejido tradicional, hacemos dos eslabones más pero esta vez con el mismo patrón de las hojas. Luego cerramos, cortamos y quemamos los sobrantes.
Cerramos el collar con un nudo plano agregándole un hilo más. Así terminamos el collar.
Gracias por leerme.
I use Deepl translator.


