Green Snake earrings tutorial / Tutorial de Aretes Serpientes Verdes[ENG-ESP].

in #hive-189641last year

Good morning, DIYHub community, it's a pleasure to share my crafts with you, exchange criteria, techniques and learn mutually by your side. I'm @viltredeltoro. The crafts, I work, is based on the use of macramé technique, which is versatile and can be created, lots of micro macramé content, as well as macro macramé. Technique that I have been developing since I was 15 years old, and at my 30 years, I continue to improve daily.

Spanish Version - Click here!


Buenos días comunidad DIYHub, es un placer compartir mis artesanías con ustedes, intercambiar criterios, técnicas y aprender mutuamente a su lado. Soy @viltredeltoro. La artesanía, que trabajo se basa en el uso de la técnica macramé, la cual es versátil y se puede crear, gran cantidad de contenido micro macramé, así como macro macramé. Técnica que vengo desarrollando desde los 15 años de edad, y a mis 30 años, sigo perfeccionando diariamente.

I develop it manually, inspired by all kinds of formats, from drawings, tattoos, wire works, I even take designs from crochet style to macramé. Every moment of the process is magical, exciting and I enjoy it from the heart.

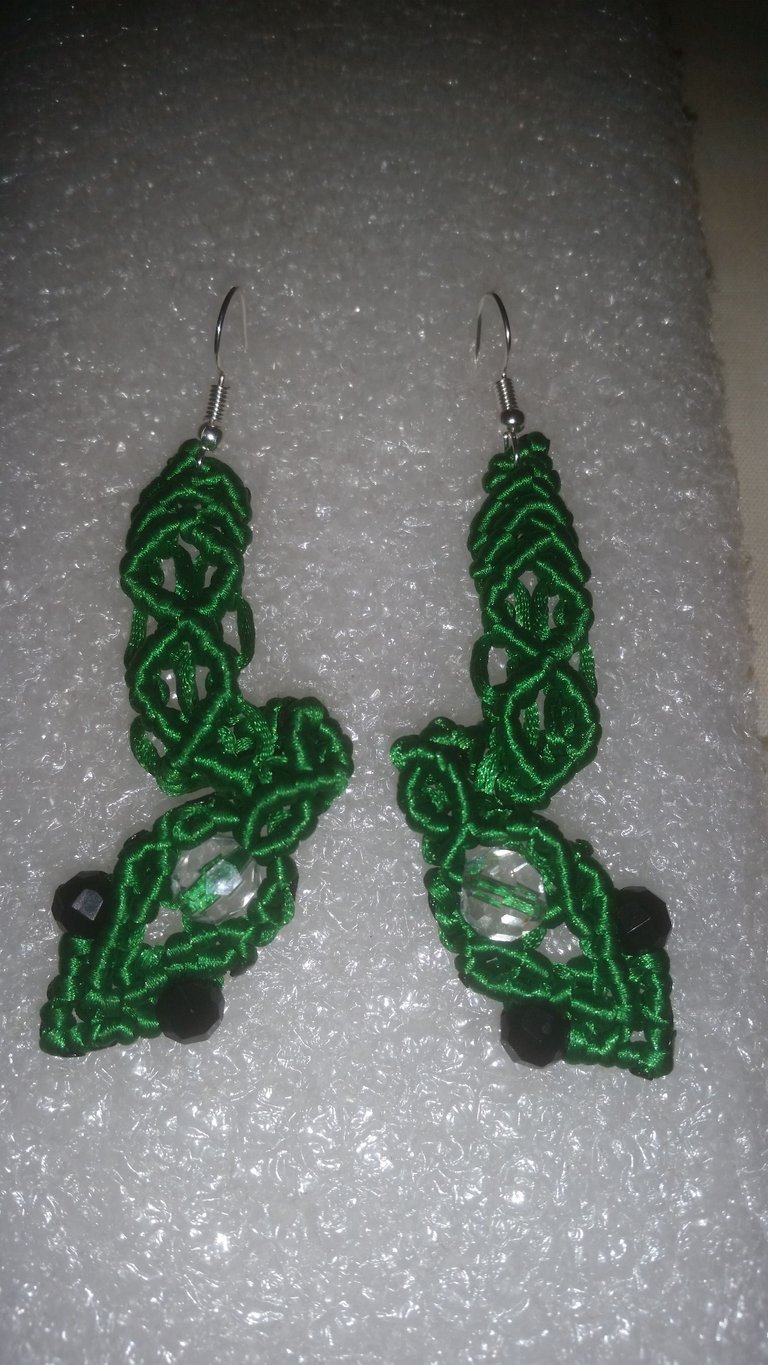
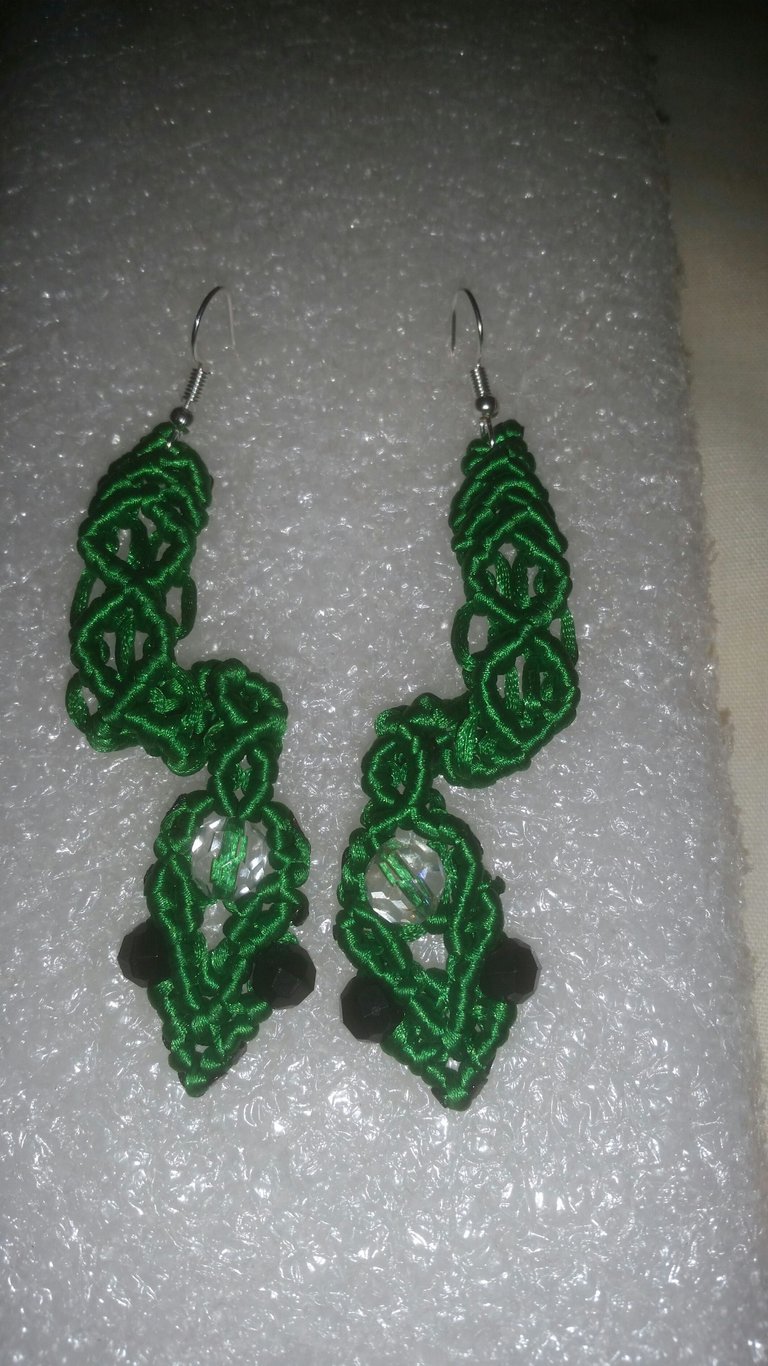
Earrings of Green Snakes, is dedicated to my girlfriend, it has a special meaning. It represents a symbol of wisdom, wealth, prudence, strength, health, convalescence, longevity, rejuvenation and immortality.

For the Chinese, the snake and the dragon are symbols of rhythmic, methodical life,
together with the principles of humidity and fecundity. Hence they are often associated with numerous female deities, adorned with snakes on their hands and heads. Said by:
Source/ Acerbi Cremades, Norma. 2011

The proposal is a design in the form of snakes, which change position giving a 3D effect, providing a unique attraction. They have three variants of positions, the head looking to the left, to the right and stretched vertically. It is an own design, easy to make, I leave the tutorial.

Spanish Version - Click here!


Lo desarrollo manualmente, inspirándome en todo tipo de formatos, a partir de dibujos, tatuajes, obras de alambres, incluso llevo diseños del estilo crochet al macramé. Cada momento del proceso es mágico, emocionante y lo disfruto desde el corazón.

Aretes de Serpientes Verde, es dedicado a mi novia, tiene un significado especial. Representa un símbolo de la sabiduría, riqueza, prudencia, fortaleza, salud, convalecencia, longevidad, rejuvenecimiento e inmortalidad.

Para los chinos, la serpiente y el dragón, son símbolos de la vida rítmica, metódica,
junto a los principios de humedad y fecundidad. De ahí que se asocien frecuentemente con numerosas deidades femeninas, adornadas con serpientes en sus manos y cabeza. Dicho por:
Fuente/ Acerbi Cremades, Norma. 2011

La propuesta es un diseño en forma de serpientes, que cambian de posición dando un efecto 3D, brindándole un atractivo único. Poseen tres variantes de posiciones, la cabeza mirando hacia la izquierda, a la derecha y estirada verticalmente. Es un diseño propio, Fácil de hacer, les dejo el tutorial.


[ Taken from my Sansung S5 phone. ]

Materials:

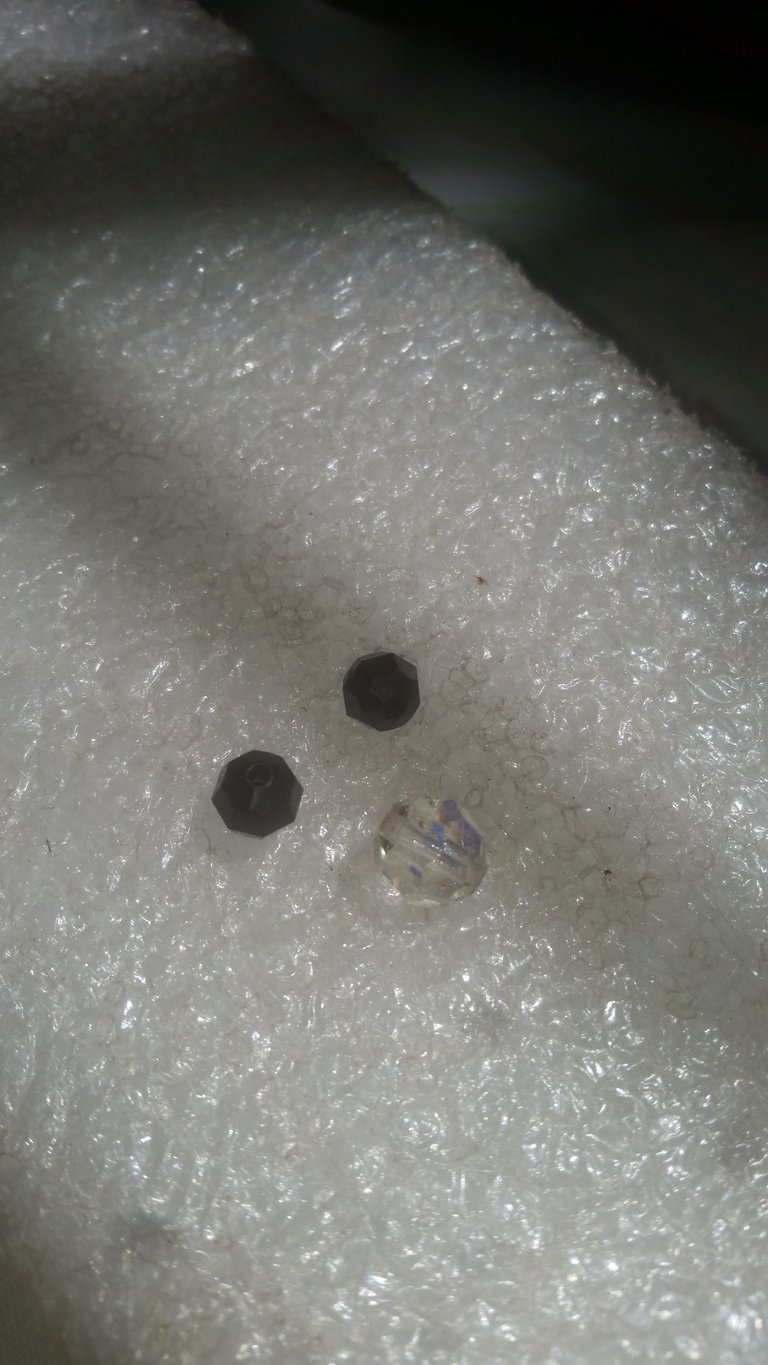
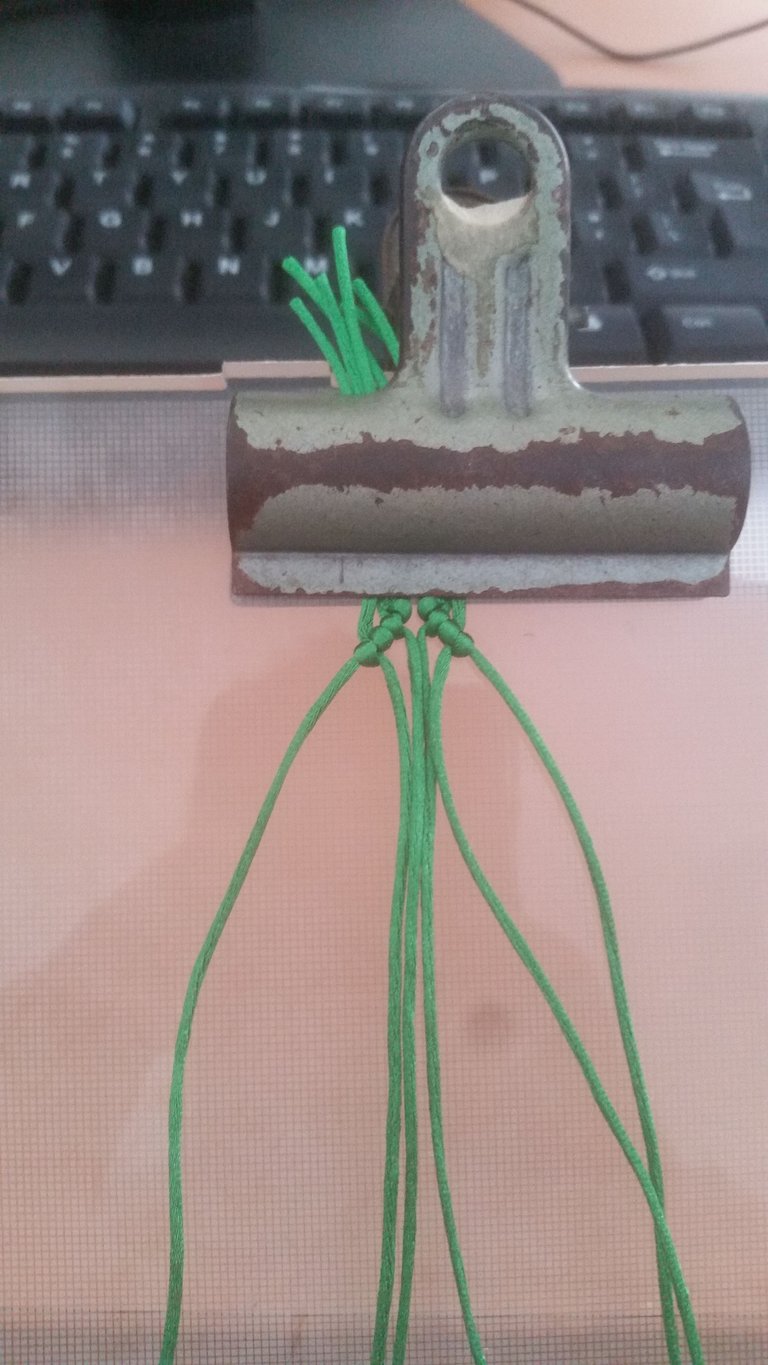
6 two millimeter green rat tail threads, length 0.50 cm.

4 Black beads.

2 Large transparent iridescent transparent beads.

Weaving board

Loop

English Version - Click here!

Materiales:

6 Hilos Cola de rata color verde de 2 milímetros, con longitud de 0.50 cm.

4 Mostacillas negras.

2 Mostacilla grande transparente tornasolada.

Tabla para tejer

Presilla


[Taken from my Sansung S5 phone.]

Steps to follow:

Inked20220719_221903_LI.jpg


[Taken from my Sansung S5 phone]

1.Choose two guide strands and attach them to the loop, then add two more strands. On each strand you tie a complete knot to the right, to make the head of the snake.


[Taken from my Sansung S5 phone]

With the first two strands you knotted you will make a forward knot to close the center. Now you have the snake's snout.


[Taken from my Sansung S5 phone]

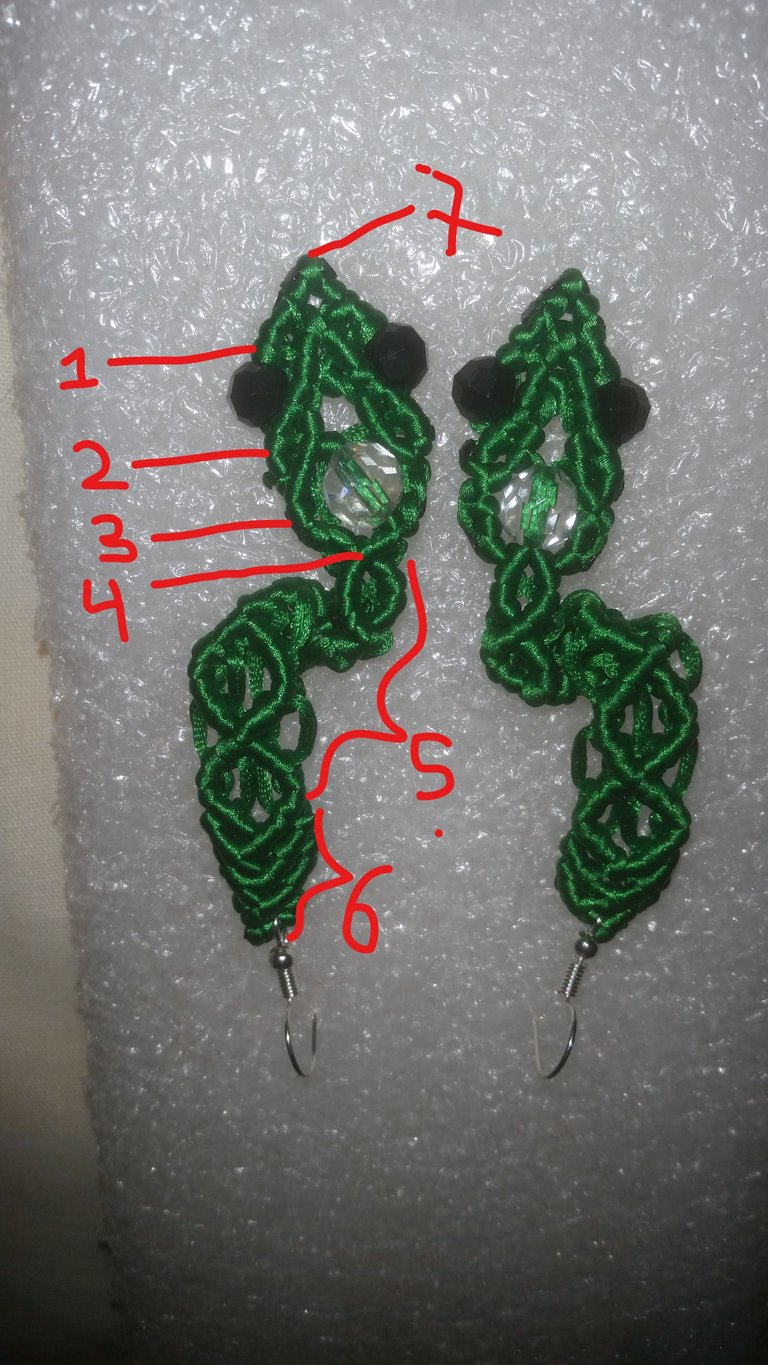
  1. Then repeat the knotting operation, on the strands that you knotted forward, they will be the new guides.On the previous guides, we place the beads, forming the eyes, to close, with a knot always to the right.


[Taken from my Sansung S5 phone]

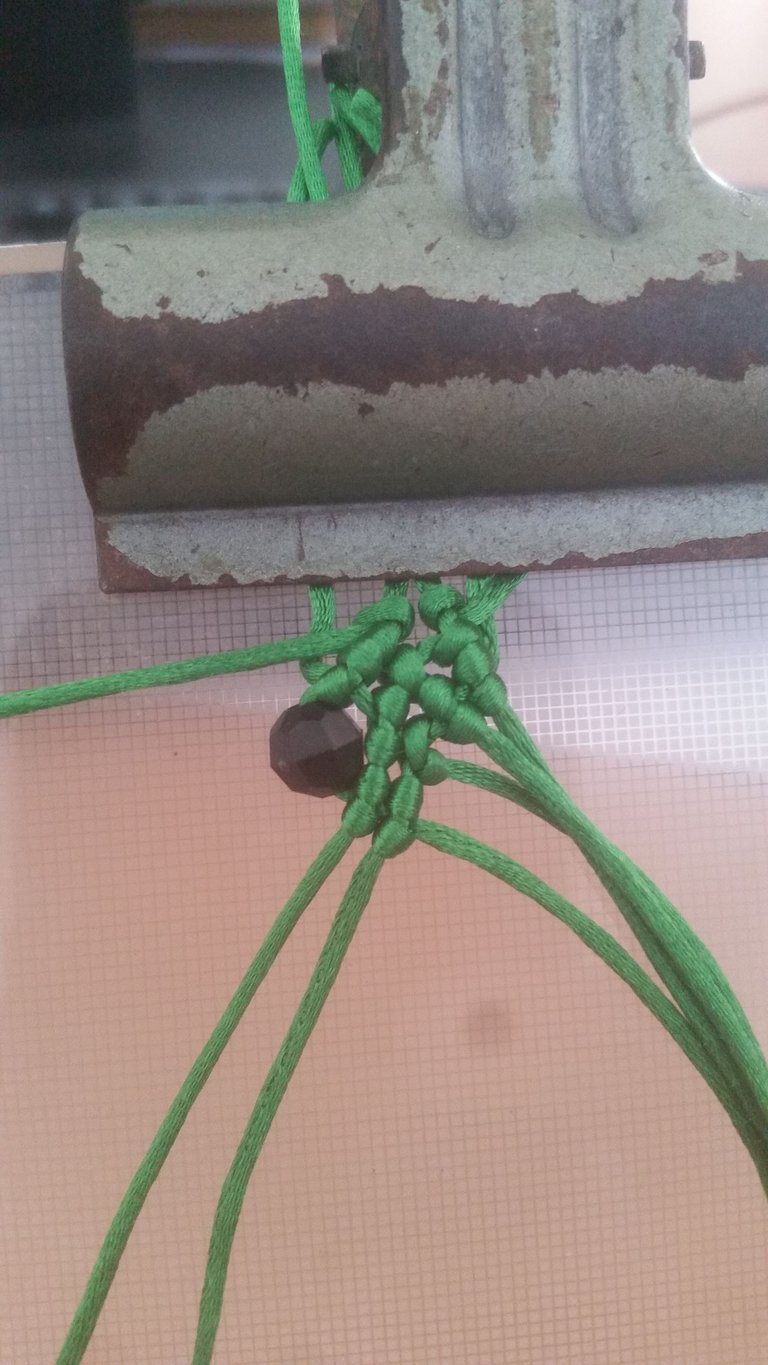
3-4. Next, you take as guides, the first strand that you left after step 2, to make step 3 resuming, to give shape to the head of the snake. The next thing is to put the large bead in the center of the snake's head, in my case I didn't fit the two strands through the hole of the bead so I improvised, finish the head with another forward knot.

Spanish Version - Click here!

Pasos a seguir:

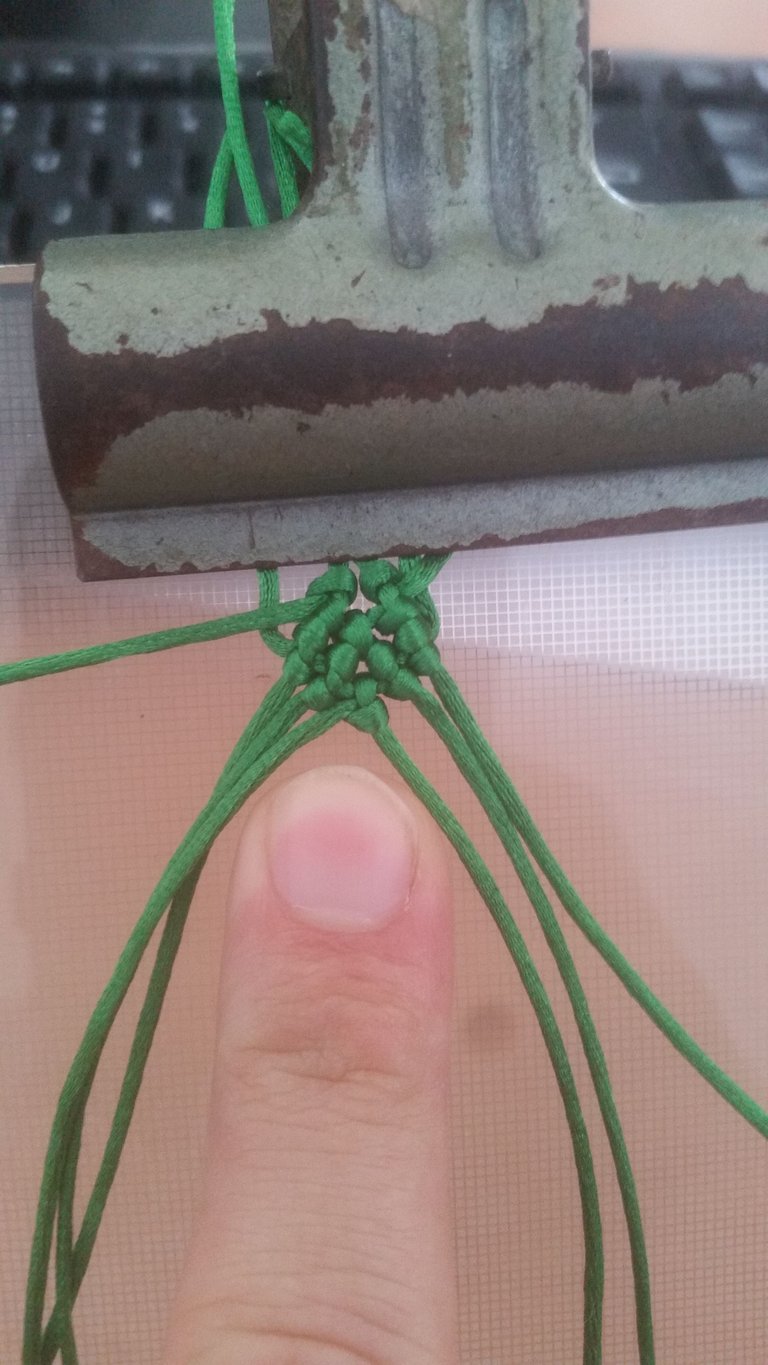
  1. Escoges dos hebras guías y lo fijas en la presilla, luego adicionas dos hebras más. Sobre cada hebra anudas un nudo completo hacia la derecha, para elaborar la cabeza de la serpiente.

Con las dos primeras hebras que anudaste harás un nudo hacia adelante para cerrar el centro. Ya tienes el hocico de la serpiente. Luego repites la operación de anudar, sobre las hebras que hiciste el nudo hacia adelante, serán las nuevas guías.

  1. Sobre las guías anteriores, acomodamos la mostacilla, formando los ojos, para cerrar, con un nudo siempre hacia la derecha.

3-4. A continuación, tomas como guías, la primera hebra que dejaste luego del paso 2, para hacer el paso tres reanudando, para darle forma a la cabeza de la serpiente. Lo siguiente es poner la mostacilla grande en el centro de la cabeza de la serpiente, en mi caso no me cupo los dos hilos por el orificio de la mostacilla así que improvise, Finaliza la cabeza con otro nudo hacia adelante.

  1. The rest is the traditional macramé knot, two knots to the right and three knots to the left and close, to form the body and to close, knot over the remaining strands to create that effect.

  2. You finish the earrings, cutting and burning the excess strands, then add the hooks and you end up with a nice option, with a personalized touch.

Thank you for inviting me to participate in your community, I look forward to your opinions to exchange criteria and grow with you.

Spanish Version - Click here!

5. El resto es el nudo tradicional del macramé, dos nudos hacia la derecha y tres nudos a la izquierda y cierre, para conformar el cuerpo y para cerrar, anudas sobre las hebras restantes para crear ese efecto.

  1. Terminas los aretes, cortando y quemando los hilos sobrantes, luego agregas los enganches y así terminas una buena opción, con toque personalizado.

Gracias por invitarme a participar en su comunidad, espero sus opiniones para intercambiar criterios y crecer junto a ustedes

  • I used DeepL translator in its free version, as my native language is Spanish.

    shc-witness.gif

Sort:  

Hola. Bienvenido. Ya debes saber de memoria cada TRENZADO de estos de macramé. Me encanta como quedó cada una de las serpientes. Uno lo ve sencillo, pero me consta que hay que poner mucha atención para lograr el diseño. Gracias por compartir tu creación con nosotros.

Gracias por comentar mi trabajo, que bueno que te guste. Como tu dices, lleva bastante trabajo, aunque se vea sencillo y más si trabajas por patrones, fotos y sin tutoriales, cualquier duda te puedo ayudar sin problemas, estamos para eso somos una comunidad unida.

Muchas gracias. Yo apenas estoy aprendiendo, algunos los saco también solo mirando el patrón o la figura. Pero todos los que hago son muy básicos. Igualmente a la orden para compartir saberes.

Exitos, asi se empieza, luego te iras soltando y te sorprenderas tu misma. Dejas que veas las proximas publicacciones los diseños que voy a sacar. Voy a revisar tu trabajo para ver que tal estas. Aqui me tienes pasa bonita tarde

Aquí hay calor para exportar. Que estés bien. Gracias.

untitled.gif

@dayadam just sent you a DIY token as a little appreciation for your post dear @viltredeltoro! Feel free to multiply it by sending someone else !DIY in a comment :) You can do that x times a day depending on your balance so:

Don't be shy - share some DIY!

You can query your personal balance by !DIYSTATS

Thank you very much diyhub for being so attentive to me, super happy to work with you. Thanks for the advice. I would like you to tell me a little more about the DIY Token, I didn't understand much about the subject.

Hey there! You are very welcome :) The DIY Token is just a little gimmick to spread appreciation for the content / comment. The more you have, the more DIY you can send to others on a daily basis. There is no other use case behind it for now. We have ideas but still did not executed them so it's definitely recommended to hold your diy tokens in case we are going to announce some other use case in future ;)

Edit: I have seen that you did not power up the Hive in your wallet.

1000003580.jpg

That's something I highly recommend you :) The more you have powered up (then it is called Hive Power) the higher your updates you give to other people.
But more importantly you need RC to post something to Hive. This RC only gets refilled when you have Hive Power.

Thank you for the details, and the detailed explanation you have given me.

Que trabajo tan lindo, excelente diseño. Me encanto tu introducción y dedicatoria. Me gustaría mucho aprender a tejer con esta técnica de macramé, manejo algunos nudos, pero no he llegado muy lejos jajaja, hay tejidos muy hermosos. Bienvenido a la comunidad, espero ver mas trabajos por acá. Éxitos @viltredeltoro

!DIY

Hola nuevamente @dayadam cres que podrias explicarme como funcina lo de multiplicar el DIY Token. Según entendi en cualquier comentario a un usuario le agregas al final lo que pusiste tu. Y como se comprueba tu estado de tokens?

!DIY

Donde reviso mi DIYSTAT?

Gracias por leer mi post @dayadam, claro estare compartiendo muchos de mis trabajos, empece por el mas sencillo. Que bien que quieras entrar en el mundo del macrame si tienes dudas estoy para ayudarte. Seguire tu trabajo tambièn espera mis comentarios. Disfrutemos del arte como comunidad.

@viltredeltoro just sent you a DIY token as a little appreciation for your comment dear @dayadam! Feel free to multiply it by sending someone else !DIY in a comment :) You can do that x times a day depending on your balance so:

Don't be shy - share some DIY!

You can query your personal balance by !DIYSTATS

My friend what a beautiful job these earrings are very creative, the Macramé technique is beautiful and you can make different things, I imagine you have created everything. It is difficult this technique but what a nice finish you gave, I loved the eyes and the head part of the snake was great, your girlfriend must have been pleased with these earrings.
For accessories I invite you to join the community of jewelry a community just for accessories 😉 you are welcome.

Saludos, amiga, gracias por reconocer mi trabajo y elogiarlo, ya me suscribí a su comunidad, estaré presentando más trabajo mañana o pasado. Espero que podamos compartir ideas jjaaa.

Seguro que si 😉, me alegro mucho saludos.

Lo propio😍😊😉

Excelente tutorial amiga 😃

Gracias amiga. Me alegra que le guste.

Hermosos pendientes amigo. Felicitaciones.

Gracias estaré sacando nuevos diseños y tutoriales no se los pierda😆

Muy lindo trabajo, y aunque se ve facil lograr el efecto 3D debe ser más difícil

Asi mismo pero cundo se desea lograr algo la paciencia y la constancia son la clave. Tu tambien puedes lograrlo.

Muchas gracias.

Congratulations @viltredeltoro! You have completed the following achievement on the Hive blockchain And have been rewarded with New badge(s)

You received more than 400 upvotes.
Your next target is to reach 500 upvotes.
You made more than 50 comments.
Your next target is to reach 100 comments.

You can view your badges on your board and compare yourself to others in the Ranking
If you no longer want to receive notifications, reply to this comment with the word STOP

To support your work, I also upvoted your post!

Check out our last posts:

The countdown to HiveFest⁸ is two weeks away - Join us and get your exclusive badge!