Saludos amigos🙋☕.¿Están listos para la hora del té?.
Y comenzado esta interrogante, quiero darle el inicio a mi publicación, pues es la que me inspiró a la realización de : tacitas personalizadas, que compartiré con ustedes hoy, en forma de tutorial, con la técnica de papel maché.
Resulta, que hace unos días tuve la visita de mi tío y su familia en horarios de la tarde, y me exclamó:¡Llegamos justo para la hora del té!. Inmediatamente, mi semblante me delató que me encontraba ajena a lo expresado, y fue cuando me refirieron que esta es una costumbre británica, que suele tener lugar en los horarios de 4 a 7 de la tarde, acompañando a pasteles típicos.
-Siempre se aprende algo nuevo, referí, dejando salir una sonrisa al escuchar exclamar a sus pequeños: - si prima, cómo Alicia en el país de las maravillas, cuando toma té con la liebre y el sombrero loco.
Ese día amigos, no brinde té, sino jugo con panetela, prometiendo que para la próxima sí sería una tarde de té.
Como obsequio a los pequeños, le confeccioné unas pequeñas tacitas.
Materiales
.Molde :Platillo de cristal, vasitos pequeños plásticos
.Aceite
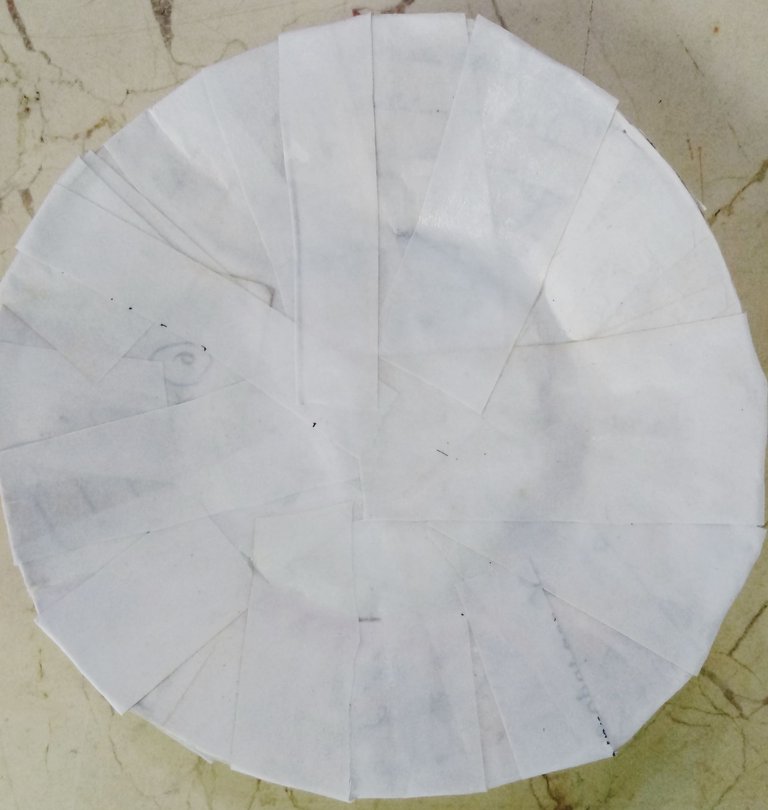
.Tiras de papel blanco.
.Tijera
.Pega elaborada de harina.
.Bisturíc
.Temperas
.Pincel
Modo de confección
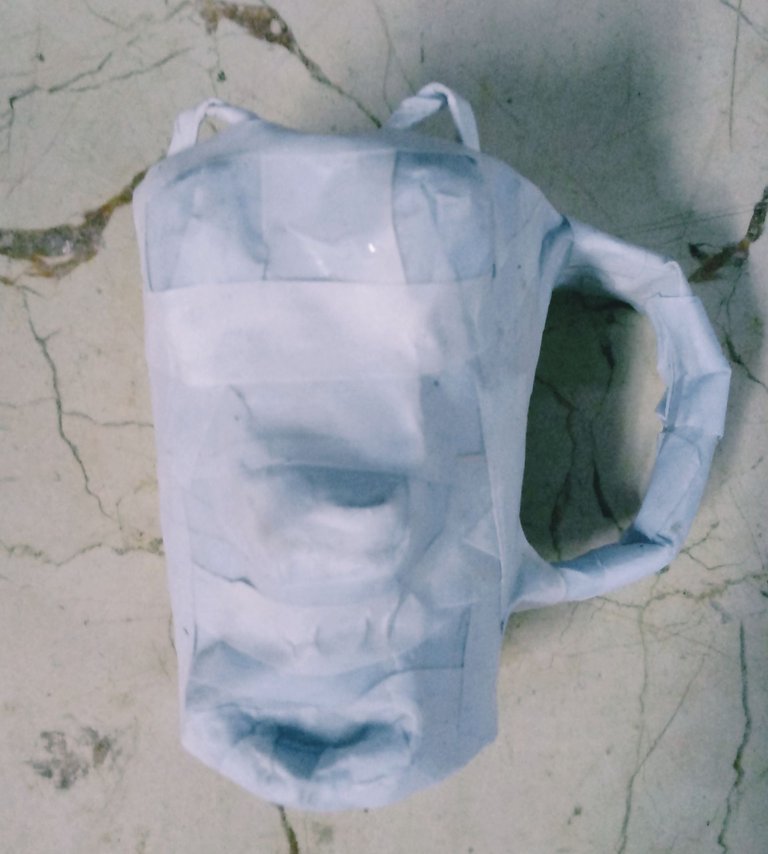
1-Primeramente, tomé los moldes y cubrí ayudándome con un algodoncito humedecido de aceite, toda su superficie. Este paso es fundamental, pues facilita el despegado.
2-Luego, utilizando las tiras previamente cortadas y la pega elaborada de harina, comencé con la técnica de papel maché el empapelado de los vasitos pequeños y el platillo, dándole tres capas.

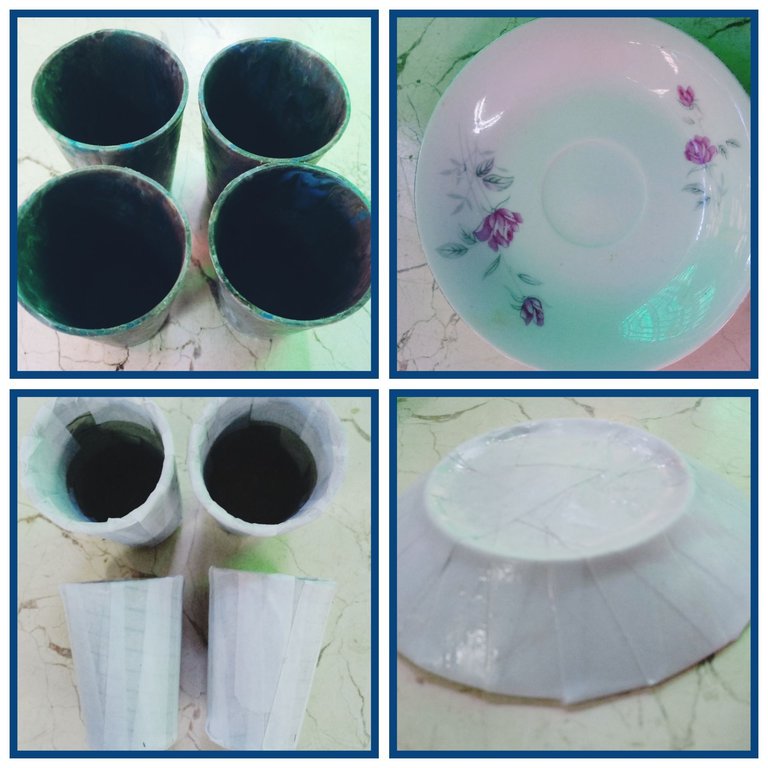
En este paso amigos, tenemos que tener en cuenta que la primera y última capa, tienen que ser de tiras de color blanco, ó del color que vayan a destinar para el interior y su parte externa.
3-Una ves terminado el proceso, lo puse a secar por 8 horas y después me destiné a desmontar de la siguiente forma los vasitos:
Con la ayuda del bisturí y presionándolo cuidadosamente sobre la superficie, realicé una pequeña grieta, la que facilitó su desmonte.
En el patillo, es más fácil desmontarlo, pues no se utiliza accesorios.
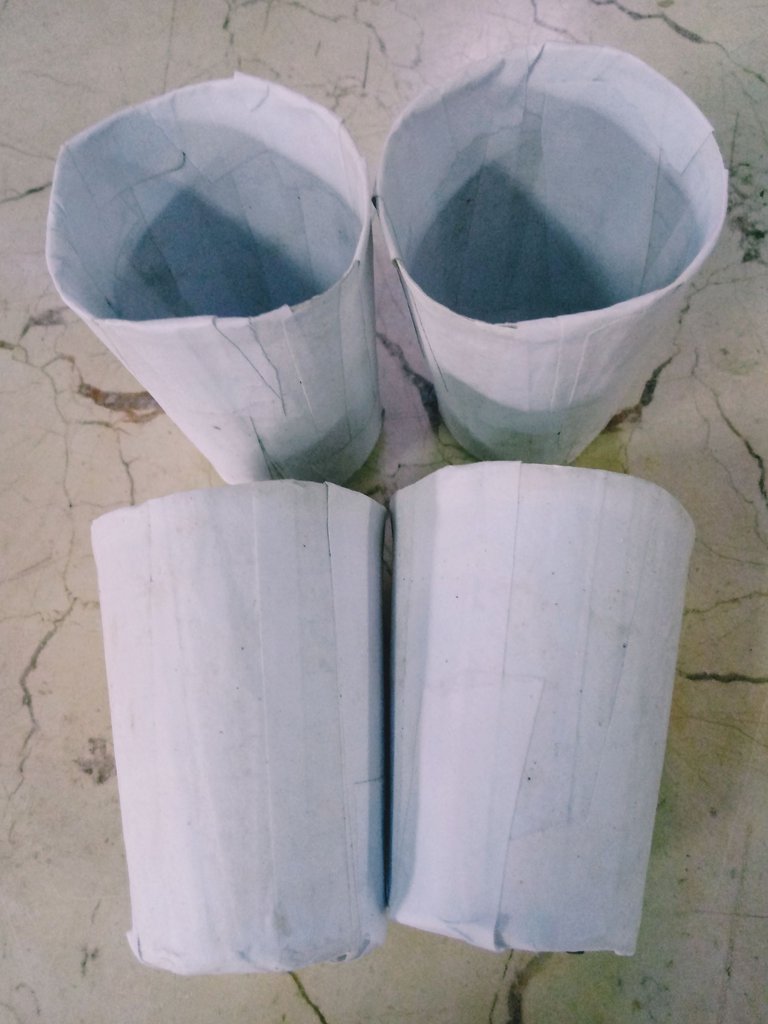
4-Ya teniendo los artículos fuera del molde, con ayuda de la tijera, cortamos las tiritas sobrantes, y con la técnica de papel maché, le damos una cuarta capa, cerrando las hendiduras y corrigiendo imperfecciones.
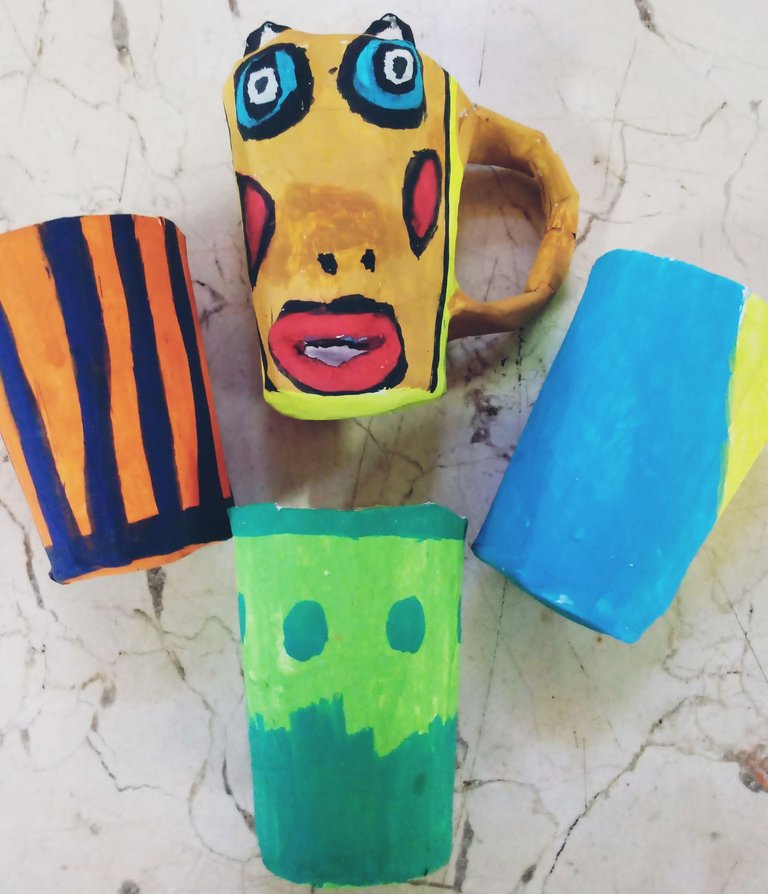
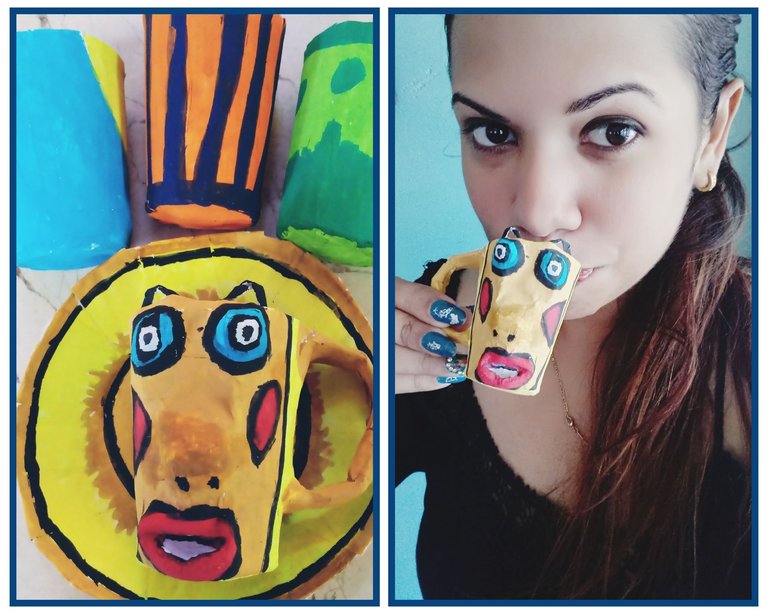
Hasta aqui amigos, después de secar por 5 horas, obtuve un resultado de cuatro tacitas, y un platillo listo para decorar a nuestro gusto.
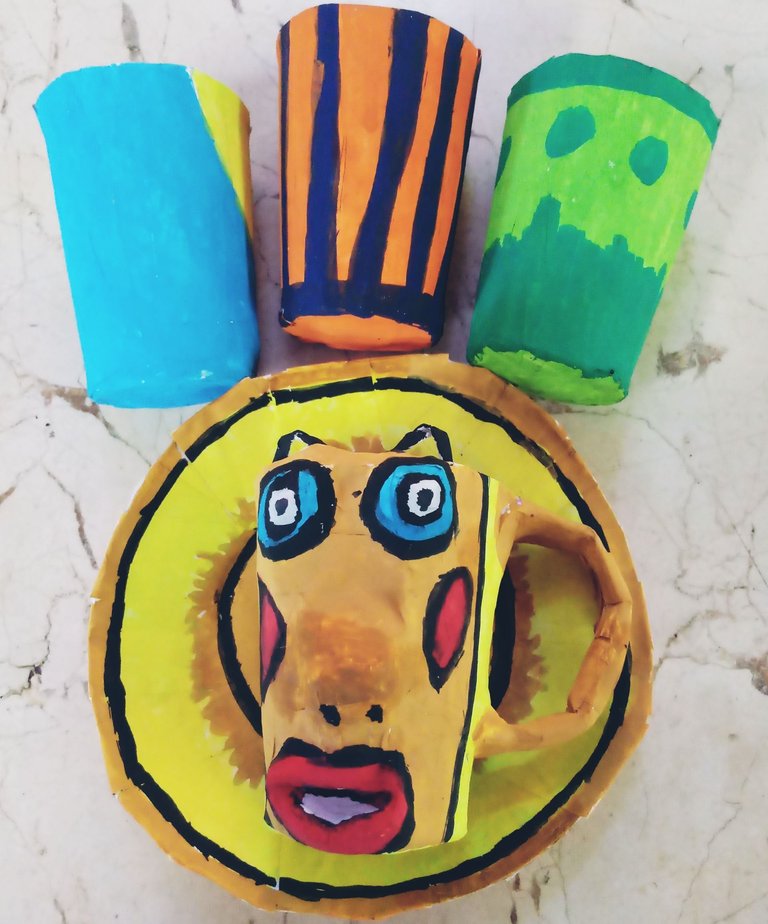
Pero contagiada con la imaginación de los primitos pequeños, y llegando a mis pensamientos la pequeña tacita Chip, de la película infantil : La Bella y la bestia . Quise darle vida a una de las tacitas.
5-Comencé con la técnica a proporcionarle rasgos como: boquita, cejas, nariz, utilizando pequeñitos papeles en forma de rollitos redondos, para sus ojos y nariz, y enrollándolo de forma alargada, para sus cejas, boca, asita.
6-Luego, a esta tacita le di una quinta capa con papel maché, para proporcionarle dureza y fijarle sus rasgos y asa.
7-Los colores, los escogí variados , pues me encantan su combinación: naranja, rojo , amarrillo, verde, azul entre otros, los que lograron después de darle barniz, para su brillo, sacarle una sonrisa a quiénes le fueron obsequiadas.
Amigos, pueden hacer infinidades de tacitas incluso que reflejen nuestros estados de ánimo. Es una confección que a los pequeños les encantan para recrear ese mundo imaginario, visto en películas y cuentos. Pero además, al personalizarlo es un obsequio que es único, original, que les aseguro que a quiénes lo reciban a parte de generarle una sonrisa amplia, les llegará al corazón la acción.
Excelentes días a todos , me encantan sus publicaciones .🙋
Confecciones y fotografías propias.
English
Greetings friends🙋☕.Are you ready for tea time?.
And having started this question, I want to give the beginning to my publication, because it is the one that inspired me to make: personalized cups, which I will share with you today, in the form of a tutorial, with the papier mache technique.
It turns out that a few days ago I had a visit from my uncle and his family in the afternoon, and he exclaimed to me: We arrived just for tea time!. Immediately, my countenance betrayed that I was oblivious to what was expressed, and it was when they told me that this is a British custom, which usually takes place from 4 to 7 in the afternoon, accompanying typical cakes.
-You always learn something new, I said, letting out a smile when I heard her little ones exclaim: - Yes cousin, like Alice in wonderland, when she has tea with the hare and the crazy hat.
That day, friends, I did not provide tea, but juice with bread, promising that next time it would be an afternoon tea.
As a gift to the little ones, I made her some little cups.
Materials
.Mould:Glass saucer, small plastic cups
.Oil
.Strips of white paper.
.Scissor
.Paste made of flour.
.Scalpel
.Temperas
.Brush
Mode of preparation
1-First, I took the molds and covered the entire surface with a cotton ball moistened with oil. This step is essential, because it facilitates the take-off.
2-Then, using the previously cut strips and the elaborate flour glue, I started with the papier mache technique the wallpaper of the small cups and the saucer, giving it three layers.
In this step, friends, we have to keep in mind that the first and last layers have to be made of white strips, or the color that they are going to use for the inside and the outside.
3-Once the process was finished, I put it to dry for 8 hours and then I was destined to disassemble the glasses as follows:
With the help of the scalpel and carefully pressing it on the surface, I made a small crack, which facilitated its disassembly.
It is easier to disassemble the hairpin, as no accessories are used.
4-Already having the items out of the mold, with the help of scissors, we cut the leftover plasters, and with the papier mache technique, we give it a fourth layer, closing the slits and correcting imperfections.
So far friends, after drying for 5 hours, I got a result of four cups, and a dish ready to decorate to our liking.
But infected with the imagination of little cousins, and coming to my thoughts the little cup Chip, from the children's movie: Beauty and the Beast. I wanted to spice up one of the little cups.
5-I started with the technique to provide him with features such as: mouth, eyebrows, nose, using small papers in the form of round rolls, for his eyes and nose, and rolling it in an elongated way, for his eyebrows, mouth, nose.
6-Then, I gave this little cup a fifth layer with papier mache, to provide it with hardness and fix its features and handle.
7-The colors, I chose them varied, because I love their combination: orange, red, yellow, green, blue among others, those that managed after giving varnish, for its brightness, to get a smile to those who were gifted.
Friends, you can make endless cups even that reflect our moods. It is a confection that children love to recreate that imaginary world, seen in movies and stories. But also, by personalizing it, it is a gift that is unique, original, that I assure you that those who receive it, apart from generating a wide smile, the action will reach their hearts.
Great days everyone, I love your posts.
Own clothing and photographs
