Español
Saludos comunidad 🙋🌈🌹.
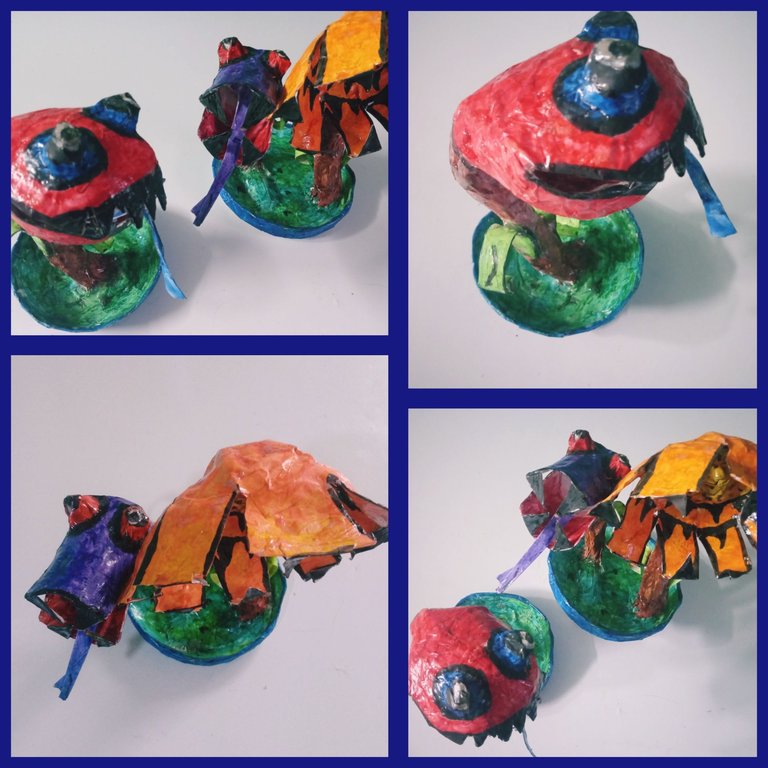
Muchas son las variedades de flores que nos alegran nuestros días con su belleza y la exquisita fragancia que desprenden. De sus variedades siempre me han cautivado las margarita, violetas, y los botones de rosas. En ellas amigos, me inspire para crear a mis flores monstruos, quiénes le daban un aspecto tenebroso a mi hogar en esta pasada noche de Halloween .
Hoy las comparto con ustedes en forma de tutorial por si gustan incorporarla en sus futuras decoraciones tenebrosas .
Materiales:
.Moldes:
-Vaso mediano
-Vaso pequeño
-Objeto redondo mediano
-Tapitas plásticas pequeñas
.Tiras de papel blanco
.Papel
.Cartulina
.Pega elaborada de harina
.Pegamento
.Tijera
.Temperas
.Acuarelas
.Pincel
.Barniz
Modo de confección
Flores
Violeta
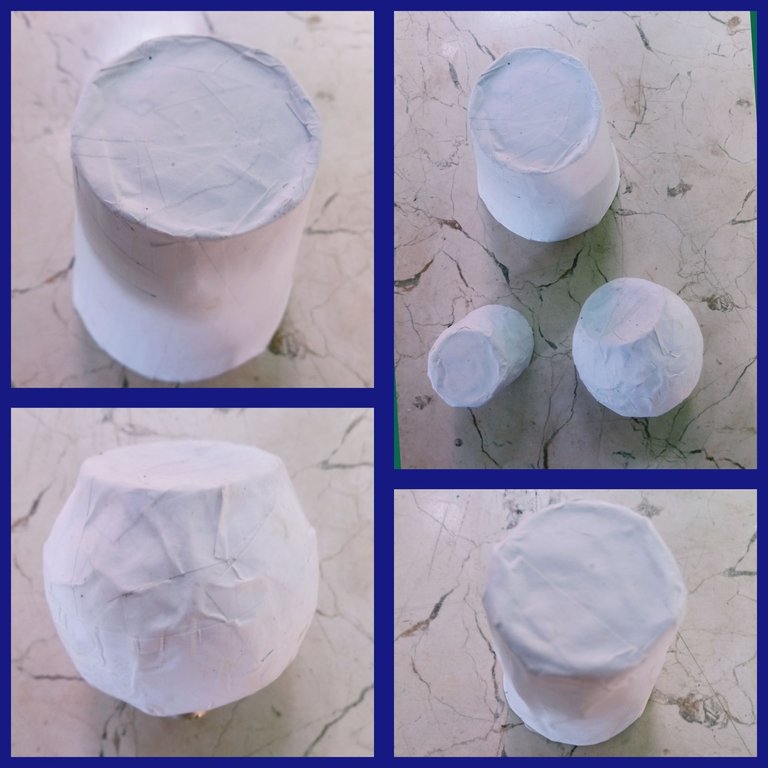
1-Tomar el molde: vasito pequeño y con un algodonsito impregnado de aceite, cubrir toda su superficie.
2-Utilizando la pega de harina y las tiras blancas de papel, realizarle tres capas de empapelado. Dejar secar por doce horas.
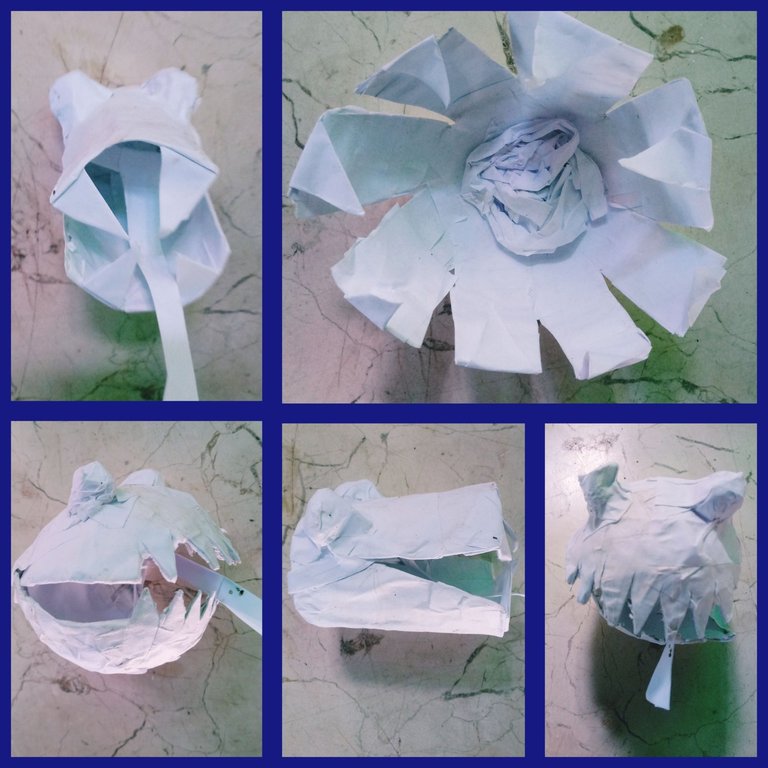
3-Utilizando la tijera por ambos lados de su centro, realizarle dos grietas que nos facilitarán su desmontado y nos derán el efecto de una enorme boca.
4-Adherir con pegamento dos rollitos de papel previamente confeccionados en la parte superior, resaltando unos enormes ojos.
5-Cortar cuatro triángulos pequeños de cartulina y adherirlo con pegamento en sus cuatros bordes, conformando los filosos colmillos.
6-Darle una capa de empapelado completamente con tiras de papel blanco y pega elaborada de harina proporcionándole firmeza y dureza.
Rosa
1-Tomar el molde redondo, e impregnarlo en su totalidad con un algodonsito humedecido de aceite.
2-Realizar tres capas de empapelado con las tiras de papel blanco y la pega elaborada de harina. Dejar secar por doce horas.
3-Realizar con la tijera una grieta por todo su centro. Permitiéndonos obtener dos mitades de igual diámetro.
4-Utilizando el pegamento unimos por uno de sus vértices, obteniendo una estructura semiabierta con aspecto de concha.
5-Realizarle con la tijera cortes triangulares en los vértices no pegados asemejándolos a dientes filosos.
6-En la parte superior adherir con pegamento rollitos de papel previamente confeccionados, conformando sus ojos.
7-Darle una capa de empapelado con tiras de papel blanco y pega elaborada de harina para generarle firmeza.
Margarita
1-Tomar el molde:vaso mediano y utilizando un algodonsito humedecido en aceite impregnar toda su superficie.
2-Realizar tres capas de empapelado con las tiras de papel blanco y la pega elaborada de harina. Dejar secar por doce horas.
3-Realizar con la tijera una pequeña grieta y desmontar del molde.
4-Marcar con un lapiz los pétalos de nuestra margarita en la estructura del vaso desmoldado, y cortar con la tijera siguiendo la guía, manteniendo el centro intacto.
5-Adherir en la puntas de los pétalos pequeños triángulos de cartulina, dándole la apariencia unos filosos colmillos.
6-Realizar una capa de empapelado en su totalidad con tiras de papel blanco y pega elaborada de harina para generarle firmeza.
Tallos
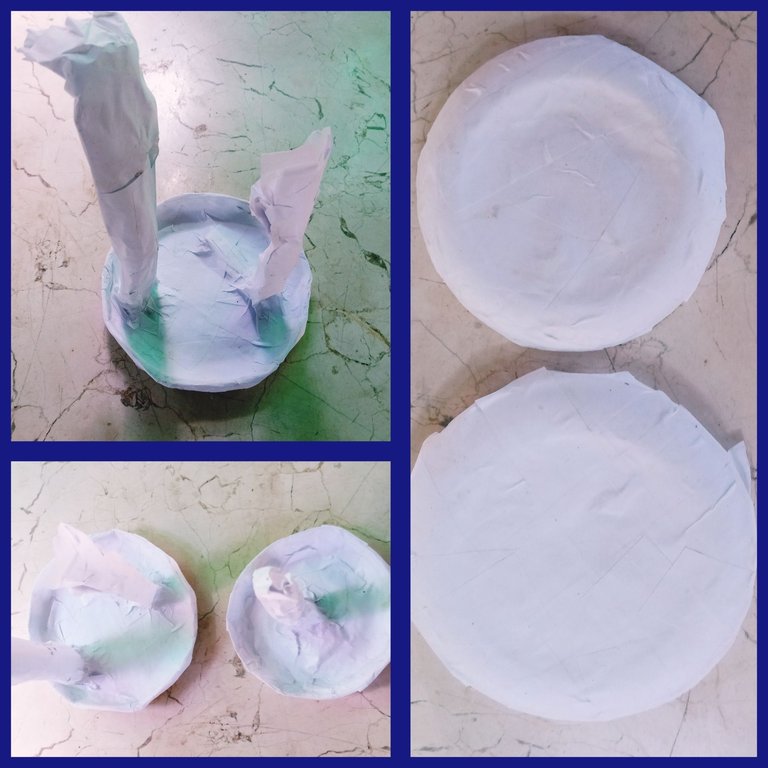
1-Tomar los moldes de las dos tapitas e impregnar toda su superficie con aceite, utilizado un pequeño algodonsito.
2-Realizar la técnica de papel maché dándole tres capas de empapelado con las tiras de papel blanco y la pega elaborada de harina. Dejar secar ocho horas.
3-Desmontar cuidadosamente y utilizando la tijera cortar las tiritas sobrantes. Obteniendo una base circular.
4-Estrujar tres papeles conformado estructuras alargadas asemejándolo a tallitos de plantas.
5-Utilizando el pegamento adherilo a la base circular y realizarle una capa de empapelado en su totalidad para generarle firmeza. Dejar secar por ocho horas.
Hojas
Podemos realizarlas de diversos modelos . Yo seguí dos dos variantes para darle a una un aspecto ovalado plano y a la otra, una forma alargada.
Para las ovalada planas:
1-Trazar con un lápiz en la cartulina la forma deseada de las hojas.
2-Cortar la guía trazada y adherir con el pegamento al tallito.
Para las alargadas
1-Doblar un papel continuamente confeccionando un tabaquito fino.
2-Enrollar el tabaquito en forma de caracol .
3-Mantener la estructura con pegamento.
4-Adherir la hojita al tallo.
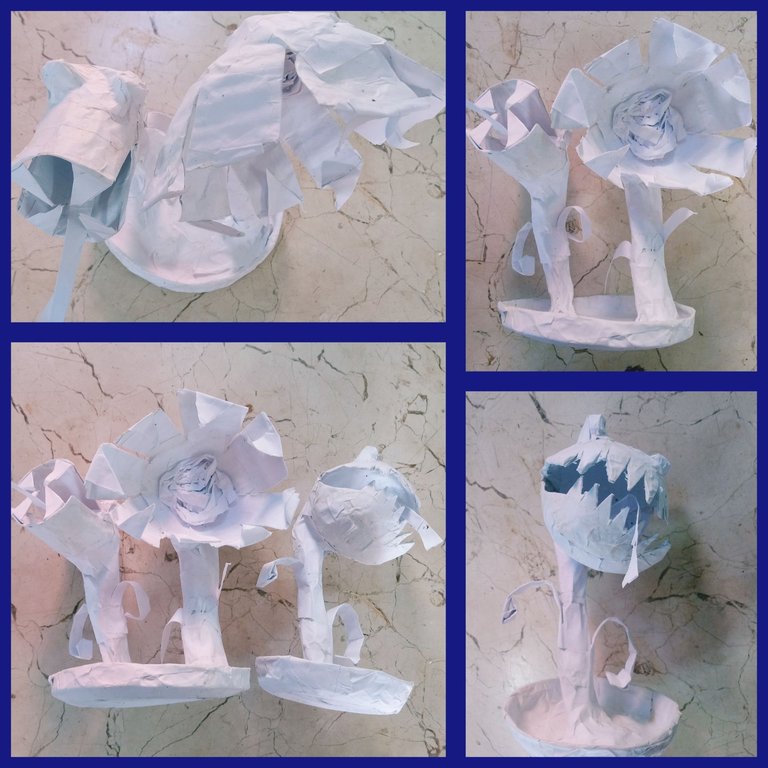
Ya teniendo nuestras flores, tallos y hojas listas, pasamos a conformarlas utilizando el pegamento, dejándolas listas para ser decoradas con temperas y acuarelas.
Los colores escogidos fueron el rojo para la rosa, púrpura para la violeta, y para la margarita amarillo y naranja combinados. Los ojos quise resaltarlos con el azul, rojo y negro para darle un aspecto penetrante. Y para los colmillos y dientes, opté por el negro generándole un toque tenebroso. Para su acabado brilloso utilicé barníz.
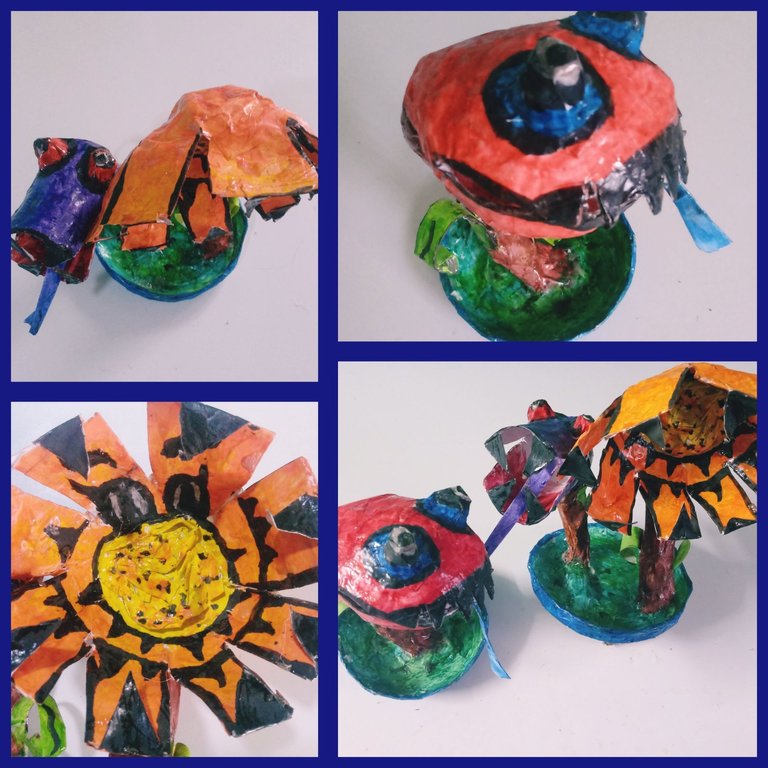
Mis flores mostruos lograron darle un ambiente colorido y escalofriante a la tan esperada noche de brujas.

Espero que les hayan gustado y los invito a que se diviertan recreándolas .
Excelentes semana amigos. Bendiciones a todos🙋☀
English
Greetings community 🙋🌈🌹.
There are many varieties of flowers that brighten up our days with their beauty and the exquisite fragrance they give off. Of its varieties I have always been captivated by daisies, violets, and rose buttons. In them friends, I was inspired to create my monster flowers, who gave a creepy look to my home on this past Halloween night.
Today I share them with you in the form of a tutorial in case you like to incorporate it in your future scary decorations.

Materials:
.Moulds:
-Medium glass
-Small glass
-Medium round object
-Small plastic caps
.White paper strips
.Paper
.Cardboard
.Paste made of flour
.Glue
.Scissor
.Temperas
.Watercolors
.Brush
.Varnish
Mode of preparation
Flowers
Violet
1-Take the mold: small cup and with a cotton ball impregnated with oil, cover its entire surface.
2-Using the flour glue and the white strips of paper, make three layers of wallpaper. Leave to dry for twelve hours.
3-Using the scissors on both sides of its center, make two cracks that will facilitate its disassembly and will give us the effect of a huge mouth.
4-Adhere with glue two rolls of paper previously made on the top, highlighting huge eyes.
5-Cut four small triangles of cardboard and stick it with glue on its four edges, forming the sharp fangs.
6-Give a layer of wallpaper completely with strips of white paper and glue made of flour providing firmness and hardness.
Pink
1-Take the round mold, and impregnate it completely with a cotton ball moistened with oil.
2-Make three layers of wallpaper with the strips of white paper and the glue made of flour. Leave to dry for twelve hours.
3-Make a crack with the scissors all over its center. Allowing us to obtain two halves of equal diameter.
4-Using the glue we join by one of its vertices, obtaining a semi-open structure with the appearance of a shell.
5-Make triangular cuts with the scissors on the unglued vertices resembling sharp teeth.
6-On the top adhere with glue rolls of paper previously made, shaping their eyes.
7-Give it a layer of wallpaper with strips of white paper and paste made of flour to generate firmness.
Margarita
1-Take the mold: medium glass and using a cotton ball moistened in oil impregnate its entire surface.
2-Make three layers of wallpaper with the strips of white paper and the glue made of flour. Leave to dry for twelve hours.
3-Make a small crack with the scissors and disassemble from the mold.
4-Mark with a pencil the petals of our margarita in the structure of the unmolded glass, and cut with the scissors following the guide, keeping the center intact.
5-Attach small triangles of cardboard to the tips of the petals, giving the appearance of sharp fangs.
6-Make a layer of wallpaper entirely with strips of white paper and paste made of flour to generate firmness.


Stems
1-Take the molds of the two little caps and impregnate their entire surface with oil, using a small cotton ball.
2-Perform the papier mache technique by giving it three layers of wallpaper with the strips of white paper and the glue made of flour. Leave to dry for eight hours.
3-Carefully disassemble and using the scissors cut the leftover plasters. Obtaining a circular base.
4-Squeeze three papers shaped elongated structures resembling plant stalks.
5-Using the glue adherilo to the circular base and make a layer of wallpaper in its entirety to generate firmness. Leave to dry for eight hours.

Leaves
We can make them in different models. I followed two two variants to give one a flat oval look and the other an elongated shape.
For the flat oval:
1-Draw with a pencil on the cardboard the desired shape of the sheets.
2-Cut the traced guide and adhere with the glue to the stem.
For the elongated
1-Fold a paper continuously making a thin tobacco.
2-Roll the tobacco in the shape of a snail.
3-Maintain the structure with glue.
4-Attach the leaflet to the stem.
Once we have our flowers, stems and leaves ready, we go on to shape them using the glue, leaving them ready to be decorated with tempera and watercolors.

The chosen colors were red for the rose, purple for the violet, and for the daisy yellow and orange combined. I wanted to highlight the eyes with the blue, red and black to give it a penetrating look. And for the fangs and teeth, I opted for black generating a creepy touch. For its shiny finish I used varnish.

My monster flowers managed to give a colorful and chilling atmosphere to the long-awaited Halloween.

I hope you liked them and I invite you to have fun recreating them.
Great week friends. Blessings to all🙋☀
