Un Saludo Amigos Hivers
Primero que nada un saludo con mucho cariño y respeto a toda la comunidad DIYHUB y mis mejores deseos. Es un gusto para mí estar nuevamente con ustedes y poder participar en el concurso de este mes de mayo con el tema "Sea Life" #diyecencycontest.
Cuando vi la convocatoria y me enteré de cuál era el tema para el concurso, me alegró mucho porque me encanta el mar y las maravillosas criaturas que habitan en el. En ese momento vinieron varias ideas para hacer algo referente al tema y por supuesto el reciclaje es una de las opciones que está en primer lugar en la lista para la tarea.
Entonces organicé todo el material que tenía disponible y surgió la idea de hacer un estuche en forma de pez que puede usarse como cartuchera para guardar creyones, lápices o marcadores y también como porta cosméticos.
Buscando plantilla o patrón por internet para hacer el pez, descubrí que ya existen estuches así y que mi idea no es nada original, pero igual quise hacerlo porque me encanta la idea de darle vida a una de esas criaturas marinas a través del reciclaje y las manualidades.
Para realizar esta labor no se necesita mucho material y es un trabajo sencillo, así que los invito a que vean el proceso y manos a la obra.
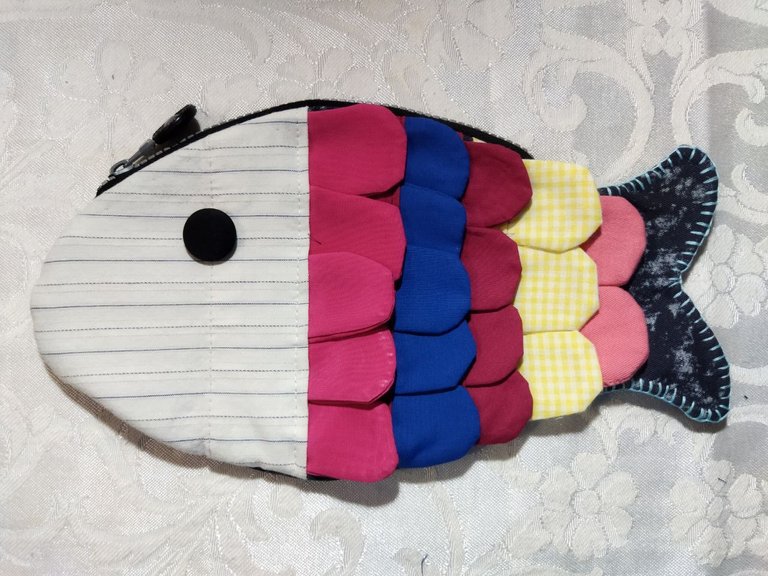
ESTUCHE EN FORMA DE PEZ
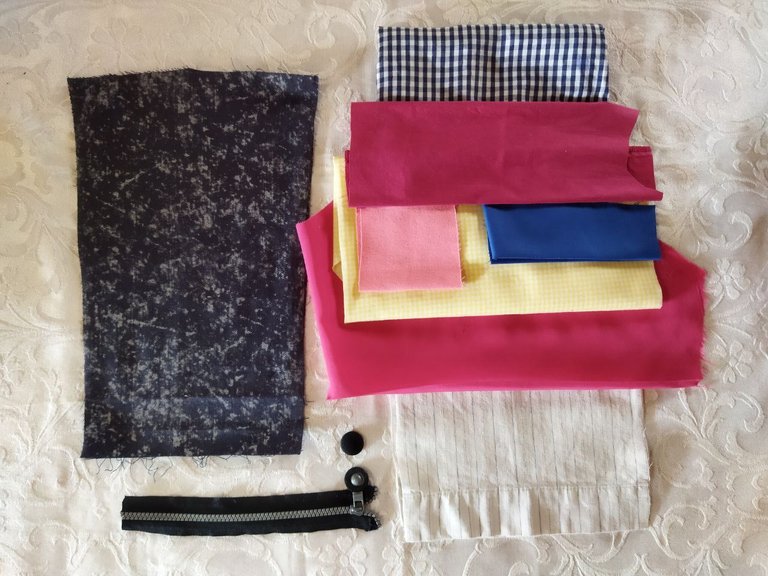
MATERIALES
- Retazos de tela de jean
- Tela para hacer forro y sesgo
- Retacitos de tela de colores
- Cierre de 22 cms
- Un botón
- Tijera, cinta métrica, aguja, hilos
PROCEDIMIENTO
Paso 1
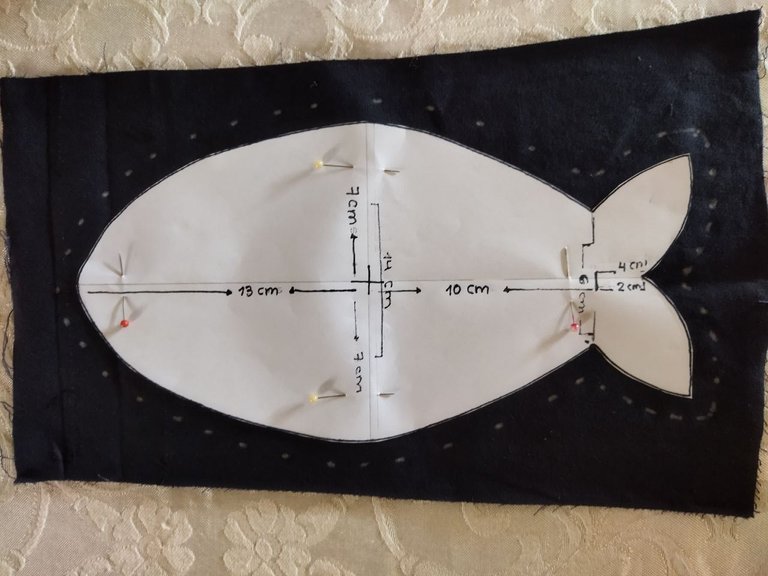
Lo primero que hice fue tomar una hoja en blanco, la doble a la mitad tanto a lo largo como a lo ancho, marque las líneas para tener un punto central y desde allí marqué las medidas para hacer la figura del pez que usaré como plantilla para cortar las piezas de tela para realizar el estuche.
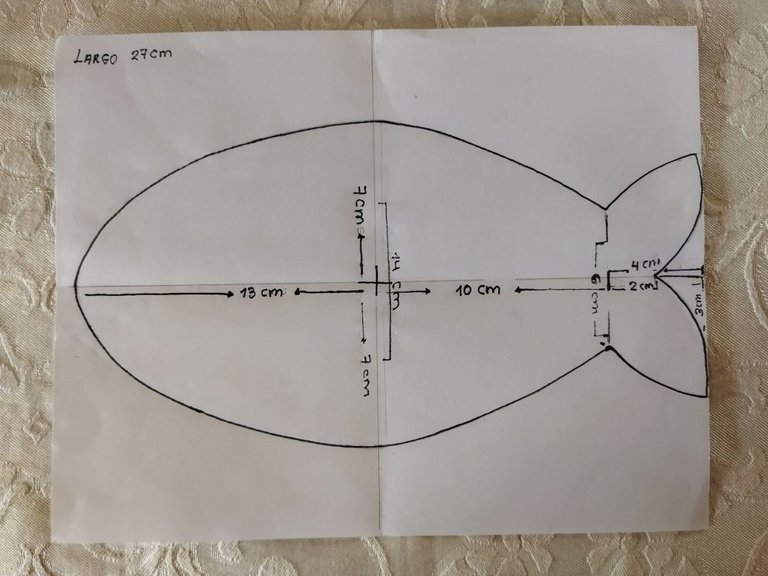
Como se observa en el patrón mostrado en la imagen, desde el centro hacia la cabeza marcamos 13 centímetros. Luego desde el centro hacia la línea dónde comienza la cola marcamos 10 centímetros y desde ese punto marcamos 4 centímetros para hacer la cola. El largo total sería de 27 centímetros. El ancho de la parte media del pez es de catorce centímetros, marcamos 7 centímetros hacia arriba y hacia abajo.
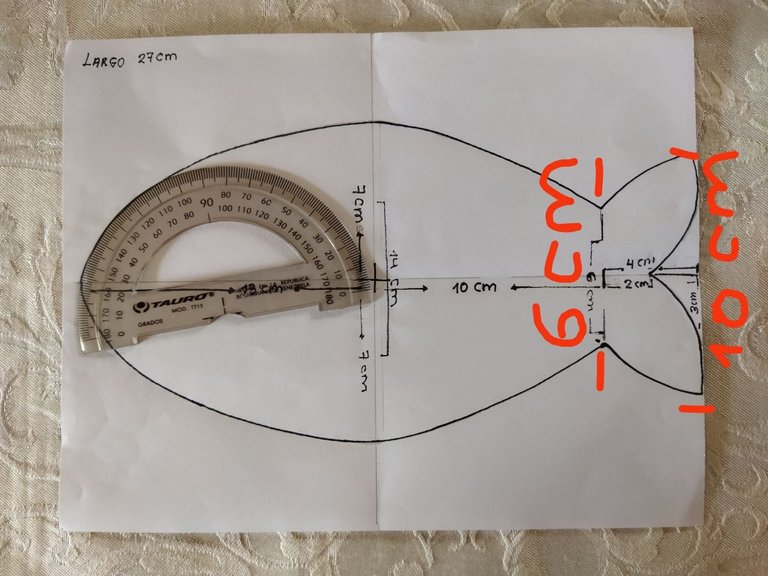
El ancho de la línea que marca el comienzo de la cola es de 6 centímetros y al final es de 10 centímetros. El ancho de la línea del lado de la cabeza es de 6 centímetros también y partiendo del centro, tracé las líneas a mano alzada para dibujar el cuerpo del pez y di forma a la cabeza con la ayuda de un transportador.
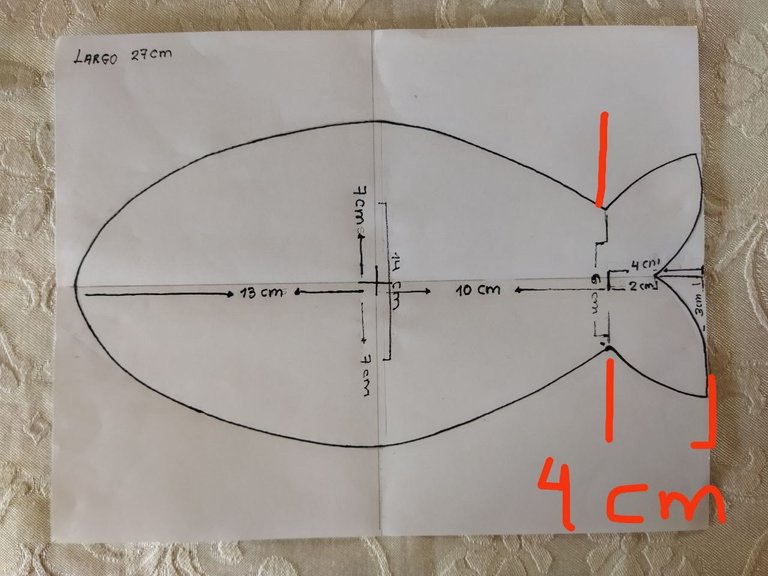
Para hacer la cola, tomamos como guía la línea de 6 centímetros de ancho como se muestra en la imagen y desde allí marcamos los 4 centímetros hacia la línea final para el largo de la misma.
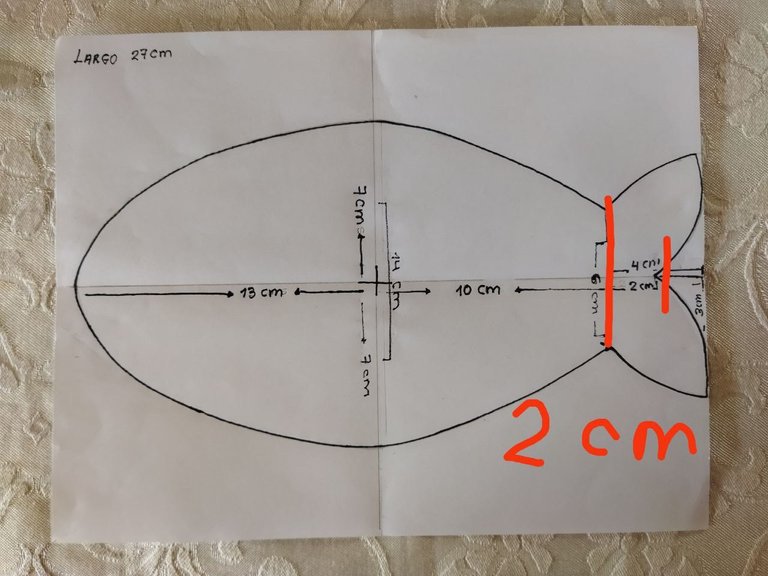
Para formar la división de la cola, marcamos 2 centímetros como se muestra en la imagen.
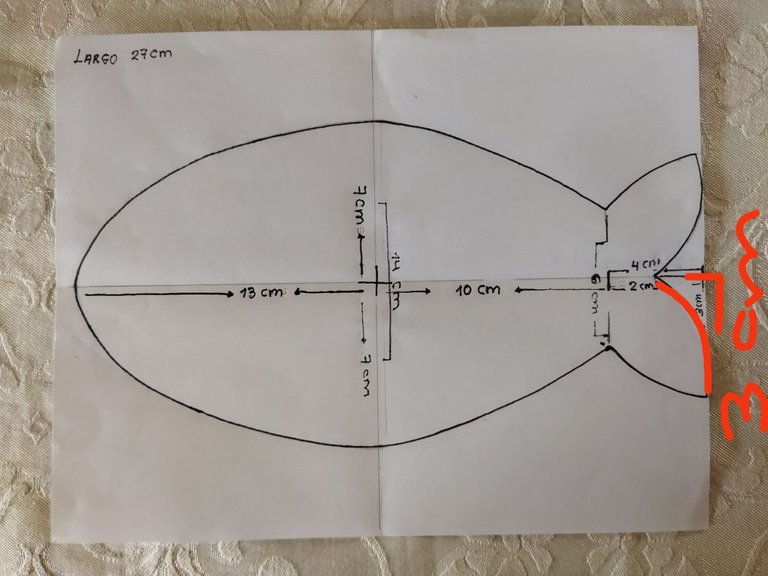
Para dar forma a la cola, trazamos la línea desde el comienzo de la cola hacia la línea final en ambos lados para formar los laterales. Luego marcamos desde el centro de la línea final hacia cada lado 3 centímetros y desde el punto donde marcamos los 2 centímetros trazamos la línea para formar la parte interna que divide la cola como se muestra en la imagen. Hecho esto, ya tenemos la plantilla para cortar las piezas de tela.
Paso 2
Hecha la plantilla, voy a marcar la figura en la tela de jeans para obtener las piezas que necesito para hacer el estuche.
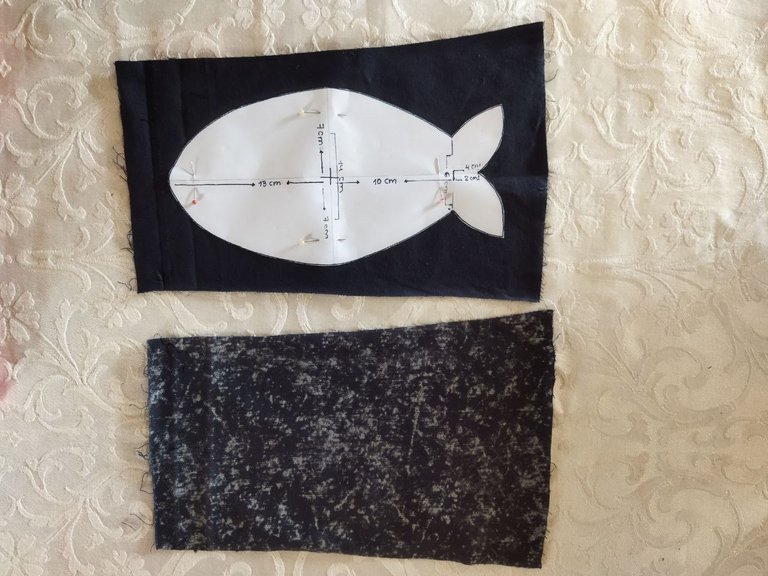
Fijamos la plantilla con alfileres para que no se mueva y podamos marcar bien la figura.
Debemos dejar siempre 1 centímetro para la costura.
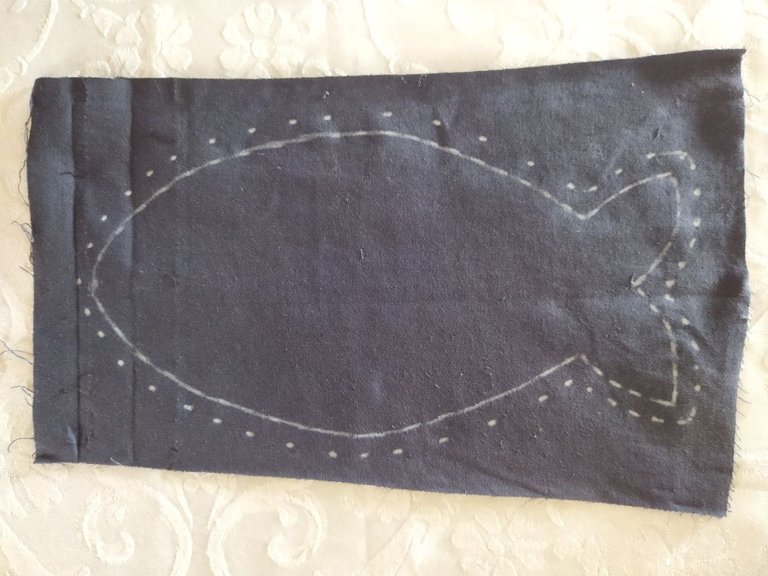
Marcada la figura, vamos a cortar por la línea de puntos.
Para que el estuche sea resistente y el trabajo tenga un buen acabado, vamos a colocar forro y refuerzo, agregando otra pieza de tela entre la tapa y el forro, como se muestra en la siguiente imagen.
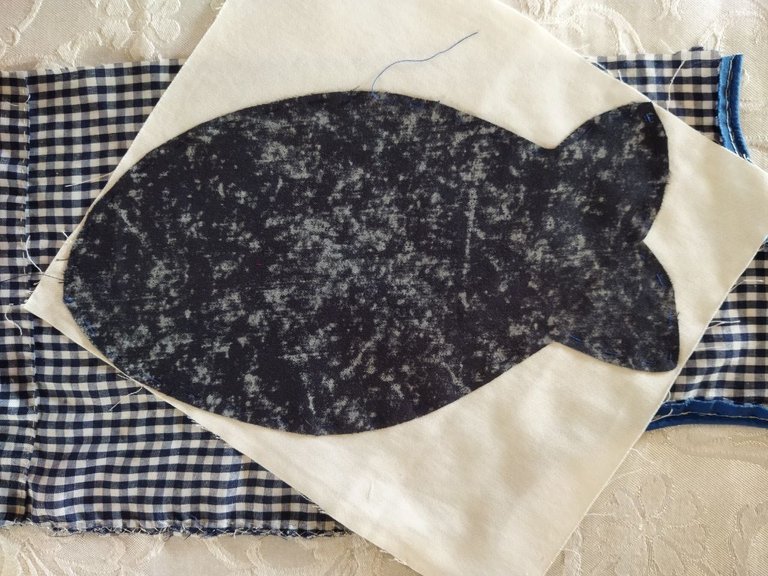
Como se observa, estoy reciclando todo el material para realizar la labor. Aquí tengo tela de una blusa para hacer el forro y un trozo de tela de jeans color crema para reforzar las piezas. Cuadre bien los retazos para que todas estén parejas y obtener un buen resultado.
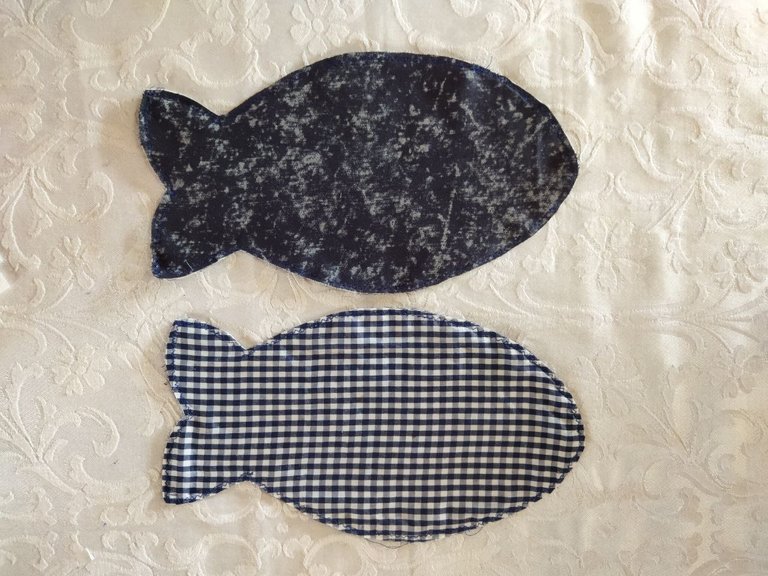
Aquí tenemos las piezas, las corte y las uní cosiendo a máquina por toda la orilla con puntada en zig zag como muestra la imagen.
Paso 3
Para comenzar a darle vida al pez, voy a realizar varias piezas con los retazos de tela de colores, las cuales usaré para decorar en forma de escamas. Este detalle puede realizarse en ambas tapas del estuche si lo desea, pero en este caso por cuestión de tiempo yo lo voy hacer en un solo lado como les mostraré en siguientes imágenes.
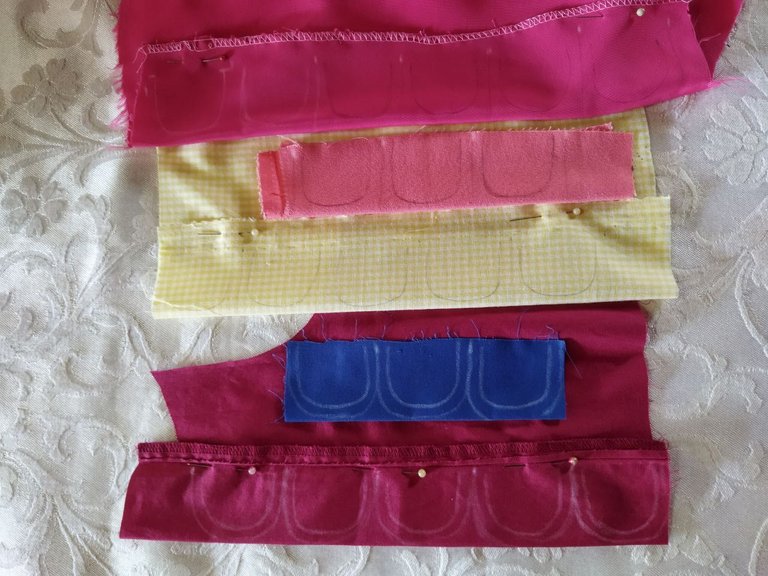
Coloque la tela doble, marqué varias líneas verticales a una distancia de 5 centímetros e igualmente la altura, luego tracé el arco en las puntas como se observa en esta imagen.
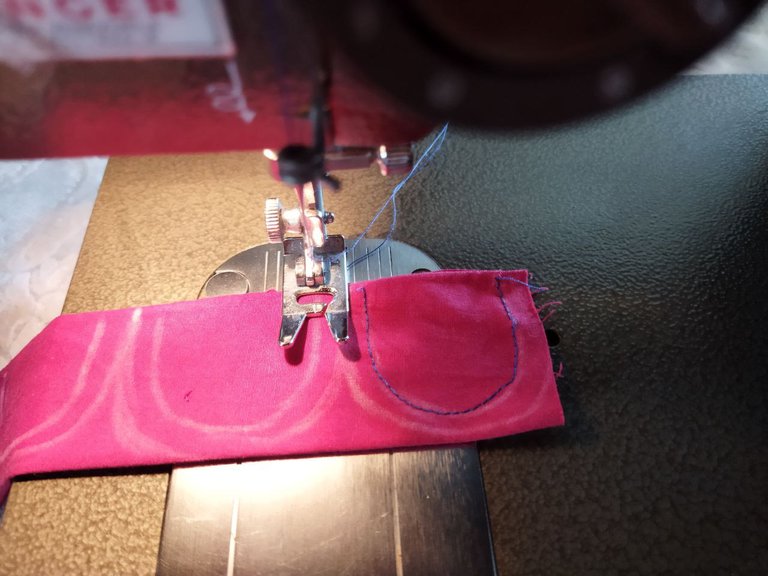
Luego las cosí a máquina con puntada recta, dejando medio centímetro de margen de costura en todo el contorno para cortarlas.
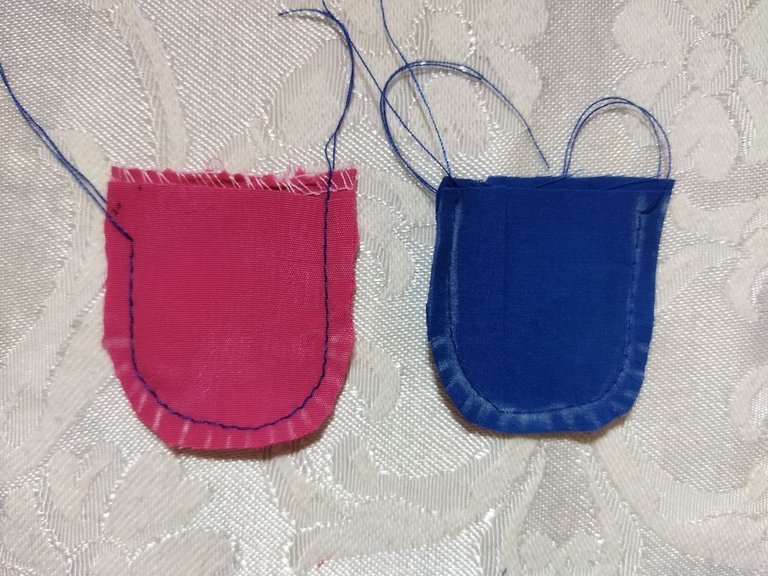
Después de coser todas las piezas, cortamos y hacemos pequeños piquetes en toda la orilla de la parte redondeada con mucho cuidado para no llegar a la costura, de esta manera al voltear las piezas la tela podrá tomar la forma suavemente.
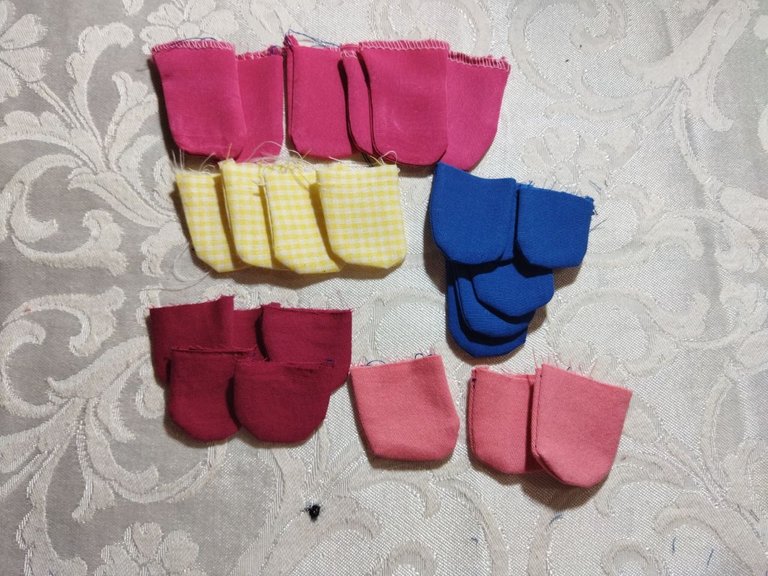
Una vez que volteamos todas las piezas, las planchamos y quedan listas las escamas para el pez.
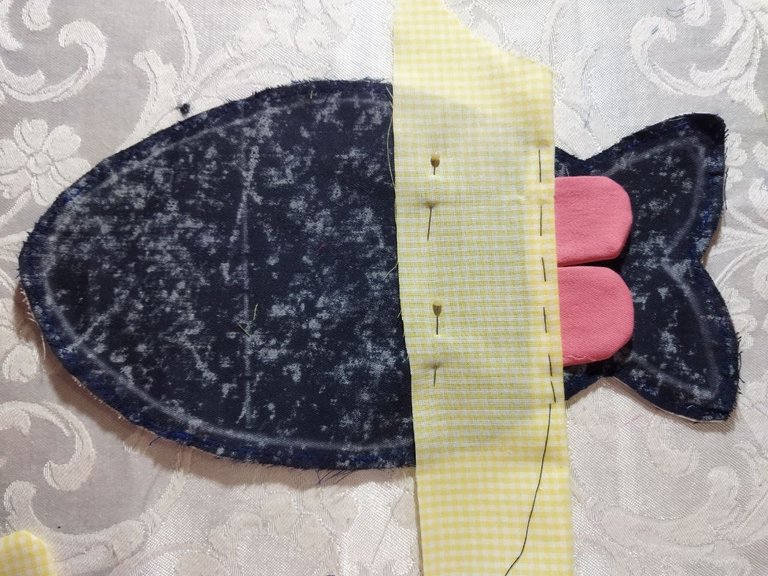
Como pueden observar en esta imagen, marque la línea del centímetro que debemos dejar de margen de costura y comencé a pegar las escamas desde la cola hacia la cabeza respetando ese margen, para que al momento de coser no queden pisadas y se pierda el efecto que quiero dar.
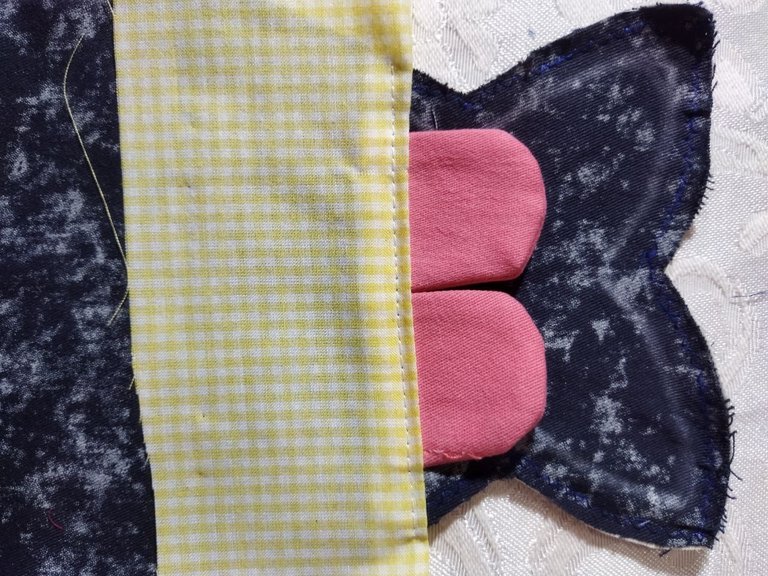
Coloque esta pieza de tela encima de las puntas de las escamas, porque aunque es un trabajo de reciclaje, siempre me ha gustado cuidar los detalles para obtener un buen resultado.
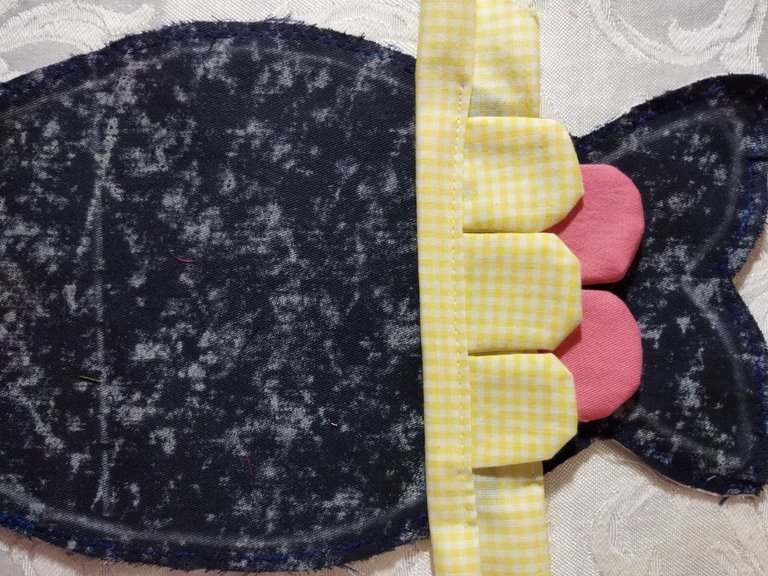
En esta imagen se observa la segunda capa de escamas y como he usado nuevamente la tela que coloque en la primera capa para tapar los detalles y que se vea bonito el trabajo.
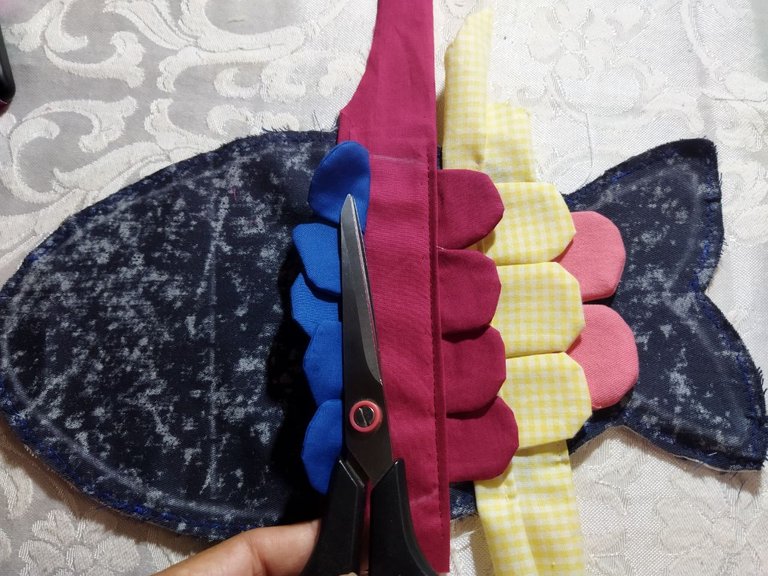
De la misma manera, vamos colocando y cosiendo las otras filas de escamas, tratando de acomodarlas bien para dar el efecto que se debe. Como pueden ver, aquí repetí el proceso de las dos primeras filas.
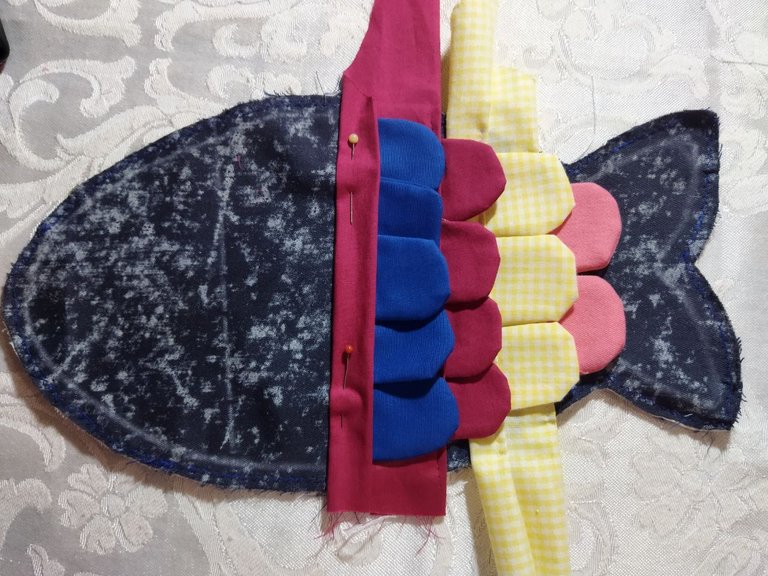
Así van quedando las capas de escamas.
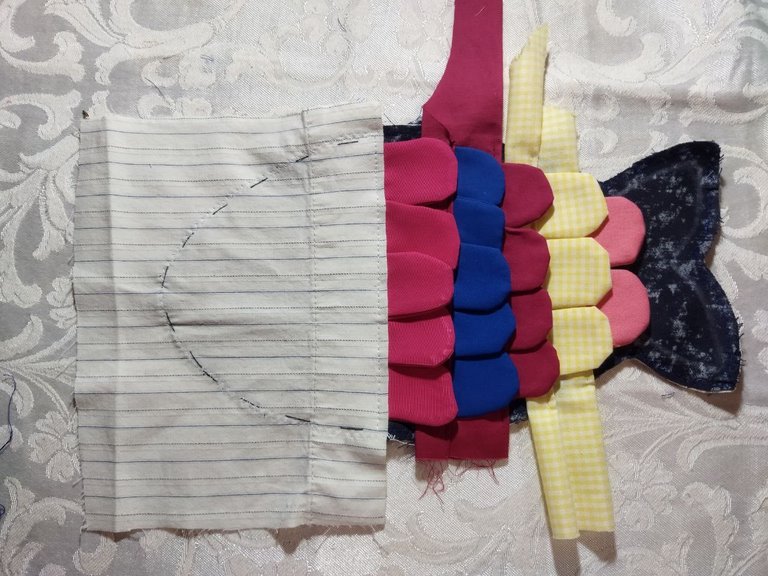
En esta imagen les muestro la última capa de escamas que vamos a coser y estoy colocando una pieza de tela color crema que además de darle una buena terminación al trabajo de las escamas, será el fondo de la cabeza del pez para que pueda resaltar el ojo que vamos a pegar mas adelante. Vamos a coser a máquina y a cortar el excedente.
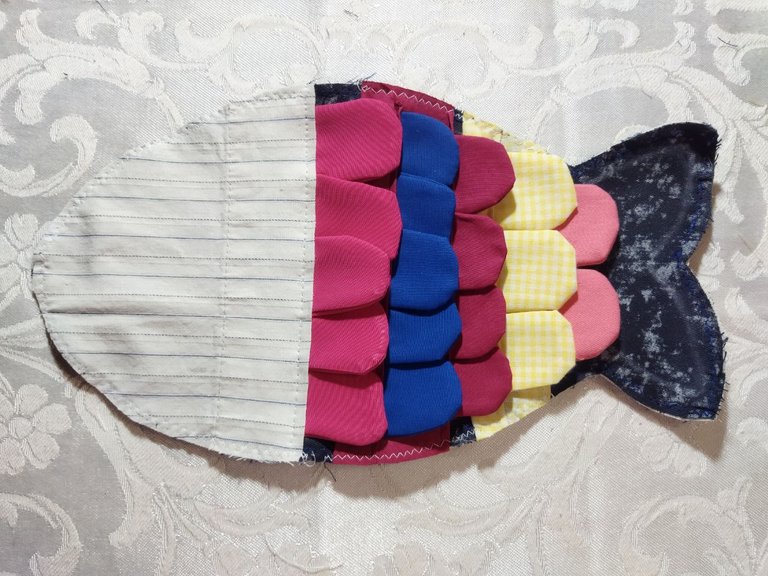
Como muestra la imagen, he cosido con puntada zig zag el contorno de la pieza color crema y corte el excedente de las telas. Así queda terminada la decoración de esta pieza y vamos al siguiente paso.
Paso 4
Ahora vamos a pegar el cierre en ambas tapas como les mostraré en las siguientes imágenes.
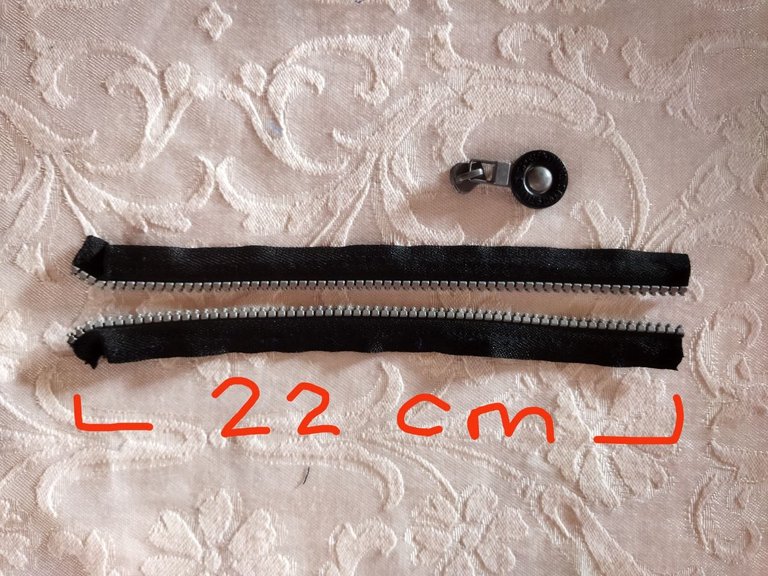
Vamos a quitar el slider para separar las piezas del cierre y de esta manera será más sencillo el trabajo al momento de coser.
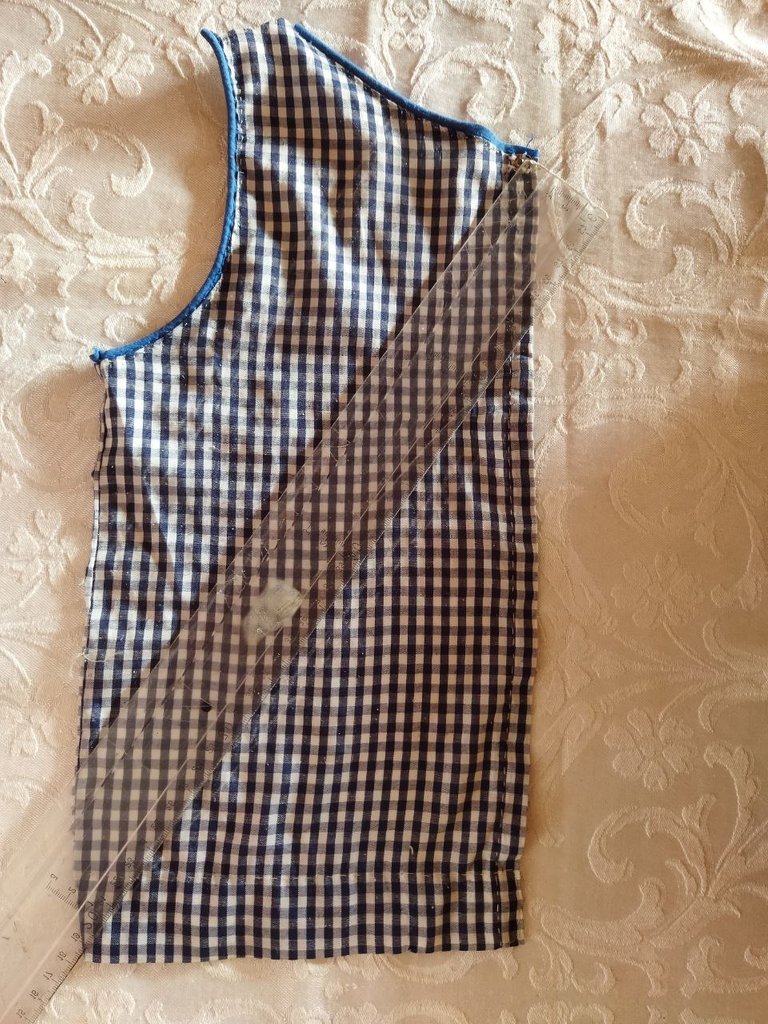
Para ahorrar tiempo y trabajo, vamos a cortar las tiras de tela que vamos a usar de sesgo de 5 centímetros de ancho como se muestra en la imagen, para pegarlo junto con el cierre. Cortar las tiras necesarias.
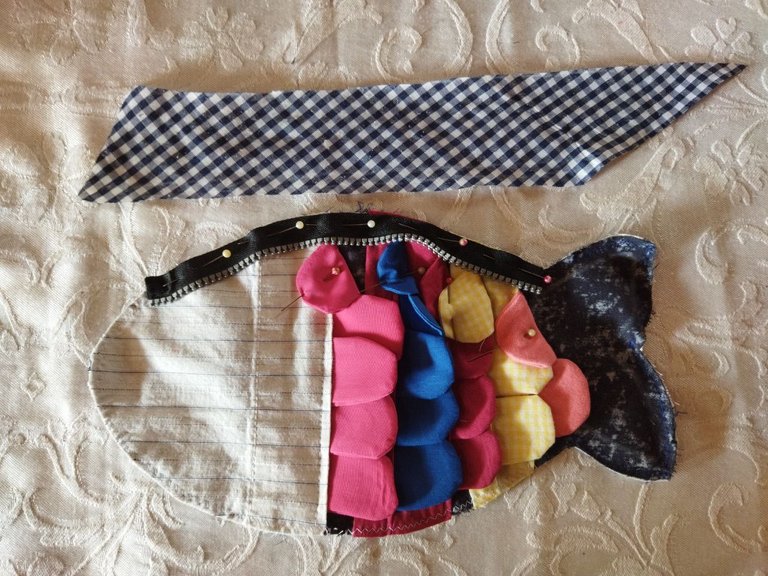
Aquí tenemos la tira de sesgo y la pieza del cierre sujeta con alfileres. Como pueden ver, lo voy a colocar desde la línea donde comienza la cola hacia la cabeza. También he sujetado las escamas con alfileres para evitar que queden pisadas cuando pase la costura al cierre.
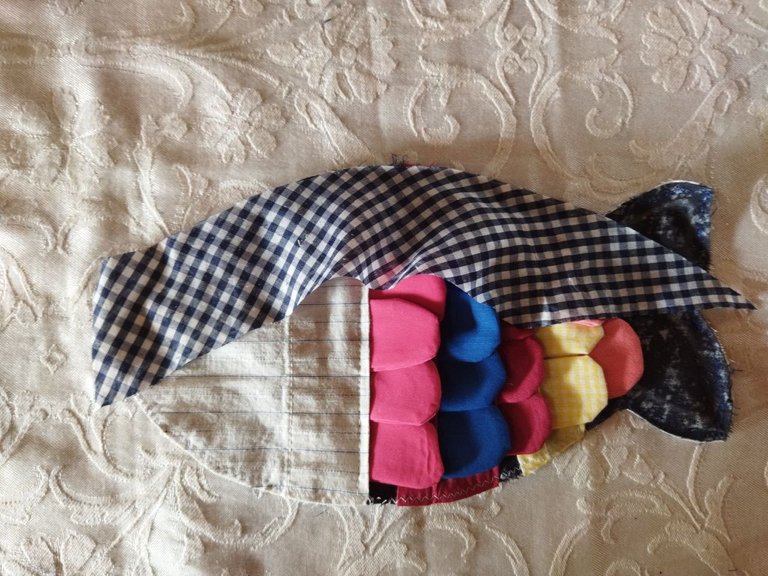
Pasamos una bastilla a las piezas para que no se muevan y cosemos en la máquina con puntada recta.
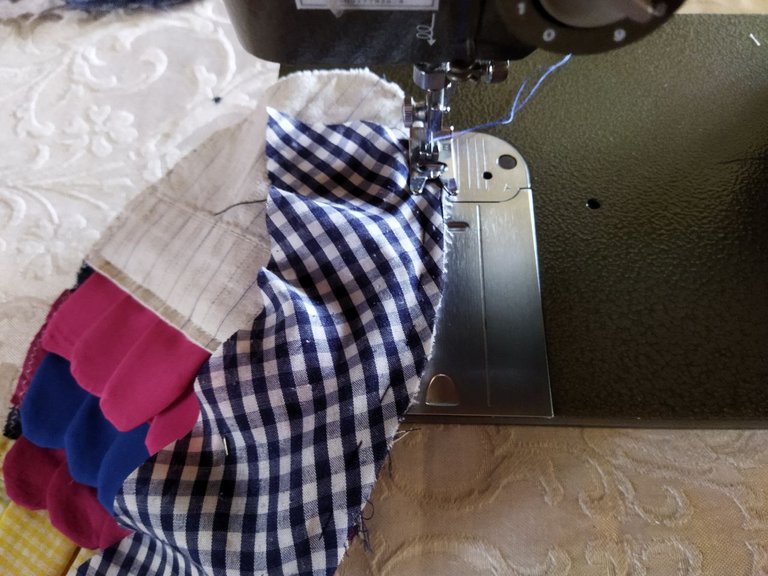
Cosemos la pieza del cierre en ambas tapas de la misma manera.
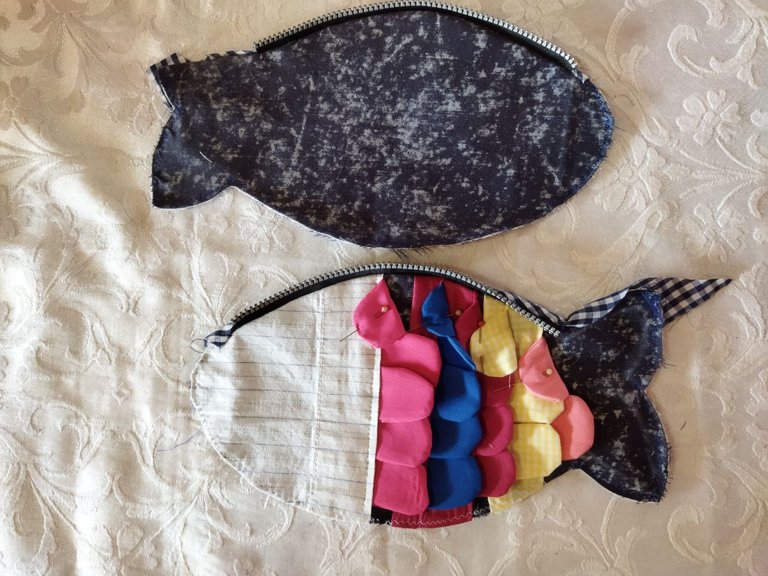
Ya tenemos pegado el cierre.
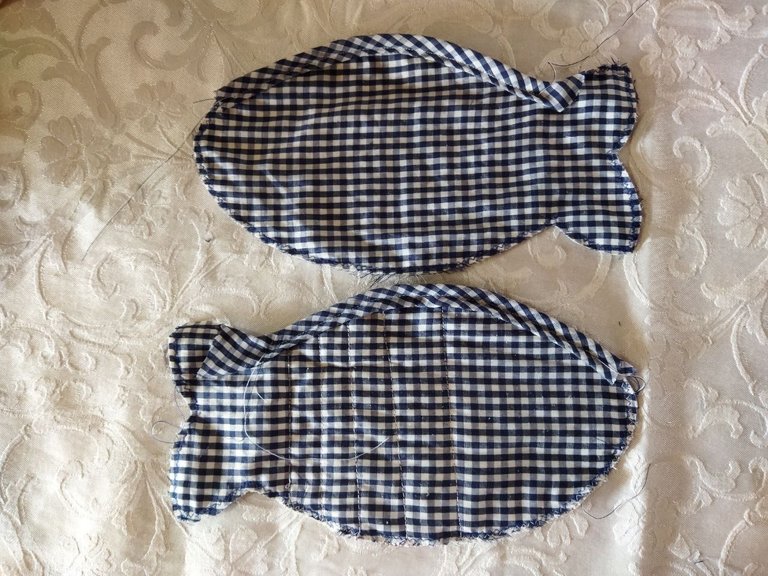
Pegado el cierre, procedemos a cerrar el sesgo, llevando la orilla hacia la parte interna de la tapa, pasamos bastilla y cosemos a máquina con puntada recta como se muestra en esta imagen.
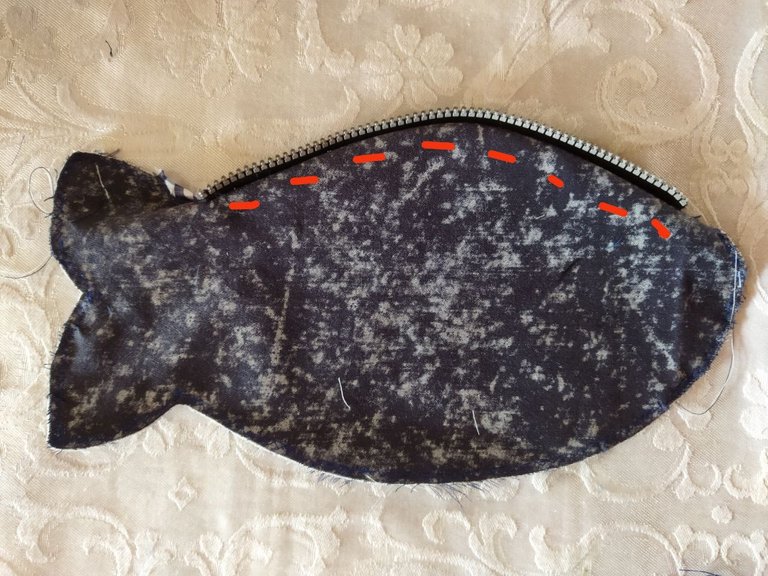
Luego para darle firmeza al cierre y que se mantenga en la posición correcta, sujetamos la orilla con el sesgo hacia la parte interna de la pieza y pasamos un pespunte en máquina como se muestra o podemos coser a mano por dentro con unas pequeñas puntadas.
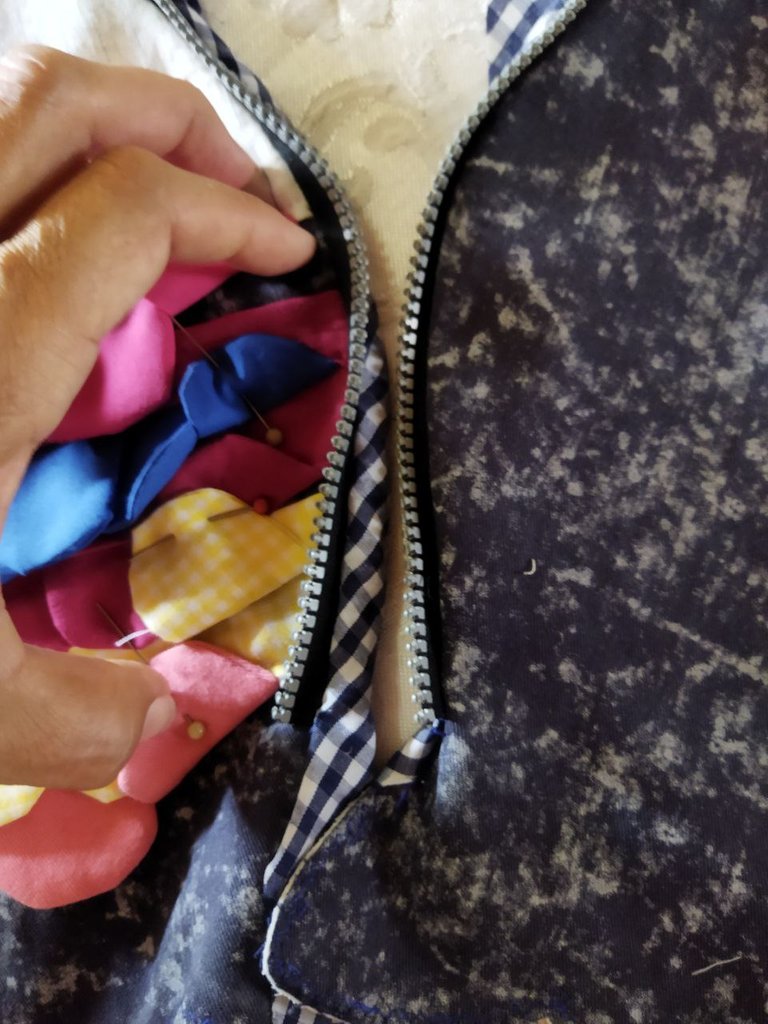
Ahora vamos a colocar el slider para armar el cierre.
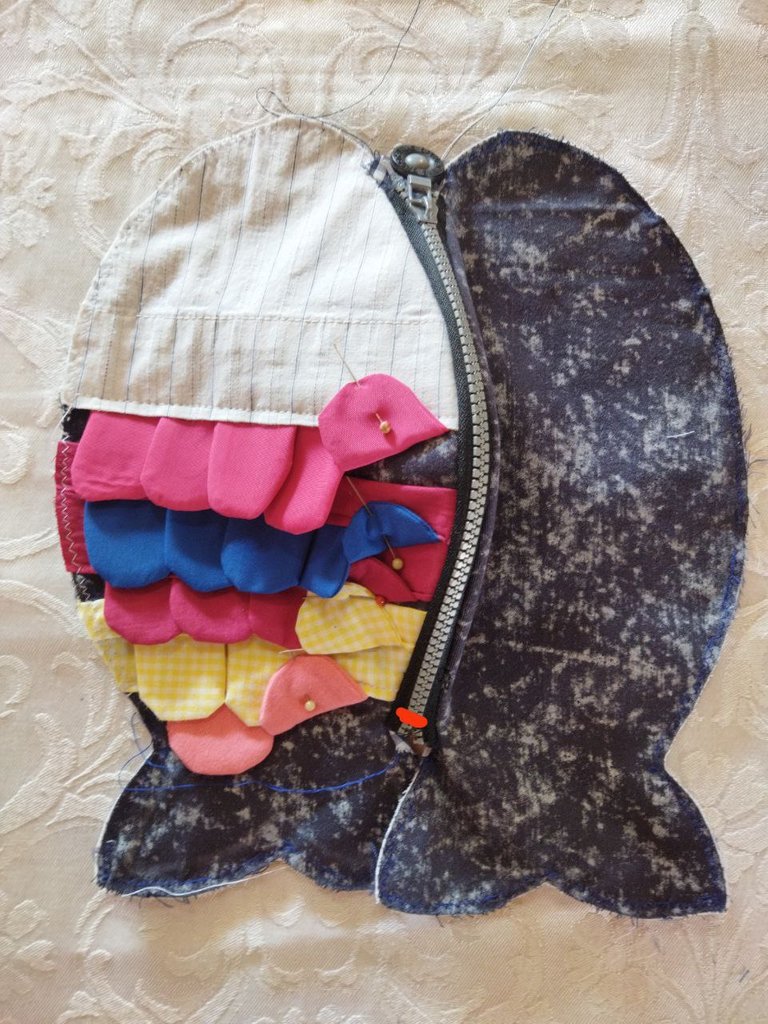
Ya tenemos listo el cierre y para evitar que el slider se salga nuevamente durante el proceso, yo realice unas puntadas con hilo en ese lado como se indica en la imagen.
Paso 5
Ahora vamos a unir las piezas para armar el estuche, sujetamos las escamas con alfileres para evitar que queden pisadas con la costura y colocamos las tapas unidas con el cierre con la parte frontal hacia adentro como les muestro a continuación.
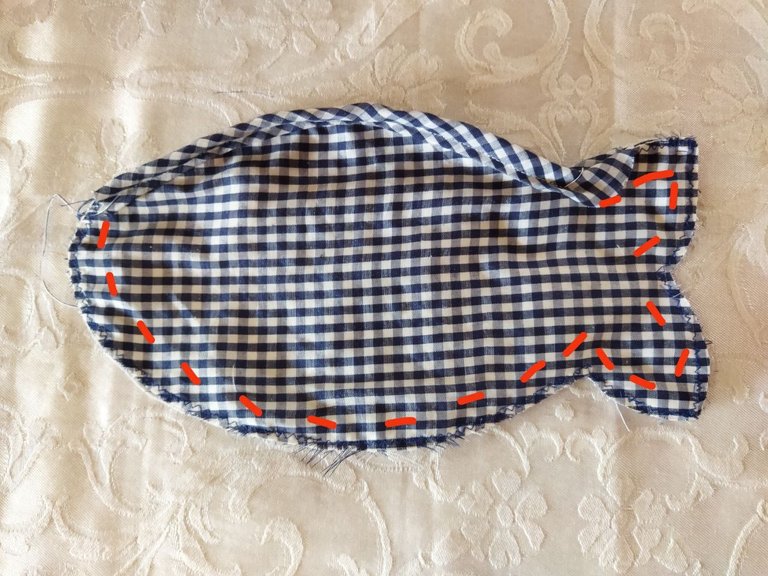
Vamos a coser a máquina con puntada recta en todo el contorno, pegando el sesgo al mismo tiempo como lo hicimos al pegar el cierre en el paso anterior.
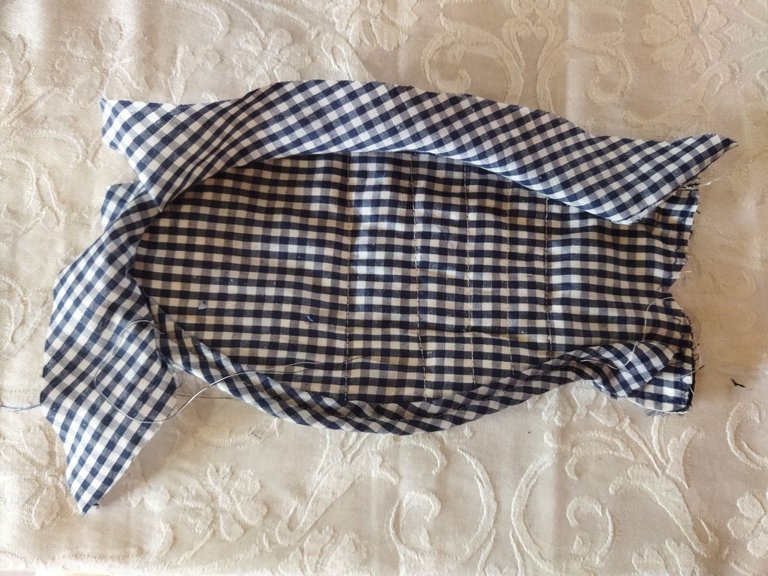
Después que cosemos a máquina como se muestra en la imagen, vamos a cerrar el sesgo para que todas las costuras queden cubiertas y darle una buena presentación al trabajo.
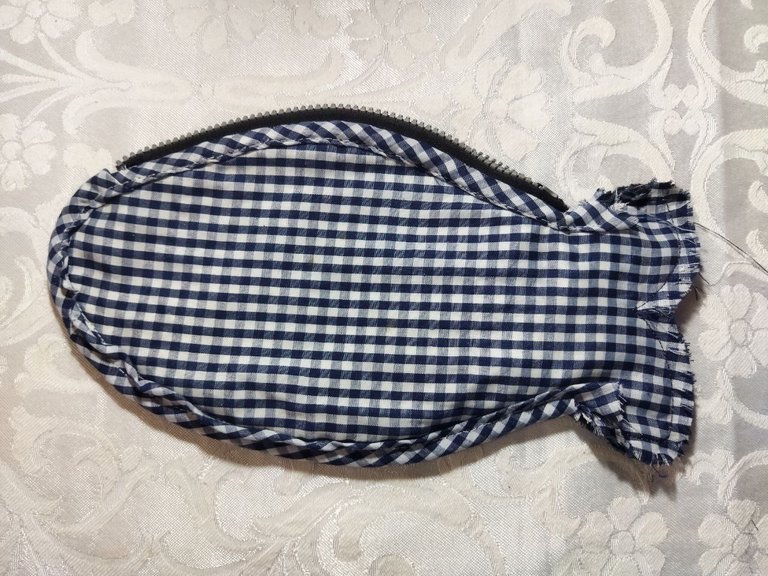
Así nos queda el estuche por dentro una vez que cerramos el sesgo. No coloqué sesgo en la parte de la cola, porqué quedaría muy gruesa y será difícil darle la forma al voltearla.
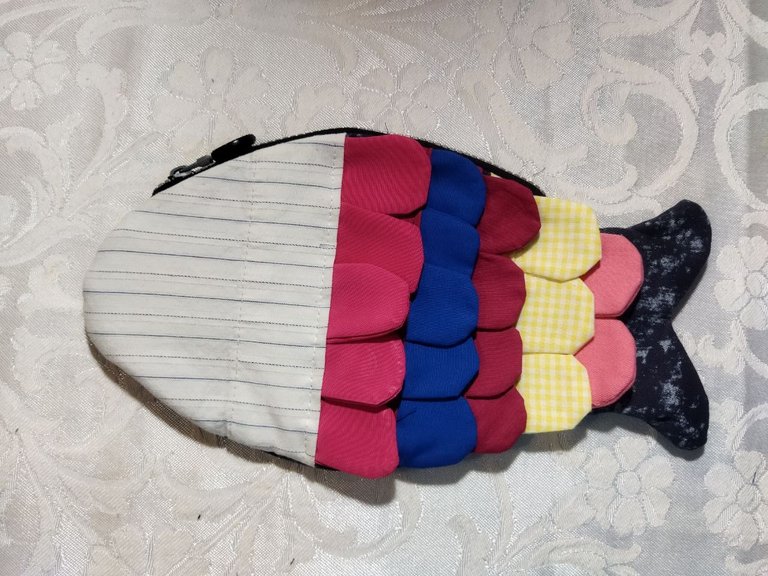
Ya hemos terminado con este paso, volteamos y así nos queda el estuche armado. Ahora vamos al siguiente paso para realizar los últimos detalles y terminar esta labor.
Paso 6
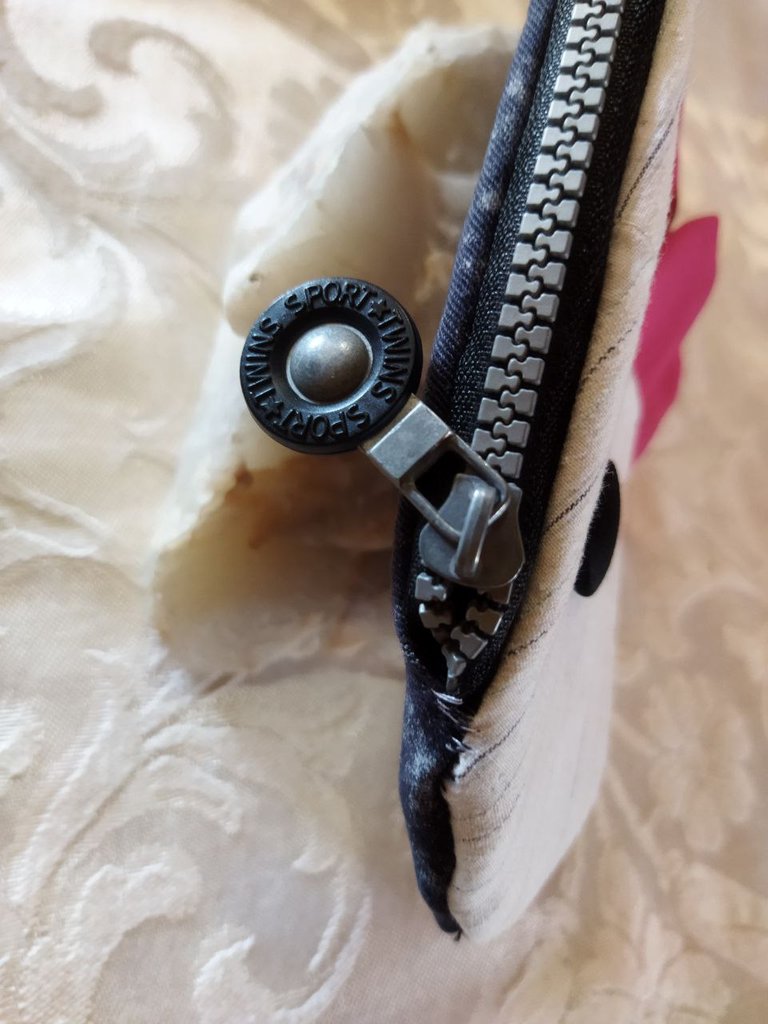
Para terminar con este lindo trabajo, voy a realizar unas pequeñas puntadas en cada extremo del cierre, para que las puntas queden bien unidas y el slider tenga siempre un tope al abrir y cerrar como les muestro en las siguientes imágenes.
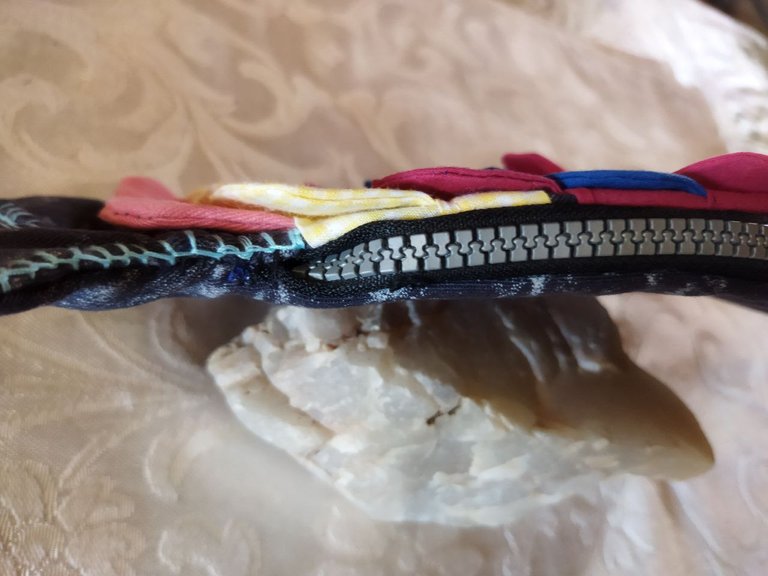
Ahora le voy hacer un bordado sencillo con hilo a toda la orilla de la cola para darle color y le voy a pasar una costura recta para que el forro quede sellado por dentro, como les muestro en las siguientes imágenes.
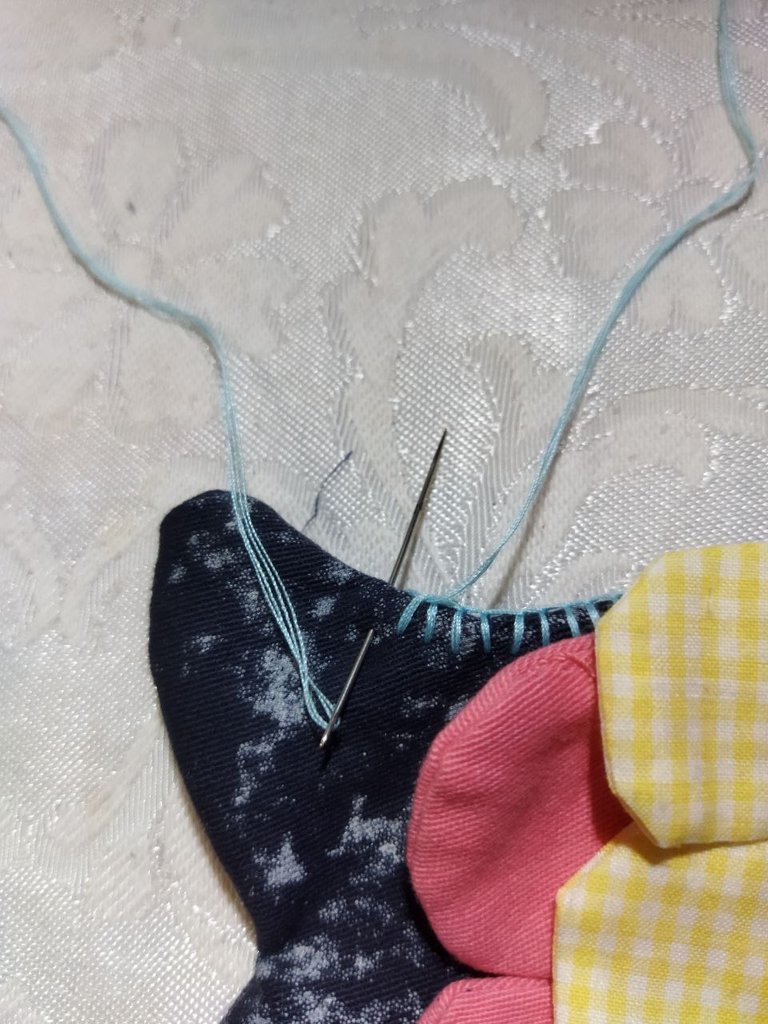
Este bordado es muy sencillo, utilicé 4 hebras de hilo normal y para ejecutar el punto, solo debemos insertar la aguja y formar un aro con el hilo por donde pasaremos la aguja para formar cada punto como se muestra en la imagen.
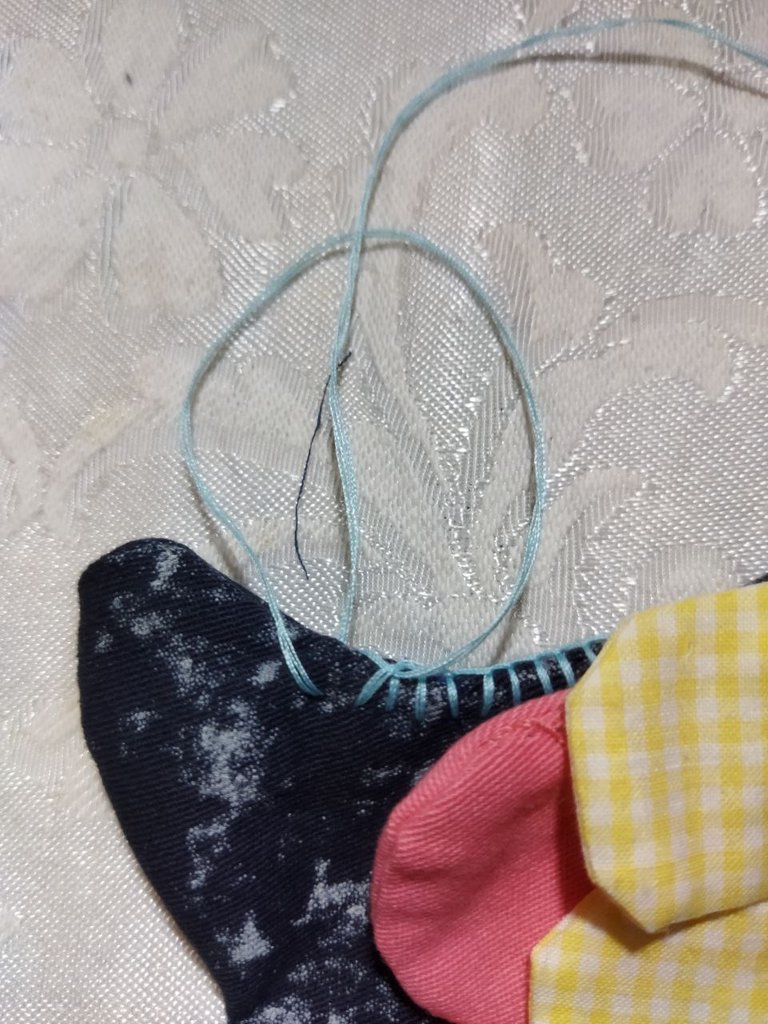
Aquí se puede ver el aro por donde pasamos la aguja.
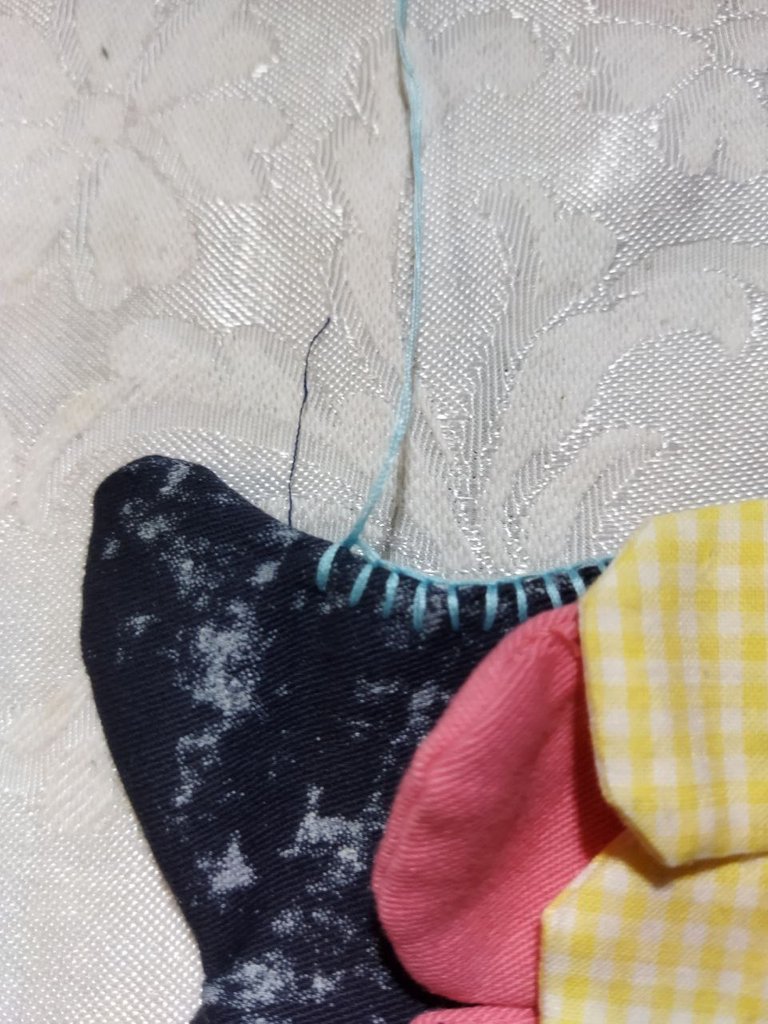
Aquí cerramos el punto y lo repetimos hasta bordar toda la orilla, tratando siempre de realizar las puntadas a la misma altura y distancia para que el bordado se vea parejo. En este caso como yo solo he decorado una tapa, los puntos los realicé solo por la parte frontal del estuche para que la parte trasera se vea unicolor.
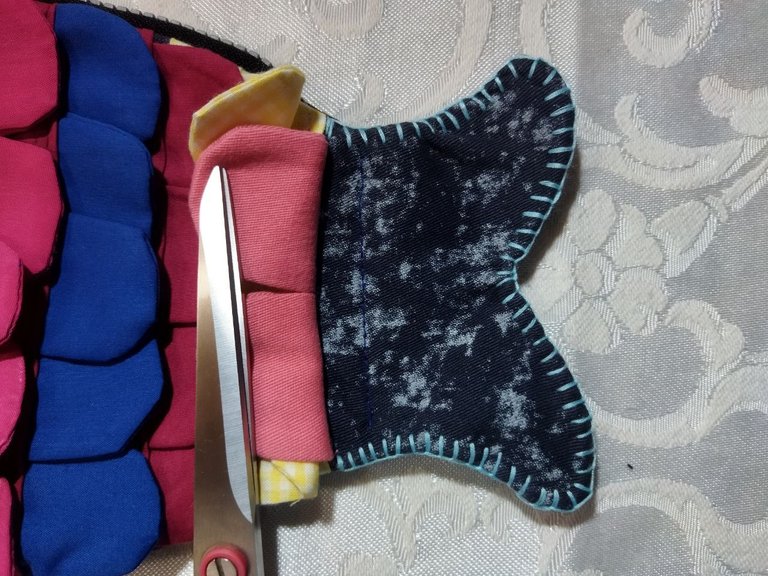
Hemos terminado con el bordado y he cosido con puntada recta una línea a un centímetro de distancia de donde comienza la cola para sellar esa parte y los objetos que guardemos en el estuche no pasen hasta la cola.

Para finalizar, pegamos el botón que será el ojo y ya tenemos listo nuestro estuche en forma de pez, como muestra la imagen.
Este estuche puede tener doble uso, dependiendo de lo que necesites.
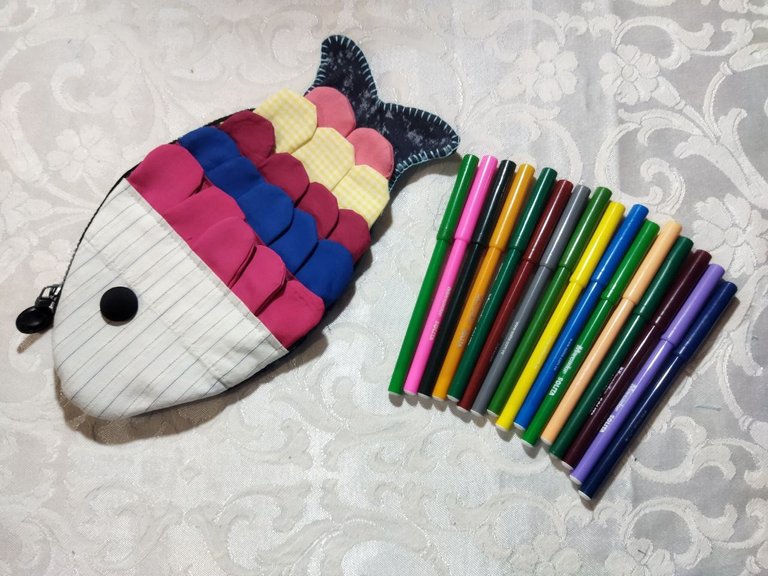
Se puede usar como cartuchera.
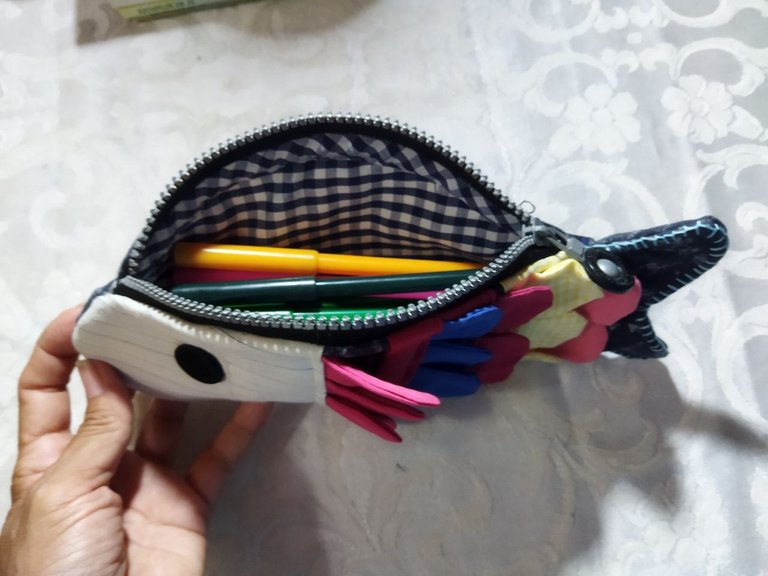
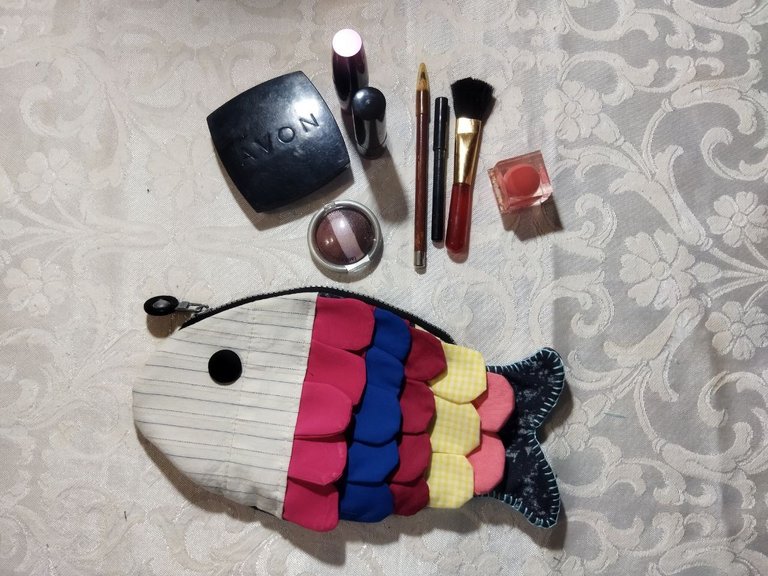
También se puede usar como porta cosméticos y creo que le daré ese uso para llevar mi pez a todos lados.
Es la primera vez que hago un estuche en forma de pez, así que fue un reto para mí, pero al mismo tiempo divertido porque disfrute mucho haciendo esta tarea y lo más importante de todo es que aprendí algo nuevo y he podido compartirlo con ustedes también.
He realizado este trabajo con mucho esmero, estoy muy contenta de haber logrado el objetivo y poder presentarlo a ustedes en este concurso, espero les guste y puedan poner en práctica esta idea.
Mil gracias por su visita y por leer hasta el final. Un fuerte abrazo!

Greetings Friends Hivers
First of all a greeting with love and respect to all the DIYHUB community and my best wishes. It is a pleasure for me to be with you again and to be able to participate in the contest this May with the theme "Sea Life" #diyecencycontest.
When I saw the call for entries and found out what the theme for the contest was, I was very happy because I love the sea and the wonderful creatures that inhabit it. At that moment several ideas came to me to do something related to the theme and of course recycling is one of the options at the top of the list for the task.
So I organized all the material I had available and came up with the idea of making a fish-shaped case that can be used as a pencil case to store crayons, pencils or markers and also as a cosmetics holder.
Looking for a template or pattern on the internet to make the fish, I discovered that there are already cases like this and that my idea is not original at all, but I still wanted to do it because I love the idea of giving life to one of these sea creatures through recycling and crafts.
To do this work you don't need much material and it's a simple job, so I invite you to see the process and get to work.

FISH-SHAPED CASE
MATERIALS
- Denim fabric scraps
- Fabric to make lining and bias binding
- Colorful fabric scraps
- 22 cm zipper
- One button
- Scissors, measuring tape, needle, thread, threads

PROCEDURE
Step 1
The first thing I did was to take a blank sheet of paper, fold it in half both lengthwise and widthwise, mark the lines to have a central point and from there I marked the measurements to make the figure of the fish that I will use as a template to cut the pieces of fabric to make the case.

As shown in the pattern shown in the image, from the center to the head we mark 13 centimeters. Then from the center to the line where the tail starts we mark 10 centimeters and from that point we mark 4 centimeters to make the tail. The total length would be 27 centimeters. The width of the middle part of the fish is fourteen centimeters, we mark 7 centimeters up and down.

The width of the line that marks the beginning of the tail is 6 centimeters and at the end it is 10 centimeters. The width of the line on the side of the head is also 6 centimeters and starting from the center, I drew the lines freehand to draw the body of the fish and shaped the head with the help of a protractor.

To make the tail, we take as a guide the 6 centimeters wide line as shown in the image and from there we mark the 4 centimeters towards the final line for the length of the tail.

To form the division of the tail, we mark 2 centimeters as shown in the image.

To shape the tail, we draw the line from the beginning of the tail to the end line on both sides to form the sides. Then we mark from the center of the end line to each side 3 centimeters and from the point where we marked the 2 centimeters we draw the line to form the inner part that divides the tail as shown in the image. Once this is done, we have the template to cut the fabric pieces.
Step 2
Once the template is done, I am going to mark the figure on the jeans fabric to get the pieces I need to make the case.

We fix the template with pins so that it does not move and we can mark the figure well.

We must always leave 1 centimeter for the seam.

Once the figure is marked, we will cut along the dotted line.
For the case to be resistant and for the work to have a good finish, we are going to place lining and reinforcement, adding another piece of fabric between the cover and the lining, as shown in the following image.

As you can see, I am recycling all the material to make the work. Here I have fabric from a blouse to make the lining and a piece of cream jeans fabric to reinforce the pieces. I have a piece of cream-colored jeans fabric to reinforce the pieces.

Here we have the pieces, I cut them and sewed them together by machine stitching all around the edge with zig zag stitch as shown in the picture.
Step 3
To start giving life to the fish, I am going to make several pieces with the colored fabric scraps, which I will use to decorate in the form of scales. This detail can be done on both sides of the case if you wish, but in this case I will do it on one side only as I will show you in the following images.

Place the double fabric, mark several vertical lines at a distance of 5 centimeters and also the height, then trace the arc at the ends as shown in this image.

Then I sewed them by machine with a straight stitch, leaving half a centimeter seam allowance all around to cut them.

After sewing all the pieces together, we cut and make small picks all along the edge of the rounded part, being very careful not to reach the seam, so that when the pieces are turned over, the fabric will be able to take the shape smoothly.

Once all the pieces are turned over, they are ironed and the scales are ready for the fish.

As you can see in this image, I marked the line of the centimeter that we should leave as seam allowance and I began to glue the scales from the tail to the head respecting that margin, so that when sewing they are not stepped on and the effect I want to give is lost.

Place this piece of fabric on top of the tips of the scales, because although it is a recycling work, I have always liked to take care of the details to get a good result.

In this image you can see the second layer of scales and how I have used again the fabric that I placed in the first layer to cover the details and make the work look nice.

In the same way, we place and sew the other rows of scales, trying to arrange them well to give the right effect. As you can see, here I repeated the process of the first two rows.

This is how the layers of scales look like.

In this picture I show you the last layer of scales that we are going to sew and I am placing a piece of cream fabric that besides giving a good finish to the work of the scales, will be the bottom of the head of the fish so that it can highlight the eye that we are going to glue later. We are going to machine stitch and cut off the excess.

As shown in the picture, I have sewn with zig zag stitch the outline of the cream piece and cut the excess of the fabrics. This way the decoration of this piece is finished and let's go to the next step.
Step 4
Now we are going to glue the zipper on both lids as I will show you in the following images.

We are going to remove the slider to separate the pieces of the zipper and in this way it will be easier to work with when sewing.

To save time and labor, we will cut the strips of fabric that we are going to use as bias binding 5 centimeters wide as shown in the picture, to glue it together with the zipper. Cut the necessary strips.

Here we have the bias strip and the clasp piece pinned. As you can see, I'm going to place it from the line where the tail starts towards the head. I've also pinned the scales to prevent them from being stepped on when I pass the stitching to the zipper.

We pass a bastilla to the pieces so that they do not move and we sew in the machine with a straight stitch.

We sew the closure piece on both covers in the same way.

We already have the closure in place.

Once the zipper is glued, we proceed to close the bias binding, bringing the edge towards the inside of the cover, pass the bastille and machine stitch with a straight stitch as shown in this image.

Then, to make the zipper firm and keep it in the correct position, we hold the edge with the bias towards the inside of the piece and machine stitch as shown or we can hand sew on the inside with a few small stitches.

Now we are going to place the slider to assemble the closure.

To prevent the slider from coming off again during the process, I made a few stitches with thread on that side as shown in the image.
Step 5
Now we are going to join the pieces to assemble the case, we fasten the scales with pins to avoid stepping on them with the stitching and we place the lids together with the zipper with the front side facing inwards as I show you below.

We are going to machine stitch with a straight stitch all the way around, attaching the bias binding at the same time as we did when attaching the zipper in the previous step.

After we machine stitch as shown in the image, we will close the bias binding so that all seams are covered and give a good presentation to the work.

This is what the inside of the case looks like once we close the bias binding. I didn't put bias binding on the tail part, because it would be too thick and it would be difficult to shape it when turning it over.

We are done with this step, we flip it over and we have the assembled case. Now we go to the next step to make the last details and finish this work.
Step 6
To finish this beautiful work, I am going to make some small stitches at each end of the clasp, so that the ends are well joined and the slider always has a stop when opening and closing as I show you in the following images.


Now I am going to do a simple embroidery with thread all around the edge of the tail to give it color and I am going to sew a straight seam so that the lining is sealed on the inside, as shown in the following images.

This embroidery is very simple, I used 4 strands of normal thread and to execute the stitch, we only have to insert the needle and form a ring with the thread through which we will pass the needle to form each stitch as shown in the image.

Here you can see the ring through which we pass the needle.

Here we close the stitch and repeat it until the whole border is embroidered, always trying to make the stitches at the same height and distance so that the embroidery looks even. In this case, as I have only decorated one cover, the stitches are only on the front side of the case so that the back side looks unicolor.

We have finished with the embroidery and I have sewn with a straight stitch a line one centimeter away from where the tail begins to seal that part so that the objects we keep in the case do not pass through to the tail.

Finally, we glue the button that will be the eye and we have our fish-shaped case ready, as shown in the image.
This case can be used in two ways, depending on what you need.

Can be used as a pencil case.


It can also be used as a cosmetic holder and I think I will give it that use to carry my fish around.
It is the first time I make a fish-shaped case, so it was a challenge for me, but at the same time fun because I enjoyed a lot doing this task and most important of all is that I learned something new and I have been able to share it with you too.
I have done this work with great care, I am very happy to have achieved the goal and to be able to present it to you in this contest, I hope you like it and you can put this idea into practice.
Thank you very much for your visit and for reading to the end. A big hug!

Herramientas usadas / Used tools
Fotos tomadas de mi teléfono Poco M3 / Photos taken from my Poco M3 phone.
Traducción por Deelp / Translation by Deelp.

