WELCOME TO MY BLOG
Helloooooo, helloooooo! I hope you are all well, kicking off this new year on the right foot, with health and lots of enthusiasm. Today I will share with you the step by step on how to make a collar for your pet. A few years ago, when we had Toky at home, we bought everything he needed, the collar, the leash and his toys. With the arrival of the crisis and the pandemic, our budgets have been in decline to acquire many things and having the idea and the desire to do so, we are not only saving some money, but also acquire the learning. I have always thought optimistically, I have not been consumed by circumstances, so there is no excuse not to pamper our pets and make them look cute. Of course, if it's within your means to buy it, you can't get away with it either, but there's nothing more satisfying than doing it with your own hands.
At home we have 5 pets, Clhoe, Fiu Fiu, Negrin, Nala and Kiro (the last three are cats) we have not made collars for them because they are cats that go out and come back and we presume that they can lose them or be victims of the underworld, hahahahahaha. but Chloe and Fiu Fiu Fiu, if they have their collars. Clhoe got it made by my daughter @aarolyslara02 some time ago. she looks very cute with her necklace. And now Fiu Fiu is also wearing her necklace.
What is the advantage of collaring our pets? I think it is a way to identify them when they go for a walk, if for some reason they get lost, we can give them different characteristics than other dogs. In my house there are many pets of the same breed as Chloe and Fiu Fiu and I think that with their collar they are easy to identify by the neighbors.
Now let's go through this step by step. If you think your pet needs a collar and you haven't made or bought one yet, I invite you to watch it. Let's begin.
BIENVENIDOS A MI BLOG
¡Holaaaaa, holaaaaaa! Espero que se encuentren todos bien, arrancando con pie de plomo este nuevo año, con salud y mucho entusiasmo. Hoy les compartiré el paso a paso de cómo elaborar un collar para tu mascota. Hace unos años atrás, cuando teníamos a Toky en casa, todo lo que él necesitó lo fuimos comprando, el collar, la correa y sus juguetes. Con la llegada de la crisis y la pandemia, nuestros presupuestos han ido en decadencia para adquirir muchas cosas y teniendo la idea y las ganas de hacerlo, no sólo nos estamos ahorrando algo de dinero, sino también adquirimos el aprendizaje. Siempre he pensado con optimismo, no me he dejado consumir por las circunstancias, así que no hay excusas para no dejar de consentir a nuestras mascotas y hacer que se vean lindos. Claro, que si está e tus posibilidades de comprarlo tampoco se te quita lo bailao, pero no hay nada más satisfactorio que hacerlo con tus propias manos.
En casa tenemos 5 mascotas, Clhoe, Fiu Fiu, Negrín, Nala y Kiro (los tres últimos son gatos) a ellos no les hemos hecho collares porque son gatos que salen a la calle y regresan y presumimos que los pueden perder o ser víctimas del hampa, jajajajaja. pero Chloe y Fiu Fiu, si tienen sus collares. A Clhoe se lo hizo mi hija @aarolyslara02 hace algún tiempo. ella se ve muy linda con su collar. Y ahora también Fiu Fiu luce su collar.
¿Cuál es la ventaja de colocarle el collar a nuestras mascotas? Yo pienso que es una forma de identificarlos cuando salen de paseo, a si por alguna razón se pierden, podemos dar unas características diferentes a las de otros perritos. Por mi casa hay muchas mascotas de la misma raza de Chloe y Fiu Fiu y pienso que con su collar son fáciles de identificar por los vecinos.
Ahora vamos a realizar este paso a paso. Si crees que tu mascota necesita un collar y aú no lo haz hecho o comprado, te invito a verlo. Comencemos.
MATERIALS
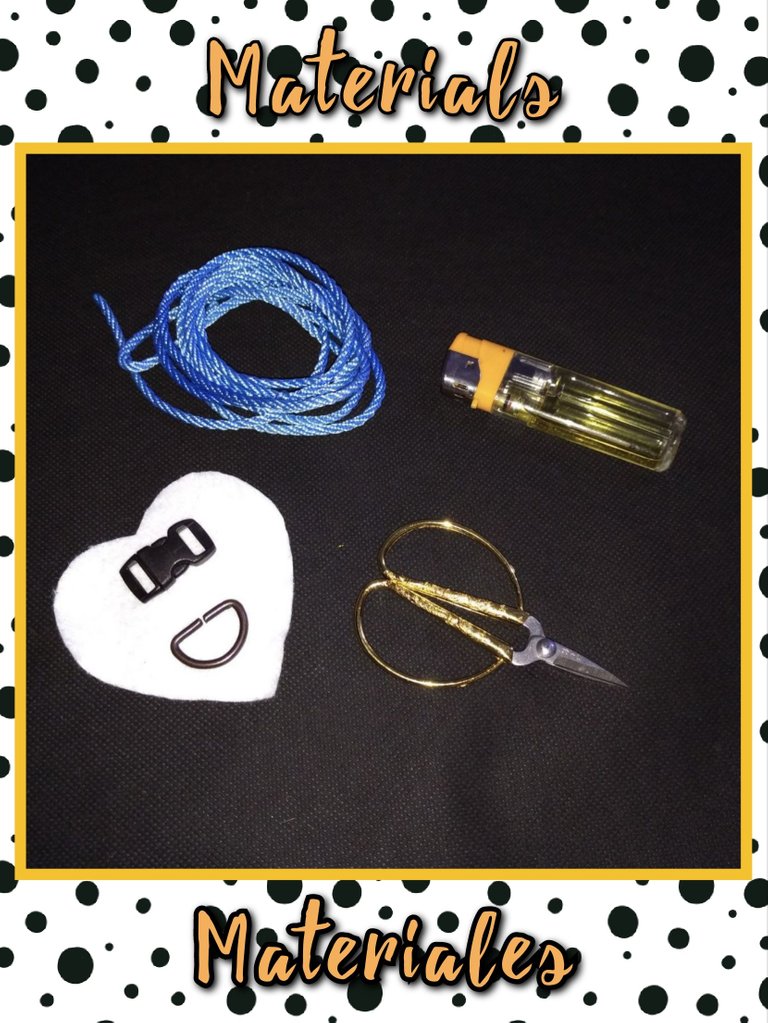
This is a very simple, fast and economical way to make this collar and the best thing is that it is adaptable to the neck of our pets, whether dogs, cats, rabbits, hamsters, guinea pigs or whatever you have at home. We will need the following:
- 3 mts of thread or round paracord of 0,4 cm.
- Half-moon steel ring
- Brooch or safety clasp
- Scissors
- Lighter
MATERIALES
Esta es una forma muy sencilla, rápida y económica para realizar este collar y lo mejor que es adaptable para el cuello de nuestras mascotas, bien sea perros, gatos, conejos hamster, cobayos o el que tengas en casa. Necesitaremos lo siguiente:
- 3 mts de hilo o cuerda paracord redondo de 0,4 cm
- Argolla media luna de acero
- Broche o seguro
- Tijera
- Encendedor
STEP BY STEP // PASO A PASO
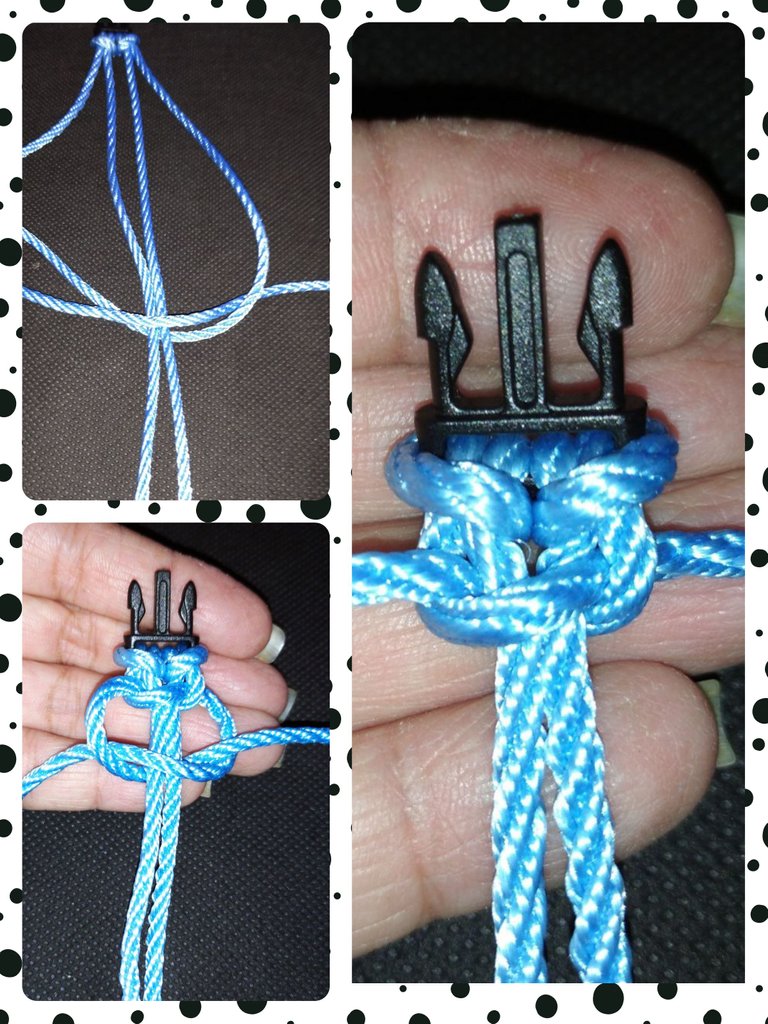
STEP #1
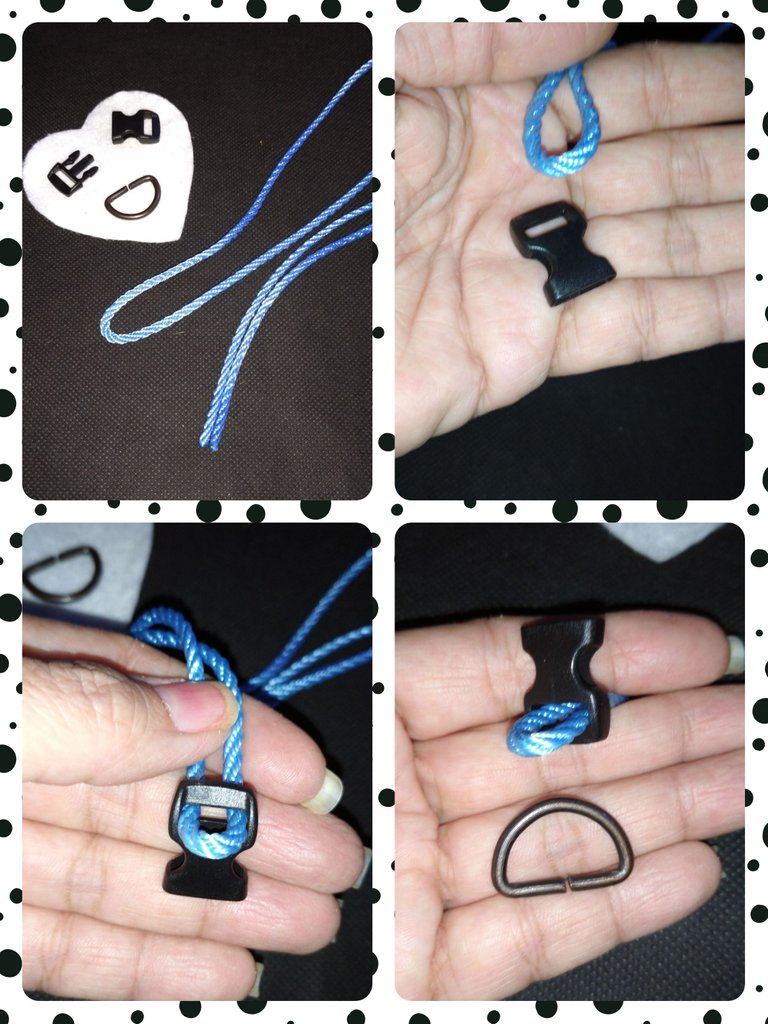
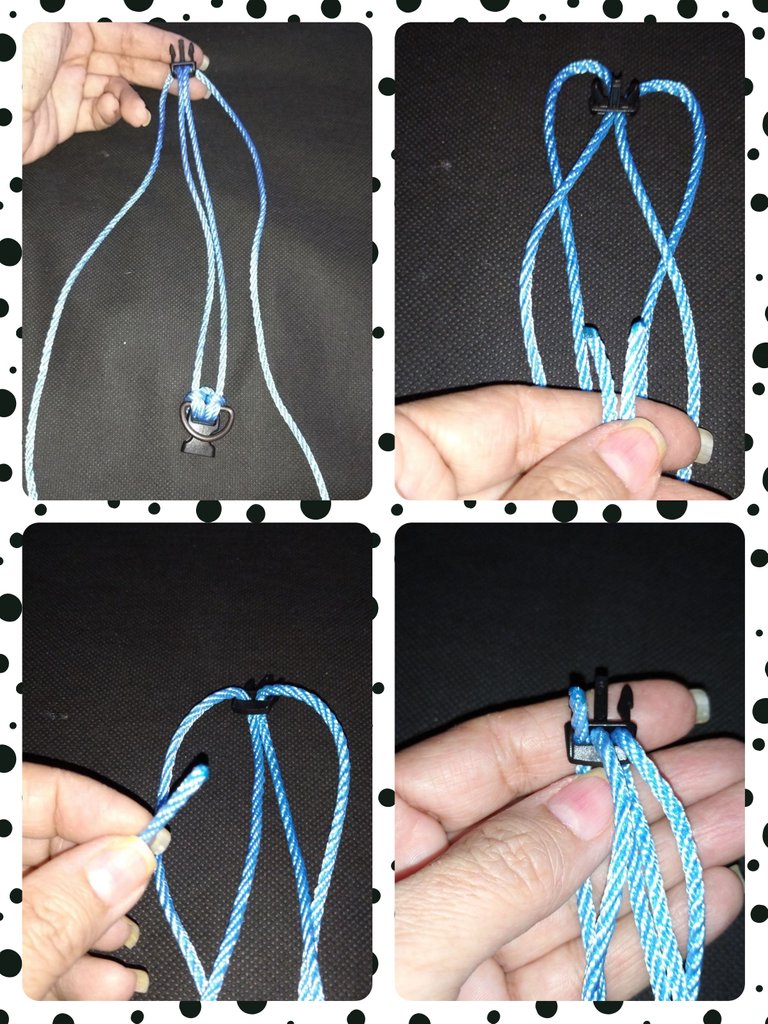
We take the 3 meters of cord and fold it in half. We introduce the cord in one of the parts of the clasp or brooch just where the halves are folded. We take out just a few centimeters and place the ring.
PASO #1
Tomamos los 3 metros de cordón y lo doblamos a la mitad. Introducimos el cordón en una de las partes del seguro o broche justo donde doblan las mitades. Sacamos solo unos centímetros y colocamos la argolla.
STEP #2
The ring should be placed with the curved part upwards. Now we open the cord and pass the lock and the ring inside and pull to make the lark knot.
PASO #2
La argolla debe ir colocada con la parte curva hacia arriba. Ahora abrimos el cordón y pasamos el seguro y la argolla por dentro y halamos para realizar el nudo alondra.
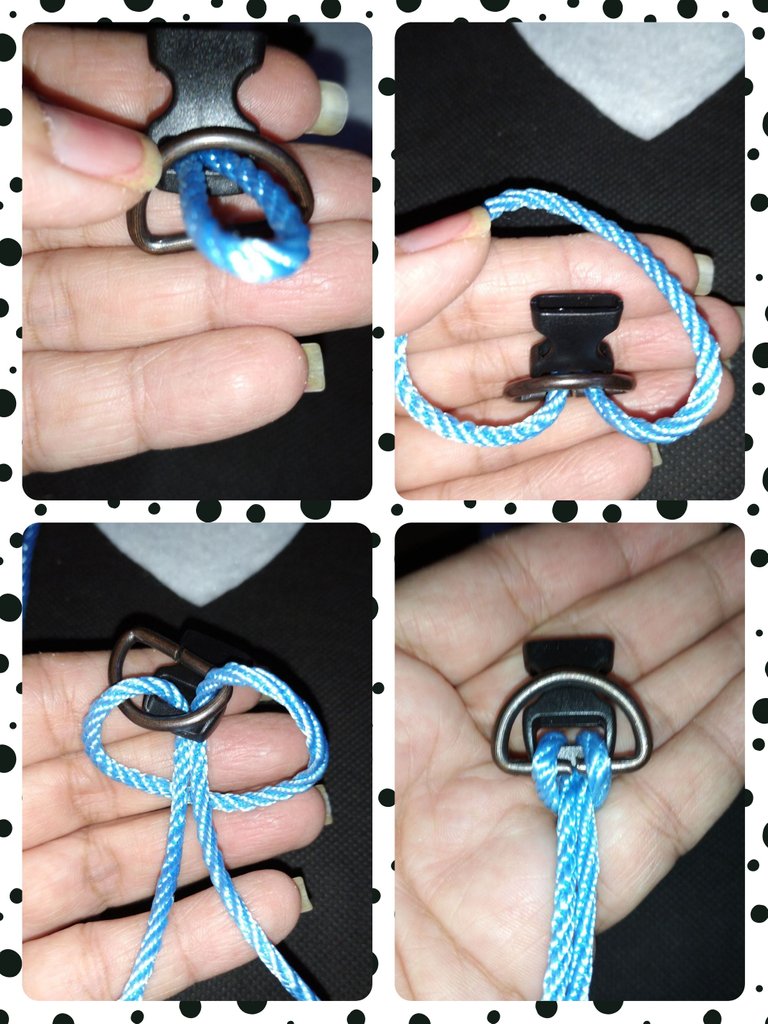
STEP #3
Now we will make two more larkspur knots at each end of the first one. To do this we take the tip of the right side and introduce it to the right side of the base knot, then pass it under the circle formed with the thread and pull.
PASO #3
Ahora realizaremos dos nudos alondras más en cada extremo del primero. Para ello tomamos la punta del lado derecho e introducimos al costado derecho del nudo base, luego pasamos por debajo del circulo formado con el hilo y halamos.
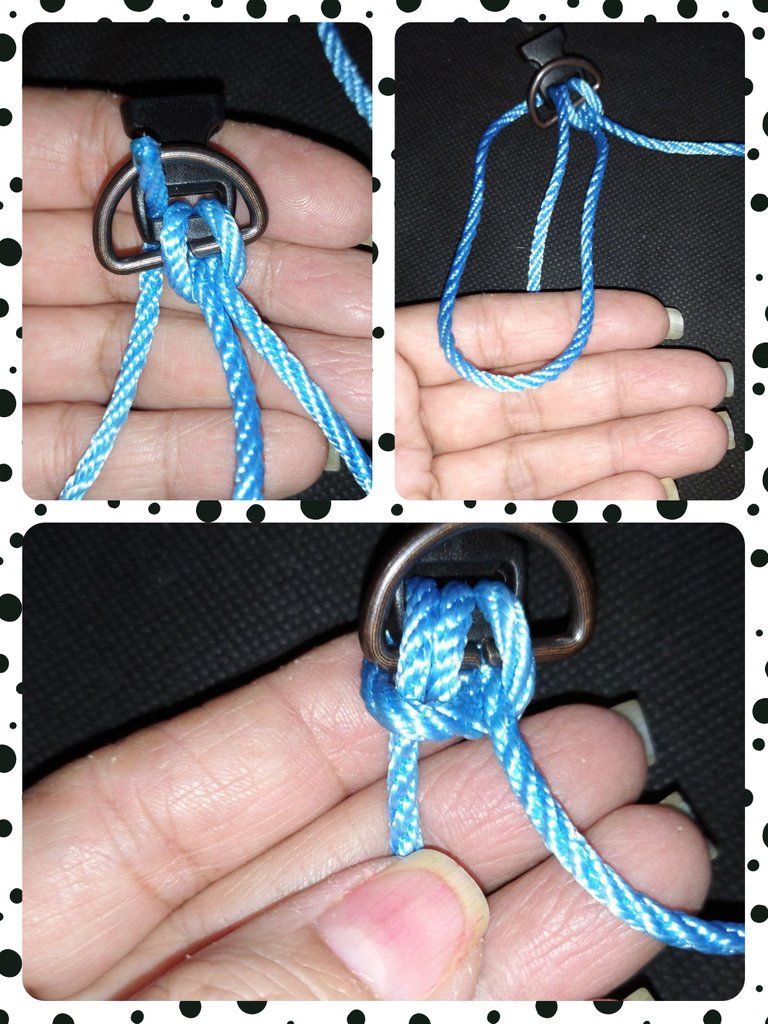
STEP #4
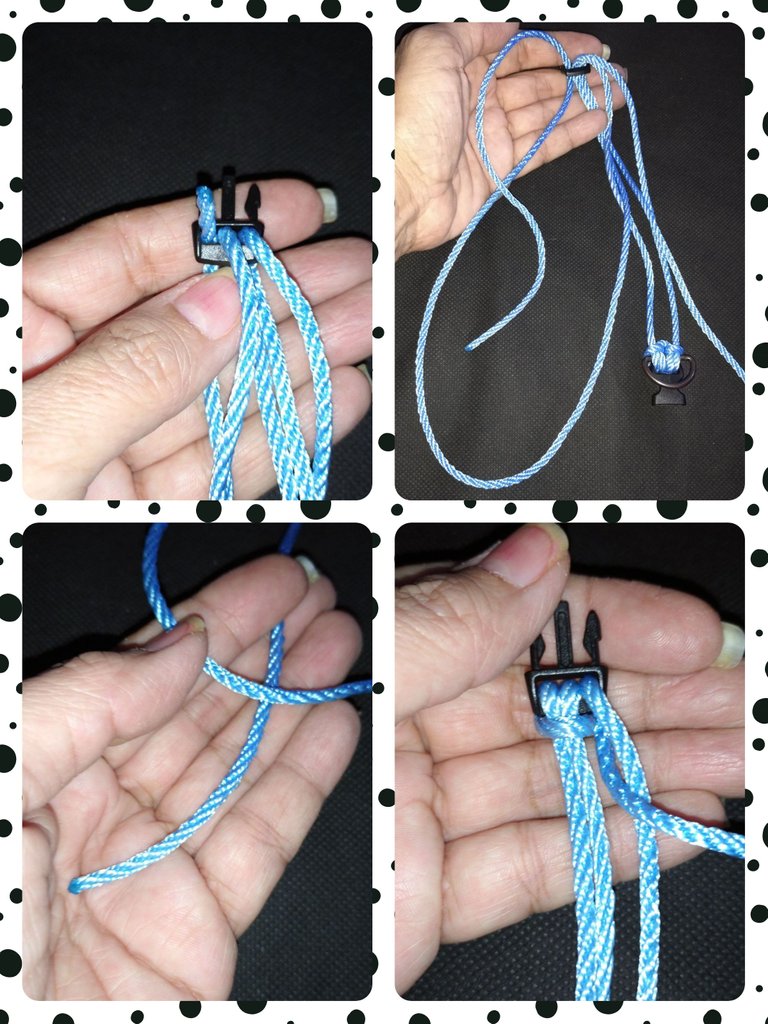
We perform the same procedure as in the previous step using the end of the opposite side. In this way we make two lark's knots from the main knot.
PASO #4
Realizamos el mismo procedimiento del paso anterior utilizando el extremo del lado contrario. De esta forma realizamos dos nudos alondra a partir del nudo principal.
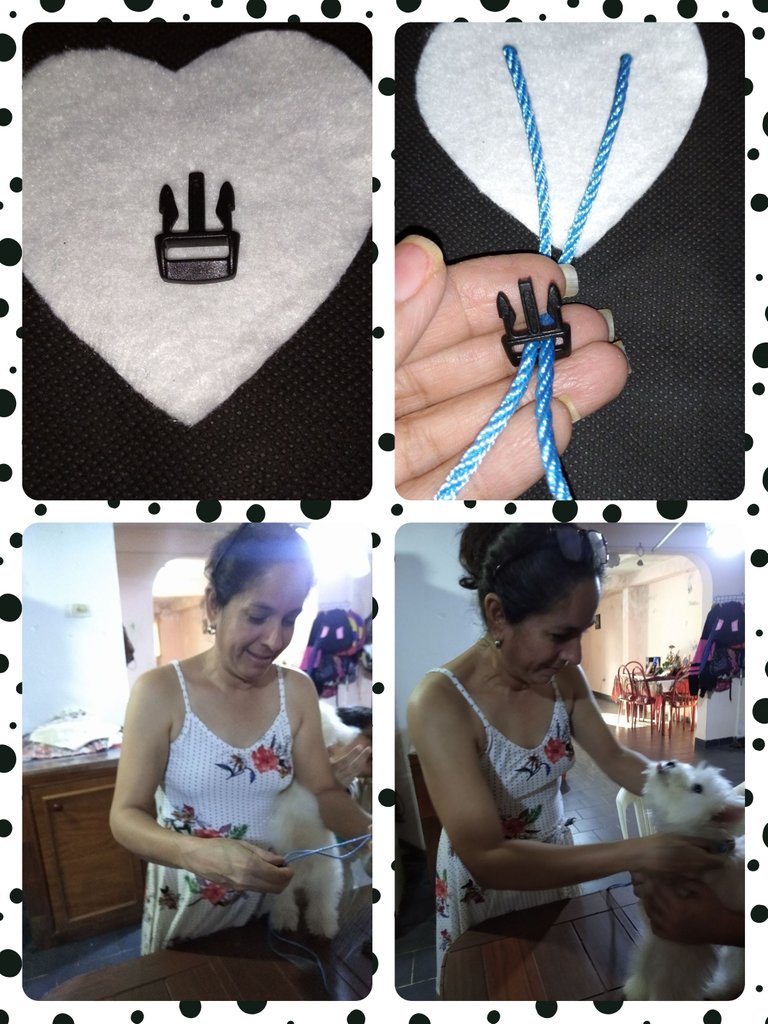
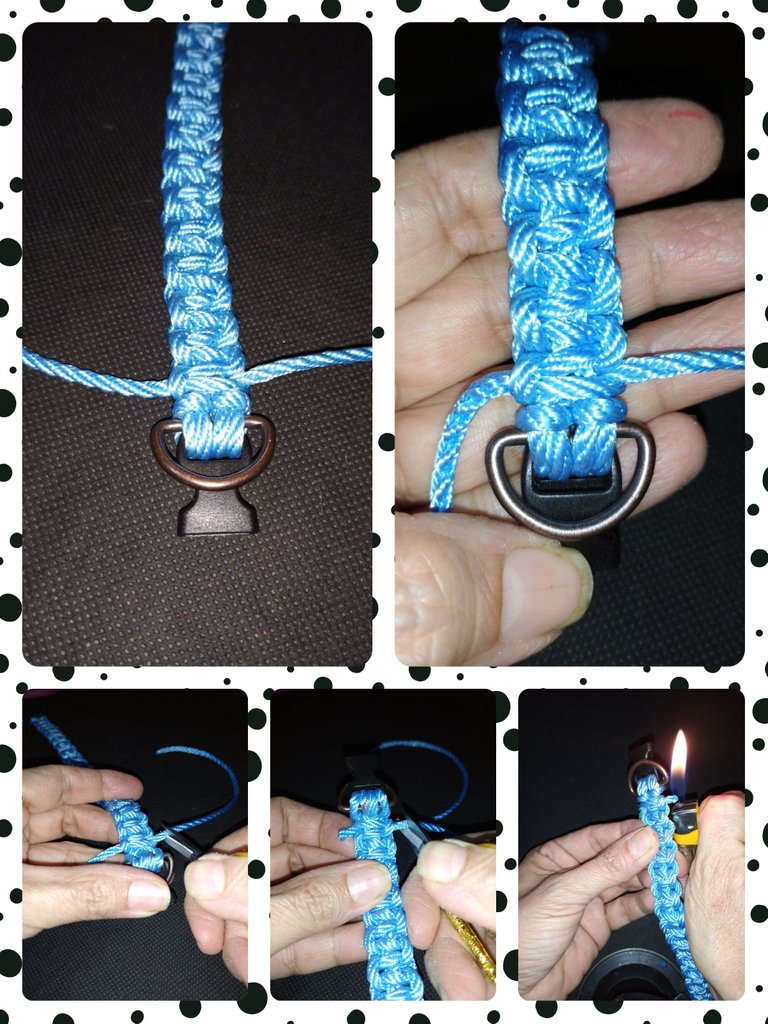
STEP #5
In this step if we do not know the size of our pet, we can take a tape measure and measure the neck or with the same cord you can do it. To do this we place the other part of the clasp, we place it on the neck of our pet and adjust it to the measure. I recommend leaving about 3 or 4 cm more since when weaving the fabric we are tightening the cord and it will shrink.
PASO #5
En este paso si no conocemos la medida de nuestra mascota, podemos tomas una cinta métrica y medir el cuello o con el mismo cordón podes realizarlo. Para ello colocamos la otra parte del seguro o broche, colocamos en el cuello de nuestra mascota y ajustamos a la medida. Yo recomiendo dejar unos 3 o 4 cm más ya que al realizar el tejido vamos apretando el cordón y se va encogiendo.
STEP #6
Once we have taken our measurement, we will begin to tie two more lark's knots in the other part of the lock. We will pass the ends of the cord each one inside the central threads. Then we place the end of the right side in the space on the same side.
PASO #6
Ya con nuestra medida tomada comenzaremos a realizar dos nudos alondra más en la otra parte del seguro. Pasaremos los extremos del cordón cada uno por dentro de los hilos centrales. Luego colocamos el extremo del lado derecho en el espacio del mismo lado.
STEP #7
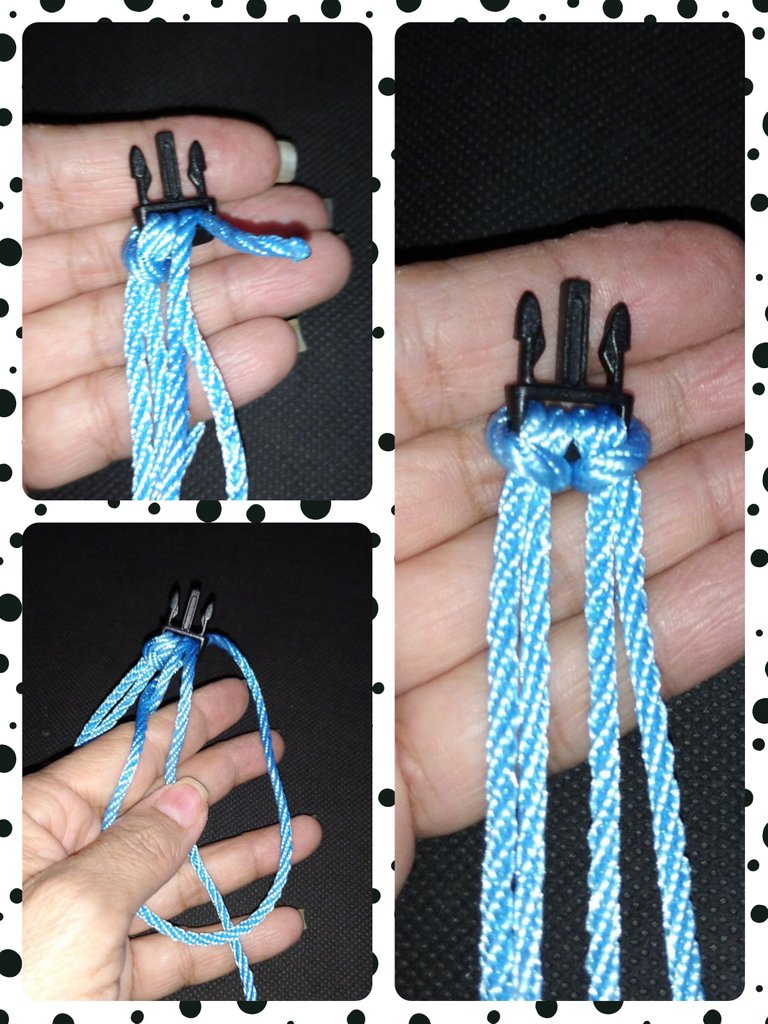
We pull the thread to form a circle, pass it underneath and pull to form the lark's foot knot.
PASO #7
Halamos el hilo hasta formar un círculo, lo pasamos por debajo y halamos para formar el nudo alondra.
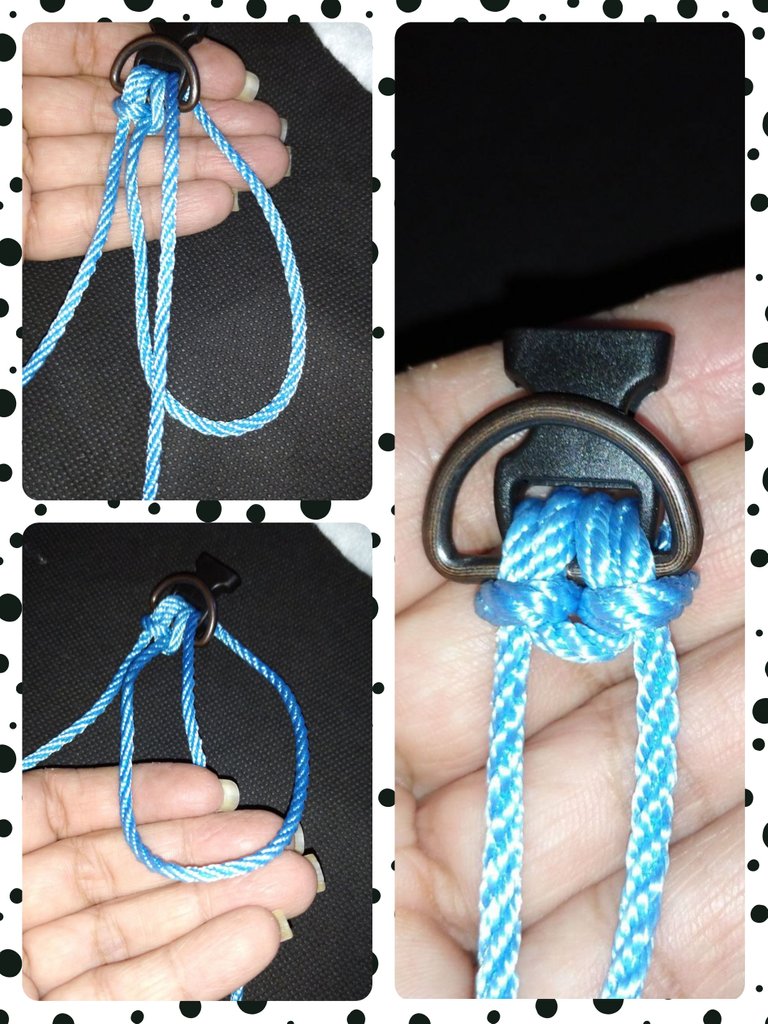
STEP #8
Same as the previous one but we take the opposite end. In this way we are making two lark knots.
PASO #8
Igual que el anterior pero tomamos el extremo contrario. De esta forma estamos realizando dos nudos alondra.
STEP #9
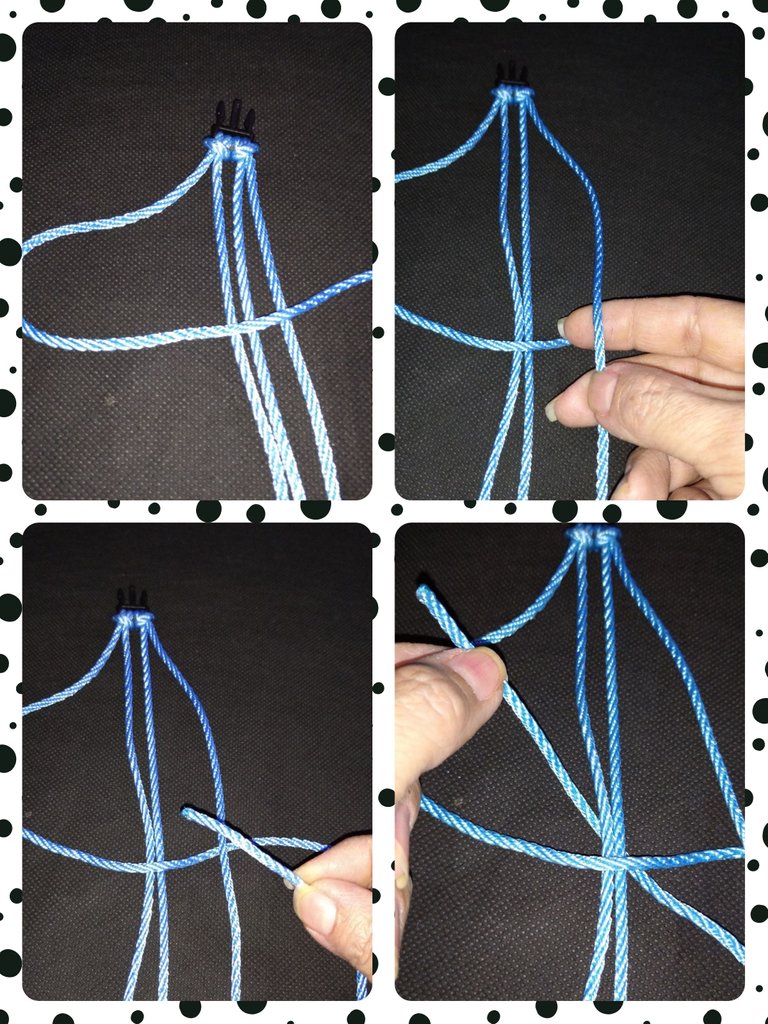
Once adjusted and verified the size we will begin the fabric. We will use the knot that in macramé is known as a flat knot. It consists of taking one end of the loose threads and making a P or 4, depending on the side you start with. You must alternate each knot, that is, one on the right side and one on the left side, until you finish the fabric.
We start the first knot. For this case we form a 4 with the end of the left side, passing the thread over all the others. Then we take the end of the right side and we pass it over the thread that forms the 4 and with the tip we will pass it under the crossings of the threads and we take it out through the center of the space that forms the 4. We pull and when we get to the beginning we adjust that it is tight.
PASO #9
Una vez ajustado y verificado el tamaño comenzaremos el tejido. Utilizaremos el nudo que en macramé se conoce como nudo plano. Consiste en tomar un extremo de los hilos sueltos y realizamos una P ó 4, dependiendo del lado con que comiences. Debes alternar cada nudo, es decir, uno del lado derecho y una del lado izquierdo, hasta terminar el tejido.
Comenzamos el primer nudo. Para este caso formamos un 4 con el extremo del lado izquierdo, pasando el hilo por encima de todos los demás. Luego tomamos el extremo del lado derecho y lo pasamos por encima del hilo qué forma el 4 y con la punta la pasaremos por debajo de los cruces de los hilos y lo sacamos por el centro del espacio qué forma el 4. Halamos y al llegar al comienzo ajustamos que quede bien apretado.
STEP #10
In this step we repeat the previous process but in the opposite way. Now we will form a P with the end of the right side, passing the thread over all the others. Then we take the end of the left side and we pass it over the thread that forms the P and with the tip we will pass it under the crossings of the threads and we take it out through the center of the space that forms the P. We pull and when we reach the Beginning we adjust that it is very tight.!
PASO #10
En este paso repetimos el proceso anterior pero de forma contraria. Ahora formaremos una P con el extremo del lado derecho, pasando el hilo por encima de todos los demás. Luego tomamos el extremo del lado izquierdo y lo pasamos por encima del hilo qué forma la P y con la punta la pasaremos por debajo de los cruces de los hilos y lo sacamos por el centro del espacio qué forma la P. Halamos y al llegar al comienzo ajustamos que quede bien apretado.
STEP #11
We carry out the same procedure until we reach the other end, always remembering to do one consecutive side of the other.
We cut the cord and with the lighter we burn and crush to prevent the fabric from coming loose.
PASO #11
Realizamos el mismo procedimiento hasta llegar al otro extremo, recordando siempre hacer un lado consecutivo del otro.
Cortamos el cordón y con el encendedor quemamos y aplastamos para evitar que se suelte el tejido.
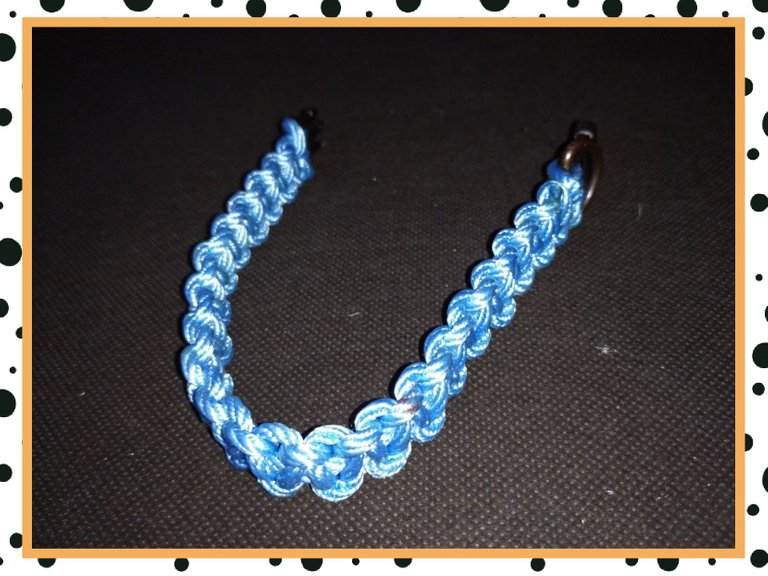
Final score
This is how our pet's collar will be cute. In lingerie we can find a wide variety of colors and textures, as well as different types of brooches and charms that we can attach to the necklace. We can also make them at home with waste materials. It is a very practical way to save and thus you avoid the worry that your puppy or pet would not have anything that differentiates or identifies it. Fiu Fiu was very handsome with his necklace and quickly adapted to having it on.
I hope you liked him. See you next time.
Resultado Final
Así quedará de lindo el collar de nuestra mascota. En las lencerías podemos encontrar gran variedad de colores y texturas, además de diferentes tipos de broches y dijes que podemos anexar al collar. También podemos realizarlos en casa con materiales de desecho. Es una forma muy práctica de ahorrar y así te evitas la preocupación de que tu perrito o mascota no tendría nada que lo diferencie o identifique. Fiu Fiu quedó muy guapo con su collar y se adaptó rápidamente a tenerlo puesto.
Espero que te haya gustado. Nos vemos en la próxima.