¡Hola, hola! Hivers y hermosa comunidad de DIYHub, espero todos se encuentren súper bien, animados e inspirados 💟
Han pasado varias semanas desde la última vez que publique por acá, pero es que no he estado muy bien anímicamente, gracias a Dios tengo a mi esposo que es un súper compañero de vida y mi mejor amigo y precisamente por eso me anime a tejerle alguito especial para el día del amor y también a volver a escribir en mi blog… así que hoy les presentare un hermoso trabajo de crochet.
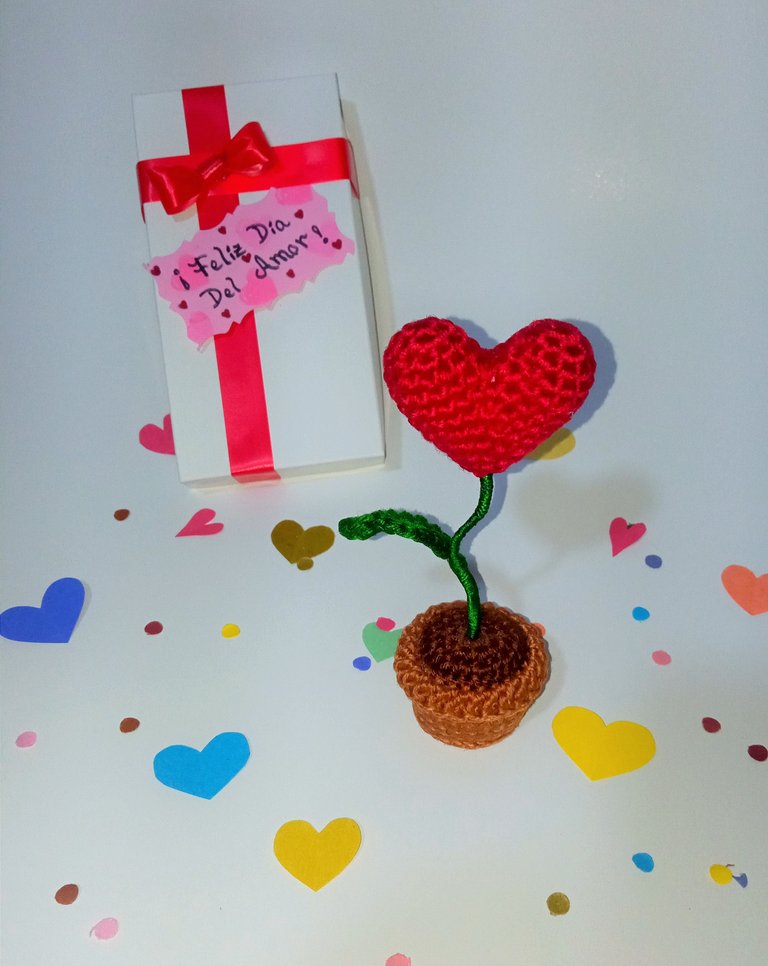
Es un corazón tejido a crochet a modo de flor con su linda maceta, y aunque suene a frase hecha EL AMOR SI ES COMO UNA PLANTA, Y HAY QUE REGARLO A DIARIO CON PEQUEÑOS DETALLES O CON UNA FRASE BONITA Y ALENTADORA O CON UN SIMPLE ABRAZO, ESO ES LO QUE LLENA EL ALMA DE LA PERSONA AMADA, y para representar esto en un tejido fue que decidí realizar este lindo detalle para mi esposo que sin duda alguna es el amor de mi vida.
Y también lo presento como mi entrada al concurso de este mes Love is in the Air - Let's spread love with our DIY contest! Aún tienen chance de participar así que anímense, entren al enlace para ver los detalles del concurso y muestren ese detallito que realizaron para su Valentín.
Hello, hello! Hivers and beautiful DIYHub community, I hope you all are feeling great, encouraged and inspired 💟
It's been several weeks since the last time I posted here, but I have not been very well emotionally, thank God I have my husband who is a super partner in life and my best friend and precisely for that reason I was encouraged to knit him something special for the day of love and also to return to write on my blog ... so today I will present a beautiful crochet work.
It is a crochet knitted heart as a flower with its pretty pot, and although it sounds like a phrase made LOVE IS LIKE A PLANT, AND IT MUST BE WATERED DAILY WITH SMALL DETAILS OR WITH A NICE AND ENCOURAGING PHRASE OR WITH A SIMPLE HUG, THAT IS WHAT FILLS THE SOUL OF THE LOVED ONE, and to represent this in a knitting was that I decided to make this nice detail for my husband who is undoubtedly the love of my life.
And I also present it as my entry to this month's Love is in the Air - Let's spread love with our DIY contest! You still have a chance to participate so be encouraged, go to the link to see the details of the contest and show off that little something you made for your Valentine.

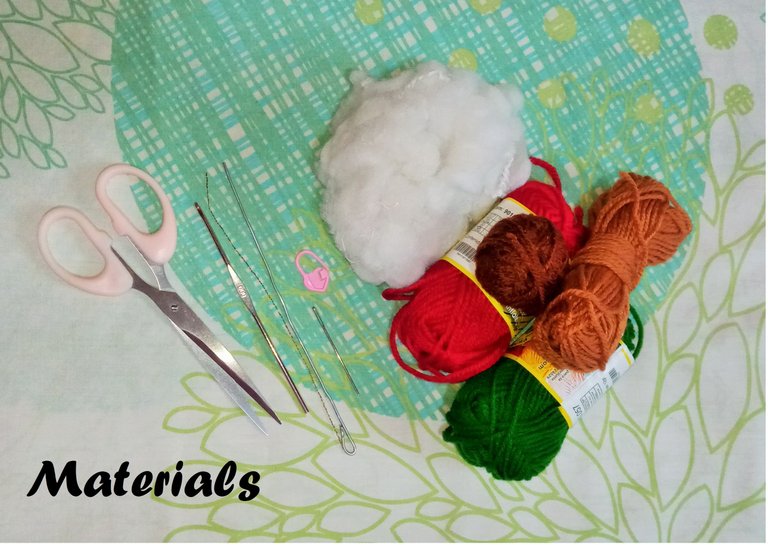
Bueno amigos a continuación les presento los materiales que use para realizar esta hermosa plantita de corazón con su macetita tejidos a crochet y también con el proceso de cómo los realice.
MATERIALES:
- Estambres de color rojo, verde, caramelo y marrón.
- Aguja de crochet #000.
- Marcadores de puntos.
- Aguja lanera.
- Relleno siliconado.
- Silicón en barra y pistola de silicón.
- Alambre para el tallo y las hojas.
- Tijera.
Well friends, here are the materials I used to crochet this beautiful little heart plant with its little pot and also the process of how I made it.
MATERIALS:
- Red, green, caramel and brown stamen.
- Crochet needle #000.
- Stitch markers.
- Wool needle.
- Silicone stuffing.
- Silicone stick and silicone gun.
- Wire for the stem and leaves.
- Scissors.
ABREVIATURAS DE LOS PUNTOS A UTILIZAR:
- Pa: punto alto.
- Mpa: medio punto alto.
- Pb: punto bajo.
- Cad: cadeneta.
- Pd: punto deslizado.
- Aum: aumento.
- Dism: disminución.
- Am: anillo mágico.
- BLO: tejer solo en la hebra trasera.
- FLO: tejer solo en la hebra frontal.
PASO A PASO:
Les cuento que como no conseguí alambre de floristería improvise usando alambre de cobre, que saque de un trozo de cable de electricidad, use dos hilos de alambre y los enrollé para así obtener el alambre para la hojita y el alambre para el tallo es alambre dulce del que se compra en la ferretería. Ahora si vamos con el proceso de tejido.
Otro detalle a tener en cuenta es que todo el tejido tanto del corazón como de la maceta los realice cerrando vueltas con Pd.
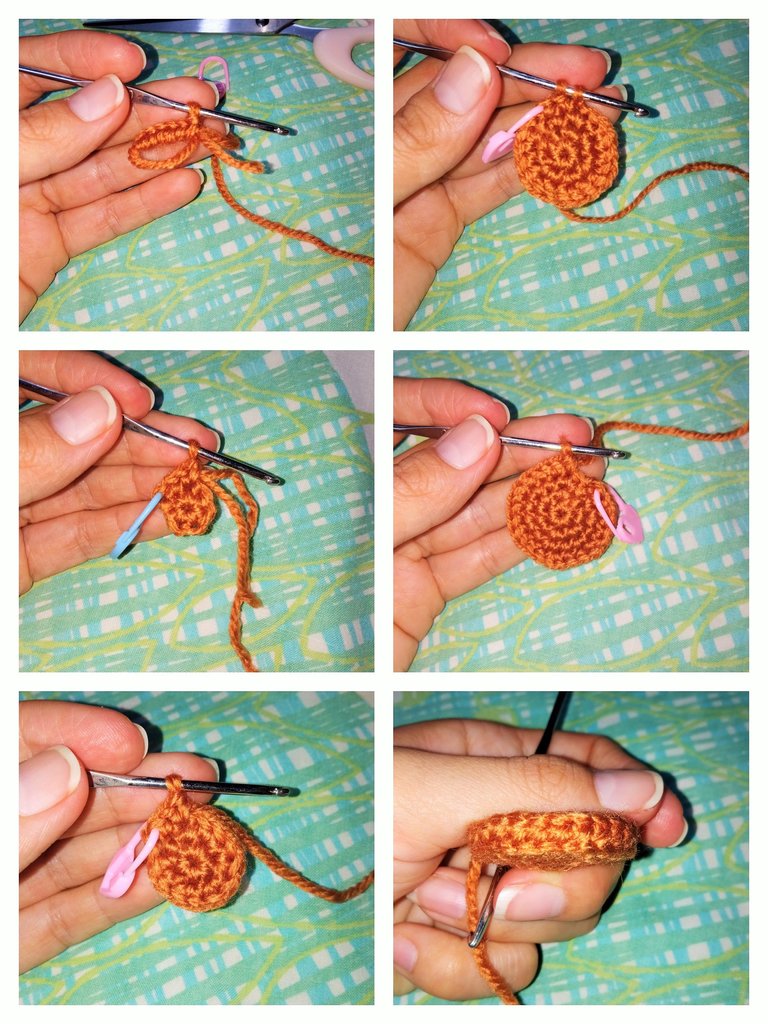
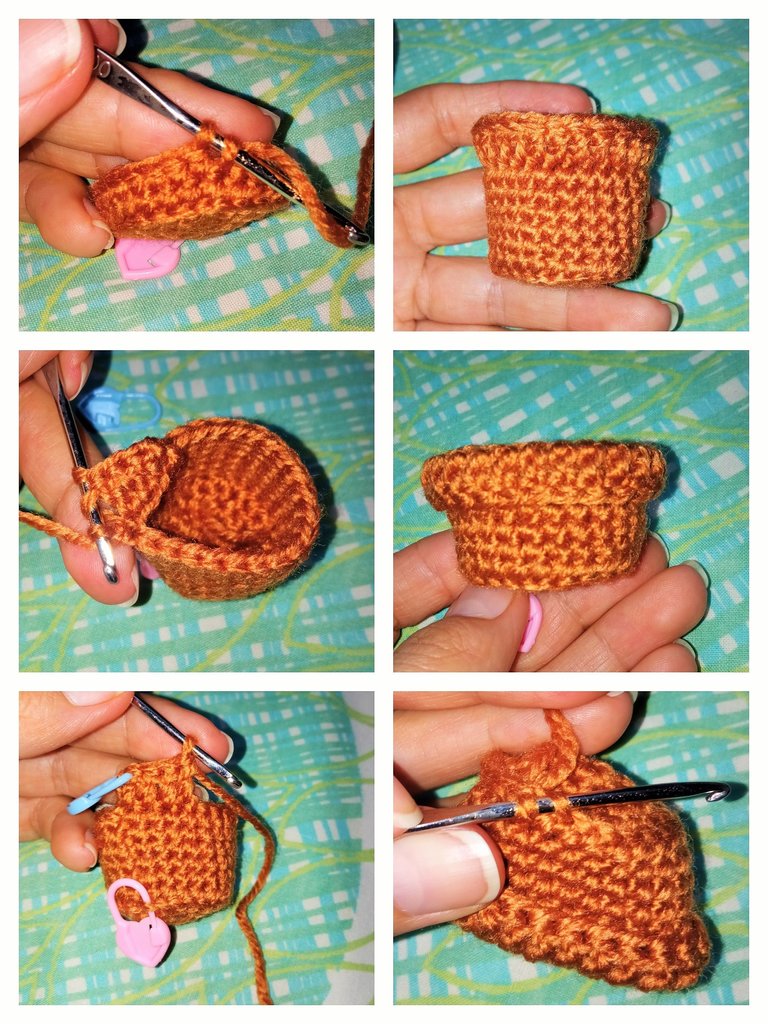
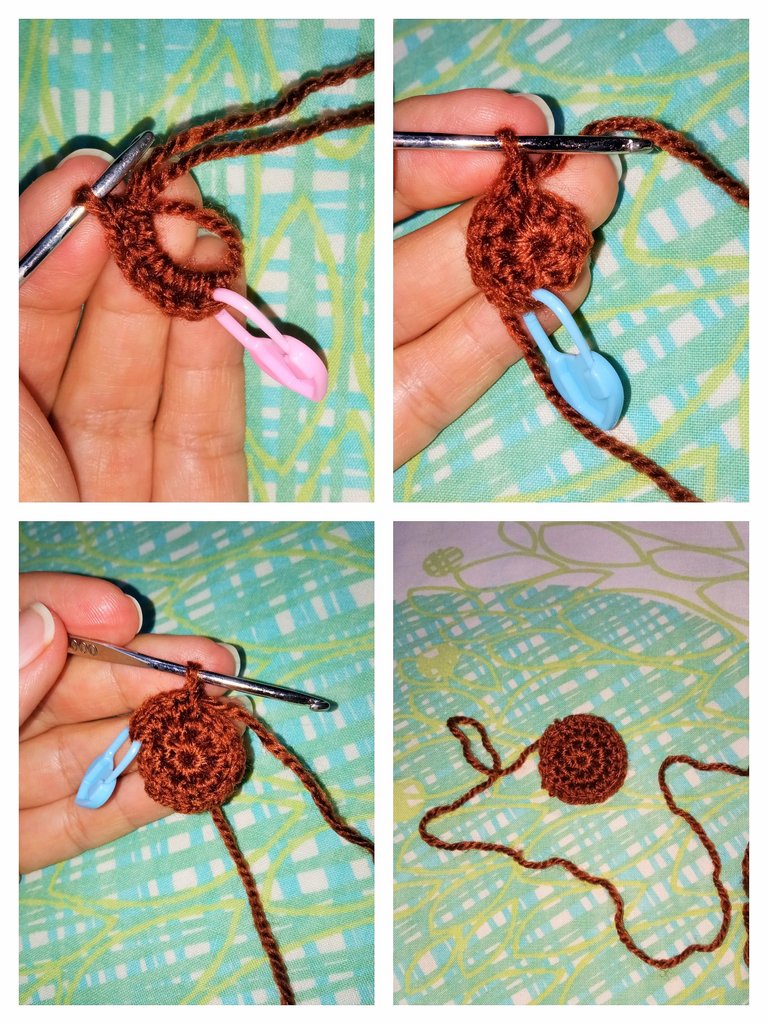
Maceta (caramelo):
V1: Am con 6 Pb. (6)
V2: 6 Aum. (12)
V3: (1 Pb, 1 Aum) x6. (18)
V4: (2 Pb, 1 Aum) x6. (24)
V5: 24 Pb tejidos en BLO. (24)
V6-10: 24 Pb. (24)
V11: 24 Pa tejidos en FLO (24) cerrar con Pd, cortar y ocultar la hebra.
Para finalizar tejer 24 Pd en la base, en la hebra delantera de la vuelta 5, esto es para dar un mejor acabado y firmeza a la maceta.
ABBREVIATIONS OF THE STITCHES TO BE USED:
- Dc: double crochet.
- hdc : half double crochet.
- sc: single crochet.
- Ch: chain stitch.
- ss: slipped stitch.
- Inc: increase.
- Dec: decrease.
- Mr: magic ring.
- BLO: knit only in the back row.
- FLO: knit only in the front strand.
ESTEP BY STEP:
Since I didn't get florist wire, I improvised using copper wire, which I took out of a piece of electrical wire, I used two strands of wire and rolled them to obtain the wire for the leaf and the wire for the stem is sweet wire that you can buy at the hardware store. Now let's get to the weaving process.
Another detail to keep in mind is that all the weaving of both the heart and the pot should be done by closing laps with Pd.
Pot (caramel):
R1: Mr with 6 Sc. (6)
R2: 6 inc (12)
R3: (1 sc, 1 inc) x6. (18)
R4: (2 Sc, 1 inc) x6. (24)
R5: 24 sc knitted in BLO. (24)
R6-10: 24 Sc. (24)
R11: 24 dc knit in FLO (24) close with ss, cut and hide the yarn.
To finish knit 24 ss in the base, in the front strand of row 5, this is to give a better finish and firmness to the pot.
Tierra (marrón):
V1: Am con 8 Pb. (8)
V2: 8 Aum. (16)
V3: (1 Pb, 1 Aum). (24) cerrar con Pd, dejar la hebra de más o menos 15cm y cortar.
Ground (brown):
R1: Mr with 8 sc (8).
R2: 8 Inc. (16)
R3: (1 sc, 1 inc) (24) close with ss, leave the strand of more or less 15cm and cut.
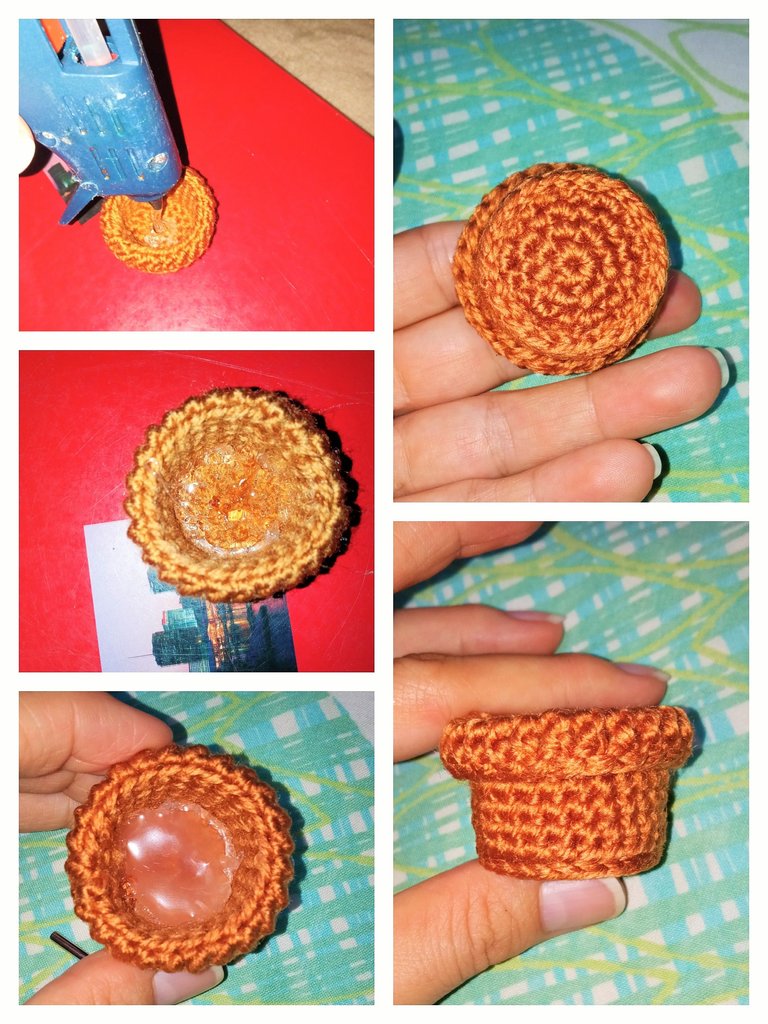
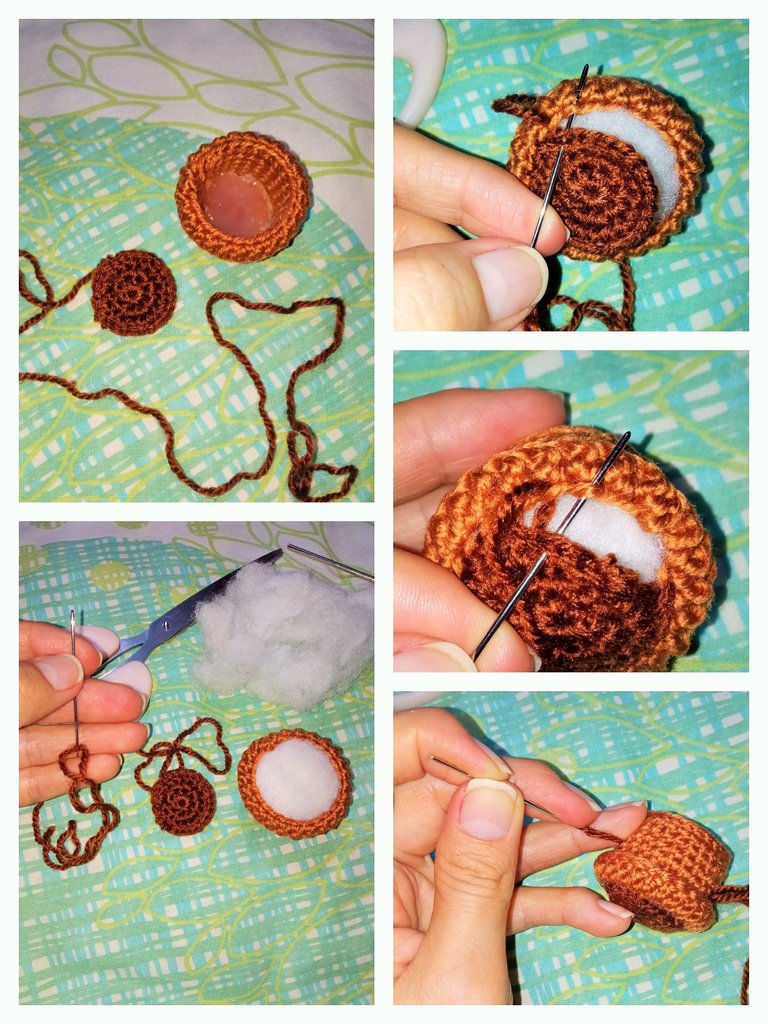
Para armar la maceta lo que hice fue aplicar un poco de silicón caliente en la base, y luego rellene la maceta y cosí el círculo marrón a la misma, que es lo que simula la tierra.
To assemble the pot what I did was to apply some hot silicone on the base, and then I filled the pot and sewed the brown circle to it, which is what simulates the earth.
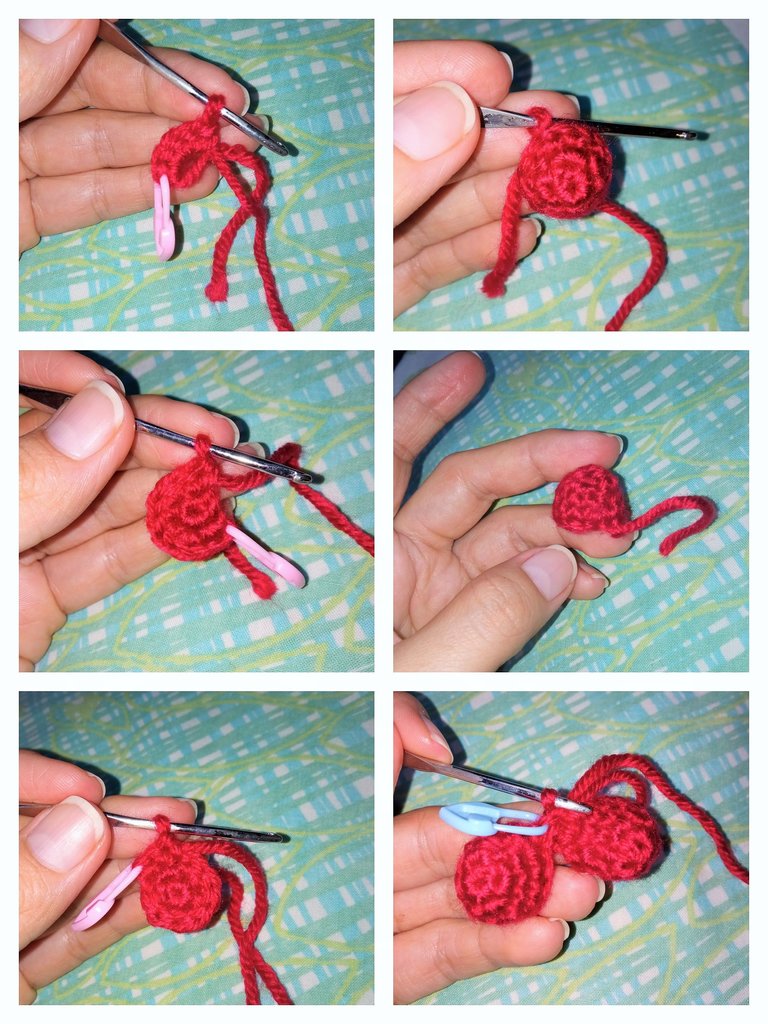
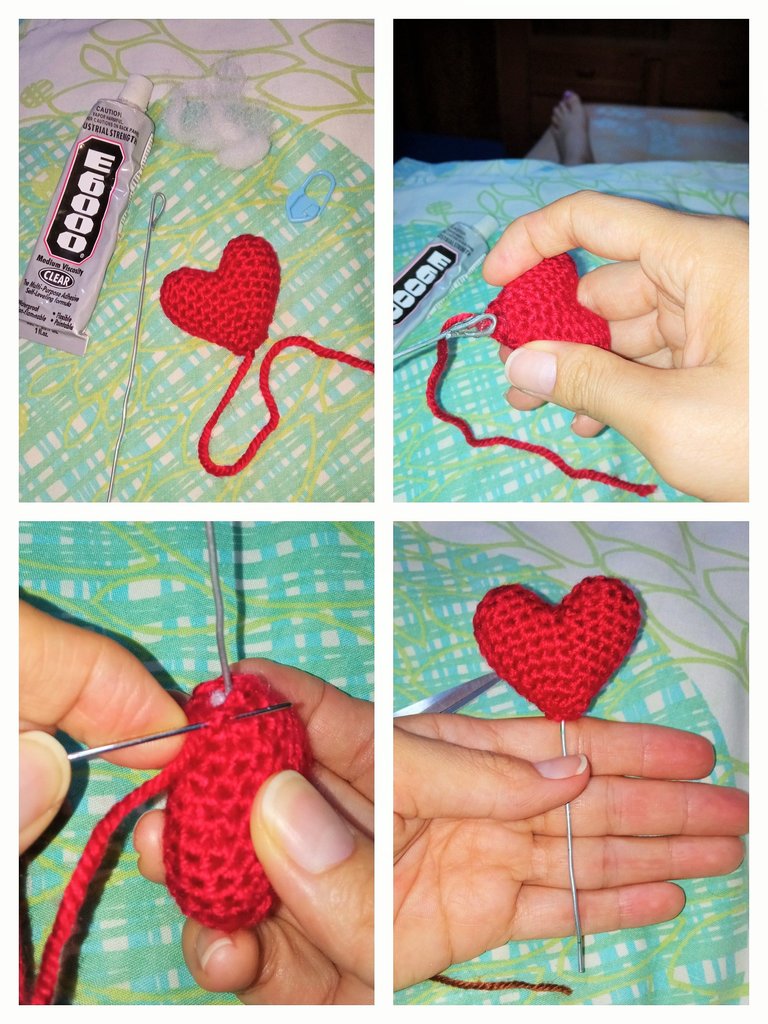
Corazon (rojo):
V1: Am con 5 Pb. (5)
V2: 5 Aum. (10)
V3: (3 Pb, 1 Aum) x 2, 2 Pb. (12)
V4: 12 Pb. (12) cortar hebra y tejer una segunda pieza igual, pero en esta segunda pieza no cortaremos la hebra, si no que continuaremos haciendo la unión de ambas piezas y tejiendo el resto de vueltas faltantes.
V5-6: 24 Pb. (24) en esta vuelta se hace la unión de las 2 piezas a travez de un punto bajo que es el primer punto de la vuelta.
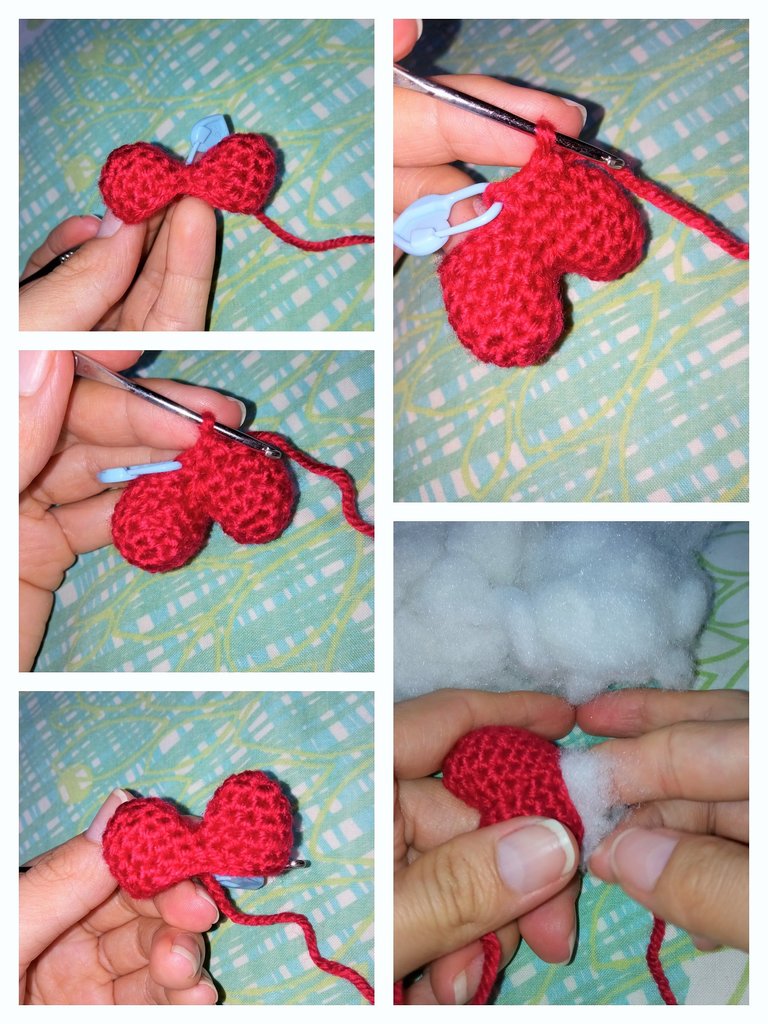
V7: (5 Pb, 1 Dism) x 3, 3 Pb. (21)
V8: (4 Pb, 1 Dism) x 3, 3 Pb. (18)
V9: (3 Pb, 1 Dism) x 3, 3 Pb. (15)
V10: (2 Pb, 1 Dism) x 3, 3 Pb. (12)
V11: (1 Pb, 1 Dism). (8)
V12: 4 Dism. Antes de cerrar colocar el alambre del tallo.
Nota: doblar un poco uno de los extremos del alambre y aplicar un poco de pegamento y luego introducir el alambre en el corazón, terminar de rellenar y cerrar con un anillo mágico invertido.
Heart (red):
R1: Mr with 5 sc (5).
R2: 5 inc. (10)
R3: (3 sc, 1 inc) x 2, 2 sc. (12)
R4: 12 sc (12) cut yarn and knit a second piece the same way, but in this second piece we will not cut the yarn, but we will continue knitting the union of both pieces and knitting the rest of the missing rows.
R5-6: 24 sc. (24) in this row the 2 pieces are joined through a single crochet, which is the first stitch of the row.
R7: (5 sc, 1 Dec) x 3, 3 sts. (21)
R8: (4 Bp, 1 Dec) x 3, 3 Bp (18)
R9: (3 Pb, 1 Dec) x 3, 3 Pb. (15)
R10: (2 Pb, 1 Dec) x 3, 3 Pb. (12)
R11: (1 Pb, 1 Dec) x 3, 3 Pb. (8)
R12: 4 Dec. Before closing place the stem wire.
Note: bend one end of the wire a little and apply some glue and then insert the wire into the heart, finish filling and close with an inverted magic ring.

Hoja (verde):
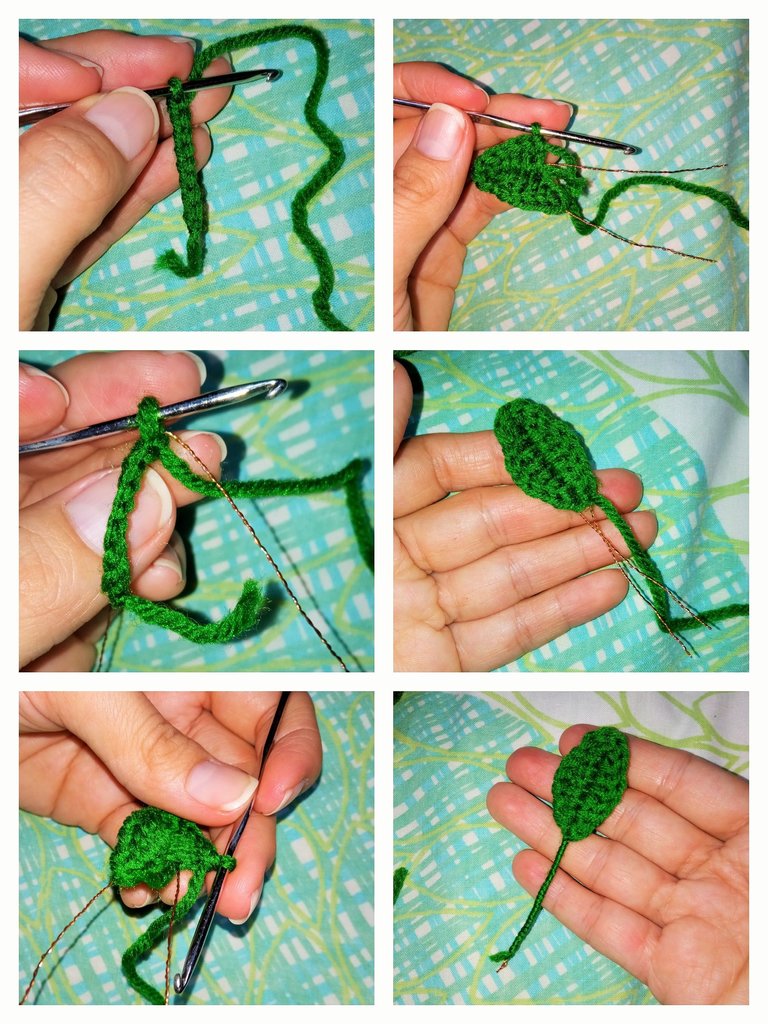
Tejer una cadeneta de 8 puntos, iniciando desde el segundo punto desde la aguja realizar la siguiente secuencia (1 Pb, 1 mpa, 3 Pa, 1 mpa, 4 Pb) y comenzar a tejer del otro lado de la cadeneta (1 mpa, 3 Pa, 1 mpa, 1 Pb) cerrar con Pd sobre el primer Pb. Cortar la hebra un poco larga para enrollarla en el alambre.
Leaf (green):
Weave a chain of 8 stitches, starting from the second stitch from the needle make the following sequence (1 sc, 1 hdc, 3 dc, 1 hdc, 4 sc) and start weaving on the other side of the chain (1 hdc, 3 dc, 1 hdc, 1 sc) close with ss over the first sc. Cut the strand a little long to wrap around the wire.
Armado:
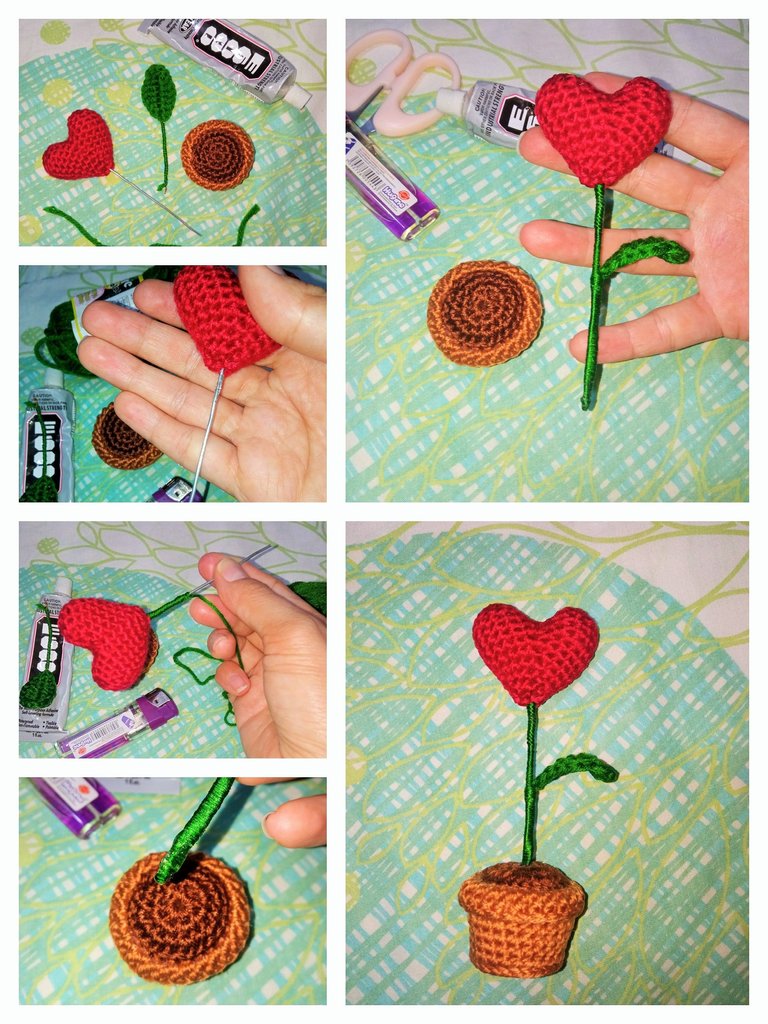
- Aplicar un poco de pegamento al alambre del tallo y forrarlo con estambre verde y ubicar la hoja en su lugar mientras se enrolla el estambre en el tallo.
- Luego aplicar un poco de pegamento en el extremo libre del tallo e introducirlo en el centro del anillo mágico de la tierra en la maceta.
- Luego se puede dar una forma curva al tallo o dejarlo rector, ya es cuestión de gustos.
Assemble:
- Apply a little glue to the stem wire and line it with green stamen and place the leaf in place while winding the stamen onto the stem.
- Then apply some glue to the free end of the stem and insert it into the center of the magic ring of soil in the pot.
- Then you can give the stem a curved shape or leave it straight, it is a matter of taste.
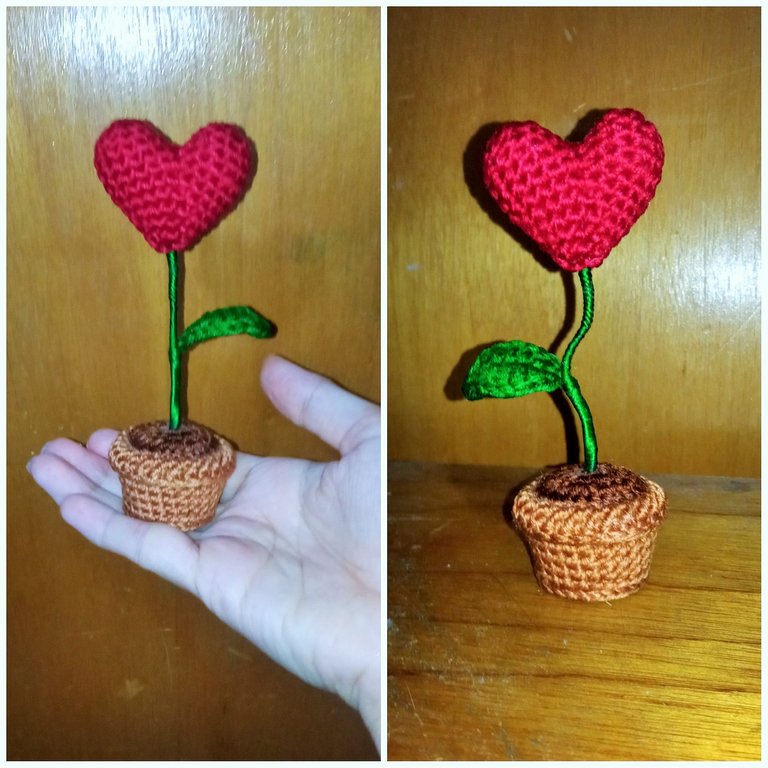
También realice una linda cajita para hacer más linda la entrega de esta plantita en forma de corazón a mi amado esposo, es que con el soy algo cursi jajaja… a mí me encanto tejerlo y a él le sorprendió mi obsequio jajaja…
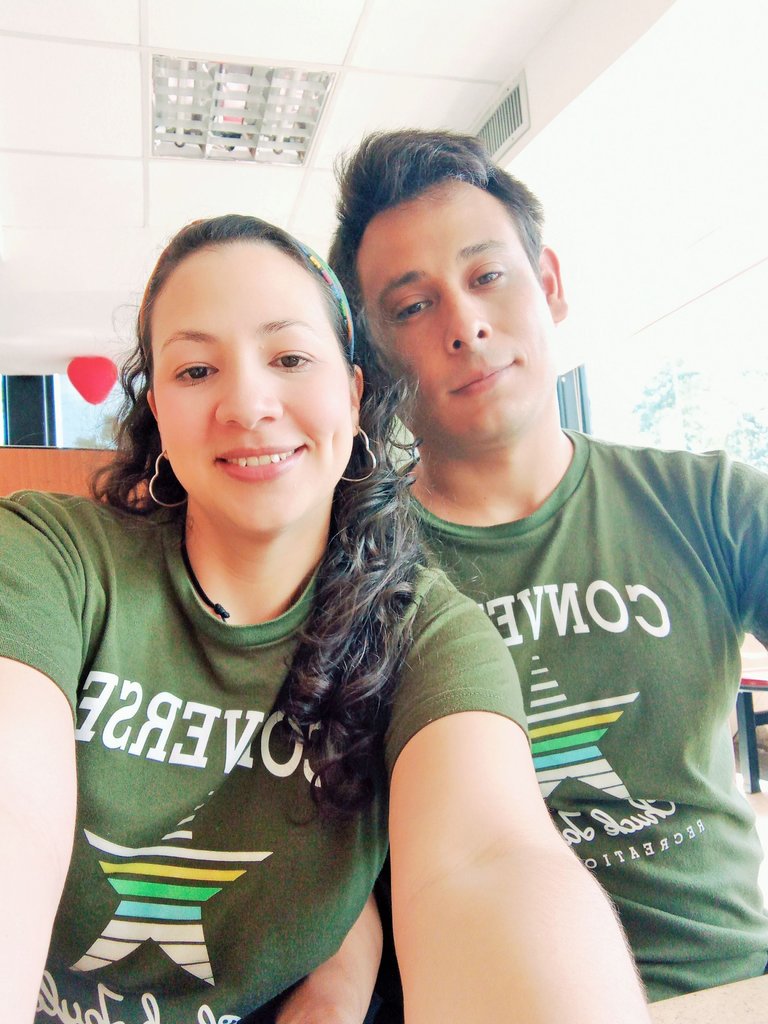
El día de los enamorados salimos a almorzar y de regreso a la casa compramos algunos dulces y pasamos la tarde viendo películas. Así que fue un día de dedicarnos un bonito tiempo de calidad juntos 😍
I also made a cute little box to make more beautiful the delivery of this heart-shaped plant to my beloved husband, I am a little corny with him hahaha... I loved knitting it and he was surprised by my gift hahaha....
On Valentine's Day we went out for lunch and on the way back home we bought some sweets and spent the afternoon watching movies. So it was a day of spending some nice quality time together 😍
BUENO AMIGOS DESEO LES HAYA GUSTADO TANTO COMO A MÍ EL RESULTADO FINAL DE ESTA HERMOSA PLANTITA EN FORMA DE CORAZÓN TEJIDA A CROCHET Y CON MUCHO AMOR, ESPERO SUS BONITOS COMENTARIOS Y/O VOTOS, ASÍ ME MOTIVAN PARA SEGUIR COMPARTIENDO MIS CREACIONES CON USTEDES, YO ESTARÉ FELIZ DE RESPONDER TODOS SUS COMENTARIOS, SEAN FELICES Y QUE LA MUSA DE LA CREATIVIDAD NUNCA LOS ABANDONE!
¡GRACIAS POR VISITAR MI BLOG!
Se despide de ustedes con mucho cariño su amiga Nathalie @laranitacrochet
WELL FRIENDS I HOPE YOU LIKED AS MUCH AS I DID THE FINAL RESULT OF THIS BEAUTIFUL LITTLE HEART-SHAPED PLANT CROCHETED WITH LOVE, I HOPE YOUR NICE COMMENTS AND / OR VOTES, SO MOTIVATE ME TO CONTINUE SHARING MY CREATIONS WITH YOU, I WILL BE HAPPY TO ANSWER ALL YOUR COMMENTS, BE HAPPY AND THAT THE MUSE OF CREATIVITY NEVER LEAVES YOU!
THANK YOU FOR VISITING MY BLOG!
Your friend Nathalie @laranitacrochet bids you a fond farewell.
*Todas las fotografías utilizadas en la publicación son propiedad de la autora.
*Las fotografías fueron tomadas y editadas con mi REDMI 9 y con la App FotoRoom.
*La traducción la hice en https://www.deepl.com/es/translator
*All photographs used in this publication are property of the author.
*The pictures were taken and edited with my REDMI 9 and the FotoRoom App.
*The translation was done at https://www.deepl.com/es/translator


