(ENG)
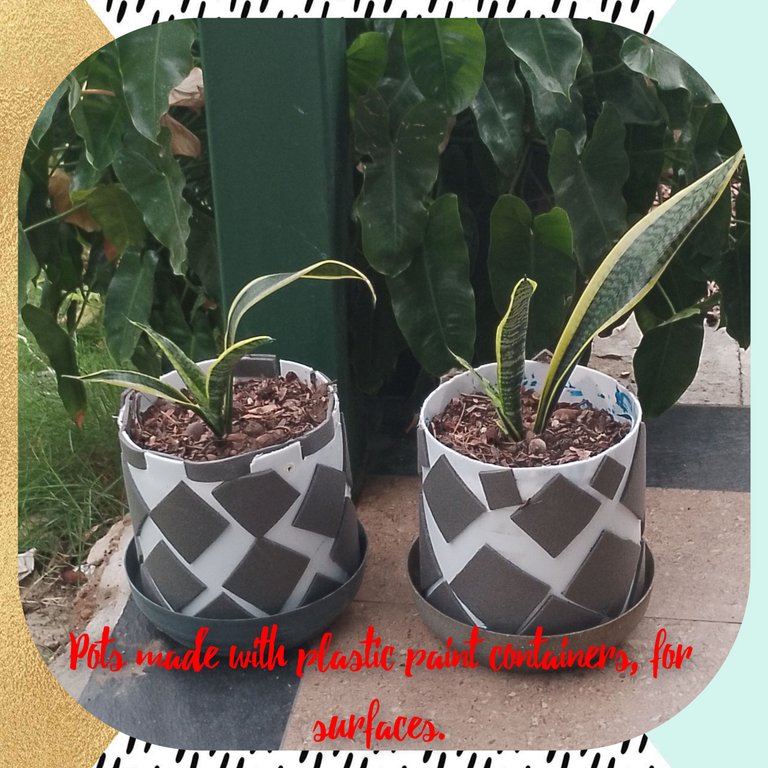
Hello to all of you, my dear people, DIY lovers, I am pleased to be hoping today that this will be a very nice weekend, full of many beautiful and comforting moments. Today I stop by @diyhub, to show you how to transform some plastic paint containers for surfaces that I found, thrown away like waste, because with a touch of imagination and with the help of some materials, I changed it by giving it a second use, this time , converted into beautiful and decorative planters, that will surely make your garden shine. Without further ado, I invite you to follow me and I will show you how I did it, I hope you enjoy it.
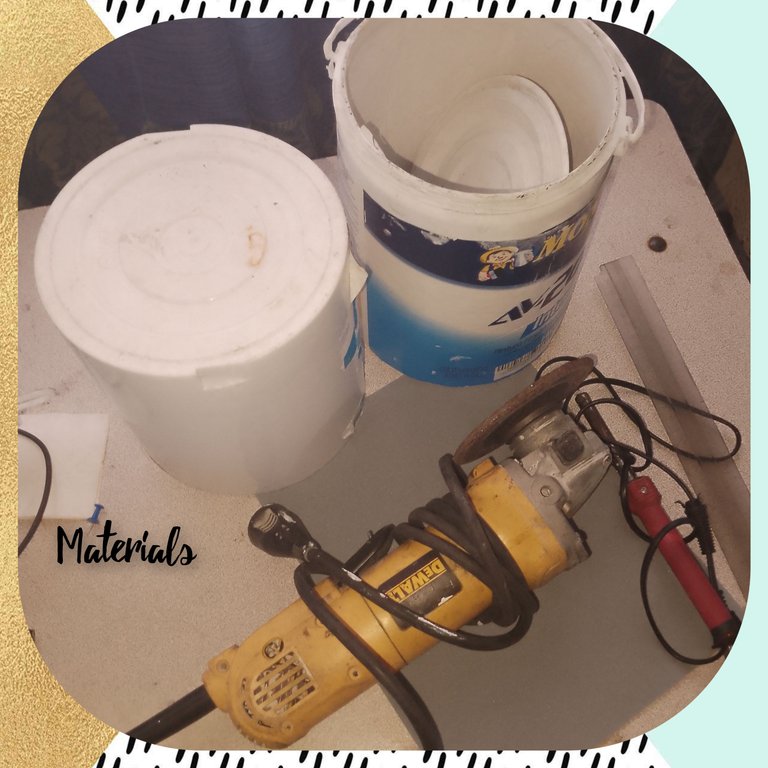
Used materials:
. Plastic paint containers.
. Adhesive sheets. I had seen these, some time ago, inside the boxes of an air conditioner. They are like corky and also adhesive, waterproof. I never knew the usefulness of the artifact, so I kept them.
. Tin gun.
. Emery.
. Pencil . Ruler
. Scissors.
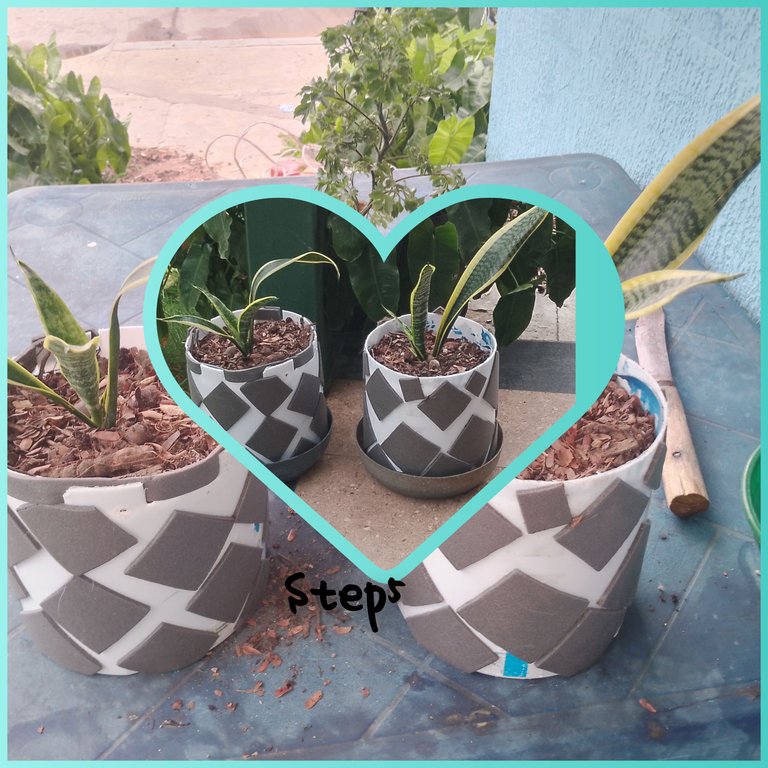
Steps:
1.) after convincing the man to drive Dean's wheelbarrow, collecting the garbage in the area, not so that he will give me or change the cans. I remove the paper that surrounds it, wash it a little and dry it. Using the grinder, I remove the upper edge, including the handle, from said containers. Trying to burn as evenly as possible. While I was doing all this, I heated up the tin gun, and made holes in the bottom of the container.
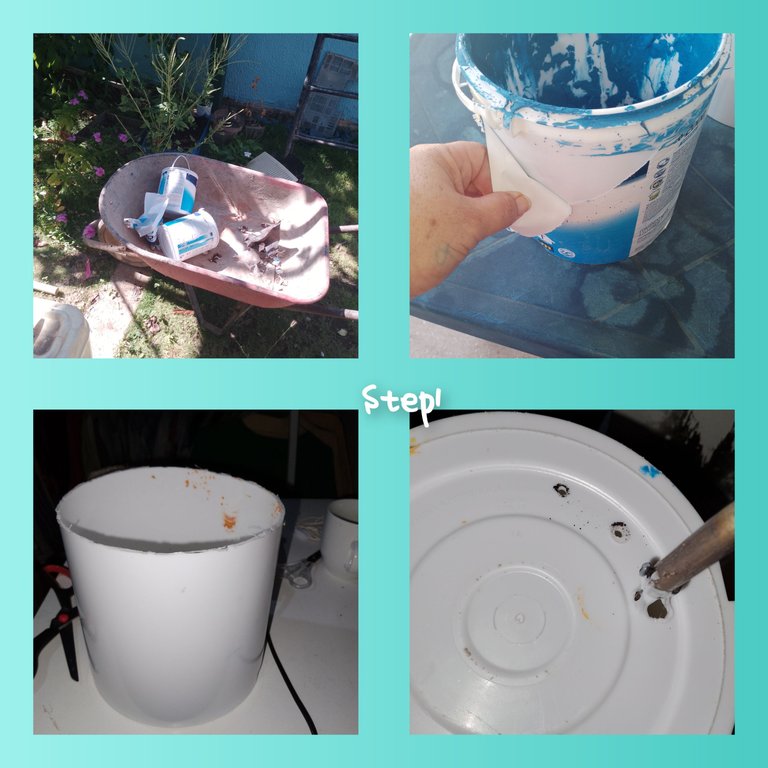
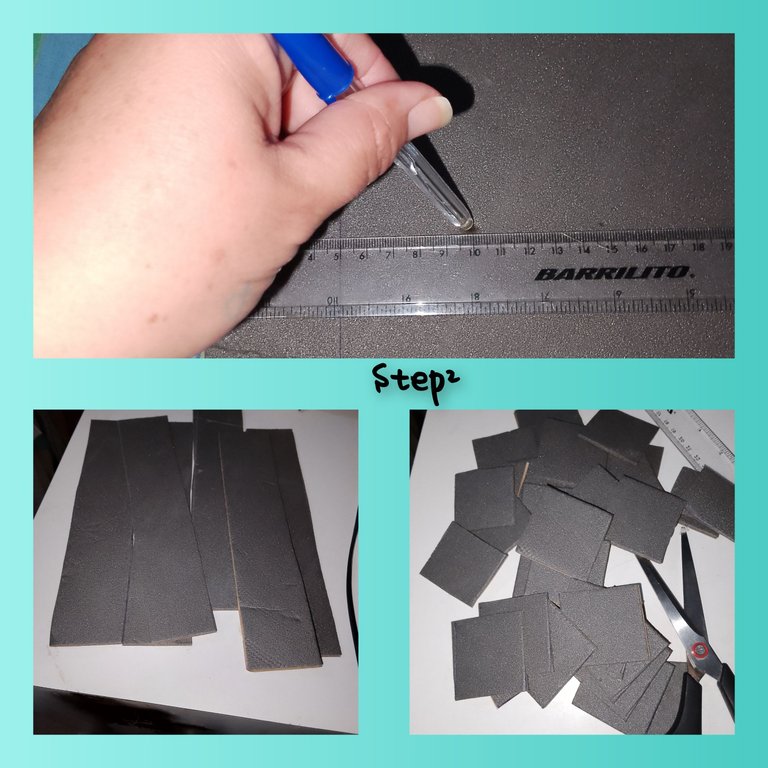
2.) With the help of the ruler and pencil, I marked and then cut out small 5*5cm squares.
3.) I begin to peel off, leaving only the adhesive, the squares cut out in the previous step, and I begin to paste, on the container, from the top, and placing the squares in a rambo shape, in this way I will stick, keeping the harmony between the spaces, until the entire journey is done in the container

4.) Now ready, the containers decorated, I continue, transplanting some plants from my garden.
Take care of your environment and do not throw away everything, that which you well know we can, as good DIYers, transform and give a second life. Let's raise awareness and protect our environment. I am very happy with my pots, I loved the color of the adhesive sheets. Now I'm collecting some other cans to make pots. It will surely be very fun and my garden will be very beautiful.
. All photos are my property, taken with my smartphone.
. Use incollage to show the steps.
. Use language translator.
Very grateful that you followed me until the end, it is a pleasure to show you my most recent creations, you are always welcome to my blog, it will be until the next opportunity, do not forget your opinion, it is to my liking, if it comes with good intentions and Help me with motivation. Thank you.

(ESP)
Hola a todos ustedes, mí querida gente, amantes de el bricolaje, me complace, estar hoy deseando, este sea un muy bonito fin de semana, lleno de muchos momentos lindos y reconfortable. Hoy paso, por @diyhub, para mostrarles, como transformar, unos envases plásticos de pintura, para superficies, que encontré, tirados como desechos, pues con un toque de imaginación y con ayuda de algunos materiales, cambie dandole un segundo uso, esta vez, convertidos en lindos y decorativos materos, que de seguro haran lucir, su jardín. Sin más les invito a seguirme y les mostraré, como lo hice, deseo los disfruten.
Materiales usados:
. Envases plásticos de pintura.
. Laminas adhesivas. Estás las había recorrido, hace algún tiempo, dentro de las cajas de un aire acondicionado. Son como acorchadas y además adhesivas, impermeables. Nunca supe, la utilidad para el artefacto, así que las guarde.
. Pistola de estaño.
. Esmeril.
. Lápiz
. Regla.
. Tijeras.
Pasos:
1.) luego de convencer a el señor, que tre la carretilla deano, recogiendo la basura por el sector,nopara que me regalará o cambiara las latas. Le desprendo el papel, que la rodea, lavo un poco y seco. Usando el esmeril, desprendo el borde, superior, incluyendo el aza de dichos envases. Tratando este queme loas parejo posible. Mientras hacia todo esto, calentaba la pistolita de estañar, y hago perforaciones en el fondo de el envase.
2.) con ayuda de la regla y el lápiz, merco y luego recortó, pequeños cuadros de 5*5cm.
3.) comienzo a desprender dejando solo el adhesivo, a los cuadros recortados en el paso anterior, y comienzo a pegar, en el envase, desde la parte superior, y colocando los cuadros en forma de rambo, de esta forma ire pegando, manteniendo la armonía entre los espacios, hasta hacer todo el recorrido en el envase
4.) ya listo, decorados los envases, continuo, transplantando algunas plantas de mí jardín.
Cuida tu ambiente y no deseches todo, aquello, que bien sabes podemos, como bueno bricolajeros, transformamos y damos una segunda vida. Hagamos consciencia y protejamos nuestro ambiente.
Yo muy contenta, con mis macetas, me encantó el color de las láminas adhesivas. Ahora ando recolectando algunas otras latas, para hacer materos. De seguro será muy divertido y mí jardín estara muy bonito.
. Todas las fotos son de mí propiedad, tomadas con mí teléfono inteligente.
. Use incollage para mostrar los pasos.
. Use traductor lenguaje.
Muy agradecida me hayas seguido hasta el final,es un placer, mostrarles mi más recientes, creaciones, siempre eres bienvenido a mí blog, será hasta una próxima oportunidad, no olvides su opinión, es de mi agrado, si viene de manera bien intencionada y que me ayude con la motivación. Gracias.
