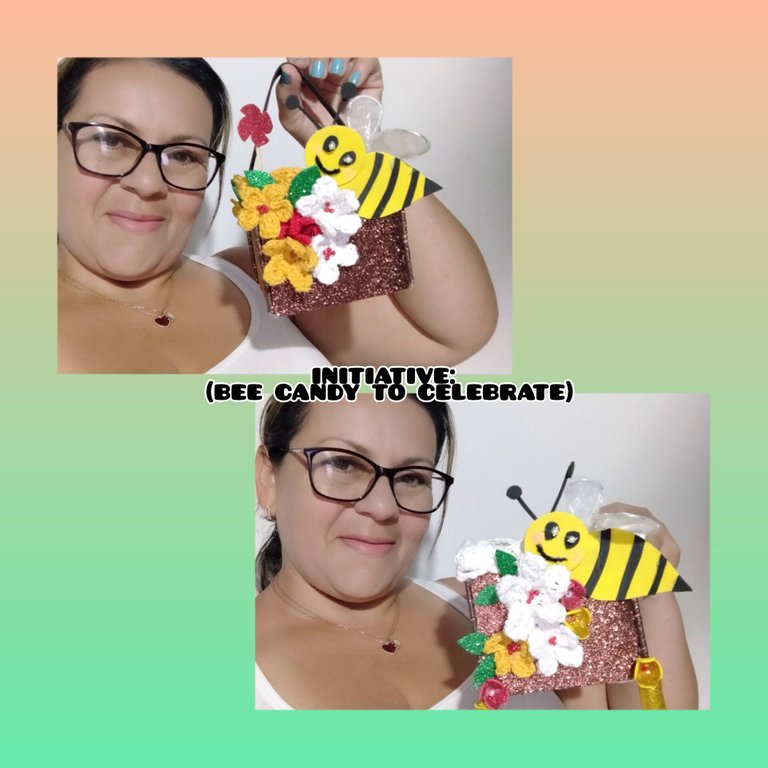
have been stung by them, it is horrible, they have a lot of power in that sting. But God I adore that nectar, their own, ideal to sweeten anything you want, and even its properties are used in body creams, facials, and any unimaginable cosmetic for our skin, hair, etc. Good thing there are those terrible and adorable animals in nature. And well, taking advantage of that sweet part of them, I made to participate, some very cute and delicate sweets, where I will also apply, several techniques that make any manual project stand out well (recycling, crochet, wire mesh, etc) my purpose is also due. That in the next few days International Children's Day will be celebrated. So this month's @diyhub proposal is very timely, because which child doesn't like sweets🥞. Without further ado, I want to thank @jorgelissanchez for the invitation, who invited me a few days ago, and I take the opportunity to extend it to @jorgelist, @lorennys and my good friend @agbogo. I look forward to seeing your creations my dear artist friends, excellent by nature and creative at heart.🐝🐝
Muy buena noche a todos, en @diyhub, hoy me uno, a la iniciativa, de este mes, dónde la protagoniza, la Dulce y temible ABEJA 🐝. Sí les confieso, tenerle fobia, he Sido picada por ellas, es horrible, tienen mucho poder en ese aguijón. Pero Dios adoro ese néctar, propio de ellas, ideales para endulzar cualquier cosa que desees, e incluso sus propiedades, son utilizadas en cremas corporales, faciales, y cualquier cosmético inimaginable para nuestra piel, cabello etc. Que bueno existes esos terribles y adorables animales en la naturaleza. Y bueno, aprovechando esa parte dulce de ellas, Realice para participar, unos muy lindos y delicados dulceros, dónde además aplicaré, varias técnicas que bien hacen resaltar cualquier proyecto manual ( reciclaje, crochet, alambrismo, etc) mí propósito además, se debe. Que en los próximos día se celebrara el día Internacional del niño. Así que muy oportuna la propuesta de @diyhub de este mes, porque a que niño, no le gusta el dulce🥞. Sin más quiero agradecer, la invitación de @jorgelissanchez, que desde hace algunos días me hizo la invitacion, y aprovecho para extenderla a @jorgelist, @lorennys y mí buena amiga @agbogo. Espero ver sus creaciones mis queridas amiga artistas, excelentes por naturalezas y creadoras de corazón.
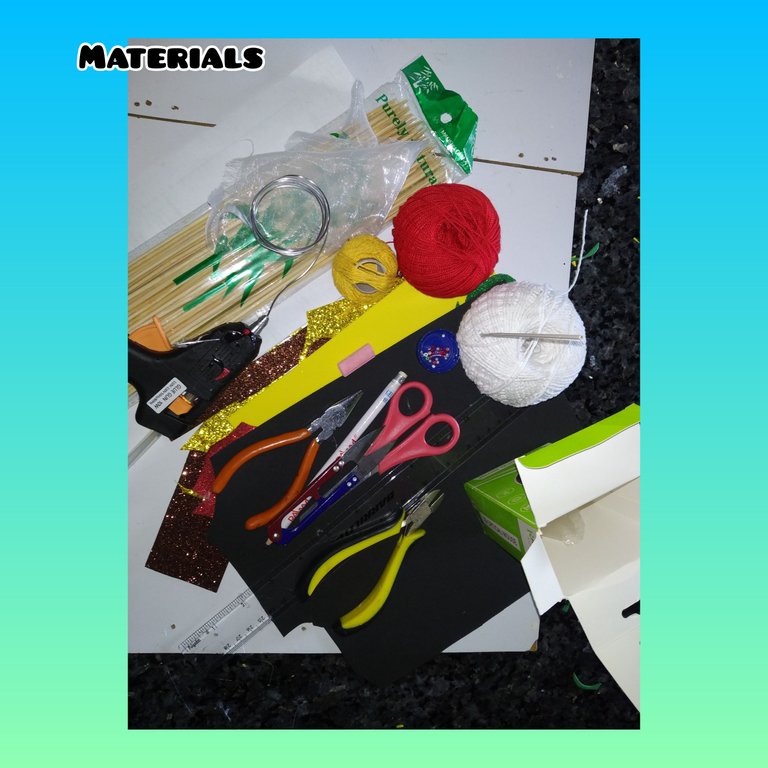
Materials/Materiales
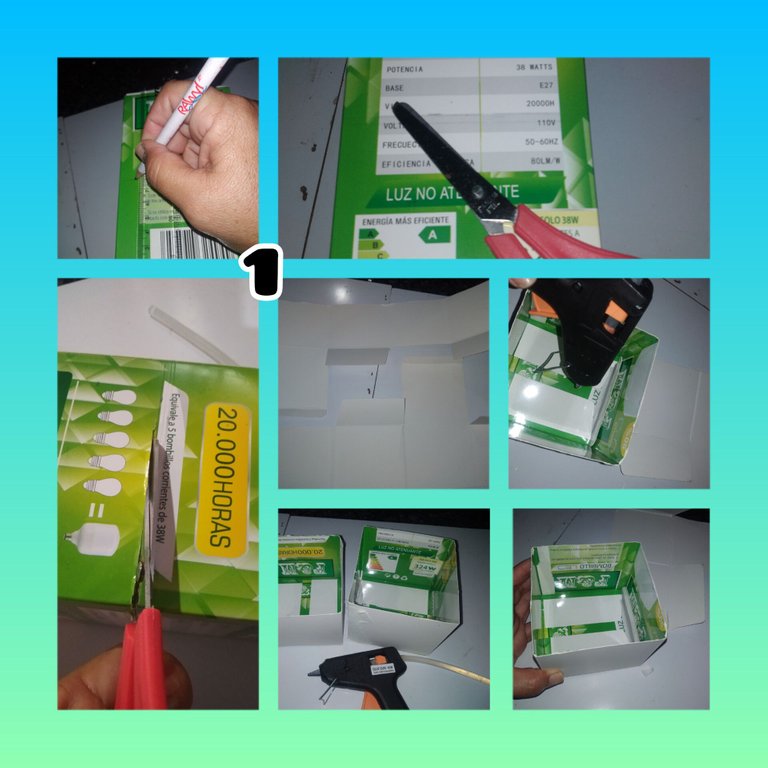
1.) I will start, marking the box of the light bulb in half with the help of the ruler, this is 19cm high, after marking its four sides, it is separated by cutting with scissors. Once the cuts are ready, I detach the box, and I glue again but on the opposite side, this to make it easier for me to glue, since on this side, the glue has more grip. So it hits well but on the oppos.🐝🐝
Cardboard box, light bulb.
. pencil crayon
. rule to mark
. Yarns for knitting (yellow, white, red)
. Knitting needle.
. Foam cutouts (gold, frosty brown, black, frosty red, frosty green).
.Hot silicone.
. Plastic soda cap.
.scissors
. Pickaxe
. Jewelry wire.
. jewelery tweezers
. White silk fabric.
. Red and pink beads.
. White pearlite.
. Pink chalk.
. Height sticks.🐝🐝
. Caja cartón, de bombillo.
. Lápiz creyon.
. Regla para marcar
. Hilos para tejer (amarillo, blanco, rojo)
. Aguja para tejer.
. Recortes de foami ( dorado, marrón escarchado, negro, rojo escarchado, verde escarchado).
.Silicón caliente.
. Tapita plástica de refresco.
.tijeras
. Piqueta
. Alambre de bisutería.
. Pinzas de bisutería
. Tela de seda color blanca.
. Mostacillas de color rojo y rosado.
. Perlita de color blanca.
. Tiza de color rosado.
. Palitos de altura.
Step/paso1
1.) Iniciaré, marcando con ayuda de la regla la caja de el bombillo a la mitad, esta tiene 19cm de altura, luego de marcar sus cuatro lados, separó cortando con las tijeras. Listo los cortes desprendo la caja, y nuevamente pego pero de lado contrario, esto para que me sea más fácil pegar, ya que por este lado, el pegamento tiene más agarre. Así que pego bien pero en el lado contrario de su origen de fabrica.
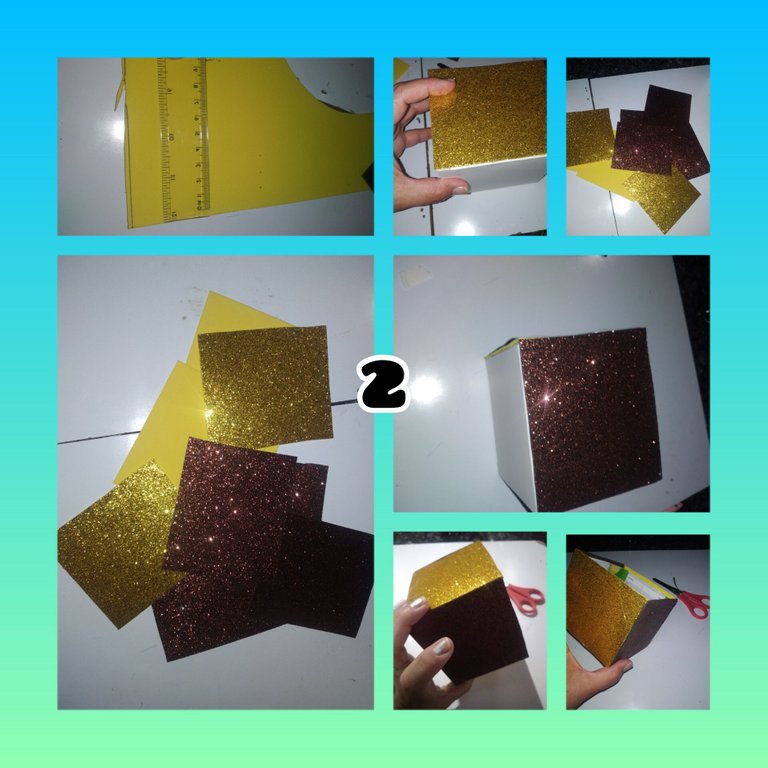
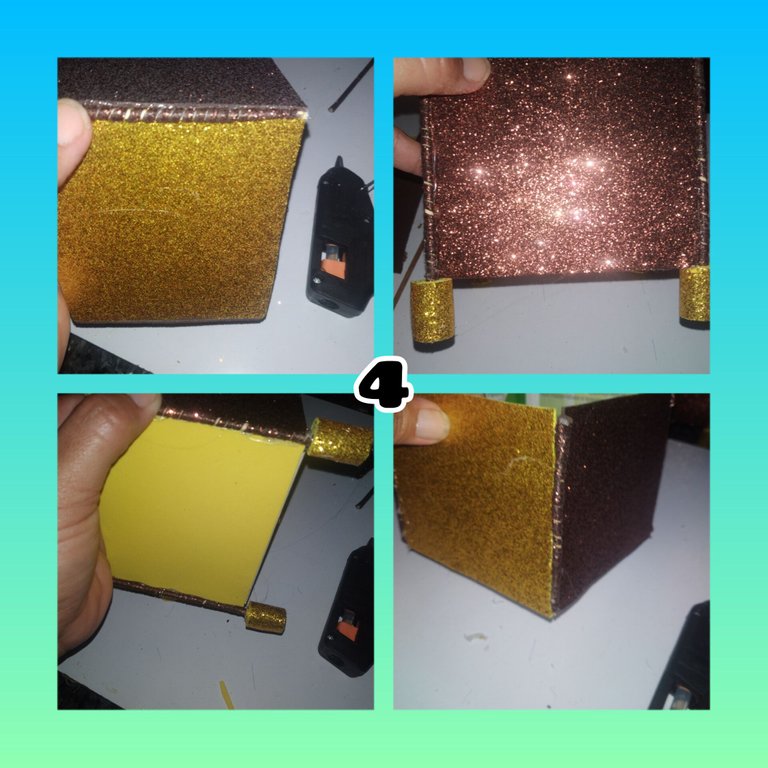
2.) I take measurements, of the length and width of the box, and I mark the box on the foami, I cut it out with scissors and I take this as a reference, to cover both pieces, that is, each one will have four sides, I will use two yellow ones and two browns. I apply plenty of silicone and lining to both pieces.🐝🐝
2.) Tomo medidas, de largo y ancho de la caja, y marco el cuadro sobre el foami, recortó con las tijeras y tomo este como referencia, para cubrir a ambas piezas, es decir cada una tendrá cuatro lados,usaré dos amarillos y dos marrones. Aplico abundante silicón y forro a ambas piezas.
3.) Measuring with the ruler, I cut four 8cm and four 10cm high toothpick pieces, cut thin strips of frosty brown foam and cover the toothpicks, applying silicone. I mark and cut four pieces of golden foami 2cm wide by 6cm long, and applying silicone I go around and stick on the largest covered toothpick, that is, the 10cm ones.
3.) Midiendo con la regla, corto cuatro pedacitos de palillo de altura de 8cm y cuatro de 10cm, corto tiras delgadas de foami de color marrón escarchado y cubro los palillos, aplicando silicon. Marco y corto cuatro pedazos de foami dorado de 2cm de ancho por 6cm de largo, y aplicando silicón voy dando vueltas y pegando en el palillo cubierto de mayor tamaño, es decir los de 10cm.
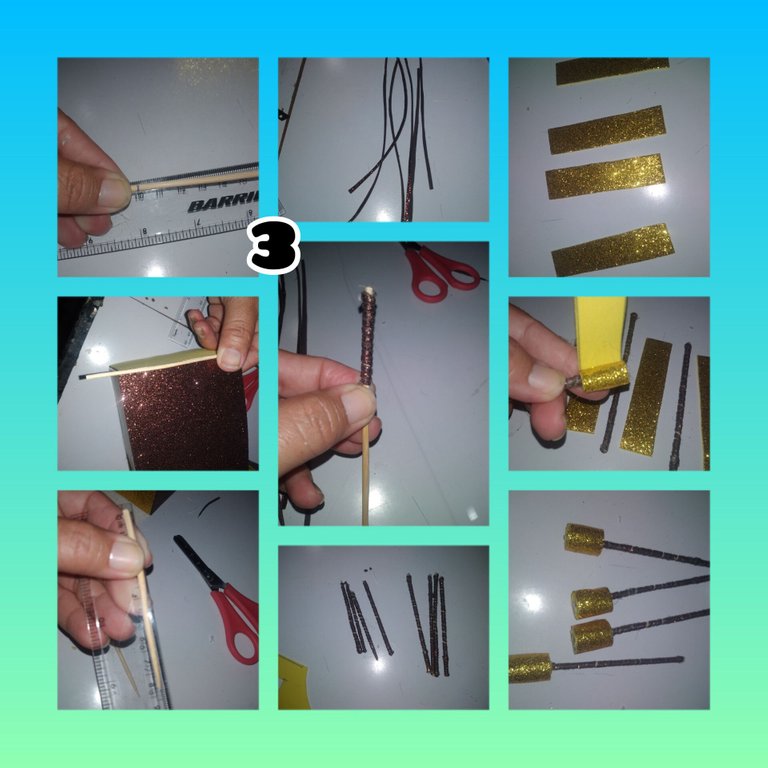
4.) I take one of the drawers and stick the largest covered toothpick, in the space between each foami glued in apso naterior, or in its effect in the corners, it will remain, with a kind of support or leg. And the other without them.🐝🐝
4.) Tomo uno de los cajones y pego el palillo cubierto de mayor tamaño, en el espacio de separación de cada foami pegado en apso naterior, o en su efecto en las esquinas, este quedará, con una especie de soporte o pata. Y el otro sin ellas.
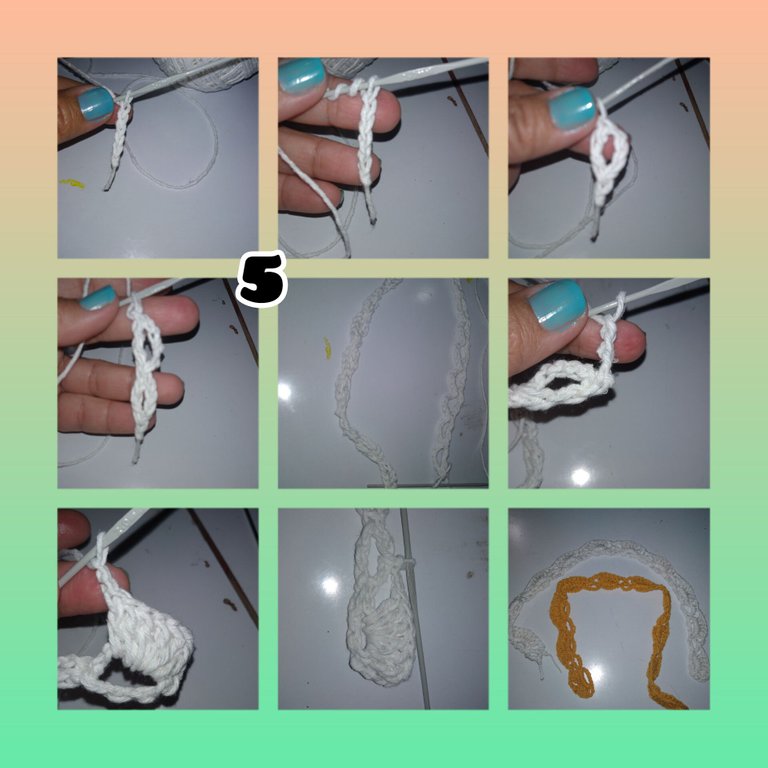
5.) Continue, and in the next step, I will crochet a nice delicate lace. I raise five chain stitches, take three loops, go down with the needle to knit the first chain stitch and raise a double treble stitch, in this way, I continue until completing twenty rows, turn the fabric over, raise three chain stitches, equivalent to one stitch high, and I knit five more double crochets into this space, I chain two more points and go down to the next space with a single crochet, two more chains and six double points in the next space. And in this way, I complete the tour. finished this, I weave one more lace using the yellow thread.🐝🐝
5.) Continuo, y en el siguiente paso, tejere a crochet un lindo y delicado encaje. Levanto cinco puntos cadenas, tomo tres lazadas, bajo con la aguja para tejer a la primer punto cadena y levanto un punto alto doble, de esta manera, continuo hasta completar veinte vueltas, volteo el Tejido, levanto tres puntos cadenas, equivalentes a un punto alto, y tejo cinco puntos altos más dentro de este espacio, tejo dos puntos cadenas y bajo a el siguiente espacio con punto bajo, dos cadenas más y seis puntos altos en el siguiente espacio. Y de esta forma, completo el recorrido. terminado esto, tejo un encaje más usando el hilo de color amarillo.
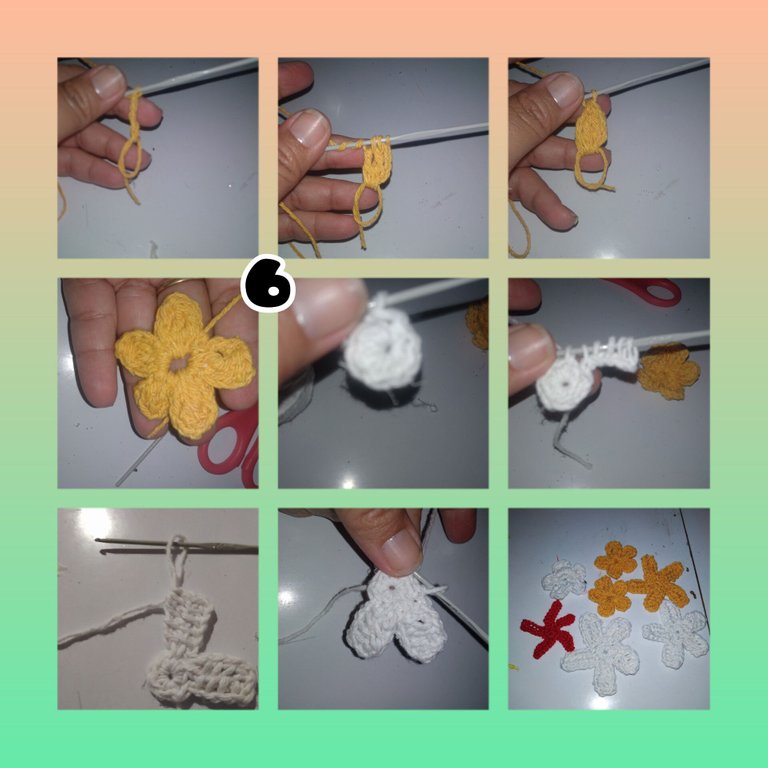
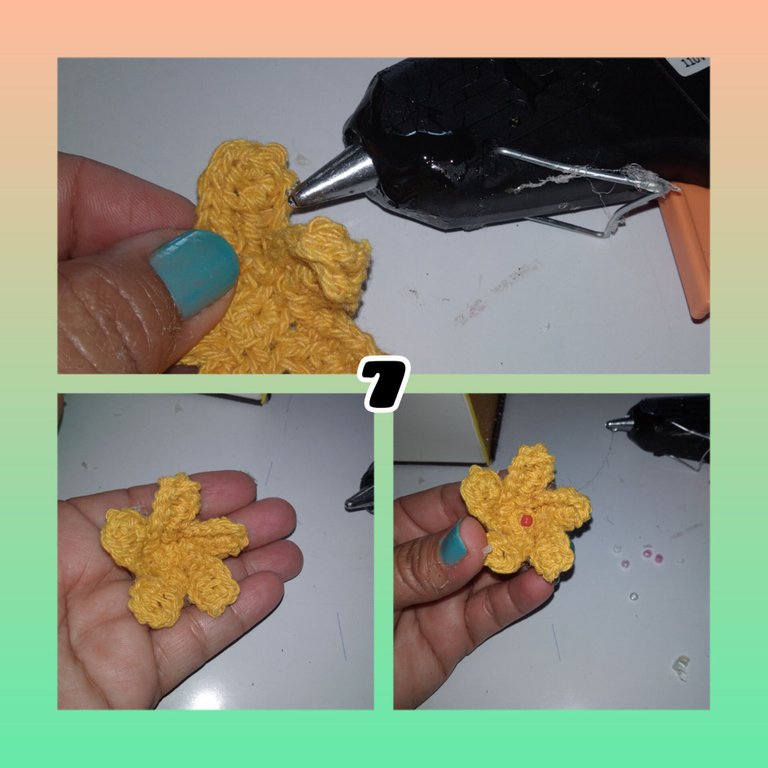
6.) Weave flowers in different shapes. In a continuous ring I raise four double crochets, closed at point four, knit, three chain stitches under with a slip stitch and repeat, until we knit five petals, then I pull the thread and tie the knot. The flower is formed. The next time I make a magic ring, weave eight half stitches into it and close the ring. I raise five chain stitches and I go down inside them, leaving the threads inside the needle, when I reach the bottom I introduce the needle in the next half point of the ring and I go up two threads at a time, I repeat a new round, With the needle located in the upper part, I remove the needle. I introduce the chain stitch number six and take the thread from the last round, this will allow to shape the end of the petal, I continue going down with a slip stitch and being in the ring, I repeat I will do this until I get five petals.🐝🐝
6.) Tejere flores diferentes formas. En un anillo corrido levanto cuatro puntos altos, cerrados en el punto cuatro, tejo, tres puntos cadenas bajo con punto deslizado y repito, hasta tejer cinco pétalos, luego, tiro de el hilo y uno el nudo. Quedando formada la flor. La siguiente hago un anilloagico, tejo dentro de el ocho puntos medios y cierro el anillo. Levanto cinco puntos cadenas y voy bajando por dentro de ellas, dejando las hebras dentro de la aguja, llegado a la parte baja Introduzco la aguja en el siguiente medio punto de el anillo y voy subiendo de dos en dos hebras, repito una nueva vuelta, ubicada la aguja en la parte alta, saco la aguja Introduzco en el punto cadena número seis y tomo el hilo de la última vuelta, esto permitirá dar forma a el extremo de el pétalo, continuo bajando con punto deslizado y estando en el anillo, repito, esto lo haré hasta obtener cinco petalos.
7.) I apply a bit of silicone to the petals of the already woven flowers, to close a bit and I also glue some Mostacillas in the center of them.🐝🐝
7.) Aplico un poco de silicón a los pétalos de las flores ya tejidas, para cerrar un poco y además pego algunas Mostacillas en el centro de ellas.
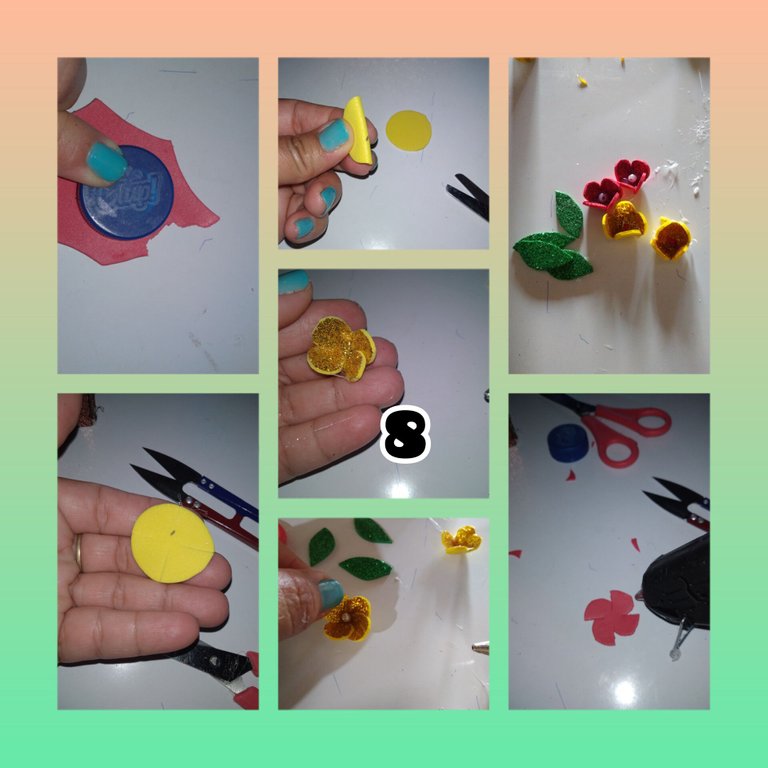
8.) With the soda lid, I frame the yellow and red foam cutouts, which I will cut into small circles with delicate flowers, glue the petals a little and . Likewise, I will mark and cut out leaves, which I will use in future steps to decorate.
8.) Con la tapa de refresco marco sobre los recortes de foami de color amarillo y rojo, círculos los cuales haciendo cortes formaré en pequeñas de delicadas flores, pego un poco los pétalos y . Así mismo marcare y recortó hojas, que usaré en pasos futuros para decorar.
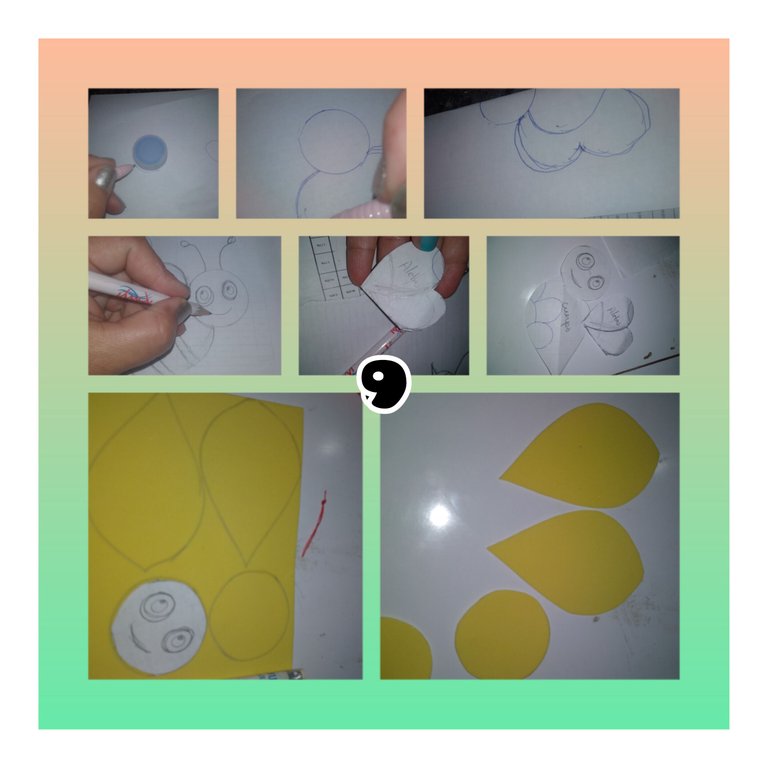
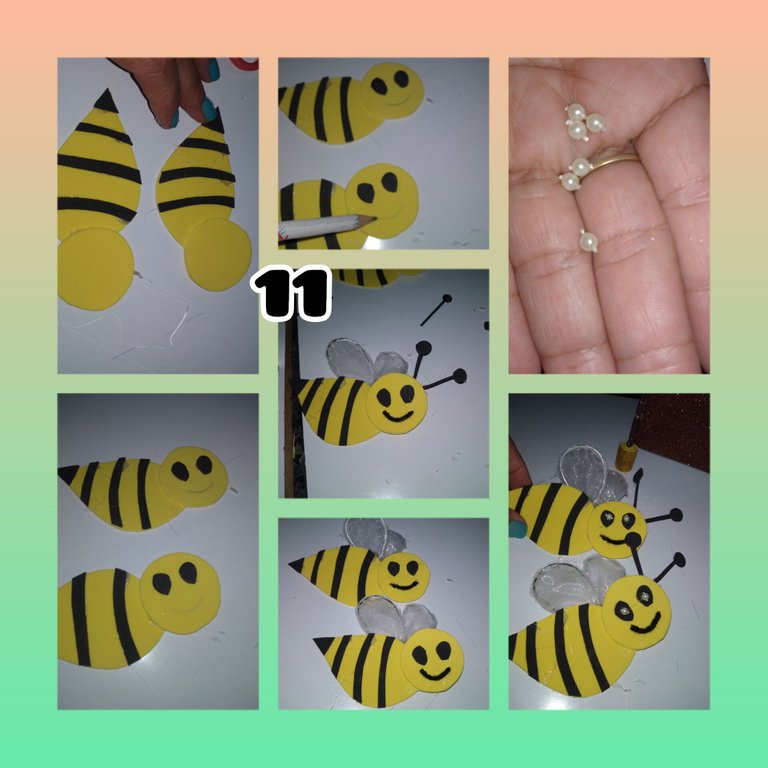
9.) On the recycling paper, I draw and cut out a beautiful bee. He cut out each piece separately and framed and remembered from the foami.
9.) Sobre el papel para reciclar, dibujo y recortó una hermosa abeja. Recortó cada pieza por separado y marco y recordó de el foami.
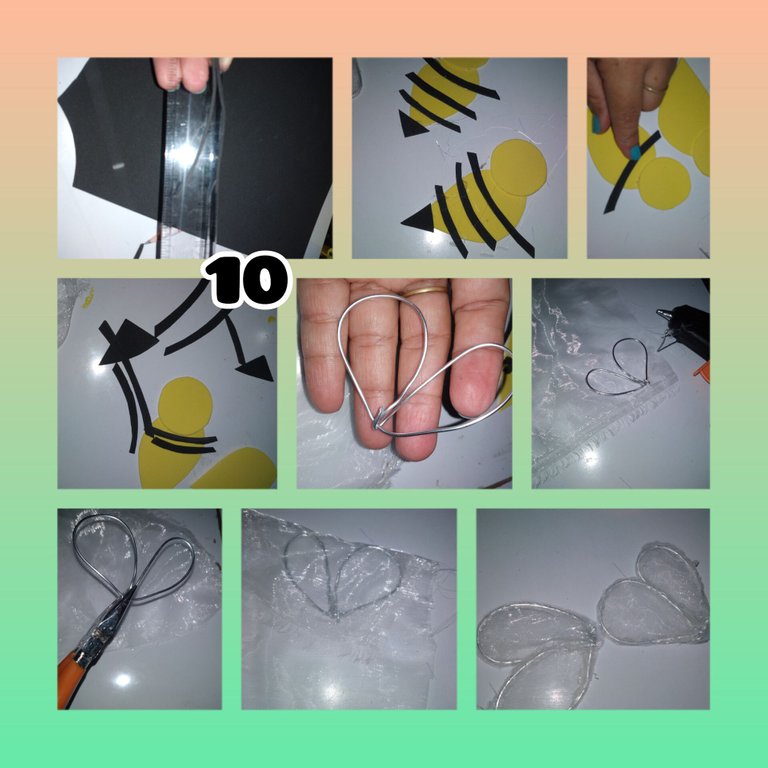
10.) Frame and cut small ribbons from the black foam, which will be glued on the body of the bee, likewise using the jewelry wire and guiding me from the wings drawn on the paper to recycle, I will assemble the bee's fins, I cut and twist the wire using the pliers. After this, I will apply hot silicone to the wings, structured with wire and glue the silk fabric on both sides, let it dry well and, guiding myself by the wire, I will cut the residual fabric.🐝🐝
10.) Marco y recortó de el foami color negro pequeños listones, que iran pegados sobre el cuerpo de la abeja, así mismo usando el alambre de bisutería y guiandome de las alas dibujadas en el papel para reciclar, armare las aletas de las abeja, corto y doy vueltas a el alambre usando las pinzas. Luego de esto, aplicaré silicón caliente a las alas, estructuradas de alambre y pego en ambos lados l atela de seda, dejo secar bien y guiandome de el alambre cortaré la tela residual.
11.) I begin to glue and join the pieces of the bees, I cut black foami circles for their eyes and in the center I glued a small white pearl, likewise I cut delicate and very thin black foami strips to simulate the antennae and some circles to stick on them. To finish I draw the mouth and apply silicone and on the black thread.
11.) Comienzo a pegar y unir las piezas de las abejas, recortó círculos de foami color negro para sus ojos y en el centro pego un a pequeña perla de color blanca, así mismo corto delicados y muy delgados listones de foami color negro para simular las antenas y unos círculos para pegarlos sobre ellas. Para terminar dibujo la boca y aplico silicón y sobre el hilo de color negro.
12.) In the following steps, I will decorate the candy boxes. I'll start by transforming a sweet rimmer into a basket , which you can take anywhere as a gift from the child. To do this, I cut a frosted brown foami ribbon and applying silicone glue on the sides. Once this is done, I glue the crocheted lace all around, for this I will use the yellow one, on the ribbon I will glue two found flip flops and on them a small flower, both pieces made of foami.
I continue decorating and on the side that will be the front of the candy box, I combined and glued the woven flowers, placed some leaves and in front of them glued the Bee.
12.) En los siguientes pasos, decorare los dulcero. Comenzaré transformando un rimer dulcero en cesta 🧺, que bien puedes llevar como regalo del niño cualquier lugar. Para ello corto un Listón de foami color marrón escarchado y aplicando silicón pego en los lados. Hecho esto, pego por todo el alrededor el encaje tejido a crochet, para está usaré el de color amarillo, sobre el liston pegare dos ojotas encontradas y sobre ellas una pequeña flor ambas piezas hechas de foami.
Continuo decorando y en el lado que será el frente de el dulcero, combinó y pego las flores tejidas, coloco algunas hojitas y delante de ellas pego la Abeja.
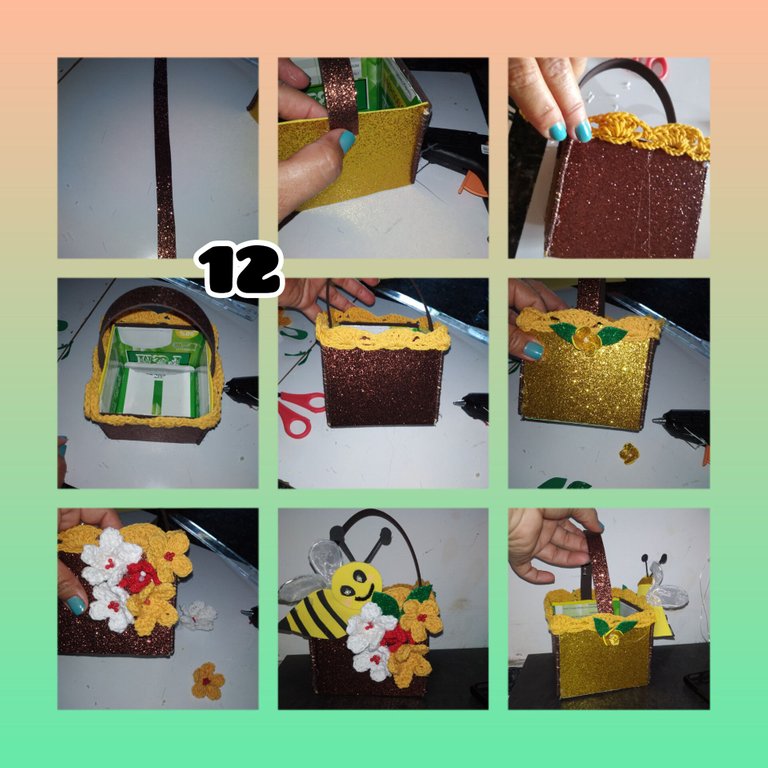
13.) The second sweet box is ideal to have it in a stable place like tables, corner or any place where you can have sweets to your liking. Following the same process, she glued the lace around the edge of the candy box, placed a flower on the front legs, then glued the remaining crocheted flowers and in front of them glued the Bee.
13.) El segundo dulcero, es ideal para tenerlo en un lugar estable como mesas, rinconero o cualquier lugar, donde puedas tener dulces de tu agrado. Siguiendo el mismo proceso pegó el encaje en todo el borde de el dulcero, coloco una flor en las patas delanteras, luego pego las flores restantes tejidas a crochet y frente a ellas pego la Abeja.

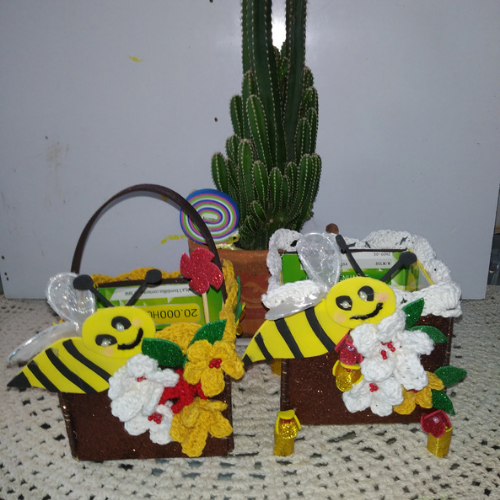
De esta manera, lucen los dulceros terminado. listo esperando el proximo domingo.🐝🐝
In this way, the finished sweets look. Ready waiting for next Sunday.🐝🐝
. All photos are my property, taken with my smartphone, during the development of the step by step.
.Use InShot.
. Use Google translate.
It was a pleasure to join this beautiful and very sweet initiative, I hope you like it and thank you for following me until the end.🐝🐝
. Todas las fotos son de mí propiedad, tomadas con mí teléfono inteligente, durante el desarrollo de el paso a paso.
.Use InShot.
. Use traductor Google.
Fue un placer, unirme a esta linda y muy dulce iniciativa, espero les guste y valla mi agradecimiento por seguirme hasta el final.
