Hello Diy Hub community I am new here and I bring you something that I have done recently and I really liked the result. I am not very good with clay but it is true that it relaxes me a lot and entertains me. I hope you like it and encourage you to make your own candle holders.
Hola comunidad Diy Hub soy nueva por aquí y les traigo algo que he hecho recientemente y me ha gustado mucho el resultado. No soy muy buena con la arcilla pero es verdad que me relaja mucho y me entretiene. Espero que les guste y se animen a hacer su propio porta velas.
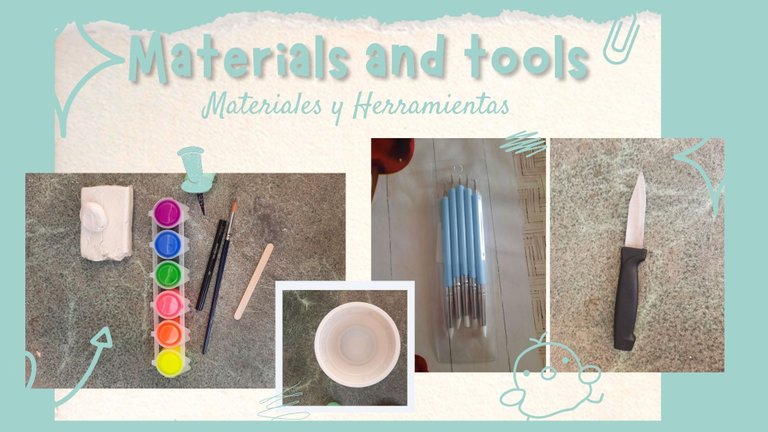
Materials and tools:
Air-drying white clay (it doesn't need an oven to harden), paints, brush, wooden applicator, eyeliner (you can use a black marker or black paint but I used the eyeliner because it has a very fine brush), water, tools to work the clay (they are not mandatory but they help to work the clay with their different metal and rubber tips) and a knife (it can be any tool that allows you to cut the clay).
Materiales y herramientas:
Arcilla blanca de secado al aire (no necesita horno para endurecerse), pinturas, pincel, aplicador de madera, eyeliner (puedes usar un rotulador negro o pintura negra pero yo usé el eyeliner porque tiene un pincel muy fino), agua, herramientas para trabajar la arcilla (no son obligatorias pero ayudan a trabajar la arcilla con sus diferentes puntas de metal y goma) y cuchillo (puede ser cualquier herramienta que te permita cortar la arcilla).
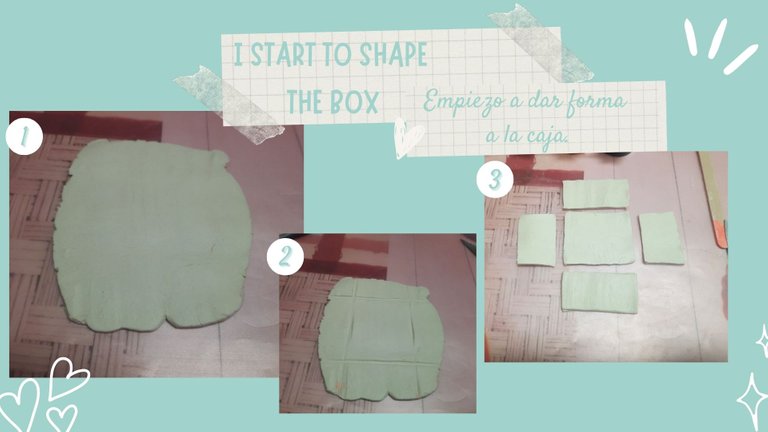
I start making the drawer where we can place the candle. As we see in image 1, I flatten the clay and then mark it with the wooden applicator and cut it with the knife. (Images 2 and 3)
Empiezo a hacer el cajón donde podremos colocar la vela. Como vemos en la imagen 1, aplano la arcilla y luego la marco con el aplicador de madera y corto con el cuchillo. (Imágenes 2 y 3)

In step 4 I join all the walls to the bottom of the box. This will not be very safe, so I put strips of clay on the inside corners and on the bottom (images 4 and 5). Then with a very wet brush I start to unify everything so that it looks like one piece. I also equalize the faces and with water I retouch all the surfaces to eliminate the roughness and the cracks of the clay. In the image 7 we can see how the box looks like.
With a small piece of clay I make a strip (image 8) and place it in the box on an outside face of my choice, creating the first root (image 9).
En el paso 4 uno todas las paredes al fondo de la caja. Esto no será muy seguro así que pongo tiras de arcilla en las esquinas interiores y en el fondo (imagen 4 y 5). Luego con un pincel muy húmedo empiezo a unificar todo para que parezca una sola pieza. También igualo las caras y con agua retoco todas las superficies para eliminar las rugosidades y las grietas de la arcilla. En la imagen 7 podemos ver como queda la caja.
Con un trocito de arcilla hago una tira (imagen 8) y la coloco en la caja en una cara exterior de mi elección, creando la primera raíz. (Imagen 9)
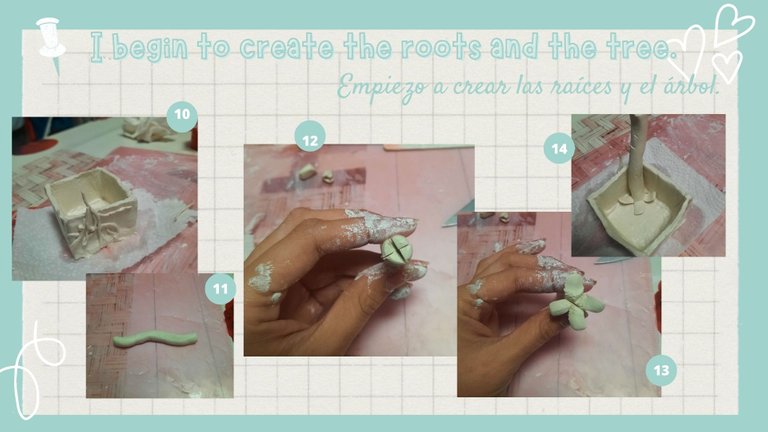
I repeat this step with more strips (image 10) and then create the tree. First I make a fairly thick cylinder of clay that should not be perfect. With the knife I make a horizontal cut and then a vertical one at one end, this will allow me to open it and flatten it like the petals of a flower that I will rest on the bottom of the box and join with the wet brush (images 11, 12, 13 and 14).
Repito este paso con más tiras (imagen 10) y luego creo el árbol. Primero hago un cilindro de arcilla bastante grueso que no debe ser perfecto. Con el cuchillo hago un corte horizontal y luego uno vertical por un extremo, esto me permitirá abrirlo y aplanarlo como pétalos de una flor que apoyaré en el fondo de la caja y uniré con el pincel mojado (imágenes 11, 12, 13 y 14).
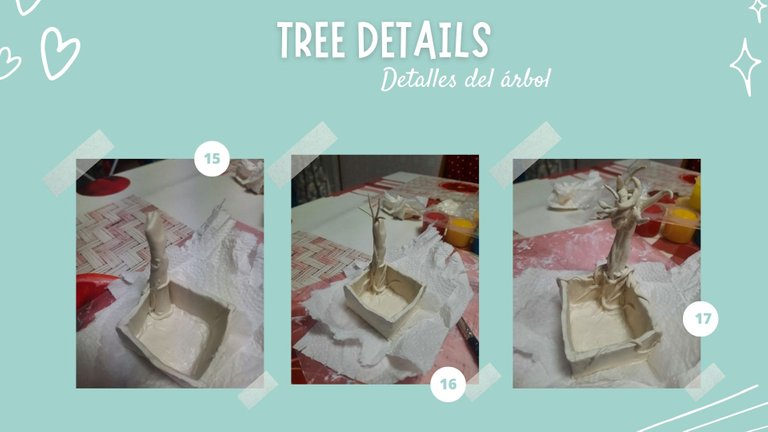
With the tree in the desired place I begin to place inner and outer roots, as we did before (image 15). I also add slightly thicker strips to create the branches, which I wrap around the top of the tree (image 16). We try not to let the branches get too low inside the box, because that's where we will put the candle. When I finish putting all the branches and roots I start to unify them with the tree using the wet brush and I also make lines that cross it vertically with the applicator to give a wooden sensation (Image 17).
Con el árbol en el lugar deseado empiezo a colocar raíces interiores y exteriores, como hicimos antes (imagen 15). También añado tiras algo más gruesas para crear las ramas, que enrollo alrededor de la parte superior del árbol (imagen 16). Procuremos no hacer ramas demasiado bajas dentro de la caja, porque es ahí donde pondremos la vela. Cuando termino de poner todas las ramas y raíces empiezo a unificarlas con el árbol usando el pincel húmedo y también hago líneas que lo cruzan verticalmente con el aplicador para dar sensación de madera (imagen 17).
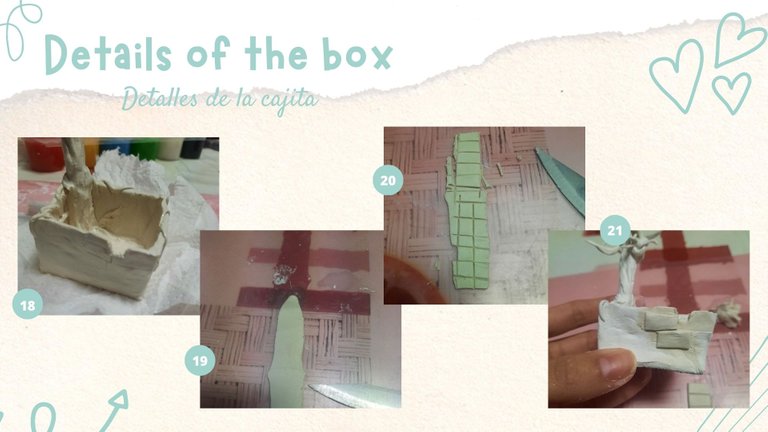
In image 18 we can see how I made a small detail by removing a small piece of clay. With another piece of clay that I flattened and cut into rectangles (image 19 and 20) I added other details to the box, in this case some bricks as we can see in image 21. I also added in other sides of the box.
En la imagen 18 podemos ver como hice un pequeño detalle quitando un trocito de arcilla. Con otro pedazo de arcilla que aplané y corté en rectángulos (imagen 19 y 20) añadí otros detalles a la caja, en este caso unos ladrillos como podemos ver en la imagen 21. También añadí en otras caras de la caja.
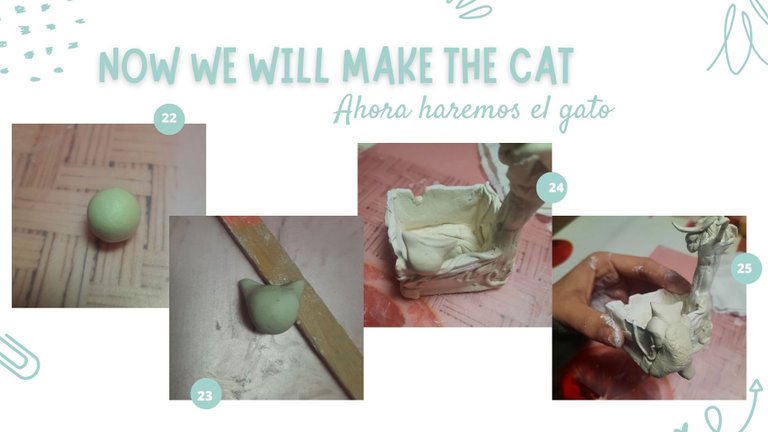
In image 22 I started to create the kitten's head from a ball of clay and in step number 23 I added two ears. I placed the head on the edge of the back wall of the box (image 24). Then I added the front paws and finally the body that already had the back legs. (Image 25)
En la imagen 22 empecé a crear la cabeza del gatito a partir de una bola de arcilla y en el paso número 23 añadí dos orejas. Coloqué la cabeza el borde de la pared trasera de la caja (imagen 24). Después añadí las patas delanteras y por último el cuerpo que ya tenía las patas traseras. (Imagen 25)
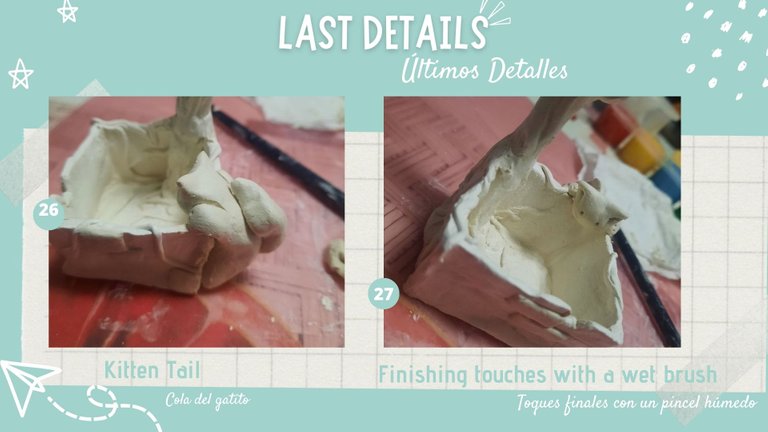
Finally I added the tail and to join it to the body I scraped both pieces and wet them. I went over the figure with the wet brush, made two eyes with one of the ultra-fine tip clay tools and the kitten was like this, looking inside the box (Images 26 and 27).
Por último añadí una colita y para unirla al cuerpo raspé ambas piezas y las mojé. Repasé la figura con el pincel mojado, hice dos ojitos con una de las herramientas de arcilla de punta ultrafina y el gatito quedó así, mirando al interior de la caja. (Imágenes 26 y 27)

Wait 24 to 48 hours for the clay to dry.
Debemos esperar a que seque de 24 a 48 horas.
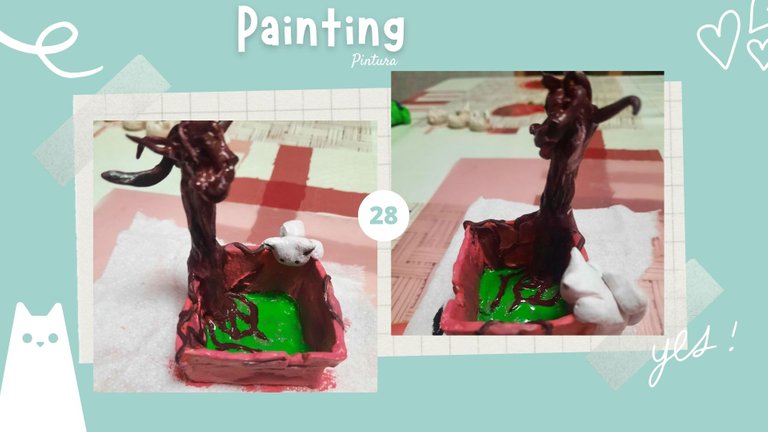
Finally it was time to paint, I used the white color for the cat and with the eyeliner I marked the eyes and ears. I painted the box pink except for the inside bottom, which I painted green. In dark carmelite I painted the tree and with black and a wet brush I retouched the trunk and the bricks of the box (Image 28).
Finalmente llegó el momento de pintar, utilicé el color blanco para el gato y con el delineador marqué los ojos y las orejas. Pinté la caja en rosa excepto el fondo interior que lo hice en verde. En carmelita oscuro pinté el árbol y con negro y un pincel húmedo retoqué el tronco y los ladrillos de la caja. (Imagen 28)
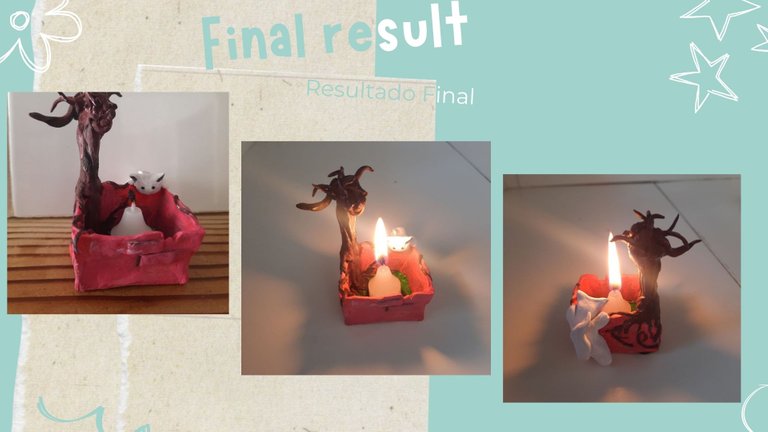
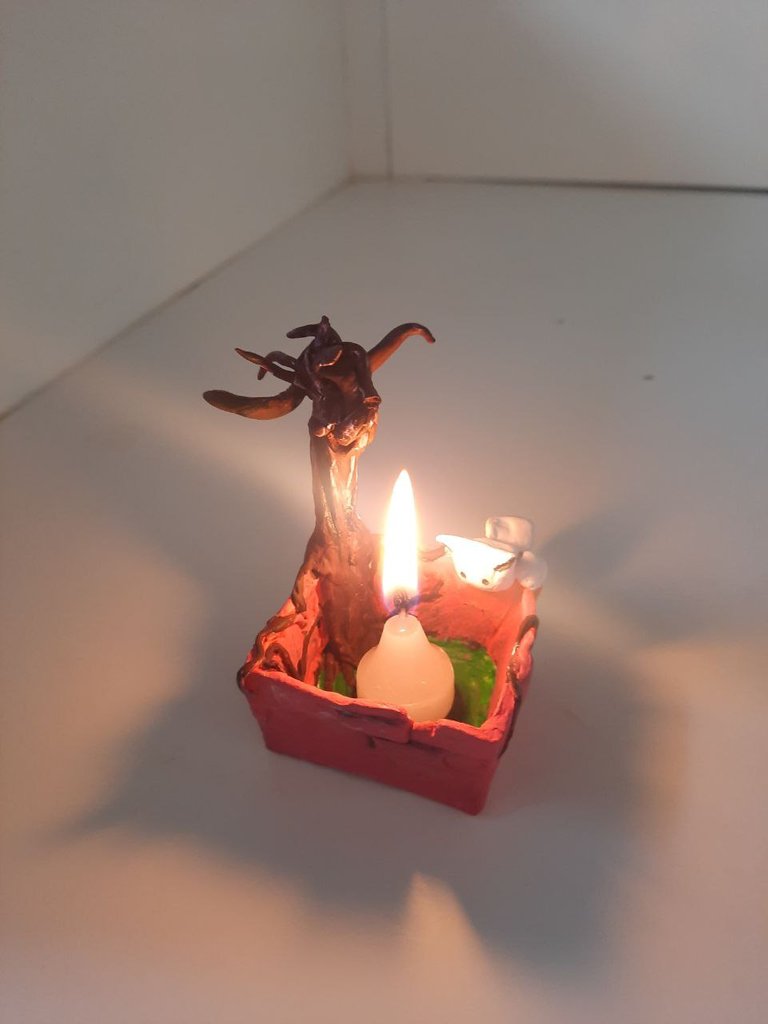
This is the final result with the candle inside. I hope you liked it and that it will inspire you to create your own things with clay.
Este es el resultado final con la vela dentro. Espero que les haya gustado y les sirva de inspiración para crear sus propias cositas de arcilla.