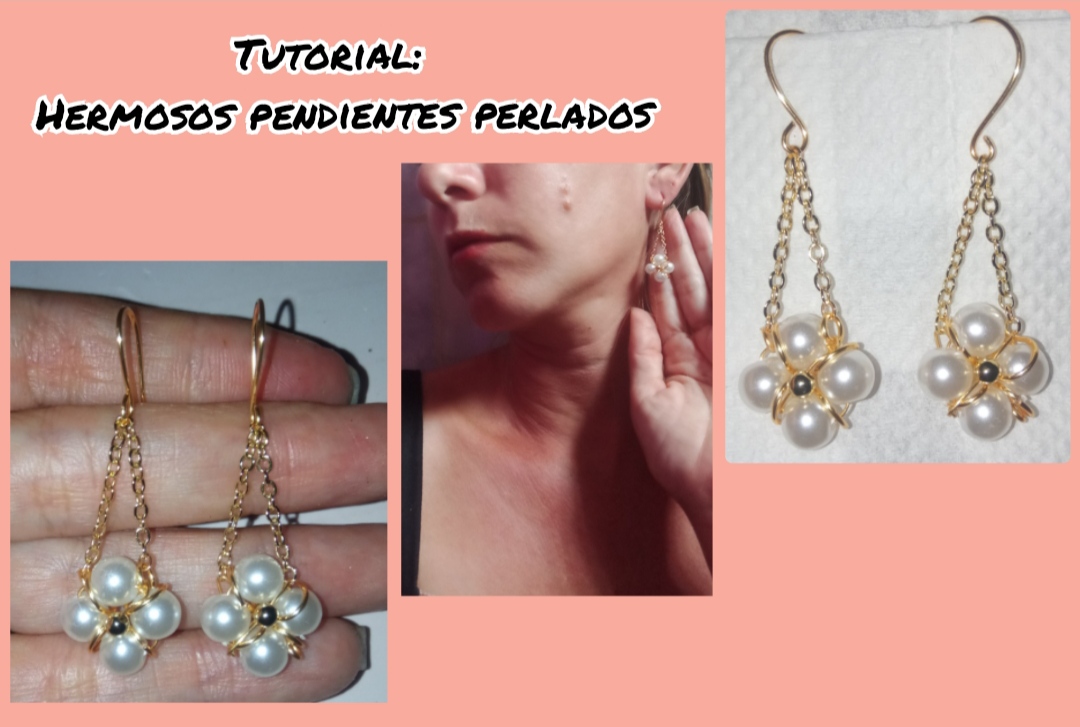
feliz y bendecido día tengan todos ustedes mis queridos y apreciados amigos, es un placer para mí visitar esta creativa comunidad el dia de hoy para compartir con todos ustedes mi última creación, unos hermosos y elegantes zarcillos largos ideales para lucir en cualquier ocasiones. Se trata de un diseño muy elegante, largo Pero poco pesado y súper cómodos, este es un diseño muy fácil y sencillo de elaborar y para todos ustedes quise elaborar este sencillo tutorial.
Happy and blessed day to all of you my dear and appreciated friends, it is a pleasure for me to visit this creative community today to share with all of you my latest creation, beautiful and elegant long tendrils ideal to wear on any occasion . It is a very elegant design, long but not heavy and super comfortable, this is a very easy and simple design to make and for all of you I wanted to make this simple tutorial.
And now I would like to invite you to join me in this tutorial and together create and obtain this beautiful design.
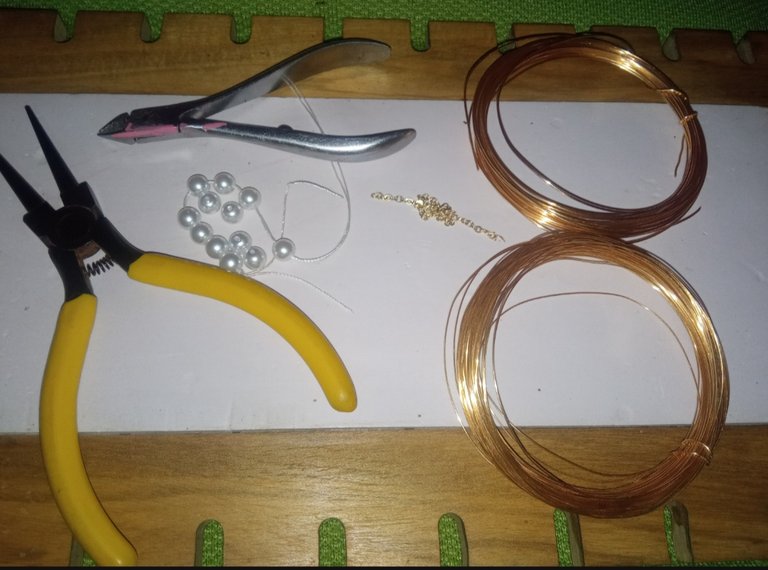
- alambre de bisutería calibre 20.
- alambre de bisutería calibre 26.
- piedras perladas.
- balines dorados pequeños.
- cadenita de bisutería.
- pinza de bisutería.
- 20 gauge jewelry wire.
- 26 gauge jewelry wire.
- pearl stones.
- small golden pellets.
- jewelry chain.
- jewelry clamp.
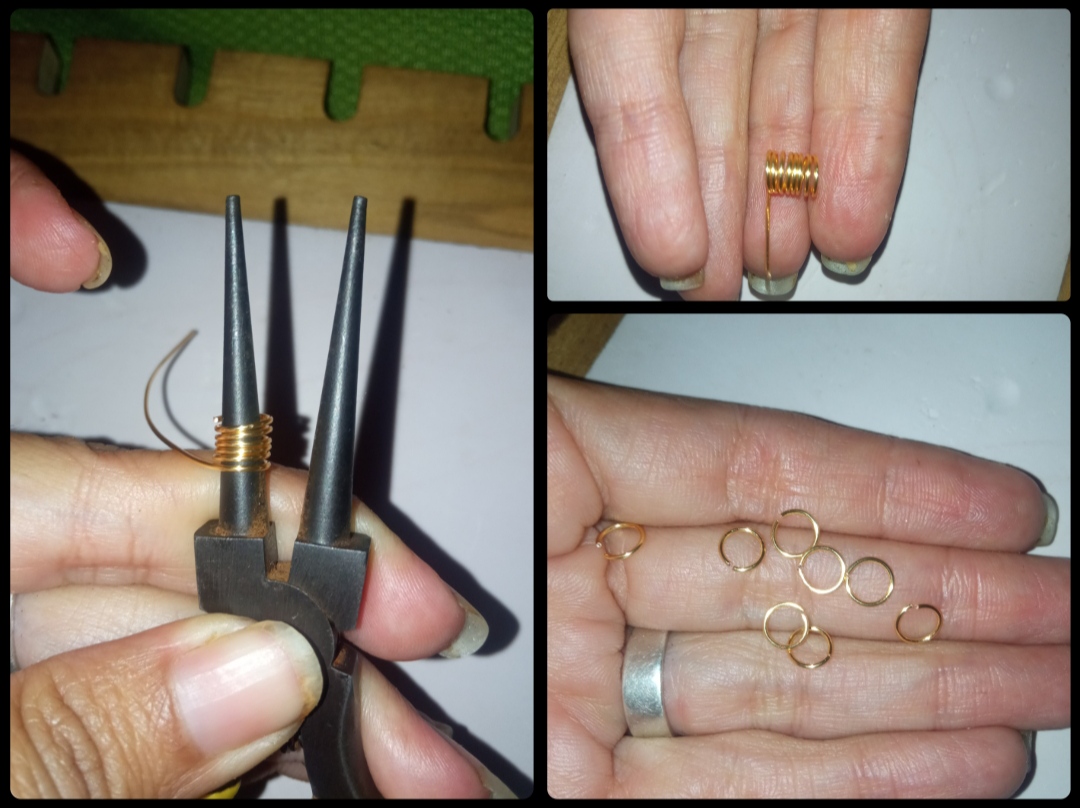
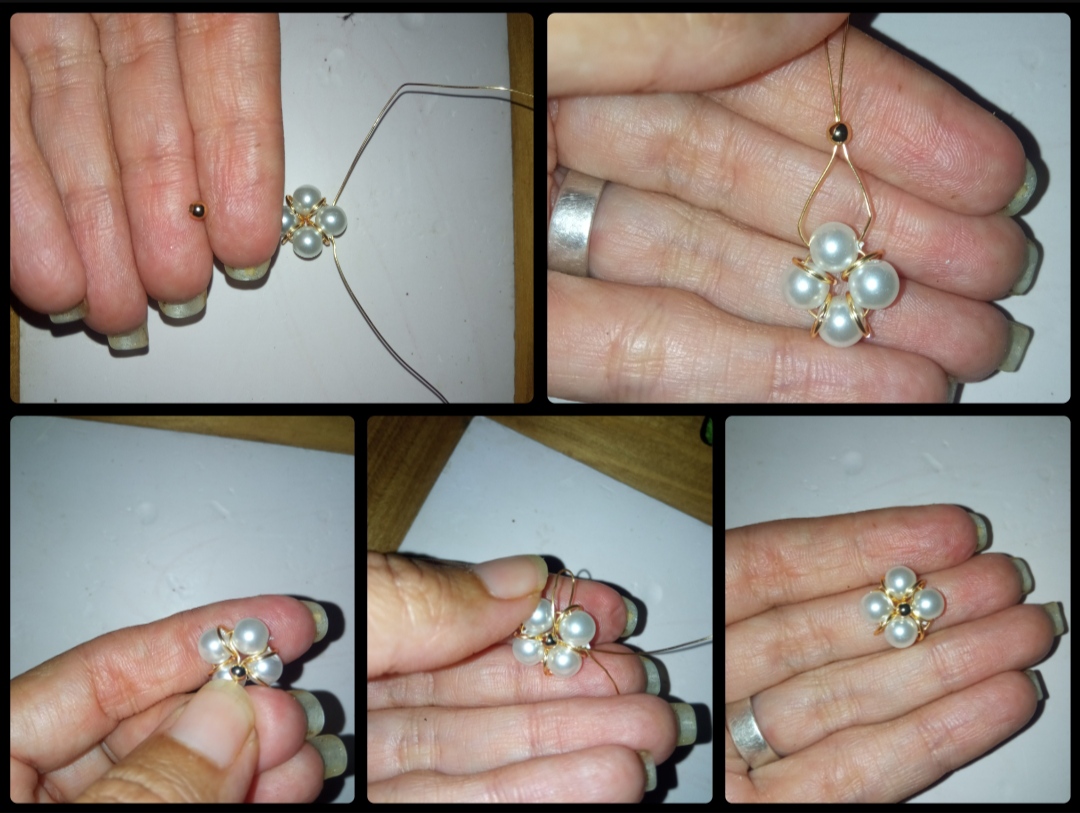
⭐ Paso 1: para iniciar la elaboración de este hermoso diseño lo primero que debemos hacer es tomar el alambre de bisutería calibre 20 y apoyándonos en la punta de la pinza de bisutería, enrollaremos el alambre realizando 8 vueltas y luego cortaremos el exceso de alambre y sacaremos el alambre de la pinza y como verán nos quedara una pequeña forma de resorte, con ayuda de ina pinza para cortar con mucho cuidado comenzaremos a picar cada vuelta del alambre y así obtendremos las 8 pequeñas Argollitas circulares.
⭐ Step 1: to start making this beautiful design, the first thing we must do is take the 20-gauge jewelry wire and, leaning on the tip of the jewelry pliers, we will wind the wire making 8 turns and then we will cut the excess of wire and we will remove the wire from the clamp and as you will see we will have a small spring shape, with the help of a clamp to cut very carefully we will begin to chop each turn of the wire and thus we will obtain the 8 small circular rings.
⭐ Paso 2: para continuar tomaremos un pedazo de 15cm de alambre de bisutería calibre 26 y comenzaremos a introducir la pedrería, introduciremos una piedra perlada, una argollita circular de las elaboradas en el paso anterior, continuamos introduciendo una segunda piedra y otra argolla y así hasta tener 4 piedras y 4 argollas. Ahora introduciremos uno de los extremos del alambre por la última piedra del otro extremo, como pueden observar en las imágenes, así cruzaremos el alambre y al jalar ambas puntas formaremos la forma deseada.
⭐ Step 2: to continue we will take a 15cm piece of 26 gauge jewelry wire and we will begin to introduce the rhinestones, we will introduce a pearl stone, a circular ring made in the previous step, we continue introducing a second stone and another ring and so on until you have 4 stones and 4 rings. Now we will insert one of the ends of the wire through the last stone at the other end, as you can see in the images, this way we will cross the wire and by pulling both ends we will form the desired shape.
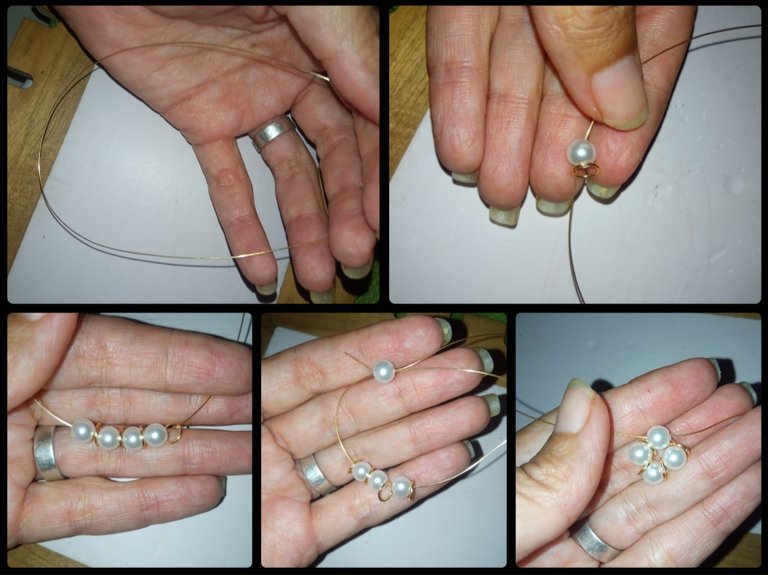
⭐ Paso 3: seguidamente uniremos las dos piezas o extremos de alambre en la parte superior y por ambas introducimos un pequeño balín dorado bajando lo para pegarlo de la última piedra perlada, sin embargo está no quedará allí, pues hablaremos el alambre y llevaremos el balín al centro de nuestra elaboración tipo flor. Y separando las puntas del alambre los bajamos e introducimos nuevamente por la piedra perlada de la parte posterior y apretando bien cortamos los excesos de alambre.
⭐ Step 3: next we will join the two pieces or ends of wire at the top and through both we introduce a small golden ball, lowering it to glue it to the last pearl stone, however it will not remain there, as we will remove the wire and We will take the pellet to the center of our flower-type elaboration. And separating the ends of the wire, we lower them and insert them again through the pearl stone at the back and, pressing well, we cut off the excess wire.
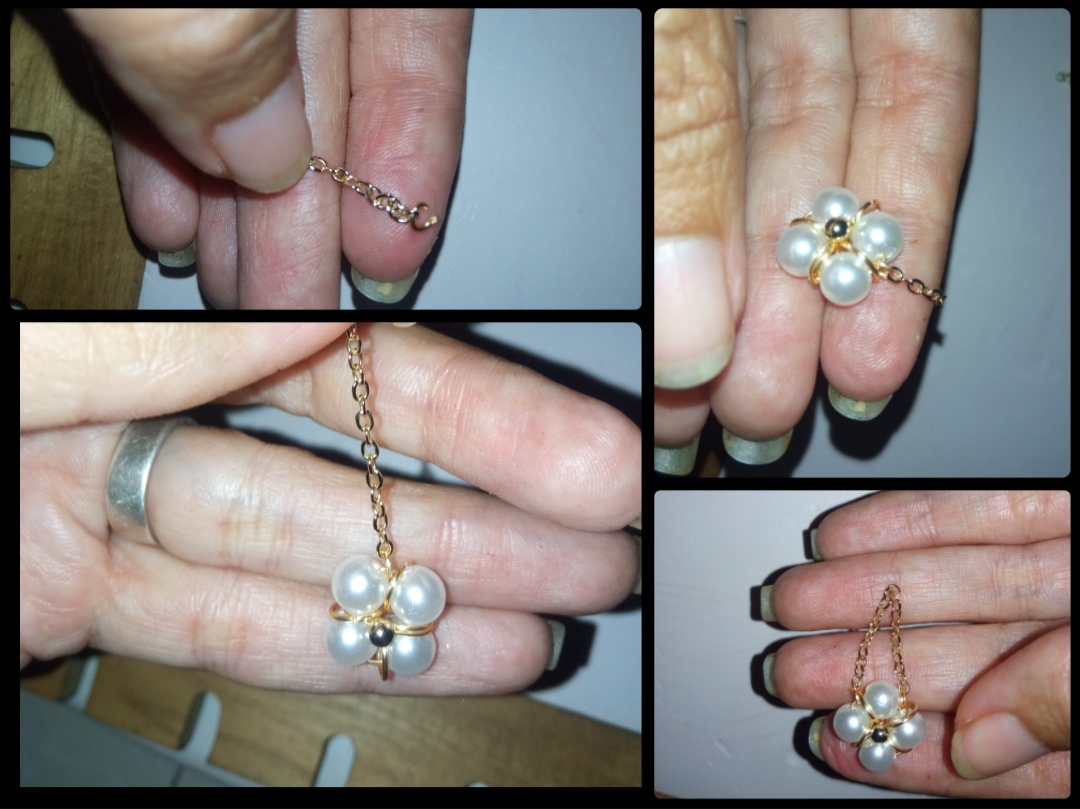
⭐ Paso 4: luego tomaremos la pinza nuevamente y con el alambre calibre 20 elaboraemos 4 formar circulares o argollas Pero de un tamaño menor a las que elaboramos anteriormente. Una vez tengamos las argollas tomaremos la cadena de bisutería y cortaremos dos pedazos del mismo tamaño, de este dependerá el largo de nuestro zarcillos, así tomaremos la primera pieza de cadena y le engancharemos en su parte inicial una de las pequeñas Argollitas elaboradas y esta argollita la uniremos a la flor de pedrería enganchando la pequeña argollita en la separación de dos de las piedras perladas y cerraremos bien la argolla para evitar sé desarme la elaboracion, de la misma manera en el otro extremo de esta cadenita colocaremos otra de las argollitas pequeñas y la engancharemos en la flor dejando una piedra perlada de separación y nos quedará de la siguiente manera.
⭐ Step 4: then we will take the clamp again and with the 20 gauge wire we will make 4 circular shapes or rings, but smaller in size than the ones we made previously. Once we have the rings, we will take the jewelry chain and cut two pieces of the same size. The length of our earrings will depend on this. Thus, we will take the first piece of chain and hook on its initial part one of the small elaborate Little Rings and this little ring. We will attach it to the rhinestone flower by hooking the small ring in the separation of two of the pearl stones and we will close the ring well to avoid disassembling the workmanship.
In the same way, at the other end of this chain we will place another of the small rings and We will hook it to the flower by inserting a pearly separating stone and it will look like this.

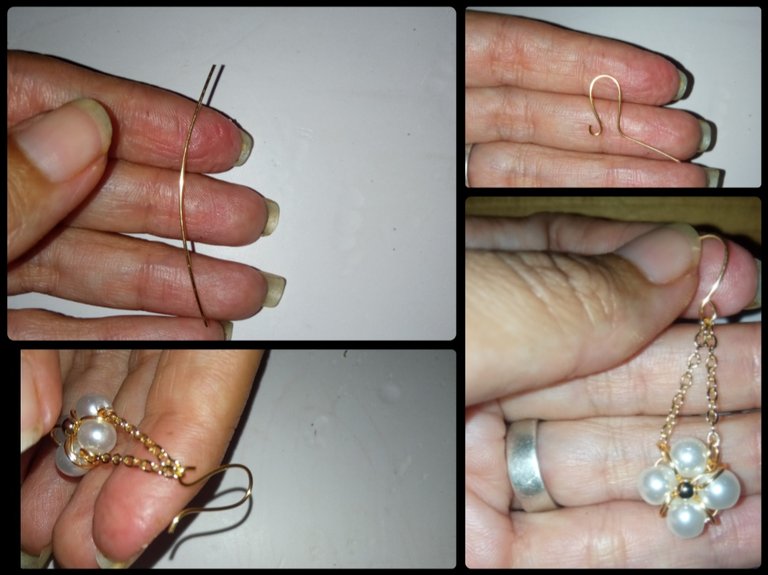
⭐ Paso 5: para finalizar con 5cm de alambre de bisutería calibre 20 y ayuda de la pinza moldearemos y daremos forma a nuestro anzuelo para zarcillos el cual colocaremos o engancharemos en la parte media de la cadenita que colocamos a nuestro zarcillos y así habremos elaborado nuestra primera pieza.
⭐ Step 5: to finish with 5cm of 20 gauge jewelry wire and the help of the tweezers we will mold and shape our earring hook which we will place or hook in the middle part of the chain that we place on our earring and so on. We will have made our first piece.
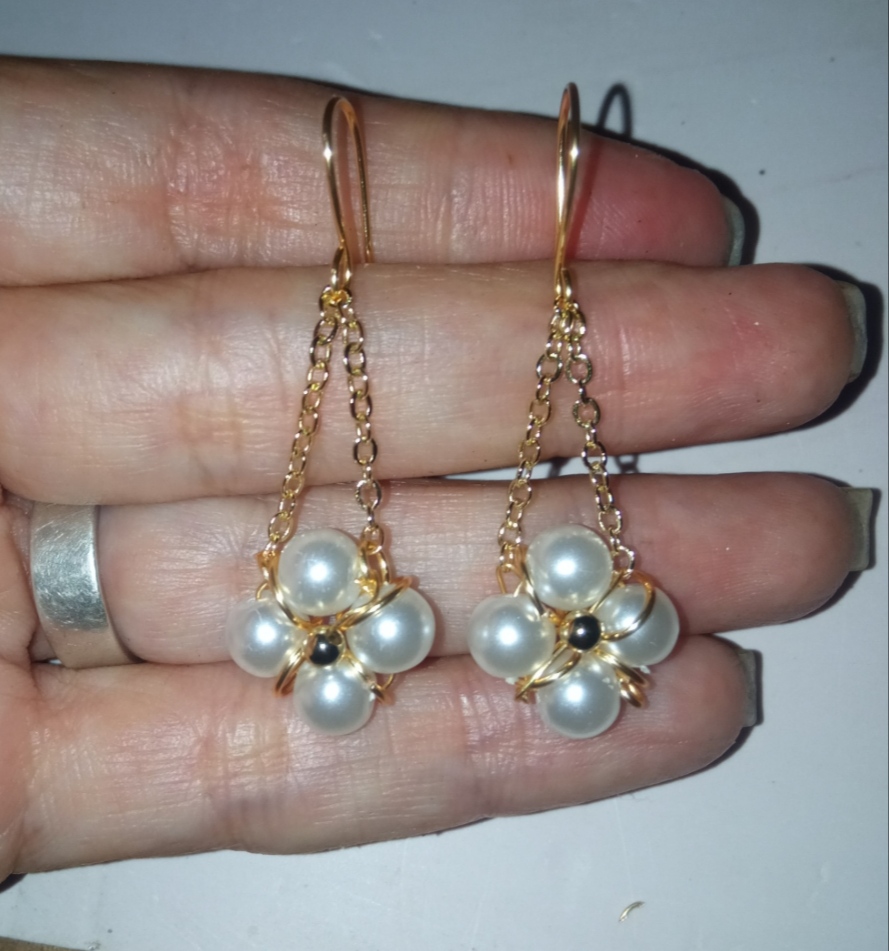
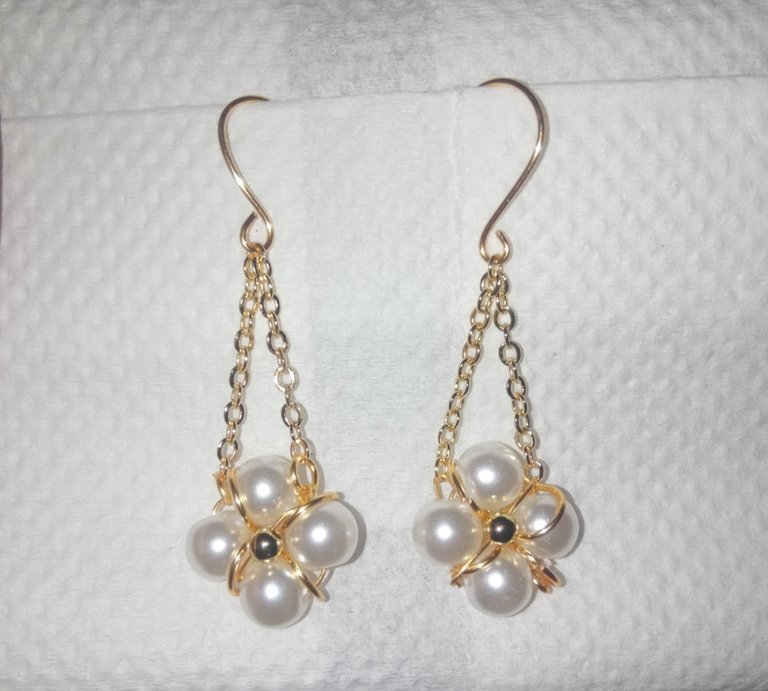
Todas las Fotos son de mi autoría y fueron tomadas con mi Celular Redmi 9.And so in this very simple way we will achieve the creation of a very beautiful pair of beautiful and elegant earrings, my dear and appreciated friends. I hope that this beautiful creation is to the liking of all of you, I say goodbye very grateful for your visit. Greetings and blessings.
All Photos are my authorship and were taken with my Redmi 9 Cellphone


