ESPAÑOL
Hola comunidad:
Estoy feliz de poder estar acá celebrando el primer aniversario de la creación de este bello proyecto donde tenemos el espacio para echar a volar la imaginación y llevarlas a cabo con nuestras propias manos.
Coincidentemente con el cumpleaños de esta comunidad fue el cumpleaños número uno de mi bebé (cinco días después). Es un oportunidad excelente para aprovechar y homenajear ambos cumpleaños.
Con todo mi amor por mi beba y con muchísimo placer de hacer un regalo especial a la comunidad, hago entrega de un conjunto de accesorios que creé a partir de elementos reciclados.
¡Tengo unos pomos plásticos vacíos y no voy a dudar en usarlos! 😂
Reciclar es una de mis grandes pasiones, así que es hora de un aporte más para salvar nuestro planeta y ¿!qué mejor manera que convertirlo en arte y compartirlo con ustedes!?
A continuación les muestro la realización en un paso a paso.
Primero vamos a asegurarnos de tener a mano todo lo necesario:
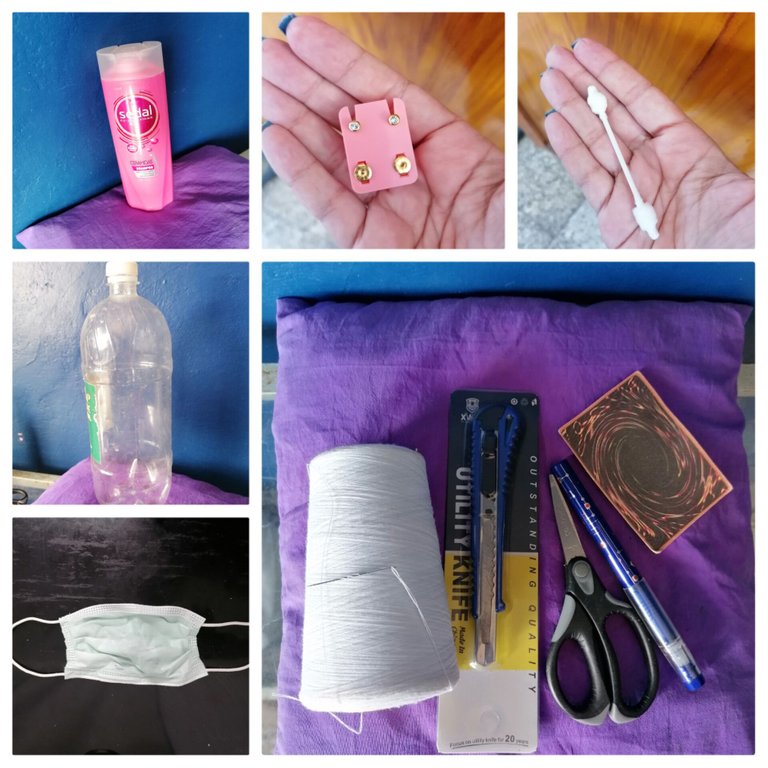
Materiales y herramientas
- Pomo de shampú vacío (pequeño y estrecho)
- Pomo de plástico (pet) vacío
- Cotones de algodón para bebé
- Aretes antialérgicos o cualquier otro tipo
- Nasobuco desechable
- Hilo para coser
- Aguja para coser a mano
- Cutter
- Tijeras
- Cartón o cartulina
- Bolígrafo
Ahora sí podemos comenzar a materializar las ideas:
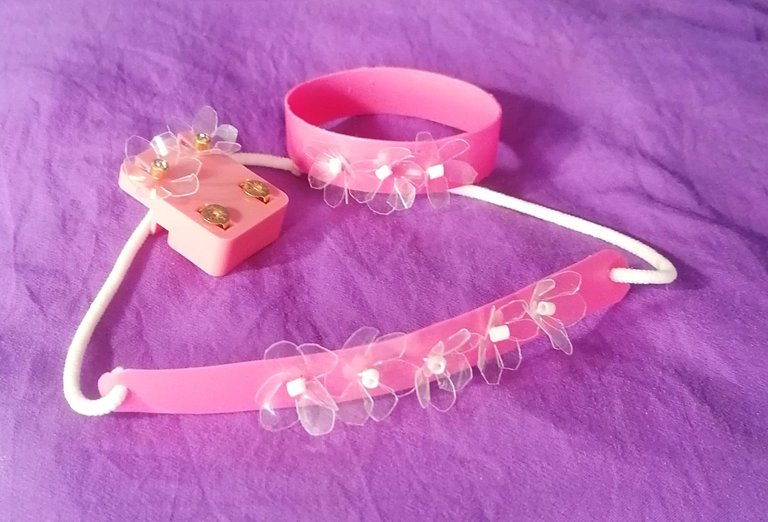
Se me ocurrió formar un juego para la bebé donde pudiera combinar estos materiales y surgió entonces una pulsera, una diedema, y aretes con accesorios.
Proceso:
Lo primero que realicé fueron los aditamentos que adornarán los accesorios. En este caso escogí flores y las realicé con el material del pet y de los cotones.
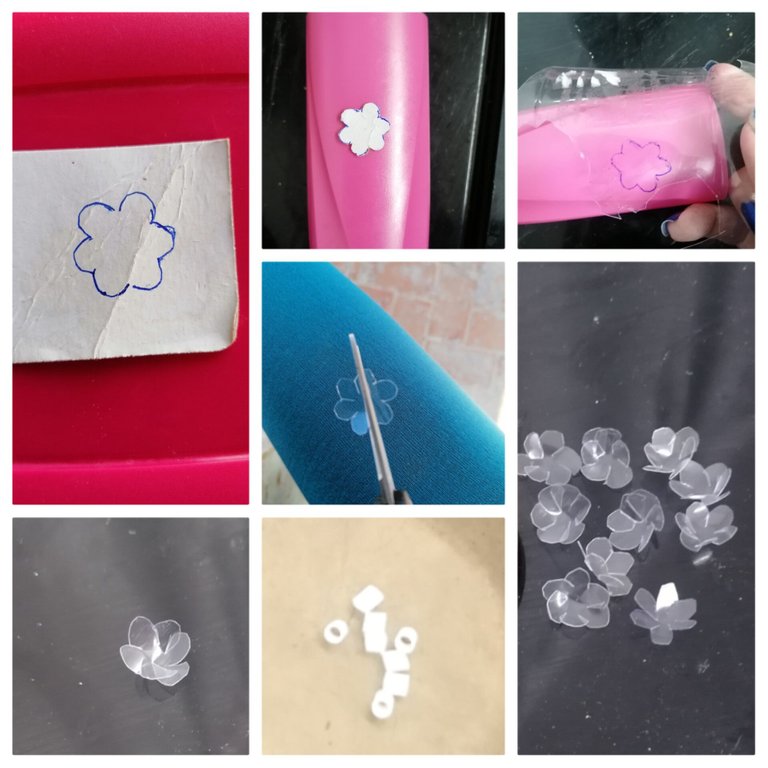
Sobre el cartón dibujé una flor de seis pétalos que sirvió como molde para luego marcar sobre el plástico del pet. Luego profundicé los cortes hacia el centro para lograr movilidad en los pétalos y los doblé hacia adentro para dar efecto de 3D a la flor (fueron diez ejemplares). Con los cotones de algodón logré hacer el centro de la flor. Luego de retirar las puntas con el algodón, corté los bastones a una longitud aproximada de 3 milímetros.
Pulsera
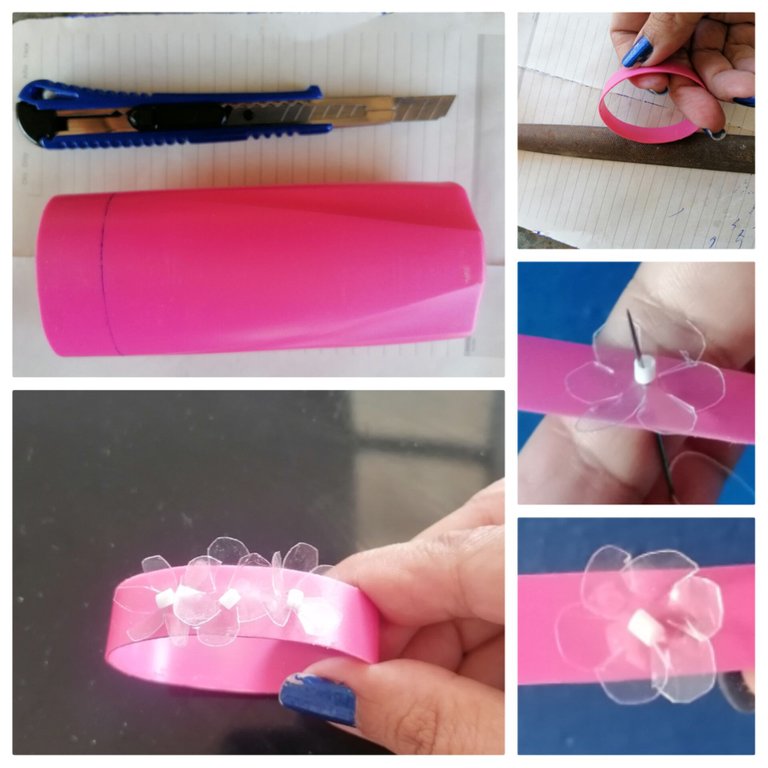
Para la confección de la pulsera tomé el envase de shampú y corté una sección transversal del frasco de aproximadamente 1.5 centímetros de ancho. Luego con aguja e hilo fijé tres flores con sus centros una al lado de la otra.
Diadema
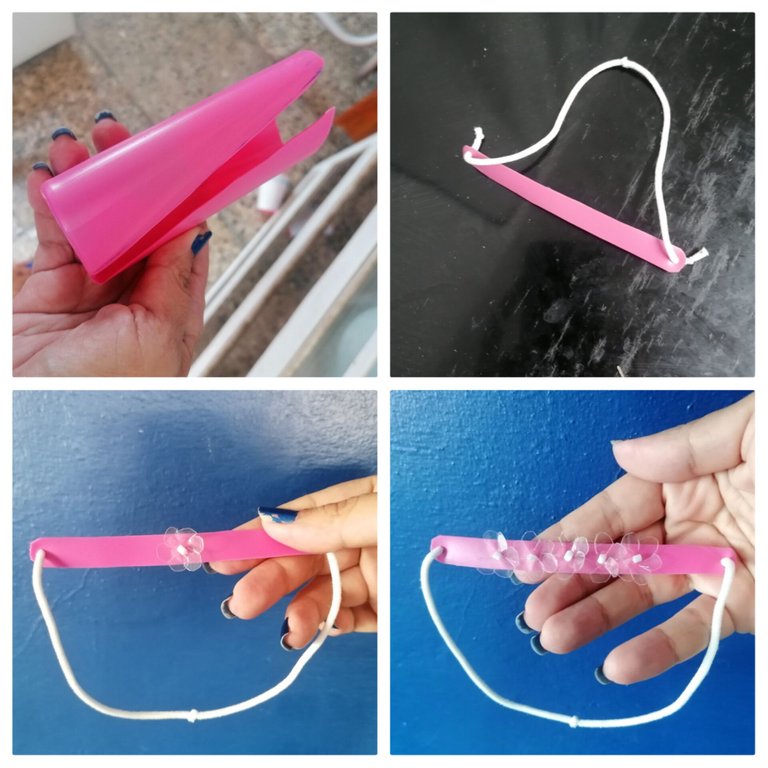
Una sección longitudinal de aproximadamente 1.5 centímetros de ancho y todo el largo posible que pude aprovechar me sirvió para hacer una sección de cintillo. Los elásticos de los nasobucos los utilicé para cerrar el cintillo, atándolos a los extremos. Para terminar coloqué cinco de las flores, dispuestas una al lado de otra.
Aretes
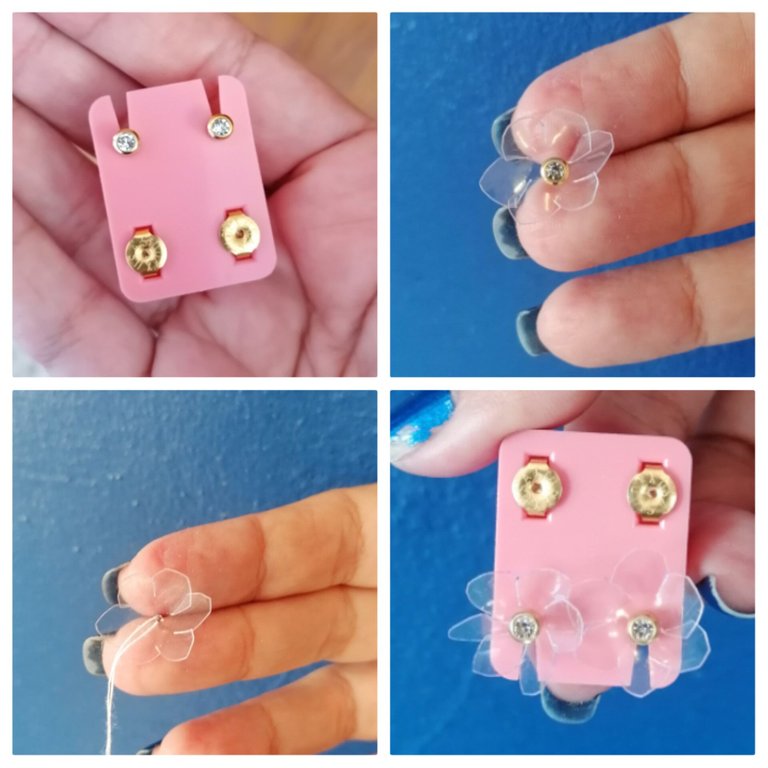
Tomando los aretes de la beba, solamente hice un agujero con la aguja en el centro de la flor e hice pasar el arte a través de él, de manera que pueda ponerle la flor o no según desee.
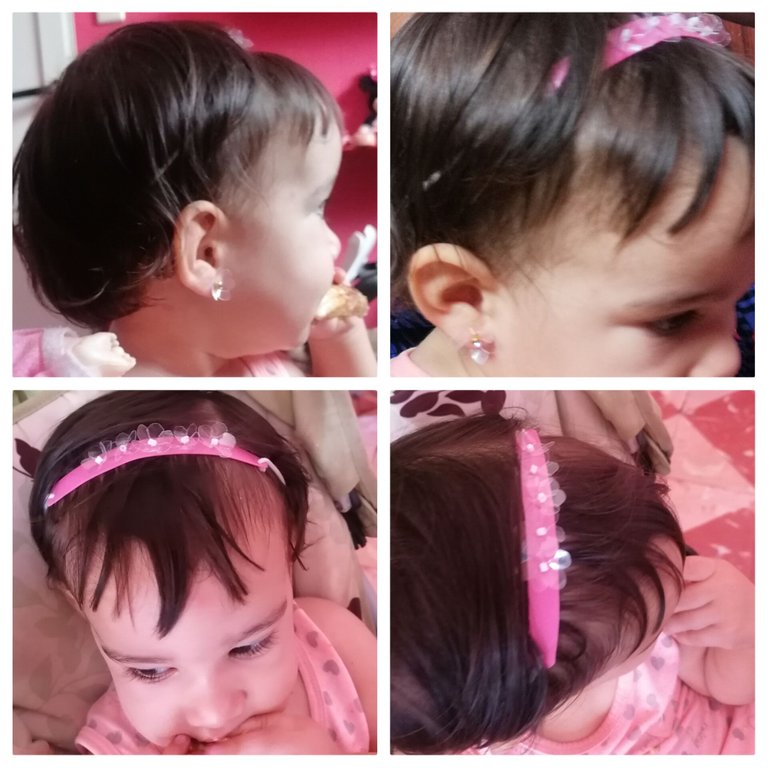
Terminados los tres elementos, ya están listos para ser probados en la persona que inspiró su diseño. Así que una probadita y una pequeña muestra fotográfica de la modelo cumpleañera les traigo aquí:
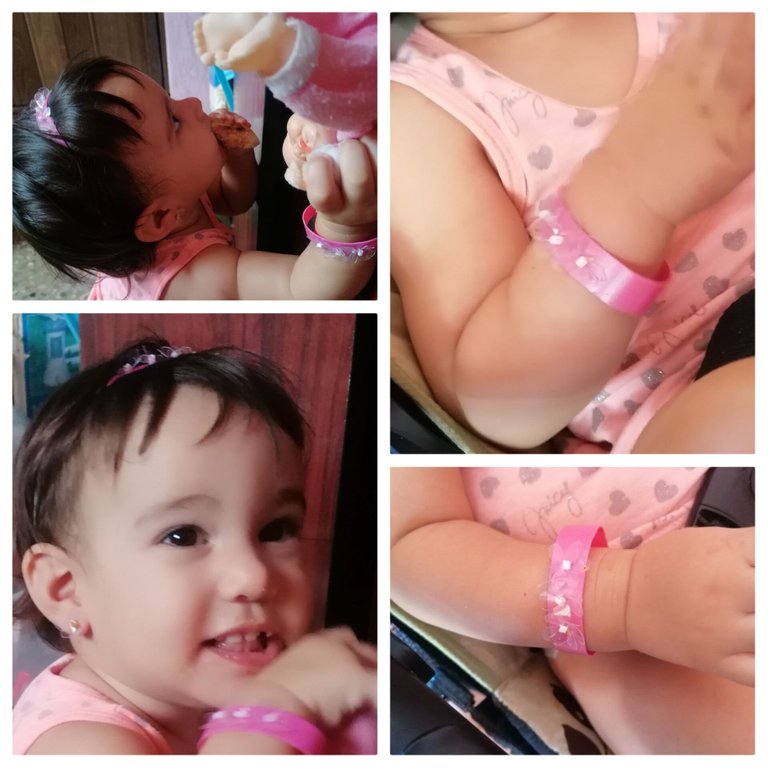
Deseo les haya gustado mi regalo en esta ocasión. Por mi parte, les cuento que disfruté de este proceso y tenía a mi familia entera intrigada con lo que saldría de los materiales que había escogido para trabajar. A ellos les gustó y a la bebé parece que también.
Espero leer comentarios para conocer si les pareció atractivo o no mi propuesta. Muchas gracias por su tiempo de lectura.
ENGLISH
Hello community:
I am happy to be here celebrating the first anniversary of the creation of this beautiful project where we have the space to let our imaginations run wild and bring them to fruition with our own hands.
Coincidentally with this community's birthday was my baby's first birthday (five days later). It is an excellent opportunity to celebrate both birthdays.
With all my love for my baby and with great pleasure to give a special gift to the community, I am giving away a set of accessories that I created from recycled items.
I have some empty plastic knobs and I won't hesitate to use them! 😂
Recycling is one of my great passions, so it's time for one more contribution to save our planet and what better way than turning it into art and sharing it with you?
Below I show you how to do it step by step.
First let's make sure we have everything we need at hand:

Materials and tools
- Empty shampoo knob (small and narrow)
- Empty plastic (pet) knob
- Baby cotton tights
- Anti-allergic earrings or other earrings
- Disposable nasobuco
- Sewing thread
- Needle for hand sewing
- Cutter
- Scissors
- Cardboard or cardboard
- Biros
Now we can start to materialise the ideas:
It occurred to me to form a set for the baby where I could combine these materials and a bracelet, a dihedema, and earrings with accessories then emerged.
Process:
The first thing I made were the attachments that would adorn the accessories. In this case I chose flowers and made them with the material of the pet and the cotons.

On the cardboard I drew a flower with six petals that served as a mould to mark on the plastic of the pet. Then I deepened the cuts towards the centre to achieve mobility in the petals and folded them inwards to give a 3D effect to the flower (there were ten copies). With the cotton cotton cotons I managed to make the centre of the flower. After removing the tips with the cotton, I cut the canes to a length of approximately 3 millimetres.
Bracelet

To make the bracelet I took the shampoo bottle and cut a cross section of the bottle about 1.5 centimetres wide. Then with needle and thread I attached three flowers with their centres next to each other.
Headband

A longitudinal section about 1.5 centimetres wide and as long as possible that I could use was used to make a headband section. I used the elastics of the nasobuckles to close the headband, tying them to the ends. To finish I placed five of the flowers, arranged side by side.
Earrings

Taking the baby's earrings, I just made a needle hole in the centre of the flower and threaded the artwork through it, so that you can put the flower on or off as you wish.

All three elements finished, they are now ready to be tested on the person who inspired their design. So a little taste and a small photographic sample of the birthday model I bring you here:


I hope you liked my gift on this occasion. For my part, I enjoyed this process and had my whole family intrigued with what would come out of the materials I had chosen to work with. They liked it and the baby seemed to like it too.
I look forward to reading comments to see if you found my proposal appealing or not. Thank you very much for your time reading.

Texto propio, traducido al inglés mediante DeepL.
Imágenes propias, editadas en InShot desde mi teléfono HUAWEI P30 LITE.
Own text, translated into English by DeepL.
Own images, edited in InShot from my HUAWEI P30 LITE phone.
Twitter: @ylaffittep
Facebook: @ylaffittep


