There are colors that although they are not our favorites, they surprise us, as it happened with the green of this set of accessories that we are working in parts and that today we will continue with the earrings.

Happy weekend creative people of #jewelry, I hope you are feeling great. Today we will continue working on our emerald green set that we started last week. In this opportunity I bring you the step by step of the earrings and in case you haven't visited my blog I leave you the link where you can see the elaboration of the bracelet.
As I said at the beginning, there are colors that even if they are not our favorite ones, they end up calling our attention. Something that happened to me with these green pieces that I had at home and that immediately "clicked " with me.
Each piece is composed of different shades of green, different shapes and materials as you can see in the image of the complete set, and that I think is the characteristic that makes it so special.
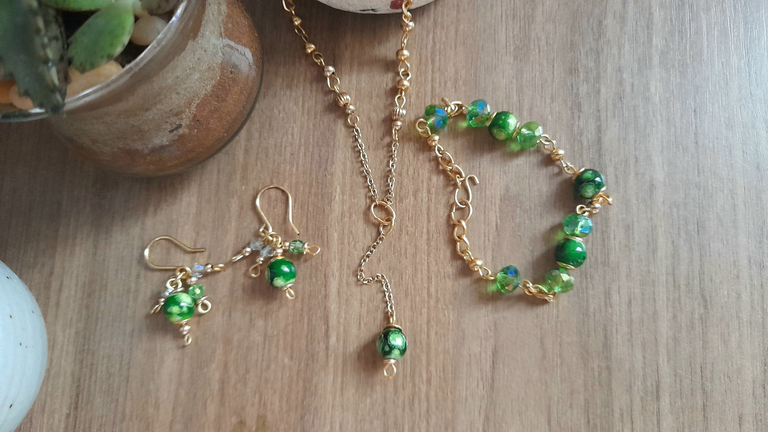

If you look closely at each piece, each one has different details. For example, in the bracelet we use dark green ball bearings, crystals and beads with a kind of design. And actually those dark green round beads are my favorite.
We also used chains, smaller swarosky crystals and a much lighter shade of green as well as white. And it's definitely the kind of thing that defines me, since I don't like things that are simple or the same as others, I always like to give them a little touch and even if they are small pieces I like that they have different things to look at.
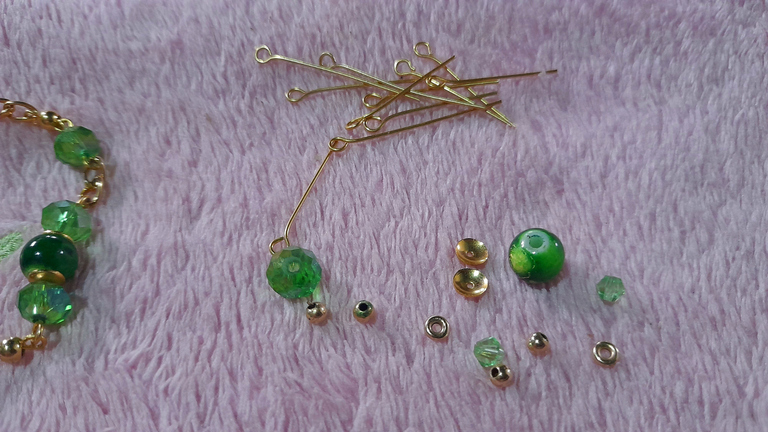
And without further ado, here are the materials we will need to make the second element of the set.

Dark green beads
Green and white swarosky crystals
Small golden pellets
Caps
Golden wire
Hook for earrings
Pliers
And round pliers

As always, before starting, we will organize all the working material we will use.

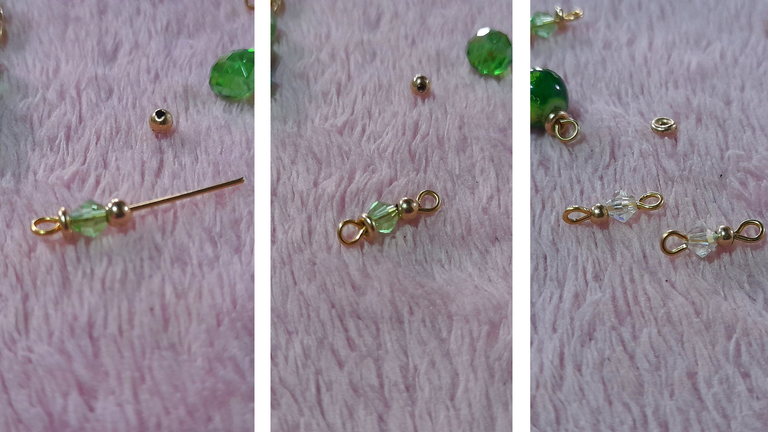
We will start by assembling three small crystals. Two white and one green. In addition to the crystals, we will need golden balls and wire.
We take a 3cm piece of wire, close one of the ends with the round pliers and insert a cap, a crystal and a ball. We cut the excess wire and close it.
We will assemble two green crystals and four white ones, in the same way.

We continue with the round beads of intense green color, which we will assemble by passing through the wire with one of its ends already closed, a cap, then the green bead, again a cap and a ball. We proceed to trim the excess and close.
From this piece we will make two.
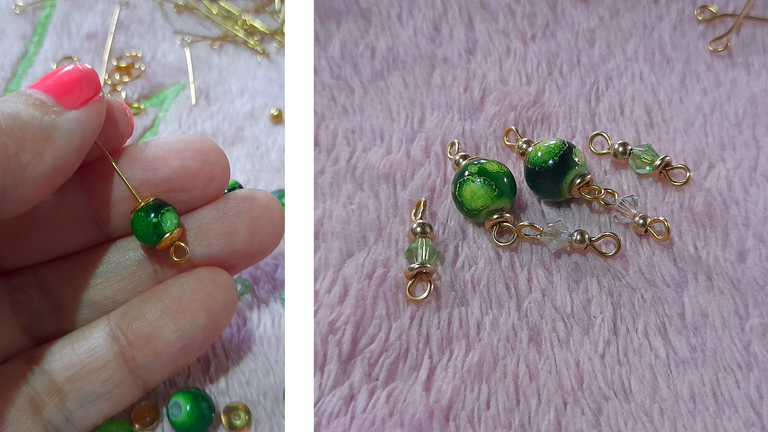

Next, we will proceed to assemble the earring, for which we need a gold-colored hook to which we will insert one of the intense green pieces, two white crystals, one green one and a small ring.
We insert all the pieces in the ring and finally we join it to the hook. We repeat the procedure with the remaining pieces and we have our earrings ready to complement our green set.
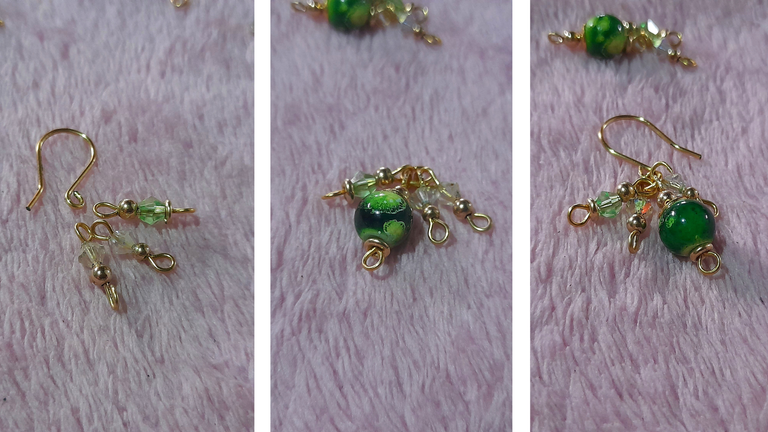

I must say that I loved the earrings because as I told you I like things to be a little out of the ordinary and adding more movements with the three crystals was an idea that I definitely loved.
I hope you can encourage yourselves at home to create your own accessories, and if you are reading this, you are in the right place!
For my part I'll say goodbye for today. In my next visit to the community I will be showing you the necklace with which we will finish the tutorial of our elegant set. Kisses and blessings guys!

Hay colores que aunque no son nuestros favoritos, nos sorprenden, así como sucedió con el verde de éste set de accesorios que estamos trabajando por partes y que el día de hoy continuaremos con los aretes.

Feliz fin de semana gente creativa de #jewelry, espero se encuentren súper bien. El día de hoy continuaremos trabajando en nuestro set verde esmeralda que iniciamos la semana pasada. En ésta oportunidad les traigo el paso a paso de los zarcillos y por si no se han dado una vuelta por mi blog les dejo el enlace donde pueden ver la elaboración del brazalete.
Como les dije al inicio, hay colores que aunque no son nuestros favoritos terminan llamando nuestra atención. Cosa que me sucedió con éstas piezas verdes que tenía en casa y que de inmediato hicieron "clic" conmigo.
Cada pieza está compuesta por diferentes tonos de verde, diferentes formas y materiales como pueden ver en la imágen del set completo, y ésa creo que es la característica que lo hace tan especial.


Si miran con detenimiento cada pieza, cada una tiene detalles diferentes. Por ejemplo en el brazalete utilizamos balines, cristales y cuentas verde oscuro con una especie de diseño. Y de hecho esas cuentas redondas verde oscuro son mis favoritas.
También utilizamos cadenas, cristales de swarosky más pequeños y de un tono de verde mucho más claro además de blancos. Y definitivamente es el tipo de cosas que me definen, ya que no me gustan las cosas simples o iguales a las demás, siempre me gusta darles un toquecito y aunque se trate de piezas pequeñas me gusta que a la vista tengan distintas cosas en las que detenerse a observar.
Y sin más, paso a dejarles los materiales que necesitaremos para realizar el segundo elemento del set.

Cuentas verde oscuro
Cristales de swarosky verde y blancos
Balines dorados pequeños
Tapitas
Alambre dorado
Anzuelo para los aretes
Tenaza
Y pinza redonda

Como siempre, antes de iniciar organizaremos todo el material de trabajo que utilizaremos.


Comenzaremos armando tres cristales pequeños. Dos blancos y uno verde. Para lo que necesitaremos además de los cristales, balines dorados y alambre.
Tomamos una pieza de 3cm de alambre, cerramos uno de los extremos con la pinza redonda e introducimos una tapita, un cristal y un balin. Recortamos el excedente de alambre y cerramos.
Armaremos dos cristales verdes y cuatro blancos, de la misma manera.


Continuamos con las cuentas redondas de color verde intenso, las que armaremos haciendo pasar por el alambre con uno de sus extremos ya cerrados, una tapita, luego la cuenta verde, nuevamente una tapitay un balin. Procedemos a recortar el excedente y cerramos.
De ésta pieza elaboraremos dos.


Seguidamente, procederemos al armado del arete, para lo que necesitamos un anzuelo de color dorado al que insertaremos en el extremo correspondiente una de las piezas verde intenso, dos cristales blancos, uno verde y una argolla pequeña.
Introducimos todas las piezas en la argolla y finalmente la unimos al anzuelo. Repetimos el procedimiento con las piezas restantes y ya tenemos listos nuestros aretes que vienen a ser complementar nuestro set verde.


Debo decir que yo amé los aretes porque como les comenté me gusta que las cosas se salgan un poco de lo común y agregarles más movimientos con los tres cristales fue una idea que en definitiva me encantó.
Espero puedan animarse en casa a crear sus propios accesorios, y si me estás leyendo éstas en el lugar indicado para ello!
Por mi parte me despido por hoy. En mi próximo paso por la comunidad les estaré mostrando el collar con el que daremos por culminado el tutorial de nuestro elegante set. Besitos y bendiciones chicos!

Photography by|Fotografía por:
@rlathulerie, Samsung Galaxy M12
Cover created in | Portada Creada en Canva
Edtion by| Edición por:
@rlathulerie on Canva
Dividers created in| Separadores creados en Canva
Translated with www.DeepL.com/Translator (free version)
