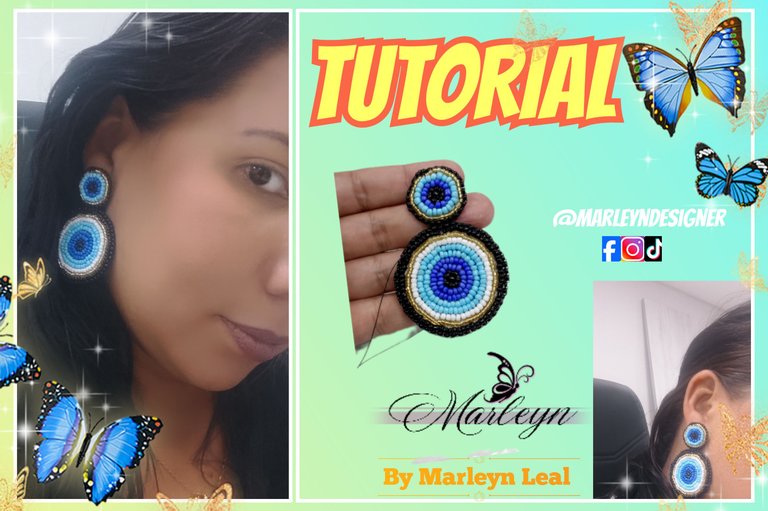


Feliz y bendecido día, espero se encuentren muy bien, llenos de buena energía, brillando, creciendo y sobre todo siendo cada día su mejor versión, el día de hoy les he realizado unos zarcillos bordados es un proyecto artesanal hermoso que permite expresar creatividad y estilo personal. En este caso, vamos a realizar unos zarcillos con mostacillas en tonos azules y una orilla de mostacillas negras, cocidas a mano Inspirados en el Ojo Turco también conocido como nazar, es un amuleto de protección muy popular en varias culturas, especialmente en Turquía y Grecia. Se cree que este amuleto puede proteger contra el mal de ojo y las malas energías. Tradicionalmente, el ojo turco tiene un diseño circular y se compone de varios anillos de colores, siendo el azul el tono predominante.
A continuación, te indico los pasos y materiales necesarios para llevar realizar estos espectaculares Zarcillos.

Happy and blessed day, I hope you are very well, full of good energy, shining, growing and above all being every day your best version, today I have made some embroidered tendrils is a beautiful craft project that allows you to express creativity and personal style. In this case, we are going to make some tendrils with beads in blue tones and a border of black beads, handmade. Inspired by the Turkish Eye also known as nazar, it is a protection amulet very popular in several cultures, especially in Turkey and Greece. It is believed that this amulet can protect against the evil eye and bad energies. Traditionally, the Turkish eye has a circular design and is composed of several colored rings, with blue being the predominant shade.
Here are the steps and materials needed to make these spectacular earrings.
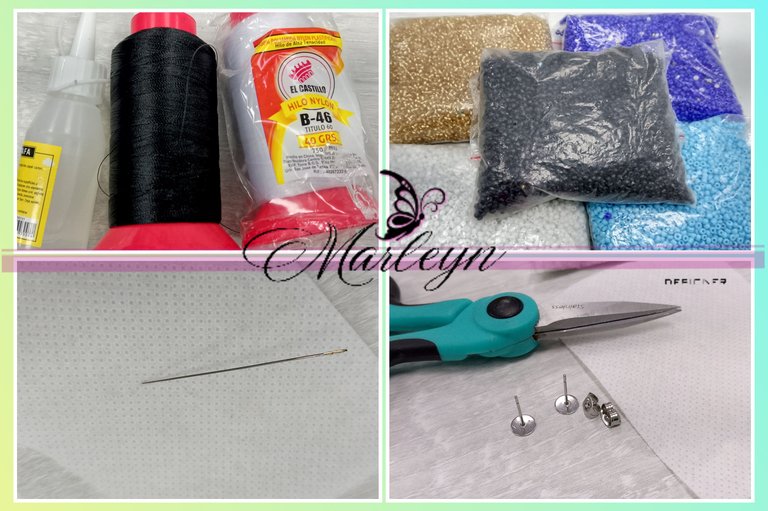
Materiales necesarios, Tijera, Hilo, Aguja para mostacillas, Silicon Liquido, Tela fina o POP, Cuero o tela Gruesa para la base, Base para zarcillos plana, Mostacillas de colores, Dorada, Negra, Azul claro, Azul Oscuro, Blanco, y lo mas importante Mucha paciencia y amor por lo que hacemos.
Materials needed, Scissors, Thread, Needle for beads, Liquid Silicon, Thin fabric or POP, Leather or thick fabric for the base, Flat base for tendrils, Colored beads, Gold, Black, Light Blue, Dark Blue, White, and the most important thing A lot of patience and love for what we do.
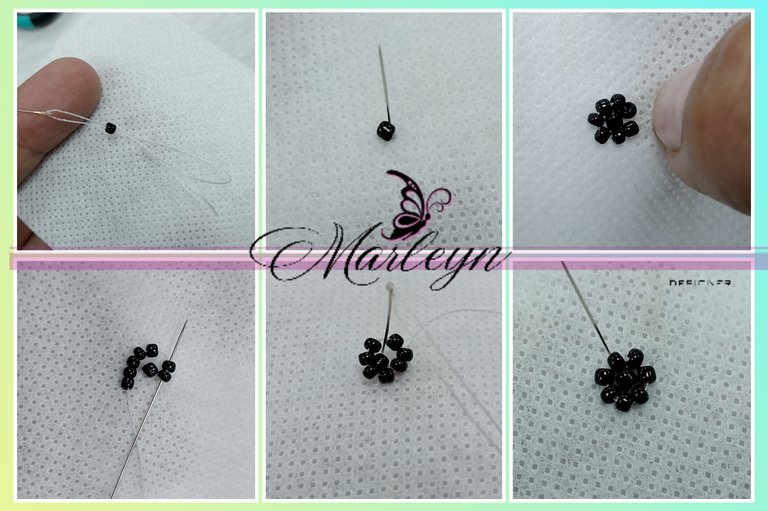
Vamos a empezar con las mostacillas negras, ensarta la aguja e introdúcela de abajo hacia arriba por el centro de la tela POP, inserta una mostacilla negra en la aguja, regresa la aguja hacia abajo, y la sacaras nuevamente hacia arriba por un lado de la mostacilla central como te muestro en la segunda imagen, ahora inserta en la aguja tantas mostacillas como te sean necesarias para darle la vuelta a la mostacilla central, lo medimos y vas a introducir la aguja por la ultima mostacilla saliendo hacia la siguiente, ahora baja la aguja y la subirás una mostacilla si y una no, para que todas las mostacillas queden bien cocidas en la tela, al terminar pasa la aguja por todas las mostacillas, para que queden uniformes, Severa como una mini flor.
Let's start with the black beads, thread the needle and introduce it from bottom to top through the center of the POP fabric, insert a black bead in the needle, return the needle down, and you will take it out again up one side of the central bead as I show you in the second picture, now insert in the needle as many beads as you need to turn the central bead, we measure it and you are going to introduce the needle through the last bead going out to the next one, now lower the needle and raise it one bead yes and one no, so that all the beads are well cooked in the fabric, when you finish pass the needle through all the beads, so that they are uniform, Severa as a mini flower.
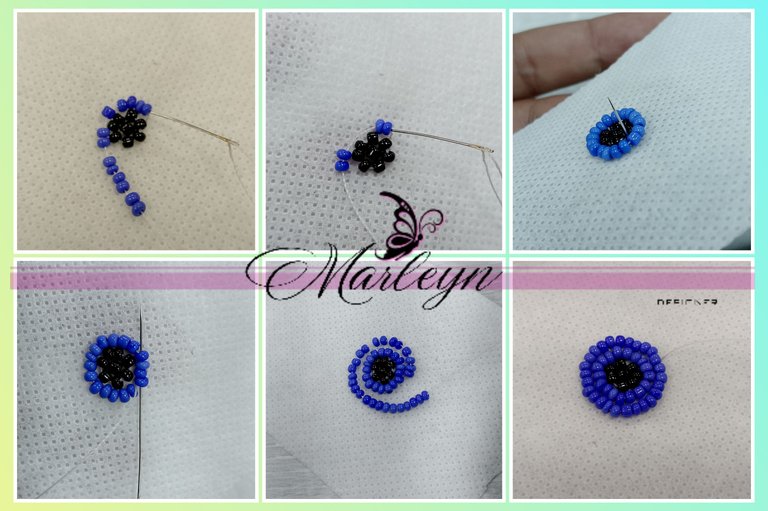
Ahora vamos a continuar el proceso, es siempre muy repetitivo aunque si te gusta lo que estas fabricando se te hará muy facil, esta vez vamos a comenzar con el tono azul oscuro, vamos a insertar tantas mostacillas como sean necesarias para cubrir el alrededor de las negras como te muestro en las imágenes, se realizara el mismo proceso anterior, se colocan tantas mostacillas como sean necesarias, luego introduces la aguja en la ultima mostacilla saliendo por la siguiente como te muestro en las imágenes, ahora vas ir cociendo las mostacillas de dos en dos para cocerlas bien en la tela, al terminar pasa la aguja por toda las mostacillas para que se vean mas uniformes, al terminar saca la aguja por una orilla nuevamente y comienza el mismo proceso para crear el segundo circulo azul.
Now we will continue the process, it is always very repetitive but if you like what you are making it will be very easy, this time we will start with the dark blue tone, we will insert as many beads as necessary to cover around the black as I show you in the pictures, the same process will be performed above, as many beads as necessary are placed, then insert the needle in the last bead leaving the next one as I show you in the pictures, now you are going to cook the beads in pairs to cook them well in the fabric, when finished pass the needle through all the beads to make them look more uniform, when finished remove the needle by one edge again and start the same process to create the second blue circle.
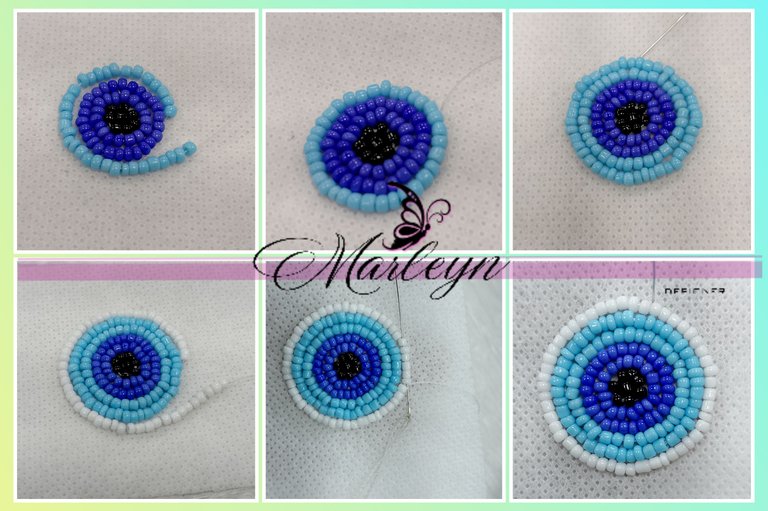

Cuando terminas los circulos azul oscuro, vamos a empezar con los circulos azul claro, vamos a colocar tantas mostacillas como sean necesarias para darle la vuelta completa, es el mismo proceso al terminar saca la aguja por la ultima mostacilla, sal a la siguiente, y ahora cada dos mostacillas para coserlas a la tela, al terminar pasa la aguja por todas las mostacillas para que queden uniformes y se vean mas bonitas, Continua formando nuevamente un circulo azul, seguido de un solo circulo blanco, siempre realizando el mismo procedimiento, lo mas importante es la paciencia y medir bien para no colocar ni mostacillas de mas, ni mostacillas menos de eso dependerá un buen acabado en nuestras piezas, aunque al principio es ensayo y error.
When you finish the dark blue circles, let's start with the light blue circles, we will place as many beads as necessary to give it a complete turn, it is the same process at the end take the needle through the last bead, go to the next, and now every two beads to sew them to the fabric, when finished pass the needle through all the beads to be uniform and look more beautiful, Continue forming again a blue circle, followed by a single white circle, always performing the same procedure, the most important thing is patience and measure well not to place or more beads, or less beads that will depend on a good finish in our pieces, although at first it is trial and error.
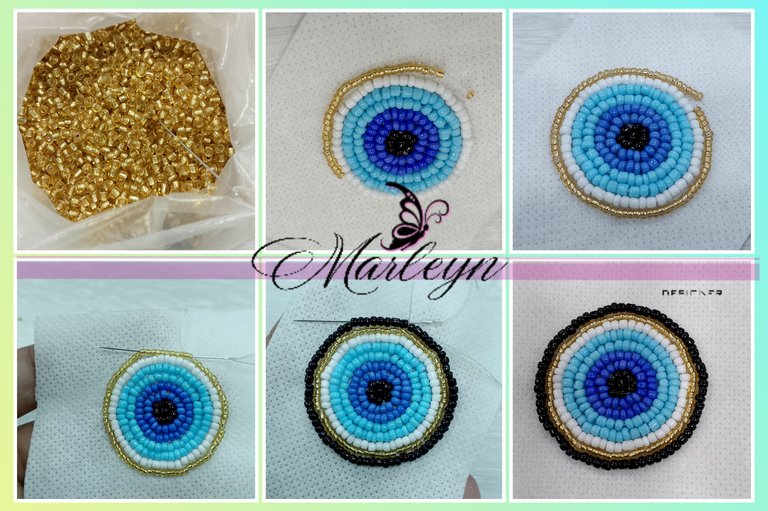
Vamos a colocar un circulo dorado, como te indique es el mismo proceso, siempre al finalizar pasa la aguja por todas las mostacillas para darles uniformidad, el circulo dorado le dará vistosidad y elegancia a la pieza, y para continuar terminaremos con un anillo negro que va a resaltar todos los circulos centrales de nuestro hermoso zarcillo.
We are going to place a golden circle, as I indicated is the same process, always at the end pass the needle through all the beads to give them uniformity, the golden circle will give brightness and elegance to the piece, and to continue we will finish with a black ring that will highlight all the central circles of our beautiful tendril.
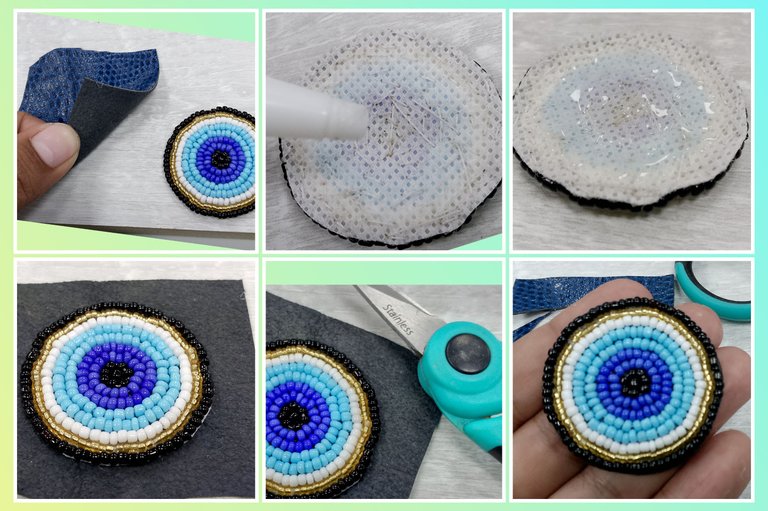
Al terminar la pieza vamos a cortar la tela sobrante, es imperativo que tengas cuidado de no cortar los hilos por que si los cortas debes empezar de nuevo, al terminar de cortar la tela colocaremos un poco de silicon liquido en las parte central, vamos a evitar las orillas y se va a pegar a una tela gruesa o tal vez un trozo de cuero del color de tu preferencia, yo estoy utilizando un trozo de cuero de color azul para que combine con la pieza que estamos realizando. Déjala secar mientras realizas la parte de arriba del zarcillo.
When we finish the piece we will cut the excess fabric, it is imperative that you are careful not to cut the threads because if you cut them you must start again, when we finish cutting the fabric we will put some liquid silicone in the central part, we will avoid the edges and it will stick to a thick fabric or maybe a piece of leather of the color of your preference, I am using a piece of blue leather to match the piece we are doing. Let it dry while you make the top of the tendril.
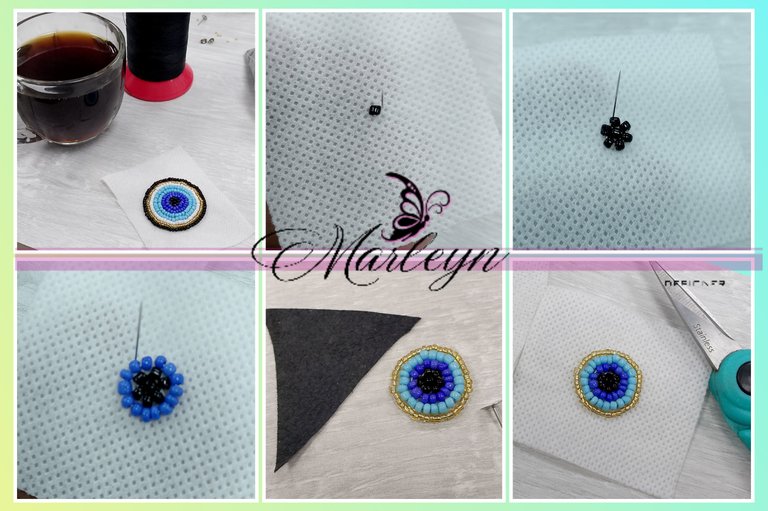

Yo deje secar la pieza de abajo mientras me tomaba un café, para luego con toda mi paciencia realizar la parte de arriba de la pieza, formar la parte de arriba es bastante facil vas a realizar el mismo procedimiento que en la pieza central, empieza por el centro con las mostacillas negras y solo se hará un circulo por color sin el circulo negro para que no quede tan grande, no olvides al terminar cada circulo pasar la aguja por todas las mostacillas. Al terminar corta el exceso de tela tomando en cuenta que debes cuidar de no cortar los hilos.
I let the bottom piece dry while I had a cup of coffee, and then with all my patience I made the top part of the piece, forming the top part is quite easy, you are going to do the same procedure as in the central piece, start in the center with the black beads and only make one circle per color without the black circle so it is not so big, do not forget to pass the needle through all the beads when finishing each circle. At the end cut the excess fabric taking into account that you must be careful not to cut the threads.
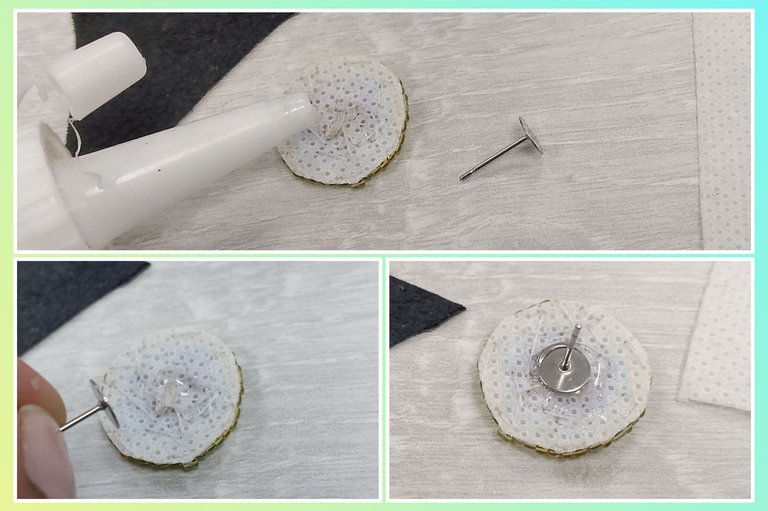
Luego de cortar la pieza vamos a pegar la base del zarcillo, así tendrá tiempo de secarse mientras bordamos la parte de abajo del zarcillo, es muy facil solo coloca un punto de silicon liquido o de pega E6000 en el centro de la pieza y coloca la base del zarcillo allí, deja secar sin tocarla.
After cutting the piece we will glue the base of the tendril, so it will have time to dry while we embroider the bottom of the tendril, it is very easy just place a dot of liquid silicone or E6000 glue in the center of the piece and place the base of the tendril there, let it dry without touching it.
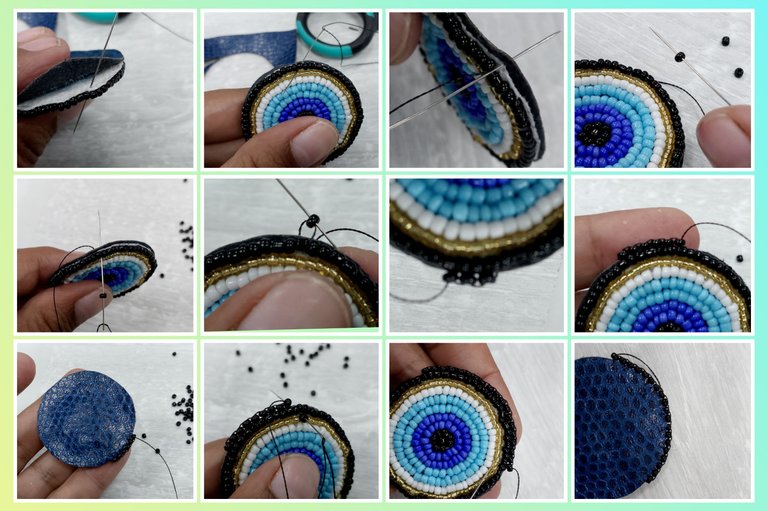
Mientras esperamos que la parte superior seque, vamos bordando la orilla de la parte de abajo, ensarta hilo negro en la aguja, levanta un poco el cuero y pasa la aguja de atrás hacia adelante como te muestro en la imagen 1, ahora introduce la aguja de adelante hacia atrás pasando por el cuero azul, como vamos a coser toda la orilla por esto les indique en uno de los pasos arriba no llenar de pegamento la orilla, ya que al pasar la aguja se ensucia y queda pegajosa haciendo mas difícil de coser, introduce una mostacilla negra en la aguja vamos a tratar de tomar las mostacillas mas planas y que sean lo mas parecidas posible para un buen acabado, ahora pasa la aguja de adelante hacia atrás como te muestro en la imagen 5 (las imágenes las contaras de izquierda a derecha) ahora sube la aguja por la mostacilla, y vuelve a introducir una mostacilla en la aguja y repite el proceso es decir, introduce la aguja de adelante hacia atrás saliendo por el cuero, sube la aguja por la mostacilla y continua realizando el mismo proceso por toda la orilla, es importante que al sacar la aguja se realice buscando siempre que las puntadas queden a la misma altura para que el acabado sea mas estético.
While we wait for the upper part to dry, we will embroider the edge of the bottom, thread the black thread on the needle, lift the leather a little and pass the needle from back to front as shown in picture 1, now introduce the needle from front to back passing through the blue leather, as we are going to sew all the edge for this reason I indicated in one of the steps above not to fill the edge with glue, because when passing the needle it gets dirty and sticky making it more difficult to sew, introduce a black bead in the needle, we will try to take the flattest beads and that they are as similar as possible for a good finish, now pass the needle from front to back as I show you in the image 5 (the images will count them from left to right) now go up the needle through the bead, and reinsert a bead in the needle and repeat the process that is to say, introduce the needle from front to back leaving the leather, go up the needle through the bead and continue doing the same process along the edge, it is important that when removing the needle is done always looking for the stitches are at the same height for the finish to be more aesthetic.
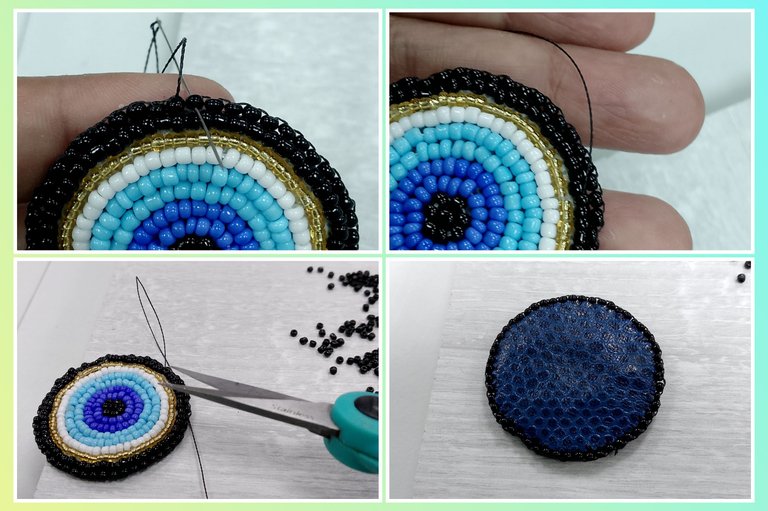
Luego de bordar toda la orilla debemos realizar un amarre de lo mas escondido, y pasar la aguja entre las mostacillas para esconderlo luego lo cortas con cuidado y tu pieza quedara como te muestro en la imagen final.
After embroidering all the border we must make a hidden tie, and pass the needle between the beads to hide it, then cut it carefully and your piece will be as I show you in the final image.
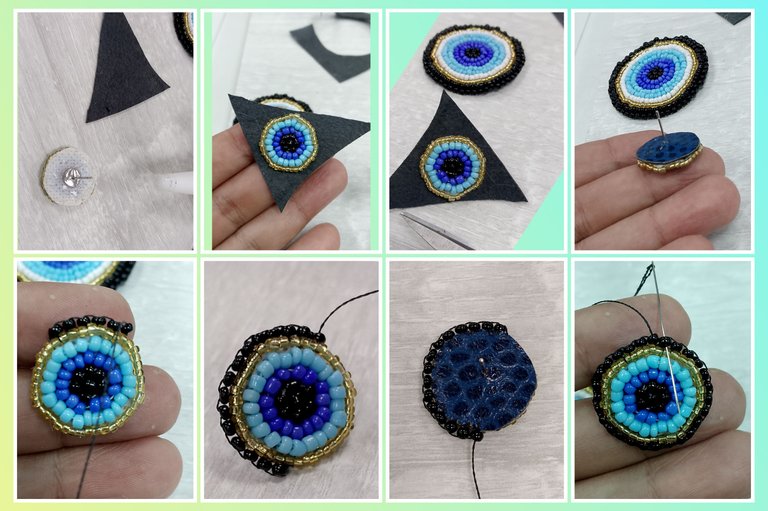
La base de la pieza superior ya debe estar seca, así que vamos a pegar esta parte al cuero, inserta el pin que traspase el cuero, coloca solo un poco de pegamento para que se fije bien la pieza mas no se llene por las orillas, deja que seque por un momento y vamos a empezar a bordar como lo realizaste en la parte de abajo, paso a paso y sin prisa eso quedara hermoso. Recuerda al terminar realiza un amarre y luego pasa la aguja por varias mostacillas para ocultar el nudo. IMPORTANTE no cortes el hilo luego de este paso.
The base of the upper piece should already be dry, so let's glue this part to the leather, insert the pin that goes through the leather, put just a little glue so that the piece is well fixed but not filled by the edges, let it dry for a moment and let's start embroidering as you did in the part below, step by step and without haste that will be beautiful. Remember to make a tie at the end and then pass the needle through several beads to hide the knot. IMPORTANT do not cut the thread after this step.
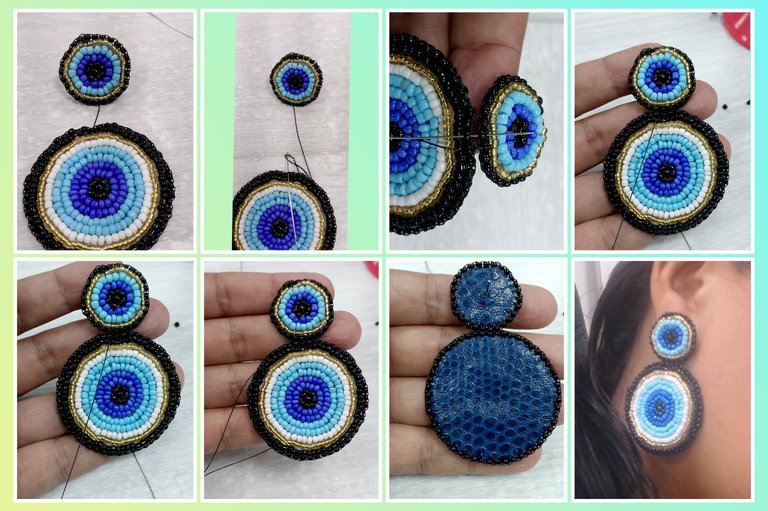
Para terminar vamos a unir las dos piezas por donde sacaste la aguja la llevaremos a una mostacilla de la pieza de abajo y la vamos a cocer entre las mostacillas tomando solo tres mostacillas y te regresaras nuevamente tres mostacillas realizas un amarre escondido y sube entre varias mostacillas para esconder el nudo, corta el hilo y de esta manera hemos terminado una pieza hermosa, y con un acabado excelente. Realiza todos los paso nuevamente para hacer el par.
To finish we will join the two pieces where you took out the needle, we will take it to a bead of the piece below and we will bake it between the beads taking only three beads and you will return again three beads, make a hidden tie and go up between several beads to hide the knot, cut the thread and in this way we have finished a beautiful piece, and with an excellent finish. Perform all the steps again to make the pair.

Consejos Adicionales
Se Creativo: Puedes experimentar con diferentes patrones de colores o añadir detalles adicionales como pequeñas cuentas doradas para un toque extra.
Práctica, con calma: Si eres principiante, puede que necesites practicar algunas puntadas antes de comenzar el proyecto final
Con paciencia y mucha atención al detalle, crearás unos zarcillos únicos y hermosos que no solo son un accesorio llamativo, sino también un amuleto simbólico. ¡Disfruta del proceso creativo!
Additional Tips
Be Creative: You can experiment with different color patterns or add extra details like small gold beads for an extra touch.
Practice, easy: If you are a beginner, you may need to practice a few stitches before starting the final project.
With patience and lots of attention to detail, you'll create unique and beautiful tendrils that are not only an eye-catching accessory, but also a symbolic charm. Enjoy the creative process!


IMAGENES CREADAS EN CANVA
IMAGES CREATED IN CANVA


