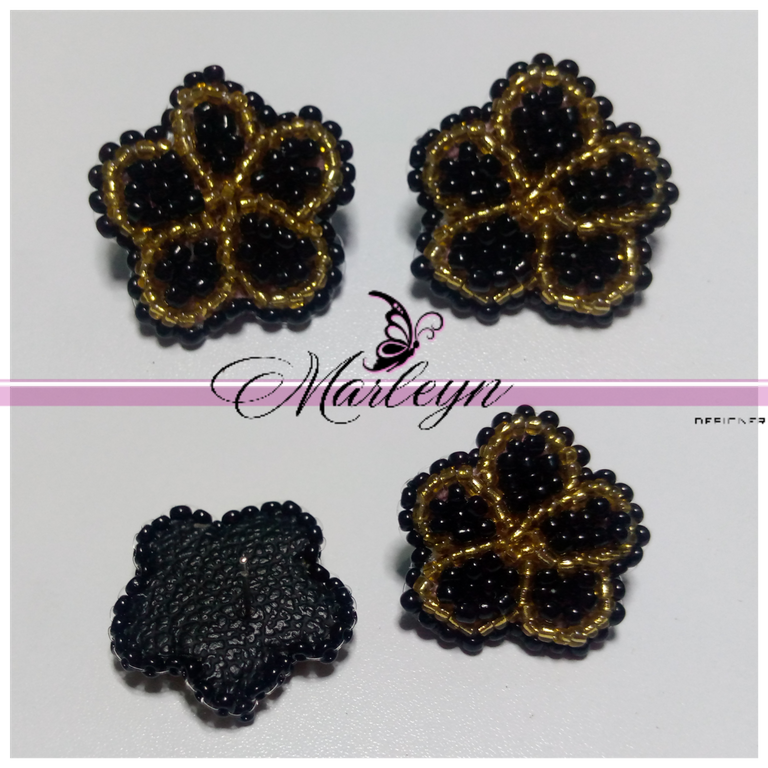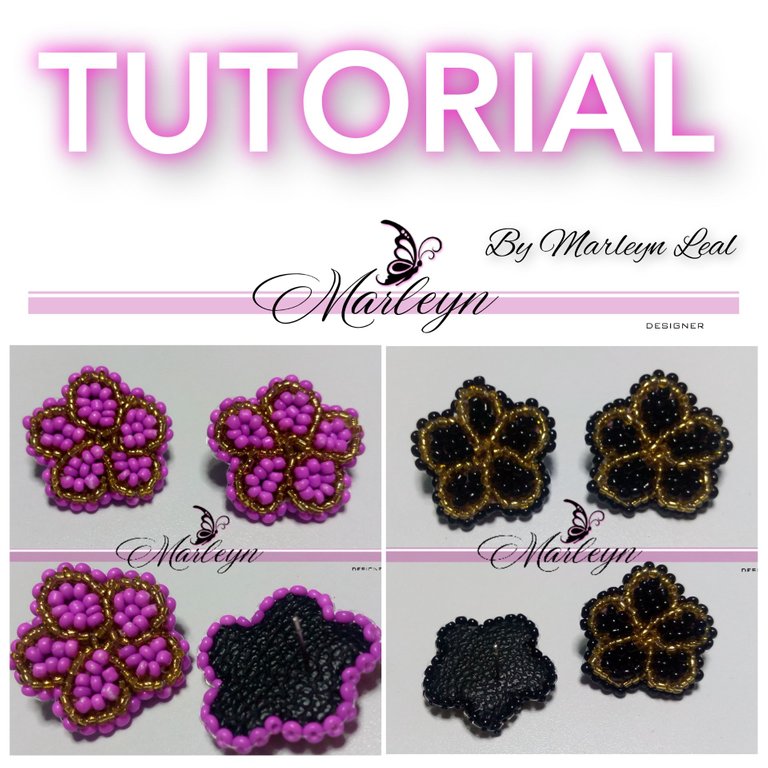
Feliz y Bendecido nuevo día, nueva semana nuevo tutorial! Deseo estés bien, feliz con energía, llenos de mucha abundancia, salud, brillando y creciendo cada día más... ✨🤗 Hoy les realice un tutorial de unos zarcillos de flor bordado en Mostacillas, con delicadas Mostacilla doradas alrededor para darle más vistosidad a la pieza, todos los materiales son de fácil acceso, es un trabajo 100% manual que lleva tiempo, paciencia y dedicación. Lo más importante es que te guste lo que haces y aprendas con amor por lo que hacemos.
Materiales: Mostacillas doradas #11, Mostacillas moradas #11, hilo nailon, aguja para Mostacillas, tijera, tela POP, cuero o tela gruesa, base de plana
Happy and blessed new day, new week new tutorial! I wish you are well, happy with energy, full of abundance, health, shining and growing more every day... ✨🤗 Today I am doing a tutorial of flower earrings embroidered in Mostacillas, with delicate golden Mostacilla around to give more showiness to the piece, all the materials are easily accessible, it is a 100% manual job that takes time, patience and dedication. The most important thing is that you like what you do and learn with love for what we do.
Materials: Gold beads #11, purple beads #11, nylon thread, needle for beads, scissors, POP fabric, leather or thick fabric, flat tendril base.
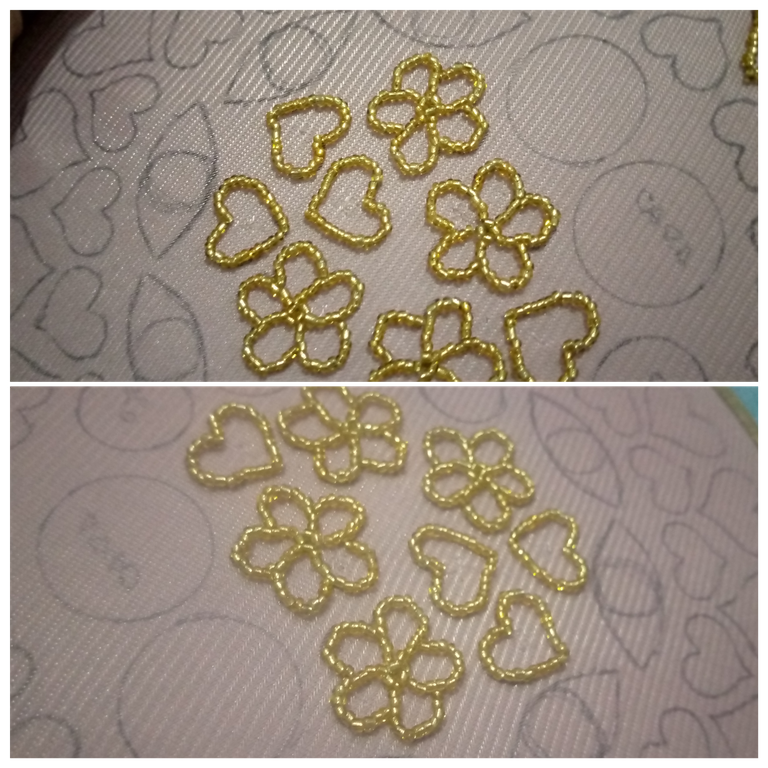
Vamos a dibujar el patrón del zarcillo en la tela POP, en este momento yo estoy utilizando tela gamuza que fue la que encontré y pega bien, luego de dibujar el patron en la tela, ensarta la aguja con el nailon y comienza a bordar con las Mostacillas doradas por toda la orilla de la pieza! Es fácil puedes hacerlo de 4 Mostacillas en 4 Mostacillas subiendo la aguja entre las mostacilla 2 y 3 entrando por arriba en la Mostacilla 3 y saliendo en la Mostacilla 4 al terminar este paso realiza un amarre sencillo por abajo de la tela para evitar que si el nailon se revienta se dañe todo tu trabajo.
We are going to draw the pattern of the tendril on the POP fabric, at this moment I am using chamois fabric that was the one I found and it sticks well, after drawing the pattern on the fabric, thread the needle with the nylon and begin to embroider with the Beads golden all over the edge of the piece! It is easy, you can do it from 4 Mostacillas to 4 Mostacillas, raising the needle between mostacilla 2 and 3, entering Mostacilla 3 from above and coming out in Mostacilla 4. At the end of this step, make a simple tie below the fabric to avoid if the nylon bursts will damage all your work.
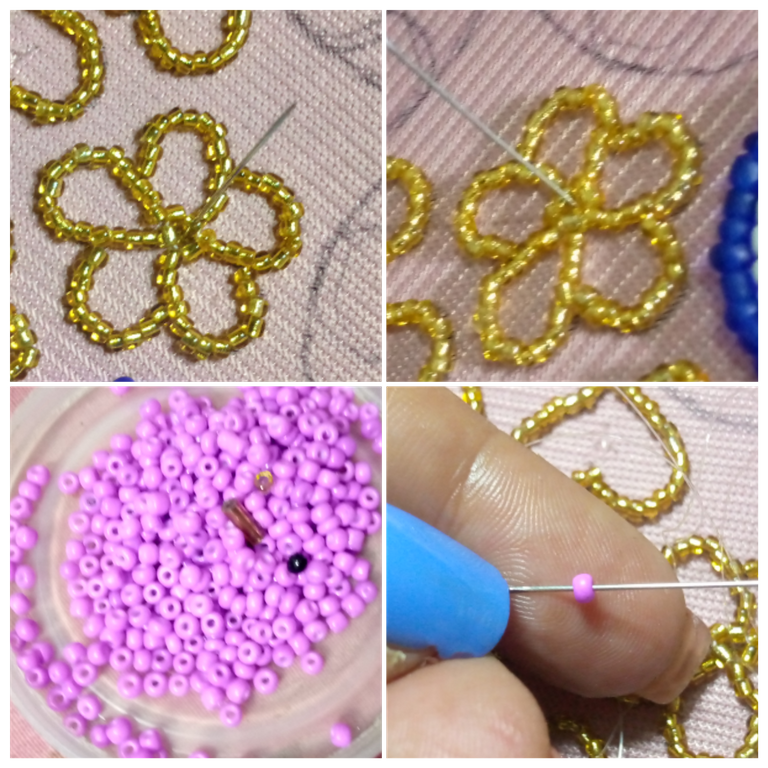
Ahora sí el hilo queda muy poco corta el hilo restante, y vuelve a ensartar la
aguja introduces la aguja de abajo hacia arriba y empezamos a bordar con las Mostacillas moradas si quieres un acabado casi perfecto te recomiendo de Dos en dos Mostacillas regresando la aguja por la segunda Mostacilla, y así sucesivamente.
Now, if the thread remains very little, cut the remaining thread, and thread the thread again. needle introduce the needle from the bottom up and we begin to embroider with the purple Mostacillas if you want an almost perfect finish I recommend Two by two Mostacillas returning the needle for the second Mostacilla, and so on.
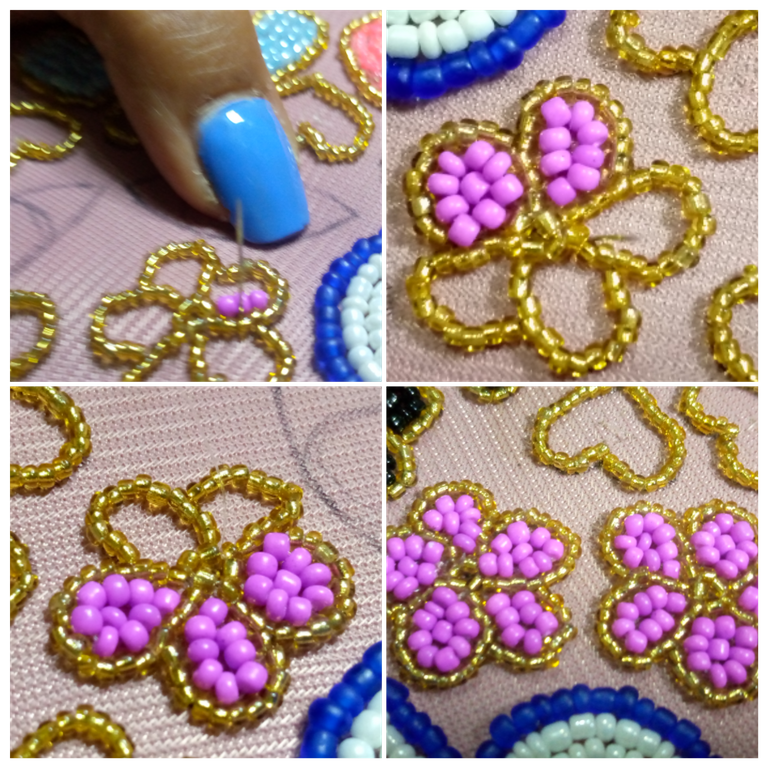
Continuamos paso a paso rellenando los espacios sin dañar la forma de nuestra pieza para así tener un acabado increíble, no olvides realizar amarres de vez en cuando para evitar, de esta manera si el hilo nailon se revienta no perderás el trabajo que se ha Colocamos silicon liquido en la parte de atrás y pegamos en el cuero
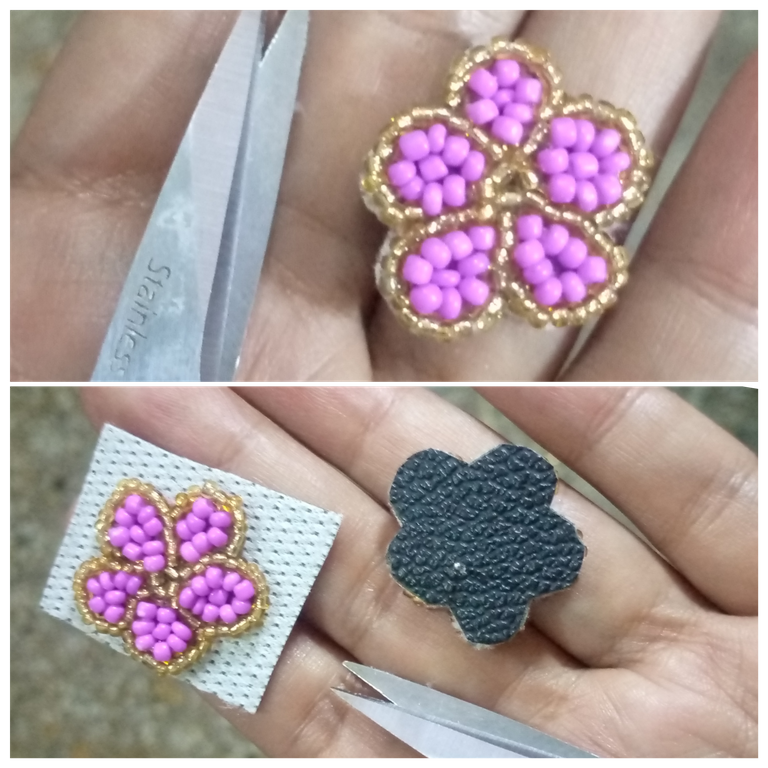
When you finish embroidering, cut the excess fabric from the piece, you must be more careful when cutting because if you cut the nylon you will totally damage the piece! And you probably have to start over. Now we are going to glue the flat base of the tendril to the back of the piece, let it dry a bit and we will place more liquid silicone around it now we glue the piece to the leather! We will preferably let it dry for a few hours before continuing!

Cuando termines de bordar, corta la tela sobrante de la pieza, debes tener mayor cuidado al cortar porque si cortas el nailon dañarás la pieza totalmente! Y probablemente debas empezar nuevamente. Ahora vamos a pegar la base plana del zarcillo a la parte de atrás de la pieza,deja secar un poco y colocaremos mas silicona líquido alrededor ahora pegamos la pieza al cuero! Dejaremos secar preferiblemente unas horas antes de continuar!
When you finish embroidering, cut the excess fabric from the piece, you must be more careful when cutting because if you cut the nylon you will totally damage the piece! And you probably have to start over. Now we are going to glue the flat base of the tendril to the back of the piece, let it dry a bit and we will place more liquid silicone around it now we glue the piece to the leather! We will preferably let it dry for a few hours before continuing!
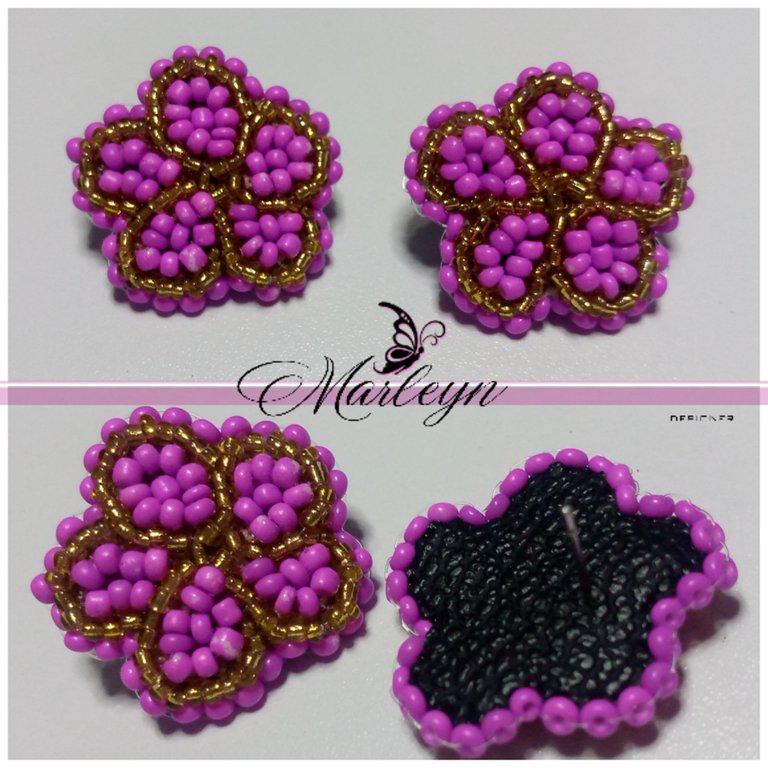
Corta el cuero que nos ha sobrado con cuidado, y vamos a comenzar a bordar toda la orilla de la pieza para darle el acabado final! Este proceso es repetitivo debemos ensartar la aguja, con el nailon e introducirlo por entre las mostacillas ocultando el nudo, ahora sacamos la aguja de arriba hacia abajo del cuero por la orilla de la pieza introduce una mostacilla morada en la aguja, ahora saca la aguja nuevamente de arriba hacia abajo del cuero, ahora vamos a subir la aguja por la mostacilla, nuevamente introduces una mostacilla en la aguja y repetimos el procedimiento por toda la orilla de esta manera bordamos todo el zarcillo! Para terminar realizamos varios nudos y los ocultamos entre las mostacilla, Ahora vamos a pegar la base plana del zarcillo a la parte de atrás de la pieza,deja secar un poco y colocaremos mas silicona líquido alrededor ahora pegaremos la pieza al cuero! Dejaremos secar preferiblemente unas horas antes de continuar! De esta manera henos terminado una belleza de zarcillos de flor realmente originales, llamativos y muy hermosos, Gracias por leerme. 🙏🙇🙆
Carefully cut the leftover leather, and we are going to start embroidering the entire edge of the piece to give it the final finish! This process is repetitive, we must thread the needle with the nylon and insert it through the beads hiding the knot, now we remove the needle from the top to the bottom of the leather along the edge of the piece, insert a purple bead into the needle, now remove the needle again from top to bottom of the leather, now we are going to raise the needle through the bead, again insert a bead into the needle and repeat the procedure along the entire edge in this way we embroider the entire tendril! To finish we make several knots and hide them between the beads, Now we are going to glue the flat base of the tendril to the back of the piece, let it dry a bit and we will place more liquid silicone around it now we will glue the piece to the leather! We will preferably let it dry for a few hours before continuing! In this way we have finished a beauty of really original, striking and very beautiful flower tendrils, Thanks for reading. 🙏🙇🙆
Puedes realizarlos de tantos colores como desees! Todo dependerá de ti! Recuerda tu puedes con todo. 🙆🙎
You can make them in as many colors as you want! It was all from you! Remember you can with everything. 🙆🙎