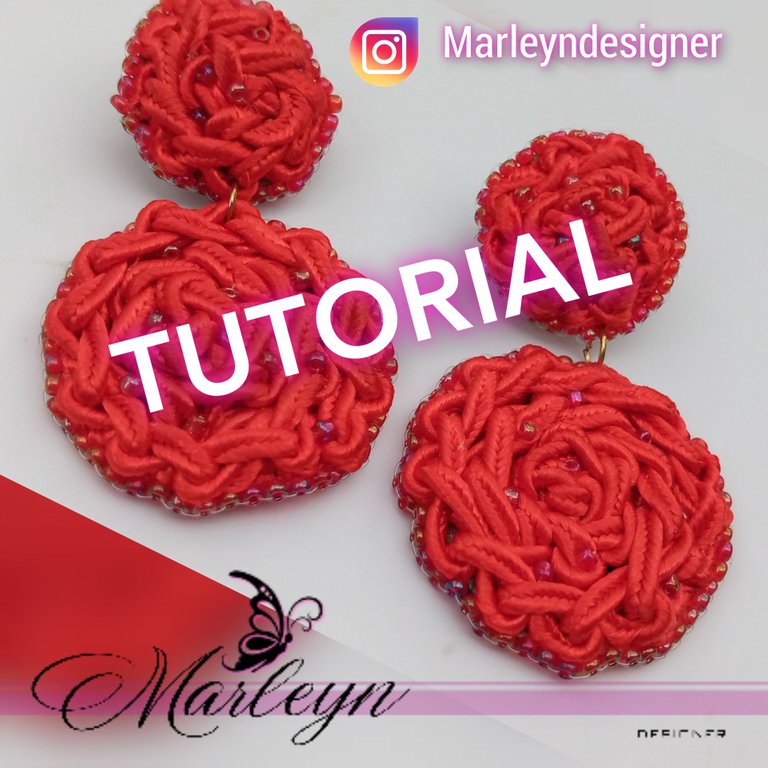
Feliz y bendecido nuevo día, espero estén bien, felices, sanos, llenos de energía positiva, brillando, creciendo y sobre todo siendo casa día su mejor versión. Hoy vamos a realizar unos delicados Zarcillos que se asemejan a una rosa con motivo de la iniciativade este maravilloso mes... Estos zarcillos son realmente fáciles, es un tejido sencillo que lo eh complementado con unas pocas mostacillas para darle un toque de delicadeza a nuestro pieza, realmente a mi misma el resultado final me gustó mucho más de lo que pensé, ya que quedó mejor y más hermoso de lo que había diseñado, espero sea de su agrado total y puedan realizarlos. Yo solo te explico lo que se, siempre estaré atenta a tus consejos, preguntas, comentarios o enseñanzas ya que todos los días aprendemos algo nuevo.
Todos los materiales son de fácil acceso, yo te indico en este tutorial los que yo utilizo, aunque siempre puedes colocar tu toque personal y utilizar y jugar con hilos diferentes.
Materiales: Hilo Soutache 4 metros, tela fina o tela POP para la base, cuero o tela gruesa para la parte de atrás del zarcillo, mostacillas, base de zarcillo plano, pega E6000 o silicón liquido, hilo nailon o del color del hilo soutache, tijera Ánimo, Paciencia y ganas de Aprender.
Happy and blessed new day, I hope you are well, happy, healthy, full of positive energy, shining, growing and above all being your best version every day. Today we are going to make some delicate tendrils that resemble a rose on the occasion of the initiative of this wonderful month.... These tendrils are really easy, it is a simple weave that I have complemented with a few beads to give a touch of delicacy to our piece, I really liked the end result much more than I thought, as it was better and more beautiful than what I had designed, I hope you like it and you can make them. I only explain what I know, I will always be attentive to your advice, questions, comments or teachings because every day we learn something new.
All materials are easily accessible, I indicate in this tutorial the ones I use, but you can always put your personal touch and use and play with different yarns.
Materials: Soutache thread 4 meters, thin fabric or POP fabric for the base, leather or thick fabric for the back of the tendril, beads, flat tendril base, E6000 glue or liquid silicone, nylon thread or the color of the soutache thread, scissors Courage, patience and willingness to learn.
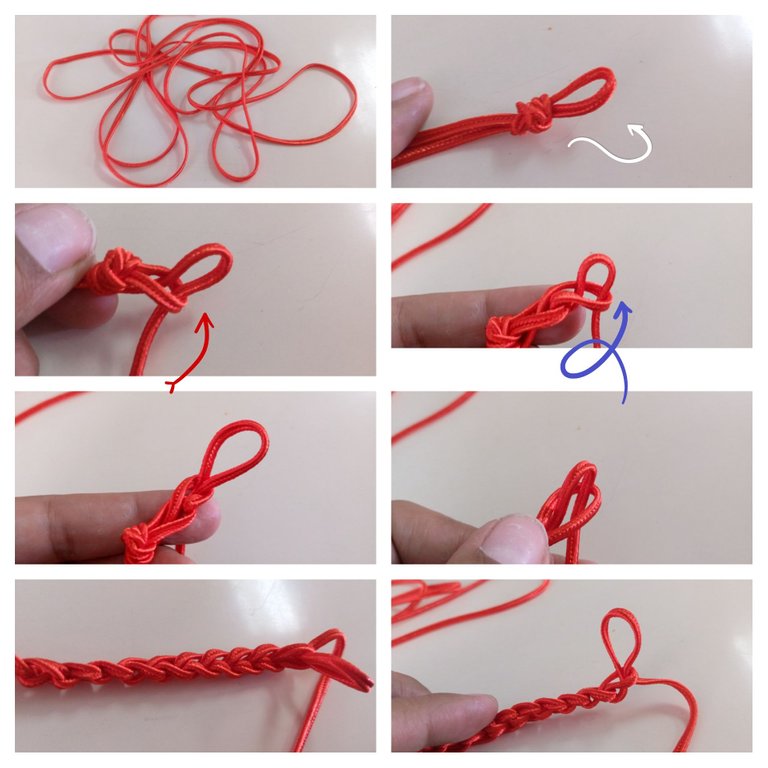
Paso 1: Corta 1,50 metros de hilo soutache realiza un nudo sencillo es una punta del hilo formando un círculo como ves en la imagen, ahora vamos a comenzar a introducir el restante del hilo por ese circulo como te indican las flechas de la imagen, creando nuevos círculos,prensa un poco el hilo poco a poco para ir cerrando los círculos anteriores, continuamos hasta llegar al final del hilo.
Step 1: Cut 1.50 meters of soutache thread, make a simple knot is one end of the thread forming a circle as you see in the image, now we will begin to introduce the remaining thread through the circle as indicated by the arrows in the image, creating new circles, press a little thread gradually to close the previous circles, we continue until the end of the thread.
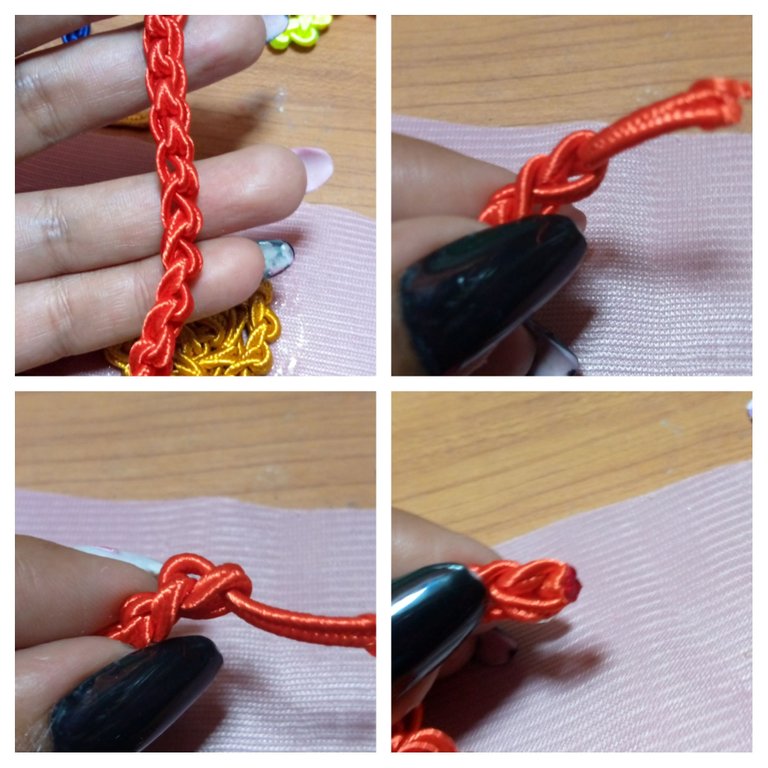
Paso 2: Al llegar al final del hilo realiza un pequeño nudo, cortamos la punta sobrante y quemamos la punta con un encendedor.
Step 2: When you reach the end of the thread, tie a small knot, cut off the excess end and burn the end with a lighter.
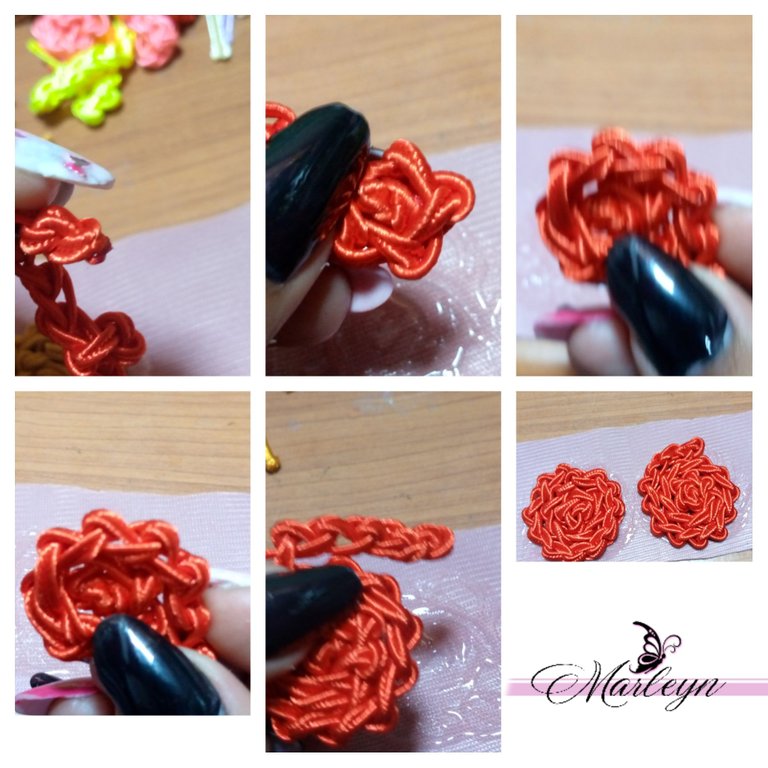
Paso 3: En un trozo de tela coloca un poco de pegamento, el hilo que acabamos de tejer vamos a tomarlo con cuidado y le vamos dando una forma circular con nuestros dedos, con calma sin apresurarte, al principio se puede soltar! Al terminar pegamos el hilo en la tela
Step 3: On a piece of fabric place some glue, the thread that we just knitted we will take it carefully and we will give it a circular shape with our fingers, calmly without rushing, at first it may come loose! At the end we glue the thread on the fabric
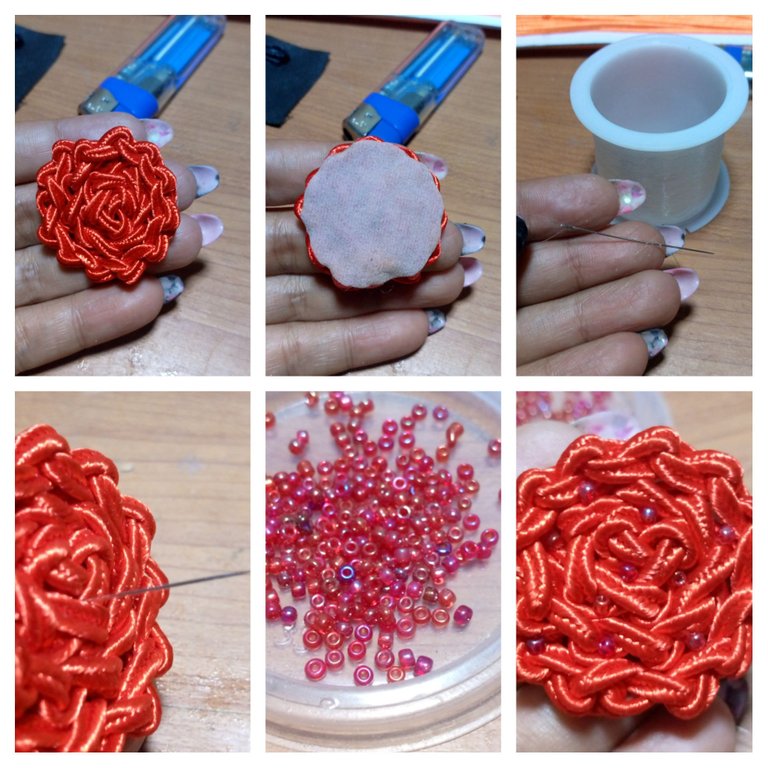
Paso 4: Espera un poco y deja secar un rato! Ahora ensarta el hilo nailon en la aguja y comienza a coser unas mostacillas sin patrón alguno, puede ser en donde veas espacios vacíos entre el hilo para taparlos, de esta manera haces doble función embelleces la pieza y tapas los huecos.
Step 4: Wait a bit and let it dry for a while! Now thread the nylon thread on the needle and start sewing some beads without any pattern, it can be where you see empty spaces between the thread to cover them, this way you do double function, you embellish the piece and cover the holes.
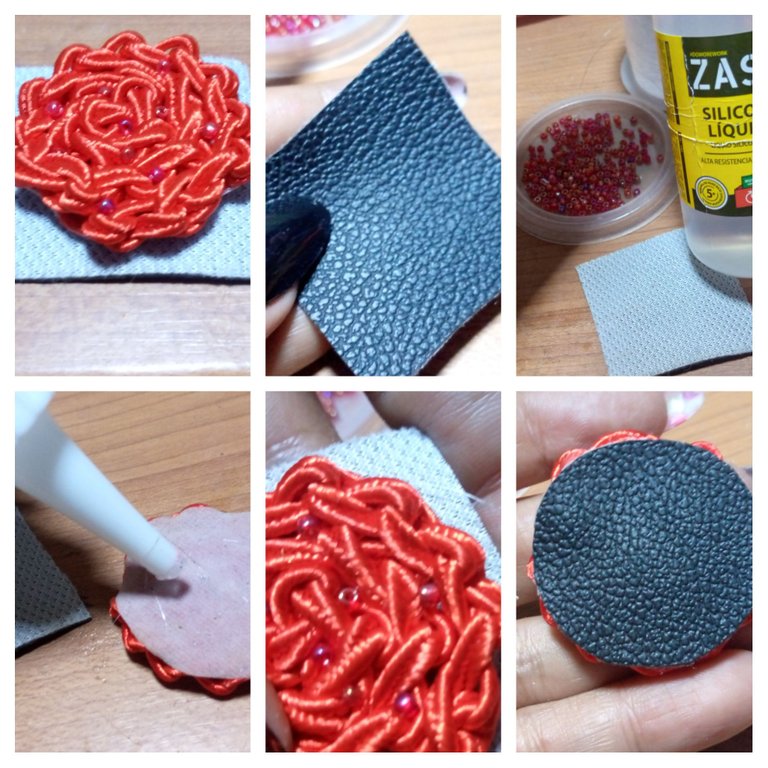
Paso 5: corta la tela sobrante, pega la pieza en un trozo de cuero o tela gruesa! Corta el cuero sobrante y deja secar un rato, al pegar la pieza en el cuero evita colocar pegamento por las orillas, debes hacerlo solo en el centro.
Step 5: cut the excess fabric, glue the piece on a piece of leather or thick fabric! Cut the excess leather and let it dry for a while, when gluing the piece on the leather avoid placing glue on the edges, you should do it only in the center.
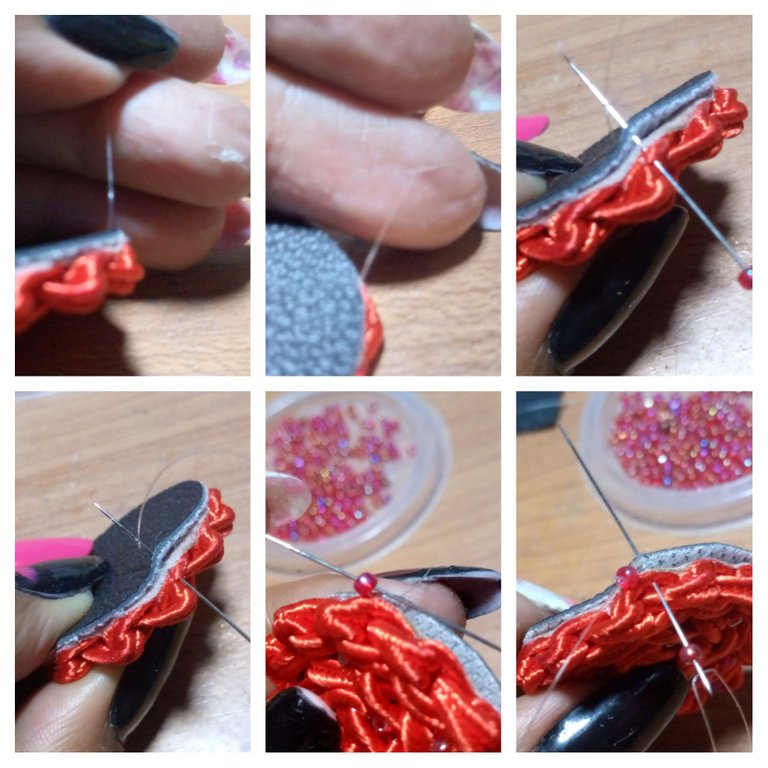
Paso 6: Vamos a bordar la orilla de nuestra pieza, este paso es más sencillo de lo que parece, ensarta la aguja con el nailon, realiza un nudo pequeño y lo introduces por entre los hilos para esconder el nudo, saca la aguja por la orilla y pasarla hacia abajo por el cuero, ahora introduces una mostacilla en la aguja y pasa la aguja por la parte superior del cuero nuevamente hacia abajo, sube la aguja por la mostacilla y repite el proceso es decir, introduces una mostacilla en la aguja pasa la aguja hacia abajo del cuero y vuelves a subir por la mostacilla. Así hasta completar toda la orilla de nuestra pieza.
Step 6: We are going to embroider the edge of our piece, this step is simpler than it looks, thread the needle with the nylon, make a small knot and insert it through the threads to hide the knot, pull the needle out through the edge and pass it down through the leather, now insert a bead in the needle and pass the needle through the top of the leather again downwards, bring the needle up through the bead and repeat the process i.e. insert a bead in the needle, pass the needle downwards through the leather and back up through the bead. This way until the whole edge of our piece is completed.
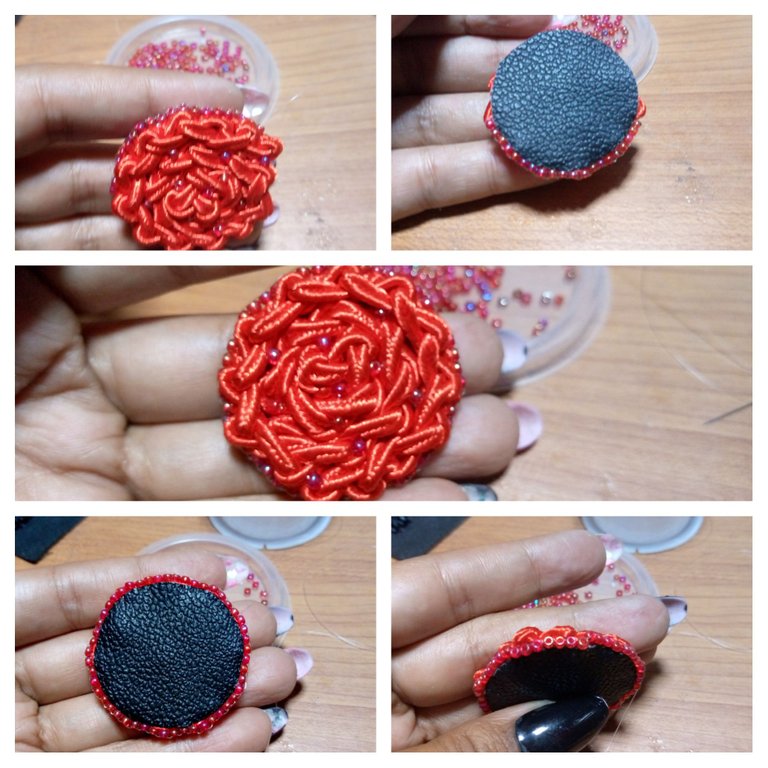
Te va a quedar de estás manera, al llegar al final realiza varios nudos escondidos entre los hilos para que no se vean. De esta manera el acabado ser mejor.
It will look like this, when you get to the end, make several hidden knots between the threads so that they are not visible. This way the finish will be better.
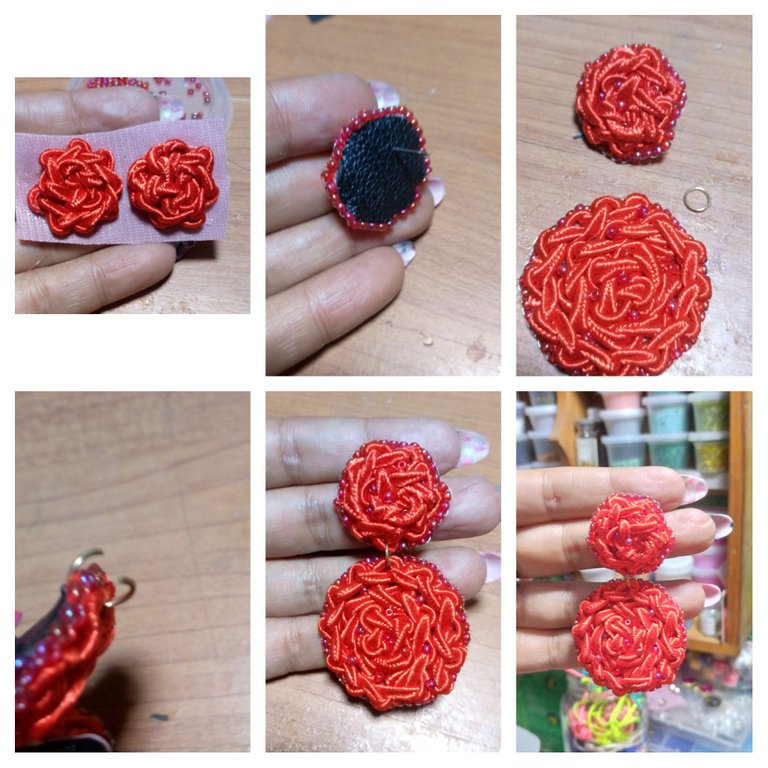
Paso 7: Realiza todo el proceso anterior con el hilo restante para formar la parte superior del zarcillo, en esta etapa la única diferencia es que atrás le vamos a pegar la base de zarcillo plano. Y al terminar de bordar la orilla unimos las dos partes del zarcillo con un aro para bisutería de 0,5 milímetros.
Step 7: Perform all the previous process with the remaining thread to form the upper part of the tendril, in this stage the only difference is that at the back we are going to glue the flat tendril base. And when we finish embroidering the border we join the two parts of the tendril with a 0.5 millimeters ring for costume jewelry.
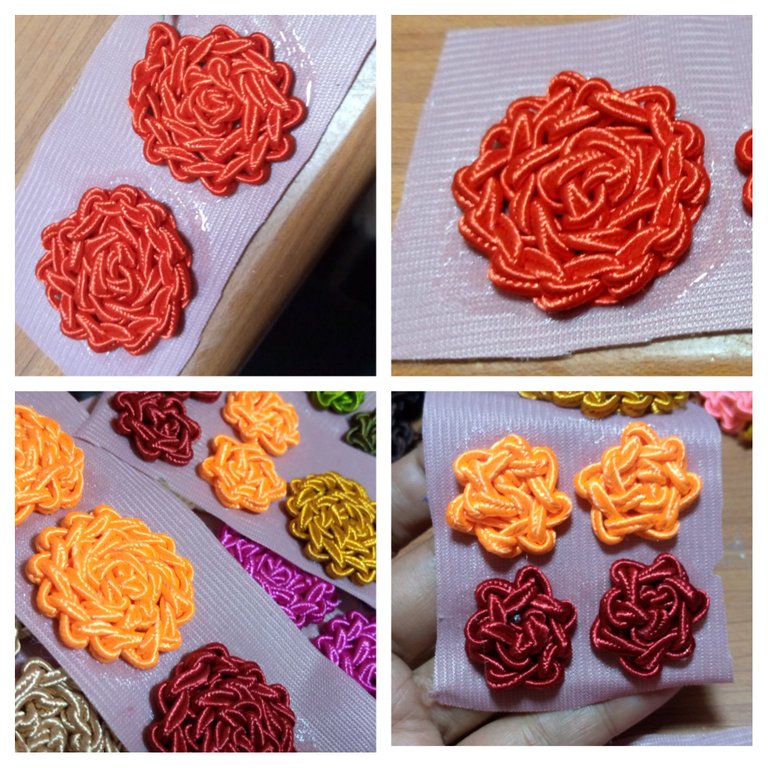
Yo estoy realizando estas piezas en muchos colores, para tener variedad disponible! Espero que te gusten y si quieres alguna de mis piezas estamos a la orden puedes ver más modelos por Instagram @marleyndesigner... Siempre será un placer para mí compartir lo que se, gracias por leerme, por tu apoyo!!! 🥰🤗
I am making these pieces in many colors, to have variety available! I hope you like them and if you want any of my pieces we are at your disposal, you can see more models on Instagram @marleyndesigner.... It will always be my pleasure to share what I know, thanks for reading me, for your support!!!!! 🥰🤗


IMAGENES CREADAS EN CANVA
IMAGES CREATED IN CANVA


