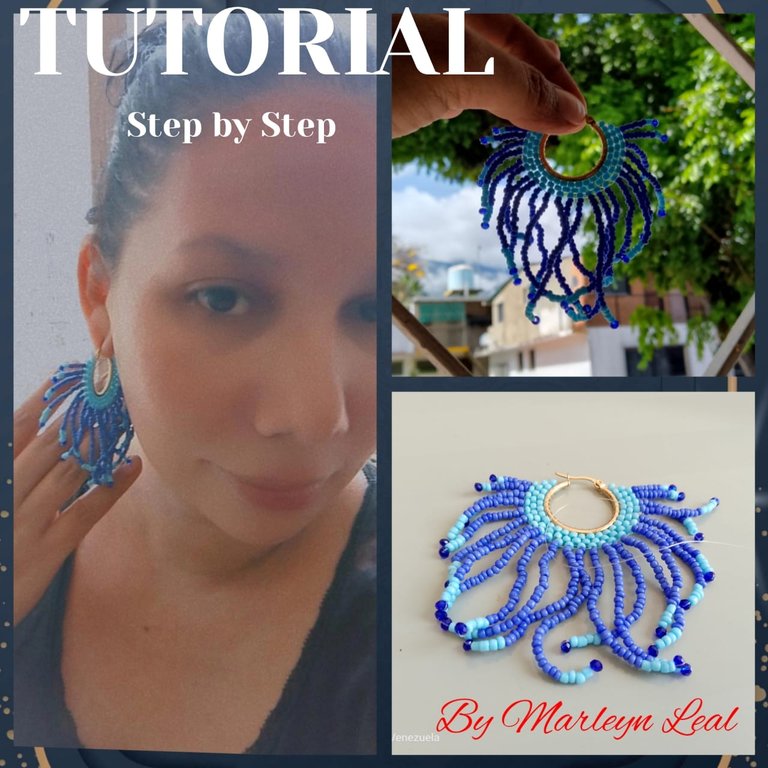
Feliz y Bendecido nuevo día, espero estén super bien felices, llenos de mucha energía, salud, bendiciones y ganas de aprender, hoy realice unos zarcillos en tonos azules muy fáciles, y hermosos les explicare el tutorial paso a paso a través de una serie de imágenes consecutivas donde podrás ver como va quedando nuestra pieza a medida que la trabajamos... Es importante que sepas que es un proceso repetitivo, debes ser paciente y a medida que se repiten los pasos vas a ver el avance, con esta técnica de ladrillo podremos hacer una gran diversidad de modelos, todo dependerá de tu imaginación, tus ganas y tu animo! Juega con los colores, diviértete, esto es como todo en la vida ensayo y error, y el resultado final después de la practica es realmente hermoso... Confía en ti, en tus instintos, que todo lo puedes.
Happy and Blessed new day, I hope you are super well happy, full of lots of energy, health, blessings and desire to learn, today I made some tendrils in blue tones very easy, and beautiful I will explain the tutorial step by step through a series of consecutive images where you can see how our piece will be as we work it .... It is important that you know that it is a repetitive process, you must be patient and as you repeat the steps you will see the progress, with this brick technique we can make a wide variety of models, everything will depend on your imagination, your desire and your mood! Play with the colors, have fun, this is like everything in life, trial and error, and the final result after practice is really beautiful... Trust in yourself, in your instincts, you can do anything!
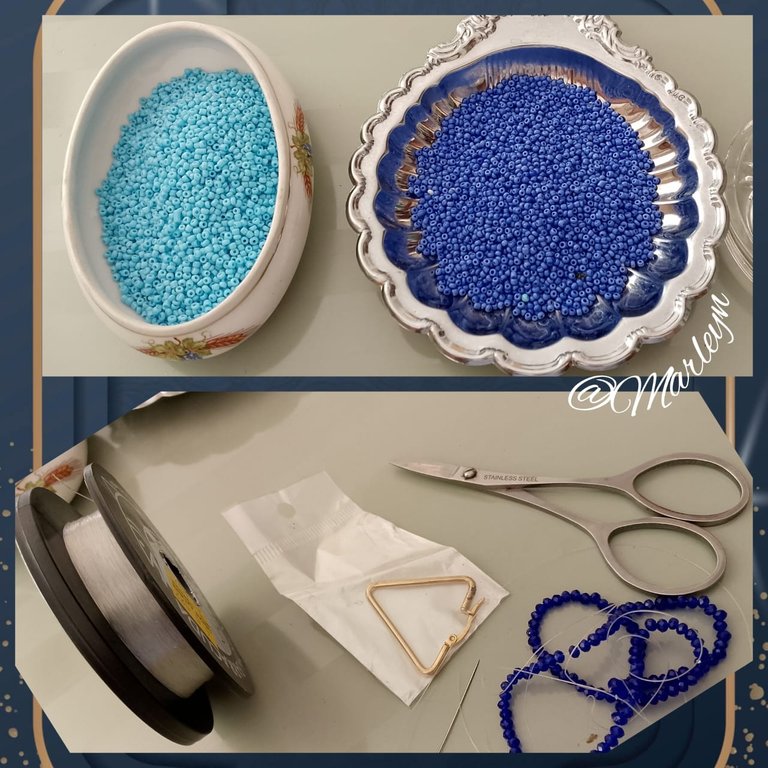
MATERIALES, Todos los materiales son sencillos de fácil acceso y puedes encontrarlos muy económicos, Son Mostacilla Azul claro #11, Mostacilla azul oscuro #11, Cristal checo 2 milímetros, Nailon 0.20 milímetros, Aguja para mostacillas, Tijera, Zarcillo de la forma que gustes, yo quería utilizar este tipo triangulo pero al momento de abrirlo note que estaba como pelado en la parte superior y por eso cambie a una argolla redonda pequeña.
MATERIALS, All the materials are simple, easy to access and you can find them very cheap, they are Light blue beads #11, Dark blue beads #11, Czech glass 2 millimeters, Nailon 0.20 millimeters, Needle for beads, Scissors, Earring of the shape you like, I wanted to use this type triangle but when I opened it I noticed that it was like peeled at the top and so I changed to a small round ring.
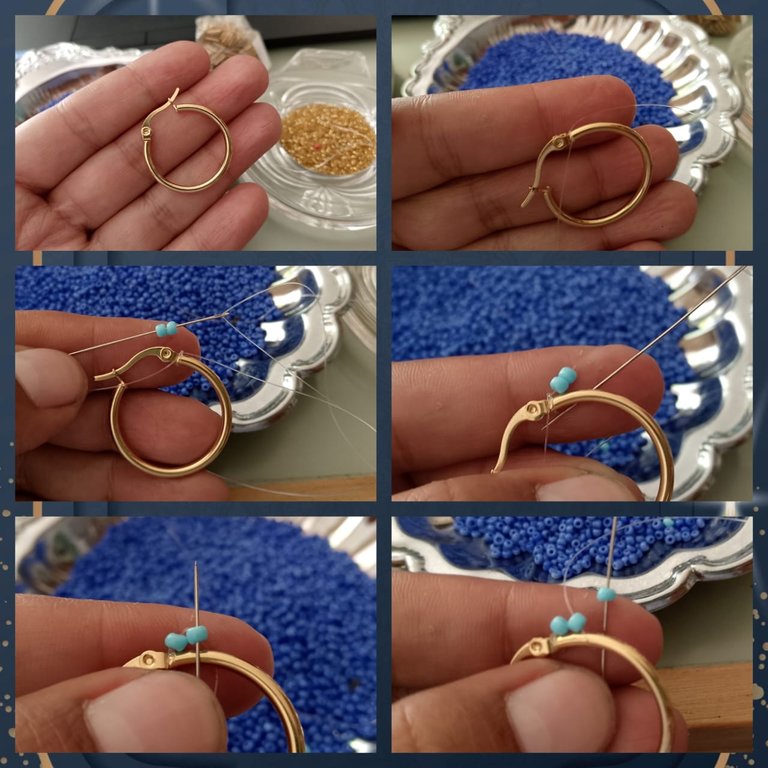
Es importante que tengas paciencia ya que es un proceso sencillo pero repetitivo, Empezamos, Ensarta el nailon en la aguja, yo le coloque un poco mas del metro pero si eres principiante coloca unos 50 centímetros nada mas porque se te enredara mucho y puedes perder el trabajo... Amarramos el nailon al aro, primero un nudo simple seguido de un nudo doble, inserta 2 mostacillas azul clara en la aguja, ahora pasa la aguja por abajo de la argolla como ves en la imagen 4 y puedes ayudarte con tus dedos, ahora sube la aguja por la segunda mostacilla, inserta una mostacilla en la aguja y repetimos, es decir meteremos la aguja por abajo de la argolla y la subimos por la mostacilla...
It is important that you have patience because it is a simple but repetitive process, let's start, thread the nylon on the needle, I put a little more than a meter but if you are a beginner put about 50 centimeters only because it will tangle a lot and you can lose the work... Tie the nylon to the ring, first a single knot followed by a double knot, insert 2 light blue beads in the needle, now pass the needle under the ring as you see in the picture 4 and you can help with your fingers, now raise the needle by the second bead, insert a bead in the needle and repeat, ie we will put the needle under the ring and up the bead...
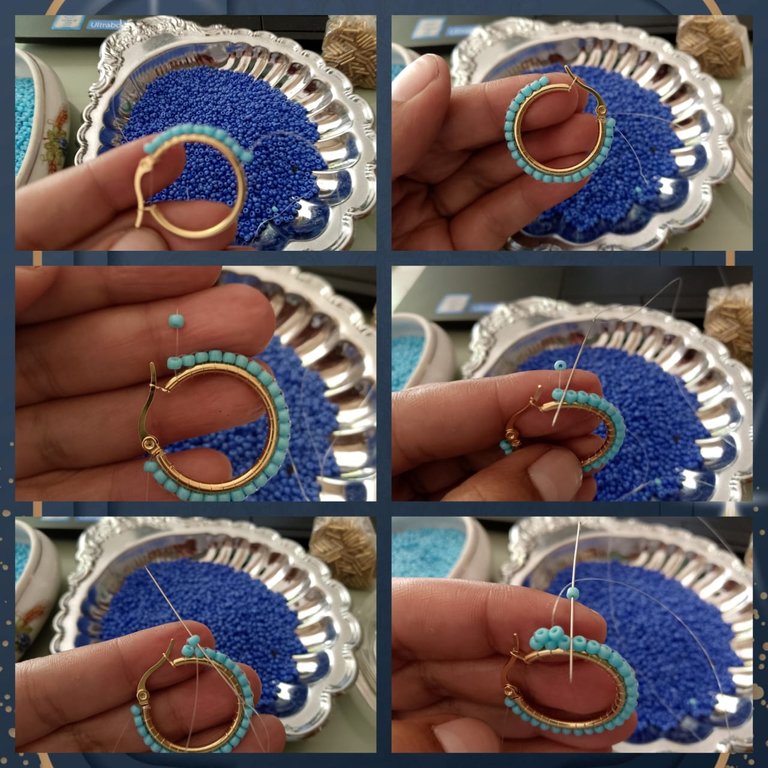
Este paso lo haremos consecutivamente hasta llegar al otro extremo de nuestro zarcillo, como ves en las imágenes y con calma seguimos... Es importante que no hales muy brusco el hilo para que no se reviente y no se dañe, debemos hacerlo suave pero sin dejarlo aguado... Cuando llegues al otro extremo que el hilo quede arriba inserta una mostacilla, esta vez pasaremos la aguja por abajo del nailon que esta agarrando las mostacillas de la linea de abajo como te muestro en las imágenes y seguimos así de una en una hasta que formemos una nueva linea de mostacillas, puedes hacerlo en azul claro o en azul oscuro para crear contraste todo depende de ti y de tus gustos. Recuerda que siempre es importante que le des tu toque personal a cada pieza eso te hará sentirte mas a gusto con la misma, ya que será mas acorde a tu personalidad.
We will do this step consecutively until we reach the other end of our tendril, as you can see in the pictures and calmly continue... It is important not to pull the thread too sharply so that it does not burst and is not damaged, we must do it smoothly but without leaving it watery... When you get to the other end that the thread is up insert a bead, this time we will pass the needle under the nylon that is holding the beads of the line below as I show you in the pictures and continue one by one until we form a new line of beads, you can do it in light blue or dark blue to create contrast it all depends on you and your tastes. Remember that it is always important that you give your personal touch to each piece that will make you feel more comfortable with it, as it will be more in line with your personality.
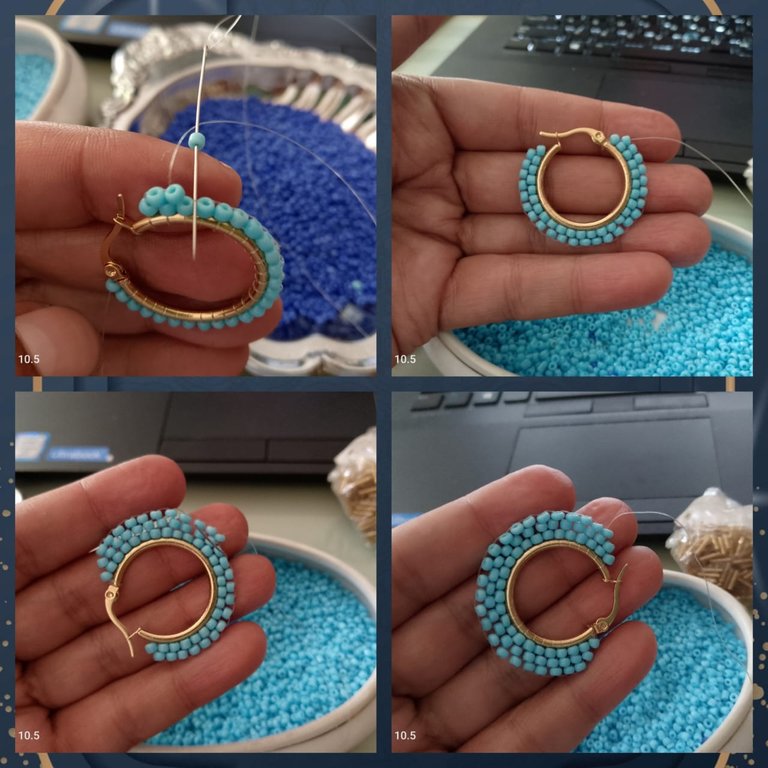
Cuando hagamos la segunda linea, continuaremos el mismo proceso para realizar una tercera linea, es decir nuevamente vamos a introducir una mostacilla, pasamos la aguja por abajo del nailon y lo subimos por la mostacilla así consecutivamente para realizar nuestra tercera linea, por esto te comente que todo es muy repetitivo y con paciencia logras excelentes resultados.
When we make the second line, we will continue the same process to make a third line, that is to say again we are going to introduce a bead, we pass the needle under the nylon and we raise it by the bead so consecutively to make our third line, this is why I told you that everything is very repetitive and with patience you achieve excellent results.
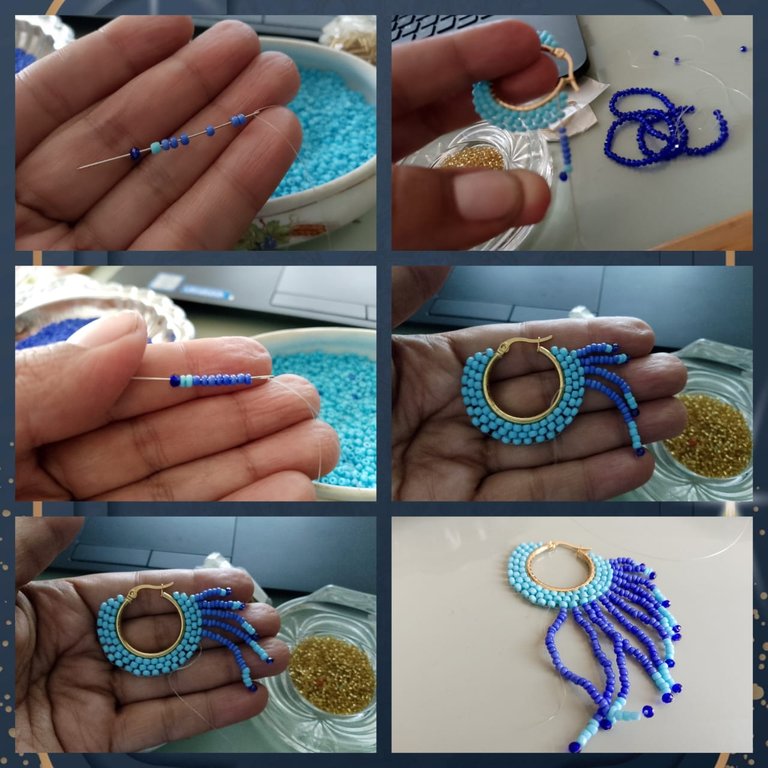
En esta etapa puedes dejar el aro de esta manera o puedes continuar, a mi me gustan mas vistosos aun cuando no me gusta utilizarlos, así que agregue unas tiras, lo primero que debemos hacer es contar cuantas mostacillas tenemos, yo tengo 23 entonces la mitad es once la tira 12 el centro, entonces al llegar a la tira 12 las siguientes serán iguales a las otras 11 pero de mayor a menor,, Espero me entiendas jajajaja es facil realmente.. Bueno yo empecé mi primera tira con 6 mostacillas azul oscuro, 1 mostacilla azul claro, y para cerrar un cristal checo azul rey de 2 milímetros, es realmente simple vamos a introducir en la aguja las mostacillas que te indique, llevarlas hasta el final del nailon y ahora vamos a subir la aguja dejando por fuera el cristal checo de manera que este sea el ancla para que nuestra hilera de mostacillas no se salgan, vas a introducir la aguja por la misma mostacilla azul clara donde salía el nailon desde el principio, ahora realizaremos el mismo proceso hasta la mitad del zarcillo aumentando cada tira 2 mostacillas azul oscuro, en las 3 primeras tiras aumentas de uno en no las mostacillas azul claro y en todas las demás tiras colocaremos 4 mostacillas azul claro siempre cerrando con el cristal, al llegar a la tira 12 la haremos en vez de aumentar solo con dos mostacillas azules le colocaremos 4 mostacillas azules adicionales para que se vea la diferencia y nos marque el centro.
At this stage you can leave the ring this way or you can continue, I like them more colorful even if I do not like to use them, so I added some strips, the first thing to do is to count how many beads we have, I have 23 so half is eleven the strip 12 the center, then when you reach strip 12 the following will be equal to the other 11 but from larger to smaller,, I hope you understand me hahahaha it's easy really.... Well I started my first strip with 6 dark blue beads, 1 light blue bead, and to close a 2 millimeters king blue Czech crystal, it is really simple we will introduce in the needle the beads that I indicate, take them to the end of the nylon and now we will raise the needle leaving outside the Czech crystal so that this is the anchor for our row of beads do not come out, you will introduce the needle by the same light blue bead where the nylon came out from the beginning, now we will make the same process until the middle of the tendril increasing each strip 2 dark blue beads, in the first 3 strips you increase one by one the light blue beads and in all the other strips we will place 4 light blue beads always closing with the crystal, when we arrive to the strip 12 we will do it instead of increasing only with two blue beads we will place 4 additional blue beads so that the difference is seen and we mark the center.
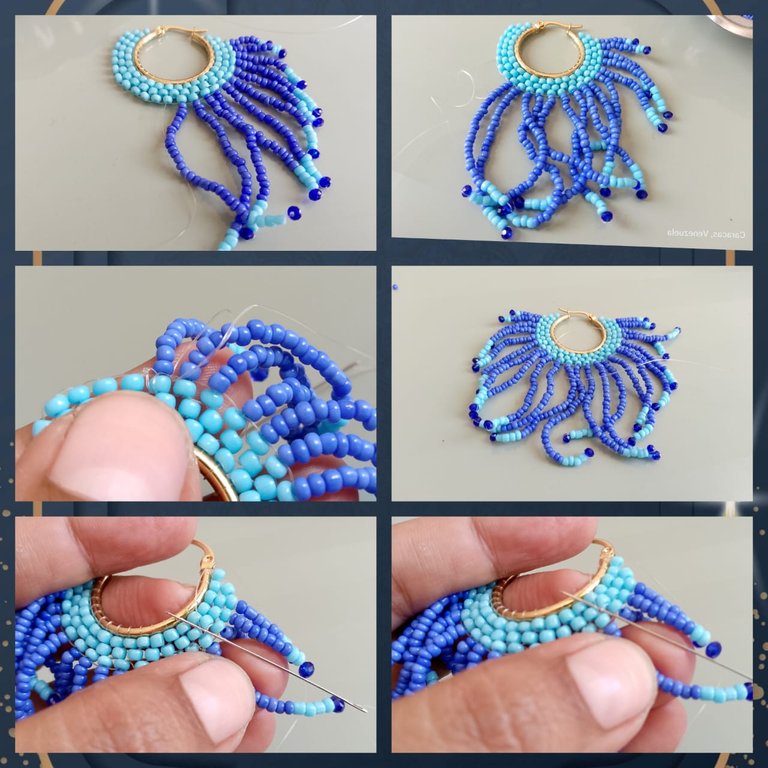
Continuamos colocando las tiras, para completar el zarcillo, en esta etapa se me estaba terminando el nailon, lo que hice fue introduje la aguja entre las mostacillas y realice un amarre simple seguido de un amarre doble y nuevamente introduje la aguja entre las mostacillas halando con cuidado para esconder el nudo, este proceso lo realizas del lado contrario de donde vienes, es decir hacia las tiras que ya coloque, y luego corte el sobrante, ensarte nuevamente la aguja con nailon y realice este mismo proceso esta vez dando oportunidad que el nailon saliera justo en la mostacilla que continua con las tiras, así continúe de manera ascendente hasta terminar nuestra pieza, que como ves quedo super colorida excelente para un día de playa con un traje de baño blanco tal vez, y el cabello como un moño corto para que el foco de tu outfit sea los zarcillos que hemos realizado.
We continue placing the strips, to complete the tendril, at this stage I was running out of nylon, what I did was to introduce the needle between the beads and make a single tie followed by a double tie and again introduced the needle between the beads pulling carefully to hide the knot, this process is done on the opposite side of where you come from, ie to the strips already placed, and then cut the excess, thread the needle again with nylon and perform this same process this time giving the opportunity that the nylon came out just in the beads that continues with the strips, so continue in an upward manner to finish our piece, which as you see was super colorful excellent for a day at the beach with a white bathing suit perhaps, and hair as a short bun so that the focus of your outfit is the tendrils that we have made.
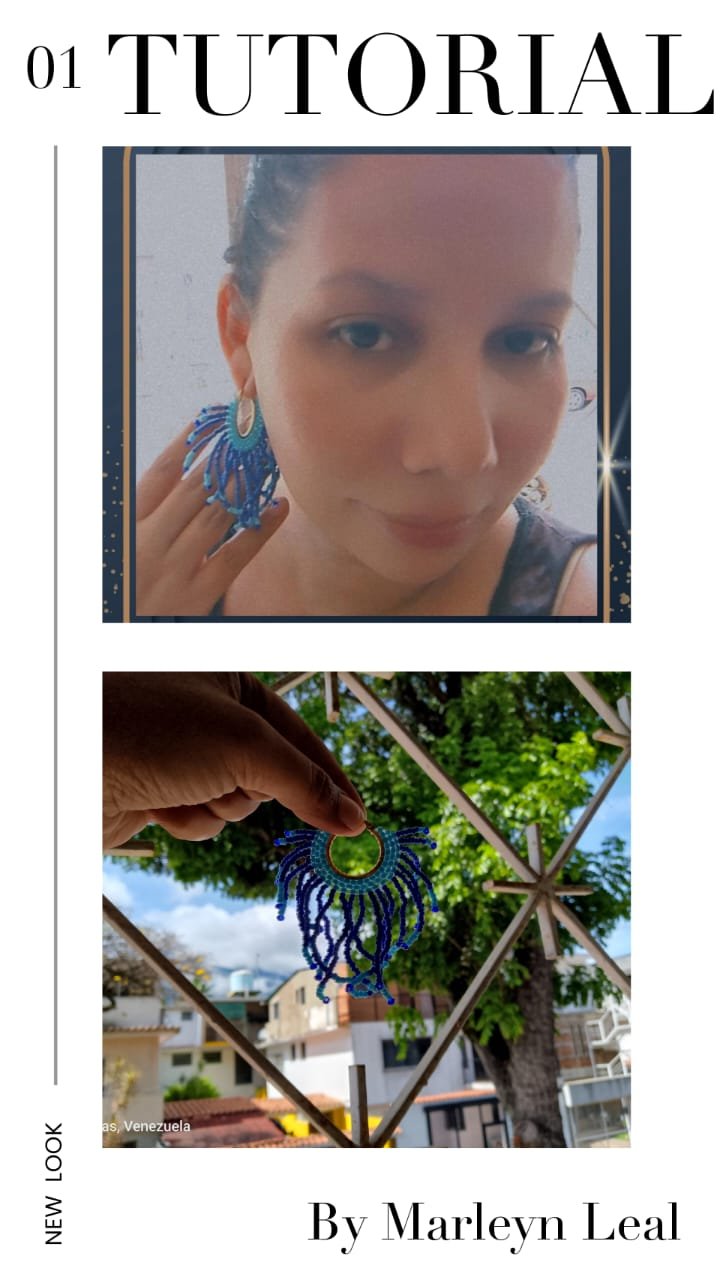
De esta manera hemos terminado nuestra pieza, espero que sea de tu total agrado y te atrevas a realizarla.. Si necesitas mas tic no dudes en escribirme esto mas que un trabajo es mi pasión y me encanta tener la oportunidad de transmitir mis conocimientos a los demás, es como una escalera yo aprendo de ti y tu de mi y juntas aprendemos de todos, creciendo, innovando y cada día mejorando mas y mas! Gracias por leerme y por tanto apoyo... próximamente nos volveremos a leer!
In this way we have finished our piece, I hope you like it and that you dare to make it. If you need more tic do not hesitate to write me this more than a job is my passion and I love having the opportunity to pass on my knowledge to others, it's like a ladder I learn from you and you from me and together we learn from everyone, growing, innovating and every day improving more and more! Thanks for reading me and for so much support... soon we will read each other again!


IMAGENES CREADAS EN CANVA
IMAGES CREATED IN CANVA
